
|
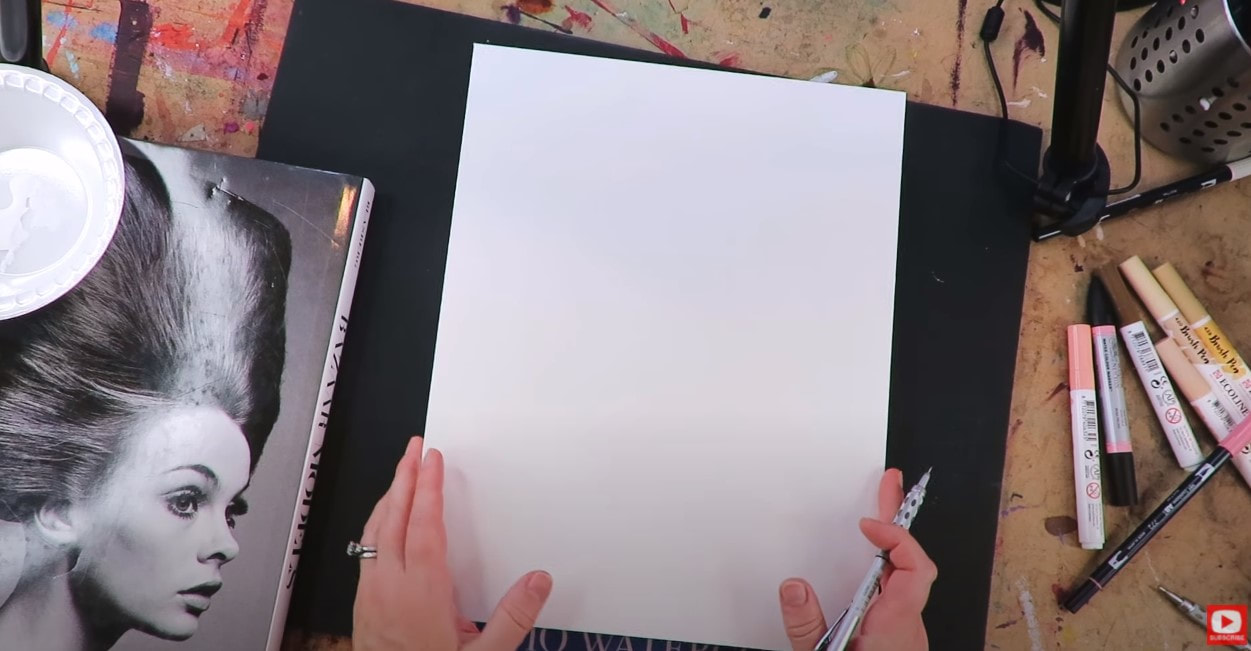
Hey there, creative soul! I’m SO excited for today’s mixed media art tutorial!! It’s been a while since I dove into the world of full-on mixed media with collage and ALL the FUN supplies using my favorite layering process, the Hamburger system!
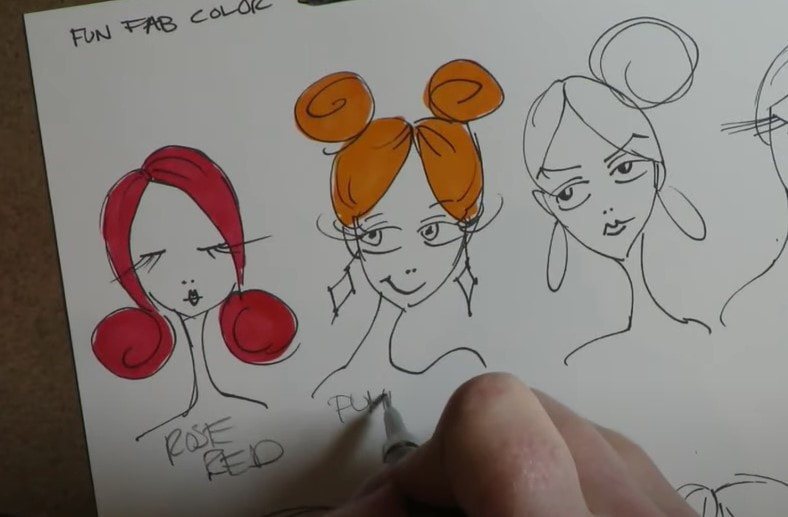
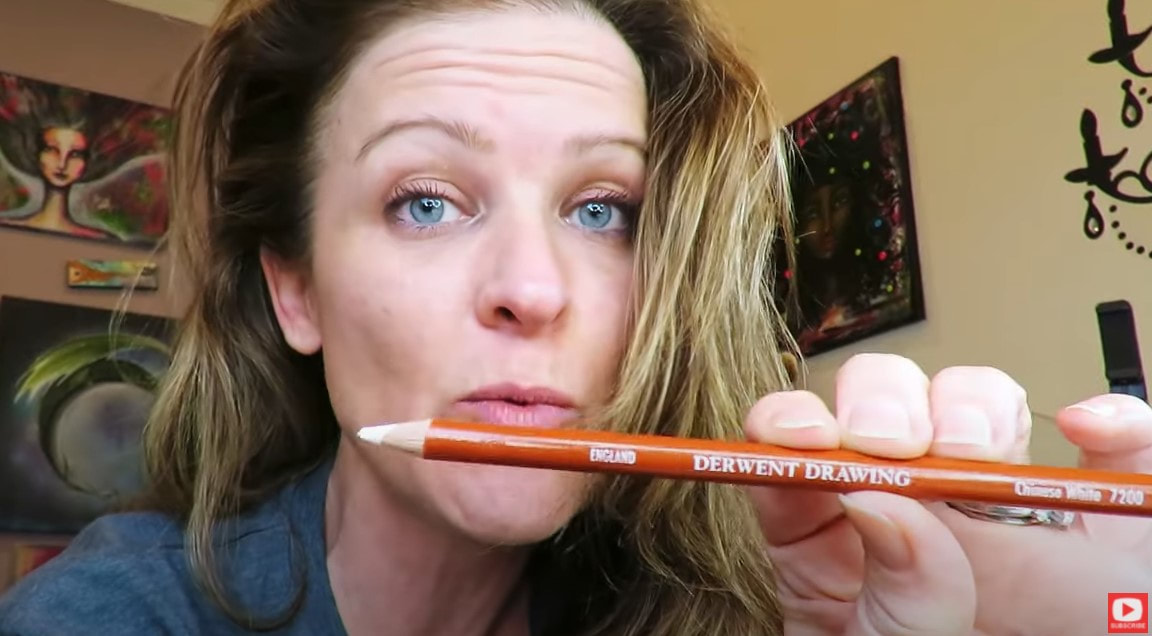
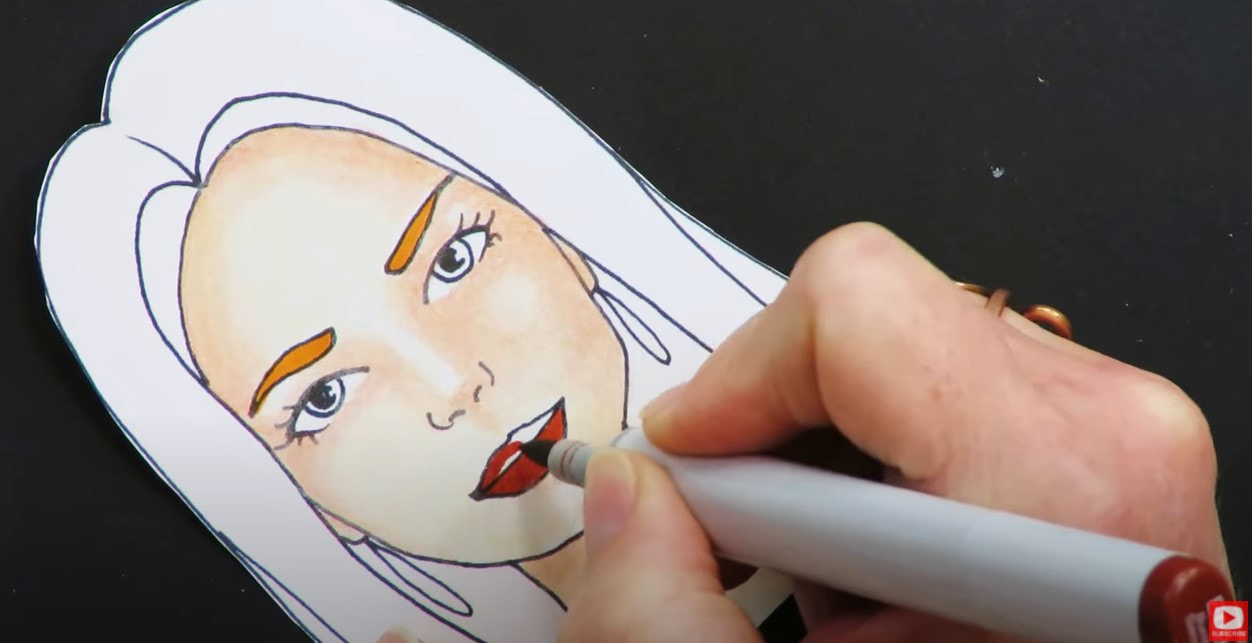
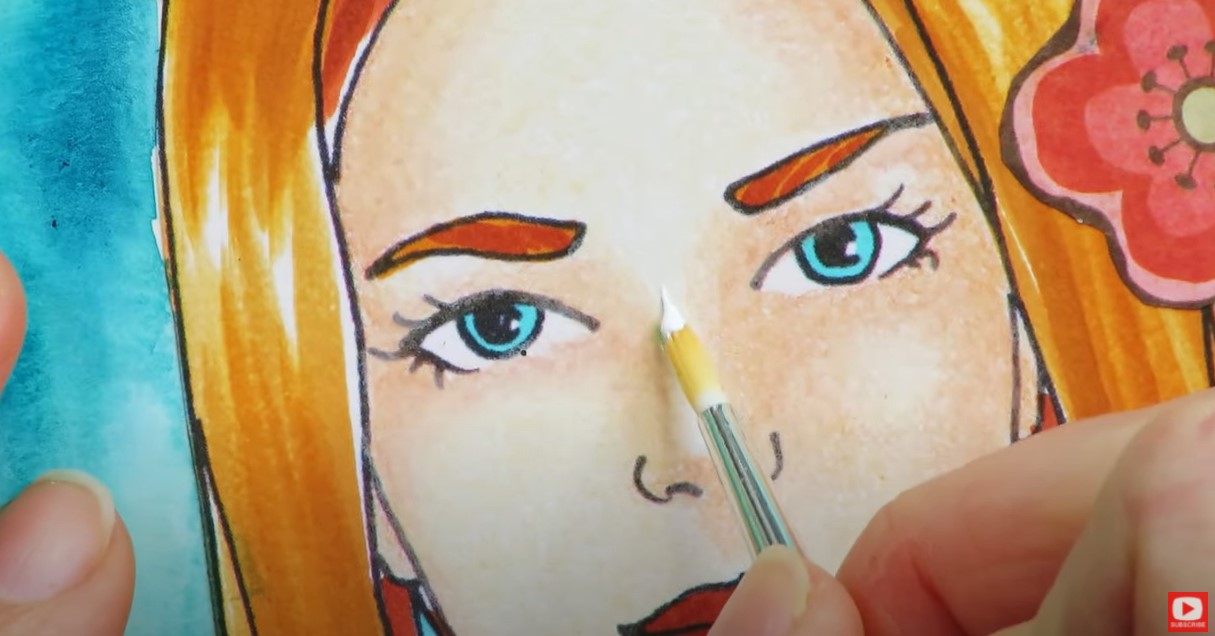
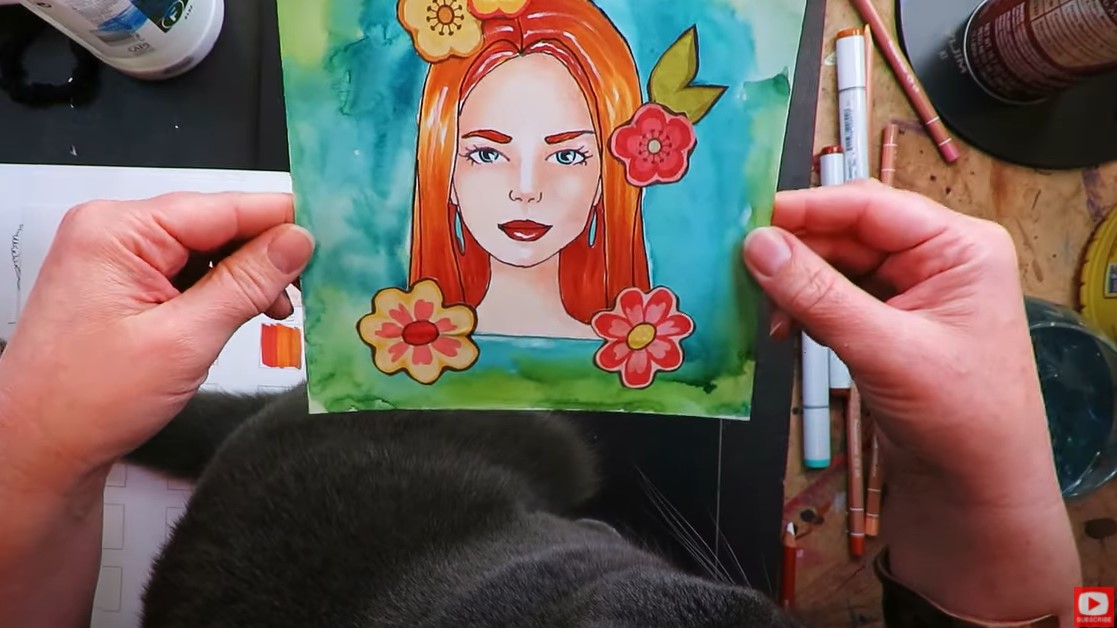
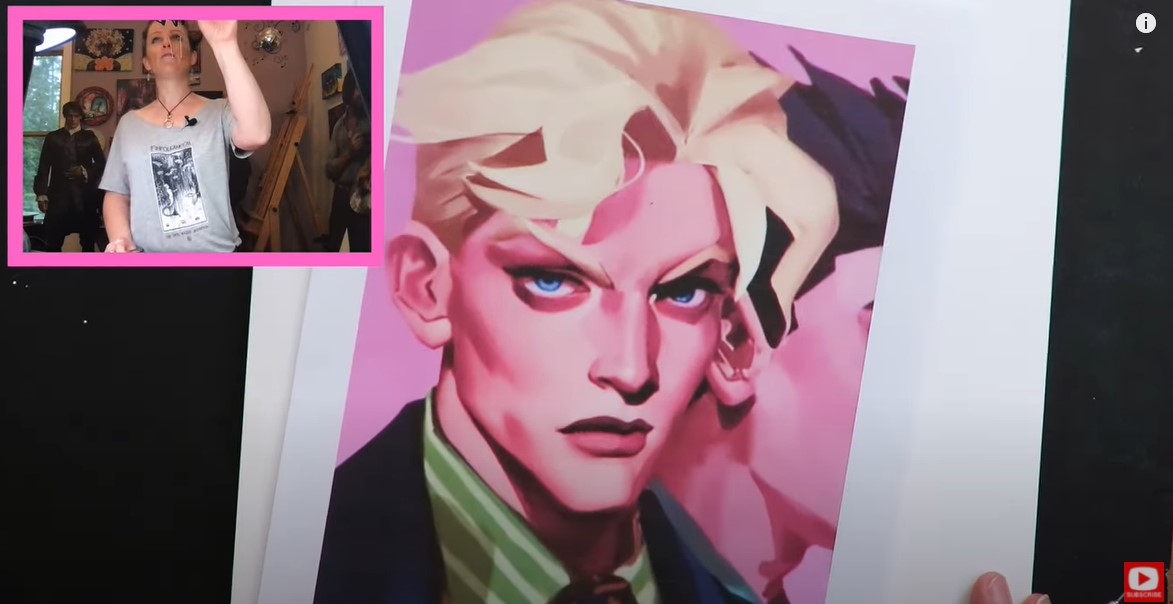
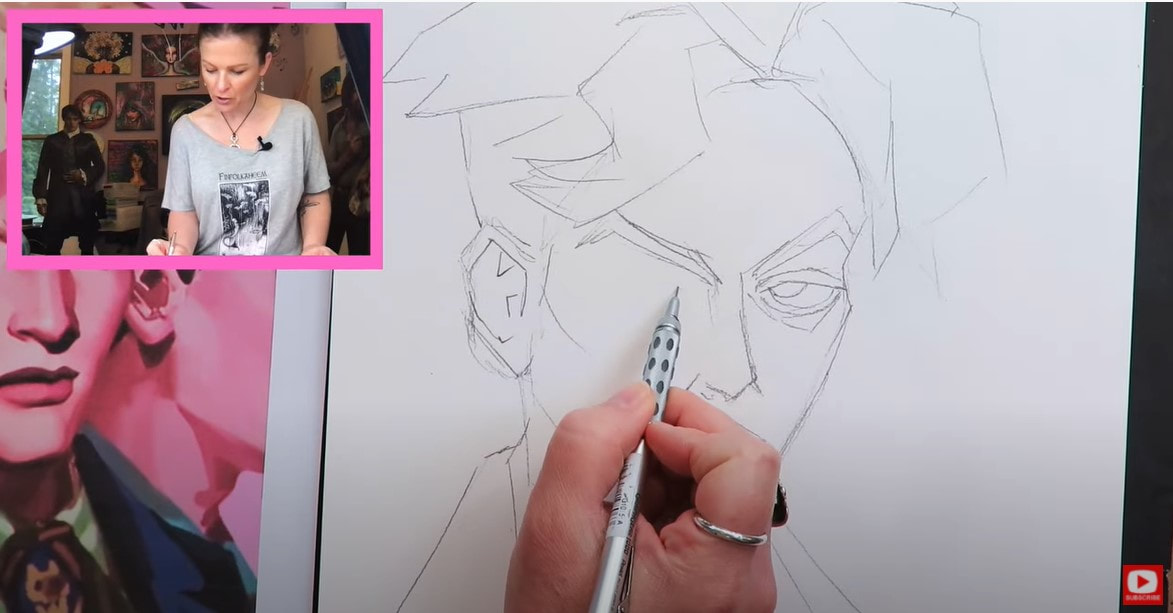
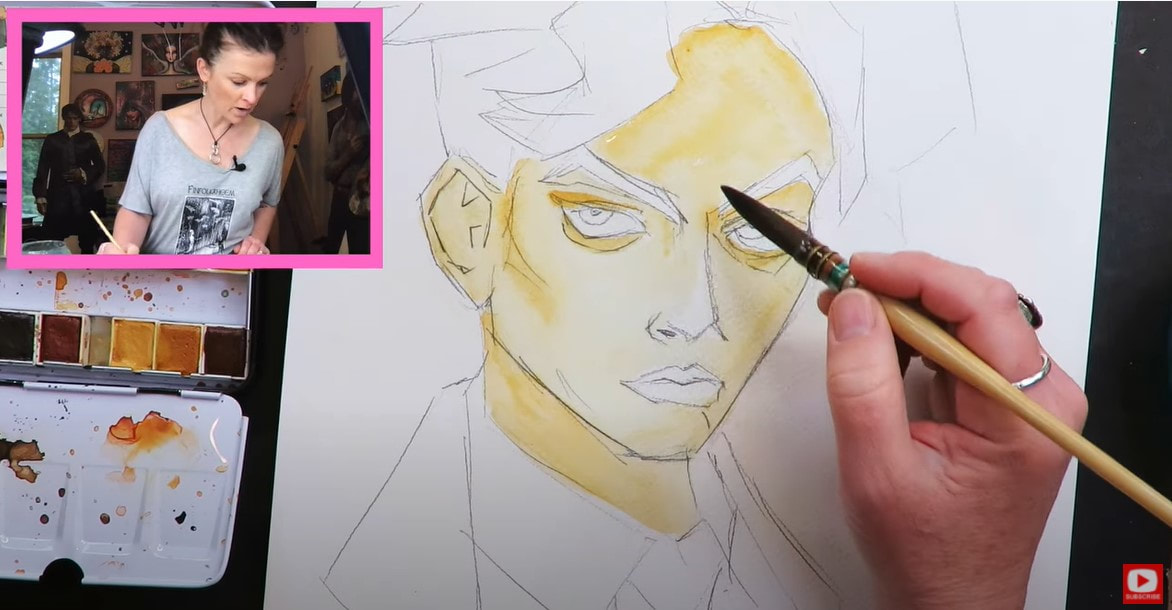
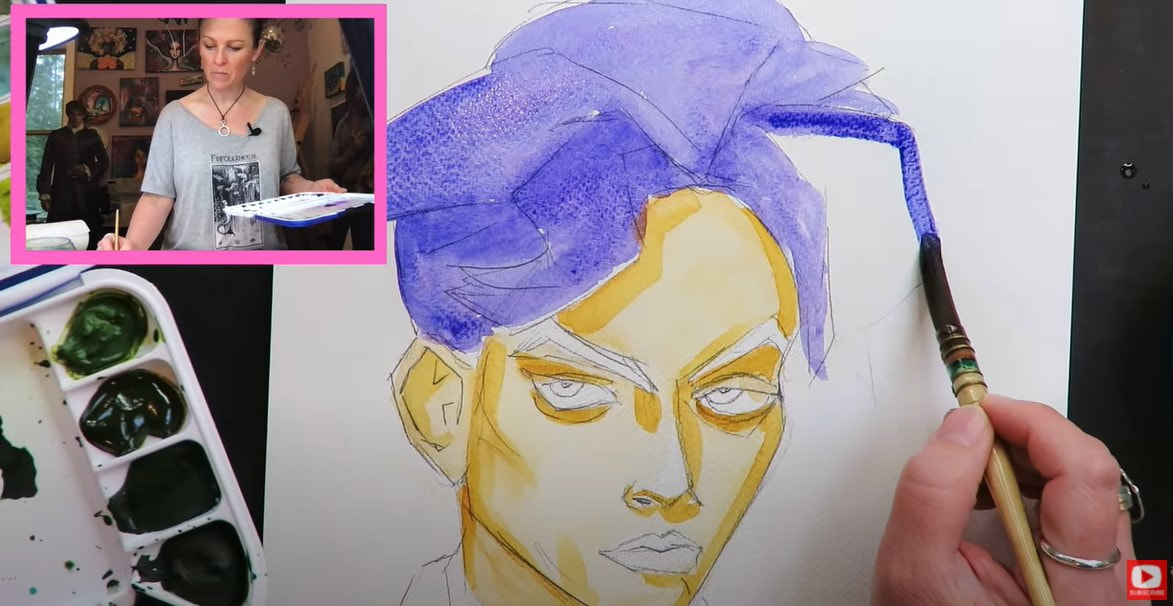
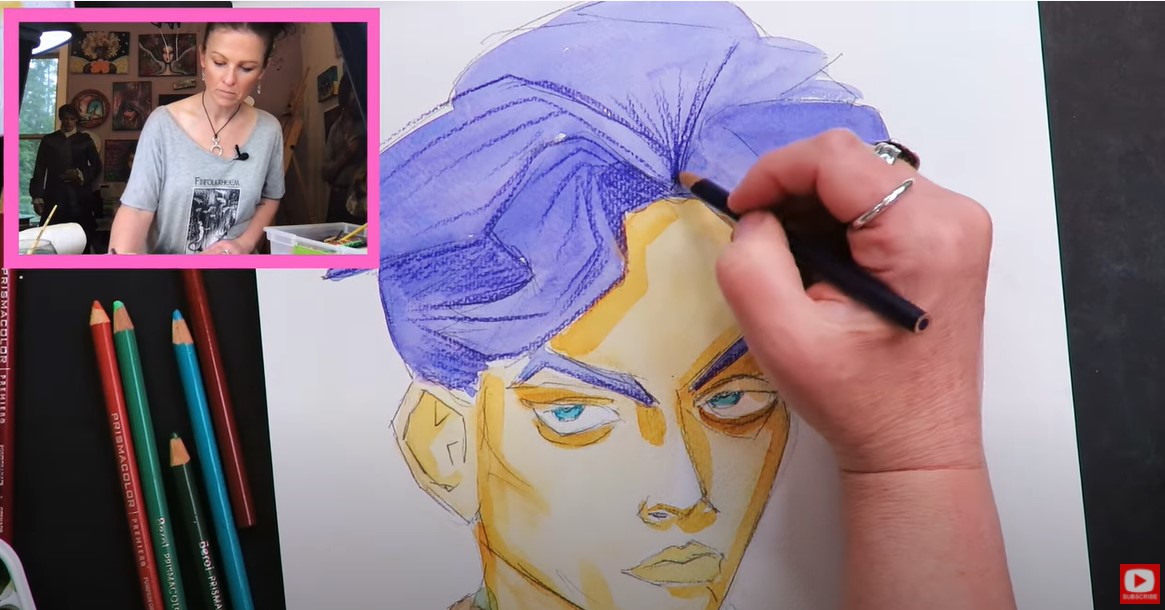
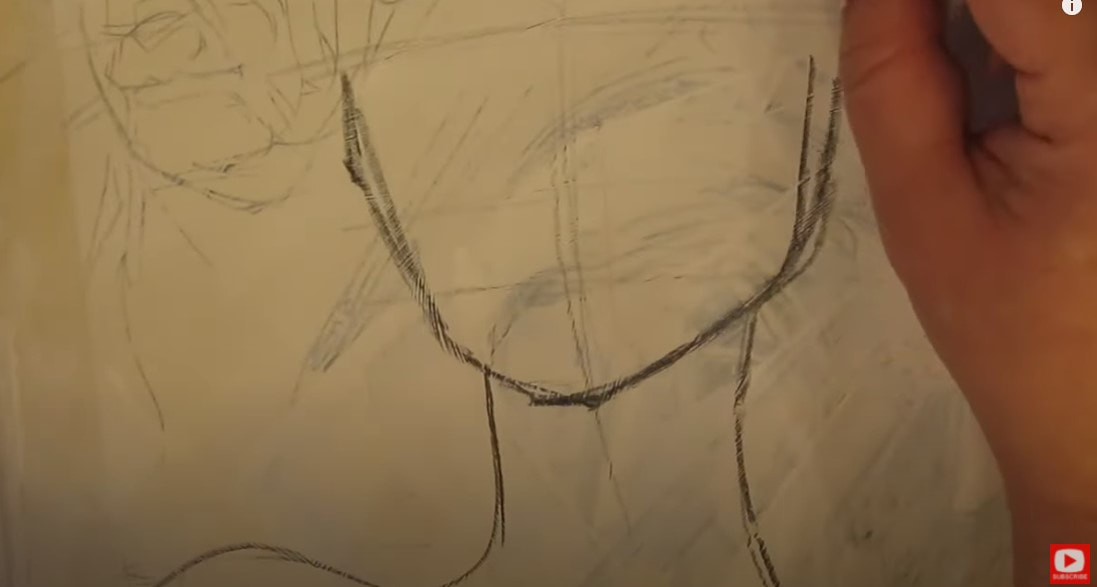
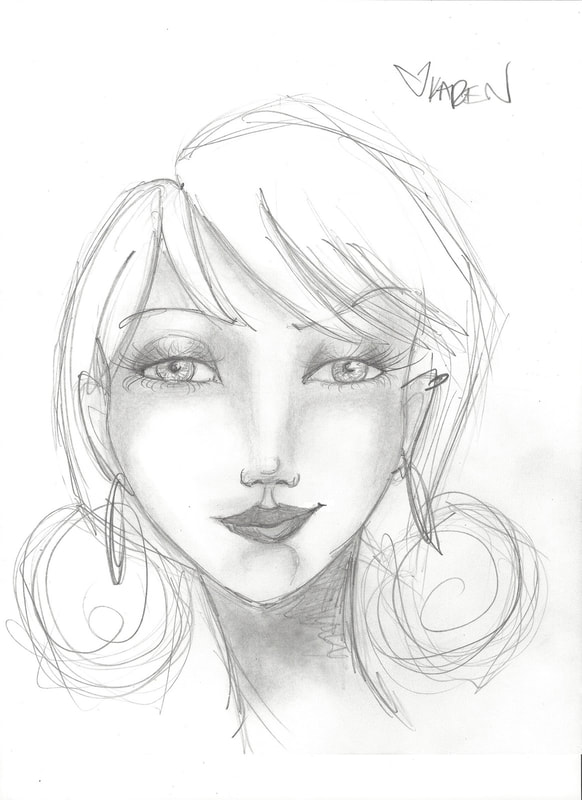
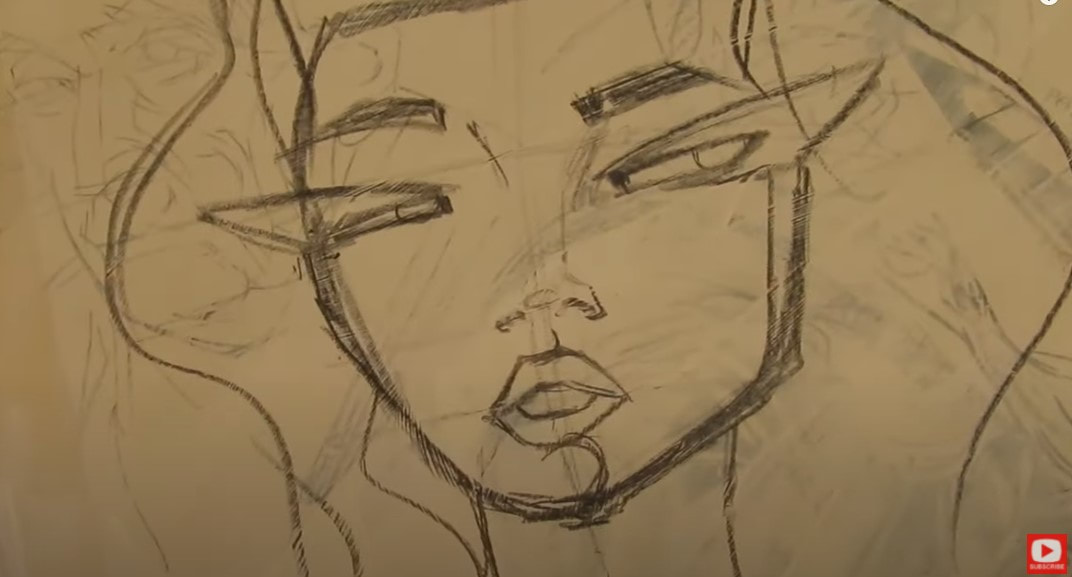
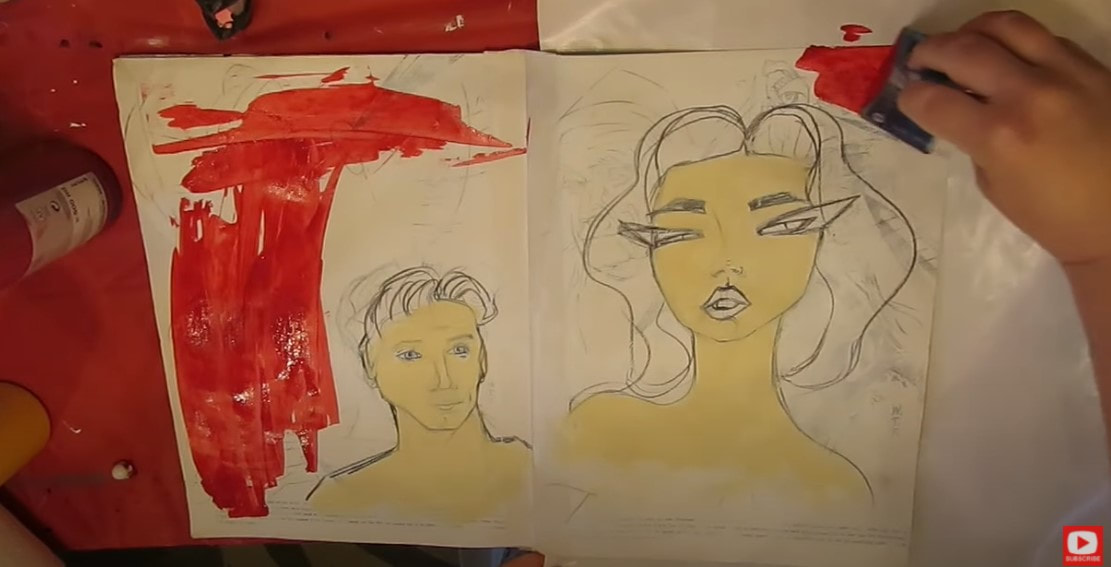
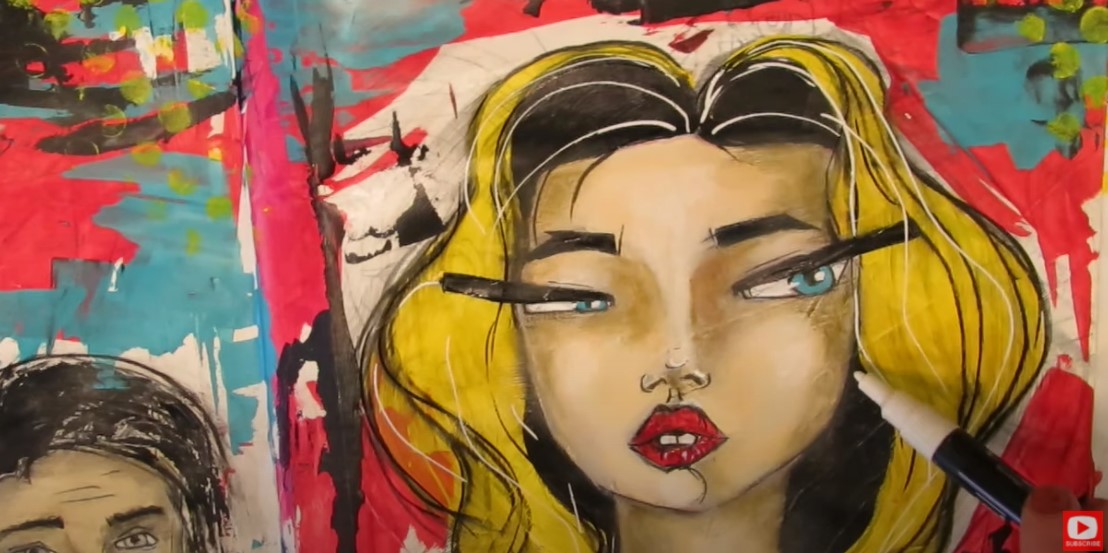
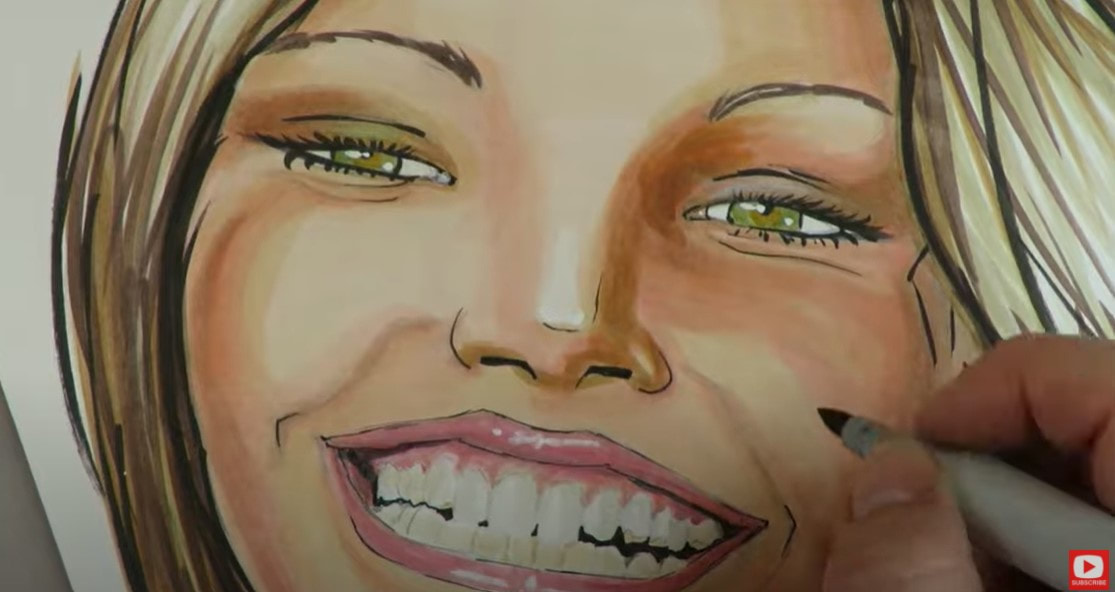
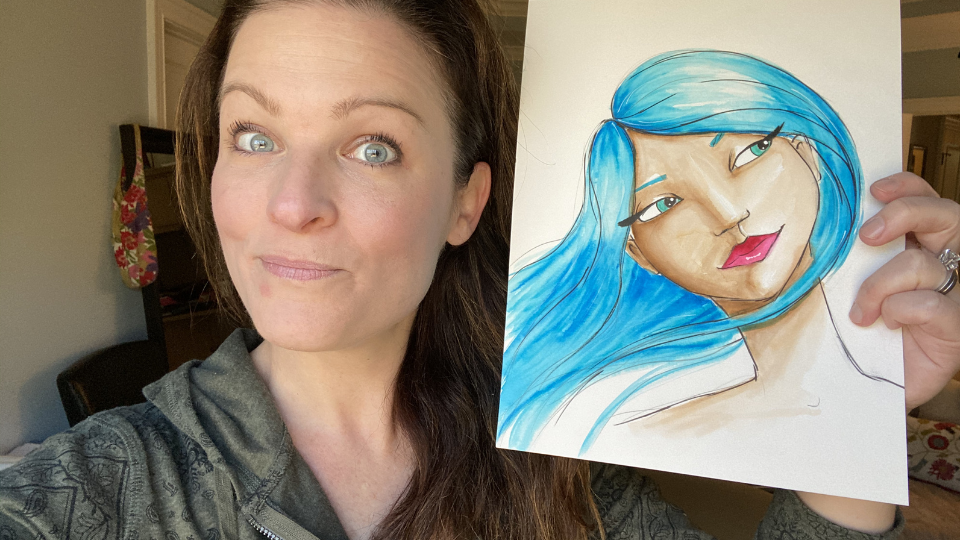
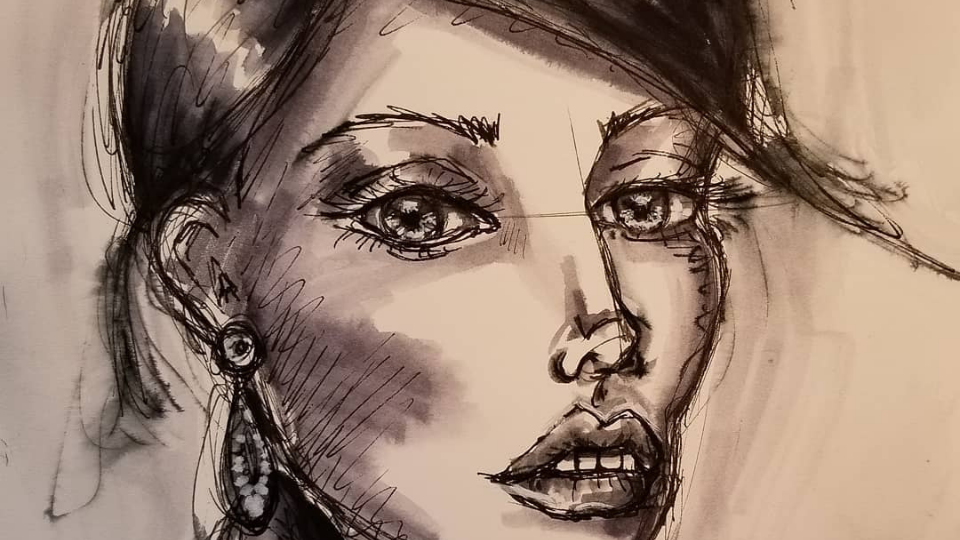
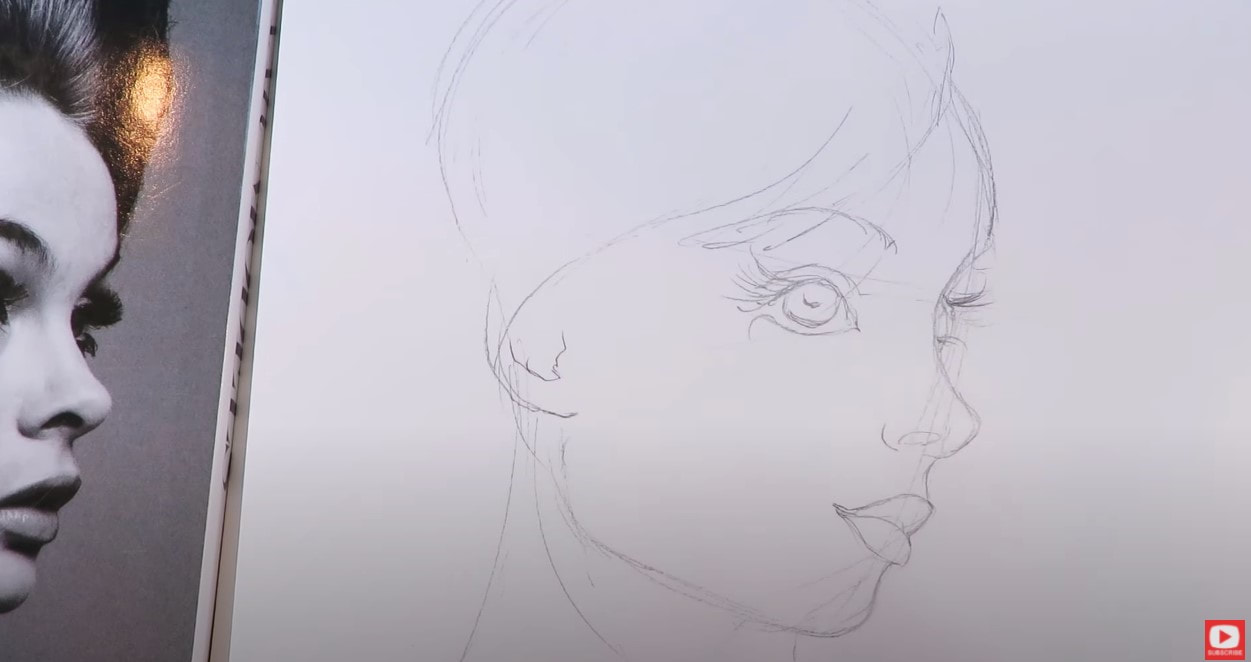
I’m feeling SUPER inspired after last week’s Fun Fab version of Vermeer’s Girl with a Pearl Earring alcohol marker drawing tutorial. I got even MORE excited about turning her into a Hamburger-style project when I discovered my favorite YouTube channel (Royalty Now Studios) had created a modern-day facial reconstruction for Vermeer’s model for this painting. If you’re not familiar with this YouTube channel - I shared it last week on my Drawing channel. They’re incredible! They take bring faces from history - either historical figures or subjects of famous paintings (like Girl with the Pearl Earring or the Mona Lisa), and “bring them to life” using facial reconstruction graphic design after studying whatever art is available on the subject from paintings to death masks, sculptures and more. This channel is fascinating and I HIGHLY SUGGEST you check it out right after this video! I asked Royalty Now if I could use their modern version of Girl with a Pearl Earring as a drawing reference. They said of course, so she’s my model for today’s grungey, mixed media art journal spread :) Isn't she gorgeous?!!! 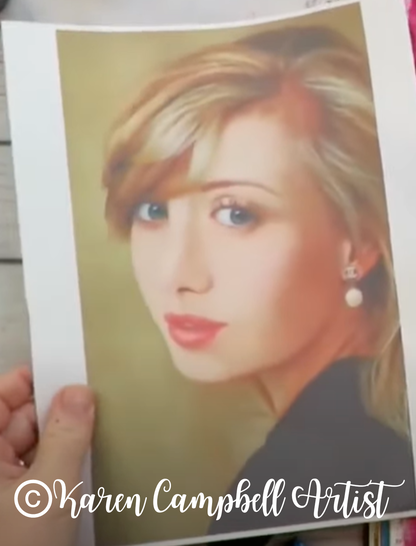
*All product links are affiliate & for U.S. residents only.*
Before we get started - if you’re art-ing along with me from home, make sure you’ve got a copy of my “Hamburger System Cheatsheet.” This will serve as your guide to help you through what supplies go where AND WHEN in your mixed media layering process. It’s kinda like my tried-and-true “recipe” for creating mixed media MAGIC every time I sit down to create instead of creating a hot mess!!
Grab the cheatsheet here, or click on the button below. 
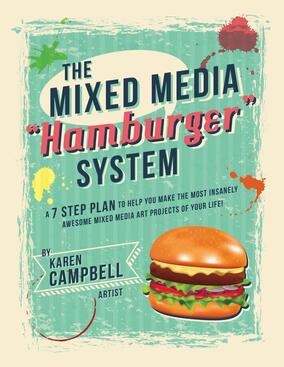
My students loved the “Hamburger System” so much, that I created an entire book about it - going even more in-depth on what supplies work well together and when they should be used in your mixed media layering to avoid a hot mess.
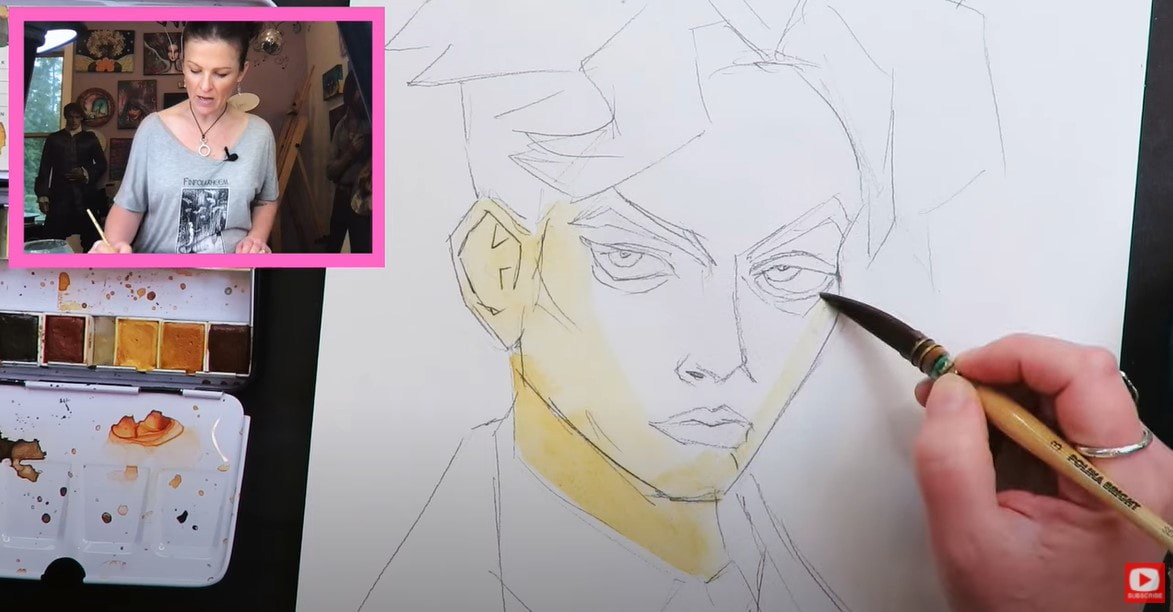
Back to TODAY’s art project! I’m working in my hardcover Strathmore watercolor journal because it’s my fave, and these babies can totally handle any wet mediums you decide to throw at them (even collage!).
On a recent trip to HomeGoods, I scored some super cute butterfly napkins, which are gonna be perfect for the mixed media collage portion of today’s project.
If you haven’t collaged with napkins before – they're thin, thinner than paper, so a bit tricky to work with. They also add SERIOUS texture to your mixed media art! So beware- collaging with napkins (or tissue paper for that matter!) means you’re gonna get visible wrinkles poking through your piece, which I happen to love!! If you hate wrinkles, don’t reach for napkins- grab something sturdier to collage with like scrapbook paper! 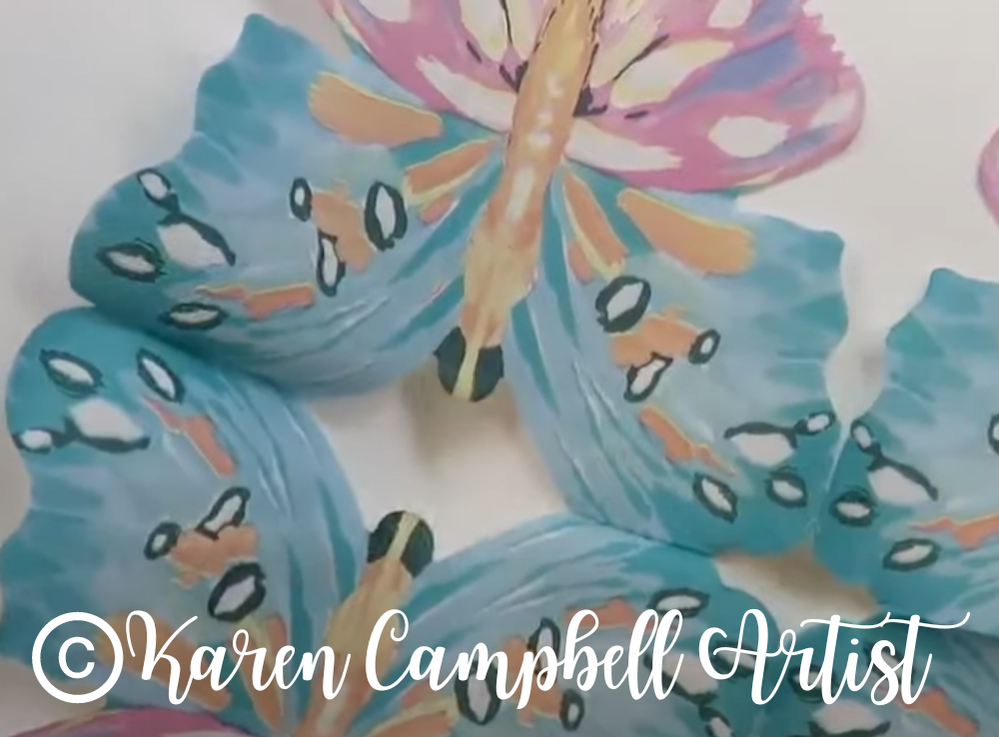
When it comes to gluing down delicate collage materials like napkins, I swear bymatte medium. AND using a LOT of it both under and over your collage materials (this helps minimize wrinkles).
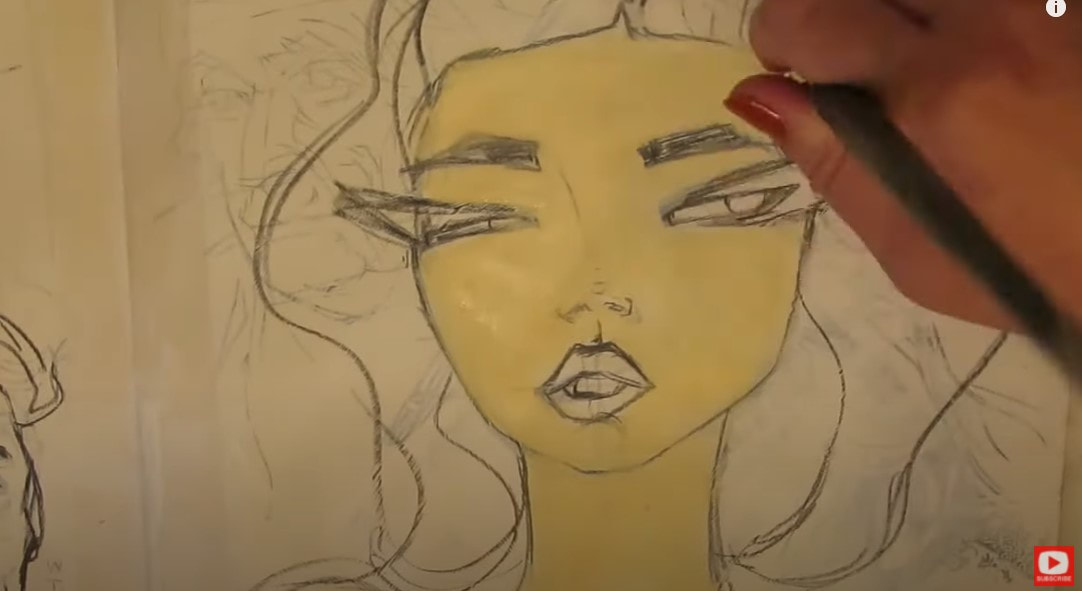
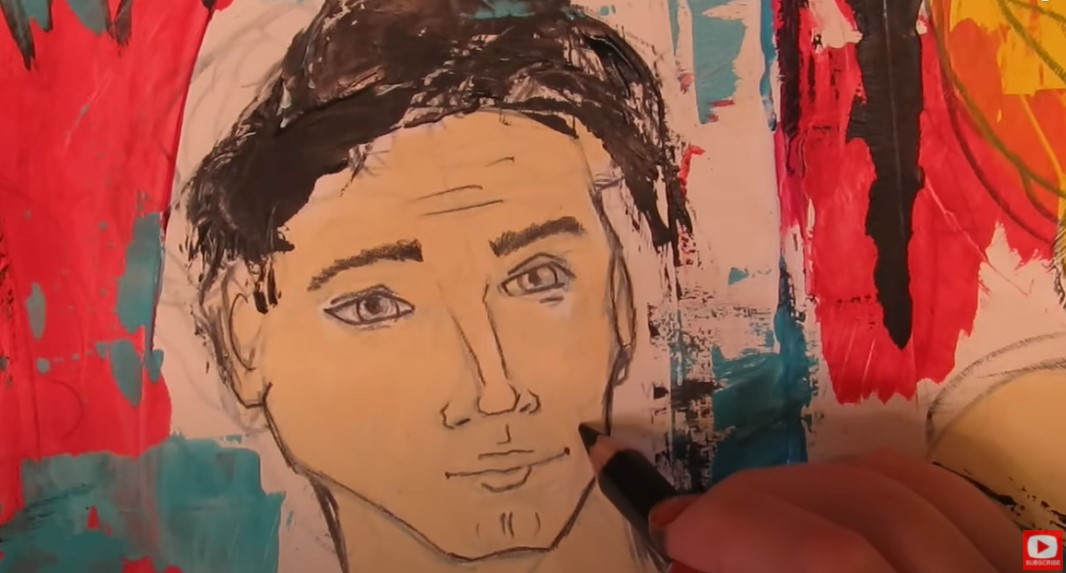
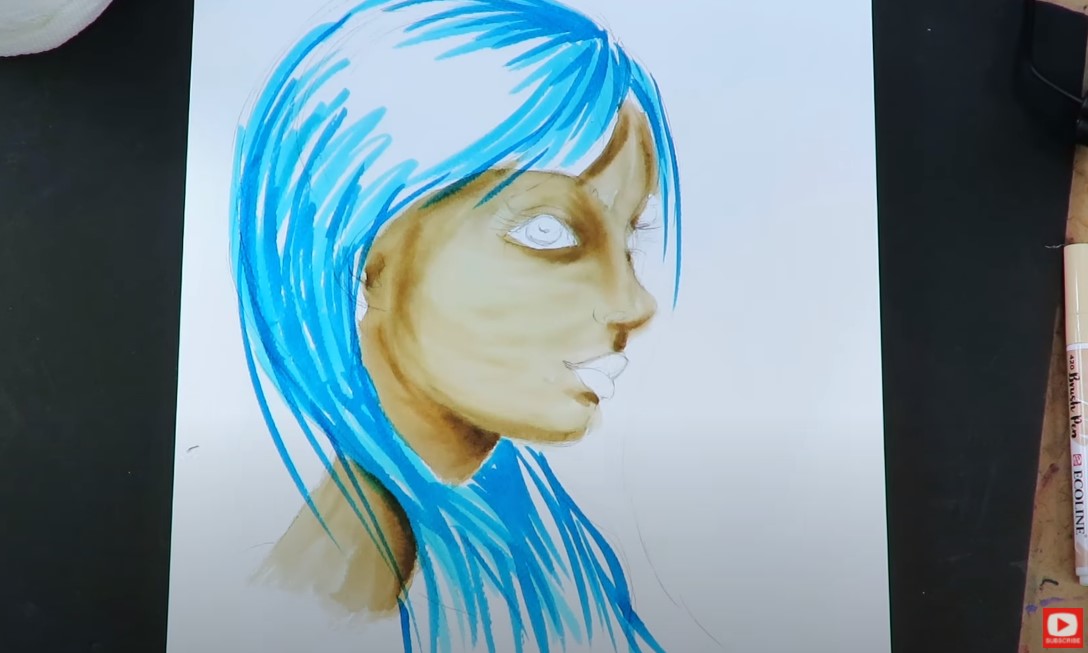
I also prefer to get down and dirty as a mixed media artist, and I simply use my fingers to smooth out those inevitable wrinkles and bubbles where I can. Embracing the messiness is all part of the true mixed media experience, right? Fast forward to the inky part – I pulled out my inks and went a bit crazy on the page. The streaks from the fan brush added a unique touch that I just rolled with. Today's project was less about perfection and more about pouring my emotions onto the paper. That's the beauty of mixed media – it's a truly expressive outlet where I can let loose and make a mess and embrace the process. 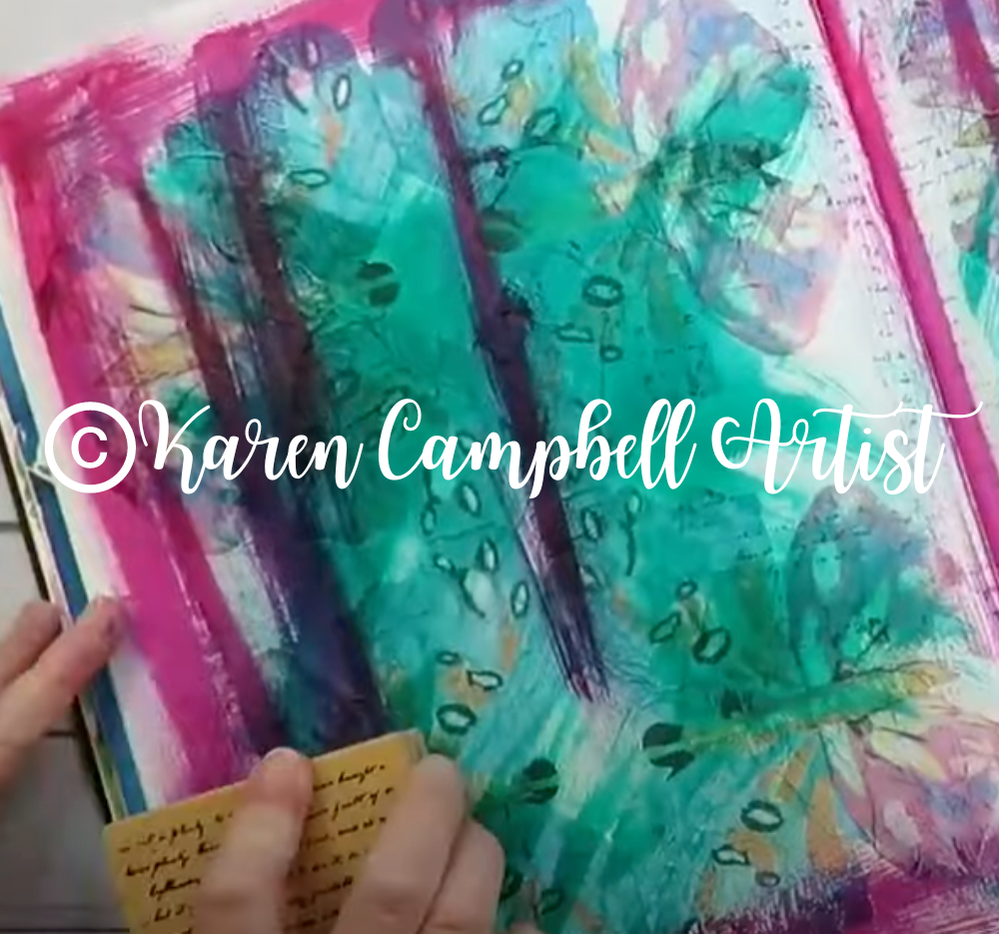
Embracing imperfection is key in this process. I didn't even use a palette today and poured all my supplies directly onto the paper, with ZERO precision. The goal was to see what happens, and trust me, the results were liberating! For me, and a LOT of other artists- the art isn’t even really about the art.
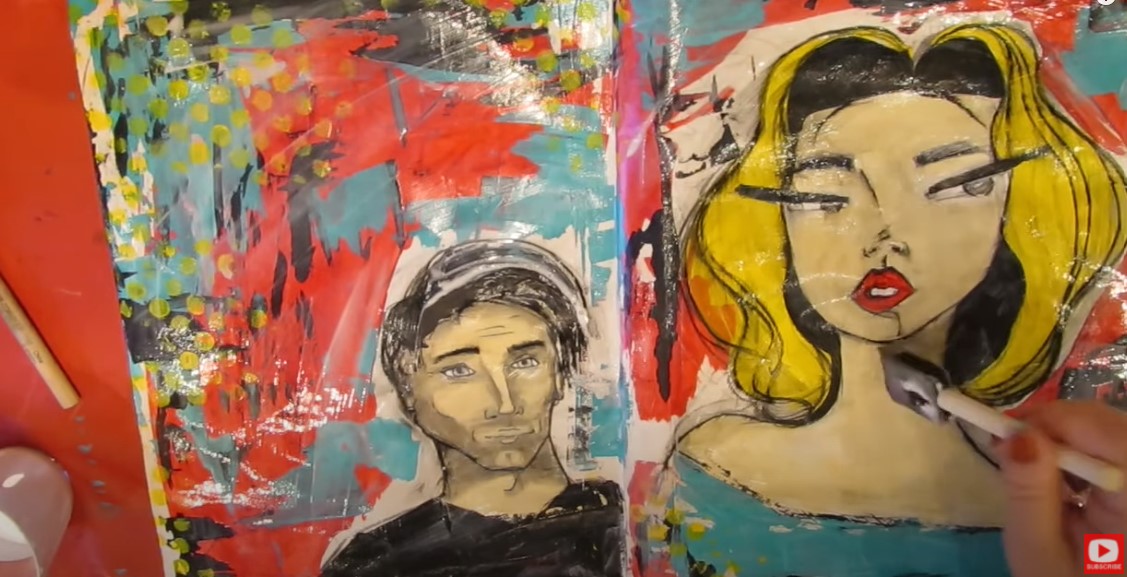
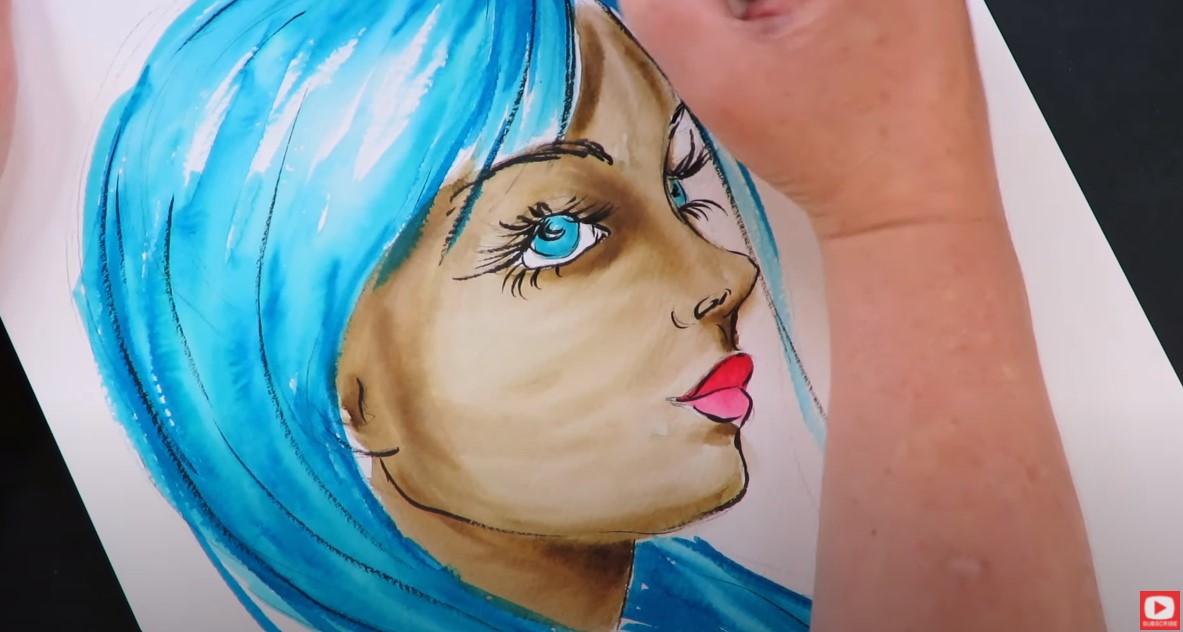
It’s about WHO is behind the art and what they were feeling the day they created it, WAY MORE than the end result. Now, the real fun began as I introduced doodles with my trusty pitt pens. They're filled with permanent India ink, allowing me to smudge them for added character. And here's a tip – if you go overboard with your pitt pens, a quick wipe with a baby wipe erases any mishaps. 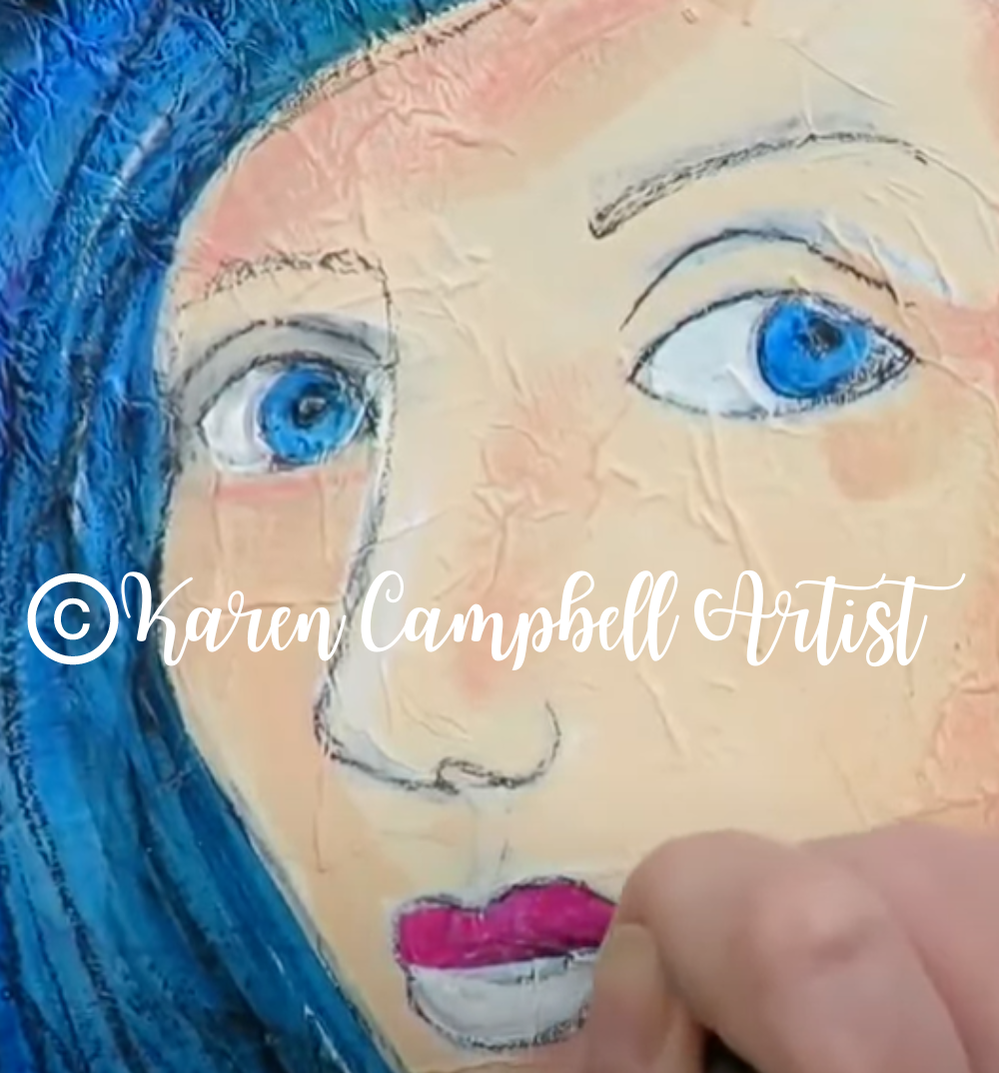
As I wrap up this unique mixed media art journal spread of “modern day” Girl with a Pearl Earring, I'm excited to announce that this is just the beginning of a Historical Faces series I'll be running on both YouTube channels, inspired by Royalty Now Studios. I plan to bring historical figures to life in my own signature Fun, Fab style.
It's my way of making history relevant and intriguing. A quick reminder for if you're venturing into mixed media and just getting started – be fearless. The journey may look rough along the way, but the end result can be surprisingly satisfying. So, don't stop, keep going, and embrace the creative process. 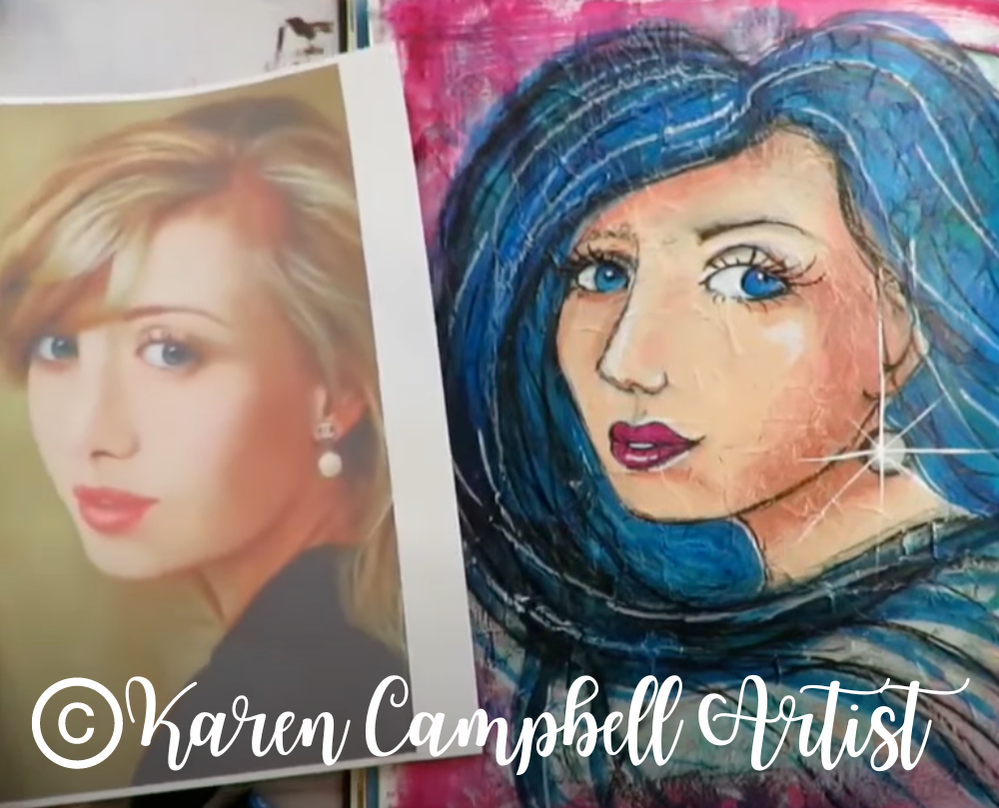
Once the final touches with my pit pens and pentel pocket brush (my secret weapon for GORGEOUS eyelashes) are finished, my wrinkled, grungy, mixed media masterpiece is complete.
Remember, it's not about the perfect end result, but the journey and expression that matter. So, fellow artists, don't be afraid, keep creating, and enjoy every messy, beautiful moment. Thanks for joining me on this artistic adventure. Until next time, happy art-ing!! LOVED this Video?Share it with an artsy friend!! Maybe she's always wanted to learn how to paint or art journal too, but never taken the time!! Here's the link to copy & paste into a text or email to her: https://youtu.be/TK8nhi2-J-I If you're watching the video on YouTube using your phone, try this! 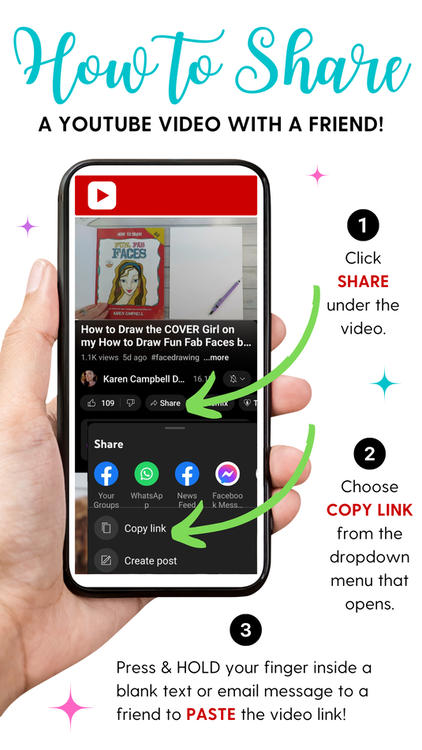
Loved this Project & Wanna Do MORE?Check out the Mixed Media Society over at Awesome Art School!! It's perfect for artists of ALL levels including beginners. We're having SO much FUN over there learning about ALL the mixed media supplies and how to use them to create mixed media art we can be proud of!! We would LOVE to have YOU join us!! 
Looking for Something Else?
2 Comments
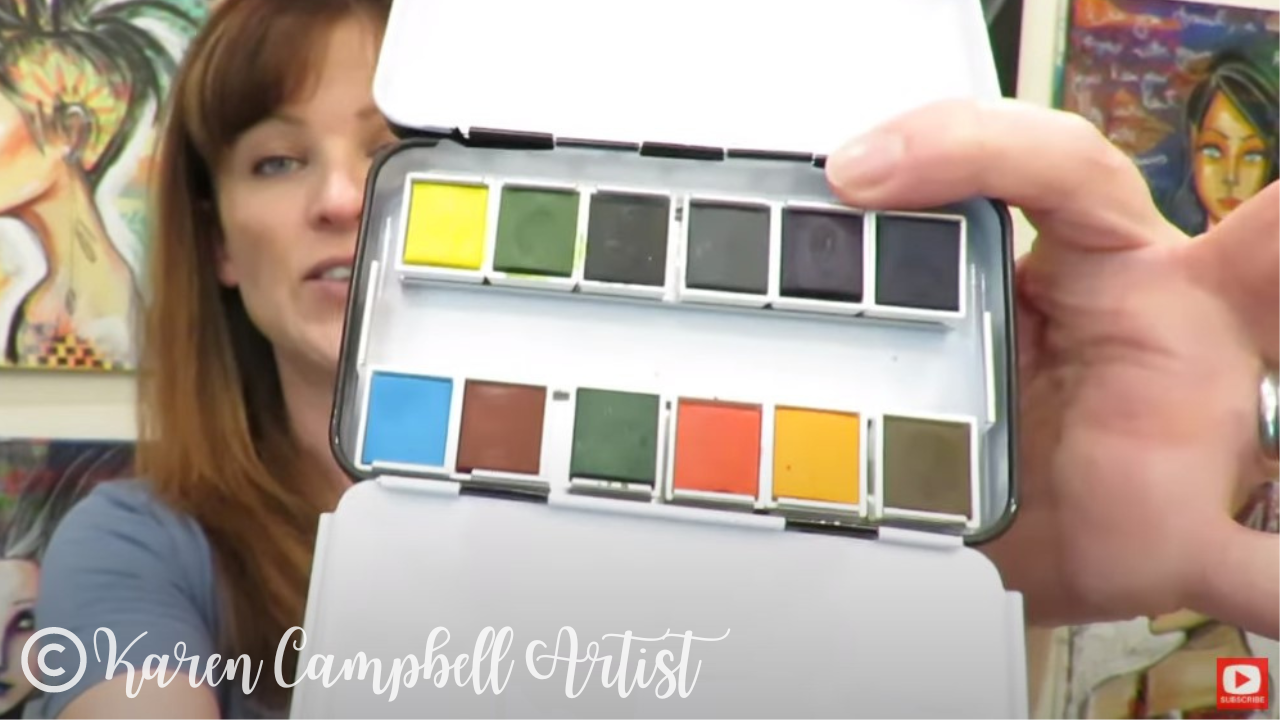
People ask me this question ALL the time, "How do you decide which watercolors to take along with you when you're traveling?" Is it better to work from tubes, pans, or to create your own custom travel watercolor palette?
Today I'm diving into ALL these questions, and can't wait to show you not one, but THREE ways to decide which colors are coming along for your next trip! 
Before we continue, super quick announcement: All product links are Affiliate. I may earn a small commission if you choose to order through these links but by law there is never any additional cost to the consumer for doing so. I thank you for your support.
Some artists prefer to purchase a palette that's already been prepared by a brand specifically for travel, like the one below, from Field Artist.
Typically palettes like this come with around 12 colors in them, including the primaries, so in theory, you can mix whatever additional colors in the rainbow you'd like to!
Personally, I hate mixing colors ALWAYS and prefer to just dip right into my palette to grab the perfect color. And, I find going with a standard out-of-the-box palette like the one above ... BORING!
There, I said it!! LOL. One of the AWESOME ways I totally enjoy choosing which watercolors get to come on a trip is by looking to my DESTINATION for inspiration! This is especially important if you plan to do landscapes and cityscapes. Here's an example of what I'm talking about. If you're headed to the beach, you'll want a palette filled with colors like this to paint those gorgeous waves, skies and cocktails you'll be sipping (or I would be sipping, LOL!). 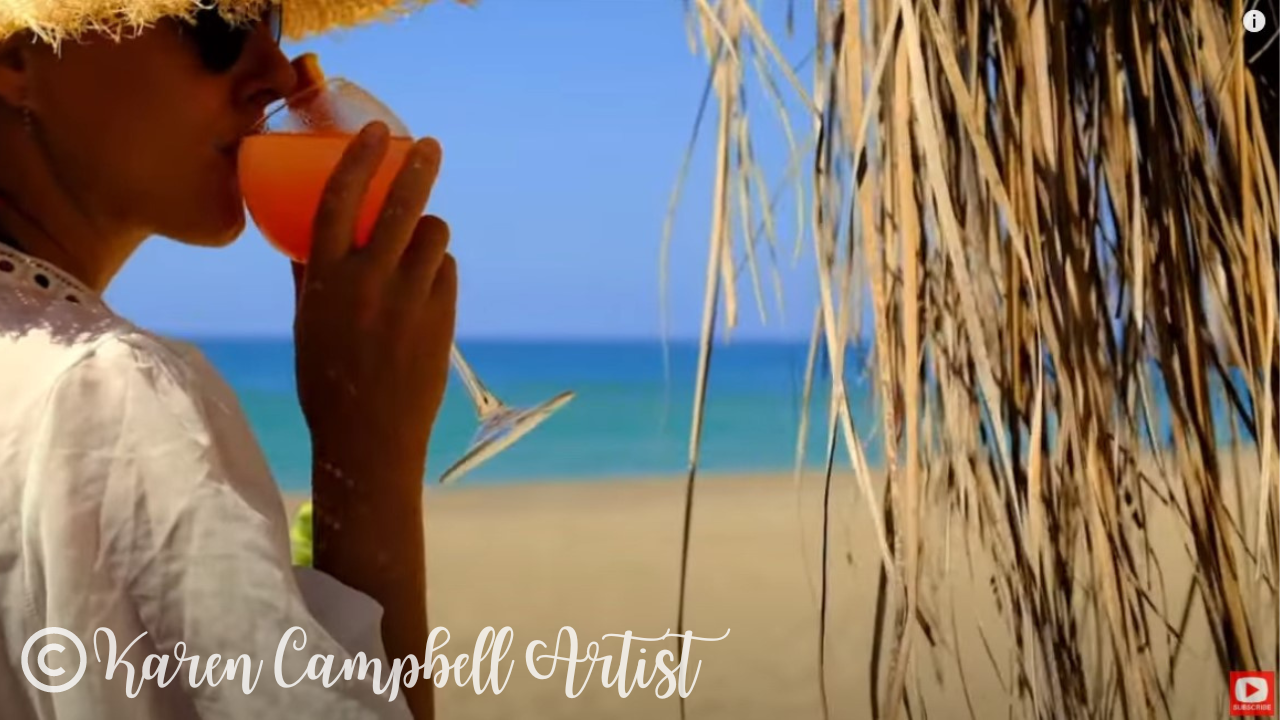
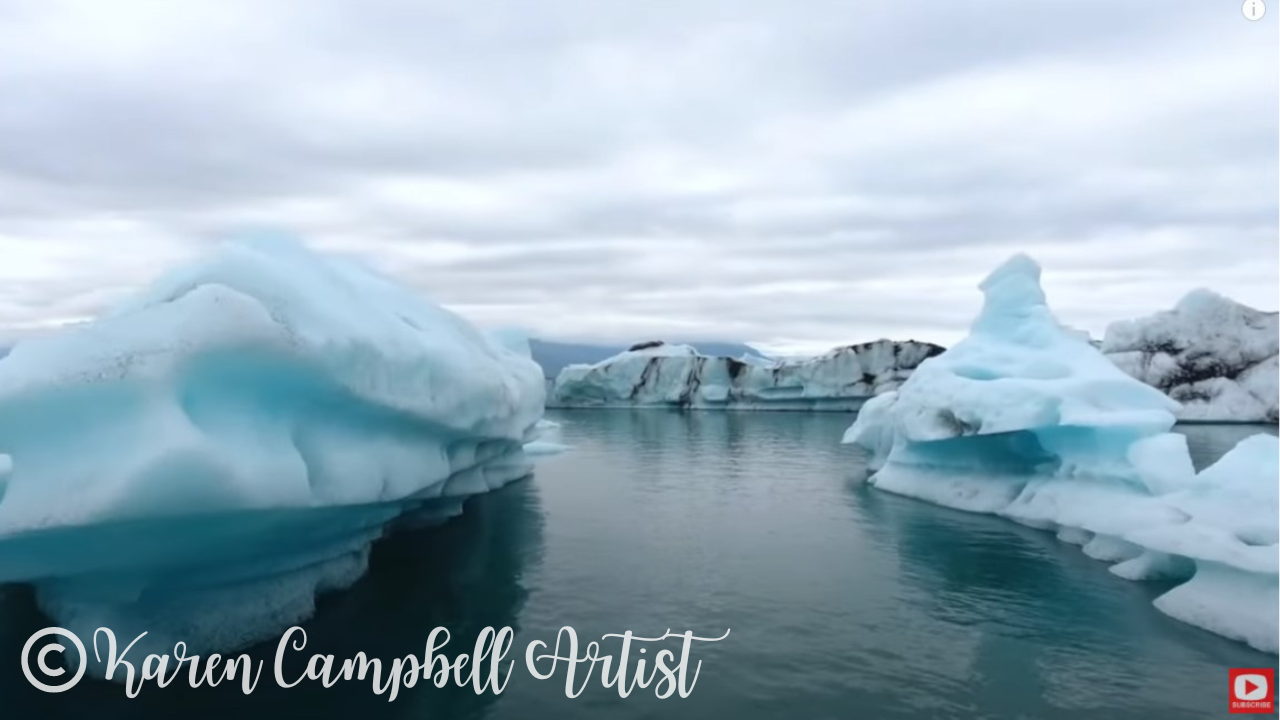
If you're headed to a place like Iceland, you're gonna want to include cool blues and grays like this to capture the moody skies, glaciers, and seas...
Or, maybe you don't even care about colors inspired by your destination... you'd rather just bring your favorites!! That's cool too!!
I tend to do a combo of bringing my faves and thinking about colors inspired by where I'm going.
When it comes to which colors I choose or recommend YOU choose, it's personal. I'm NOT gonna tell ya what to bring, and there are NO WRONG ANSWERS :) Just bring what YOU LOVE, and don't worry about anyone else! For me, Daniel Smith Serpentine Genuine (below), goes wherever I go! 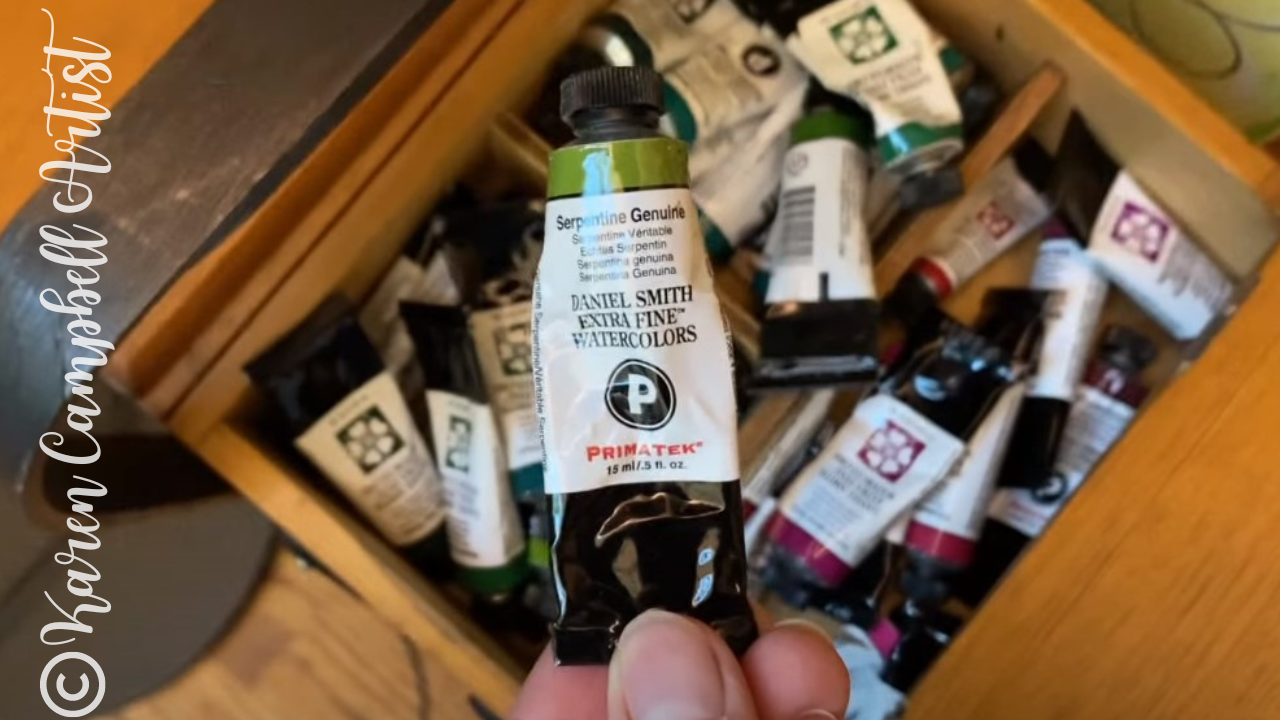
Since I love choosing specific colors to bring with me, I prefer to create my own custom travel watercolor palettes. I've done videos on this before, but today's demo is a little different, so make sure you click over to watch this new process unfold.
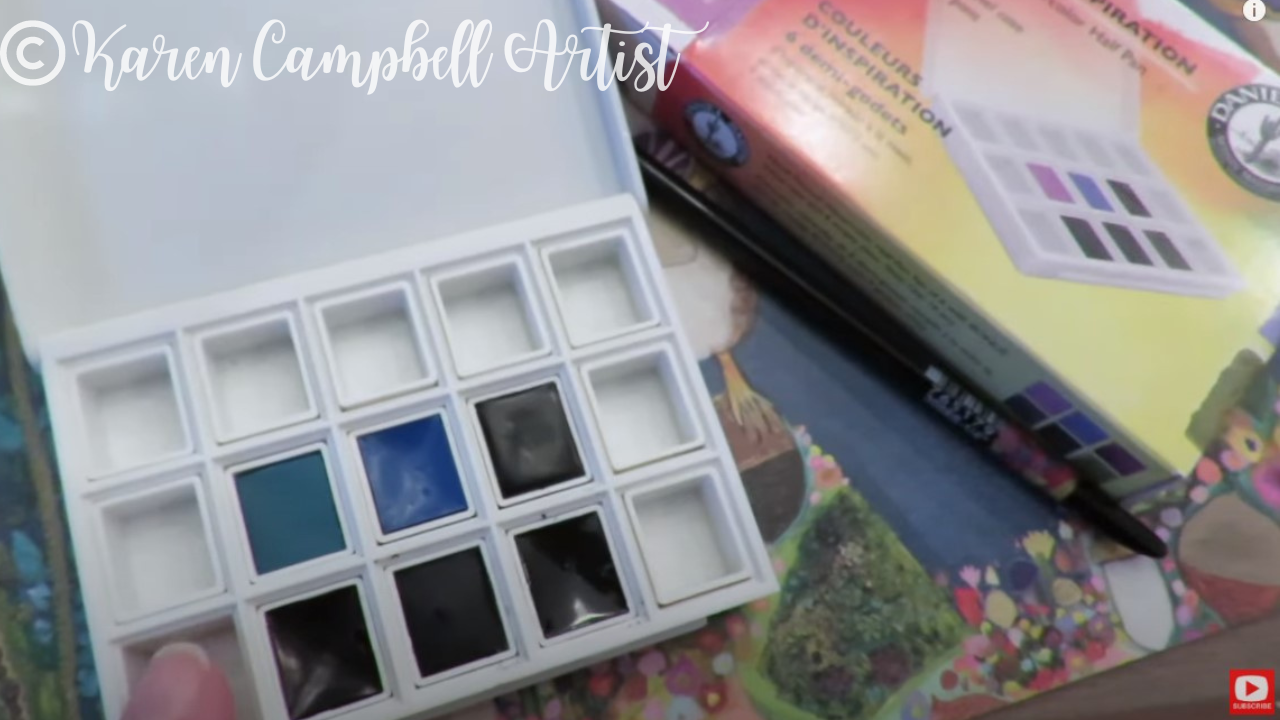
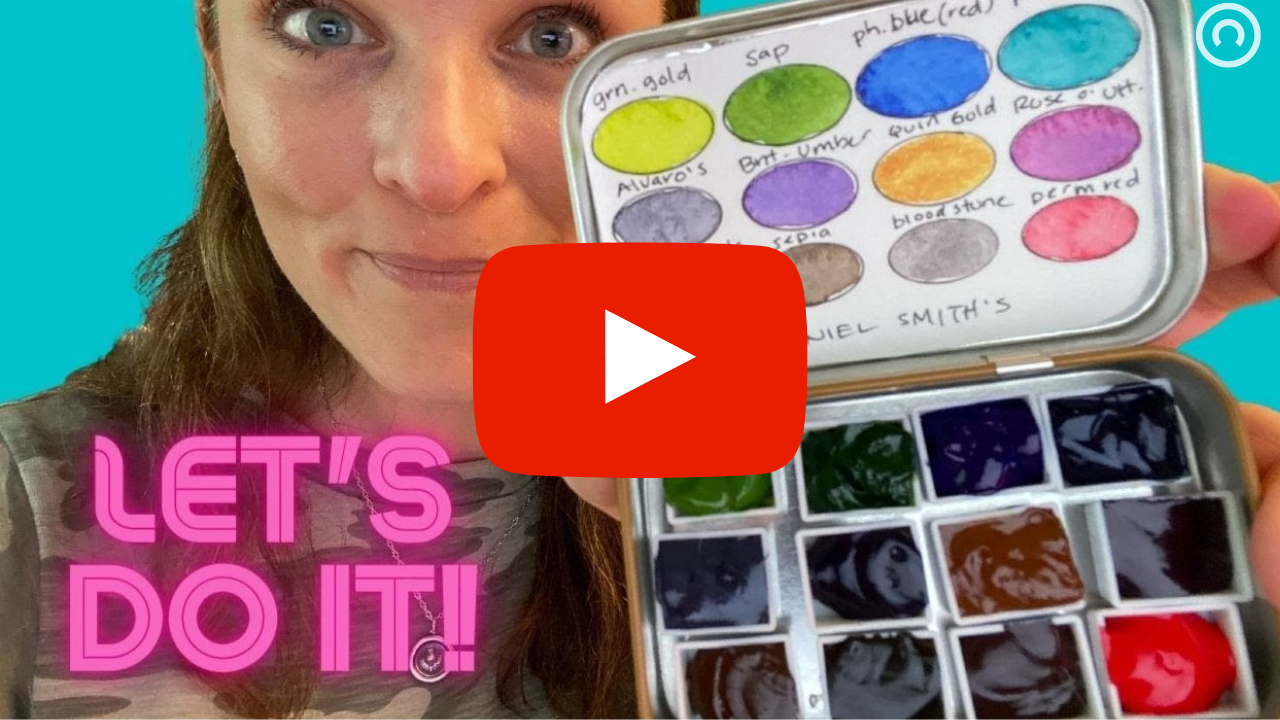
I recently discovered some cute PARTIALLY FILLED travel palettes by Daniel Smith (see below). Each palette has 15 half pans, 9 of which are totally empty - ready and waiting for YOU to add your fave colors to, and 6 of the half pans come pre-filled with color families like blues, purples, neutrals, etc. Cool, right? Best of both worlds!
The brand QoR also has a similar travel palette that's been pre-filled with 6 colors, and has 6 empty half pans ready and waiting to hold YOUR favorites!
Just look at how beautiful these color selections are!! 
I've really been enjoying the vibrancy of QoR watercolors lately. I recently purchased this QoR set of 24 5ml watercolor tubes and am planning on adding 15 of them into a baby watercolor palette that will clip onto my journal. Its' SO adorable. Make sure you stay tuned till the end for a sneak peek at THAT!
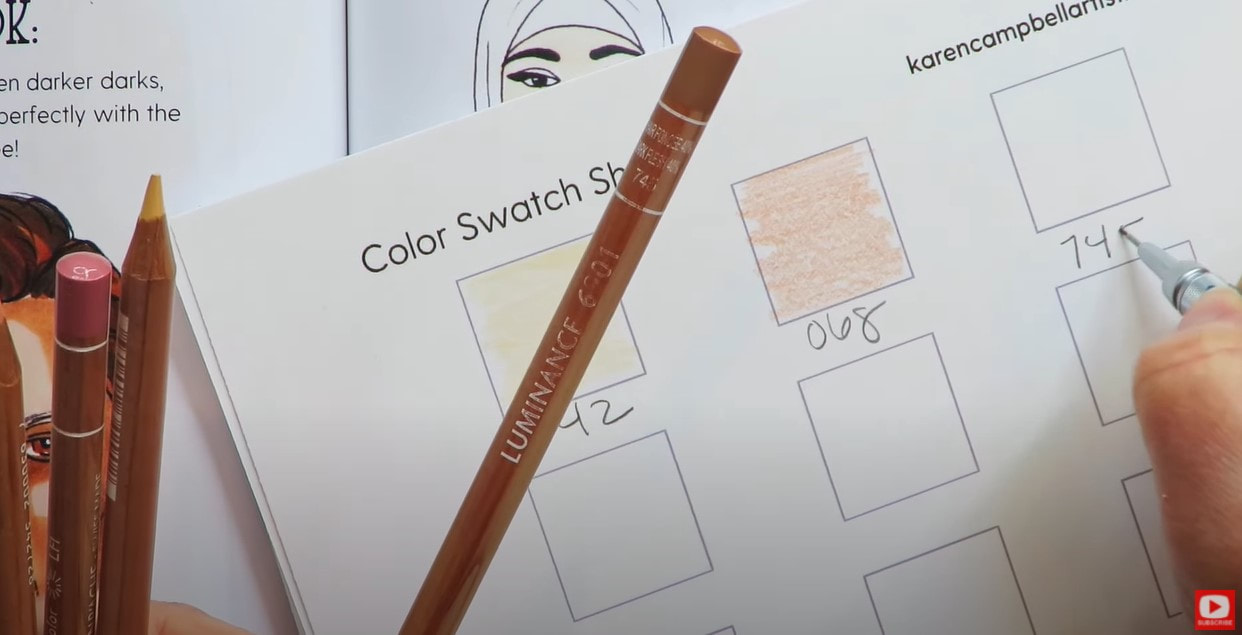
Once I've filled my empty half pans in each palette, I swatch my colors inside a little travel watercolor journal so I know what's inside each palette.
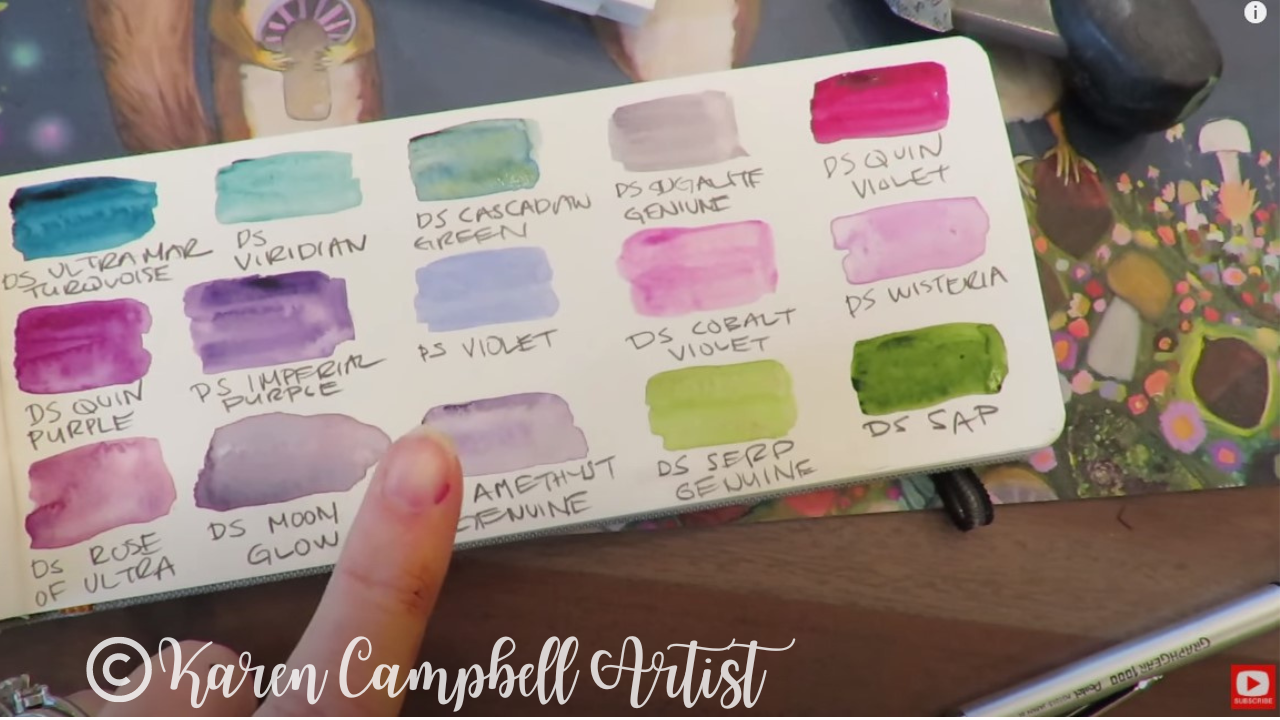
These cute skinny watercolor journals are awesome for swatching!
If you're NOT getting ready for a trip and just want something to make swatching a little more fun, make sure you download my FREE Swatch Sheet! You can use it for watercolors, markers, colored pencils, you name it!! 
I hope you found today's video helpful for your next trip!
And if you DON'T have any travel plans right now, who cares?!! You can STILL create some little custom watercolor palettes for yourself. 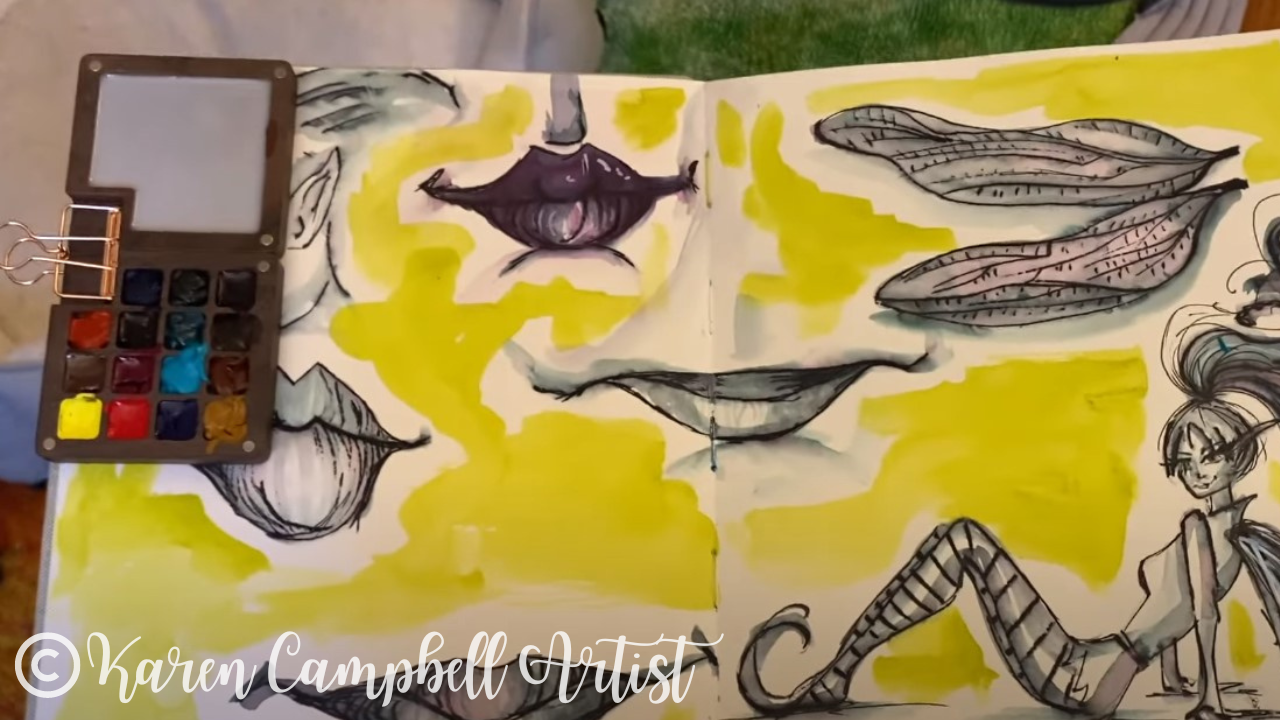
This baby mini travel watercolor palette is completely ADORABLE, wooden, and even clamps onto your journal!! It's perfect for moving your watercolor supplies easily around your house, into your backyard, or for an artsy walk in the park! I can't wait to use mine!!
Need Some Awesome Watercolor Lessons?
Of course you can't just have a set of gorgeous watercolors and NOT use them, RIGHT?! Check out the Celtic Collective art club over at Awesome Art School. It's like Netflix for watercolor and drawing lessons and are all FANTASY themed! So tons of mythical creatures from fairies (good & bad!!) to mermaids, unicorns and more!
Lucy Brydon and I are having a blast with our students, and would LOVE for you to join us!! You don't have to have ANY watercolor skills to join. We'll teach you everything you need to know from the ground up!! 
Wanna Watch Another Video?
I thought you'd never ask ;) This one's a goodie about ... surprise, surprise... how to make a teeny tiny travel watercolor palette!! It's SOO fun and soo cute!!
Need More Resources?
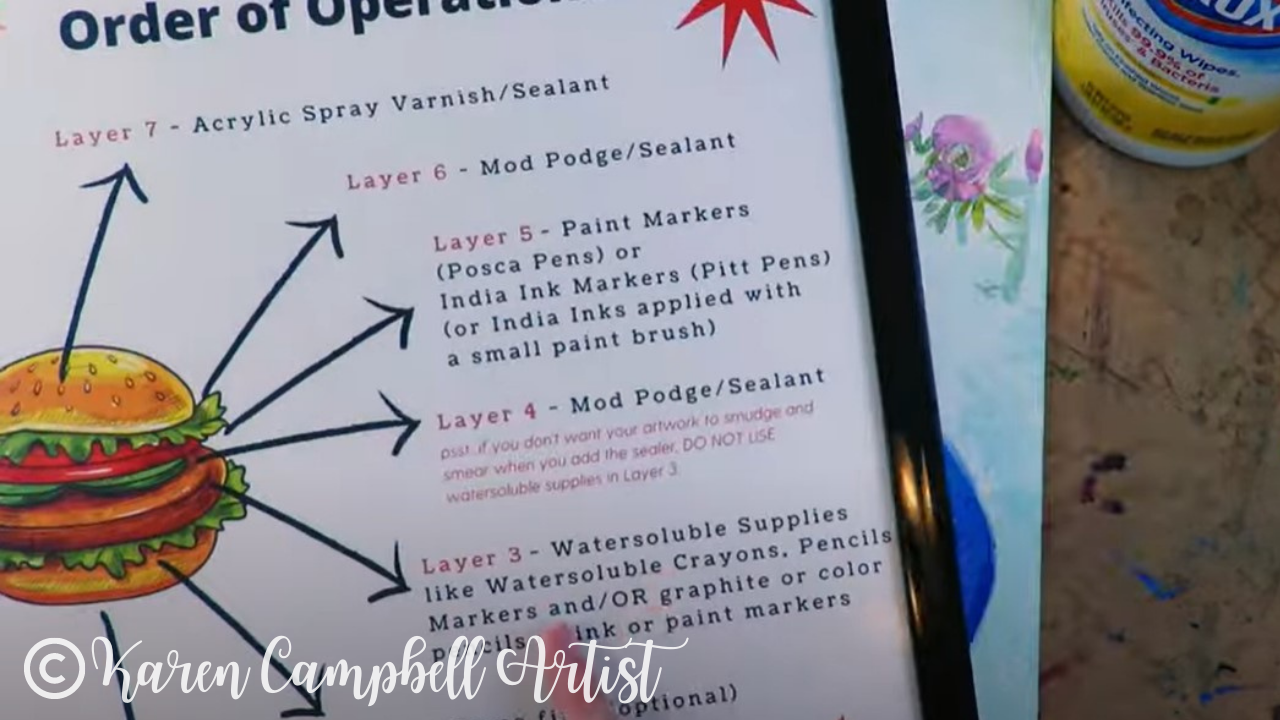
Creating a mixed media collage background is SO MUCH FUN and happens to be the first layer of my signature mixed media process called the Hamburger System.
Recently I received an email from a viewer asking me WHAT materials work best for collage backgrounds. I have hundreds of ideas, but here are my TOP 20 FAVORITES to use on canvas OR in my mixed media art journals! 
Do you love collage or have always wanted to try it in your art, but aren't quite sure how to do it without making a HOT MESS? You need my FREE Hamburger System cheatsheet.
If you're new to mixed media, collage, art journaling, mixed media on canvas - any or ALL of it, my Hamburger System is gonna rock your art world! You'll learn my tried and true process of how to create a mixed media MASTERPIECE every time. It's simple, step-by-step, tells ya exactly WHICH supplies you need, and did I mention it's SO MUCH FUN?!
Click that button above or click here and I'll email my Hamburger System cheatsheet straight to your inbox!
Before we continue, super quick announcement: All product links are Affiliate. I may earn a small commission if you choose to order through these links but by law there is never any additional cost to the consumer for doing so. I thank you for your support.

My Hamburger System series on YouTube has been watched by over 140,000 people and even became a book, available on Amazon.
I LOVE starting my mixed media canvases and mixed media art journal pages with a layer of collage! There's something so simple and relaxing about this process that connects me with my inner child. It's honestly pretty brainless and kinda serves as an art warmup to get my head into a creative space. 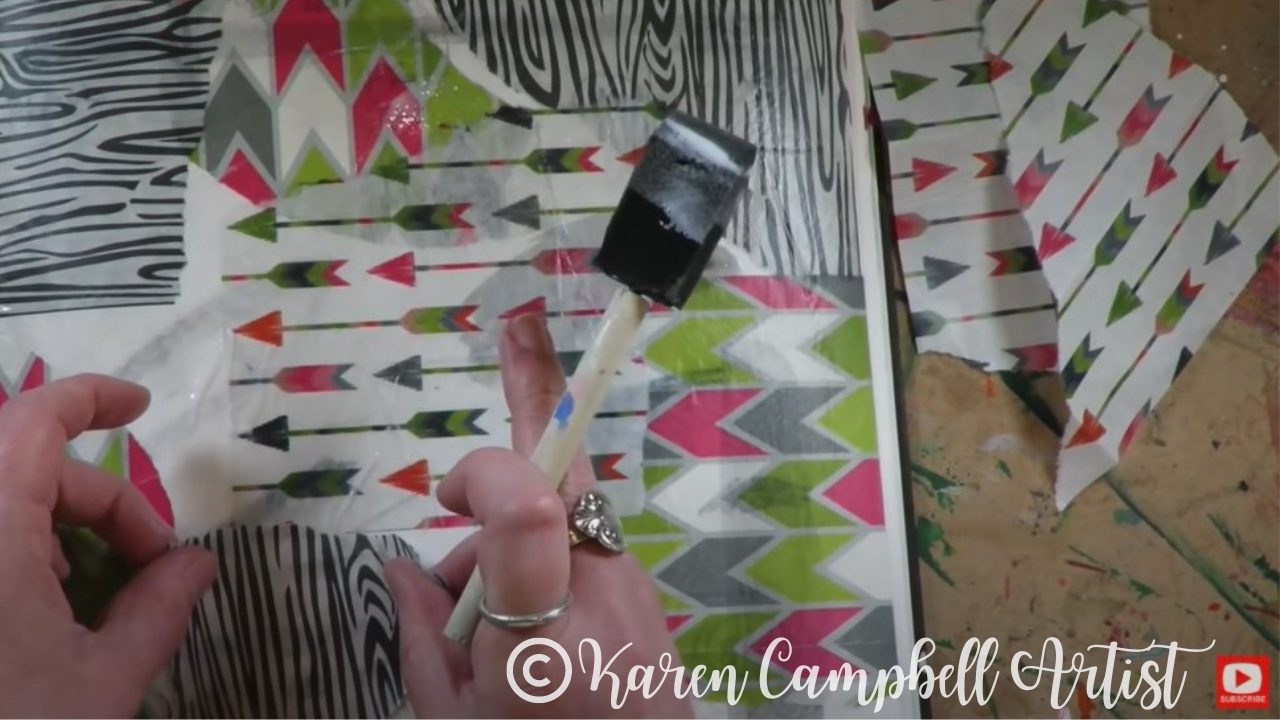
Collage is also one of the BEST things to do to bust through creative block whenever it strikes (and trust me- it hits ALL of us).
Here are my TOP TEN favorite mixed media collage materials. Make sure you scroll down and watch the video to see TEN MORE ideas and watch a super fast mixed media collage tutorial I think you're gonna love!! 
Scrapbook Paper
I LOVE a good scrapbook paper pad. This is the perfect collage material for people who have a hard time picking papers that go together and those who might be in a hurry or feeling lazy who just wanna grab and go!
With scrapbook paper, the work has already been done for you because EVERYTHING in the scrapbook paper pad only features colors and patterns that go together. All YOU have to do is pull out your favorites and start ripping. 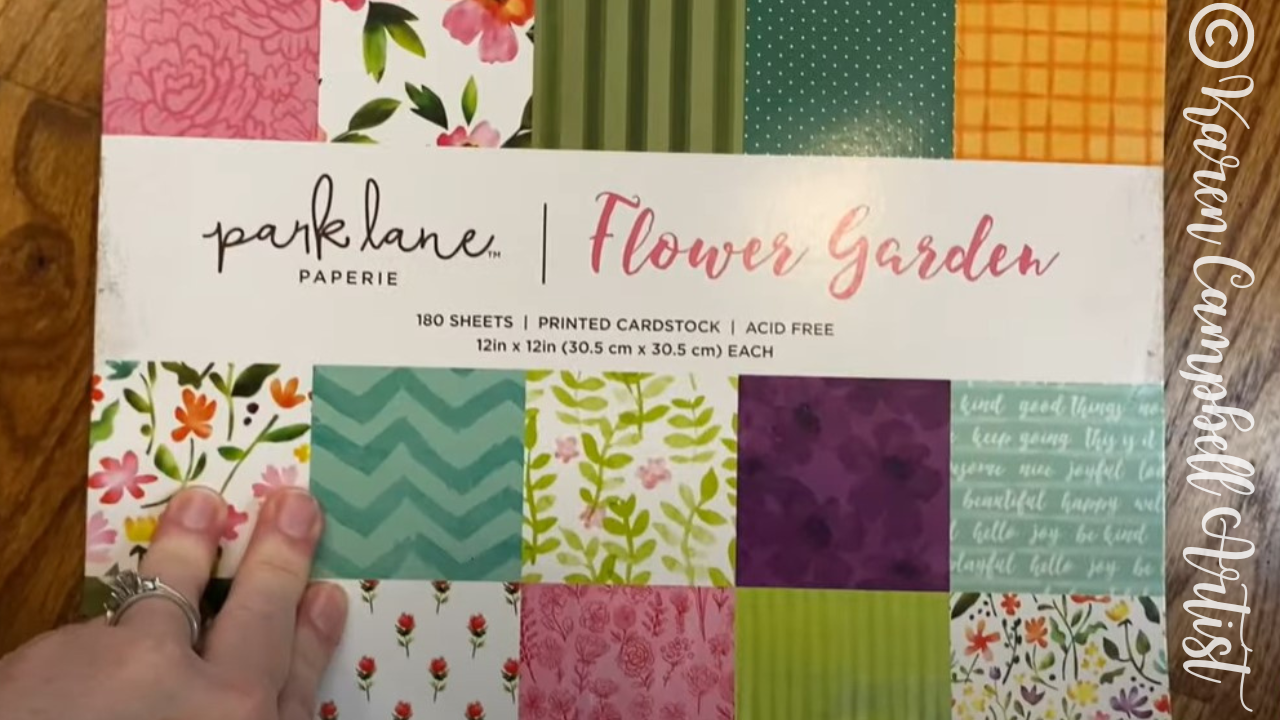
Scapbook paper even tells you exactly what color paints to use for your acrylic layer! It's awesome :)
Make sure you click over to the video to see the mixed media collage examples I show you of how I incorporated scrapbook paper into BOTH the background and foreground of a mixed media portrait on canvas. 
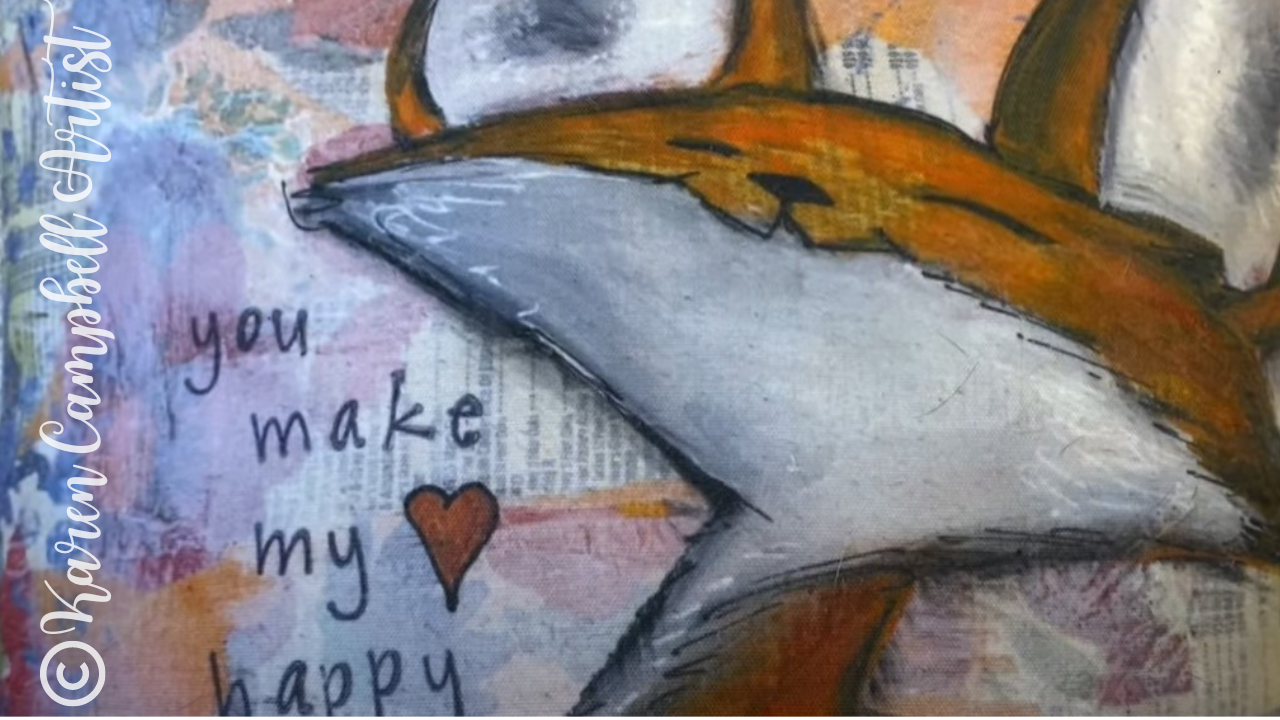
Phone Book Pages
This adorable mixed media fox painting was originally done on an upcycled record jacket I found in a thrift shop. I used the record jacket as my canvas. If you look closely at the pillow I had made of this canvas, you'll see some type in the background. Those are just phone book pages! So simple, right?!

Sheet Music
Sheet music collage is a favorite of mine, super cheap, and beautiful to use in both the background and foreground of your mixed media art.
You can either turn an old book of sheet music from a thrift shop into an altered book art journal or rip old sheet music into collage pieces like I did below. Isn't it beautiful how the music notes peak through the skin tones in the painting? 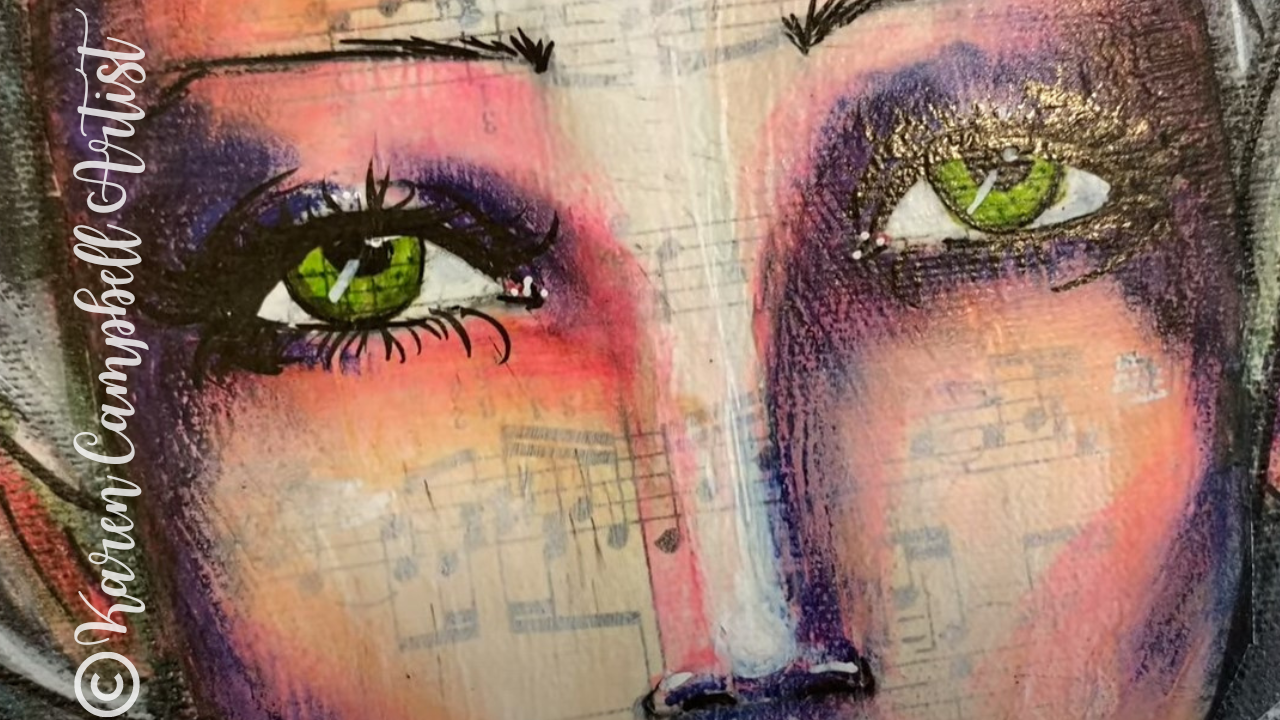
If you wanna create the piece above with me, it's one of the projects in my Mixed Media Magic book over on Amazon. Check it out!!

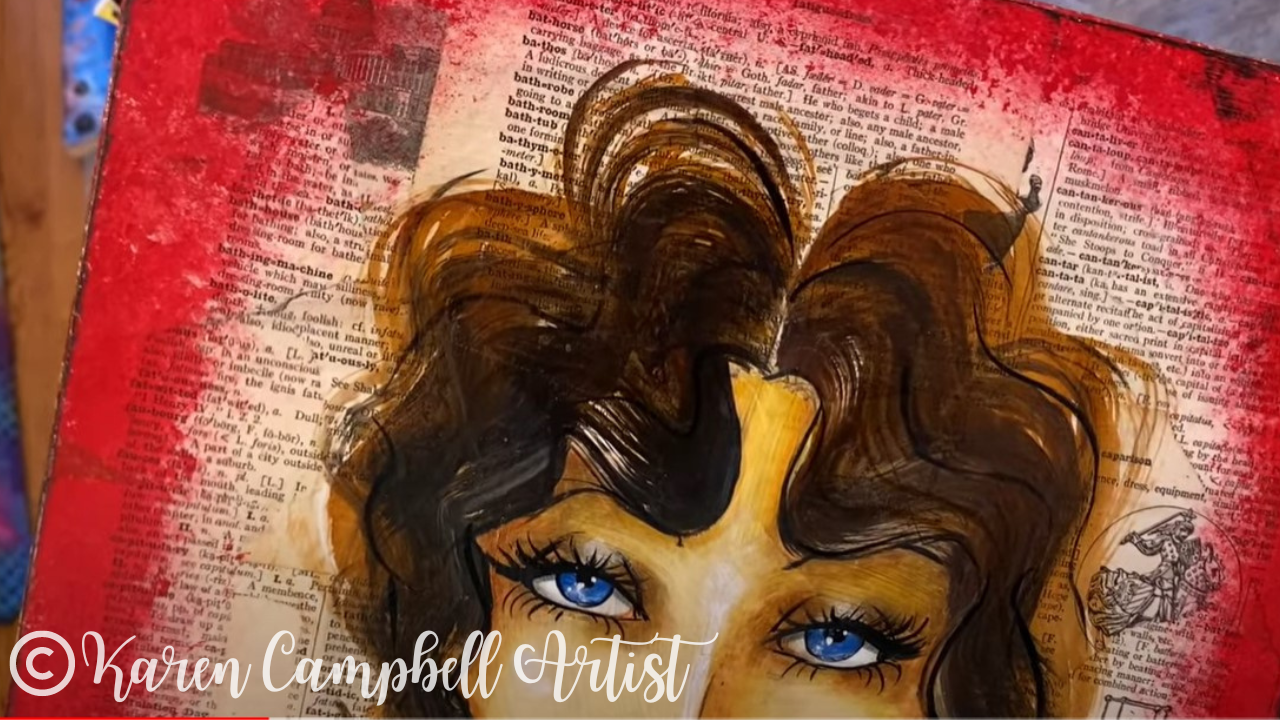
Dictionary Paper
I LOVE a vintage dictionary! The really old ones have a yellow tone to them and rip SO easily for collage. They also have a distressed look to them already because they're old. I think these are fun to have peaking through the background in a mixed media face, or to use strictly in the background. Your options and endless (and SO CHEAP) here!
This art deco mixed media portrait project is available at Awesome Art School as a stand-alone project if you'd like to create along with me!

Masking Tape
Lots of people don't even think of masking tape as a collage element, but it's weirdly a perfect surface to art upon and creates a lovely texture to your art. It also accepts gesso, acrylic paint, and all the mediums you would typically reach for to create mixed-media art.
Look closely at the piece below and you'll see some subtle, horizontal lines from my masking tape collage layer. 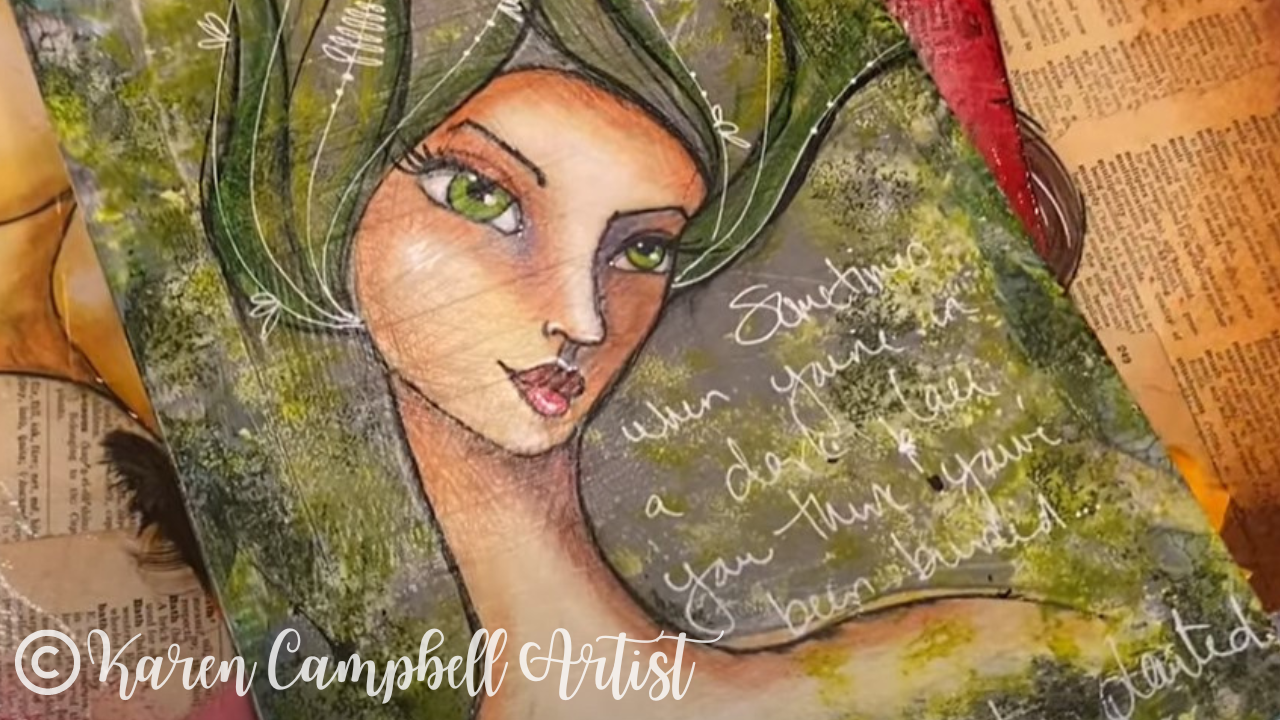

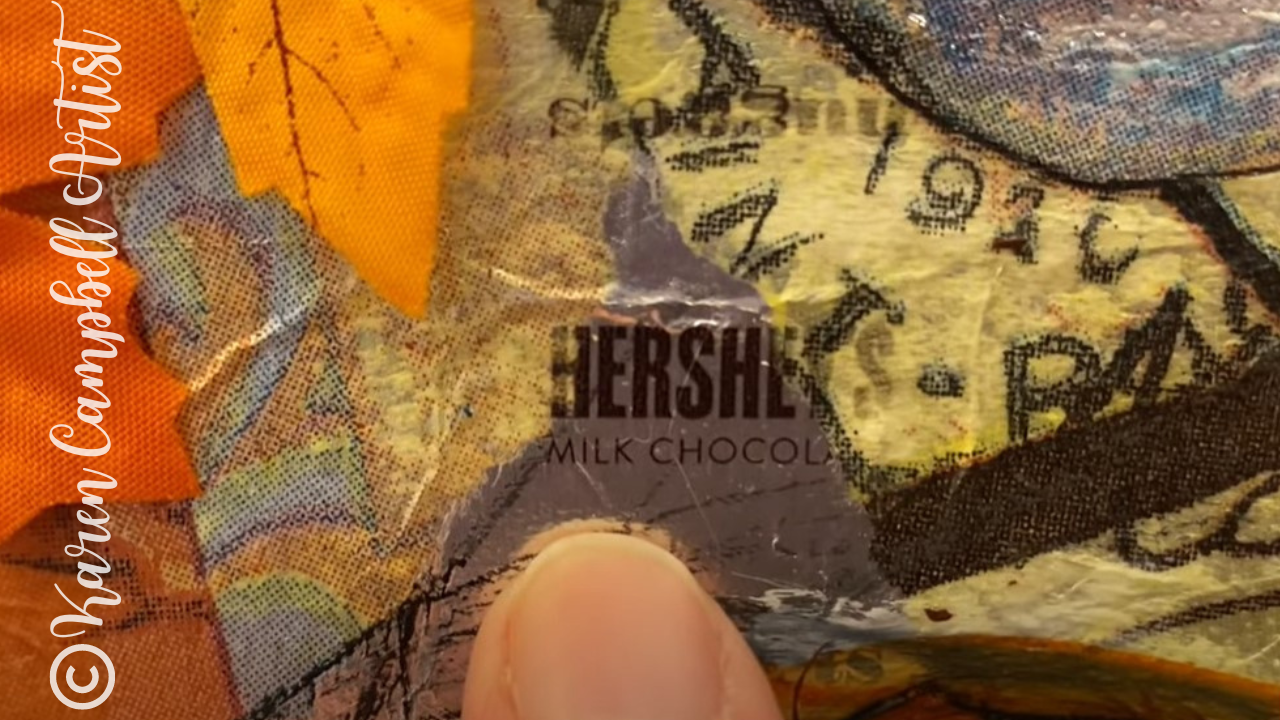
Trash!
You can totally use TRASH as a mixed media collage element. Hilarious, right?! I've enjoyed using beer bottle labels (I love to collect these when I travel), foil candy wrappers (shown below), discarded tissue paper from a gift, you name it!
See this project being made in my cereal box art journal or create along with me.
Fabric
I once found this pretty fabric with an adhesive backing to it that peeled off like a giant sticker. I used that to create the background of this fun Bathtub Babe in my cereal box journal. Don't be afraid to think outside the box with the collage elements you choose!

Washi Tape
Washi tape is SO fun to use in mixed media collage. I love how there are SO many fun colors, patterns and thicknesses of washi tape. I use it a lot like how I use scrapbook paper. Sometimes it's strictly in the background. Other times I've used washi tape in the foreground as hair or clothing (like the tutu below) and it looks SO awesome!
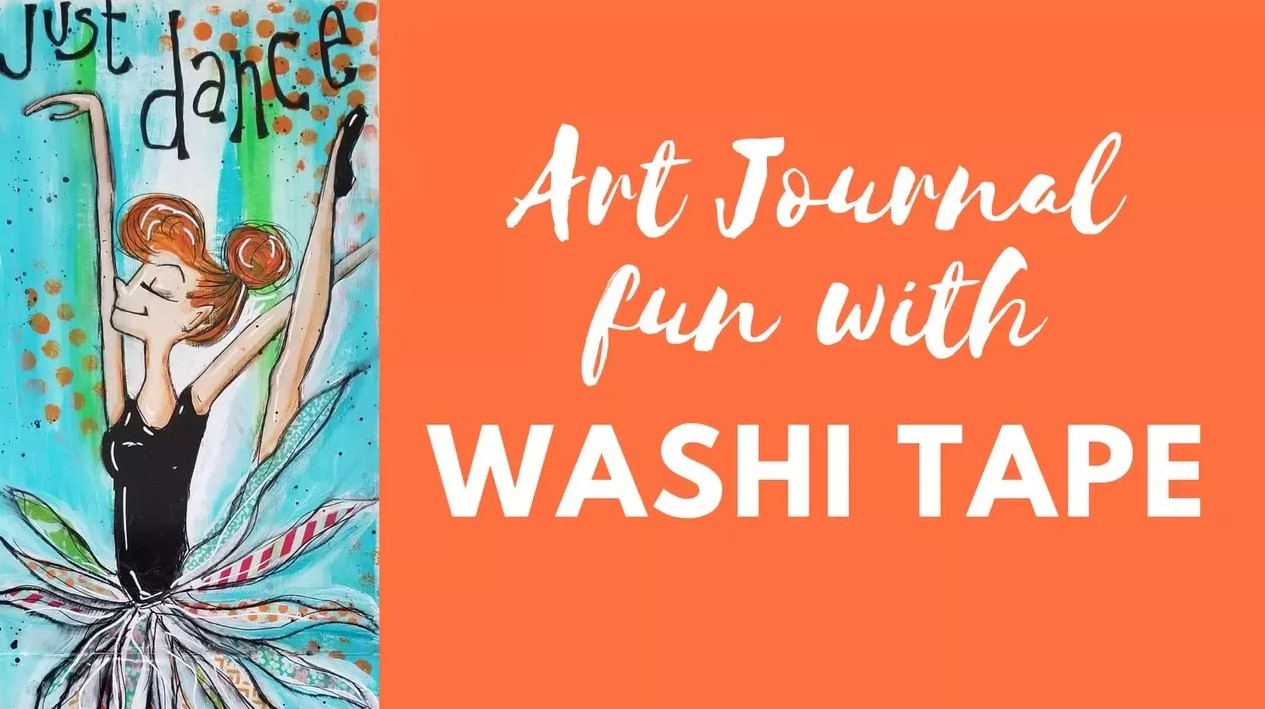
Washi tape doesn't always adhere the best, so you'll want to go over it with a sealant to keep it in place.

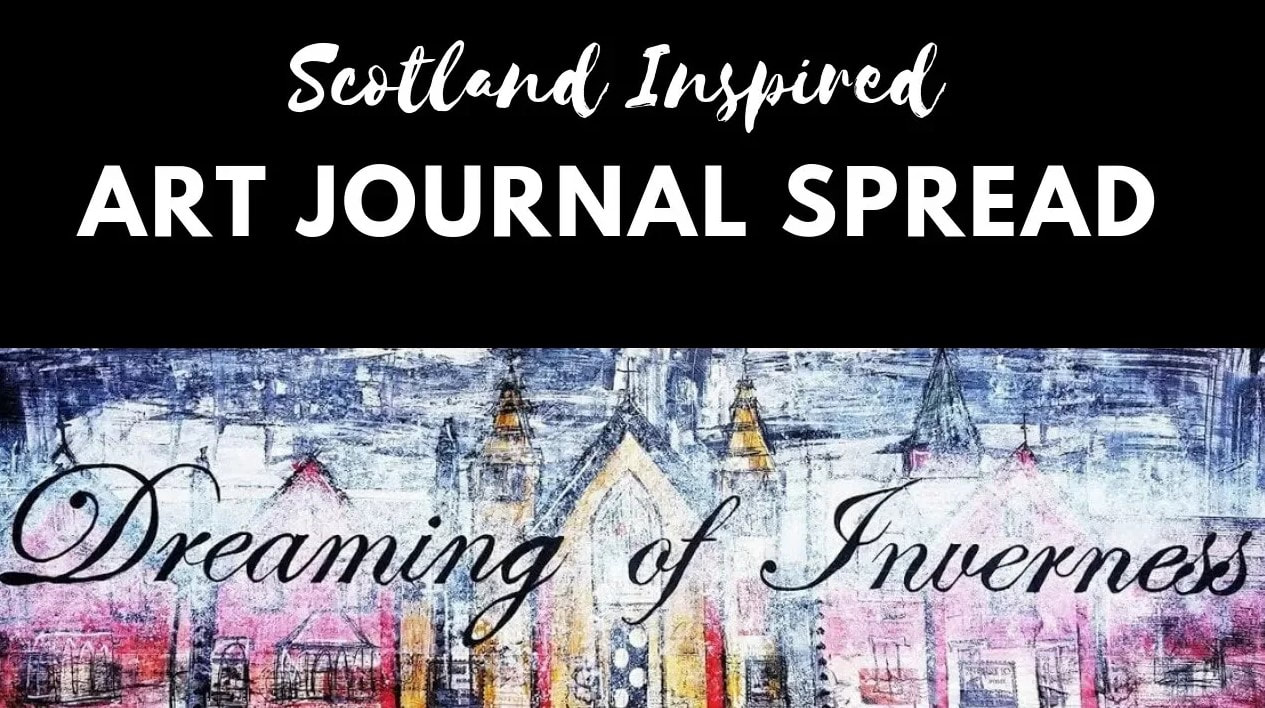
Maps
Maps are becoming SO old school now, but they can be such a fun way to create an art piece based on a place you visited or want to visit. In this one, I have elements from a map of Inverness, covered them in gesso, and went to town.
Duct Tape
You may not even know this, but duct tape comes in SO many fun patterns now!! I've used this kinda like I use washi tape- in the background or foreground.
In this Mixed Media Retro Girl project, I carved out my entire girl so I could use this fun camper duct tape for her clothes, shoes and hair. So cute, right?! 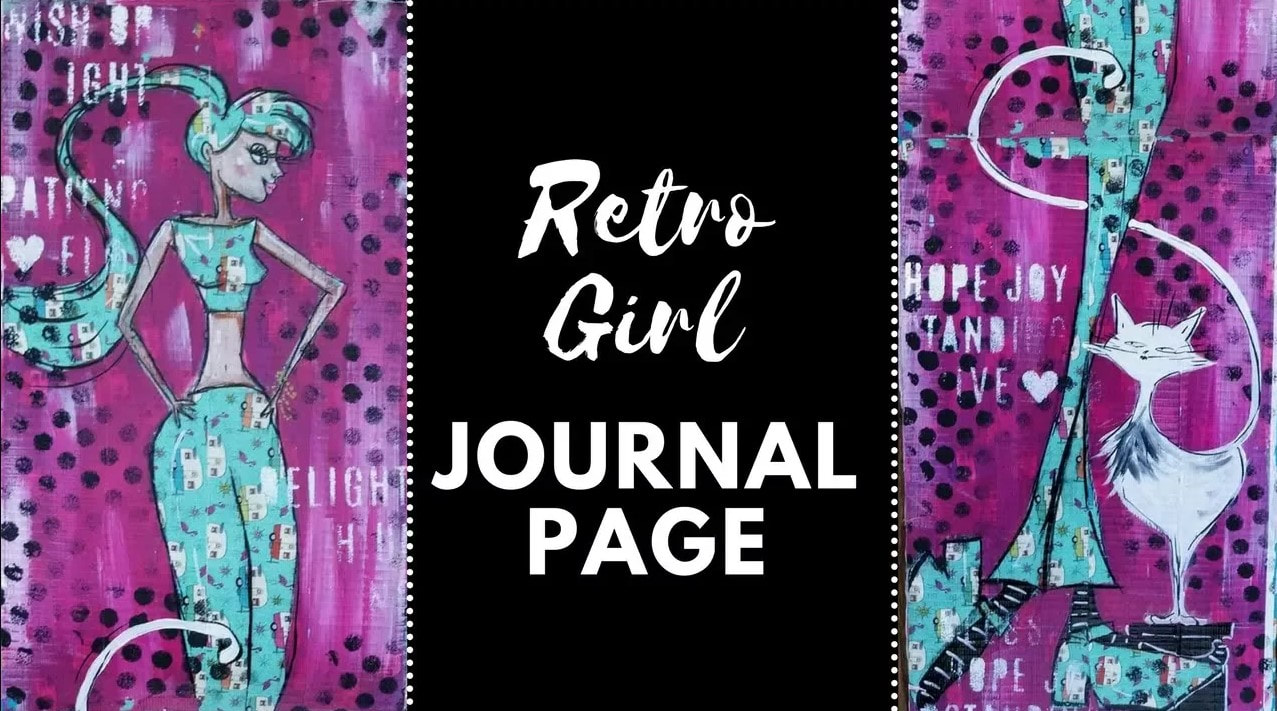
Just a quick warning on using duct tape as a mixed media collage element - it's super glossy, so can be tricky to paint on top of. Just make sure you seal it so the paint doesn't peal off when you're done.
This is only HALF my list!!
Make sure you click over to watch today's video to find out what my other TEN mixed media collage elements are. I KNOW there are some you haven't considered yet and just might love!!
Need more resources to get your creative juices flowing?
❤️ CHECK OUT ALL my art books on AMAZON ❤️ CHECK OUT ALL my online art classes @ Awesome Art School ❤️ MY FAVORITE ART SUPPLIES on AMAZON (affiliate links) ❤️ MY BELOVED FACEBOOK GROUP
Have you ever heard the words "Mixed Media Art" and wondered what the heck that even means?! Today's YouTube video is FOR YOU!
I'm sharing my super simple mixed media definition to eliminate ALL confusion and make mixed media feel more approachable - especially for beginners because it's SO MUCH FUN! 
If you're new to mixed media, struggling to understand your art supplies or how to layer them so you can create a MASTERPIECE instead of a hot mess - you need to download my FREE Cheatsheet outlining my signature mixed media technique called the Hamburger System.

Simply click the button above, and I'll send my Hamburger Cheatsheet straight to your inbox. Once you've printed that out - meet me right back here to learn just how simple the definition of mixed media art is, and how much FUN it can be!
Before we continue, super quick announcement: All product links are Affiliate. I may earn a small commission if you choose to order through these links but by law there is never any additional cost to the consumer for doing so. I thank you for your support. 
Wanna learn see the Hamburger System step-by-step, in action? Check out my Hamburger System series on this playlist next.
I loved doing this series so much, I turned it into a book!
Now that you know WHAT mixed media art is, I hope you feel empowered to try it - even if you're a total beginner.
YOU CAN DO THIS!! Need more resources to get going? ❤️ CHECK OUT ALL my art books on AMAZON ❤️ CHECK OUT ALL my online art classes @ Awesome Art School ❤️ MY FAVORITE ART SUPPLIES on AMAZON ❤️ MY BELOVED FACEBOOK GROUP
Last Updated 5/31/24
Mixed media paper is something I get asked about ALL THE TIME by my students! As mixed media artists, we need super strong paper that isn't gonna buckle no matter how many wet, messy mixed media art supplies we throw at it. If you're a mixed media beginner or a seasoned artist looking for answers that won't break the bank, today's video is for you!
Mixed media art supplies can get overwhelming FAST because there are so many to choose from. I've created a FREE 9-page Supplies Guide to explain which mixed media art supplies I love most AND how they perform so you know what to expect right from the start.
Simply click the button below, and I'll send it right over. 
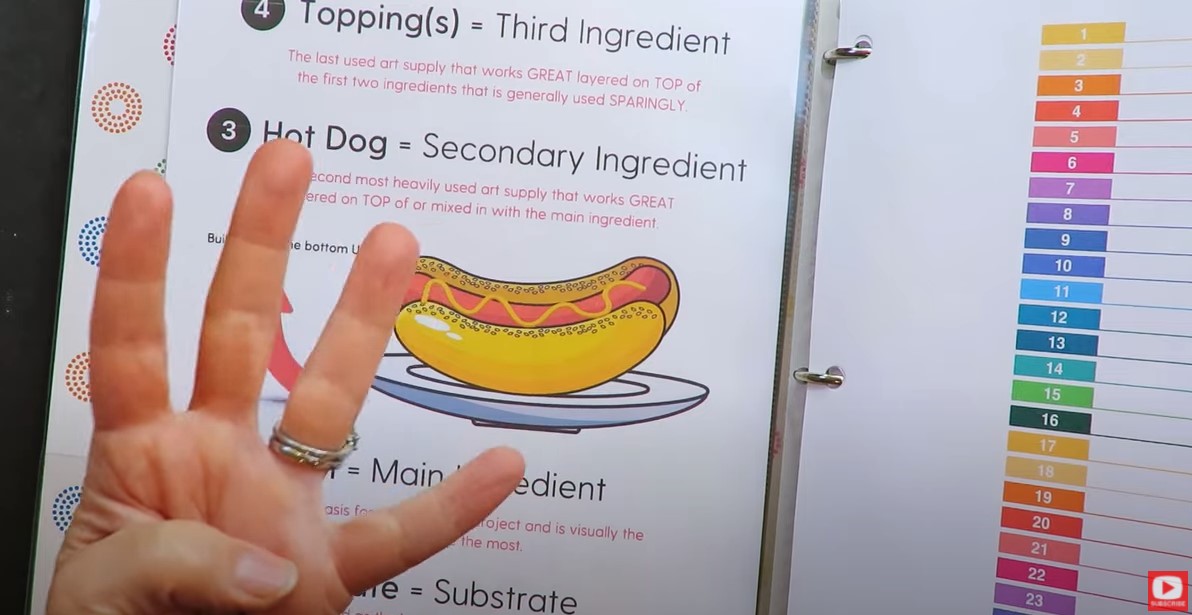
Once you understand your supplies a bit better, mixed media art will become SO much more FUN! If you need help with layering check out my signature Hamburger System. When you're in the mood to work with fewer supplies, check out the Hot Dog System!
*All product links are affiliate & for U.S. residents only.*
When it comes to mixed media projects you want to complete on paper, my advice is to simply use watercolor paper EVERY time.
Are you surprised by my answer?! People usually are. I know there are a zillion papers sold by amazing brands labeled "Mixed Media Paper," but trust me. I've tried them all, and nothing holds water soluble products, watercolors, fountain pen inks, acrylic paints, mod podge, and even collage- like watercolor paper! Take a look... 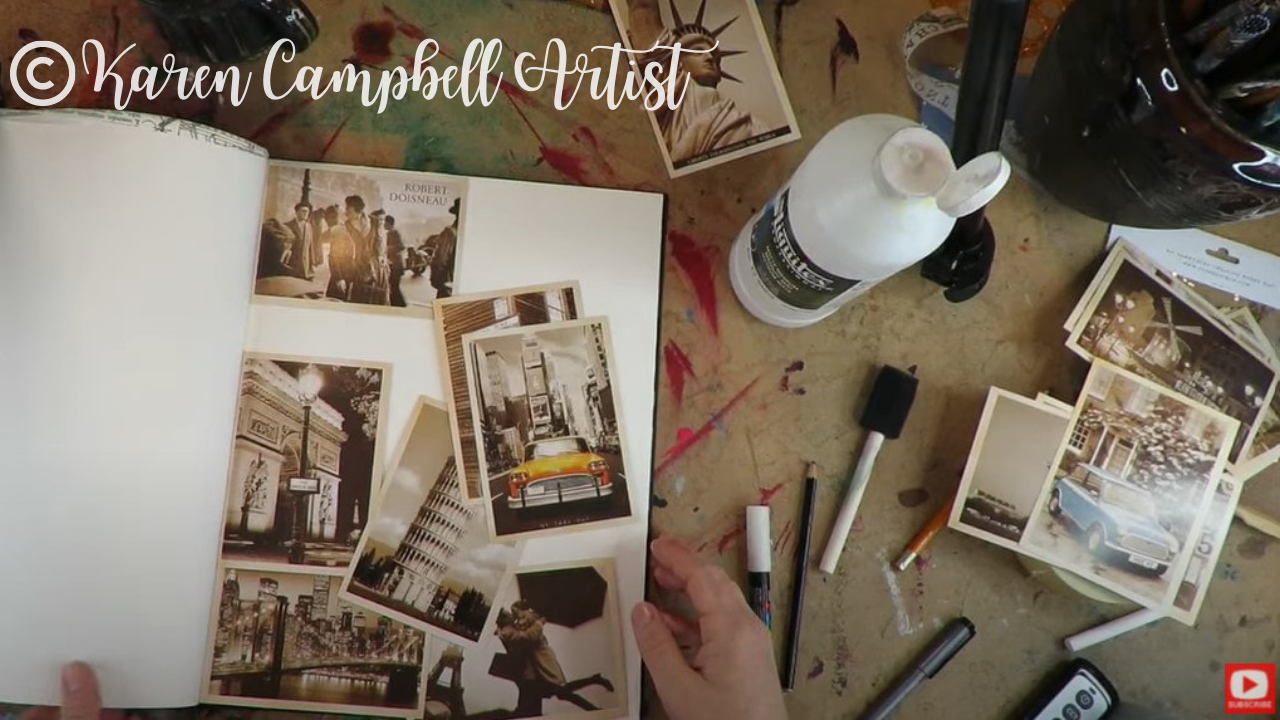
See the vintage postcard collage materials above? I glued these all down with matte medium in my Strathmore Watercolor Journal, and did a full on, 7 layer mixed media project on top of it - "Hamburger Style" (see below). This page was FULL of matte medium, gesso, mod podge and acrylic paint!

If you're new to me and my work, I do mixed media art projects on anything and everything. Typically if I'm not working on canvas, I'll do projects in my Strathmore Watercolor Art Journal (above), or on loose sheets of watercolor paper.
To keep things simple, I'm teaching you about 3 main kinds of watercolor paper today:
While rough cut watercolor paper can be super fun, keep in mind, your watercolors aren't going to work exactly the same as they would on cold or hot press paper. It's just different. Here's one of my rough cut watercolor art journals: 
What about cost? You'll notice when you visit your favorite craft store that there's super cheap watercolor paper and crazy expensive watercolor paper.
What's the difference?!
When it comes to the cost of watercolor paper, the biggest factor connected with expensive watercolor paper is the percentage of cotton used to create the paper. The higher the percentage, the higher the price.
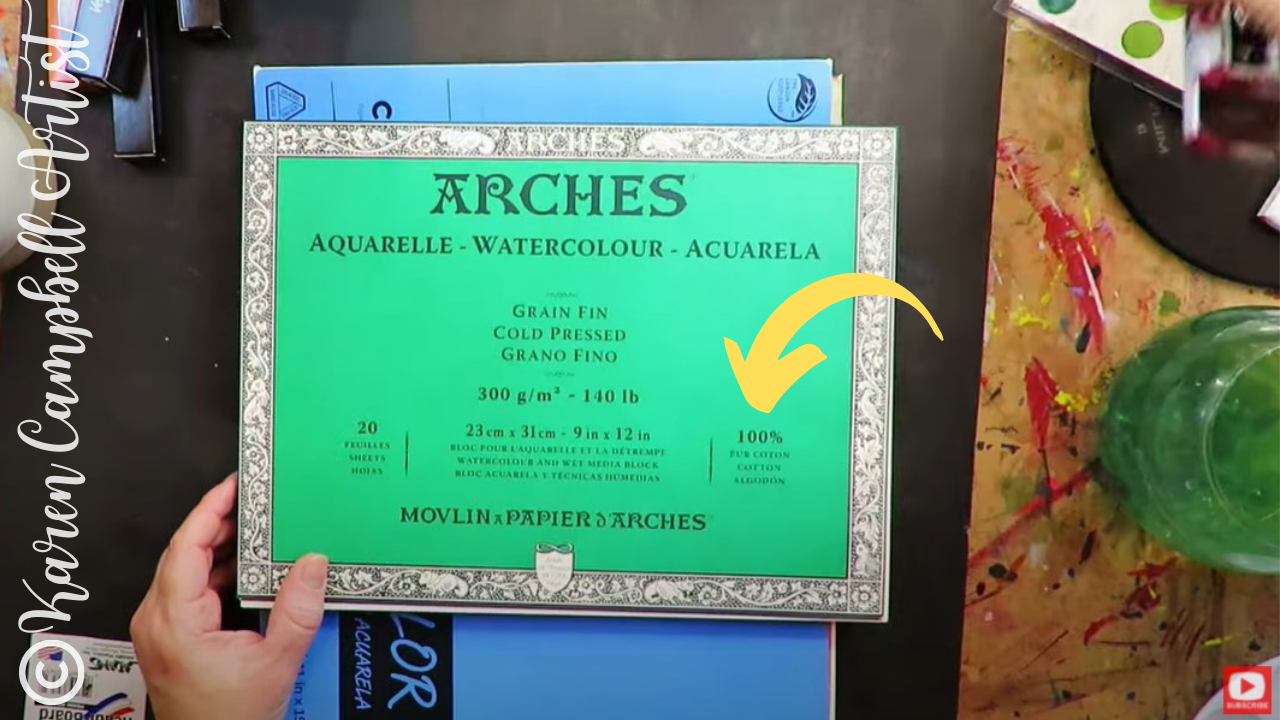
Arches is one of the most expensive watercolor papers because it's made up of 100% pure cotton. You can find the cotton percentage of paper on the cover (yellow arrow above). This type of paper typically comes in "blocks," so the paper stays nice and firm, and does not buckle.
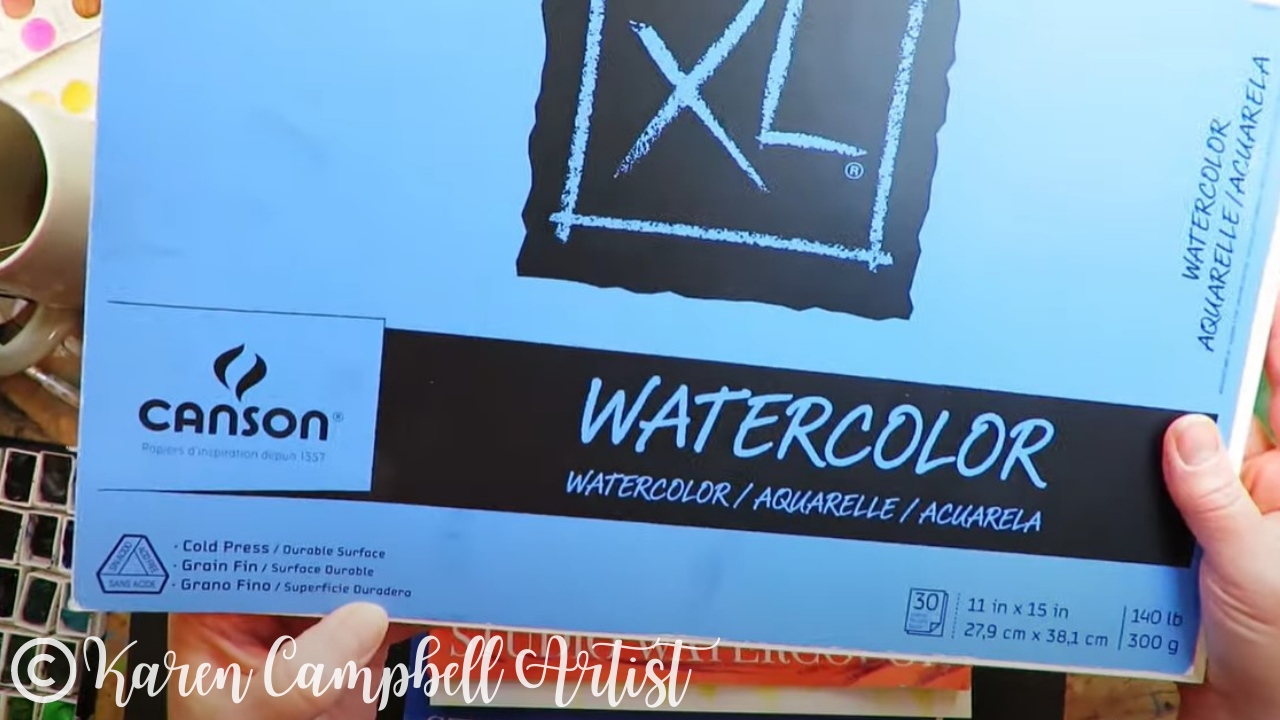
If you find a watercolor paper without the cotton percentage noted, you're likely in the right place, and your cost will be significantly cheaper. I love using Canson watercolor paper for doing practice work. It's much more reasonable than Arches.
The second cost factor to watch for when you're buying watercolor paper for mixed media projects is the paper's weight.
At a minimum, I recommend using 140lb. paper, especially if you're doing mixed media work on top and not just watercoloring. Don't use the 90lb. paper because it's just not gonna hold up. The watercolor paper I typically use now is by Fabriano. It's 25% cotton (and 75% cheaper than the Arches brand!), plus it comes in either hot press (smooth) or cold press (textured). This is a very high quality paper. You can work on this and it will be museum quality, is great if you want to sell or gift your work. 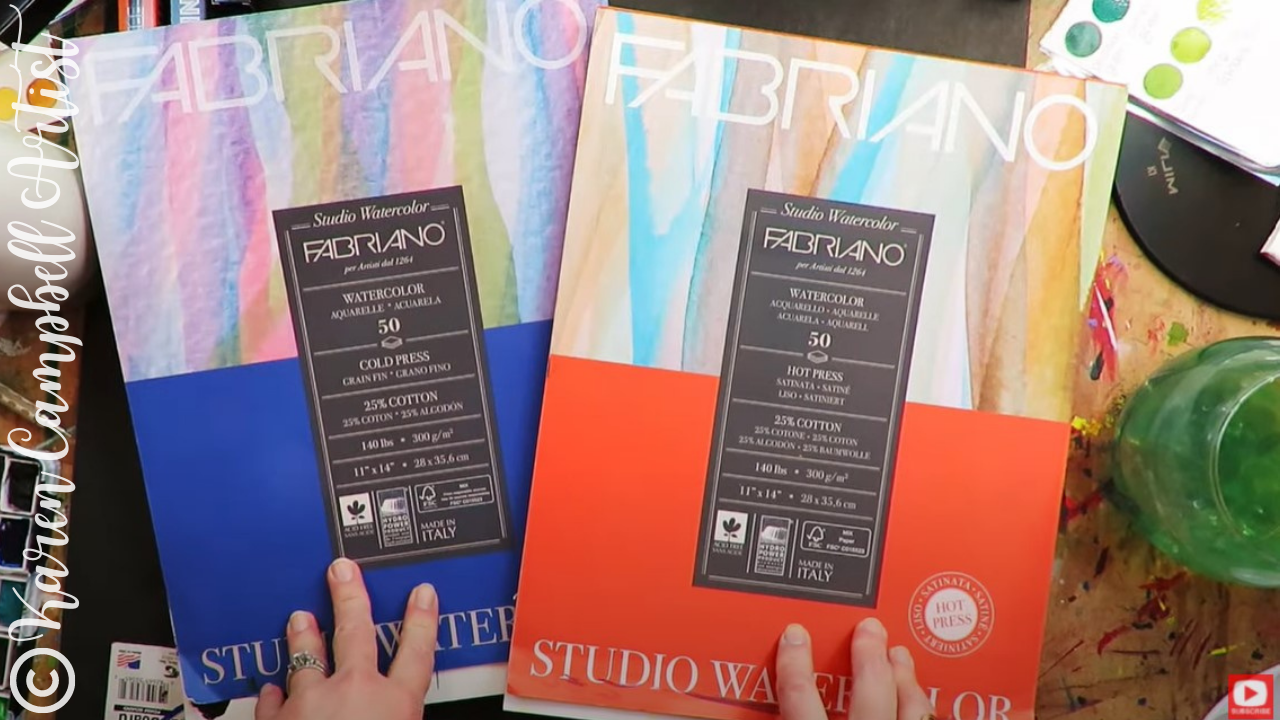
HOT TIP: You DON'T have to put gesso on top of watercolor paper to prime it for acrylic paints - just start painting!
Gesso is well-known in the world of mixed media art as a primer for acrylics, but when you're working on watercolor paper for mixed media projects, it's not needed, so save your money and skip the gesso!
I hope you found this info helpful! Be sure to click over to the video, so you know what to look for next time you head to the craft store on the hunt for mixed media paper for your own masterpieces!
|
Karen CampbellFounder of Awesome Art School. Mixed Media Artist. Author of 19 Instructional Art Books! 
Whose work has appeared in...
   
 Archives
July 2024
Categories
All
|


 RSS Feed

"Karen is flipping hilarious and she's very real...I like the way she teaches in a way that really gives you confidence, whether you're a beginner or advanced there's always something new to learn!"
- Elizabeth W. |
What Fans Are SayingKaren, you are absolutely fabulous! You make me feel like I can draw anything. I have recently retired and finally have the time to do some of the art that I have loved since I was in school. I am really at the beginning of my art journey and I hope to learn as much as I can. Thank you for all you do. |
Contact ME |