
|
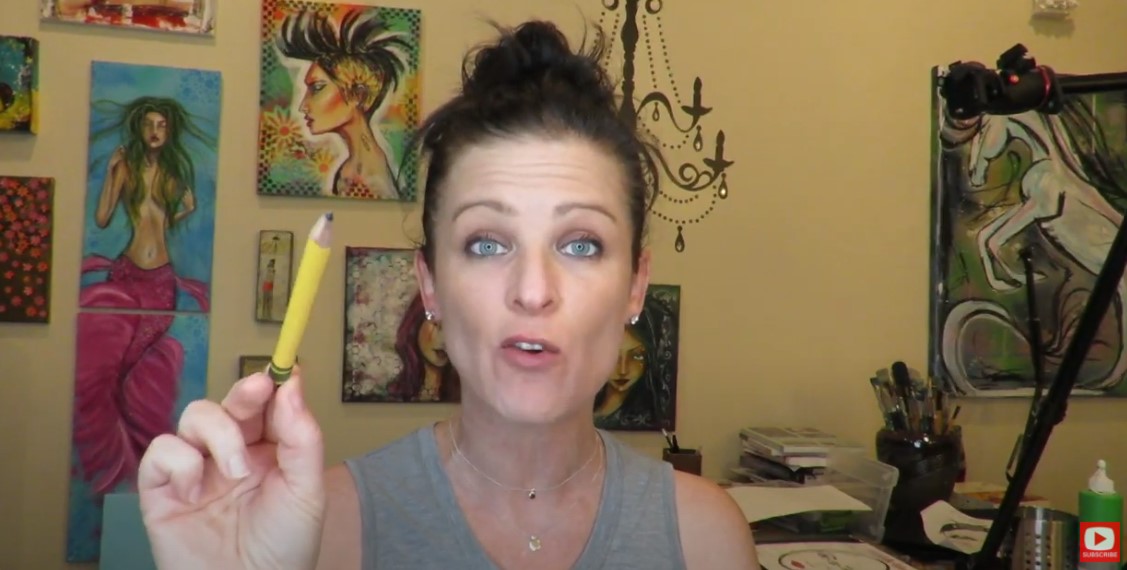
I LOVE teaching people just how EASY it is to draw a face EVEN IF THEY'VE NEVER DRAWN A FACE BEFORE! Don't have a sketchbook yet? Don't worry! We're gonna start with the basics. All you need is a number 2 school pencil and a piece of paper to get started.
If you're a baby beginner at face drawing- you're in the right place! If you've been drawing faces for a while and want to take your drawings to the next level, you're ALSO in the right place!
Either way - you NEED my FREE whimsical face drawing guidelines. They're super easy to follow, and will help you draw proportional facial features every time. Simply click the button below to request your free guidelines cheatsheet, and I'll email it right over! 
My free face drawing guidelines cheetsheet will help you with today's face drawing tutorial, and is exactly what I use each and every time I draw a whimsical or semi realistic face!
Once you print that out, grab a sheet of any paper you have on hand, a pencil, and eraser and let's get started. 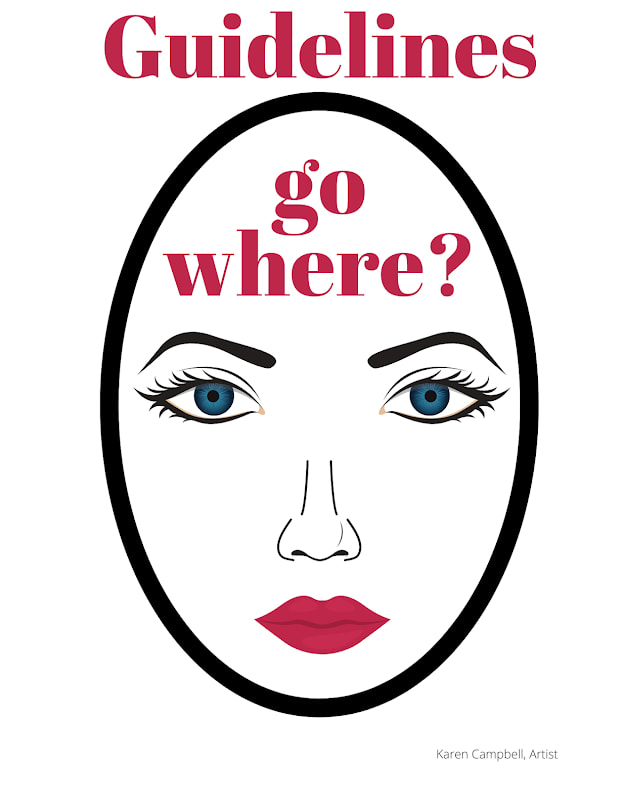
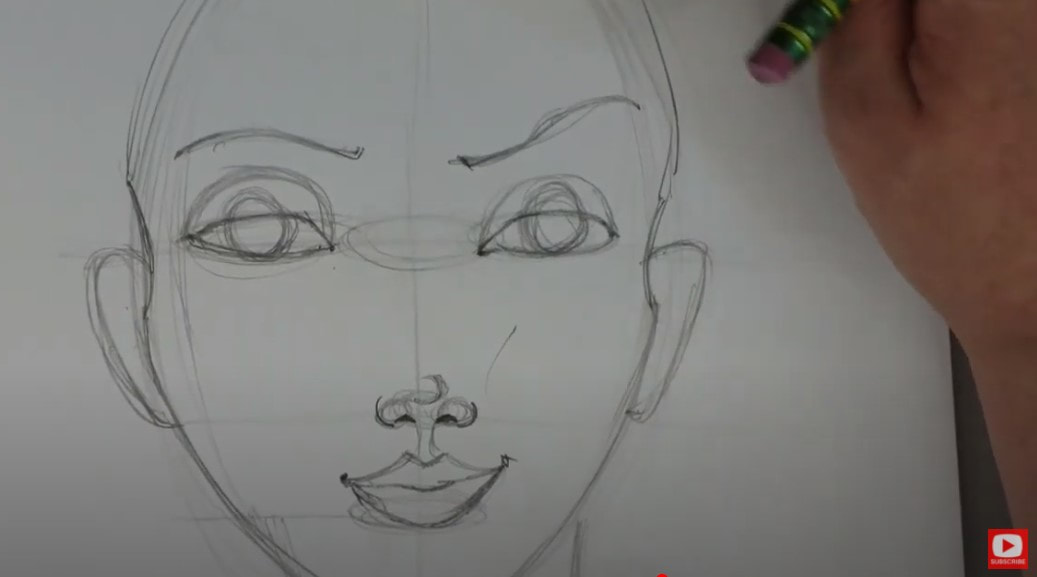
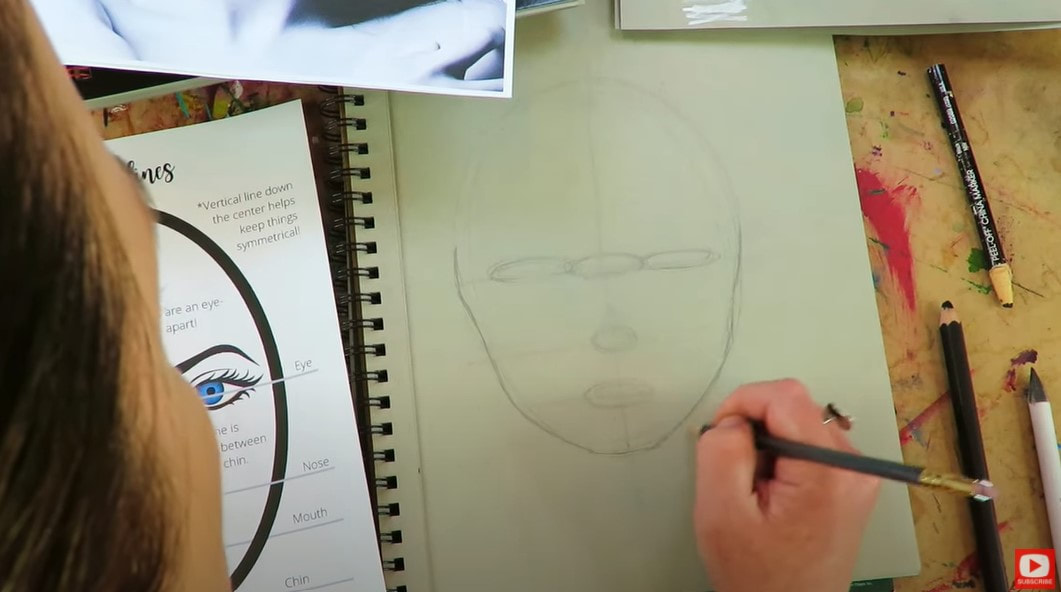
We start out by lightly sketching some large ovals on our paper. If you're totally new to drawing faces, draw as many as you need to - to warm up and get an oval you're happy with for today's face drawing project.
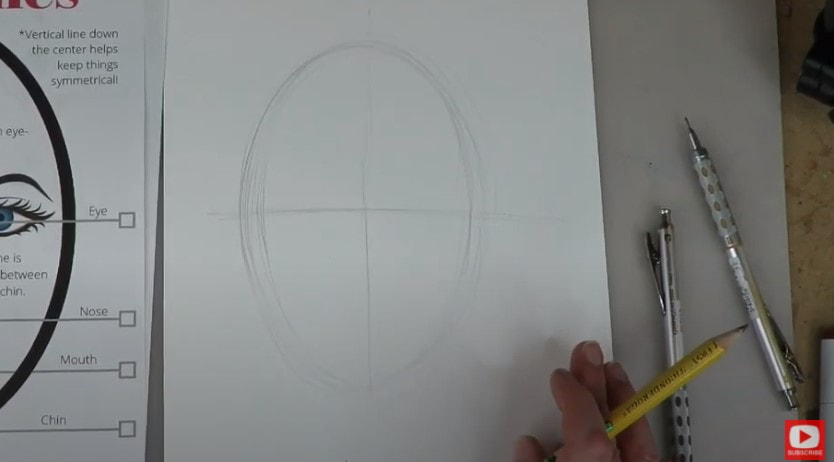
Next we're gonna simply sketch in the guidelines for where all the facial features need to sit on our oval. Even though I've drawn a zillion faces, I STILL ALWAYS sketch in my face drawing guidelines, each and every time because I dont want my faces to come out looking wonky. If I don't use guidelines, that's exactly what's gonna happen.
Once all my facial features have been penciled in, it's time to get ready to add some cute hair. Lots of people freak out about drawing hair, but I promise you - it's not nearly as hard as you think! Make sure you click over to the video so you see how simply this is in action.
The first step to drawing hair is to pick a part line - left, right or middle. Then you simply sketch in some lines extending from your part. Make sure they go up and over the head shape, and into the head shape space because hair has volume in real life, and doesn't just sit on top of our head line. We want to show that in our drawing.
Make sure you click over to the video to see just how easy this is! When your drawing is done - keep on watching so you can take your drawing one step further. First, we'll shade her and add dimension with pencil... 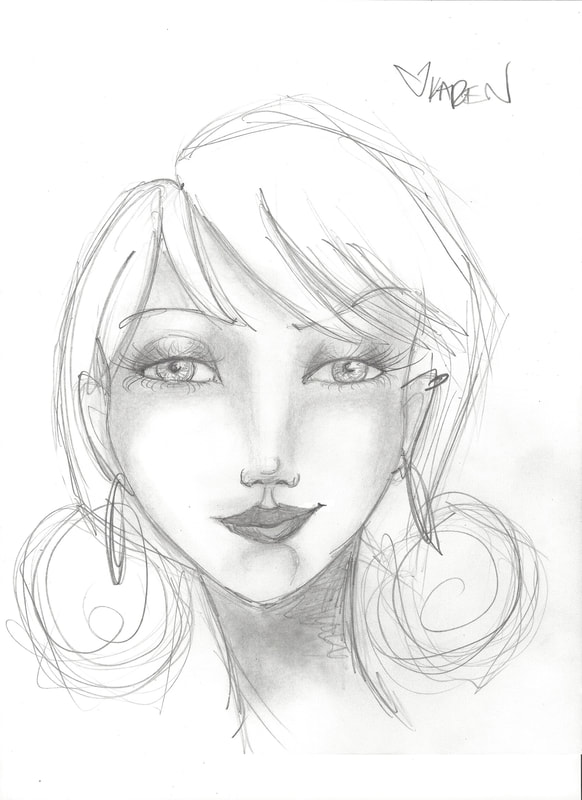
Then, I'll teach you how to shade a face using alcohol markers! 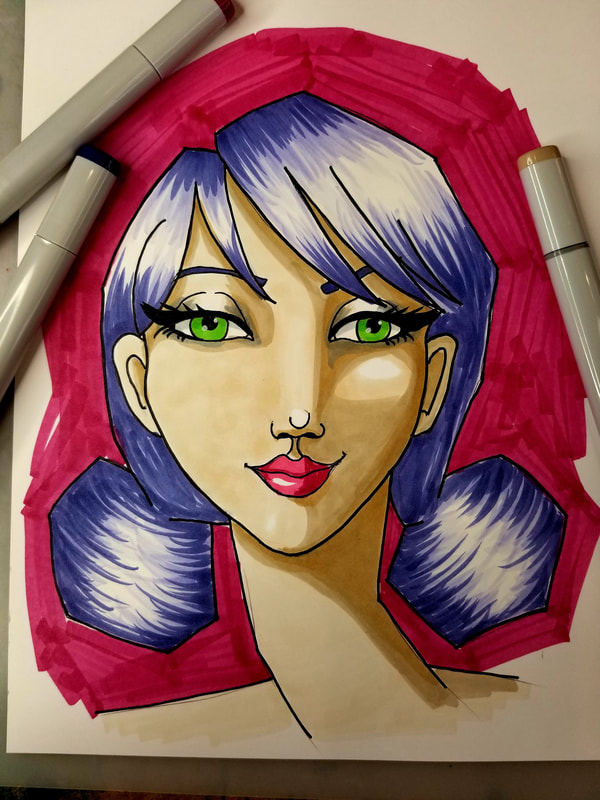
Thanks for hanging out with me today!
❤️ CHECK OUT ALL my art books on AMAZON ❤️ MY FAVORITE ART SUPPLIES on AMAZON ❤️ MY BELOVED FACEBOOK GROUP ❤️ FOLLOW ME ON INSTAGRAM
0 Comments
In today's face sketching video, we're building on what you learned about toned paper drawing over the last 2 weeks, and putting it ALL together to create a QUICK female face drawing!
We'll use my face drawing guidelines and identify the values we see in our face drawing reference photo. Then I'll show you how to shade your drawing + quick ways for drawing shadows and highlights using china markers, a pencil, blending stump and sharpies on toned paper! BEGINNERS WELCOME!!
Grab your supplies & come practice face drawing with me! 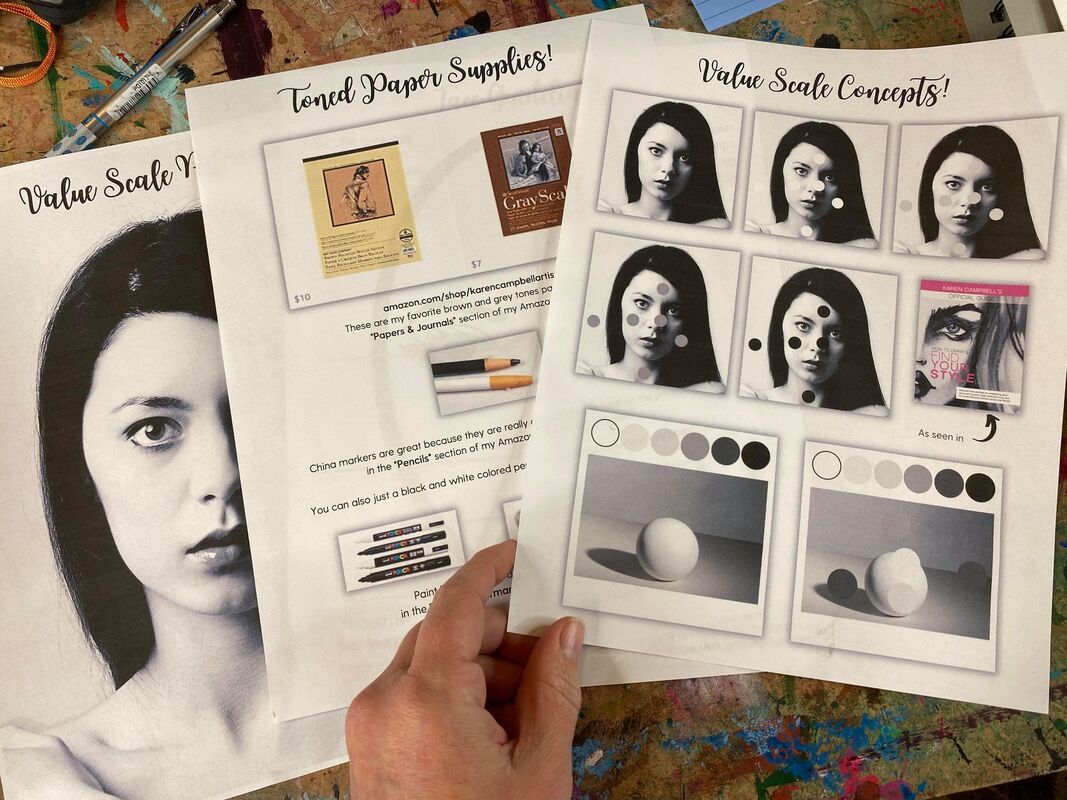
First things first, if you haven't grabbed my FREE Toned Paper Packet/cheatsheets- please do that and get them printed out. It's 5 helpful pages to set you up for toned paper drawing success!
You'll recieve my face drawing guidelines, along with a few reference photos for drawing a sphere (last week's exercise), a reference image for today & a list of my fav supplies if you need some!
Simpy click on this button and I'll send the cheatsheets STRAIGHT over to your inbox!
In Part 1 of this toned paper drawing series, we went over concepts and supplies for drawing on toned paper. Last week in Part 2 - we talked about how to draw and shade a sphere on toned paper, as well as the differencecs to keep in mind when working on toned tan paper or toned grey paper vs white paper.
I'm working on toned grey paper today because I think this is a bit easier for beginners who are getting used to value scale drawing. Before I start drawing, I scribbled some shading with a variety of pencils and marked which pencil helped me achieve which value on a scrap of toned paper, below. If you're new to toned paper drawing- I suggest you do this too so you have a reference for yourself that you can use while you draw. 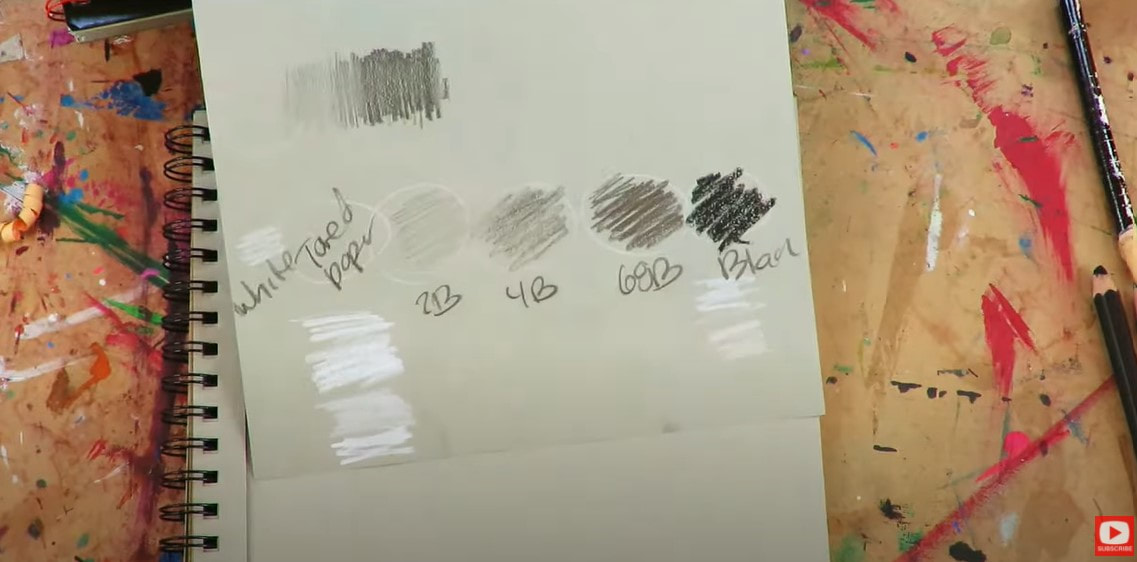
As we discussed last week, when you're drawing on toned paper- you're "responsible" for adding in ALL the brightest highlights and darkest shadows. The mid-tones are already represented for you by the tone of the paper.
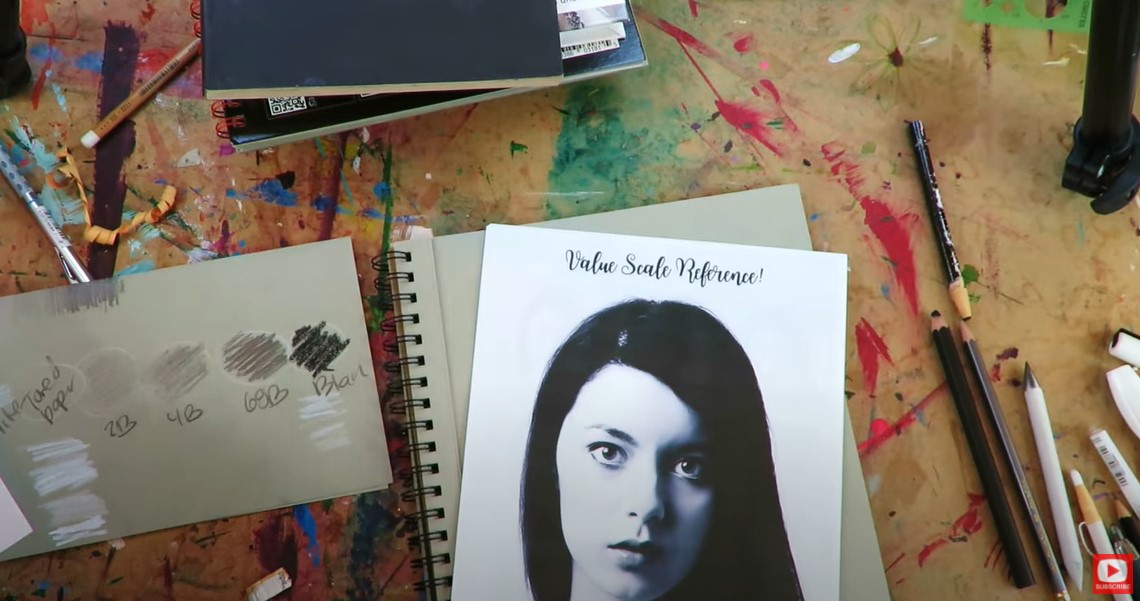
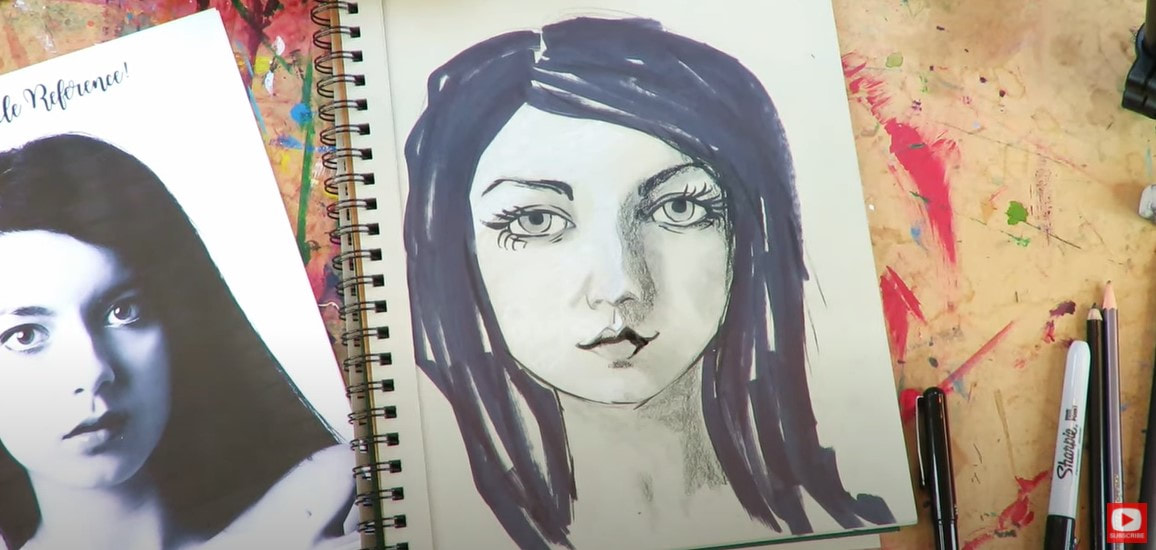
Once you get your Toned Paper Packet downloaded and printed- grab your reference drawing photo for today (shown above), and we'll get started on your free drawing lesson.
The face I'll be drawing isn't going to be super realistic because I typically prefer a lighter style called whimsical drawing. If you're new to my YouTube drawing channel - my goal is to help you become a better artist by keeping things FUN so nothing feels stressful. That means we don't get too hung up on details. 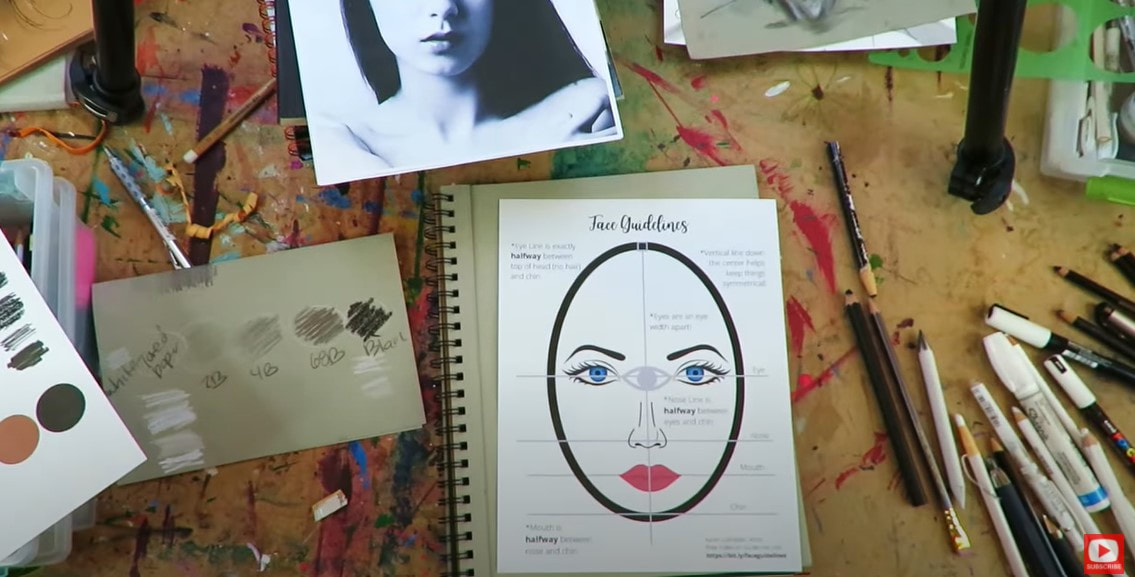
Make sure you click over to the video to do this face drawing lesson in REAL TIME with me because it makes SUCH a difference!! We're starting out with an oval and sketching in our face drawing guidelines - something I NEVER skip -even after all the hundreds of faces I've drawn!!
If you're somewhat familiar with drawing facecs and feel like you'd enjoy learning more about how to draw facial features more realistically, I have another FREE series you might enjoy (which also comes with free drawing worksheets). Make sure you check that out because it's awesome if you like drawing faces as much as I do!
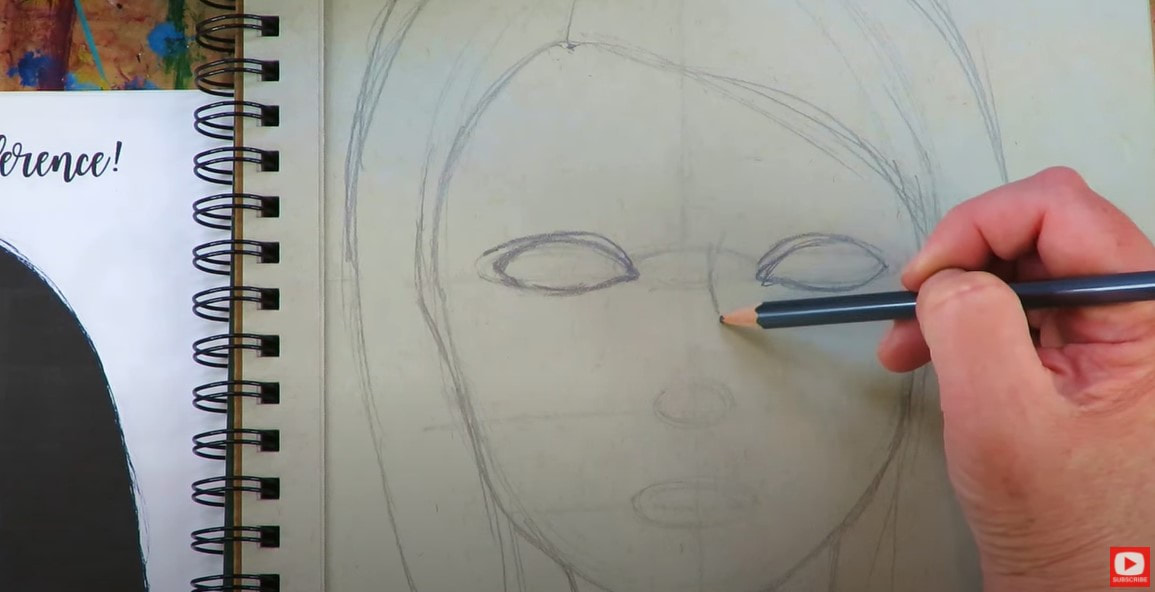
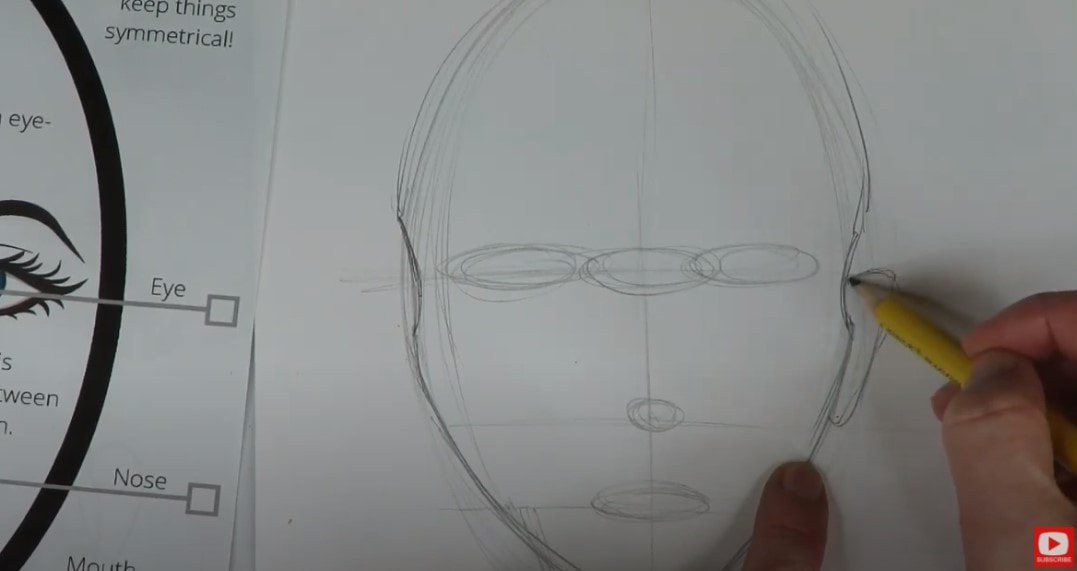
After you get your face shape and guidelines drawn, it's time to lightly sketch in some squished ovals to serve as placeholders for the eyes, nose and mouth.
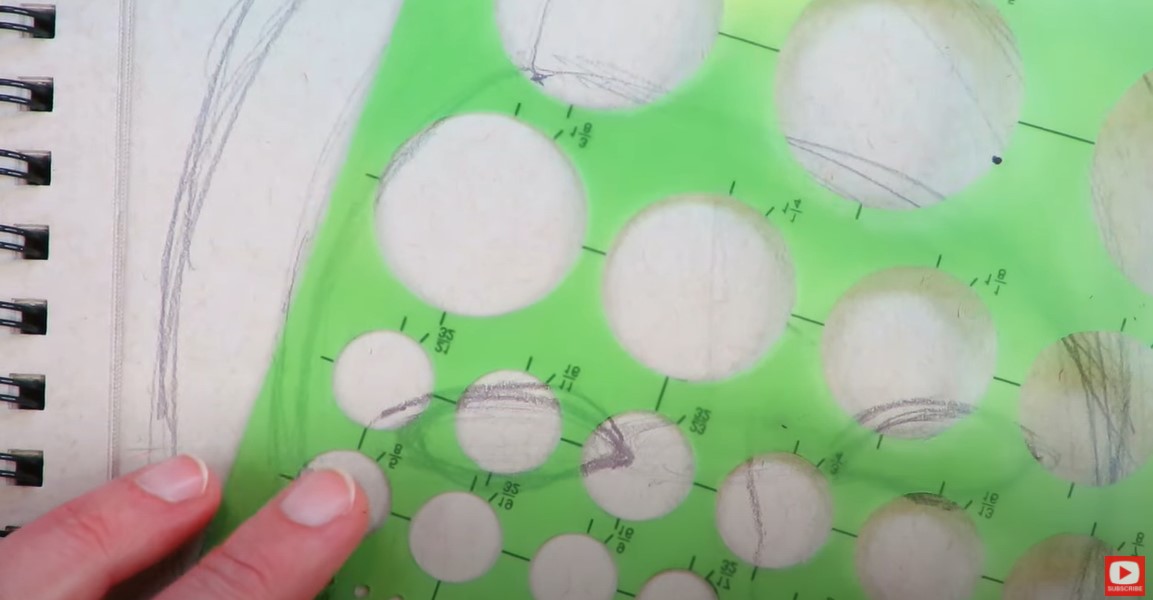
If you're just learning how to draw eyes, I LOVE using my circle template to draw the irises on my girls when I'm pressed for time, or not in the mood to draw perfect circles from scratch! If this little cheat helps you too - DO IT, and don't feel bad about it. Just move on and keep your drawing project FUN!
Make sure you click over to the video because I'm showng you exactly how to draw a face step by step, and will keeping things EASY for you if this is your first time drawing a face. The face drawing guidelines will help a TON! Trust me ;)
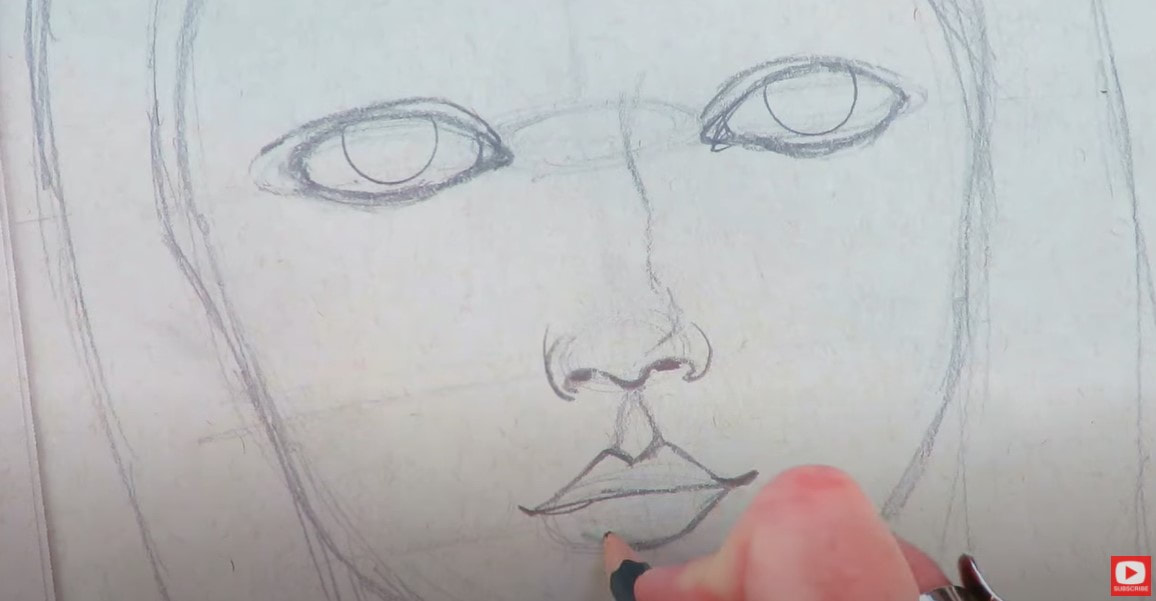
I also bring back my circle template/ stencil for adding pupils into the eyes. Make sure you pop those right into the center of your irises. I see pupils kinda all over the place, and this little tidbit will help make your faces look more sophisticated- especially if you're just learning how to draw eyes!
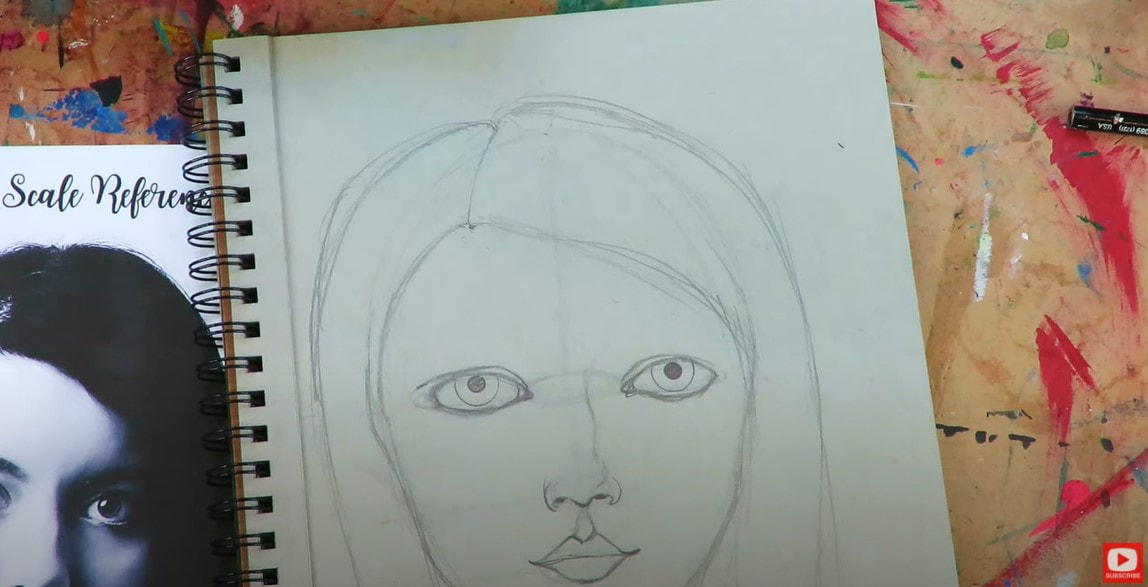
Once you've gotten all the facial features in position where they need to go - you can erase all of your guidelines.
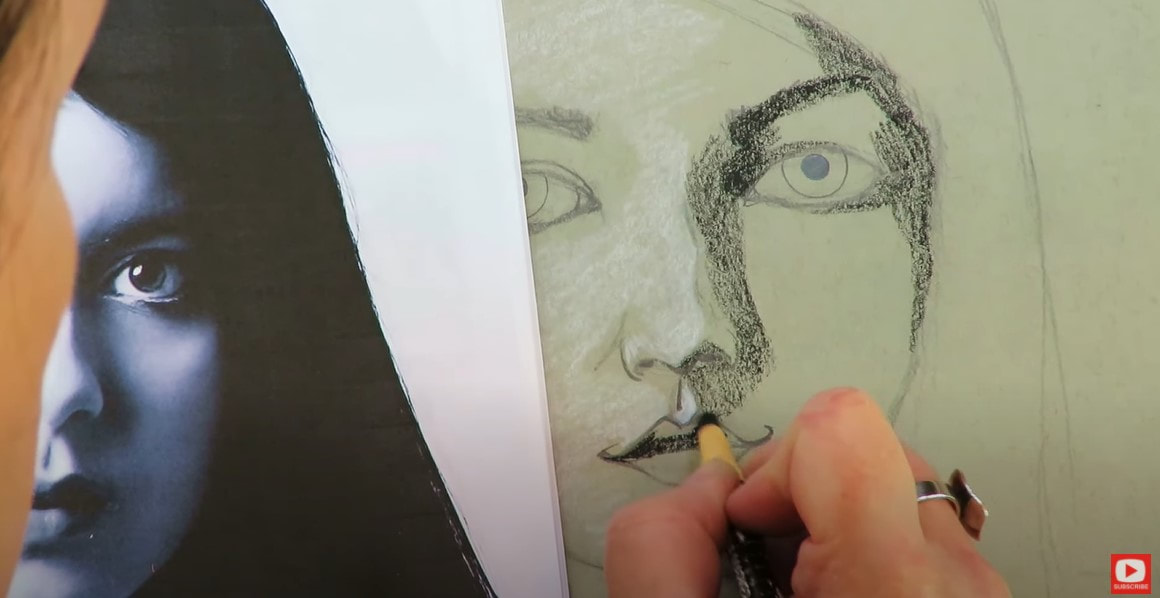
Follow me in the video to start observing the values depicted in our reference photo. As you'll see in the FREE Toned Paper Packet I've provided- there are some versions of the reference image with polka dots of gray that I've laid down to help you decide which pencil to grab when shading various parts of her face. 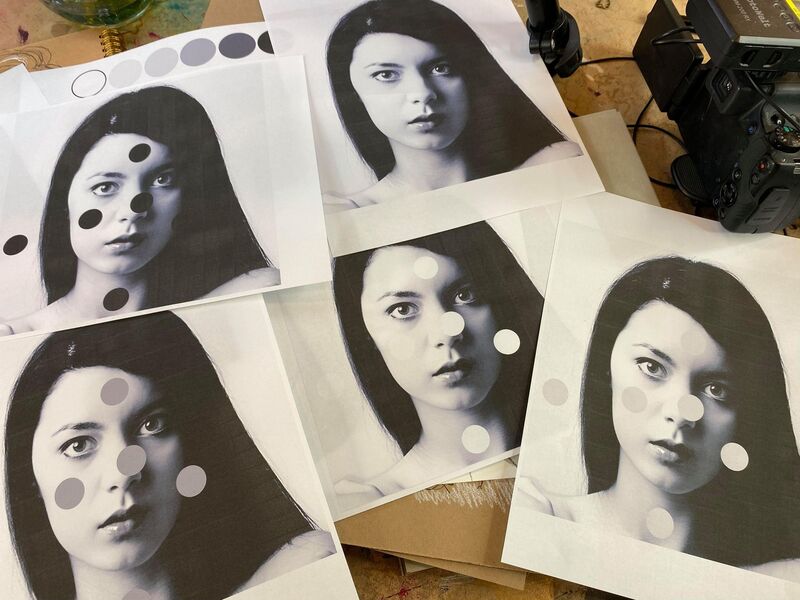
I love using my china markers (also called grease pencils) on toned paper because you can get really opaque coverage with them.
The only thing I don't love about my china markers is they don't blend - so just be aware of that as you head in to attack your shadows. If you haven't used a china marker before - here is another video for you. I demo how to sharpen a china marker in that video and in last week's YouTube drawing tutorial. For today's face shading, l'm starting with my white china marker to pop in the lightest white highlights first - which are really happening in the left side of her face. 
When you've finished with the whites- move on to your darkest darks with your black china marker (colored pencils are fine to use for this drawing exercise too).
Now when you take a step back to view your work a little from a distance, I don't want you to freak out if you're new to face drawing!
This girl is in what I lovingly refer to as "the ugly phase." It means she probably looks really unfinished and might have you second guessing if you should toss her into the trash because you feel like she is so ugly. DON'T DO IT. This is normal! EVERY face drawing has an ugly phase. Just accept it, know your project is about halfway done and KEEP GOING. Don't let the "ugly phase" win! Now that I've got a good base of my highlights and darkest shadows down, I'm going to work some graphite pencil in, and start moving some of the graphite around with my blending stump. 
Remember, china markers don't blend, but you can ease some of your shading transitions by adding some pencil and a little graphite blending with a blending stump.
I pulled out my sharpies and pentel pocket brush to add some hair and a few details into her face. She's starting to come to life and working her way out of the ugly phase. See?! I told you! You've just gotta keep going!! She'll snap out of it! A word of caution about the pentel pocket brush- it doesn't want to work that well over the china marker, but I'm doing it anyway because I LOVE it for drawing eyelashes. If eyelash drawing is a struggle for you, or you're just not sure how to draw eyelashes - download my cheatsheet with tips on how to draw eyelashes. I also have two videos on eyelash drawing - one on my YouTube drawing channel, and one on my mixed media YouTube channel. 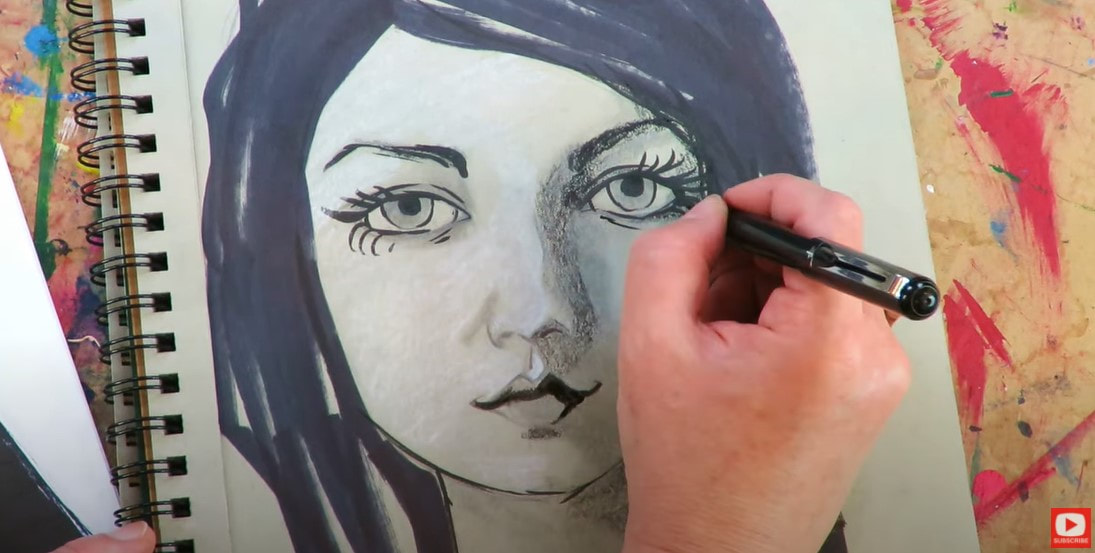
Once eyelashes are popped in, I step back a little to compare my drawing to my drawing reference. I'm not looking for perfection. Remember this is totally for fun and just a quick drawing lesson to help you get started with working on toned paper!
What do you see when you compare the two? Focus on lights and darks. Where can we add more drama to make her pop even more? Zero in on the lightest lights and darkest darks.
Get aggressive! Don't be afraid to dive in and make the black areas blacker. Do a second pass with your china marker, or pull out your pencil and darken what needs to be so you can move the graphite around with a blending stick to ease the shading transitions from light to dark. Remember, you can vary the amount of pressure you use when you're coloring with china markers. This is another way to soften shading transitions since you can't blend china markers with a blending stump. 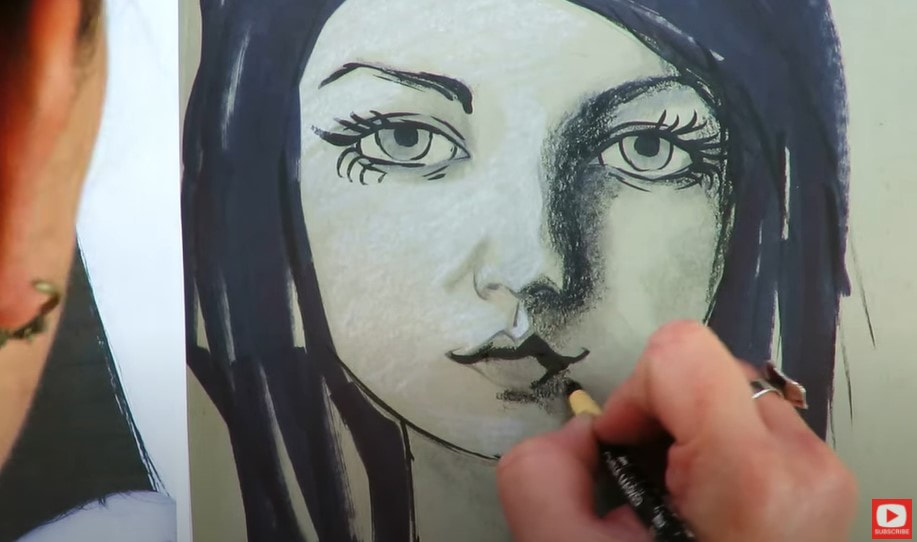
See how she's coming even more to life now that I've added additional shading? This extra layering makes ALL the difference.
Once I've finished with my darkest shadows, I pull out my white sharpie to help accentuate the brightest whites. Take a look at this!! 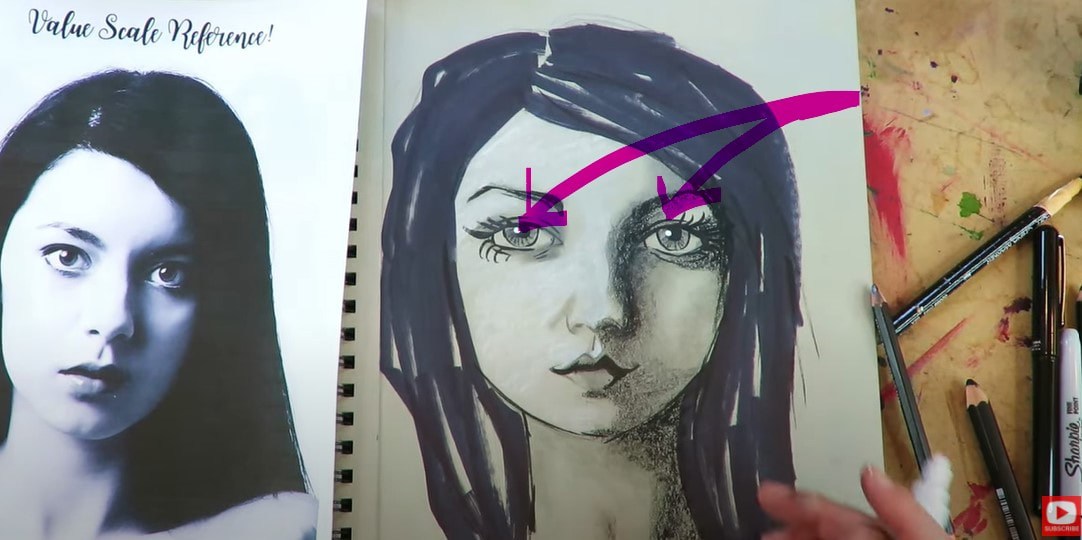
Just adding ONE dot to each pupil for some eye shine takes the whole drawing to another level of fun and makes her look more sophisticated. We could actually call her done at this point! Those two dots did THAT much!
If you follow me, you KNOW I love some dramatic face shading on my girls so I'm not calling her done yet... adding white paint pen is my favorite part and hasn't been done yet! 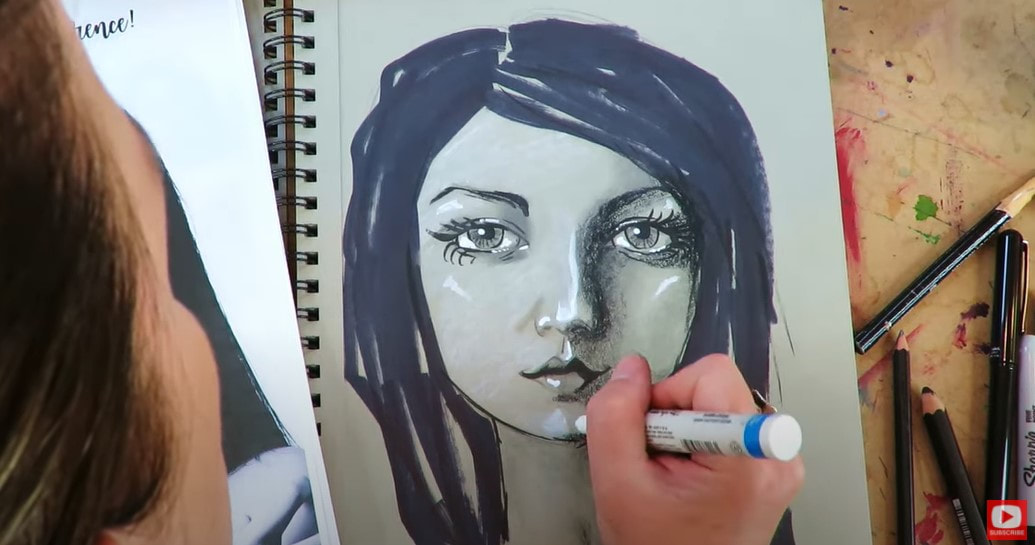
Because I'm doing a whimsical drawing, I look to my face drawing reference photo for inspiration about where to add my shadows and highlights. However, I absolutely feel comfortable stretching that a step further and adding a few marks where I know highlights naturally occur on the human face.
Watch the video to see that in action when I'm drawing highlights on the chin, cheekbones, eyebrow ridge etc. A really great trick for helping you understand where to pop in face shading is to pick up a foam head from your local craft store. Then just play with a light source - either a lamp, the flashlight on your phone - whatever! Shine the light directly on the foam head -forcing a variety of shadows and highlights you can follow. 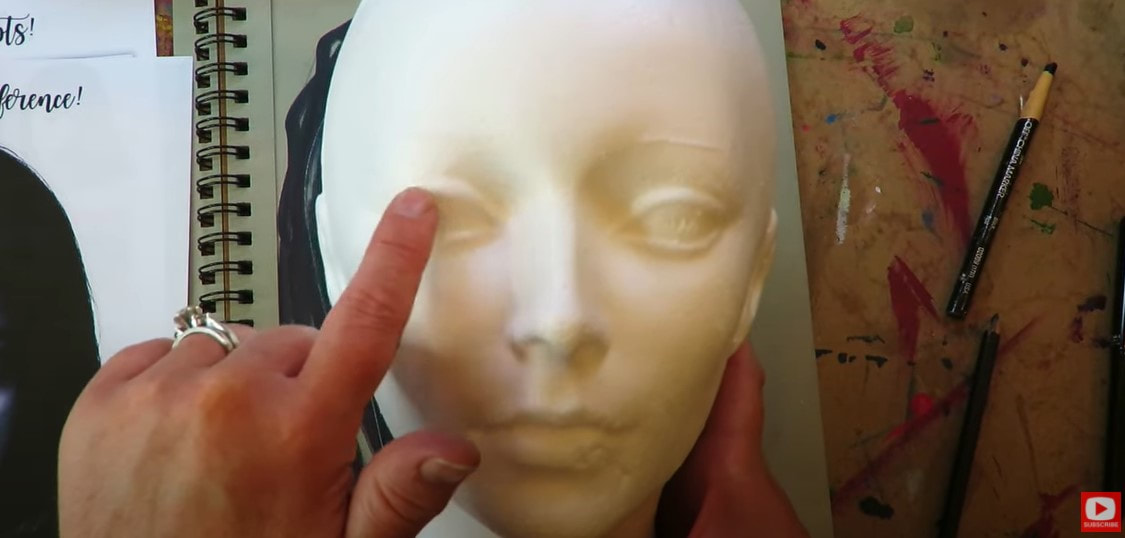
Alternatively, I've got a video taking a closer look at this concept to help you out.
Need that link again for the toned paper packet to get started on this entire tone paper drawing series on YouTube?
Click the button above, and I'll drop my toned paper packet straight to your email. (Includes my face drawing guidelines & today's face drawing reference image!)
Thanks for hanging out with me today!
❤️ Did you miss my Gnome Workshop with guest artist Sarah Turner of Tenderfoot Village? CLICK HERE to enroll for $27 at Awesome Art School (if you're in the Mixed Media Society - you got free access to this but NEED a coupon - if you don't see it in your email, please email me!) 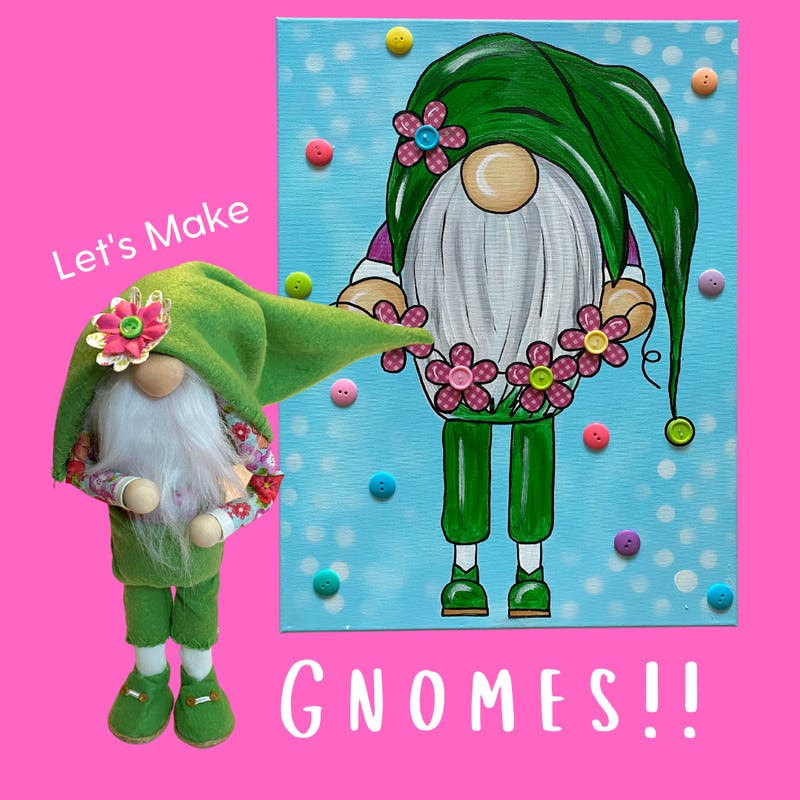
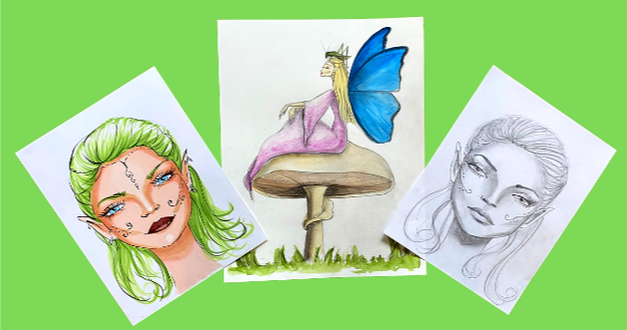
❤️Did you miss my Fun Fab Fairies Workshop? NO worries!! You can STILL sign up and enjoy each of these lessons on your own time at your own pace in this stand alone classroom at Awesome Art School! CLICK HERE to REGISTER.
❤️Did you know I've started a FUN new podcast with my Scottish, artsy bestie, Lucy, ALL ABOUT SCOTLAND & the mythical goodness I can't get enough of about this magical place?! YES - we talk about everything including ARE Fairies Real?! (You know I think they are!!)
The podcast is called 1 Scot, 1 Not! Check us out on YouTube and here's our podcast website! ❤️EVEN BETTER - LUCY & I are creating a NEW ART MEMBERSHIP together called The Celtic Collective!! Learn More & add your name to the waitlist here. 
❤️Want FREE, immediate access to my Fun Fab Drawing Club and/or Mixed Media Society plus discounts on all my art books, sneak peek at YouTube videos and new book content, behind-the-scenes fun and MORE? Join me over on Patreon today and get HUGE PERKS in return for a small monthly donation. ❤️ CHECK OUT ALL my art books on AMAZON (available in both Kindle and Paperback) ❤️ SIGNED COPIES of my art books on ETSY ❤️ MY FAVORITE ART SUPPLIES on AMAZON ❤️ MY BELOVED FACEBOOK GROUP ❤️ FOLLOW ME ON INSTAGRAM If you are just getting to know me... it won't take you long to discover I'm obsessed with all things Scotland, and fairies!! I love drawing their adorable, pointy ears and teaching students how to draw fairy ears. 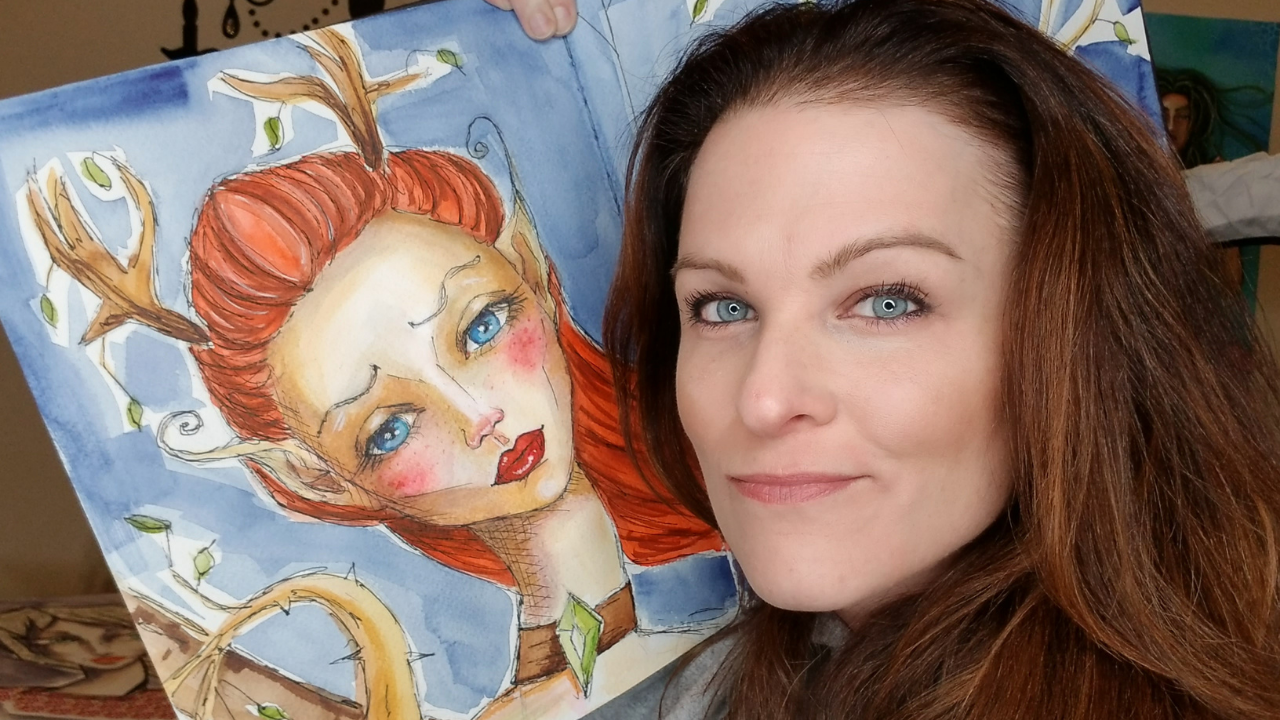 This is one of my art journal spreads from my Scotland art retreat last year. She's watercolor and ink! Since I can't go back to Scotland for a while, I'm amusing myself at home in my studio whenever I can with cute fairy projects. The other day I posted one as a new lesson for The Fun Fab Drawing Club! Club members are welcome to join at ANY stage of drawing experience to work on building new skills to really take their work to the next level. And of course, because this is my club - it's never stuffy or boring! I LOVE teaching students how to draw faces in a whimsical style to keep things light and enjoyable, without any pressure!! Fun Fab Drawing Club members who consider themselves beginners learn the basics of line weight and do a bit of zentangling to get them used to having fun making marks on paper. 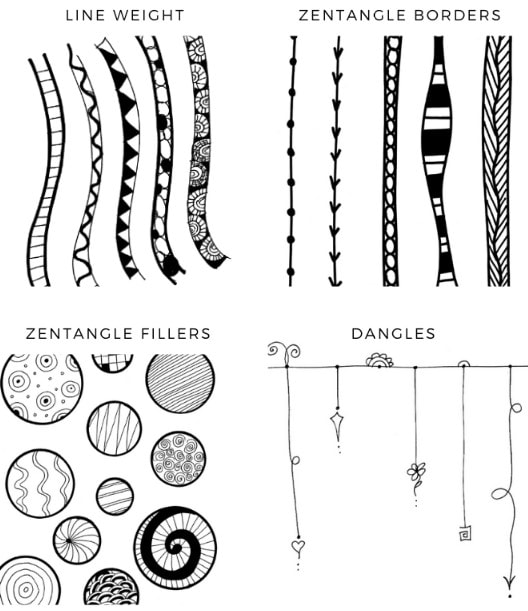 This month, I've added a cute new fairy drawing lesson for my Pixies - or anyone else who'd like to keep things easy, simple, colorful and FUN!! IF you're ALREADY a Fun Fab Drawing Club member, I've dropped this lesson into the Fantasy Classroom. 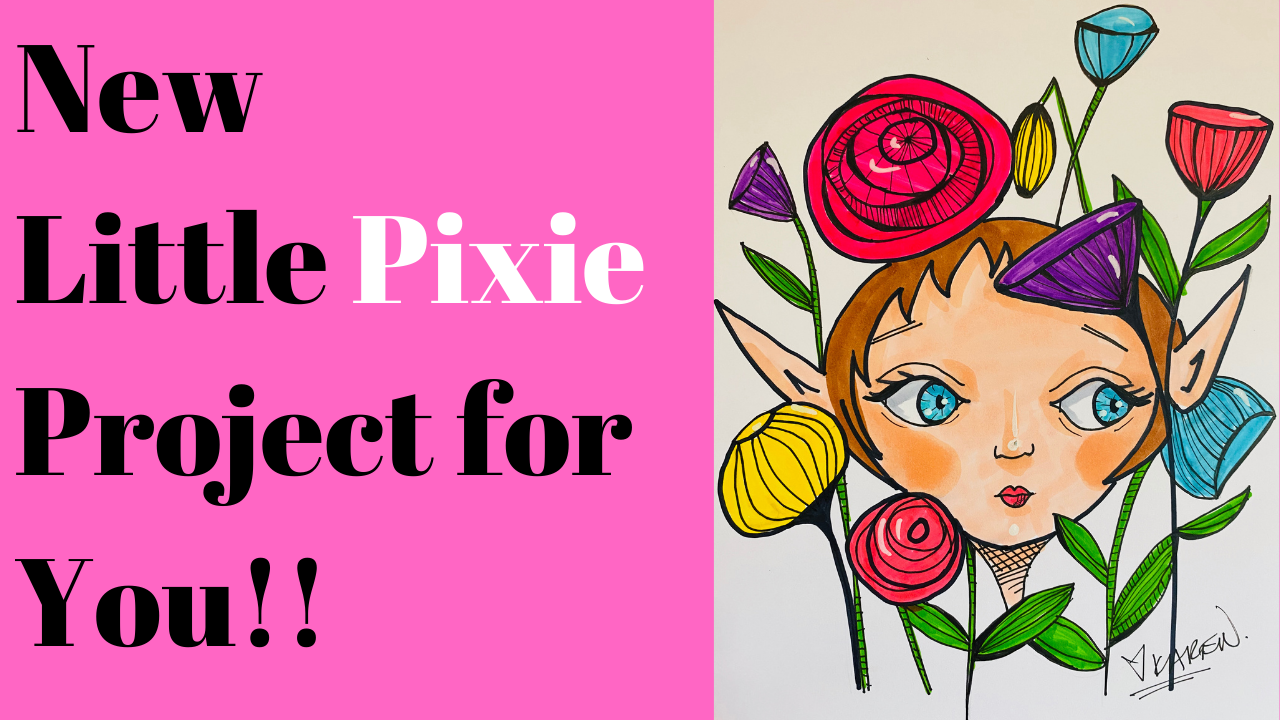 If you're not a member of The Fun Fab Drawing Club, and want to learn more about it and get your name on the waitlist to be notified when enrollment opens in the spring, just hop over to Awesome Art School! One of my favorite things to see on Facebook after a new lesson has posted, are all the amazing artists who share their interpretations!! Each one is special. I'm SO PROUD OF ALL MY STUDENTS!!! I need to brag on two of the first who shared their beautiful work... 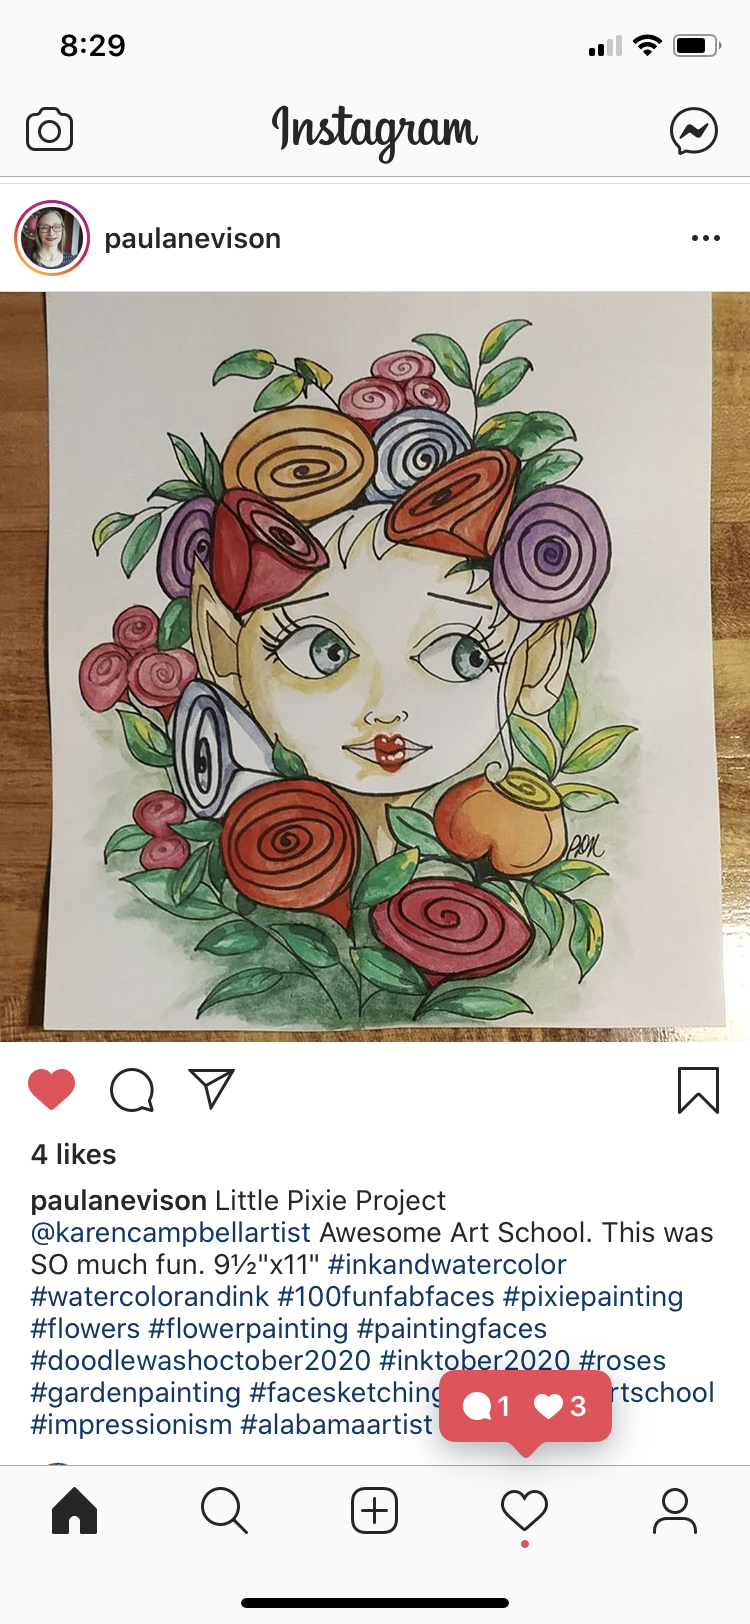 How CUTE is that?! She's precious, Paula!! I LOVE how she used watercolor instead of copics to mix things up! Debbie shared this one... 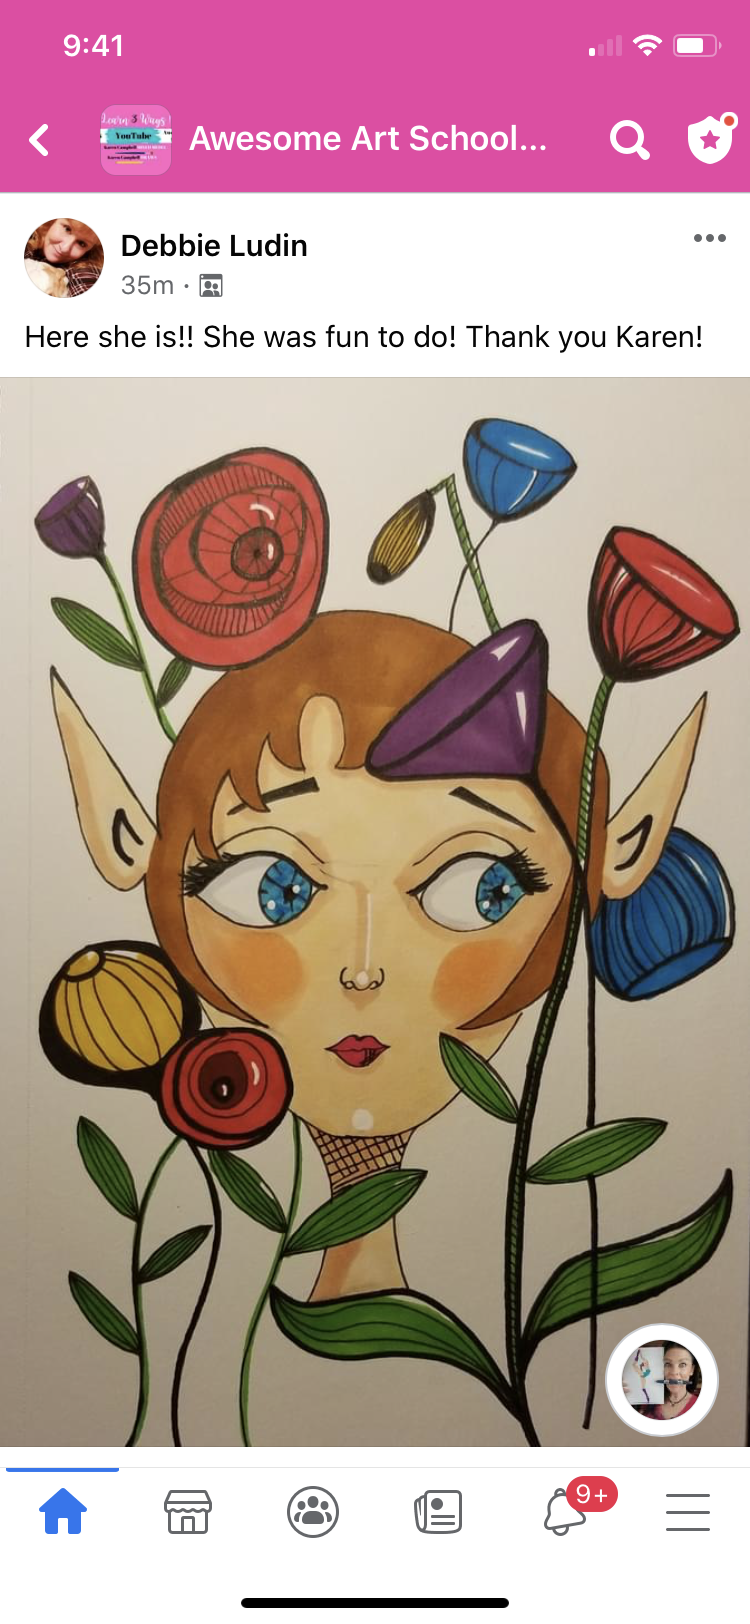 SO cute, Debbie!!! She is adorable!! Awesome highlights, girl!! Don't you wonder what she's looking at??? Thank you both for sharing and for letting me RE-SHARE your gorgeous artwork :) If YOU are interested in learning more about The Fun Fab Drawing Club - please pop your name on the waitlist over at Awesome Art School so I can send ya a quick note when enrollment opens. We'd love to have you there!!  If you need a little drawing inspiration right now - please feel free to jump on over to my Drawing Channel on YouTube. I've got tons of fun projects for you to try - including my new Whimsical Women of the World Drawing Series!! We are having a blast with that, and would LOVE to have you join us! All of these lessons are free on YouTube and are being posted once/week on Mondays. We'll have 12 Whimsical Women's faces when we're done. See ya there!!
Today we're doing some EASY pencil shading techniques to add drama to our three quarter portrait face drawing! This is part two of my 3/4 face drawing series on my Drawing Channel over on YouTube.
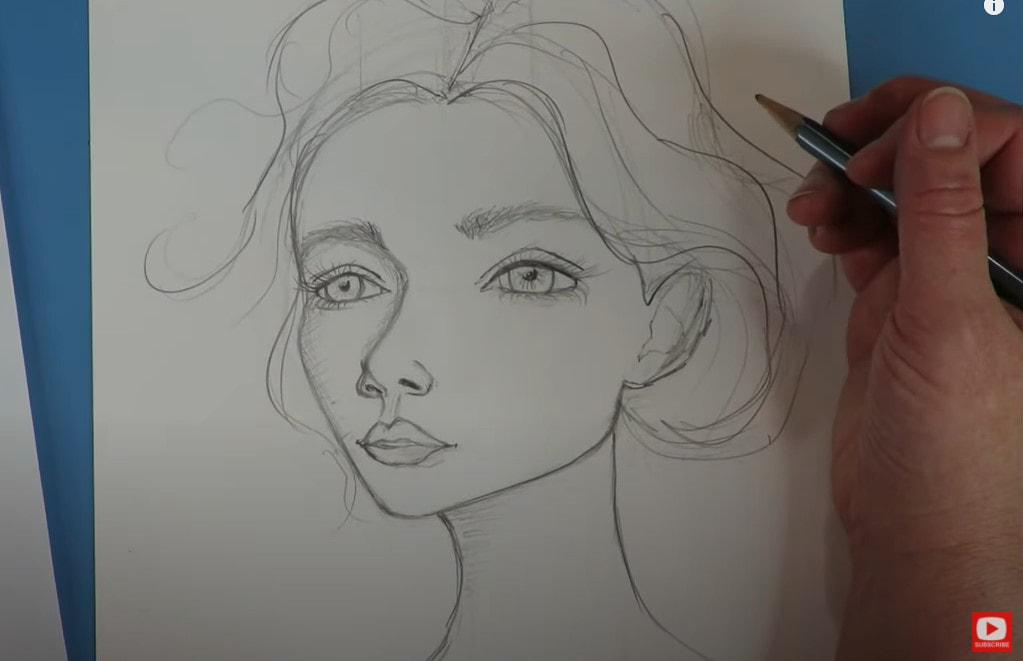
If you missed the first episode, make sure you click the button below to download my FREE 3/4 view face drawing guidelines so you can draw along with me in episode one.
Once you've got your three quarter portrait guidelines printed and you're all set to begin practicing, click here so you can draw this girlie along with me in episode one. When that video is over, today's shading video should begin automatically so you can keep on going!
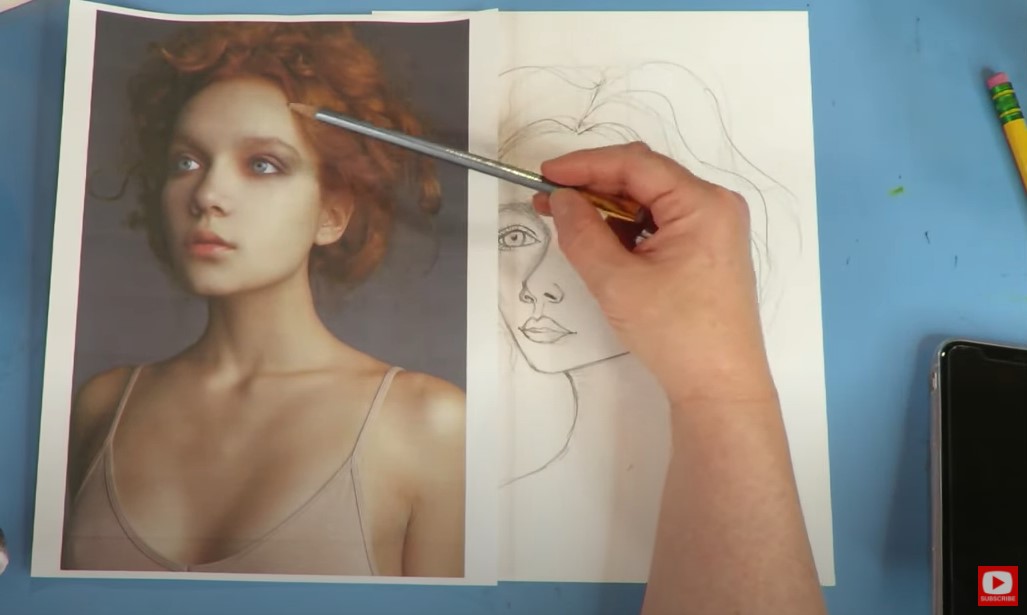
I used the same photo reference to give me some face shading ideas today as I did to sketch my original 3/4 portrait for this series.
Even though my drawing is semi-realistic / whimsical, I feel it makes a HUGE difference in my work if I use a reference photo to tell me where I should add in shadows, and how dark they should be. One of the fun things about drawing in a whimsical style, is I can mix and match reference photos for my work and use them in different ways. For example, I really LOVE the dramatic shadows and highlights in this image (below). If I'm shading a face in pencil, I feel like it's super helpful to use a black and white shading reference like this one... 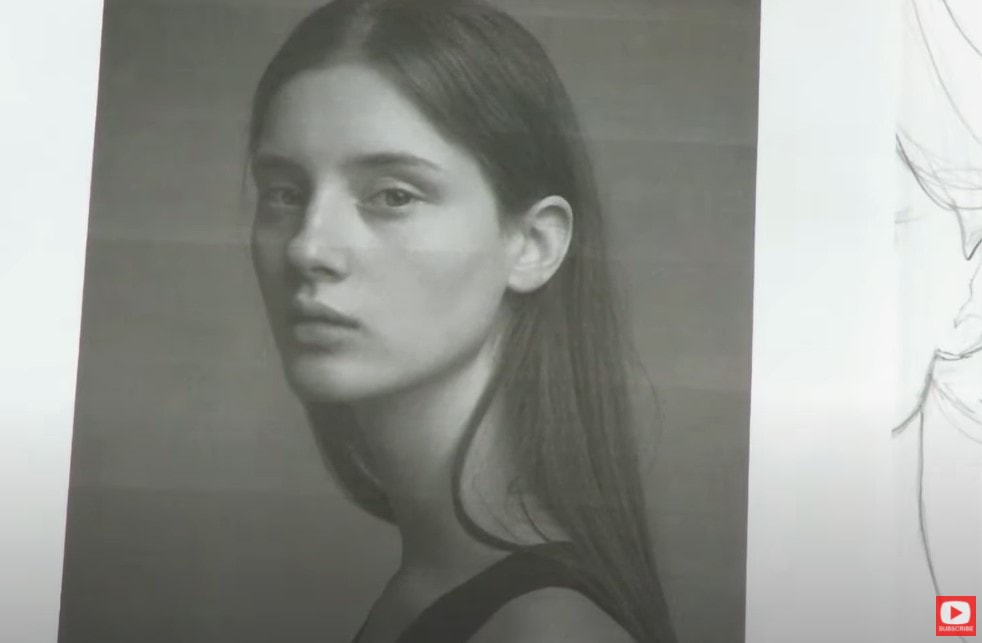
Before we continue, super quick announcement: All product links are Affiliate. I may earn a small commission if you choose to order through these links but by law there is never any additional cost to the consumer for doing so. I thank you for your support.
In my How to Draw and Find Your Style book, I talk in depth about how to take advantage of the value scale when you are shading, because it adds so much more depth and dimension to your drawings and sketches. The more tones you incorporate into your drawing from the value scale like bright white highlights, and dark black shadows, the more sophisticated your work will be.
In today's shading tutorial I'm using one of my Blackwing pencils (TOTALLY unnecessary, but I SO LOVE THEM!!!). This one is equivalent to about a 4B, but you can absolutely use a simple #2 school pencil, so don't stress about your supplies! I start applying graphite by looking at my reference photo for the darkest areas first. When I'm shading, I often use the side of my pencil to begin. My initial layer of shading is very light and almost scribbly. After I have a light layer of shading down, I use my blending stump to "moosh" the graphite around. In this particular reference photo, the model is very light skinned, so I actually use the cleaner side of my blending stump to work my shading in and around the face. If I lay down too much, I simply pick a bit of that graphite back up with my eraser and moosh some more! For the darkest areas, I use the super dirty side of my blending stump. 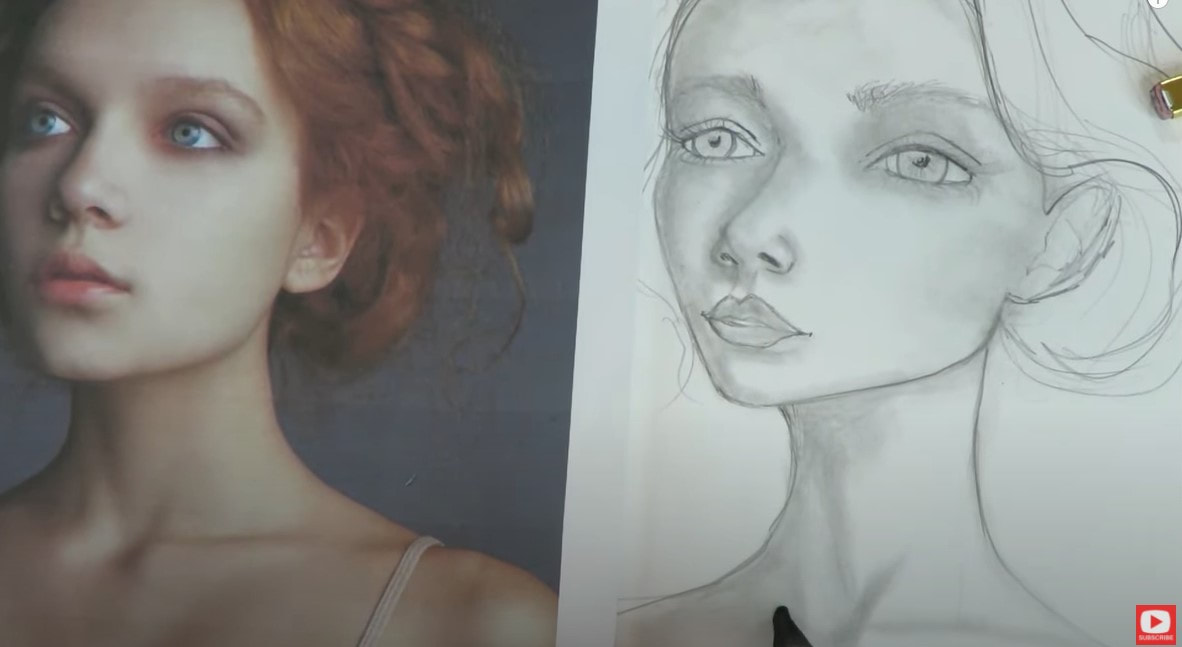
When you're starting out with drawing and shading, I think it's SOOOOO much easier to practice in a whimsical drawing style. It just takes the pressure off and keeps things light and fun! And if you're having fun...you'll practice more, and if you practice... your skills will only grow and improve!!
When my first layer of shading is done, I go back for a second layer of shading to really punch up my details that could have been lost while "mooshing" my graphite around with my blending stump. This is where the drama starts to come in!! Sometimes it can also help you to look at a reference photo with squinted eyes. It may sound funny, but doing this can often help you see darks and lights a bit more. The objective of shading for me is to use the WHOLE value scale. So you'll see me use a black colored pencil for the darkest darks - found in the crease of her lips and in her pupils. Additionally, for my brightest white highlights, I will typically carve out some of the graphite I already put down with an eraser. 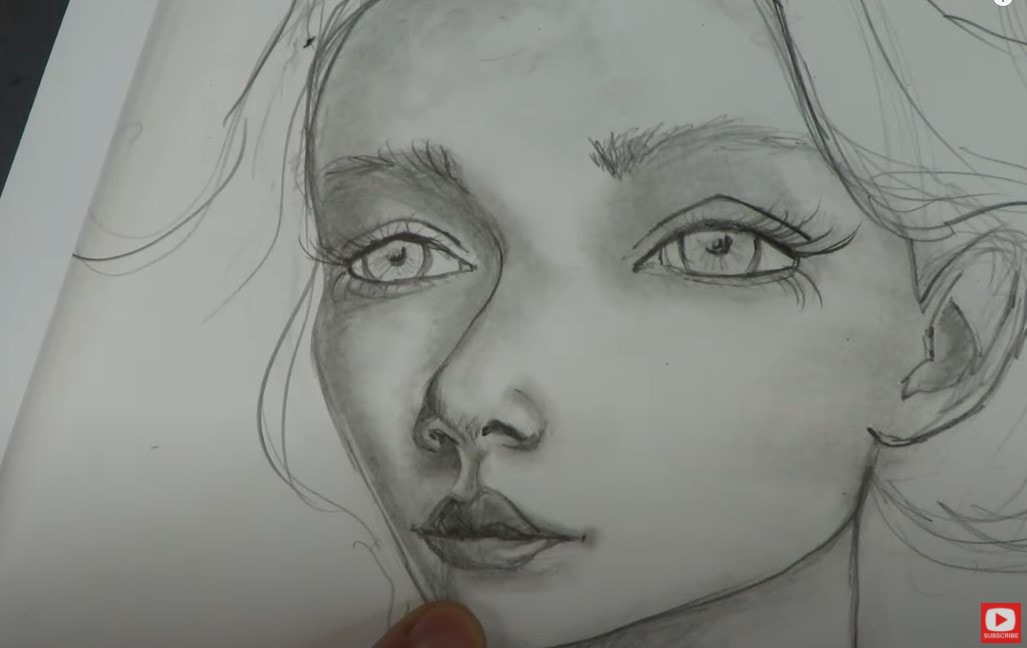
I hope you have fun with this face shading practice!! Please stay tuned for next week's video. I'll be shading another 3/4 portrait using copic markers.
Thanks for hanging out with me today!
Wanna learn more about my How to Draw & Find Your Style book? Press play below to see the flip through of EVERY PAGE! I've been a full-time working artist for 15 years! If you've been wondering how to become an artist, how to become a better artist, or if it's too late to start your own art journey, you NEED to watch today's YouTube video on my Mixed Media channel, because that is EXACTLY what I'll be talking about!!  Would it surprise you to know that I don't sell ONE SINGLE PIECE of my art? I don't!! So WHY do I make art and spend all of my time and energy on TEACHING art with a team of people behind me? Because I know the way art makes us FEEL. It can have a HUGE impact on our own lives and the lives of others. You might find it interesting to know that becoming an artist was NEVER even on my to do list when I was growing up!!  Not for one second did I even consider becoming an artist! I grew up thinking art was a hobby - no more, no less. So how did I get where I am today- with two YouTube channels, an online art school, and 12 art books already under my belt?! I got into art later in life because I got addicted to the way it made me feel when I spent time being creative. If I was having a bad day, stuck home when my kids were little and I was changing diapers and wanted to cry, the minute that I sat down to draw, sketch or paint, all of those feelings melted away. It was like a drug. There was a transformation that happened inside of me - in my brain, in my soul, in my heart...and it made everything ok again. Art gave me ALL the FEELS inside, and was something I craved because this goodness washed over me every single time I sat down to create. These amazing feelings are what I hope ALL my students can experience, and they're WHY I spend SO much time coming up with cheatsheets and shortcuts and break things down step by step for my online art classes - because I want my students to get to their happy place TOO, and to get there even faster than I did!! 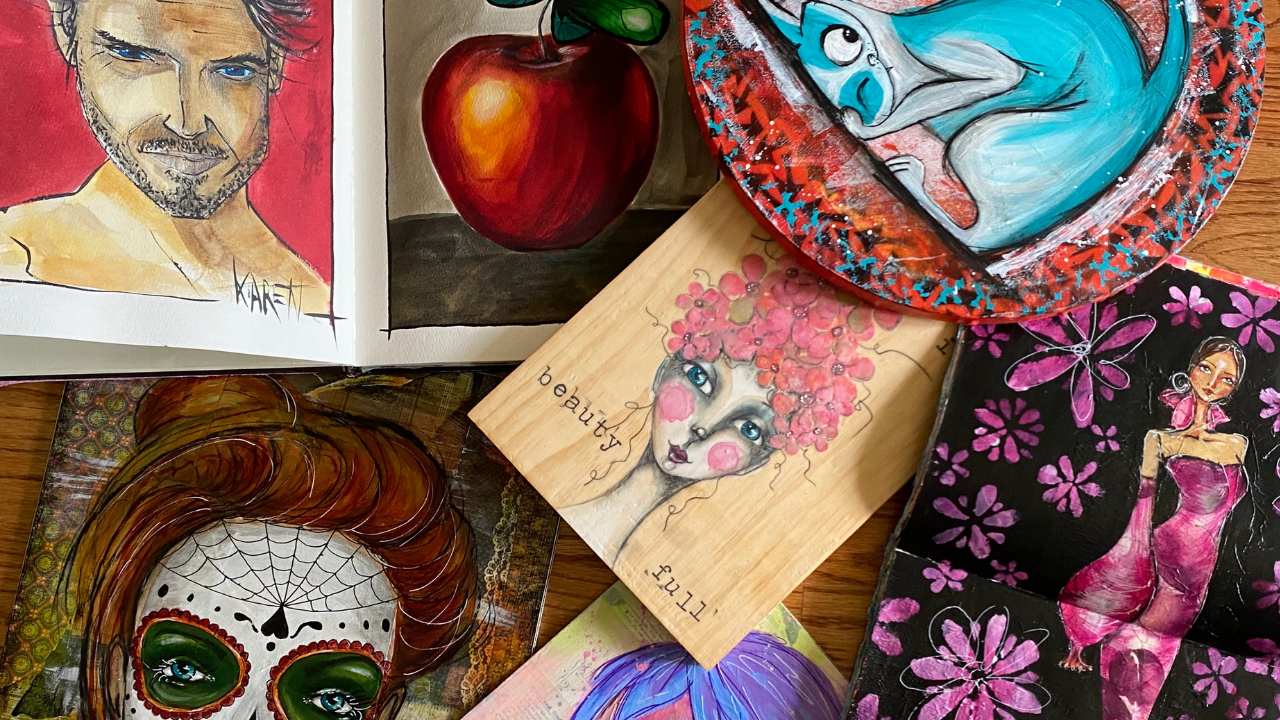 I became a good artist by default. Because ALL the chasing of those good "happy place feelings" lead to practice, and all of that practice lead to really great results. Why does that matter? Because I grew up believing people who made art were BORN with talent. I didn't even entertain the thought that I could make art because I didn't think I was born with that talent. Yet here I am, a successful working artist impacting students who are now making masterpieces of their own. So how does that happen?! This is my philosophy on what happened... if I CAN LEARN to be a good artist... so can anyone!!! SO CAN YOU!!!!! 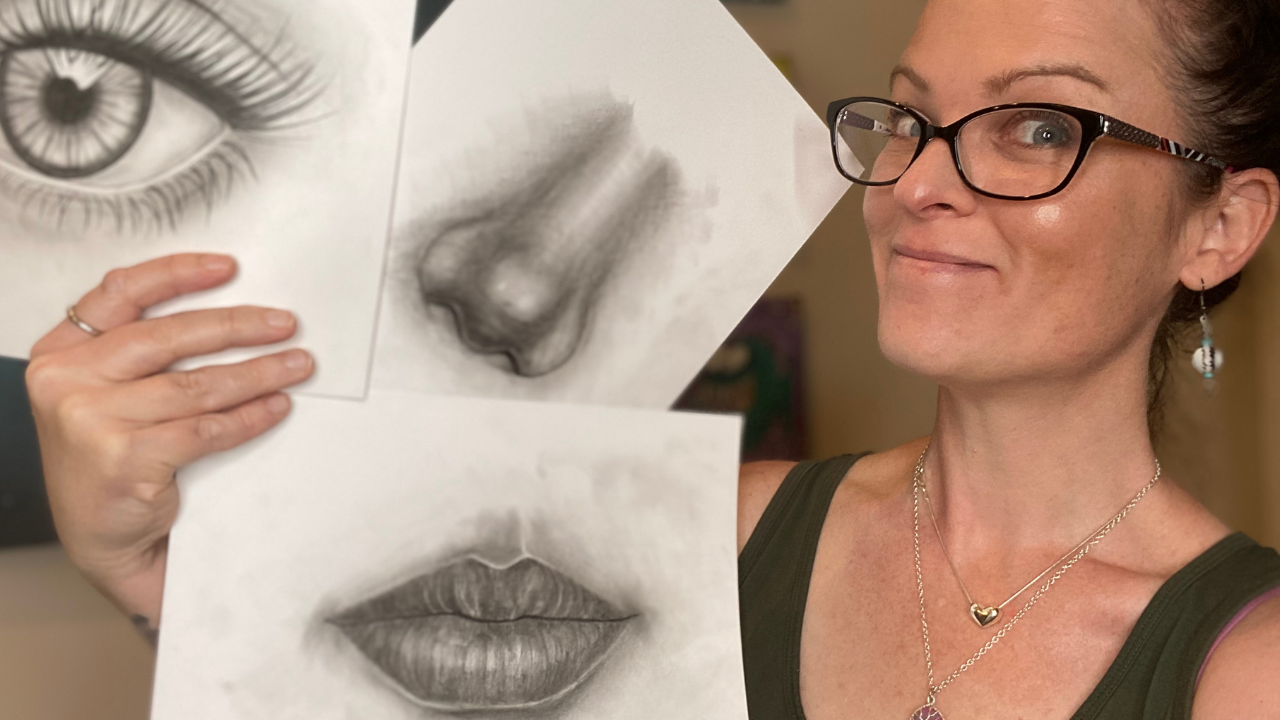 After you watch today's video, make sure you sign up to join one or both of the art challenges I'm running next week. They start on MONDAY!!! ✅ SIGN UP for my MIXED MEDIA CHALLENGE ✅ SIGN UP for my DRAWING CHALLENGE Now press play already for today's video so I can show you how YOU can become an awesome artist too ;) I can't wait to show you!!!! When I discover an EASIER way to draw something, I immediately create drawing guidelines for my students so they can HAVE MORE FUN in their sketchbooks!! In today's sketching tutorial, I'll lead you through 2 EASY WAYS for sketching heads in the tricky, but sophisticated 3/4 view. Like usual, I'm gonna show you how to draw this tricky view from the WHIMSICAL drawing perspective FIRST, because it TOTALLY takes the pressure off! We are using a page from my drawing book, How to Draw MORE Fun Fab Faces as our cheatsheet to help us today, because these are PERFECT for beginners ;) If you'd like a copy of my cheatsheet, please make sure you request one in the comments of today's video and I'll get that RIGHT OVER!! 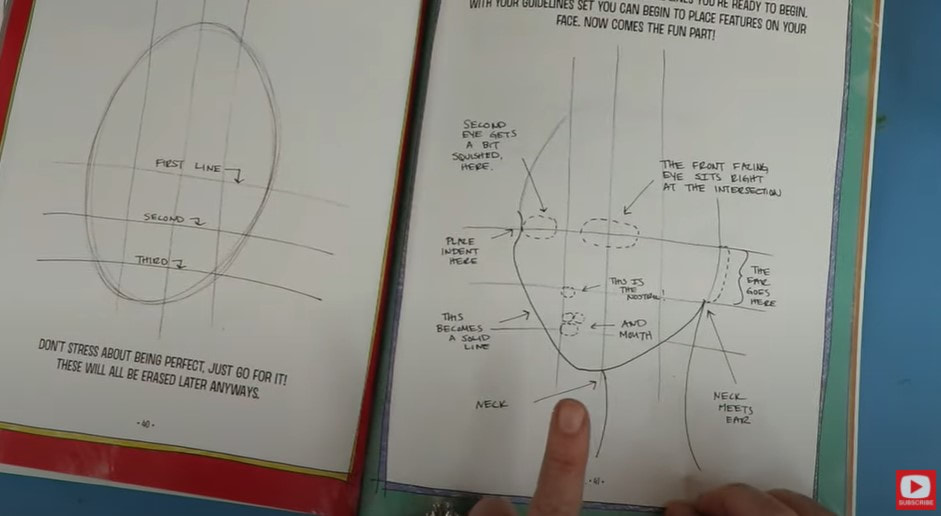 Before we start drawing, I'm going to show you with a reference photo and sheet of trace paper just how my drawing guidelines look on top of a real face so you have a strong point of reference before we begin. I'm a visual learner and assume you probably are too if you've found your way over here to learn about how to draw faces!! 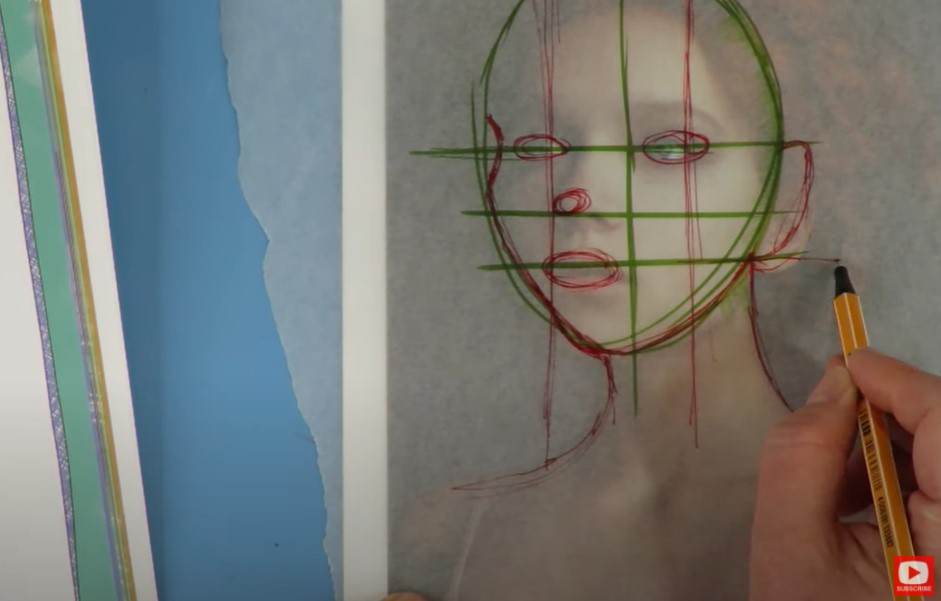 Using references is INSANELY helpful while you're drawing, even if you aren't doing a realistic style drawing. These photos can help us add greater detail to every aspect of our drawings from the features of the face to hair, and eventually shading. 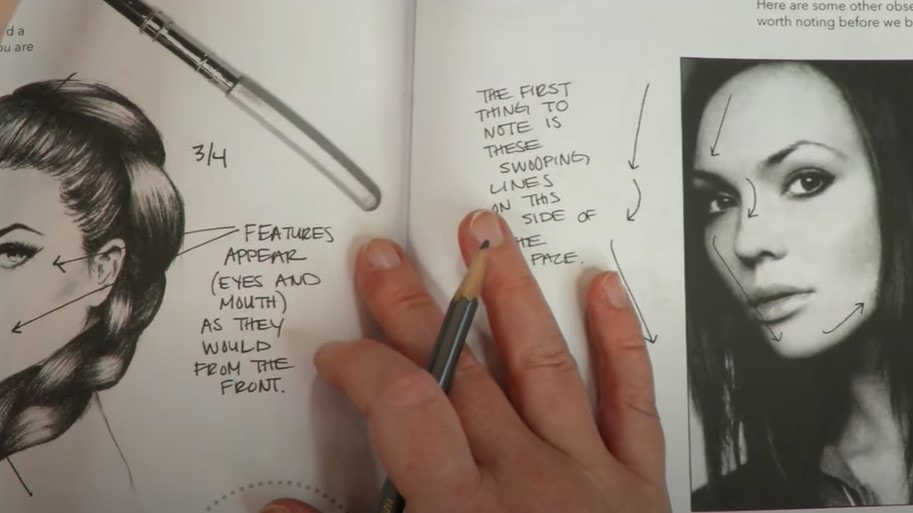 The second way I teach how to draw a 3/4 face is from my book, How to Draw and Find Your Style. In this approach, we don't really use the grid guidelines, we kind of approximate with a circle to indicate the top portion of the head, and swoop in with a soft V off to the bottom left of that for the chin. 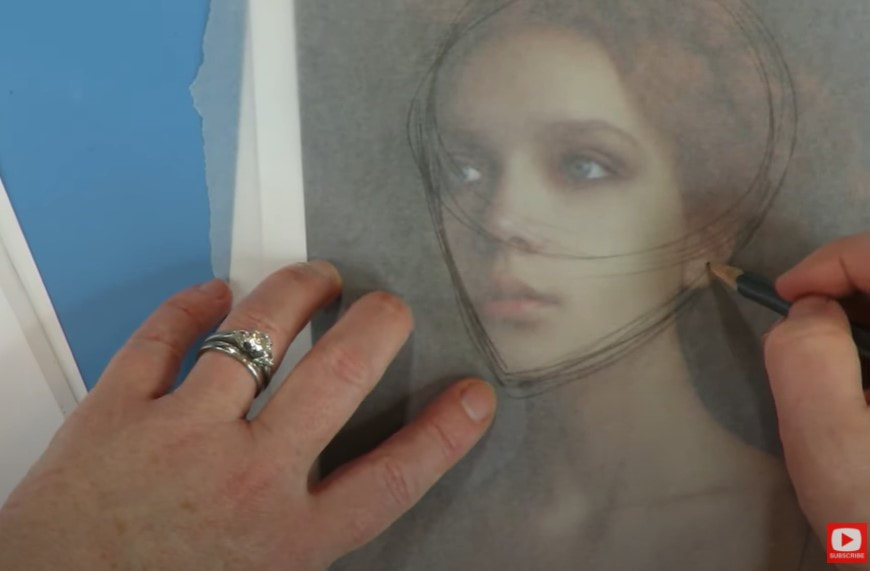 I hope you enjoy today's lesson and find these approaches to the 3/4 face helpful for your drawing practice!! After you draw a 3/4 face with me, make sure you head over to Awesome Art School to sign up for my TWO SUPER FUN challenges that begin NEXT MONDAY, September 21st!! Here are the links .... ✅ CLICK HERE to SIGN UP for my DRAWING CHALLENGE ✅ CLICK HERE to SIGN UP for my MIXED MEDIA CHALLENGE Each challenge is going to run for 5 days and kicks off open enrollment for The Fun Fab Drawing Club & Mixed Media Society! SOOOOOO .... if you've been waiting for these clubs to open up - your wait is almost over!! We're having a blast and hope you come join us!!!! ❓ NEW to Face Drawing? I got you!! Start here https://youtu.be/pthkYGBpssU See ya next week! |
Karen CampbellFounder of Awesome Art School. Mixed Media Artist. Author of 19 Instructional Art Books! 
Whose work has appeared in...
   
 Archives
July 2024
Categories
All
|
 RSS Feed

"Karen is flipping hilarious and she's very real...I like the way she teaches in a way that really gives you confidence, whether you're a beginner or advanced there's always something new to learn!"
- Elizabeth W. |
What Fans Are SayingKaren, you are absolutely fabulous! You make me feel like I can draw anything. I have recently retired and finally have the time to do some of the art that I have loved since I was in school. I am really at the beginning of my art journey and I hope to learn as much as I can. Thank you for all you do. |
Contact ME |