
|
While I was creating a lesson for the Fun Fab Drawing Club the other day, I was having so much fun, I decided to do a similar lesson as a Draw Along party in my Facebook Group!
In case you missed that, or aren't on Facebook, I'm dropping the video on my YouTube Drawing channel as well :) Today's FREE martini glass drawing lesson has a little twist to give us a teensy challenge... 1. No drawing in pencil 2. No drawing freehand Sound fun?! Let's get started!! 
Before we continue, super quick announcement: All product links are Affiliate. I may earn a small commission if you choose to order through these links but by law there is never any additional cost to the consumer for doing so. I thank you for your support.
Drawing Supplies for Today
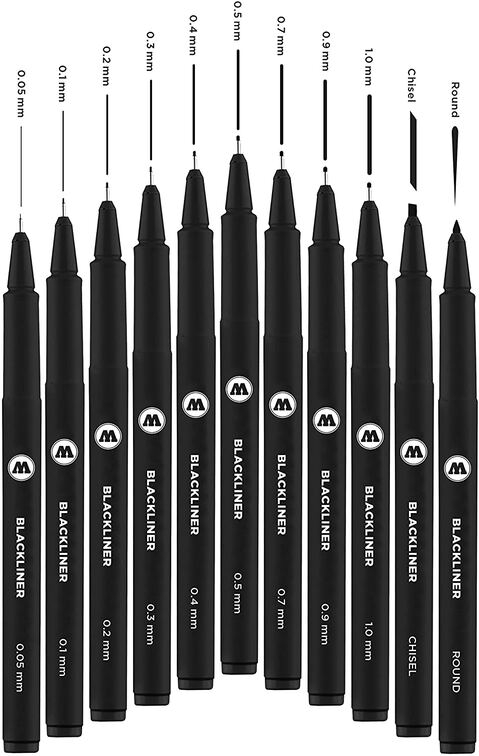
Since we're not drawing in pencil, you might want to grab a few fineliners in different nibs (thicknesses). My favorite fineliner set is by Molotow, below.
Since I plan to use alcohol markers to color in my martini glass drawing, I'm working on a super smooth sheet of cardstock that is similar to Bristol (but waaaaay cheaper).
Next, you're gonna want a straight edge. You can easily use the edge of a book, or whatever you have lying around. Try NOT to reach for a ruler, because I don't want you to start measuring stuff :) I'm using a triangle for my straight edge and NOT measuring on purpose to keep the vibe FUN and wonky! 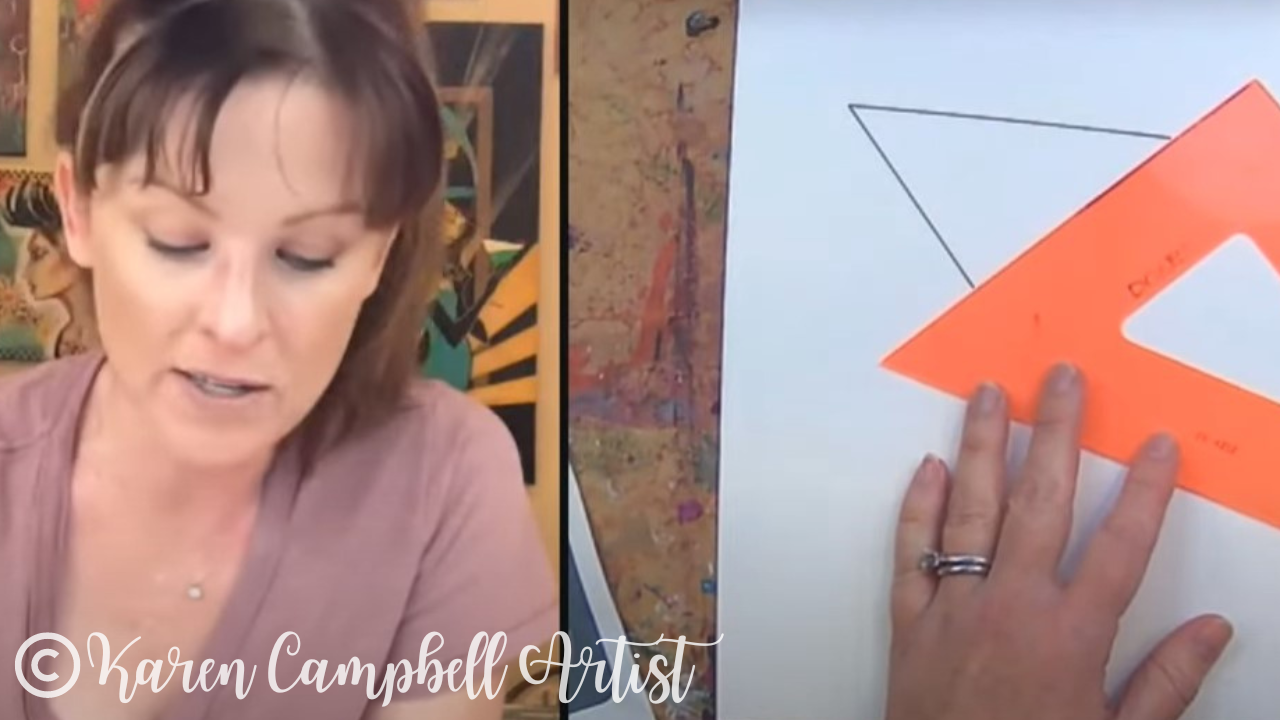
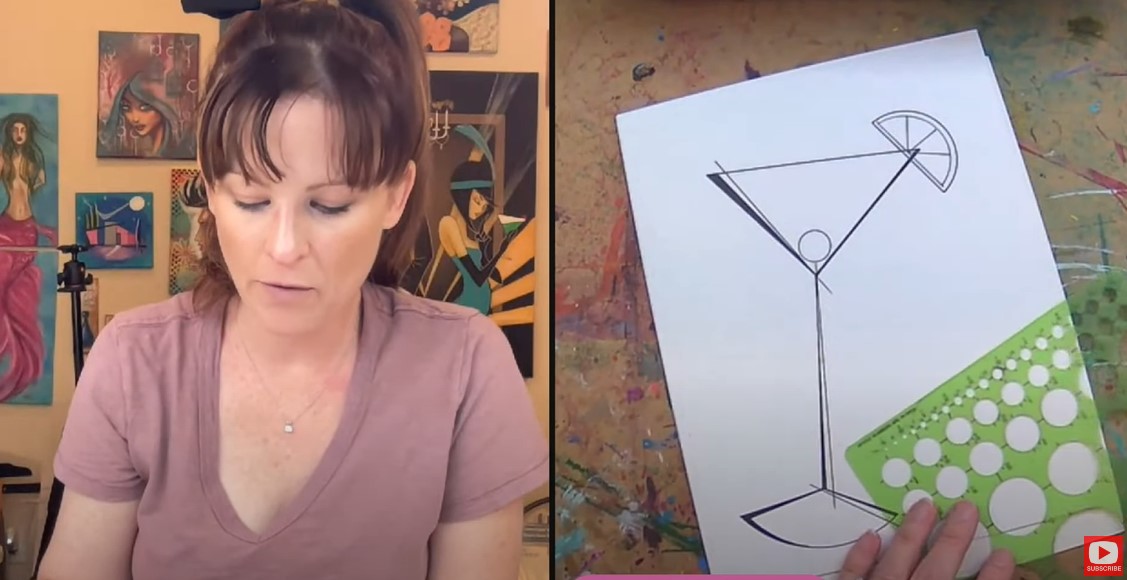
I've also got my ellipse and circle templates nearby. I use BOTH of these constantly when drawing faces.
The ellipses are perfect for dropping in facial feature placeholders when I'm sketching in my face drawing guidelines at the beginning of a project. I love using the circle template whenever I'm drawing eyes to help me draw quick irises and pupils (because who wants to spend forever trying to draw a perfect circle?! NOT ME!!). 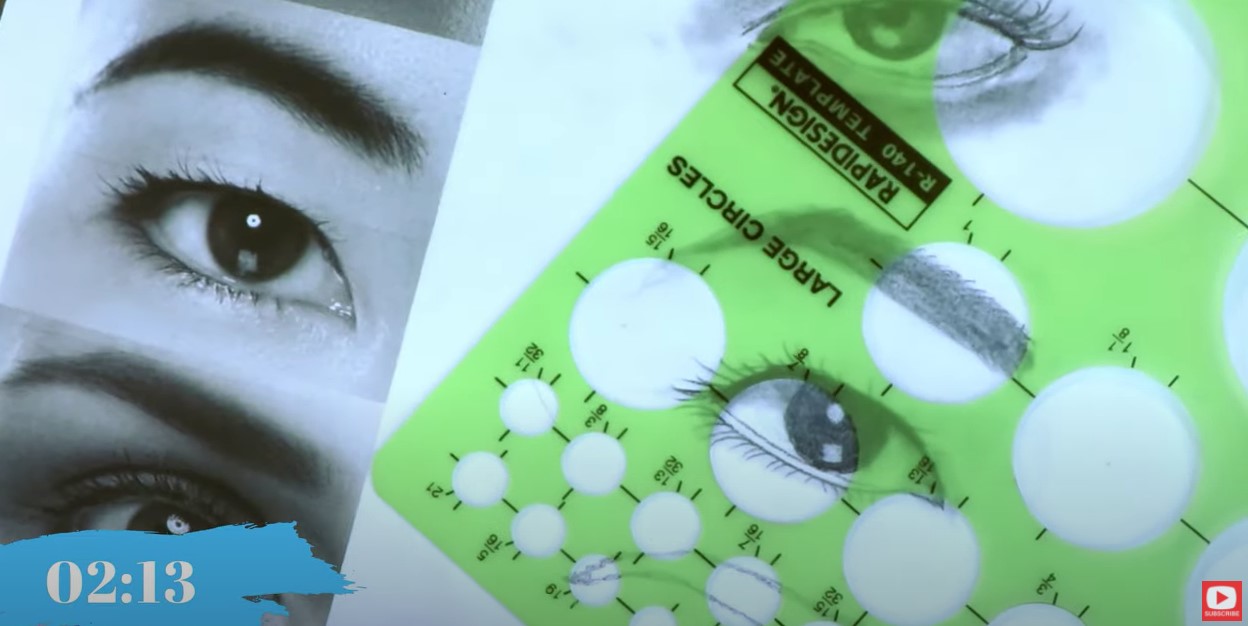
If you don't have templates like this, it's totally fine! Use whatever you have lying around in the shape of a circle that you can trace.
My last "supply" for today is seriously just a bunch of cocktail drawing reference images to provide me with a little inspiration and get my creative juices flowing. 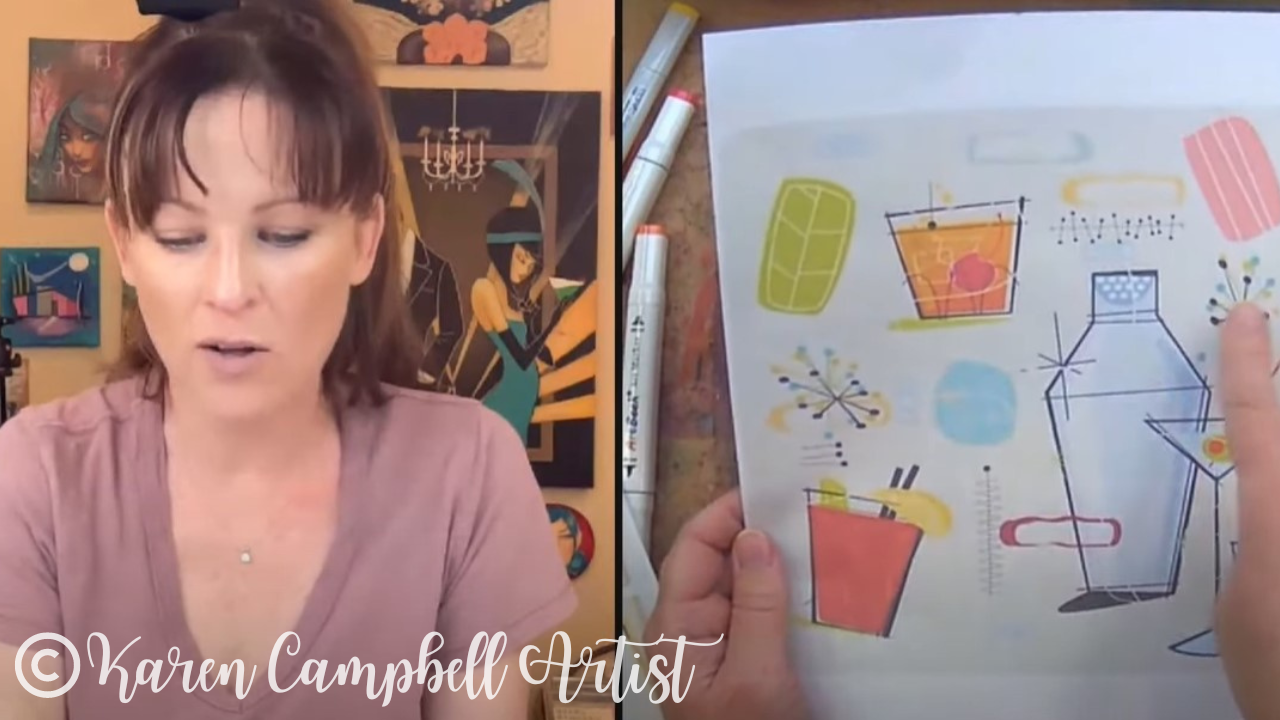
After you've grabbed your supplies, make sure to click over to the video because everything in today's FREE drawing tutorial is step-by-step, and in real-time so you can draw along with me from home :)
How to Make Your Line Drawing Even COOLER!
Once you've got your basic martini glass drawing done, it's time to take your drawing from simple and plain... to awesome! We do that by varying LINE WEIGHT throughout the drawing.
Line variation is super easy to achieve. You can either use fineliners in a variety of nibs (thicknesses), or you can add some wonky lines with a straight edge like I'm doing in today's video, and then color them in! You're definitely gonna wanna see this in action! 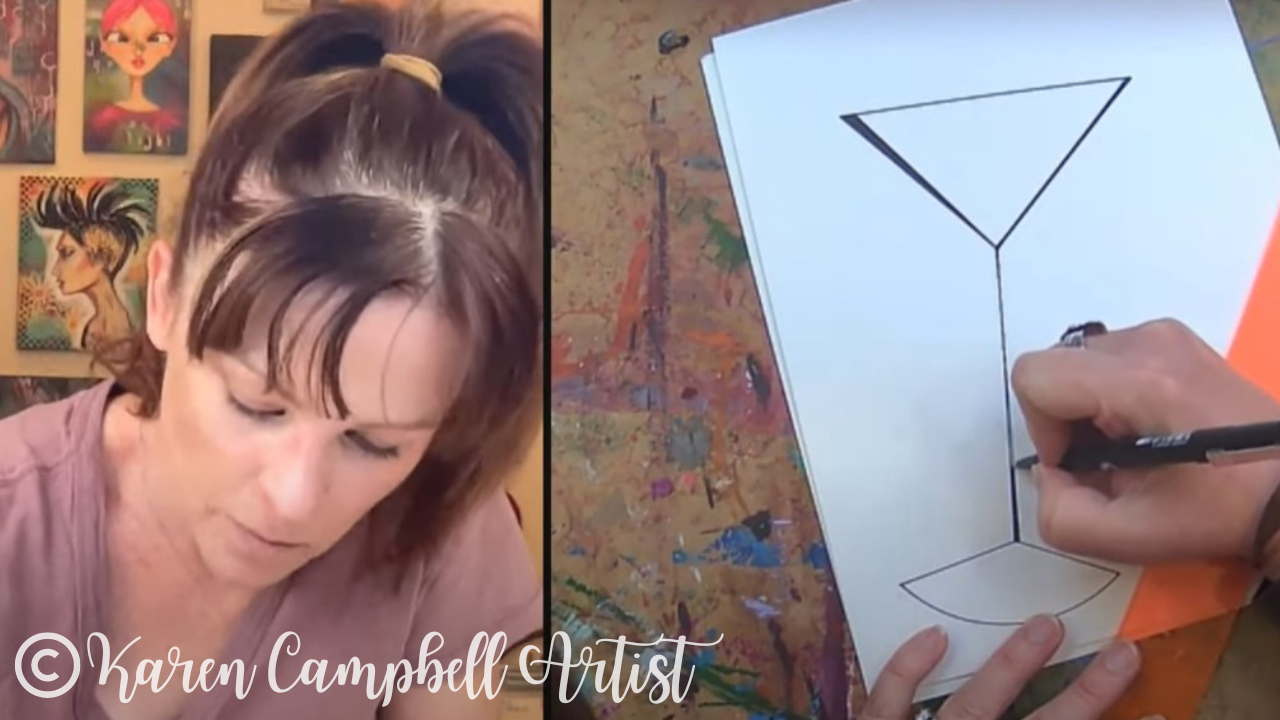
Once you've got some line variation going on in your drawing, you can add even more interest with the addition of a few action lines. Action lines are common in cartoons and anime drawings to indicate movement or energy. I like to use a thinner fineliner for these, like a 0.4.
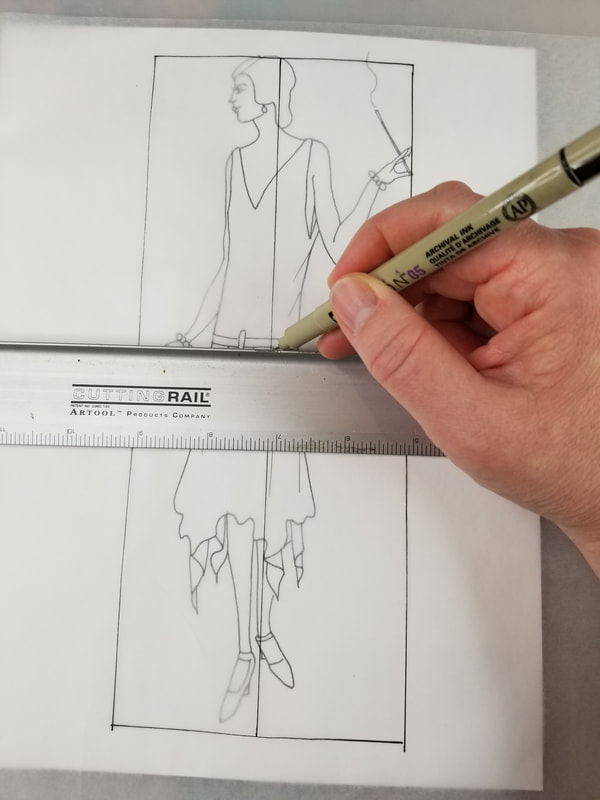
HOT TIP: Make sure you wipe your straight edge off BEFORE adding action lines around the martini glass because we don't want any excess ink smearing onto your drawing once your template hits the page again.

Once the action lines are in place, it's time for some fruity embellishments, because who doesn't love a little fruit inside a sassy drink?!
Let's Add Color
The first rule of thumb for coloring ANYTHING is to swatch! You can use a piece of scrap paper off to the side of your drawing, or download my FREE Fun Fab Swatch Sheet to make things even more interesting!

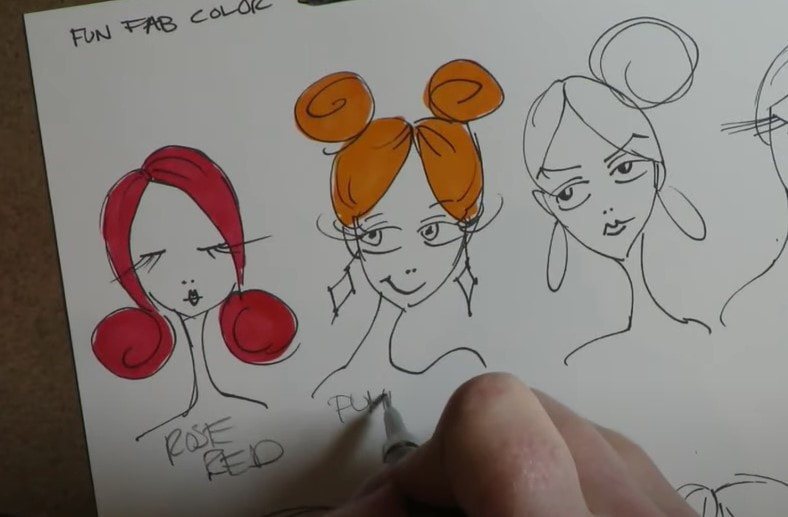
I used to hate swatching and think it was boring, but trust me, there's nothing worse than grabbing a marker or tube of paint based on the cap, only to find a completely unexpected color popping onto your page! I've learned this the hard way time and again!
Your future self will thank you for swatching!! 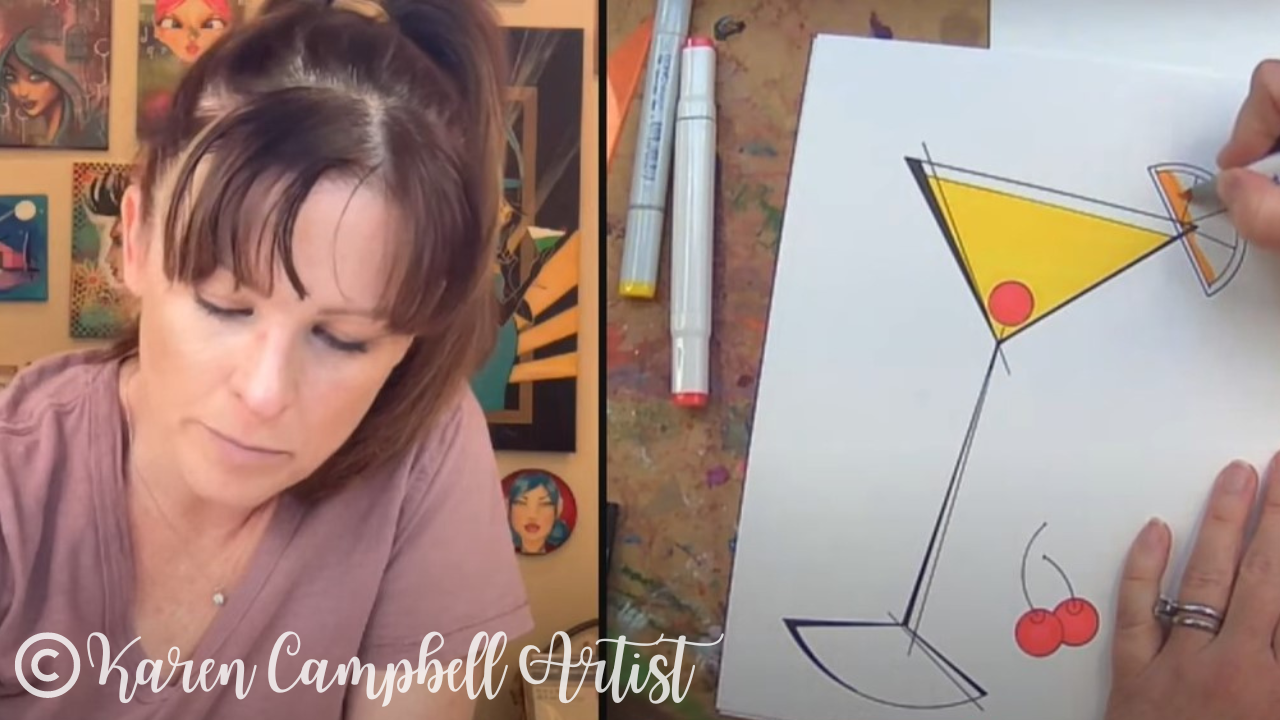
If you don't have any alcohol markers at home, don't sweat it. Use whatever art supply you have from colored pencils to watercolor!
Wanna Learn MORE About Alcohol Markers?
In case you don't know this about me yet, I'm OBSESSED with alcohol marker art!! I love using my Copics and Ohuhus for shading faces, fairies, art deco fashions, and everything in between!!
Over the years, I've tried just about every alcohol marker brand from dollar store cheapies to my beloved Copics, and have learned a ton along the way. Check out this playlist to watch my BEST ALCOHOL MARKER COLORING TIPS in action, learn about blending, mixing alcohol markers with other media, and SO MUCH MORE!! 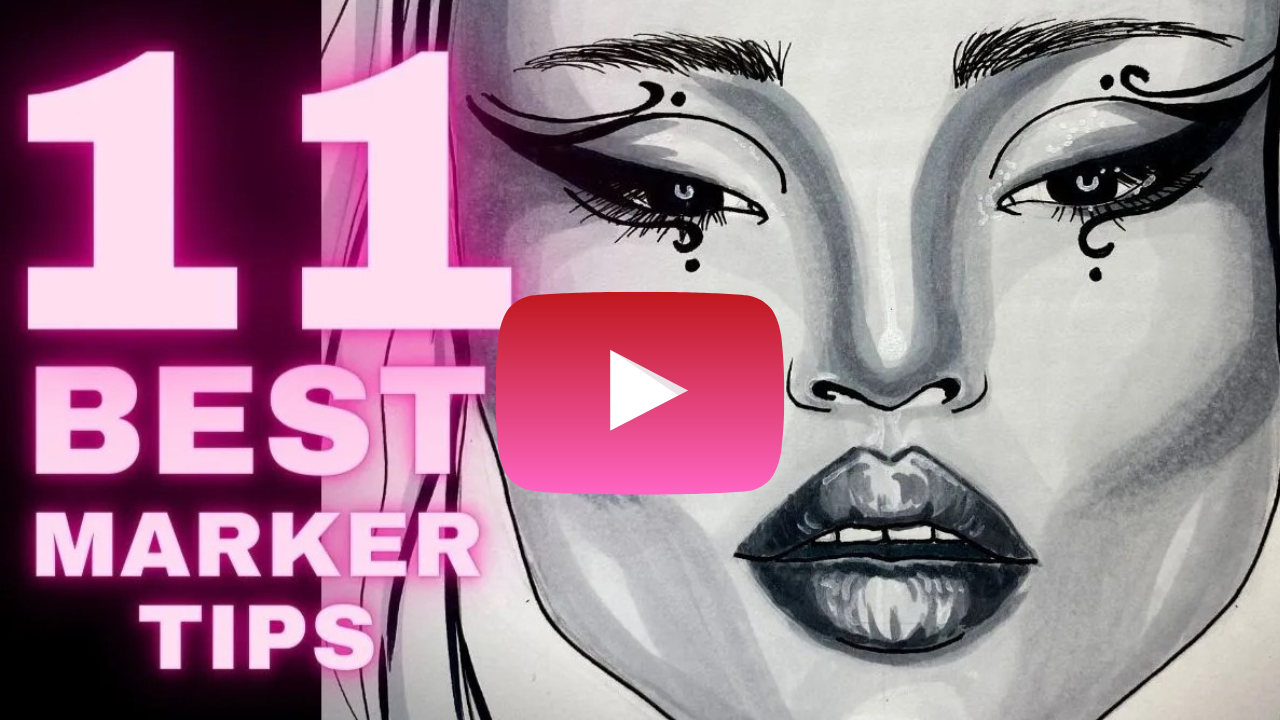
Need More Real-Time Drawing Lessons?
I've got TONS!! Go check out the Fun Fab Drawing Club over at Awesome Art School. There are SO many fun lessons just waiting for you to enjoy!!

Need More Resources?
0 Comments
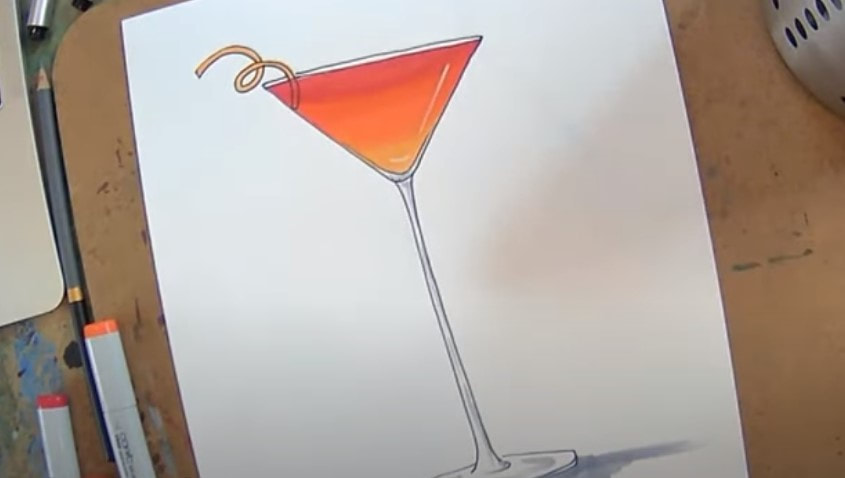
This martini glass drawing tutorial is SO fun & easy! Pour yourself a drink & come hang out with me for our own little draw & paint party. If you love art deco style already - you'll LOVE seeing a glimpse of the projects in my recently released trilogy of Learn to Draw Art Deco Style books. Then, I'll show you how to draw a martini glass and shade it 2 different ways- once using Noodler's Ink (it's basically like watercoloring!), and the other using my favorite alcohol markers (copics)!!
Before we continue, super quick announcement: All product links are Affiliate. I may earn a small commission if you choose to order through these links but by law there is never any additional cost to the consumer for doing so. I thank you for your support! 
In 2020, I went down a serious 1920s -1930s / art deco rabbit hole just for me. I fell in love with the styles and just had a blast getting into the fashion, figures, hats, shoes, jewelry, furniture, pets, men, cars and cocktails of that era!
During that time period I published not one, but THREE Art Deco Drawing books (1, 2, 3). 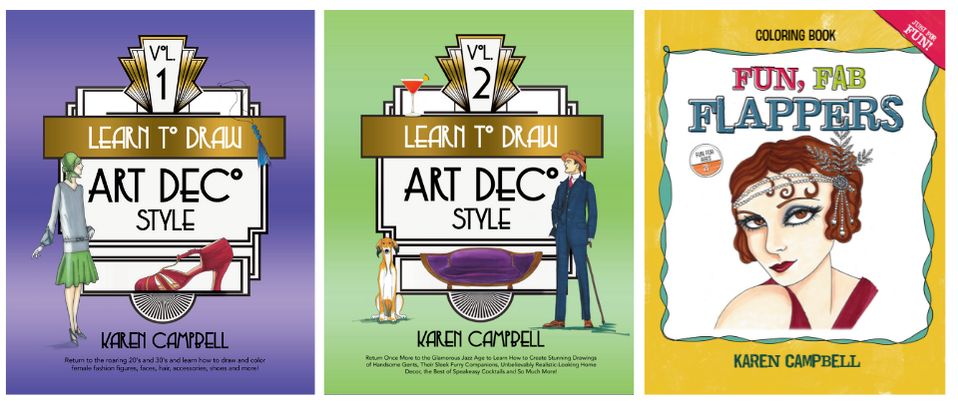
What's fun about these books is I do have a lot of FREE videos on YouTube to accompany the book, so if you've ordered a book and see a little film icon in the corner- make sure you check that link out because there is a video lesson you can play while you work your way through lessons in the book.
I used a lot of watercolor, alcohol markers, and fountain pen inks. In each of these books you'll even find a few fun facts about this time in history because I'm a bit of a vintage history nerd! And when I look stuff up, I've gotta share!! I love everything OLD!
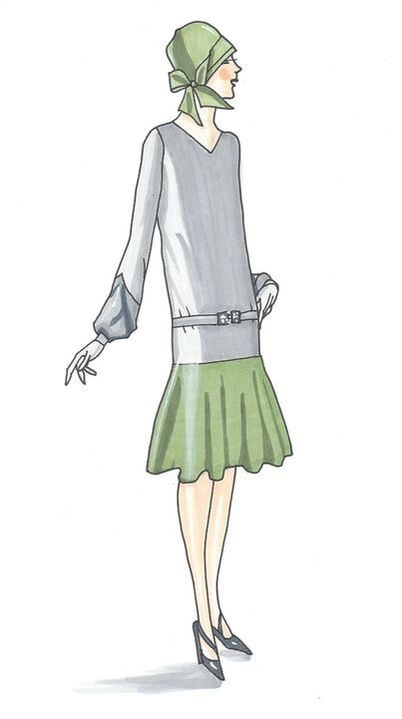
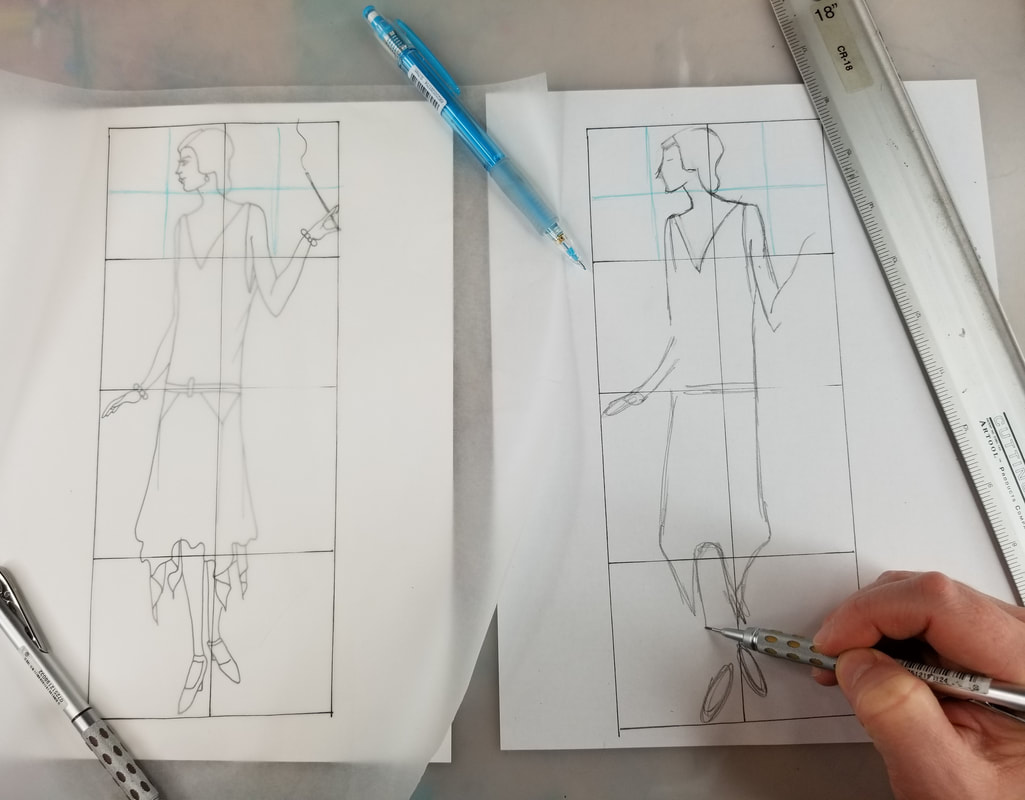
Volume #1 is super "girly" with lots of fashion, shoes and jewelry. In this book I go in depth about how to use my Quadrant Method for drawing figures too, so if you've been wondering how to draw figures easily - this is a great way for beginners to get started!
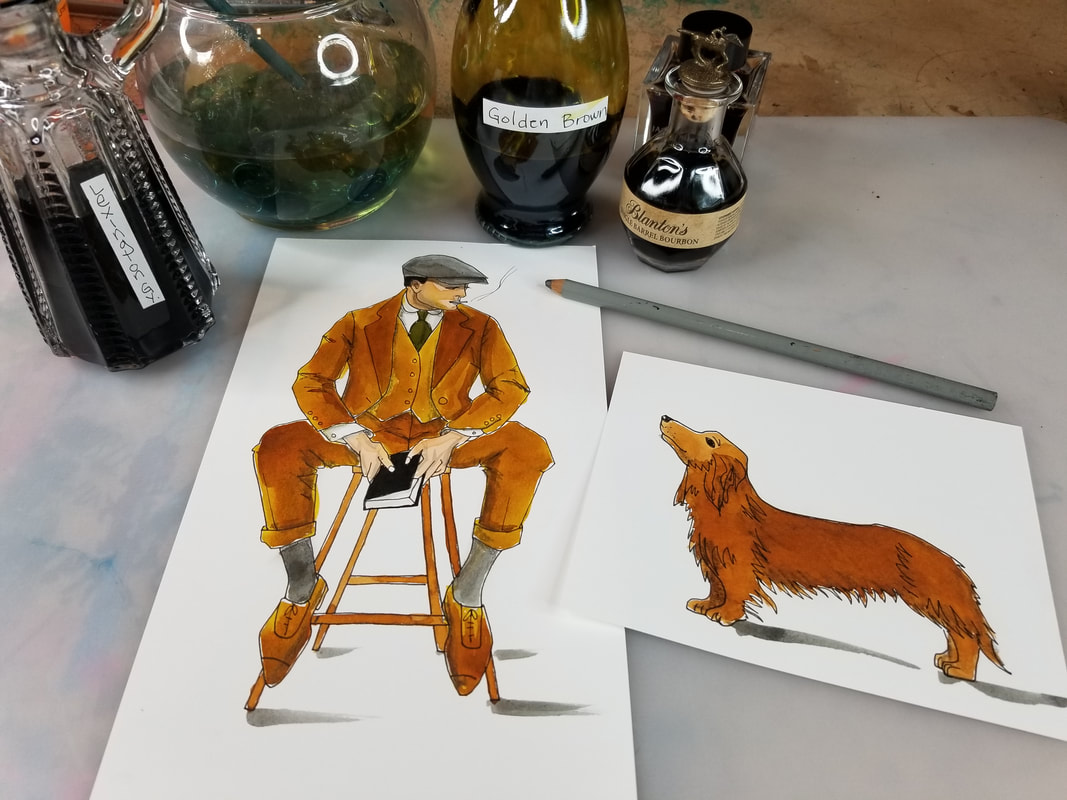
In my second volume, I'll teach you how to draw male figures as well as popular dogs and cats from the Art Deco era. If you're not sure how to draw a dog or how to draw a cat, I teach you how to use my Quadrant Method for this as well. It's SUPER easy!!
Art deco furniture was GORGEOUS, so you'll find quite a few fun pieces in this volume as well. If you've been following me for a while, you may already know I've got an obsession of painting with fountain pen inks!
I find fountain pen ink to be even MORE vibrant than my favorite Daniel Smith watercolors, and I love to just dip my watercolor brush straight into the bottle to get some serious pigment onto my paper. 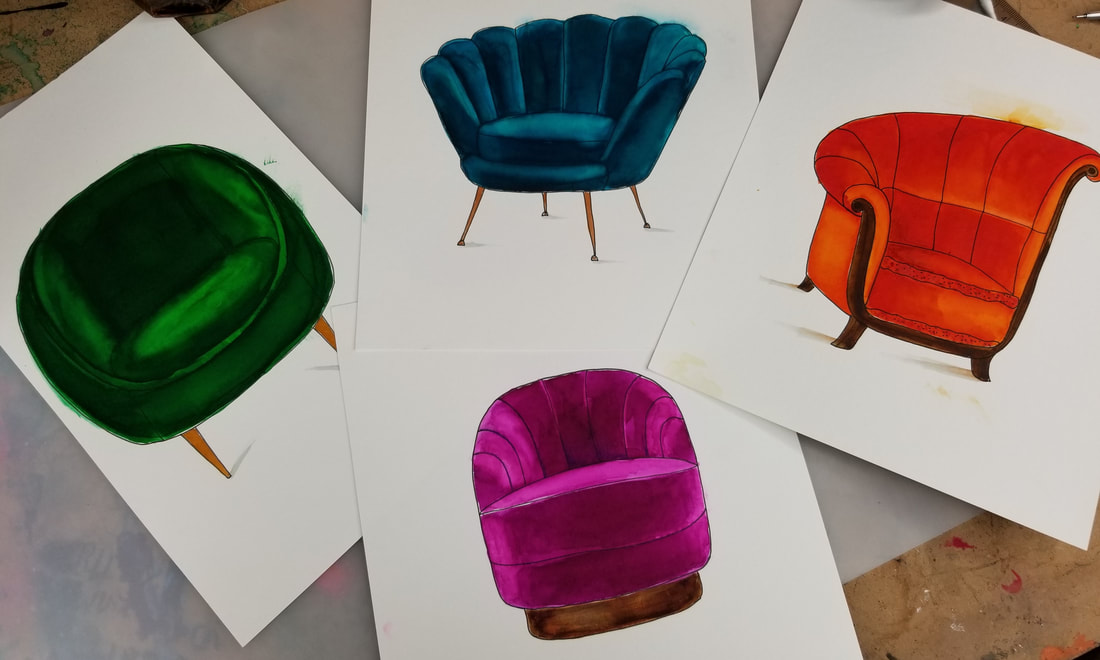
When I was painting the Art Deco furniture projects for this book, I felt my fountain pen inks really made the velvet I was rendering look realistic! You kinda have to see it to believe it.
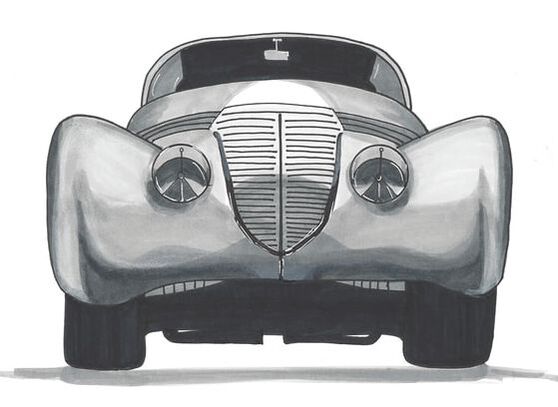
I wrapped up Volume #2 of Learn to Draw Art Deco style with a chapter on cars and cocktails from this era. It's really remarkable how realistic some of these drawings look!
You can totally achieve this too when you learn how to layer your art supplies properly. Even if you're a beginner- you can do this! I'll show you how and keep each project step by step, so even beginners just learning how to draw feel comfortable!
To dotoday's full length drawing tutorial with me - all you need is a sheet of watercolor paper (if you want to color your martini using a wet medium like watercolor), or a sheet of bristol, card stock, or marker paper if you'd like to shade your martini in alcohol markers.
Be sure to click over to the video to draw with me in real time (22:22). The drawing itself is fairly simple, so if you're a beginner interested in learning how to draw - this project is perfect for you!
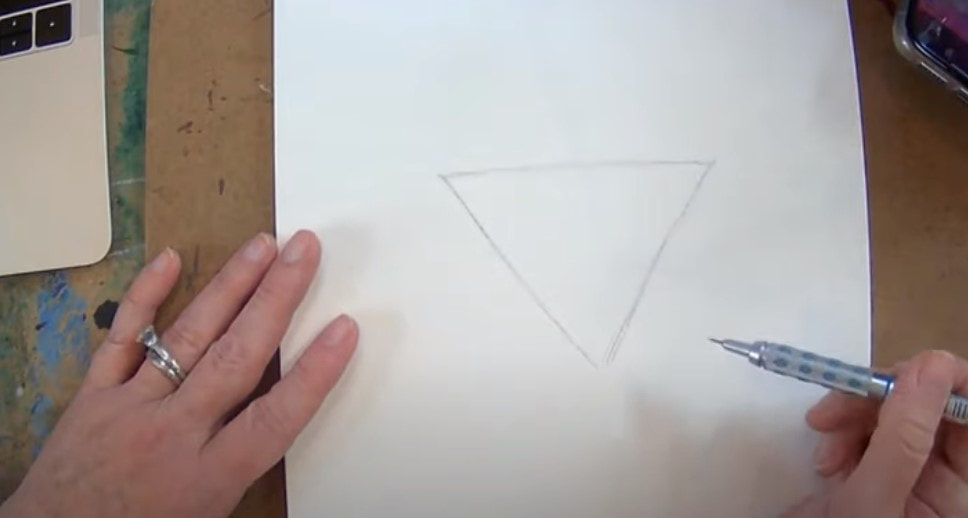
We're starting with an upsidedown triangle and adding a stem. Once everything is sketched in, I pulled out my Habannero Fountain Pen Ink and simply started coloring in the liquid for my martini. If you're not sure how to paint with fountain pen inks, just follow me. It's basically the same as using watercolors - just richer. 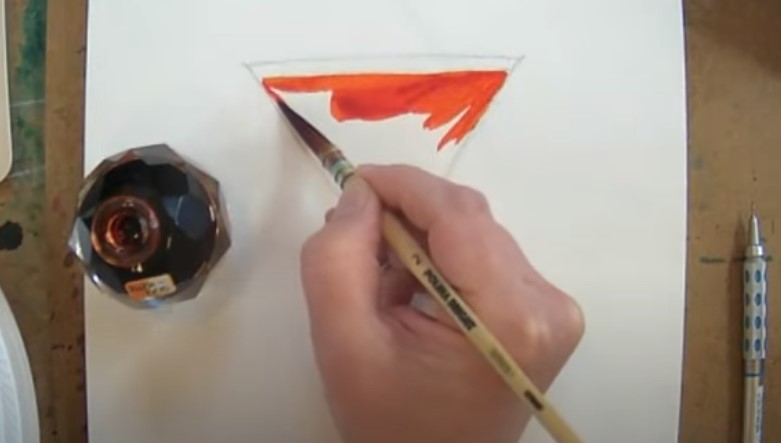
If you don't have any fountain pen ink, you can definitely use Dr. Martin's acrylic ink in a similar way or watercolors.
Click over to the video to see how I shade the stem of the glass. I often reach for my Daniel Smith Hermatite Genuine. This is a really soft gray. You can also just really water down some Bloodstone Genuine or Payne's Gray as well to paint a fine line down the stem of the glass. 
If you'd like to see the same project done in alcohol markers while your ink painting is drying, click over to the video (42:00). If you enjoy the look of outlining in your work and are going to shade with alcohol markers, you can outline your glass before or after you shade.
If you choose to outline first, make sure you're NOT working with an alcohol based fineliner because it will bleed. The fineliner should be pigment based or water based (warning: SHARPIES will bleed, so don't use these). Check out my Amazon Shop of favorite art supplies for drawing and mixed media. I recommend Moltows for outlining with copics or other alcohol markers. 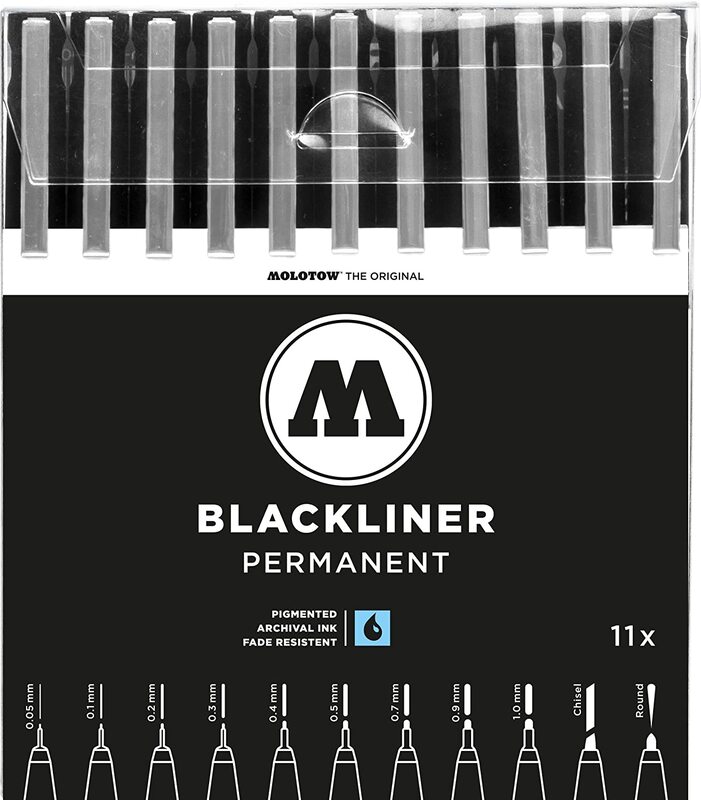
Make sure you swatch your alcohol marker shades off to the side so you know ahead of time that they will blend well together. Before your start shading in marker, be sure to erase your graphite because your markers will drag that around and smear.
HOT TIP: To ease your shading transitions between marker shades, just keep on layering because each top layer rewets the bottom layers and helps them blend. You can also use your lightest of the three colors to blend, or work in a layer of colored pencil, followed by some highlights with a posca paint pen. Click over to this video for more tips on how to copic marker blending!
Make sure you click over to the video because I walk you through both versions of this project step by step!
Thanks for hanging out with me today!!
❤️ CHECK OUT ALL my art books on AMAZON ❤️ MY FAVORITE ART SUPPLIES on AMAZON ❤️ MY BELOVED FACEBOOK GROUP ❤️ FOLLOW ME ON INSTAGRAM |
Karen CampbellFounder of Awesome Art School. Mixed Media Artist. Author of 19 Instructional Art Books! 
Whose work has appeared in...
   
 Archives
July 2024
Categories
All
|
 RSS Feed

"Karen is flipping hilarious and she's very real...I like the way she teaches in a way that really gives you confidence, whether you're a beginner or advanced there's always something new to learn!"
- Elizabeth W. |
What Fans Are SayingKaren, you are absolutely fabulous! You make me feel like I can draw anything. I have recently retired and finally have the time to do some of the art that I have loved since I was in school. I am really at the beginning of my art journey and I hope to learn as much as I can. Thank you for all you do. |
Contact ME |