
|
Are you ready to make art better than you ever could've imagined?! You can!! Join me LIVE on YouTube this Sunday, April 28th @ 2pm EST !! We will be creating this awesome art deco-inspired mixed media girl together, and I absolutely can't wait!
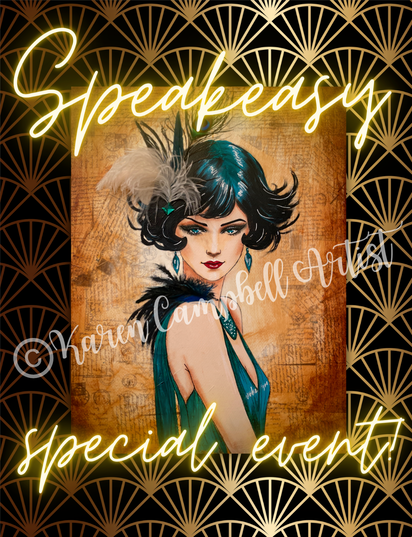
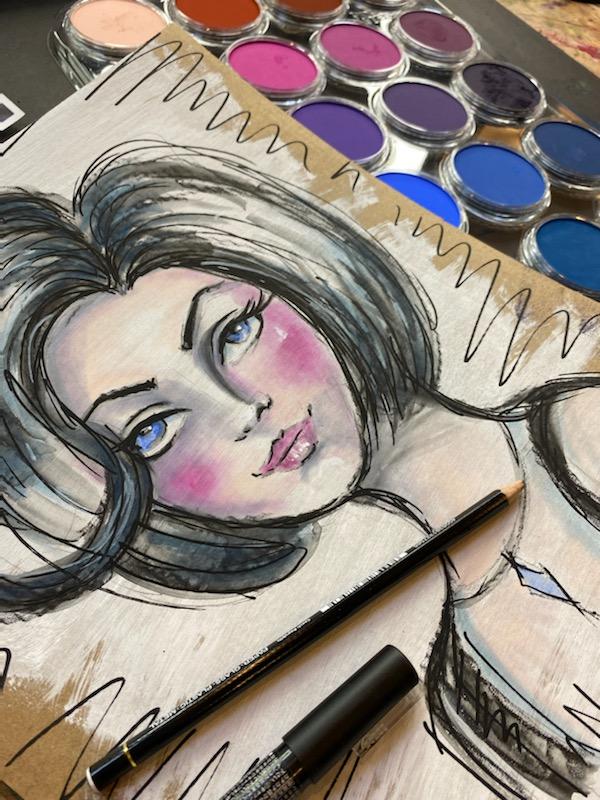
To get you totally prepared for this exciting, live art-along, I've dedicated today's YouTube video to explaining the supply list for Sunday (which just so happens to be FILLED with some of my all-time FAVORITE mixed media art supplies:)
Grab the Supply List HERE, or simply click the button below. 
*All product links are affiliate & for U.S. residents only.*
What Surfaces Can You Create Mixed Media Art On?
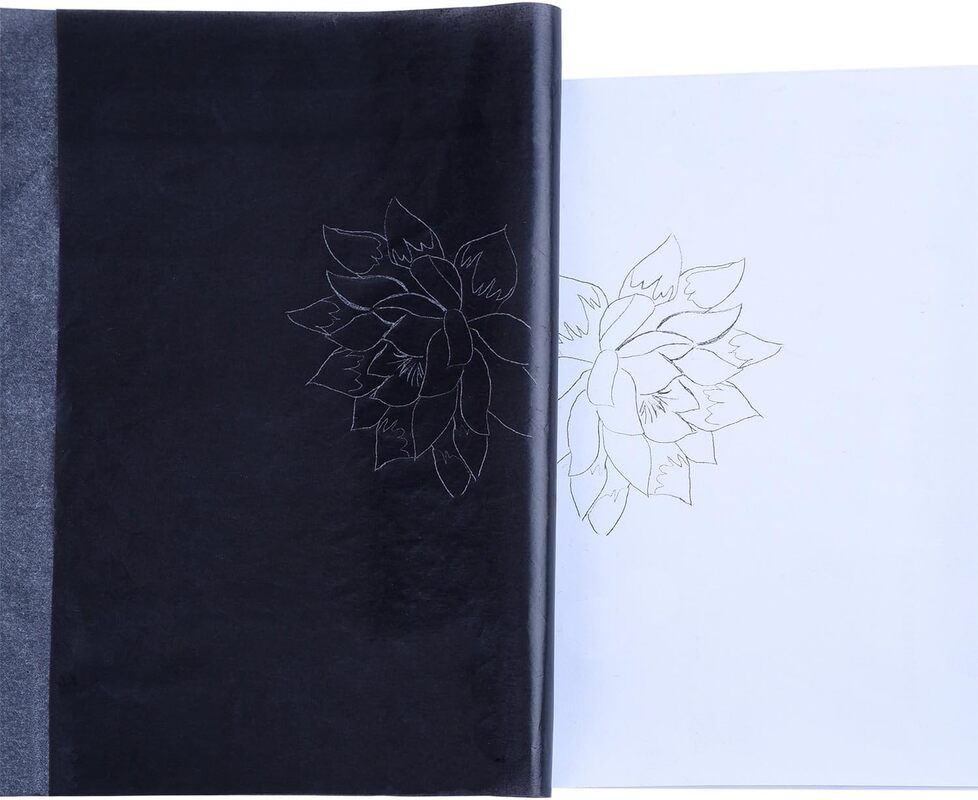
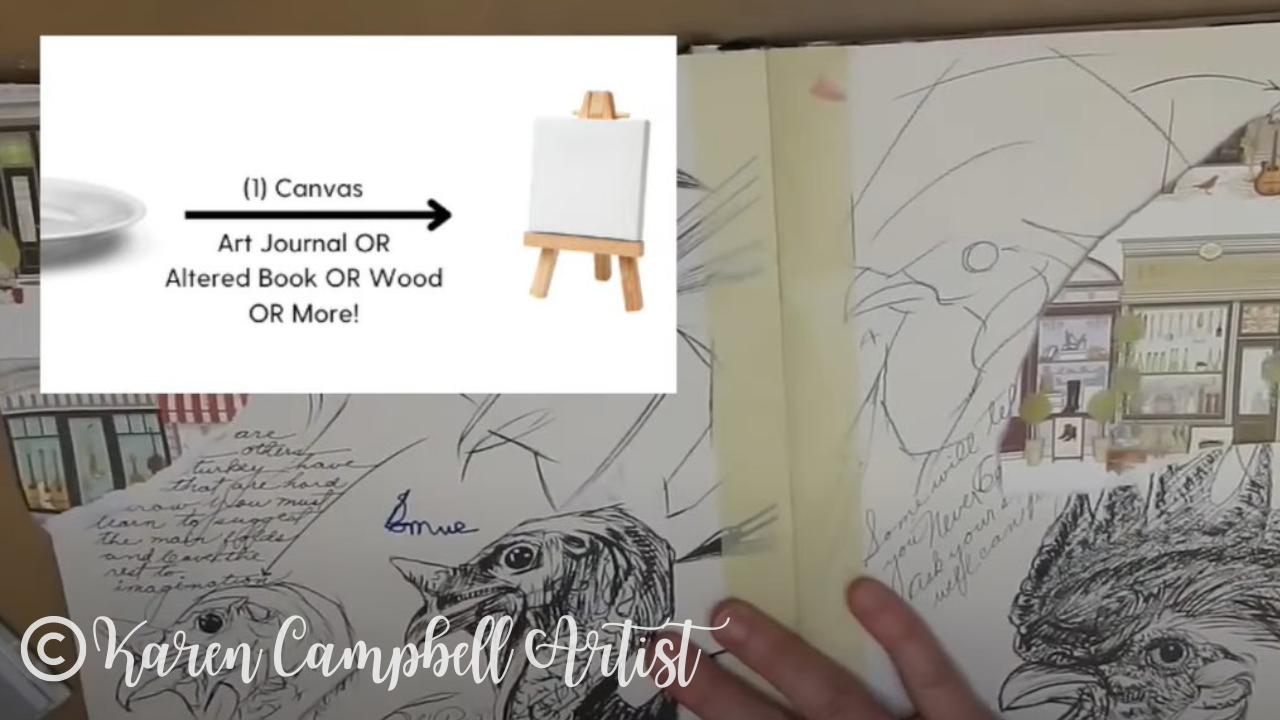
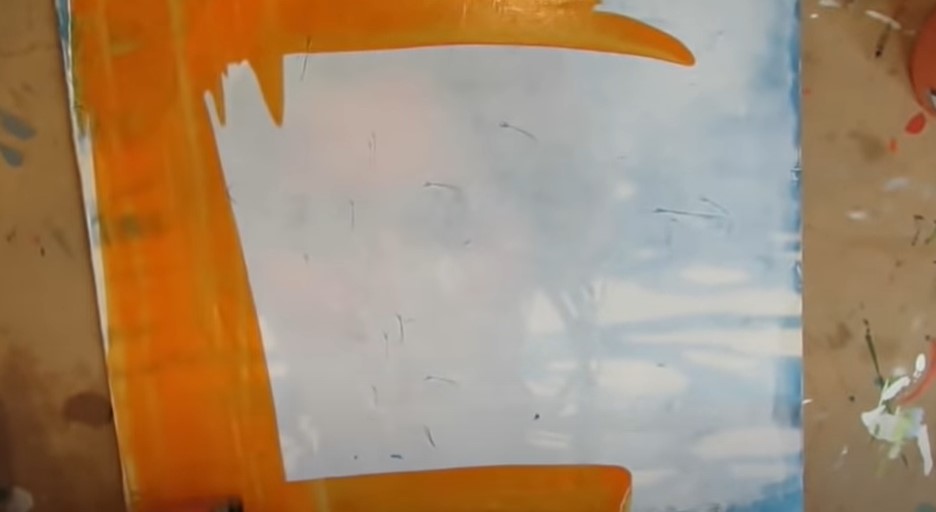
I get asked all the time WHAT SURFACES are best for creating mixed media art. It really depends on what supplies you're gonna be using. If you're doing a full-blown mixed media piece with collage, acrylics, sealers and all the wet mediums, most people assume you need to be working on canvas. You totally can, but you can ALSO work on mixed media paper, in an art journal, or on cardboard.
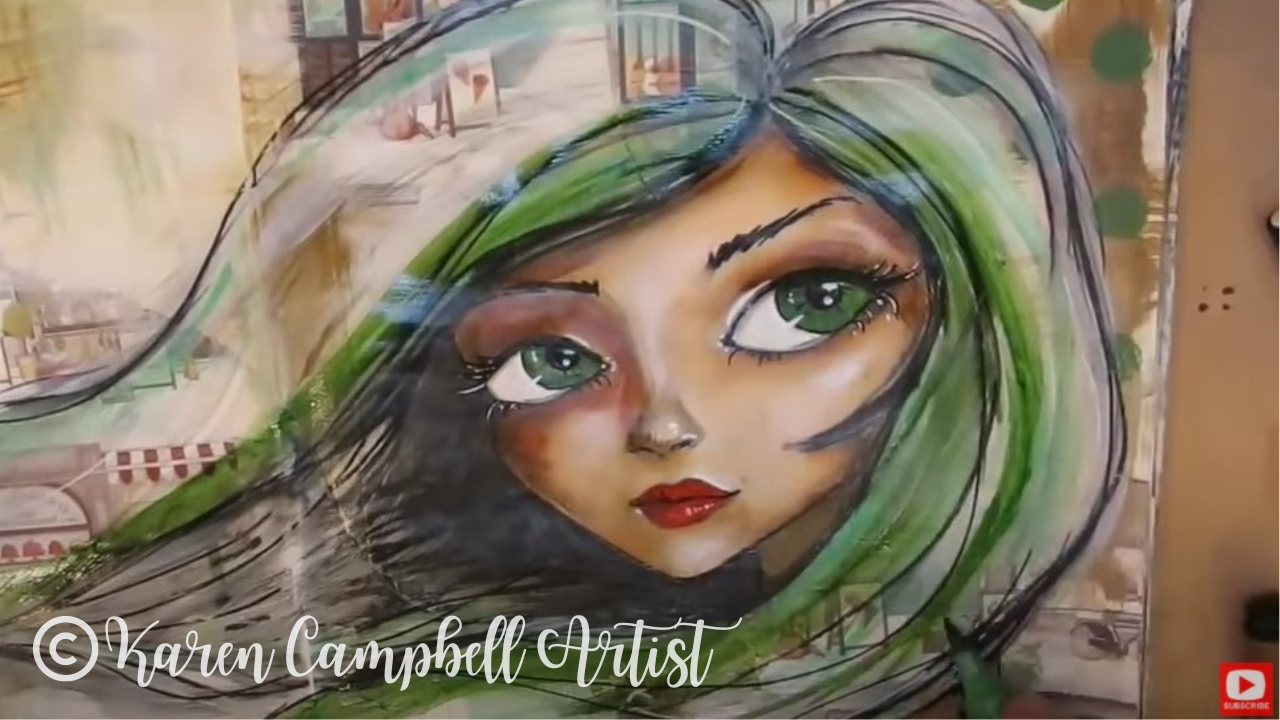
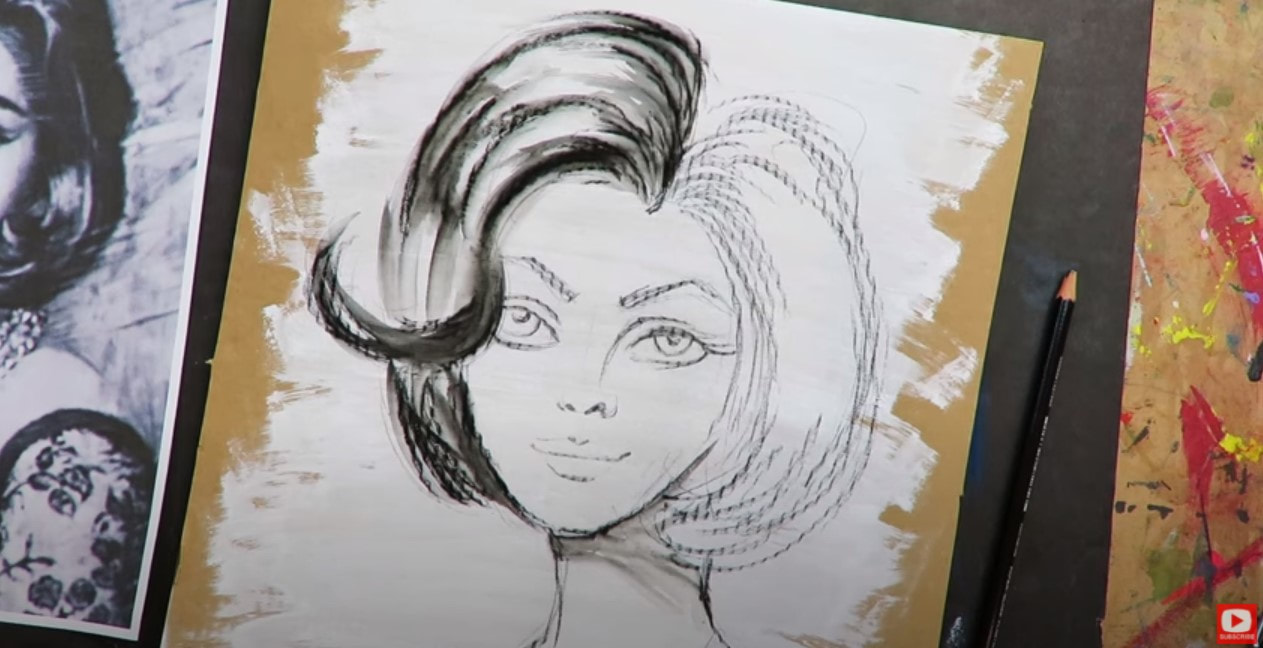
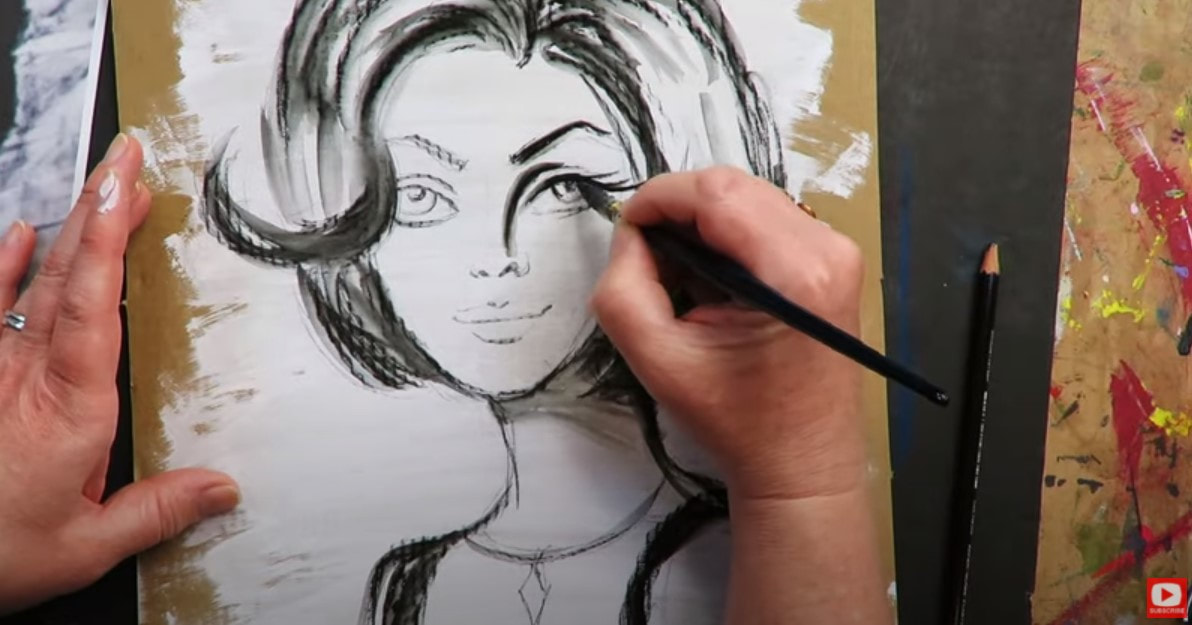
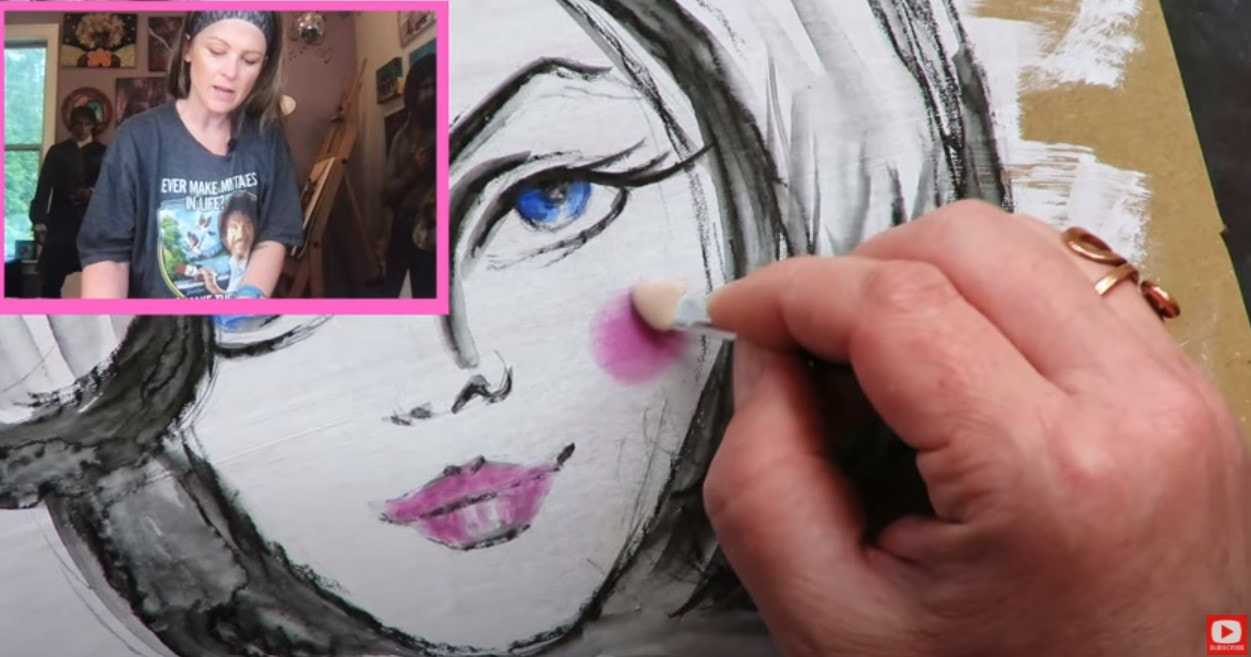
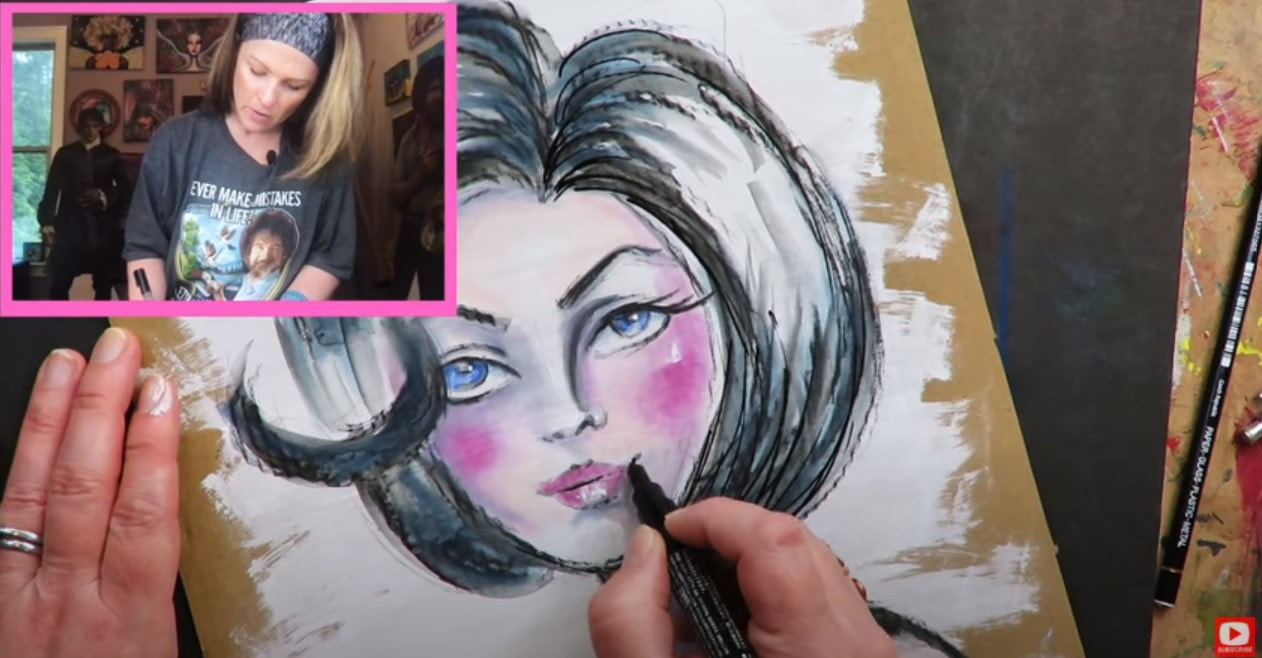
The demo piece I created to prepare for next Sunday's LIVE art-along event was done on a GIANT sheet of watercolor paper :) I actually do a lot of my mixed media pieces in a watercolor sketchbook because heavyweight watercolor paper (140# or higher) is actually stronger than traditional mixed media paper and can hold pretty much ANY mixed media layering you throw at it :) On Sunday, we'll be art-ing LIVE on canvas panel, which I LOVE using for mixed media collage because it's so STURDY! Did I tell you yet that one of my good friends is coming over to ART with me on Sunday?! I'm so excited!! 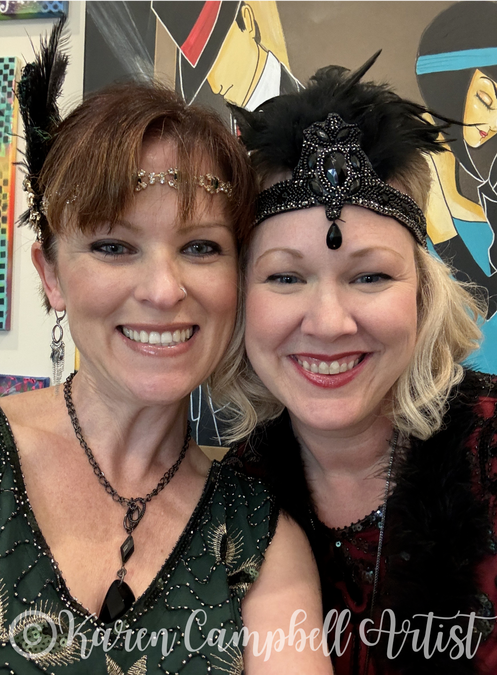
Mandi and I have been friends for years and she loves to create just like me!! But- she's also got 3 kids, a job, and doesn't have endless time to dedicate to her art. She's never done this project before and will be learning step-by-step right along with you, so you don't have to feel alone :) We tried on our costumes together earlier this week!!
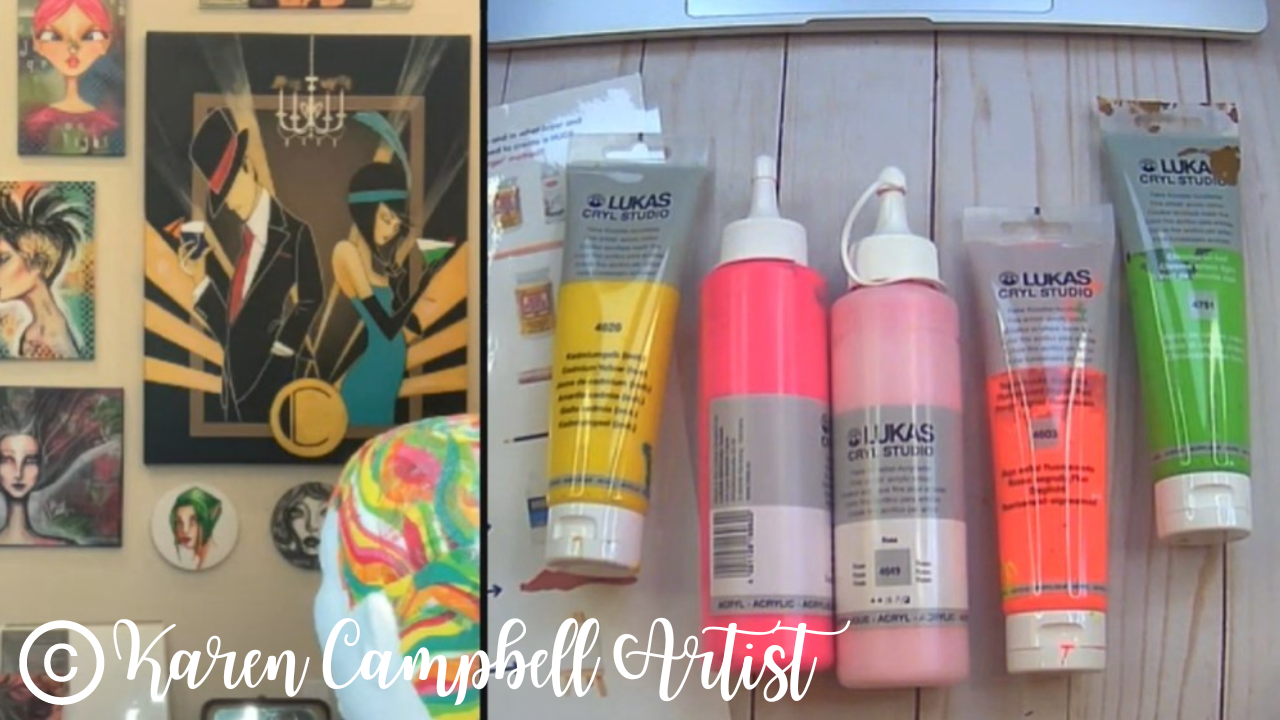
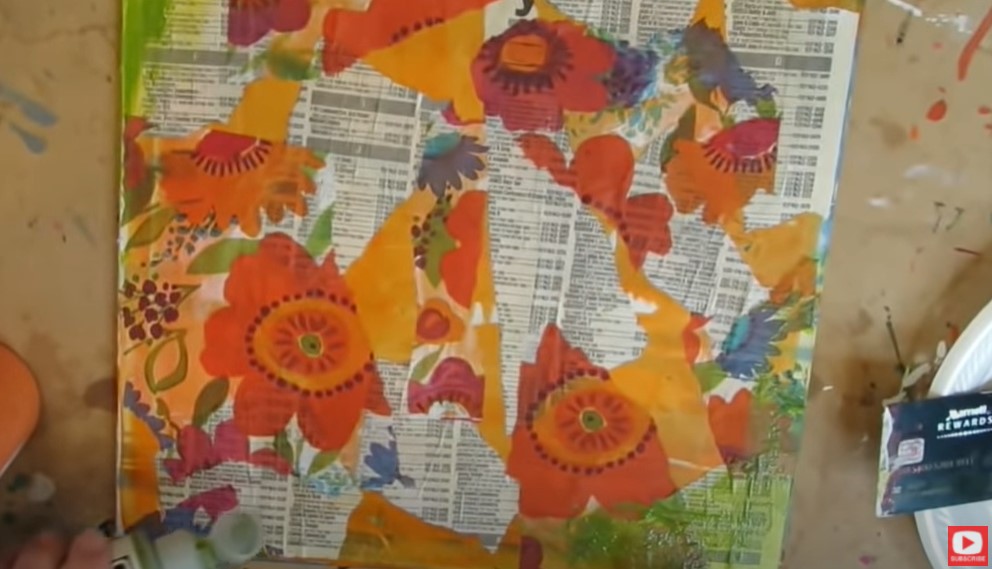
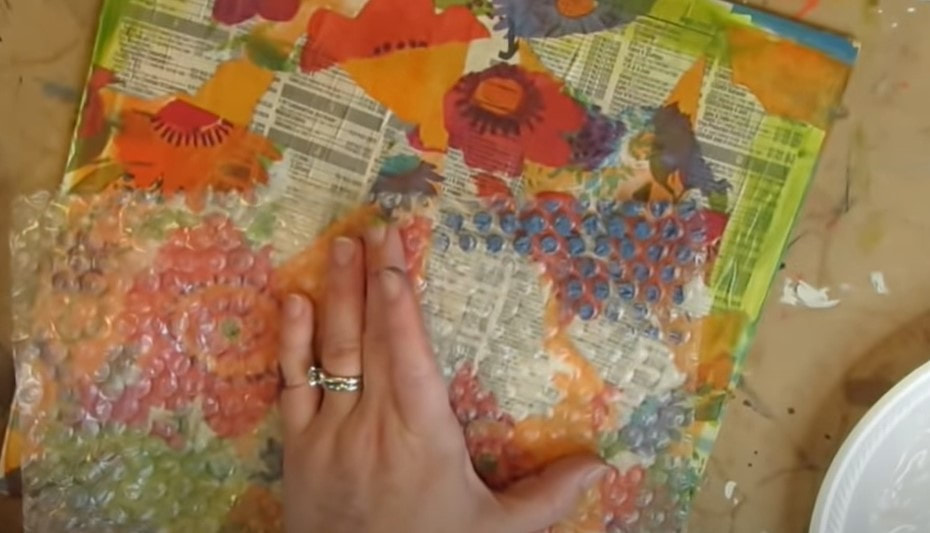
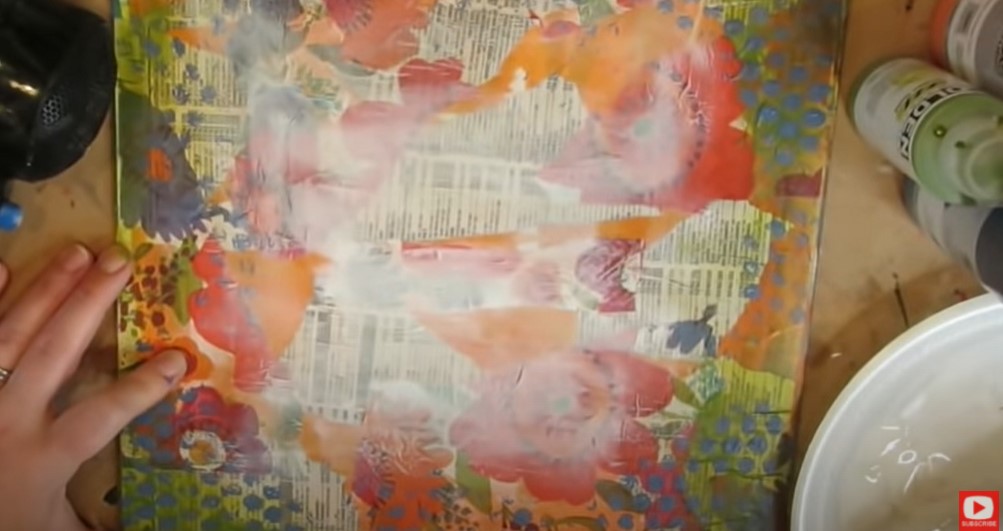
Aren't they FUN?! My FAVORITE Collage ElementsIn today's video, I also explain TWO of my all time favorite mixed media art supplies for collage: Liquitex matte medium and tissue paper! I'm obsessed with matte medium for two HUGE reasons. One- it's got great adhesive qualities, which makes it work AMAZINGLY WELL as collage glue. And second- it's designed to work with acrylic paint, so it's the perfect "surface prep" for the acrylic paints I like to add on top of my collage layers. Tissue paper works beautifully for mixed media collage because it's thin and adds tons of texture to your background without getting quite as wrinkley as napkins. For Sunday's project, I grabbed some beautiful tissue paper on Amazon that looks like vintage postcards! You could also use old book pages for collage (the thinner, the better!). Or, you can get vintage printables from Etsy to use for collage! The possibilities really are endless. 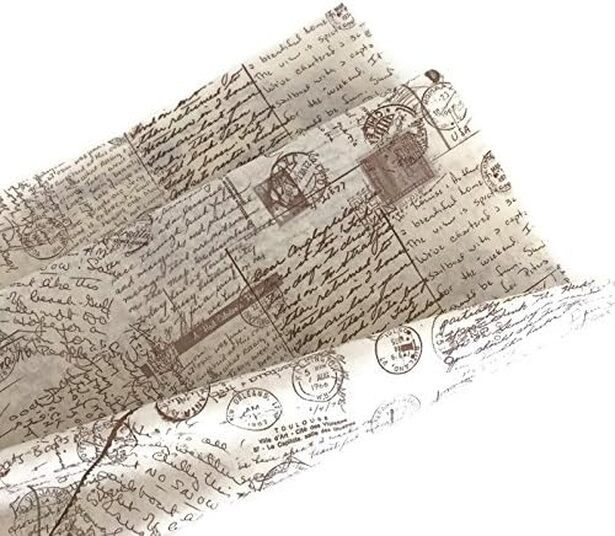
My Favorite Acrylic Paints to Make Things Look Vintage!
Since the tissue paper I got for the collage portion of Sunday's project wasn't "pre-yellowed," I decided to add acrylic paint on top to make it look older.
I recommend using transparent acrylic inks or high-flow acrylics because these aren't going to fully cover up the interesting collage pieces we added to the background of your painting. 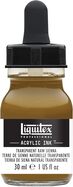
Don't Know How to Draw?
|

|
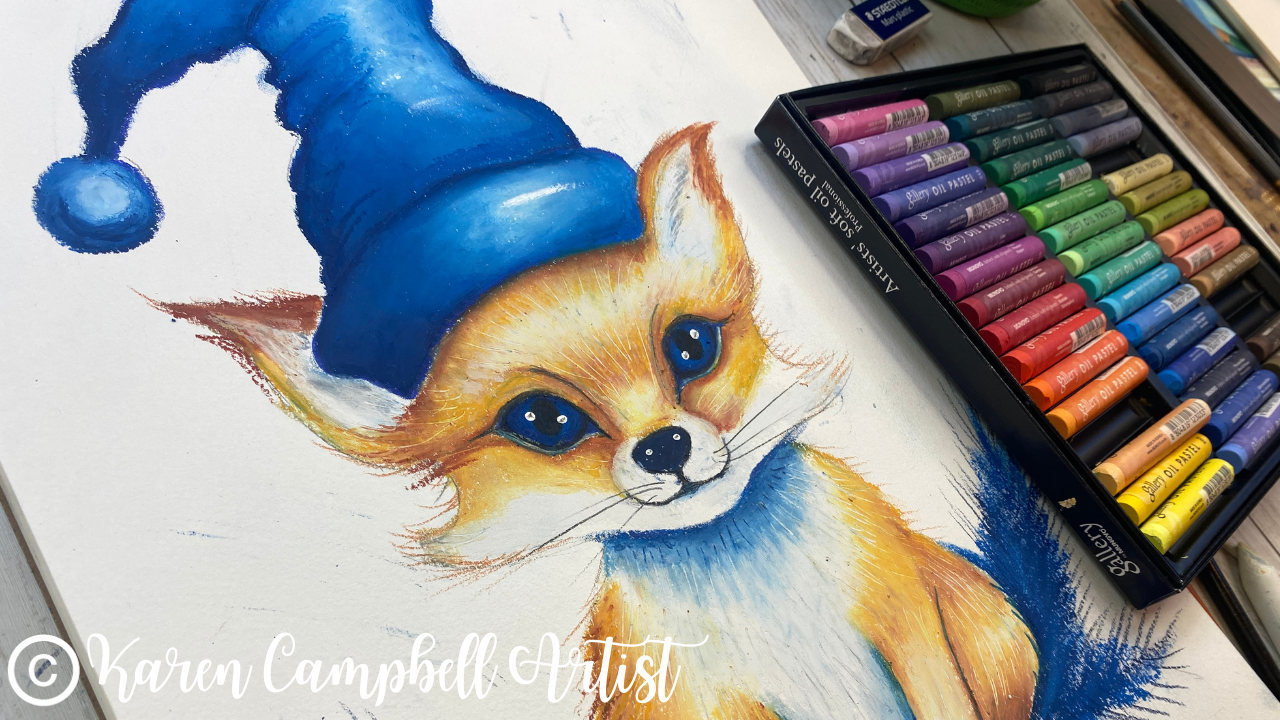
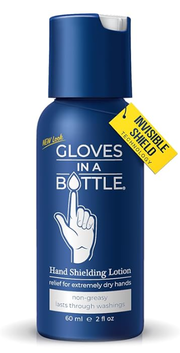
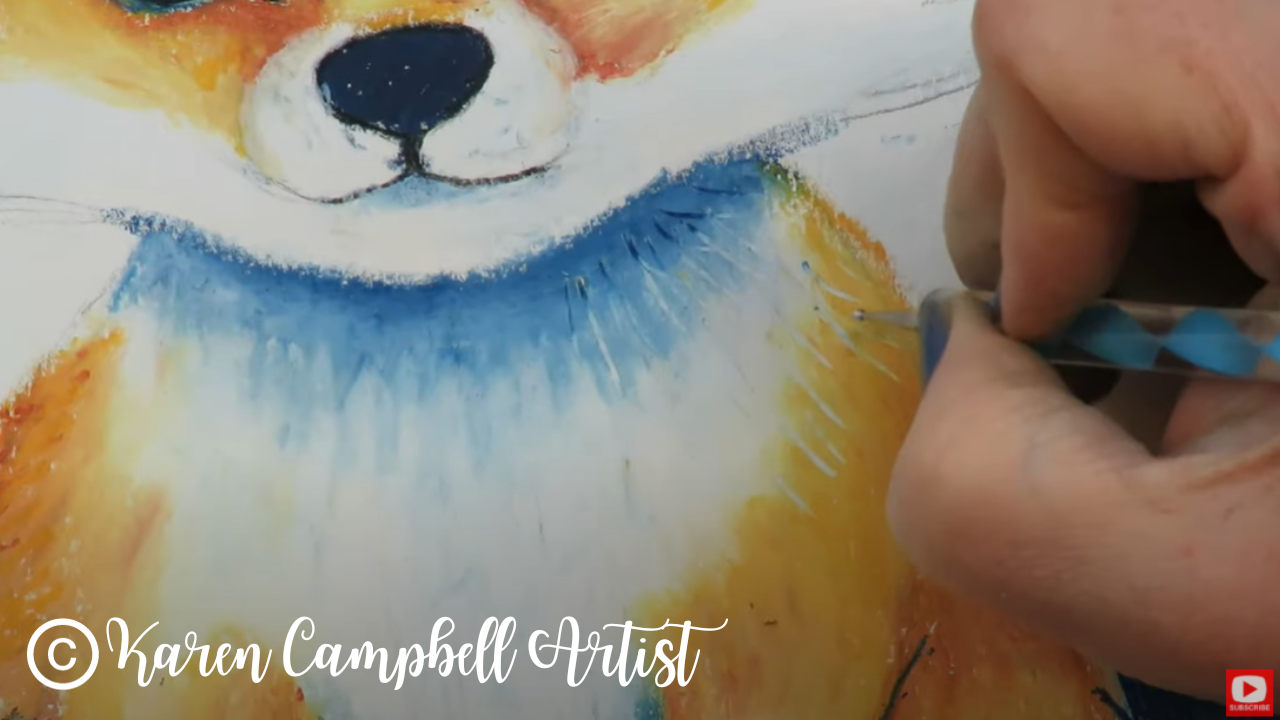
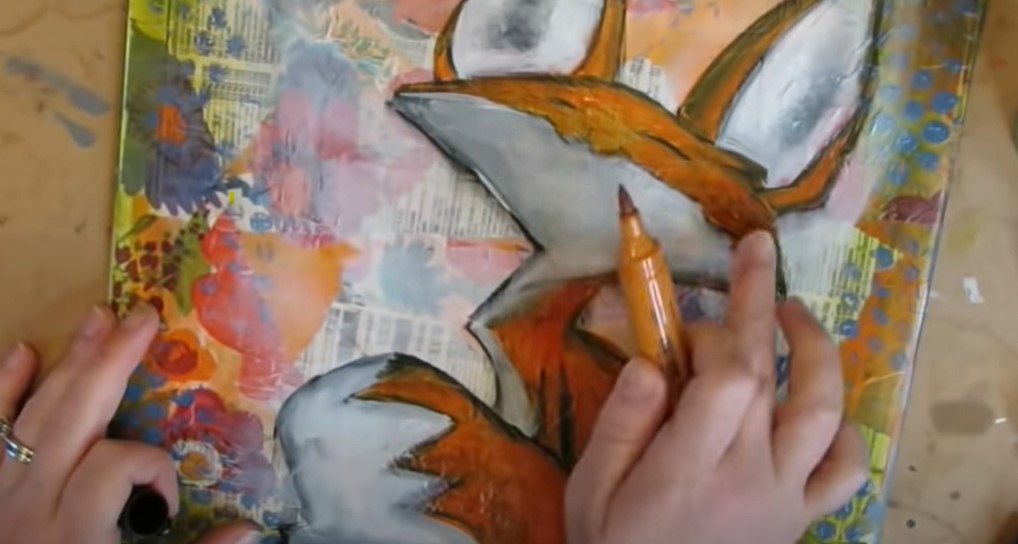
After you've drawn your fox, it's time to protect your hands before diving into shading with oil pastels.
I'm using a product called Gloves in a Bottle. It works kinda like hand lotion and just gives your hands a protective coating because the materials inside oil pastels (and oil paints for that matter), can be toxic depending on the brand you're using. |
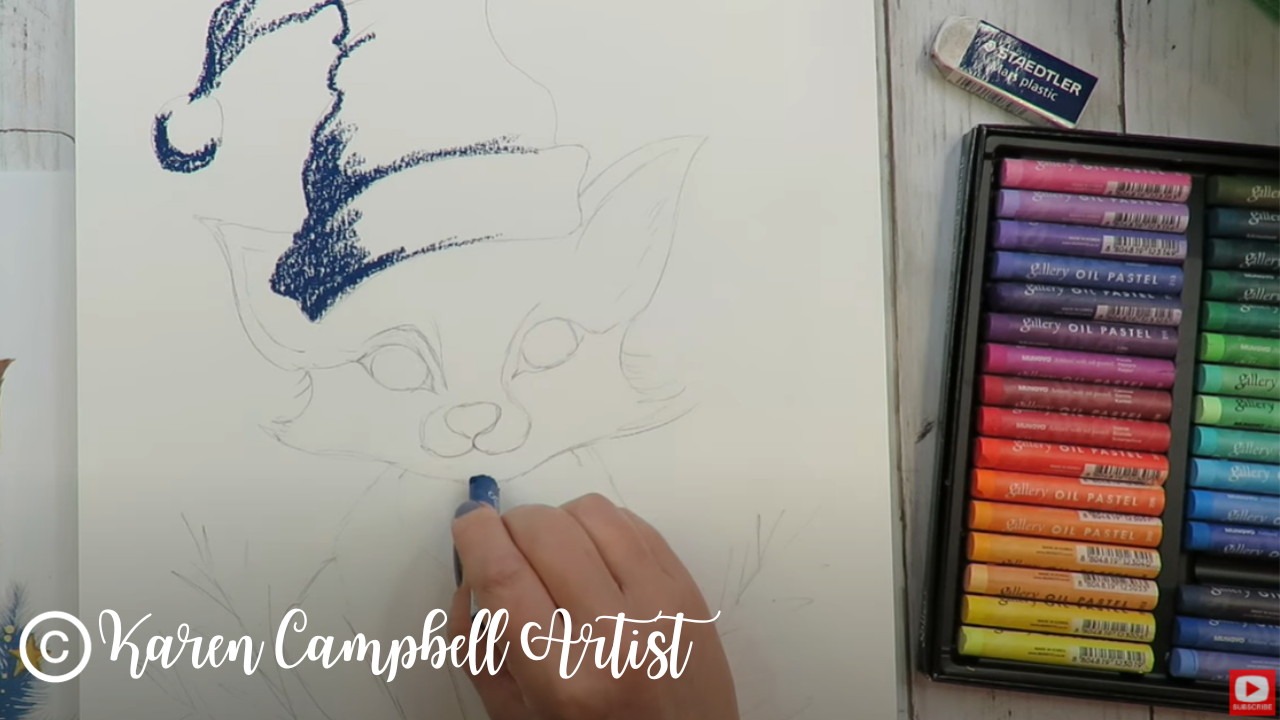
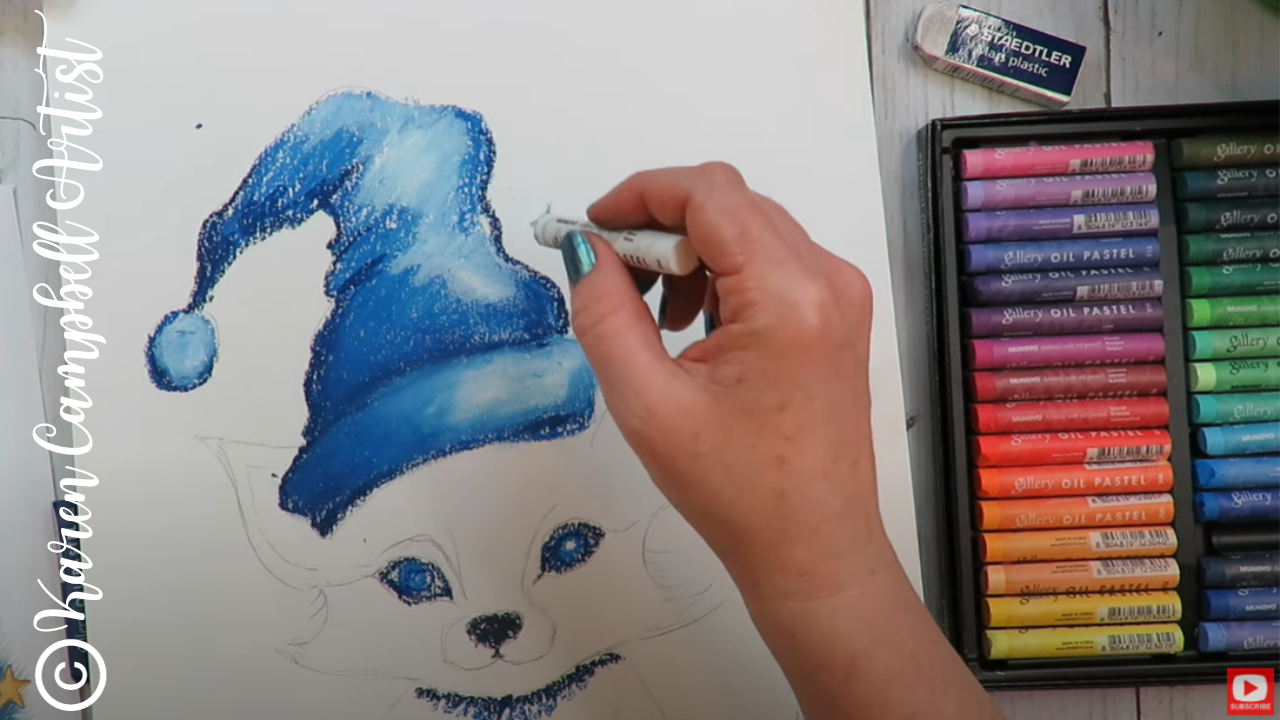
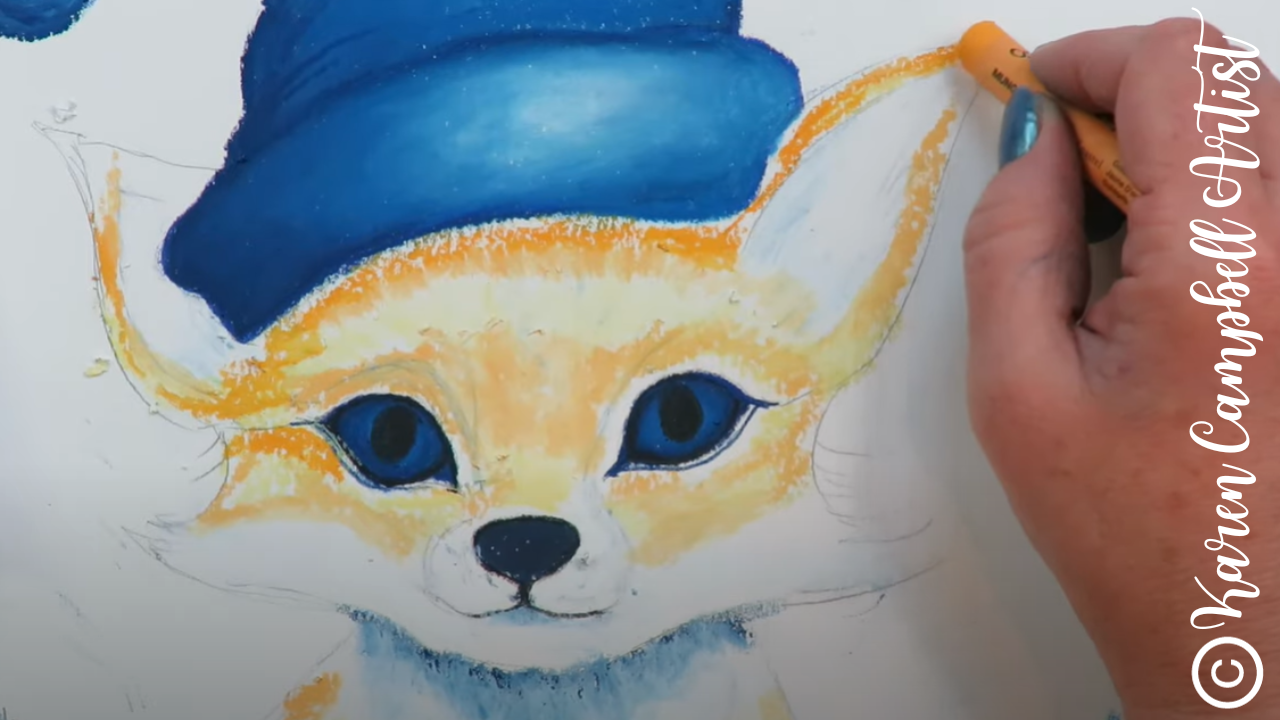
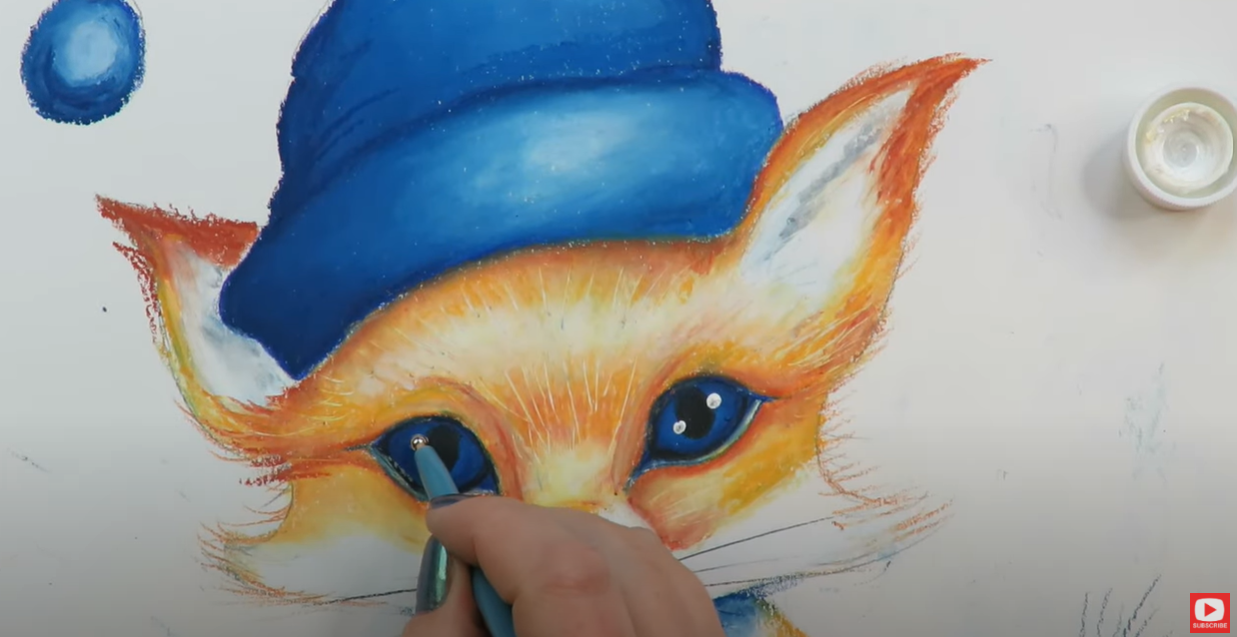
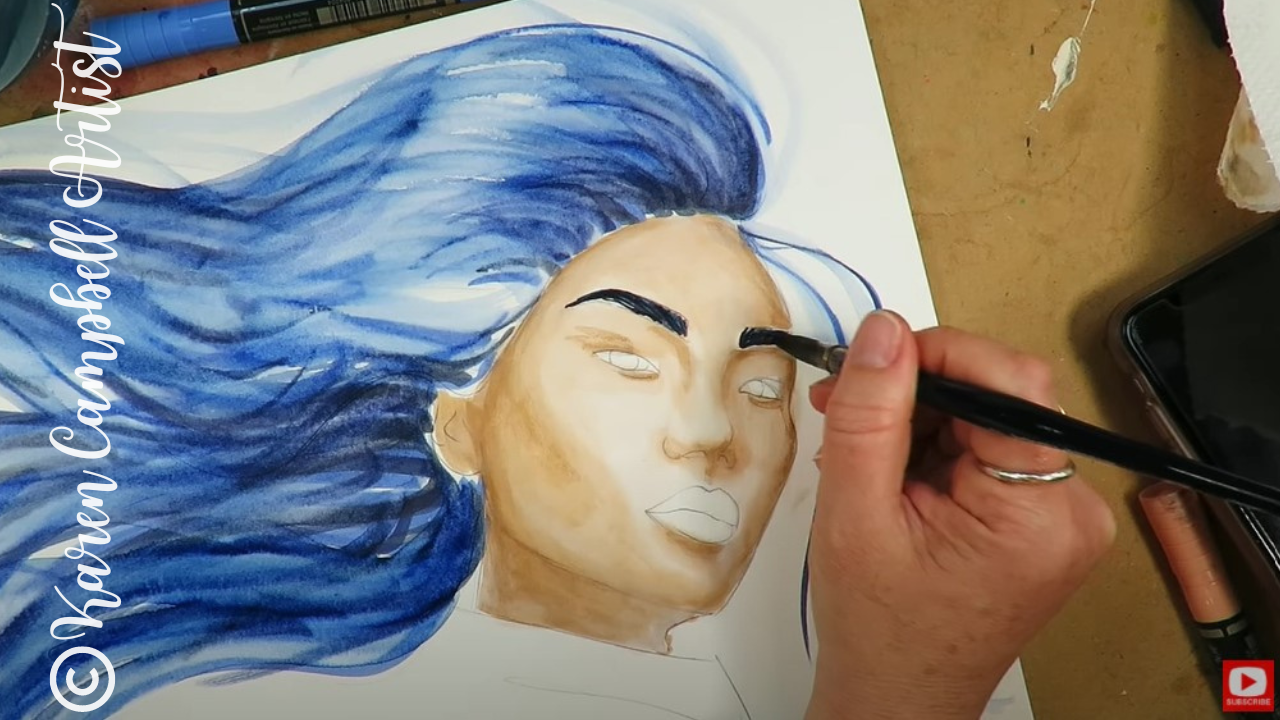
I started today's shading in the fox's hat, using a dark blue here, and anywhere else I noticed this color in my reference image. (Grab the reference here if you didn't get it yet).
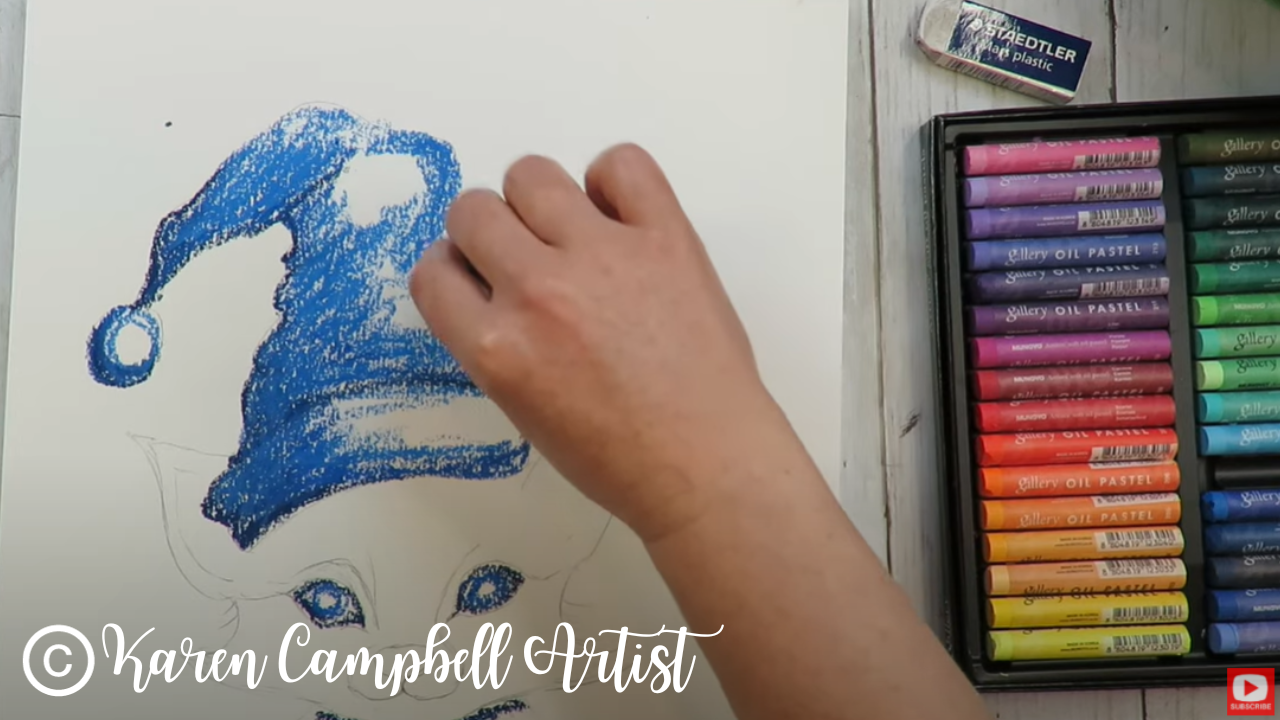
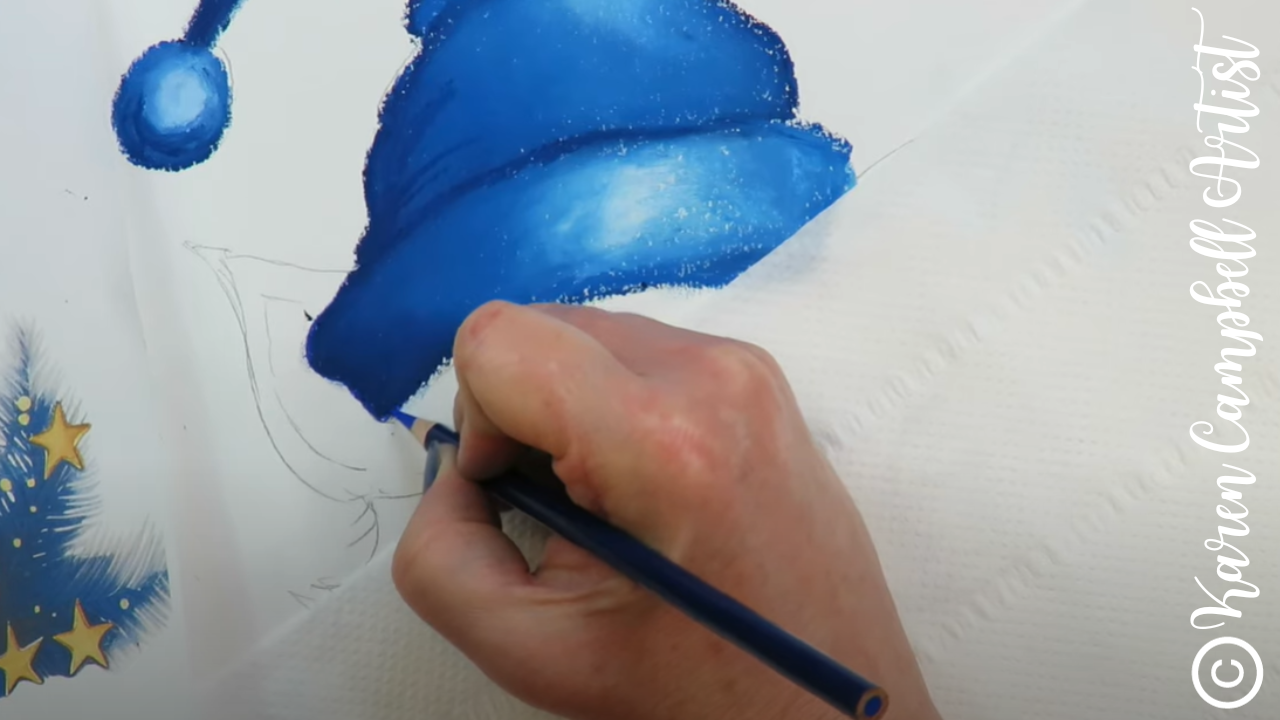
HOT TIP! Oil pastels are messy, and will smear into your skin and subsequently ALL over your paper as you work, if you're not careful. Keep a paper towel or scrap paper under your wrist to avoid smudges where you don't want them.
HOT TIP: When it comes to white highlights (which I'm obsessed with in EVERY medium I work with), DO leave the white of the paper showing where you want your whitest highlights to appear.
Alternatively, you can go to 01:14:11 in today's video to watch how I used light colored pencil to carve through the pastel layers where I wanted highlights. Seconds later, I tested one of my etching/embossing tools to attempt creating the look of animal fur. This turned out sooooo cool and is something I highly recommend!!
Are Oil Pastels Worth It?
Stay tuned for next week's oil pastel tutorial because I'll be painting a face in acrylics and shading it with oil pastels on top of the acrylics layer. I can't wait to see how this works!!
Want to Learn How to Mix Your Media
To Create Art You Can Be Proud Of?
The first video alone has over 171K views!!
Need MORE Resources?
❤️ MY FAVORITE ART SUPPLIES on AMAZON (affiliate links)
❤️ MY BELOVED FACEBOOK GROUP
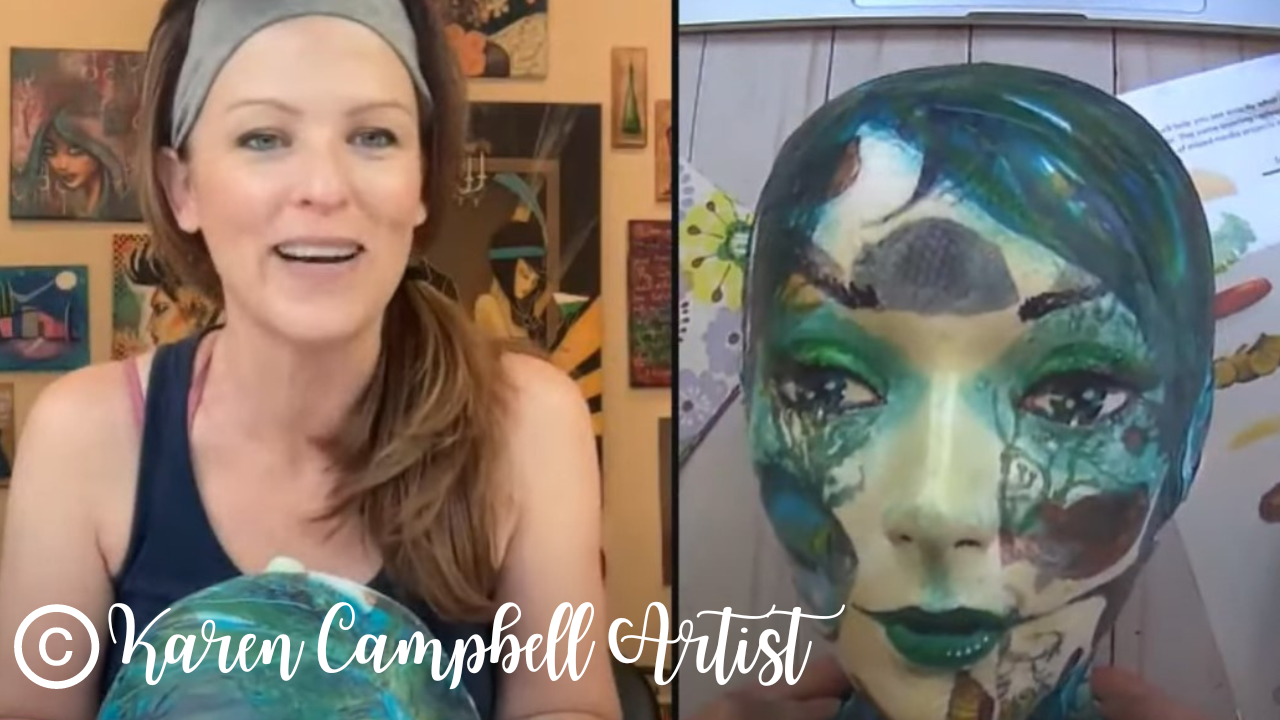
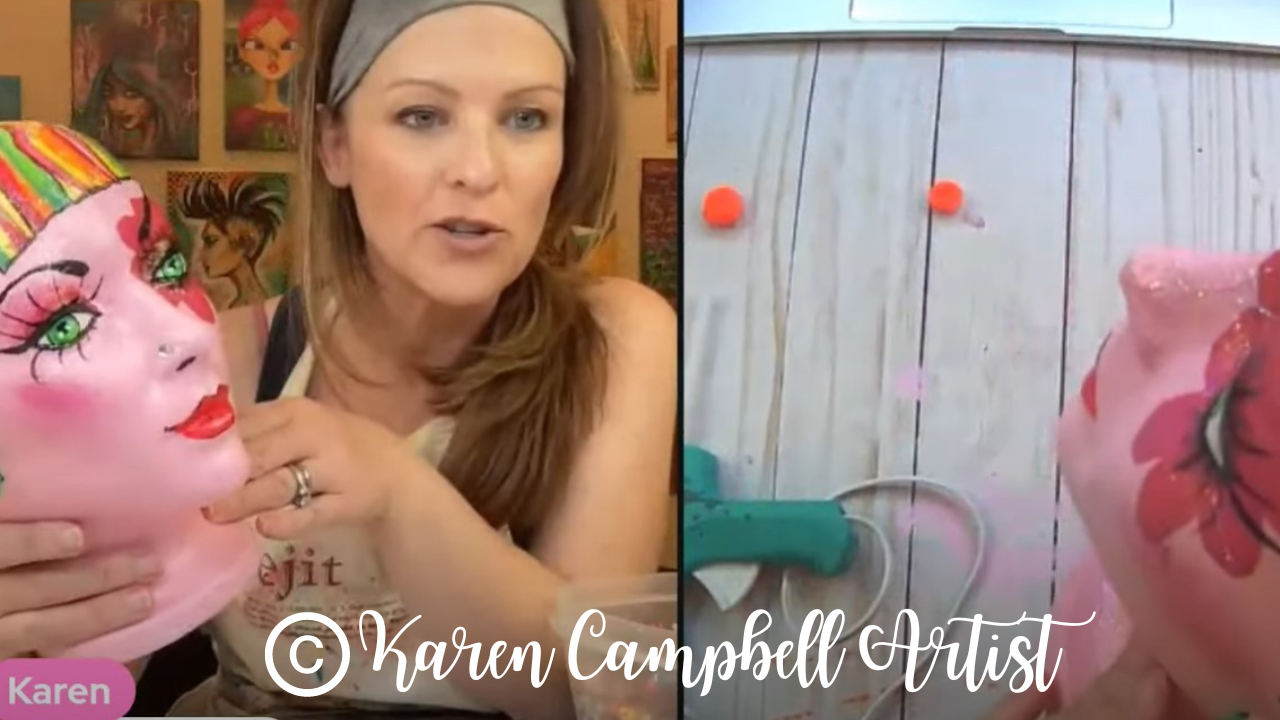
These funny foam heads have WAY more purposes than you'd think :)
From Halloween decorations (heck ya - see the black widow girl in the far right below?!), to eye-glass holders (much-needed, thank you), or something that's plain old FUN to liven up a boring corner of your house!
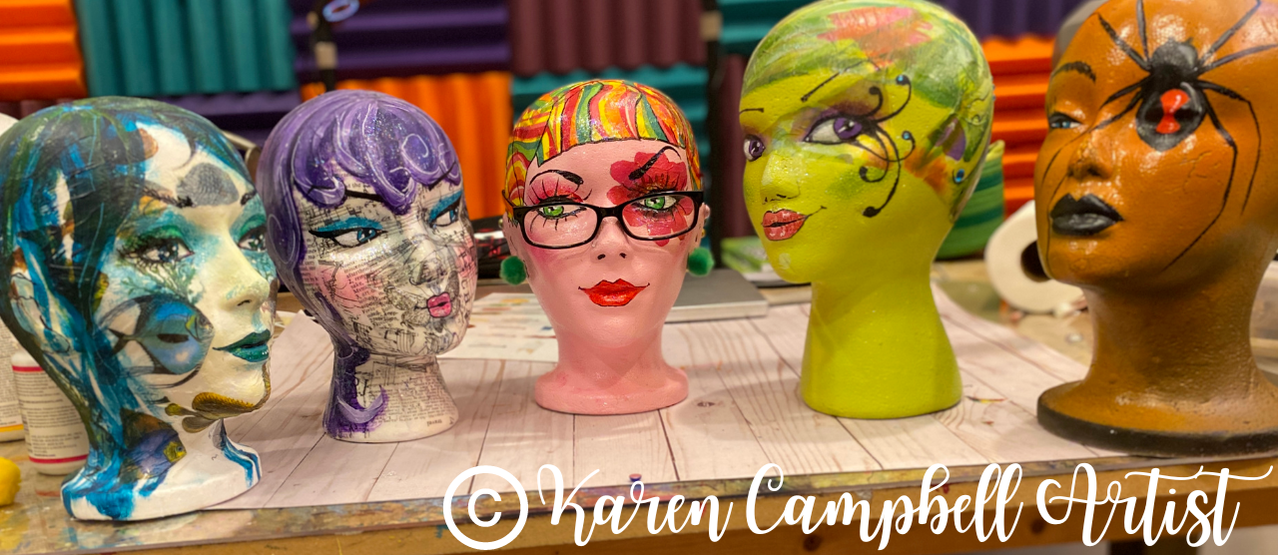
Supplies Needed
- 1 super freaky Foam Head (yup, they're even on Amazon!! Here's another option with more realistic features!) You can also find these in your local craft store (Michael's and Joann's have them!). If you're outside of the U.S., you can also do a Google search or call around to your local craft stores, Walmart, or Amazon in your country.
- Mod Podge OR Matte or Gel Medium or any glue that dries fast and CLEAR (I find mod podge helps to fill in the porous styrofoam a bit as I work!)
- Tissue paper or napkins (also optional - I'll also show you different variations to use them if you don't like a "busy" look).
- Acrylic paints of any kind/color
- Pitt or Paint Pens are optional but nice to have for details and blending.
- Foam Brushes are really nice to use for your mod podge layer
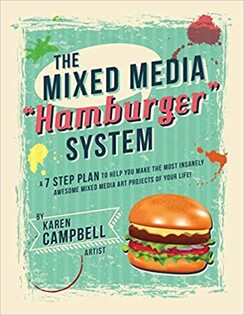
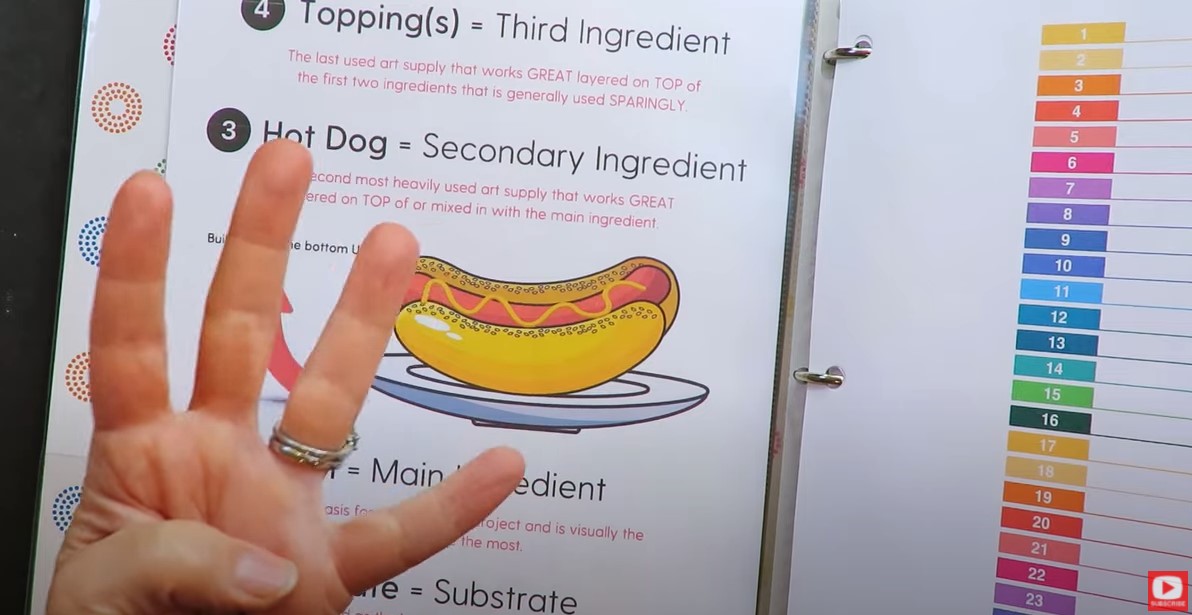
Click here to start the full step-by-step mixed media art tutorial in my signature "Hamburger" style!
Grab my Hamburger System cheatsheet and follow along layer by layer just like you're following a recipe.
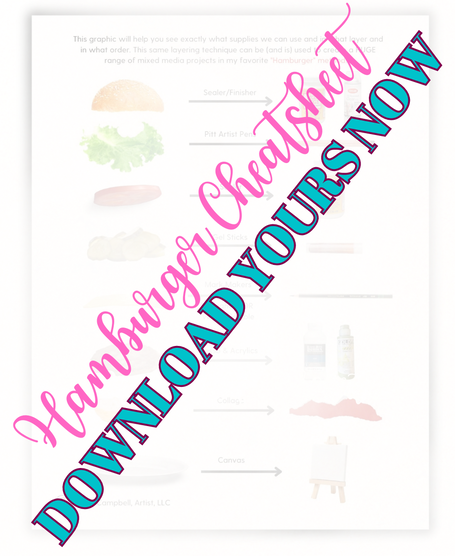

Feel free to grab that on Amazon if you'd like to dig a little deeper into how your supplies work, and how to combine them successfully to create art YOU love!
I'm SUPER literal about this decision every time, and simply look to my collage materials for guidance. I've found this to be a fail-safe way to create, and it never lets me down! Typically I pick 3 colors from my collage paper and move on!
Today I decided to zero in on a lighter variation of my hot pink because it looks a little more like skin tone to me, and that's what I'm in the mood for :)
Stay with me till the end of this FUN tutorial because there are LOTS of SPARKLES coming this foam head's way :) She even gets a nose ring (below left!).
Go grab your supplies and come get creative with me!!
Want MORE Projects Like This?
What to Watch Next...
Need More Resources?
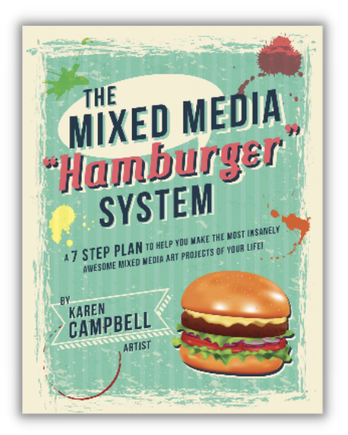
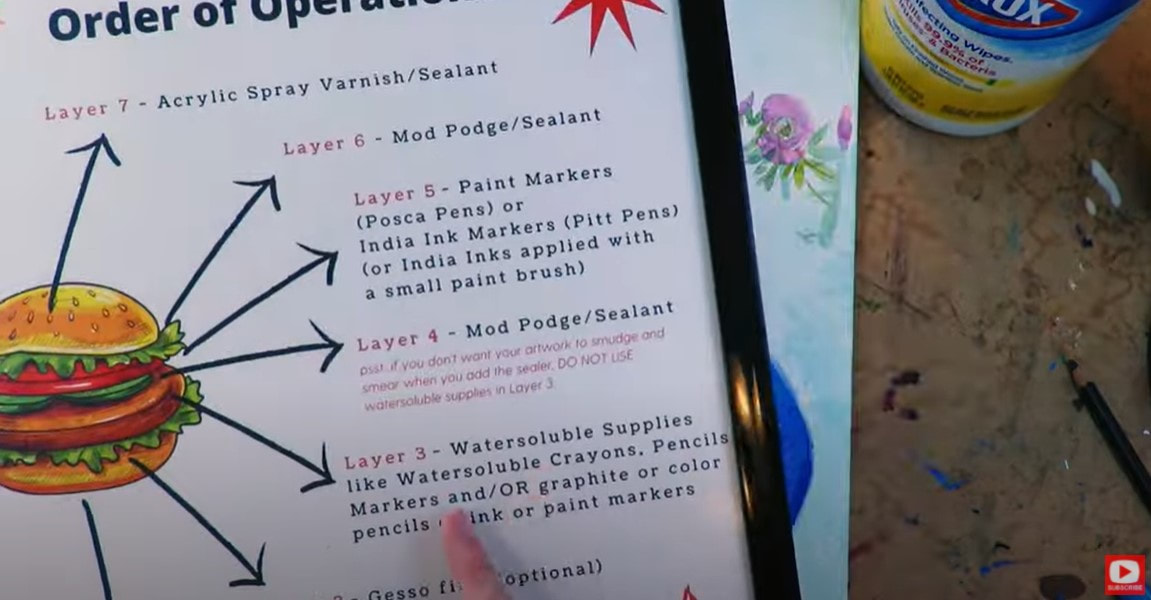
I've got a solution that will make it super easy and fun for you. I call it "The Hamburger System," and it's seriously going to revolutionalize your approach to mixed media art (if it hasn't already!).
In my signature 7-step process, you'll learn MORE about your art supplies (what they do & if they play nicely with others), plus I'll teach you exactly how, and when to layer your supplies to set you up for mixed media success EVERY time you sit down to create.
Let's dive in!!
Need a Cheatsheet Before We Get Started?

Layer 1: Substrate
Layer 2: Collage
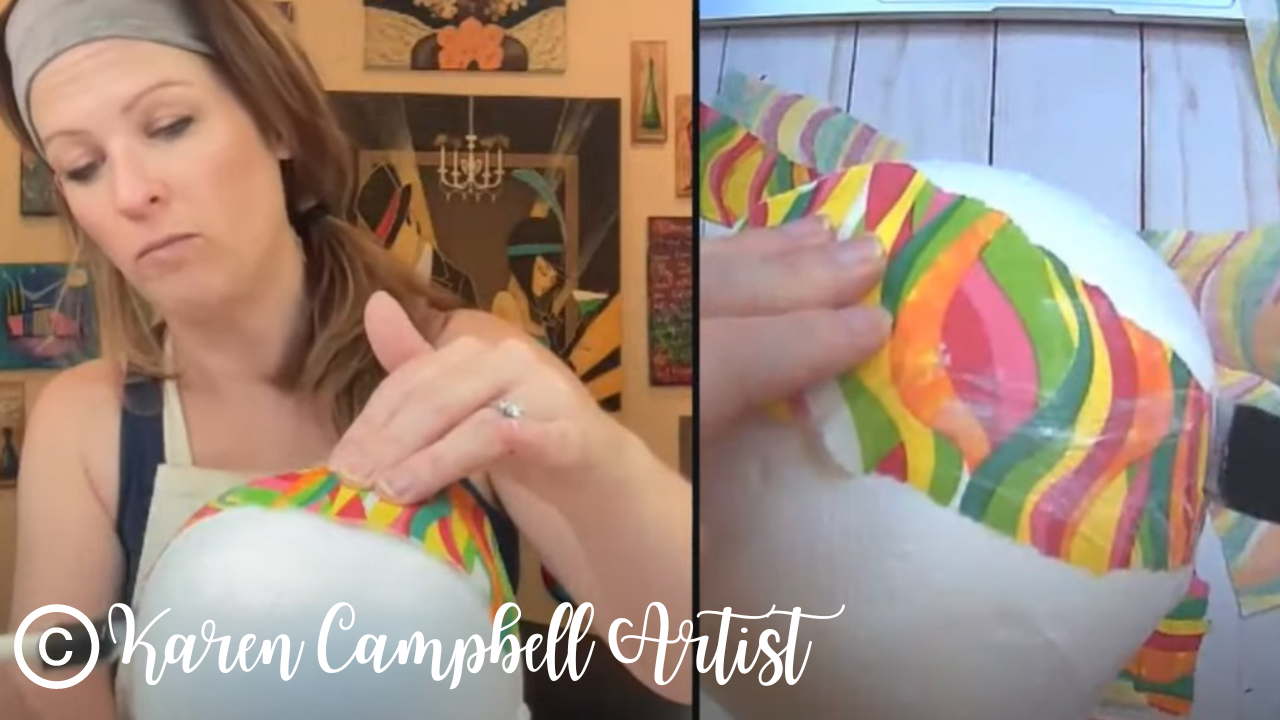
Grab your matte medium (or any adhesive YOU like) along with a few sheets of scrapbook paper. Then rip the scrapbook paper into chunks and start gluing it to your substrate. I think collage is an awesome foundation for your piece and adds visual sophistication to your work!
Layer 3: Acrylic Paints (This Includes Stencils!)
Lots of people ask me how I choose my paint colors for each project. Typically I look to my collage layer for inspo, and simply pull 3 shades of paint that match my scrapbook paper. Easy, right?
Once you've got your colors, add them throughout your collage layer wherever you want to jazz things up, or even cover something up that you don't like.
Feel free to experiment with different colors and techniques like stenciling to achieve the effect you're after.
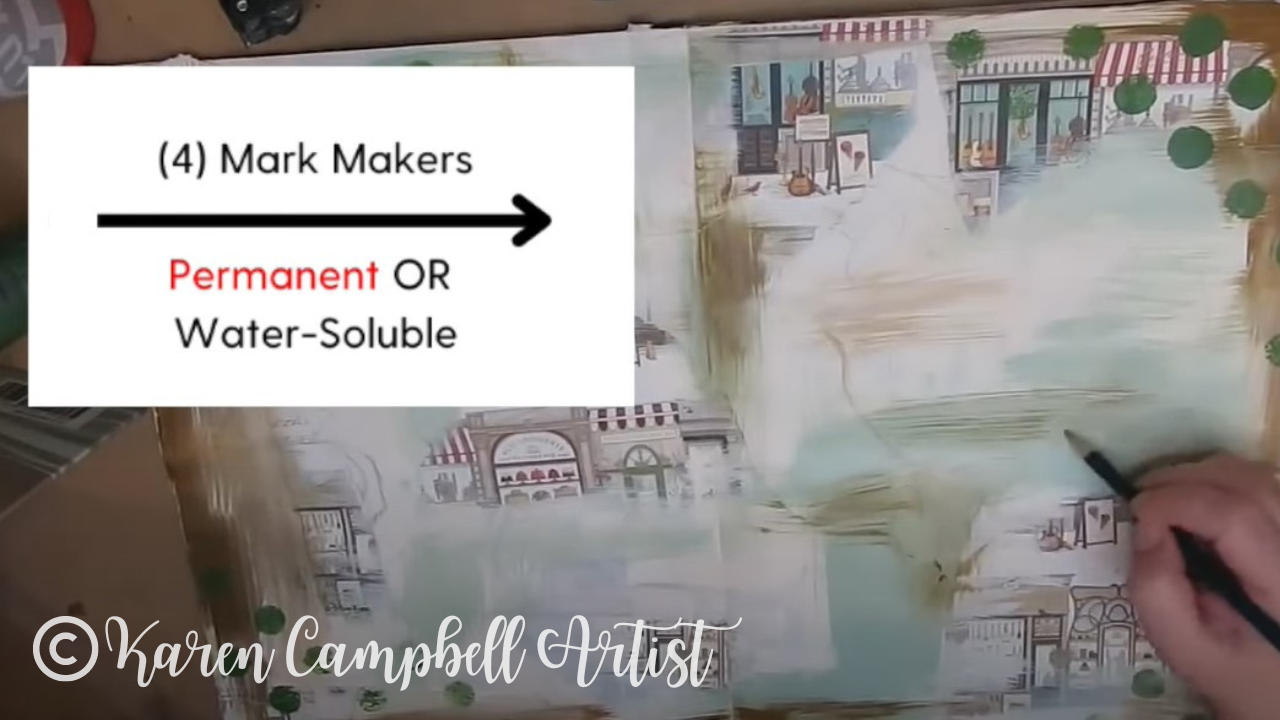
Layer 4: Mark Makers
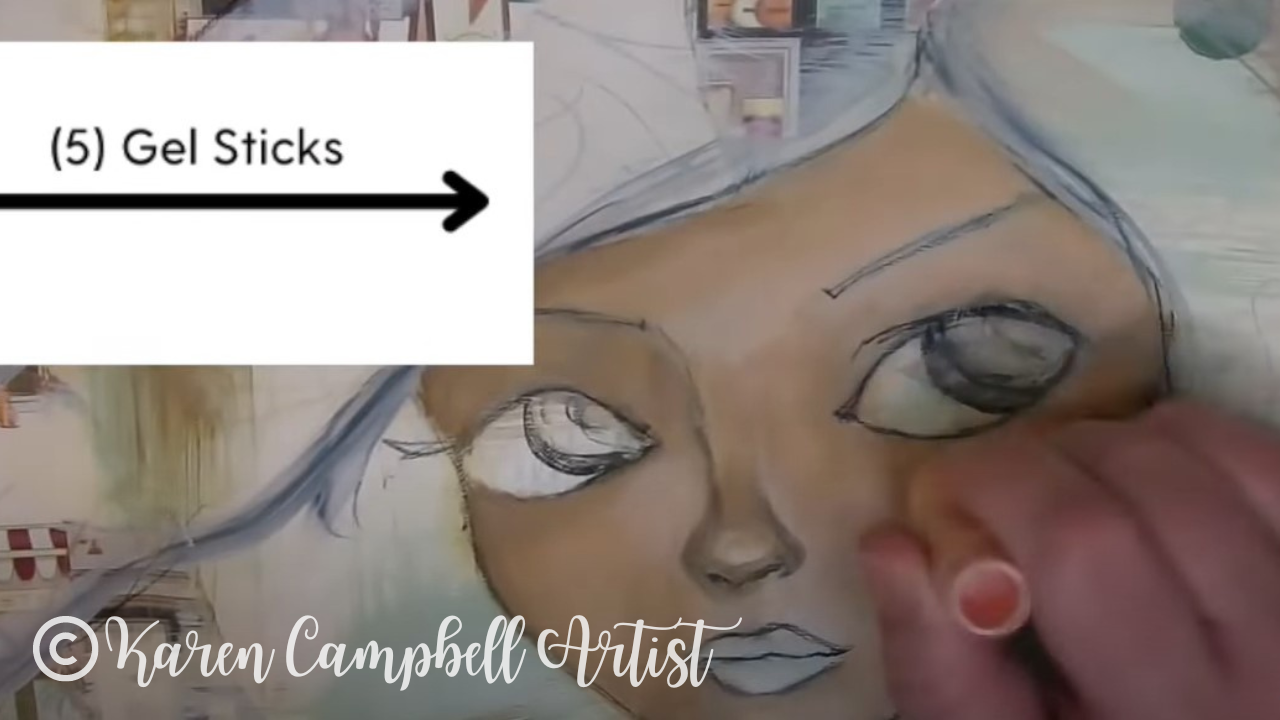
Layer 5: Gel Sticks
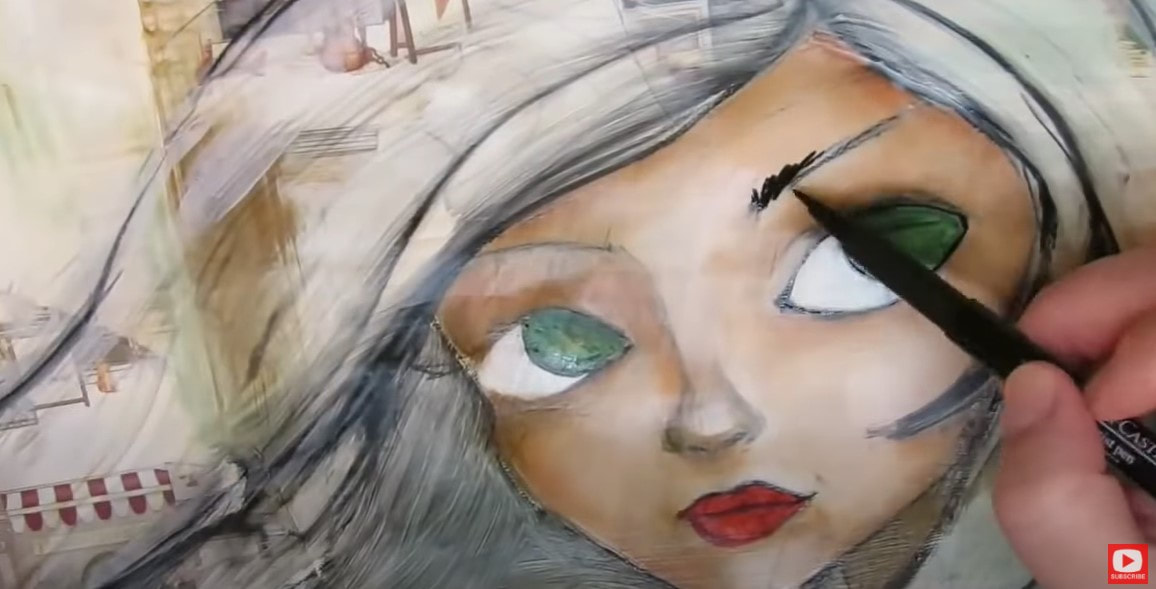
Layer 6: Pitt Pens
Layer 7: Sealer
Not long ago I tested Mod Podge against SEVEN other sealers to see if there were any others I wanted to start working with. Check out what I learned and which glossy one I I fell in love with!
Did you grab my Hamburger Cheatsheet yet? Here's that button again in case you need the link again!

Dying to TRY the Hamburger System with Me?!
Add your name to the waitlist to be notified the next time I'm taking new members!
Wanna See MORE "Hamburger Style"
Mixed Media Art Projects on YouTube?
Need More Resources?
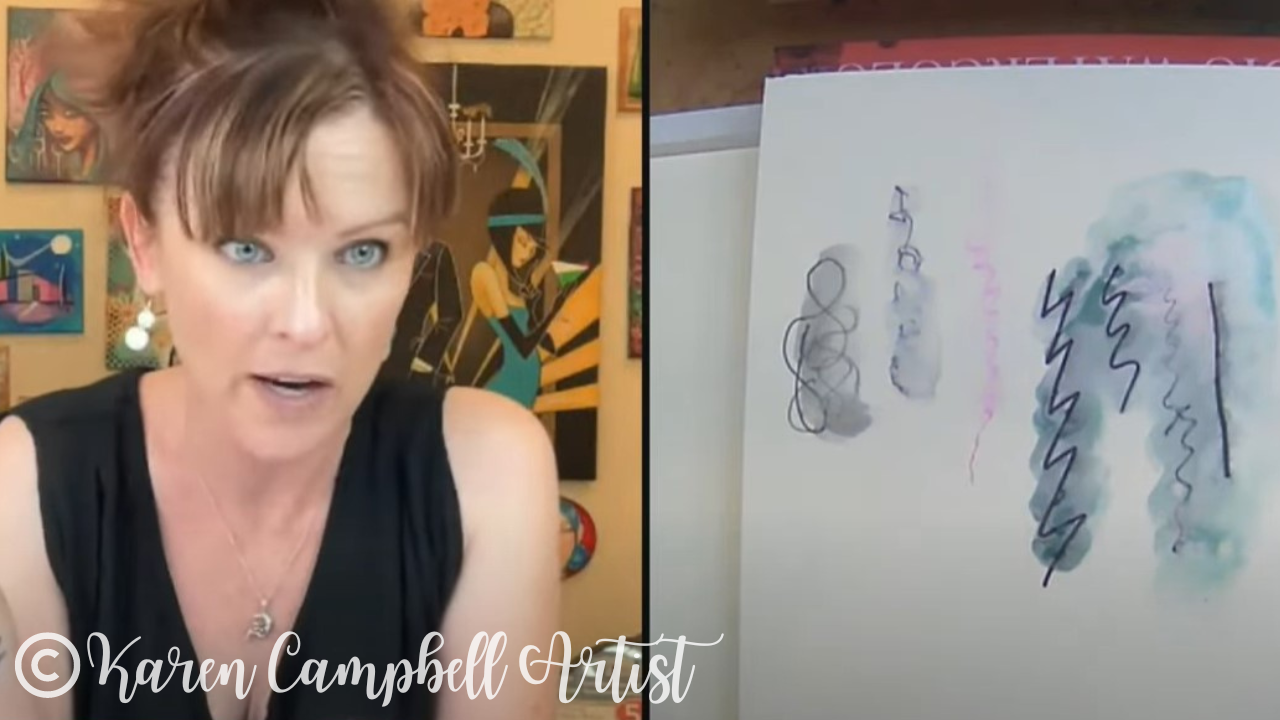
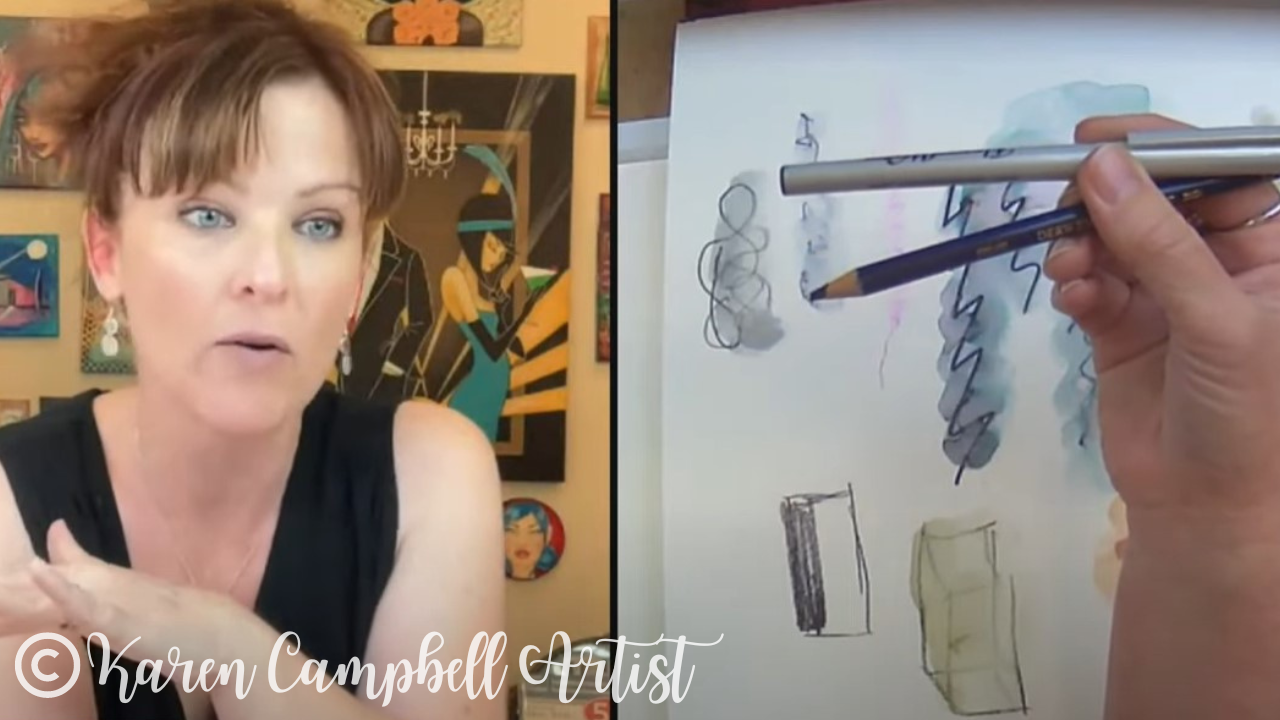
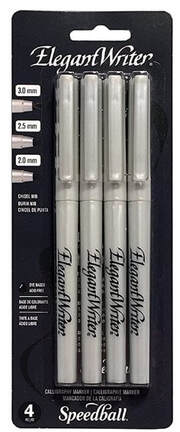
I'm going to be using an elegant writer (felt tip calligraphy pen), but you can use any kind of water-soluble marker or pen you have lying around at home. Not sure if you've got any water-soluble art supplies at home? Keep reading, because I'm gonna help ya find one!!
in this FREE mixed media art lesson including:
- What IS water-solubility?
- How do you tell if your writing instrument or art supply IS water-soluble?
- What is the Elegant Writer and how does it work?
- What can I use if I DON'T have an Elegant Writer??
- What paper should I use for this?
- How do I do this project if all I have is a pencil?
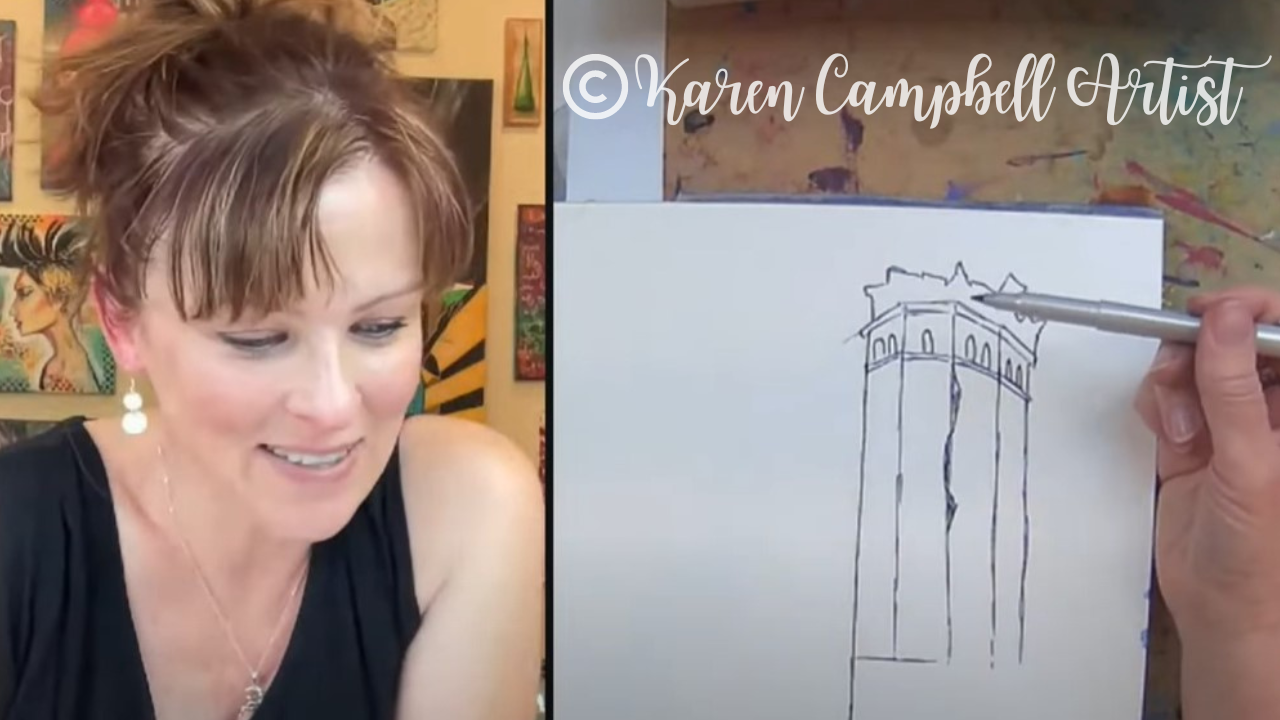
- How to draw a castle ruin and rocks!
- How to depict realistic shading (and light sources)...
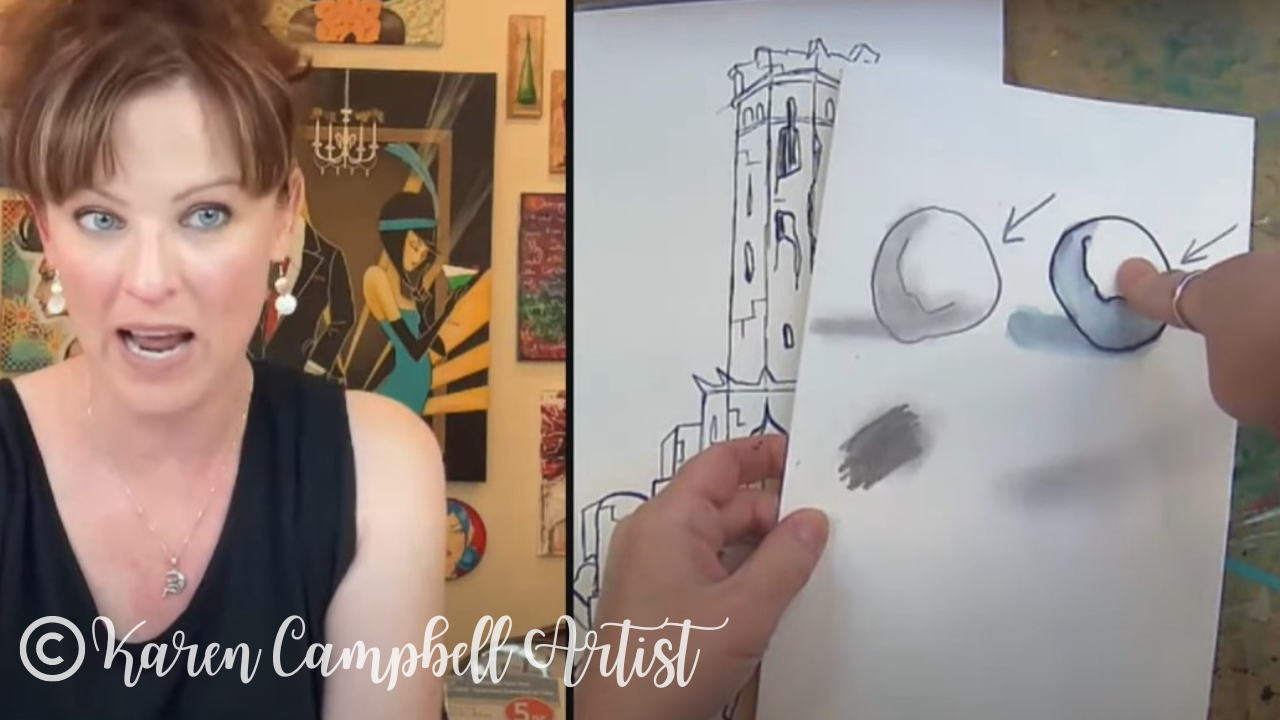
- How to strategically use water to create the look of depth and dimension when using water-soluble art supplies.
Forget about perfection and masterpieces – today, it's all about having fun and exploring the amazing properties of water-soluble materials. We're gonna let our inner second-grader shine through, embracing the joy of creating without any pressure.
They're water soluble! Yep, just draw a line and add water to it with a paintbrush – it will melt like magic!
Now, let's talk about the materials that can take our creativity to the next level. If you happen to be an artsy, fartsy person with a collection of art supplies (lucky you!), there are some fantastic options to consider.
Mixed media art supply lovers may also have Fineliners, Tombow markers, Neo Color IIs, watercolor pencils, watercolor markers, or a Stabilo all black pencil (if you've been hanging with me for a while - you definitely have one of these!!). Any of these supplies are an excellent choice for today's castle ruin project.
Don't have any fancy art supplies? You can still have a TON of fun using any regular old pencil!
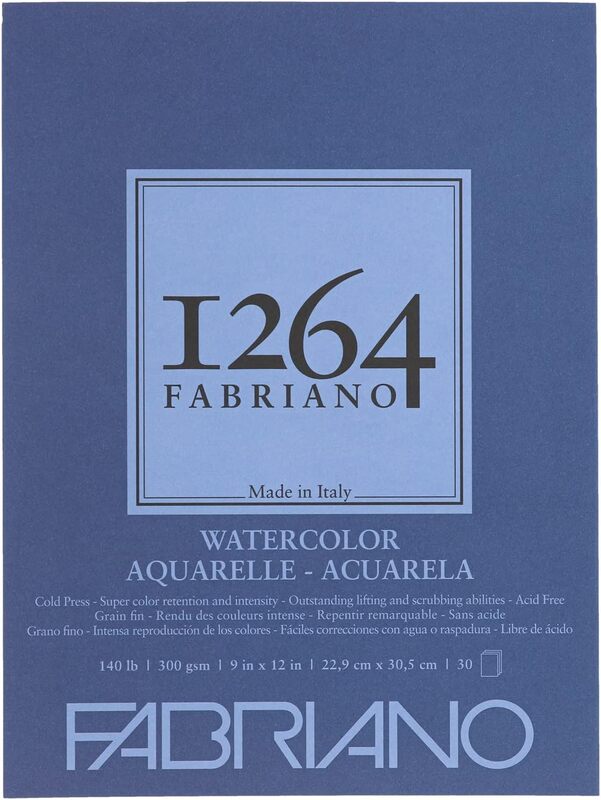
As far as watercolor paper goes, you've got choices. Cold press watercolor paper or hot press watercolor paper would both work beautifully for this activity. Cold press offers more texture and holds more water, so I'd go with this option if you plan to do multiple layers. Hot press doesn't really have any texture to it, and is super smooth.
What you choose today is entirely up to you, and your artistic preference!
To learn more about watercolor paper and see each type of paper in action, check out this recent video.
Make sure you watch today's video so you can draw along with me in real-time. Then, get ready for the magic – we're gonna activate the elegant writer ink by applying water selectively to just one side of our drawing using a watercolor brush!!
You're gonna LOVE watching the ink melt into stunning shadows, adding depth and sophistication to your work!
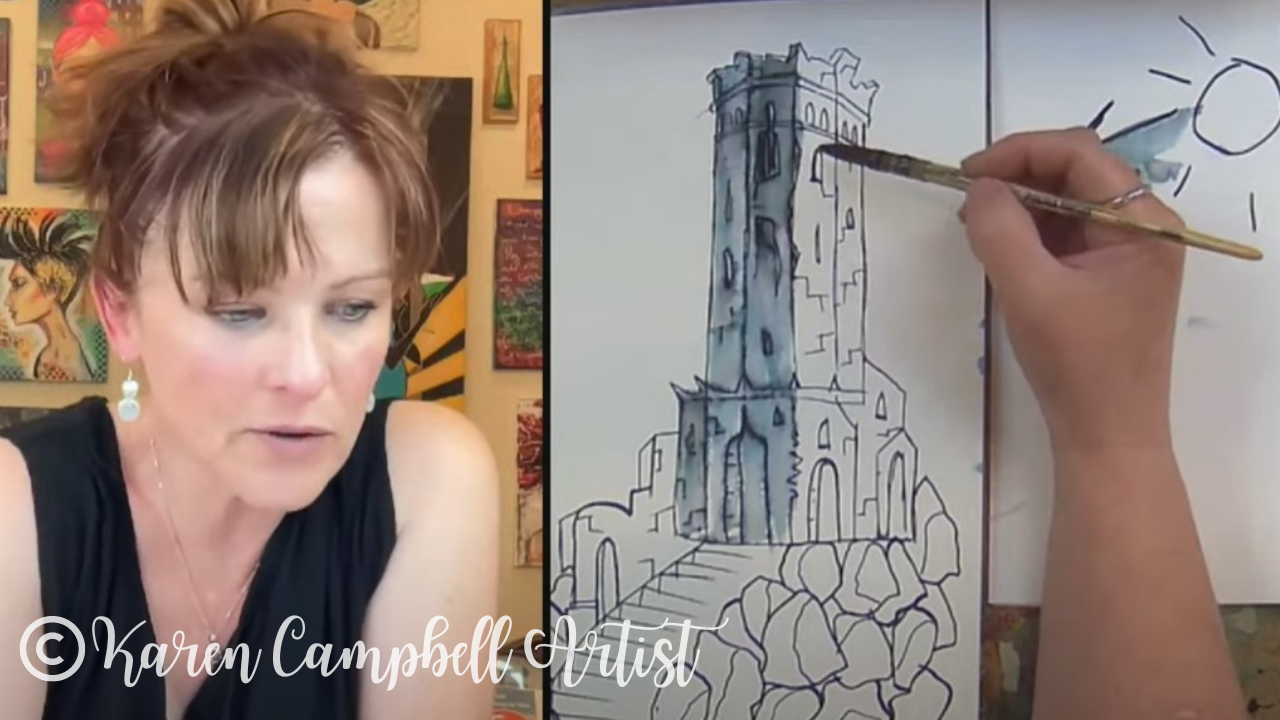
For all you pencil lovers out there, fear not! A blending stump, cuetip, or your finger does an amazing job of adding dimension to your drawing when you're ready to start shading.
There's no right or wrong way to approach this – it's all about exploring, playing with your supplies, and adding your personal touch to those craggy castle ruins.
?www.facebook.com/groups/awesomeartschoolPost a pic of your craggy castle ruins in my Facebook group
?Or tag me on Instagram @KarenCampbellartist
I'm genuinely excited to see what you create!!
Want Another FREE Elegant Writer Project?
Loved This Castle Project & Want MORE?
?Check out The Celtic Collective & add your name to the waitlist to be notified next time we're taking on new members!
Need More Resources?
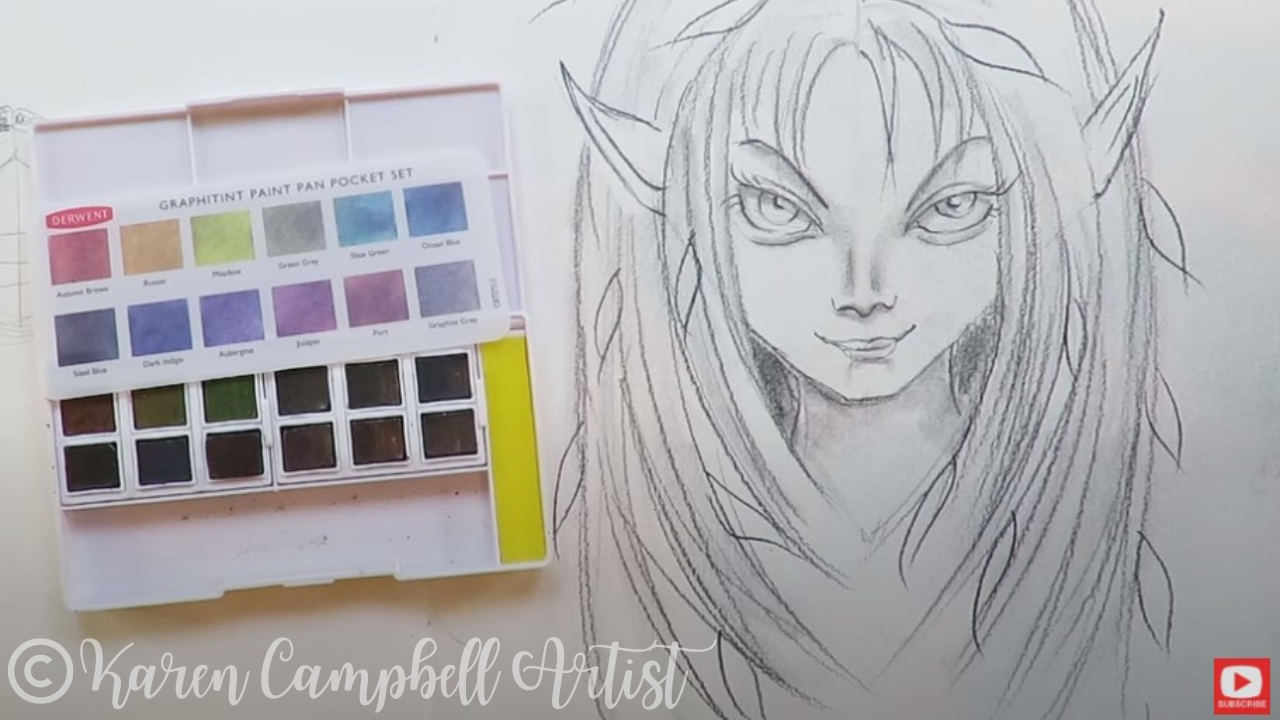
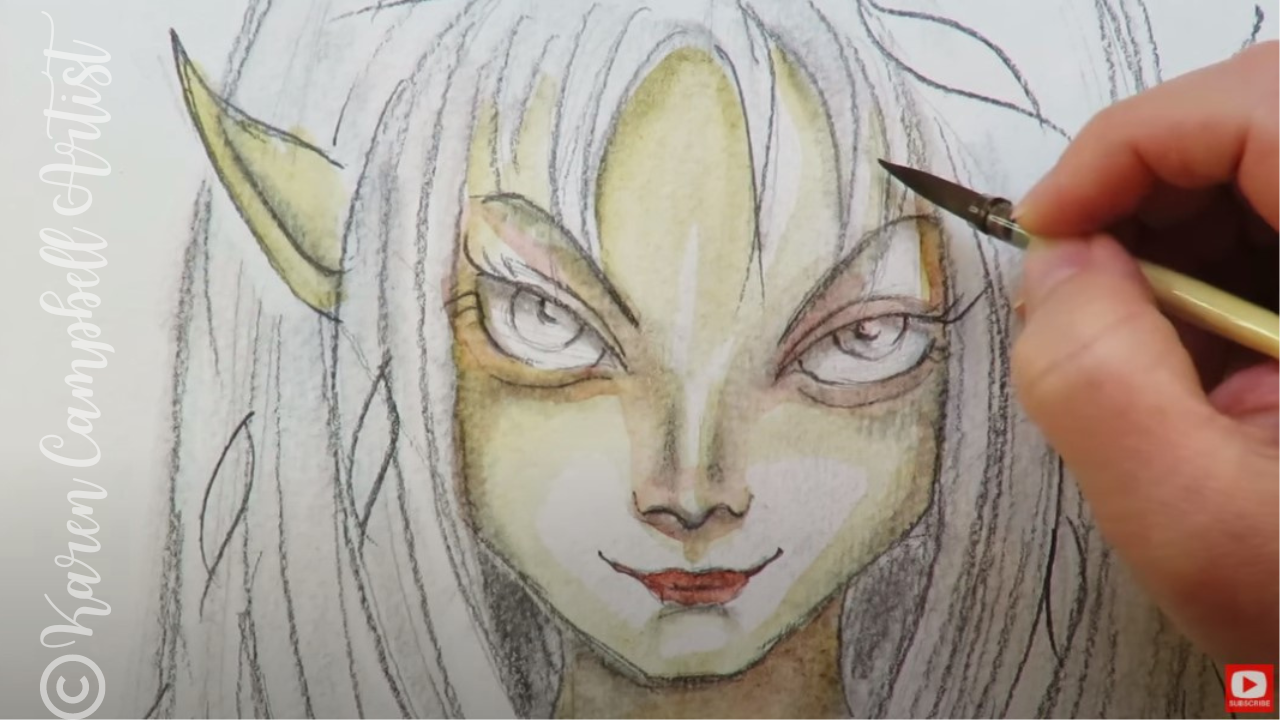
FUN & EASY Mixed Media Project for Beginners with Derwent Graphitint Watercolor OVER Pencil
20/9/2022
Adding watercolor over pencil drawings is a super FUN and EASY technique that can really make your drawings look more sophisticated.
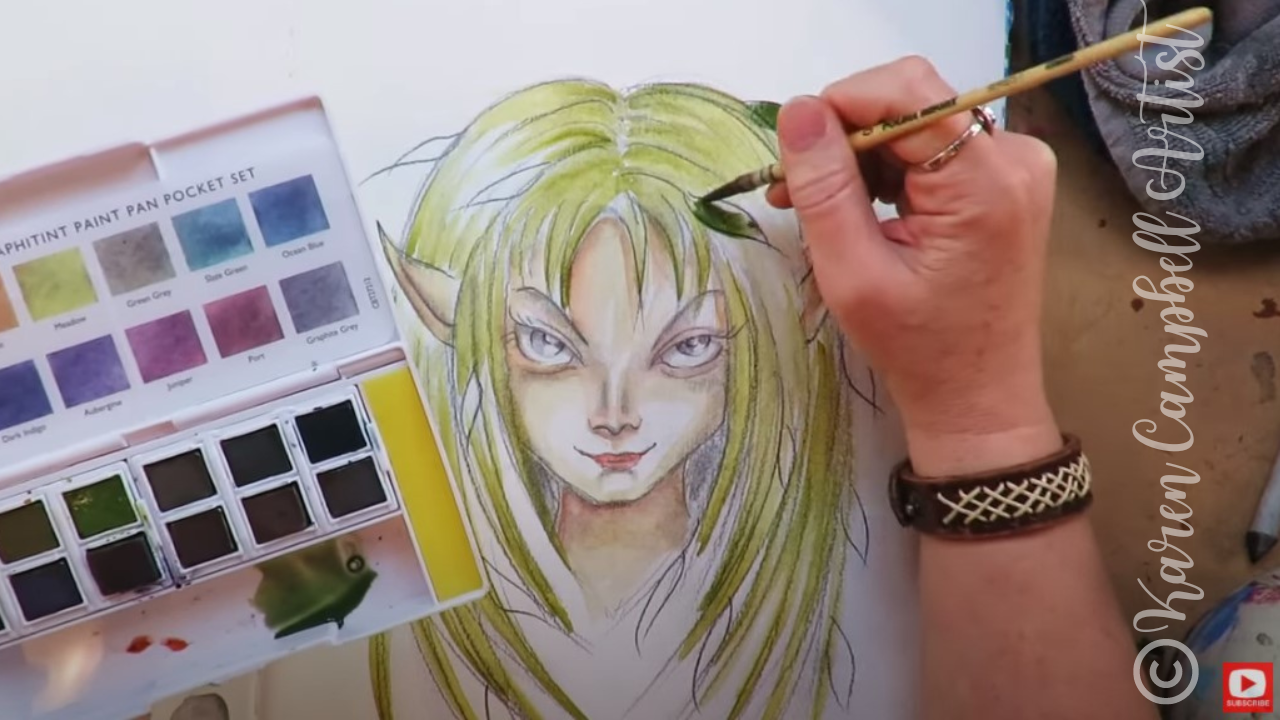
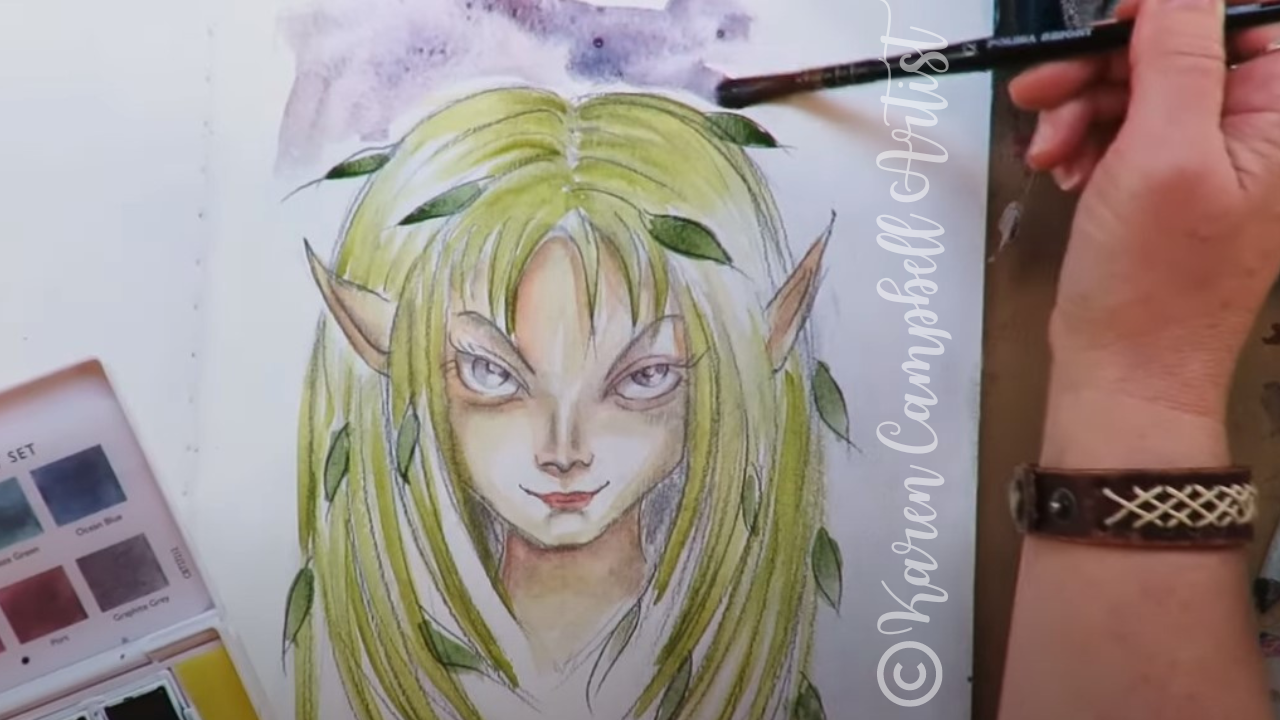
Grab your watercolors and your fairy drawing to create along with me as I lead you step-by-step through simple face shading, creating magical hair, and an easy background in watercolor!


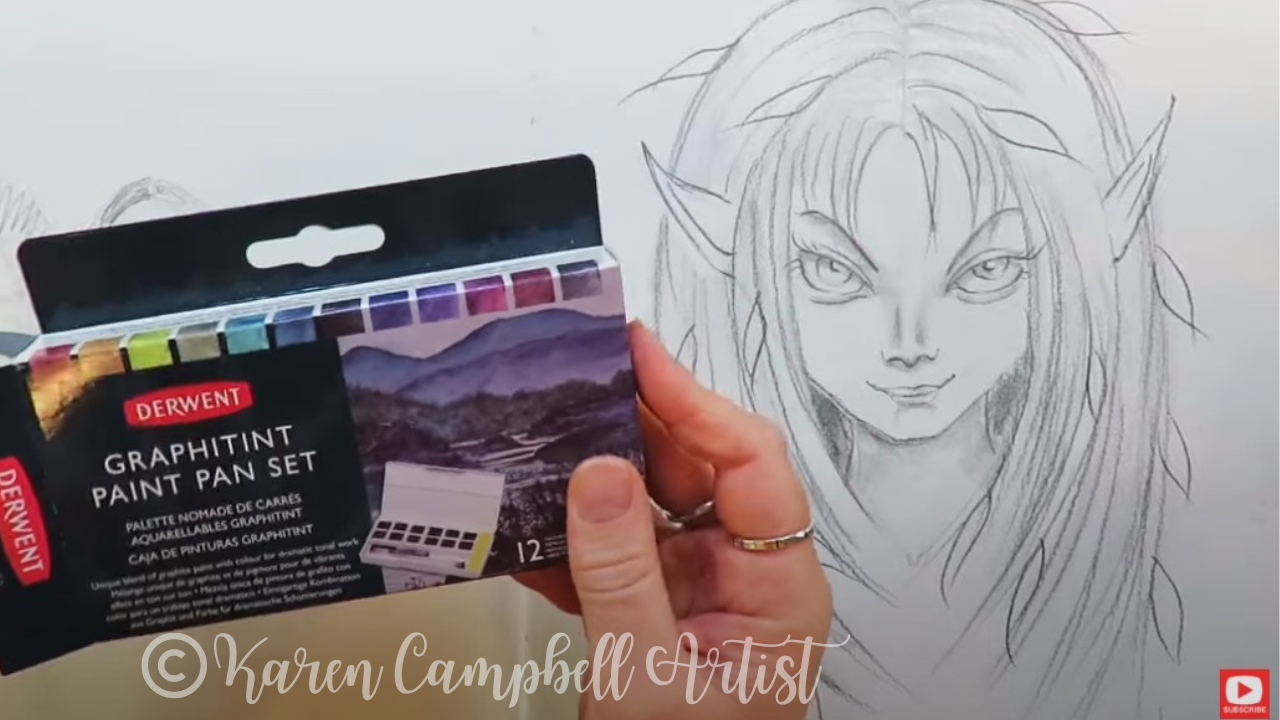
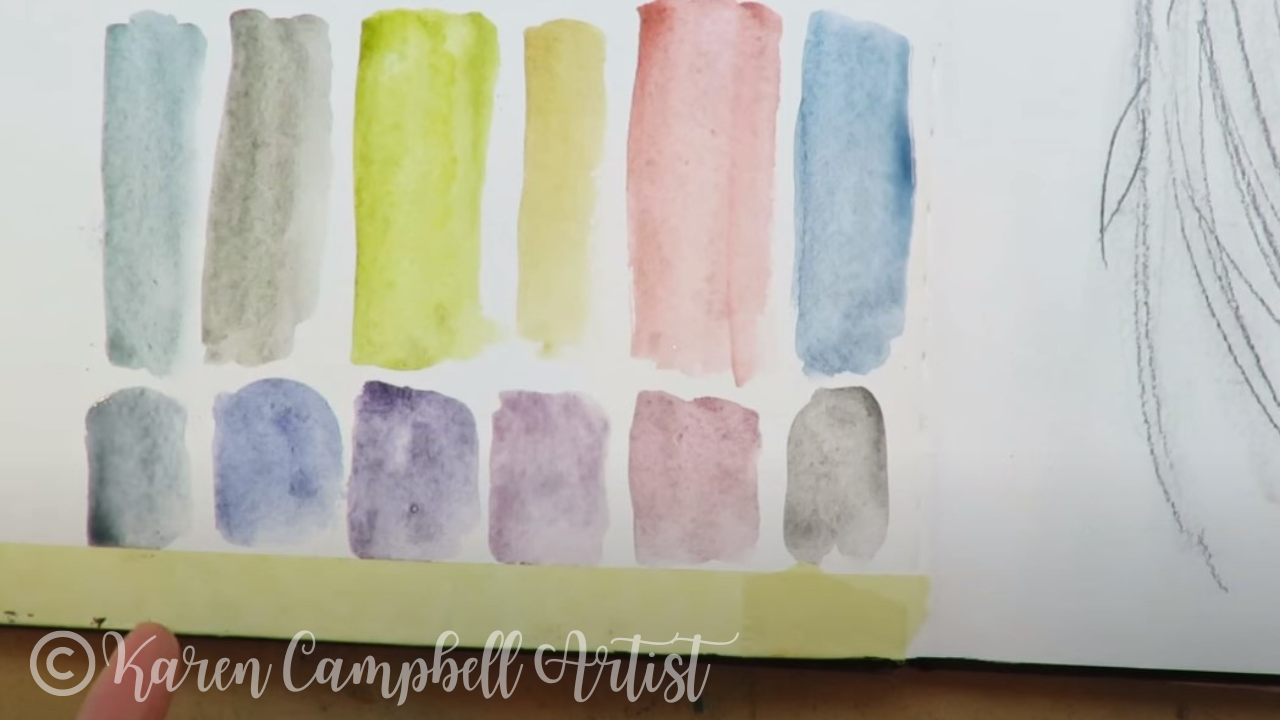
If you've never heard of Graphitint before, it's a "unique blend of graphite paint with color for dramatic tonal work," according to the package.
To me- this set feels like muted nature tones, which is perfect for today's mixed media project.
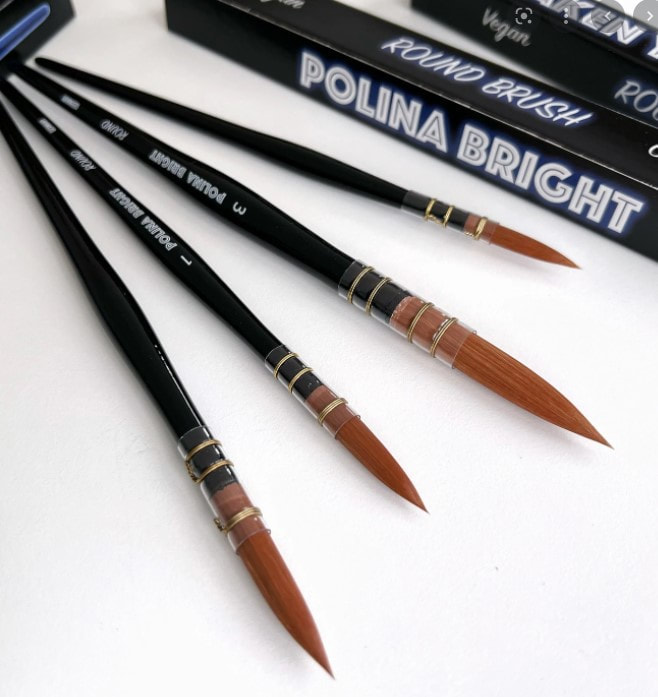
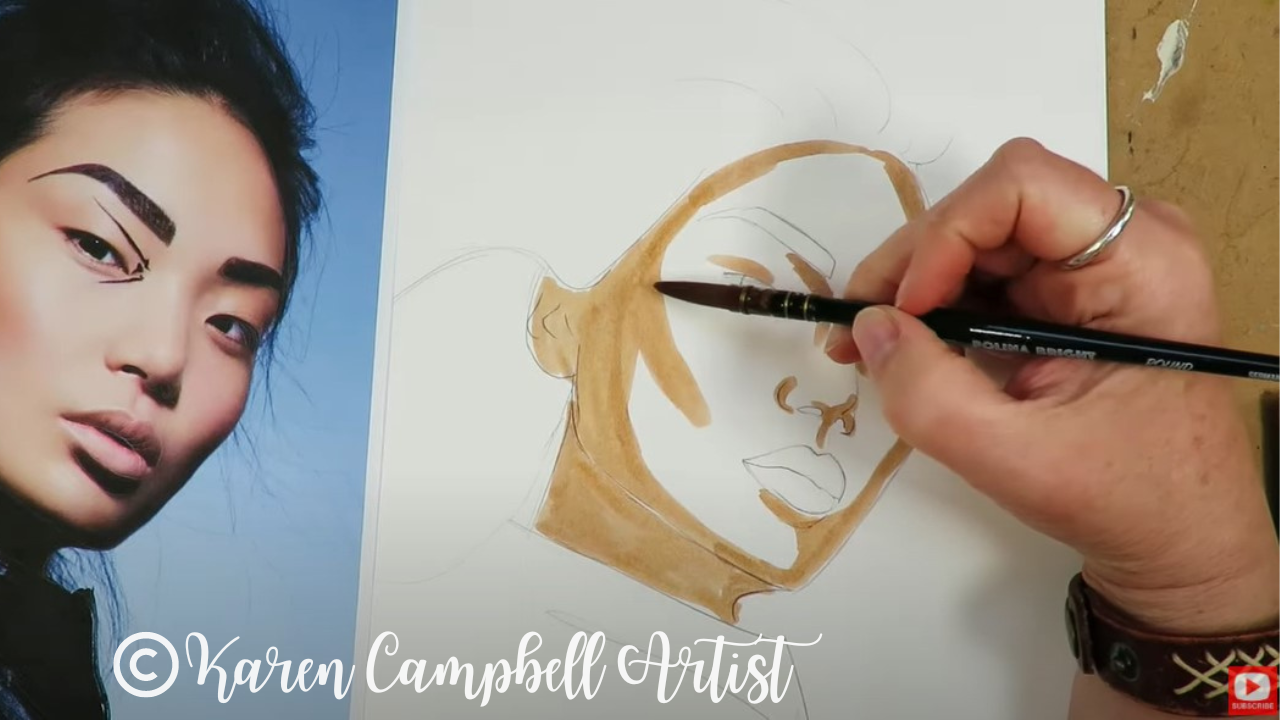
I'm using my Polina Bright watercolor brushes (get 10% off Polina's watercolor brushes here) for this project. They're the only thing I use now! Find out why here.
It's so freeing because you don't have to be "precious" about your work - just get in there, drop a light wash where you want some color, and call it a day.

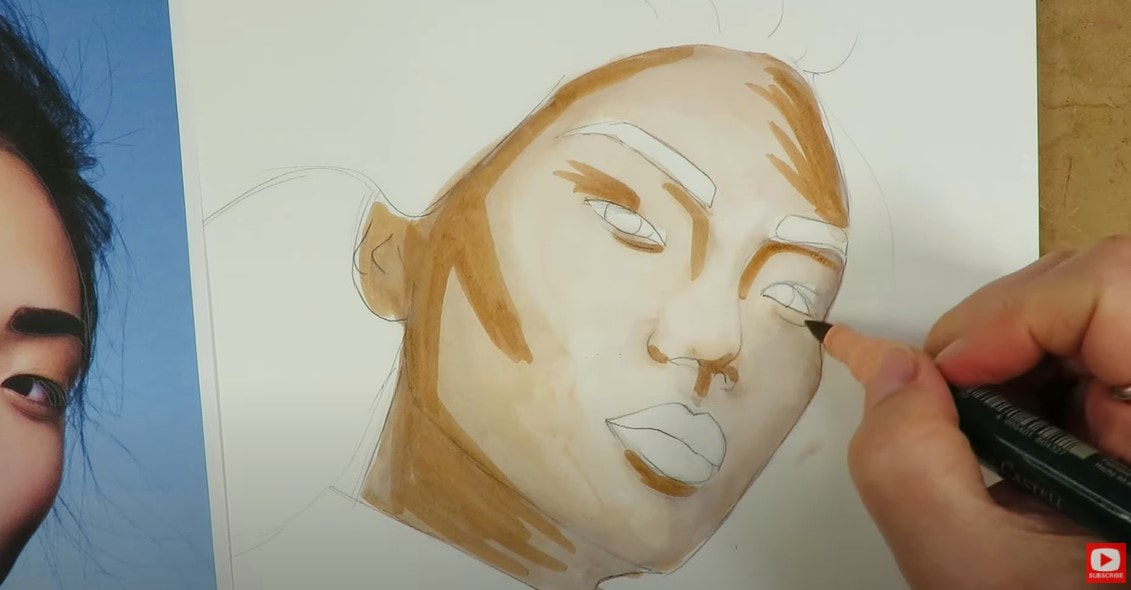
Make sure you click over to the video to see this in action. It's such a cool effect, and SO easy to do - even if you're a beginner.
I'm just lazy like that - I love to work straight from the pan, tube or whatever. It's faster and there's no guesswork about what color I'm gonna get!
I feel like this Derwent set could've used a nice dark forest green. Since it doesn't have one, I went out of my way (LOL) to mix one for the leaves in my fairy's hair.
If you've been following me for a while or are a student in one of my art clubs, you know I'm obsessed with my pentel pocket brush for drawing eyelashes and outlining.
I know many of my students are intimidated by it because it can be unpredictable and take some getting used to.
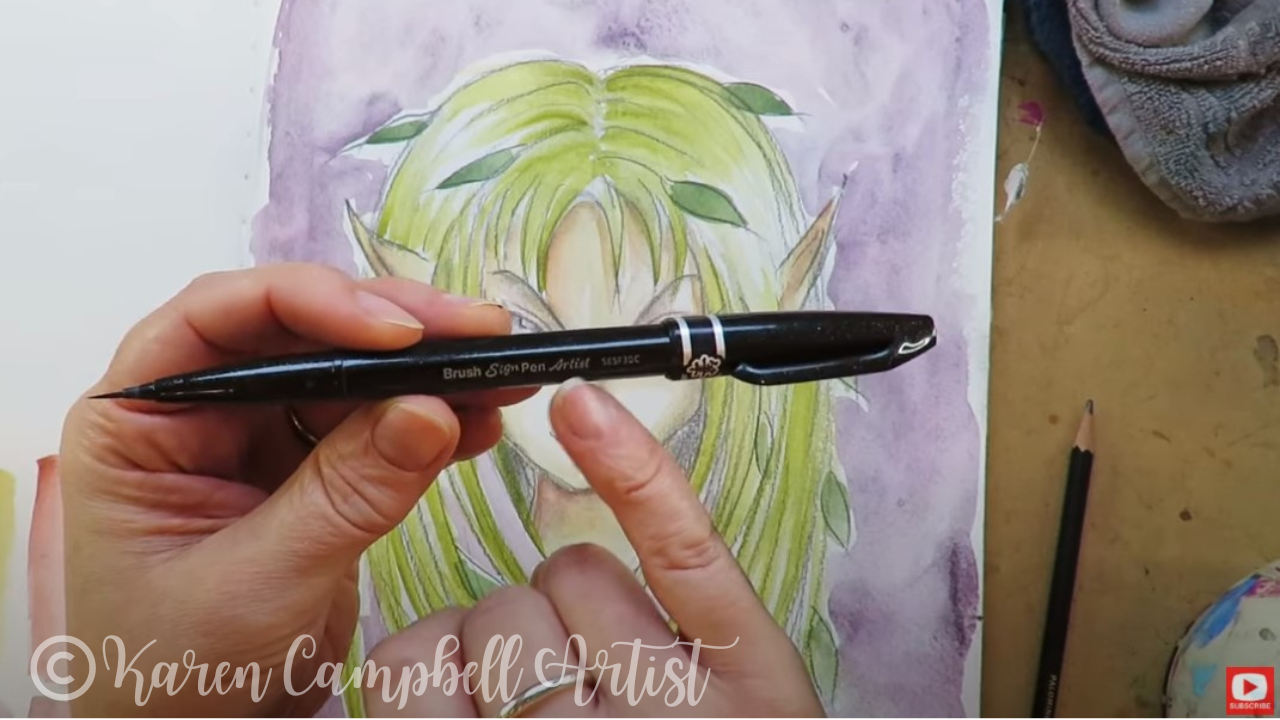
I think it will also help those students intimidated by the Pentel Pocket Brush. This one has a much thinner bristle tip and is way easier to control to create daintier lines.
I hope you enjoyed today's full-length mixed media tutorial! Remember, if you want to draw this fairy- watch this video first:
When you've finished your drawing, watch this one to watercolor her:
Thanks for hanging out with me today! If you enjoyed this lesson, you might just LOVE my entire #50FunFabFairies drawing challenge. Here's the playlist in case you wanna check that out.
❤️ CHECK OUT ALL my art books on AMAZON
❤️ MY FAVORITE ART SUPPLIES on AMAZON
❤️ MY BELOVED FACEBOOK GROUP
❤️ FOLLOW ME ON INSTAGRAM
I've made this process MORE FUN for you by creating a FREE Swatchsheet! Simply click the button below, and I'll send it straight to your inbox.

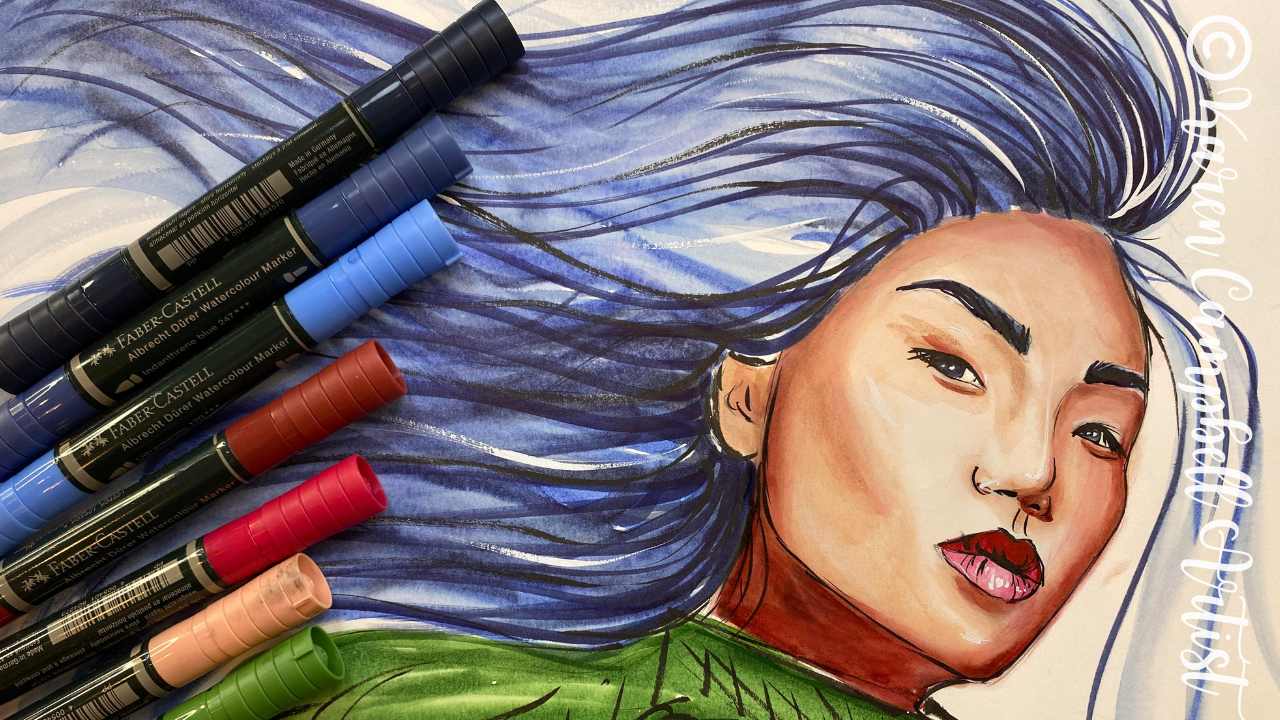
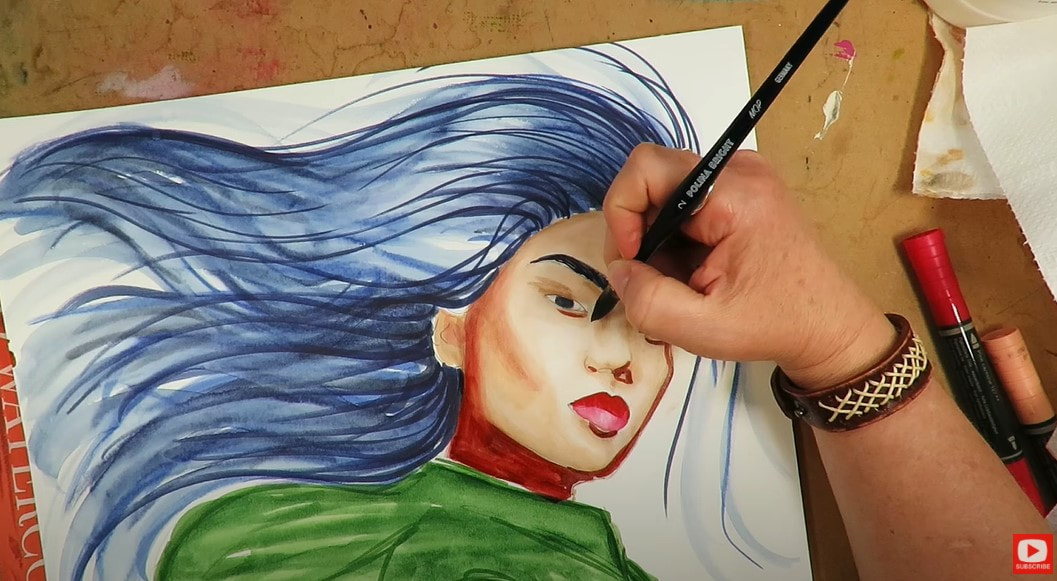
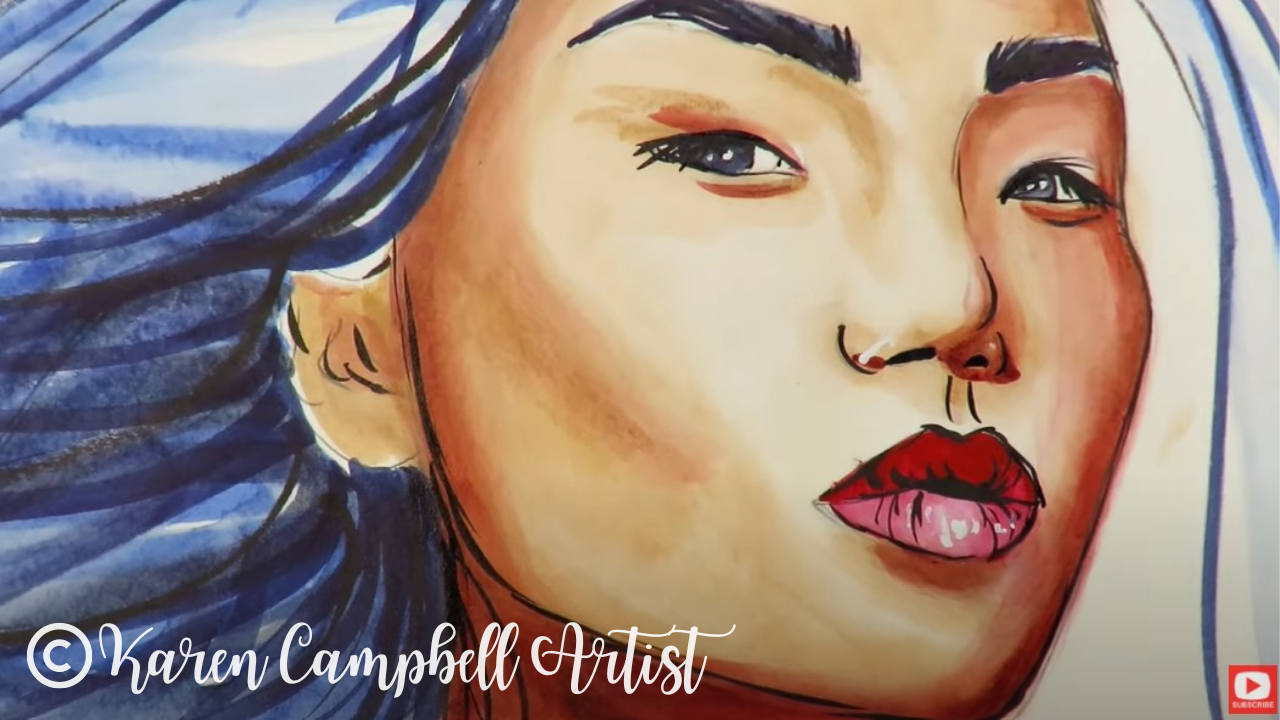
How to Use Watercolor Markers
to Shade a Mixed Media Face
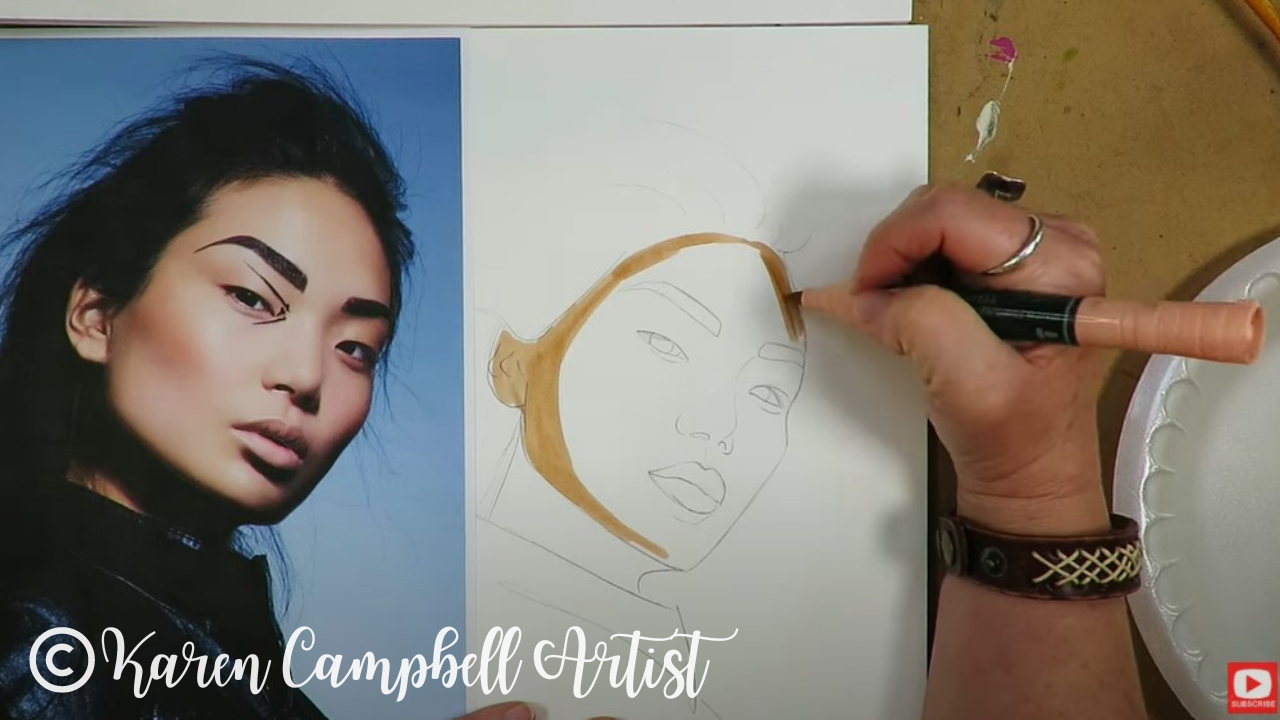
A couple of weeks ago I tried Faber Castell Watercolor markers for the first time and tested them against my Winsor Newtons. I was thrilled to discover the Faber Castell set has SO many colors, including SKIN TONES! I can't wait to try these out today...
How to Activate Watercolor Markers With Water
When to Activate Watercolor Markers
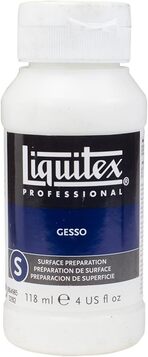
With Gesso & Matte Medium
White gesso is one of MY TRICKS that I use to make watercolor markers behave for my mixed media projects!
HOT TIP: Whenever you work with gesso, make sure to use a cheap, stiff brush,like these.
Using gesso and/or matte medium with other watercolor markers, watercolor pencils and watercolor pens can totally HELP YOU whenever these water-soluble art supplies aren't cooperating for you just by adding water!
How to Draw Hair with Watercolor Markers
Hot Press vs Cold Press Watercolor Paper
for Mixed Media Projects
Remember, all mixed media projects are kind of a big experiment. They're free-flowing. Sometimes things go well, sometimes they don't! Don't freak out.
Keep going, try to chill out, and enjoy the process!
❤️ CHECK OUT ALL my art books on AMAZON
❤️ MY FAVORITE ART SUPPLIES on AMAZON
❤️ MY BELOVED FACEBOOK GROUP
❤️ FOLLOW ME ON INSTAGRAM
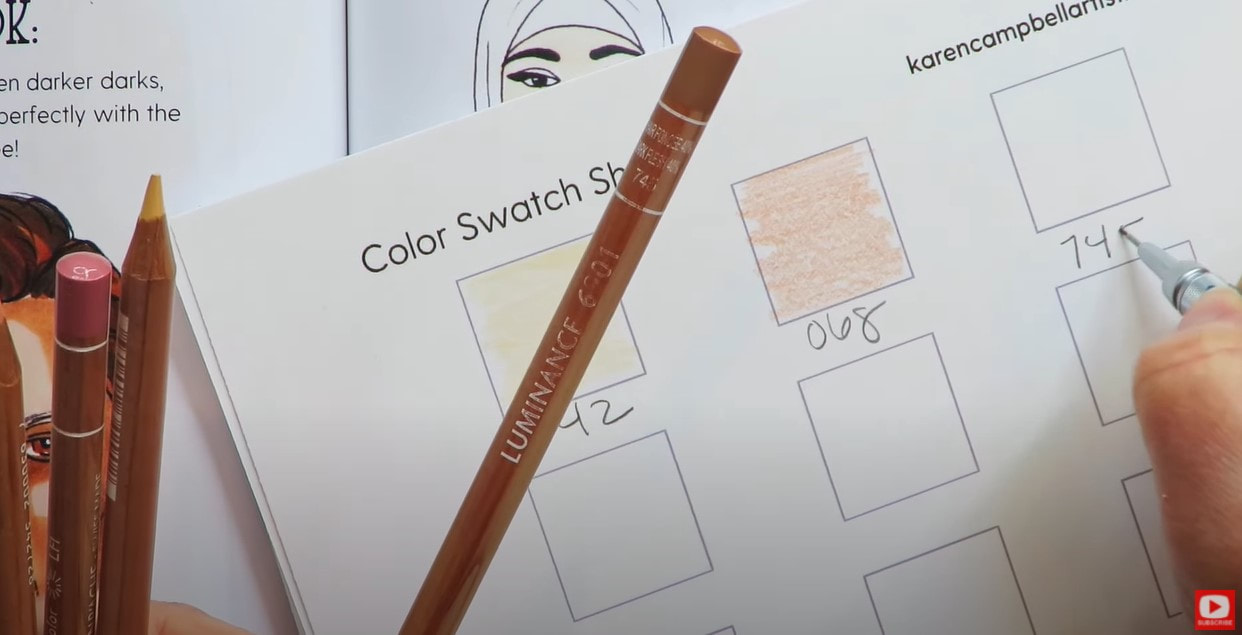
Create DREAMY Skin Tones with Caran d'Ache Luminance Colored Pencils for Your Mixed Media Portraits!
16/5/2022

Before I start shading this face in, I need to swatch out my colored pencils so I know exactly what colors I'm working with.
If you have the patience for working with colored pencils- you do you!! I know they can create some absolutely gorgeous portraits, even from the little shading I did with them today!
First I tried adding a little water on top of the spot to lift the color with a paper towel. That didn't work because this particular color is very staining. I decided to try white gouache because this is super opaque and I know will do exactly what I need it to do. Luckily the watercolor mistake I need to fix is located right on the nose of my portrait where a highlight would naturally go anyway- so it's all good! The gouache worked perfectly.
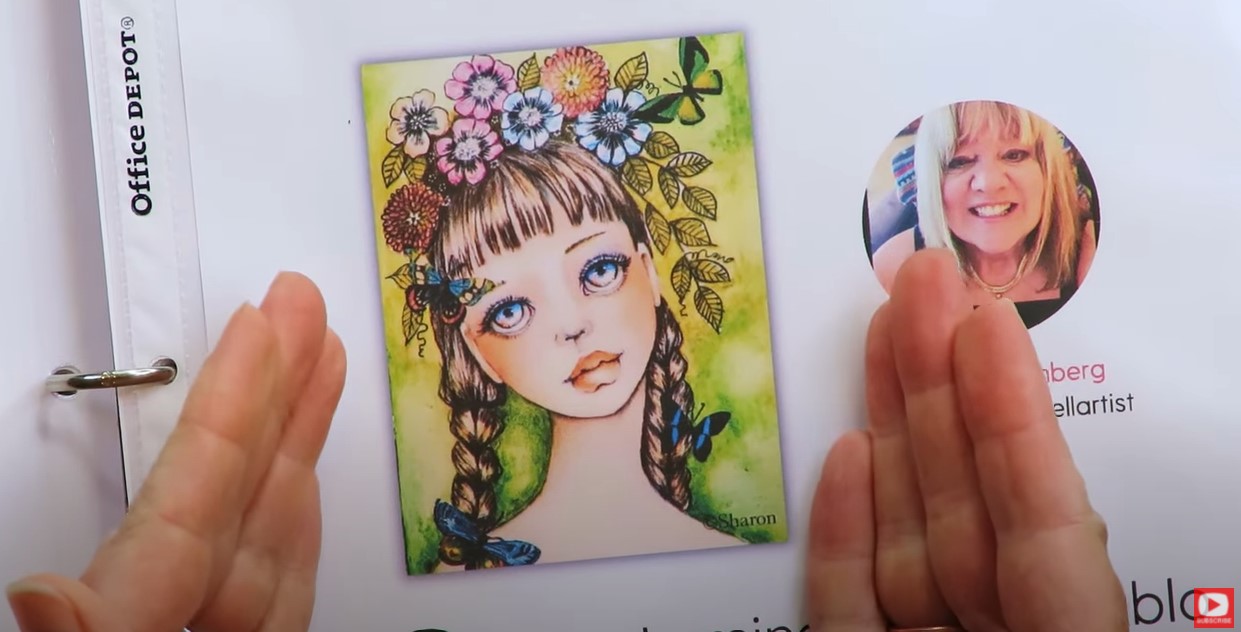
So a huge thanks to Sharon Holmberg for sharing her secret, gorgeous process for shading adorable mixed media faces using only 4 art supplies! I totally love how this project has turned out.
SO stinkin' cute!!
Thanks for hanging out with me today!
❤️ CHECK OUT ALL my art books on AMAZON
❤️ MY FAVORITE ART SUPPLIES on AMAZON
❤️ MY BELOVED FACEBOOK GROUP
❤️ FOLLOW ME ON INSTAGRAM
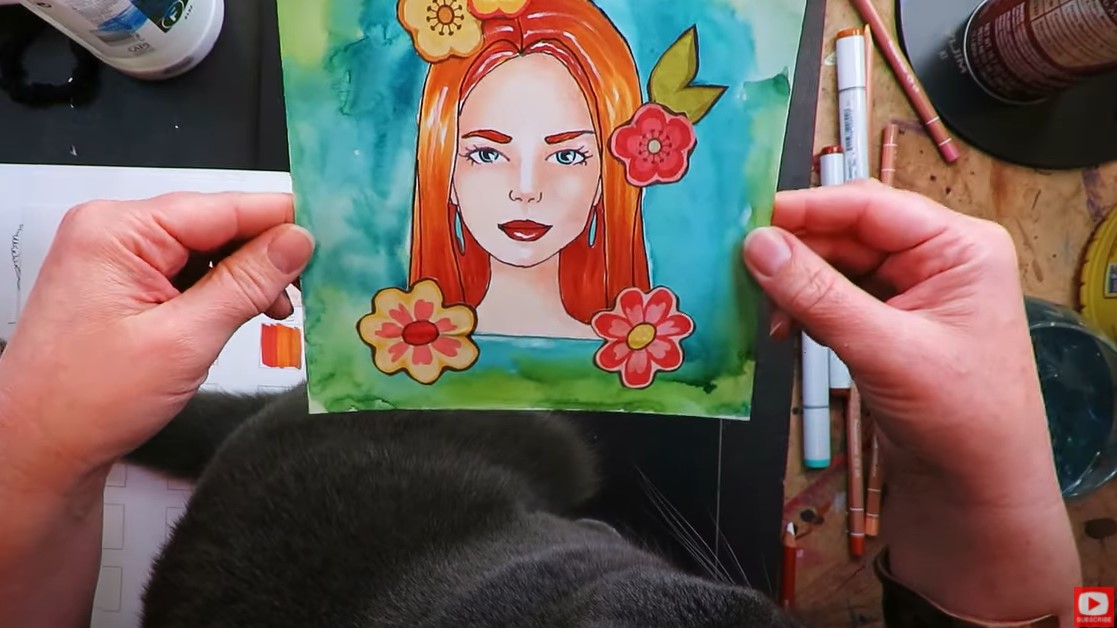
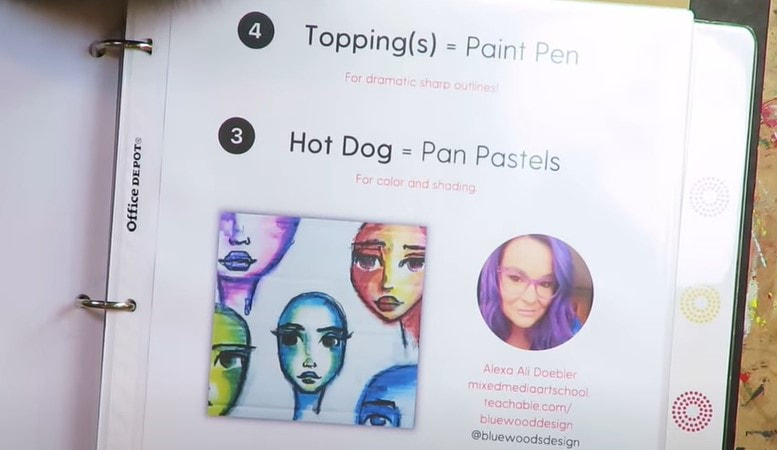
QUICK & EASY! Mixed Media Portrait in Stabilo All Pencil, Pan Pastels & Paint Pens ["Hot Dog" Style]
10/5/2022
I asked 20 of my artsy friends about the simple mixed media art supply combos THEY love and have TONS of FUN ideas to share with you in a FREE 32-page PDF (you're welcome!). This packet contains our BEST, tried and true, 4 art supply combos- "HOT DOG" style.

She's suggested we create on cardboard. Feel free to use the back of a cereal box, an Amazon box, whatever. You can also just as easily do this project in an art journal (preferrably one filled with watercolor paper because we'll be activating a water soluble pencil with water). It's up to you!
As you'll see in the video, I'm using a cheap foam brush to apply it. These are amazing for SO many applications and can easily be washed out and reused for a long time.
Typically gesso is used as a primer for acrylic paint, and absorbent ground is the primer for watercolor and water soluble products. However, because I know the Stabilo All Pencil in Black SO well as a product, I know it will perform beautifully when layered over white gesso.
I know her neck is totally wonky, but I'm just letting it be since I'm in a hurry. Try to ignore that for now, LOL.

There's a cute little pan pastels applicator that looks like it fell out of an eye shadow compact. This will help you dab color on wherever you want it, and do some blending.
Thanks for hanging out with me today!
❤️ CHECK OUT ALL my art books on AMAZON
❤️ MY FAVORITE ART SUPPLIES on AMAZON
❤️ MY BELOVED FACEBOOK GROUP
❤️ FOLLOW ME ON INSTAGRAM
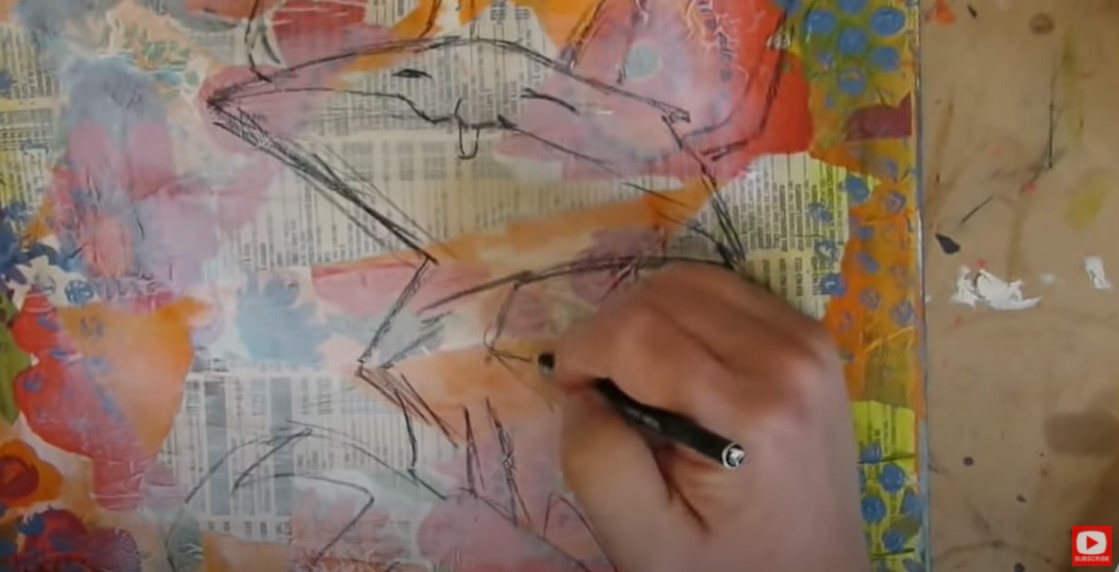
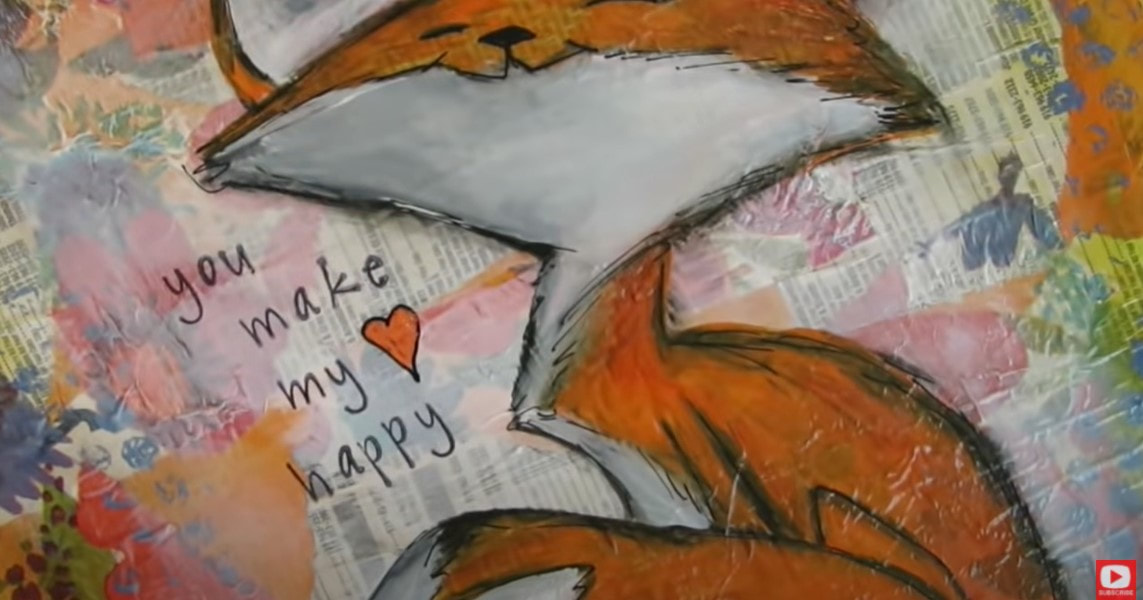
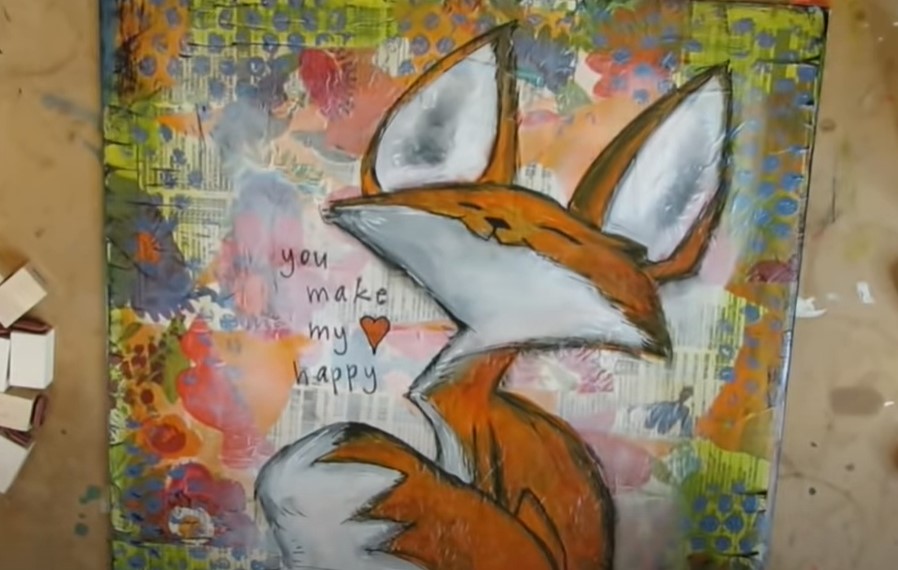
If you're intimidated by mixed media, or struggling with how to layer your supplies, I'd love to teach you my SIMPLE mixed media technique for layering my supplies (it's the exact process I used to create this adorbale fall fox!).

#1: Learn how to make this adorable fall fox (stay right here & keep reading).
OR
#2: WATCH my entire FREE Mixed Media Hamburger Playlist on YouTube. There's a video for every single layer of the cheatsheet (you printed that out, right?!) to help you learn my signature process from start to finish, step by step.

If you haven't met me yet, you'll soon learn I love hoarding art supplies as much as the next girl, but I ALSO love saving money and upcycling thrift store finds for my art.
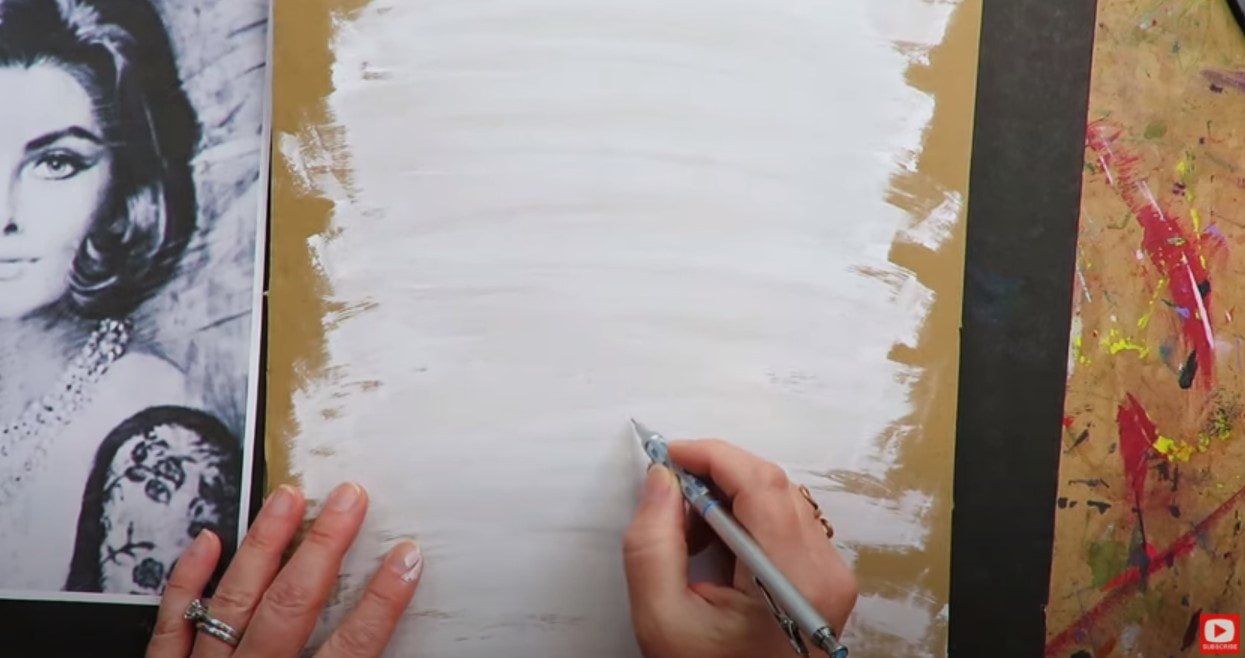
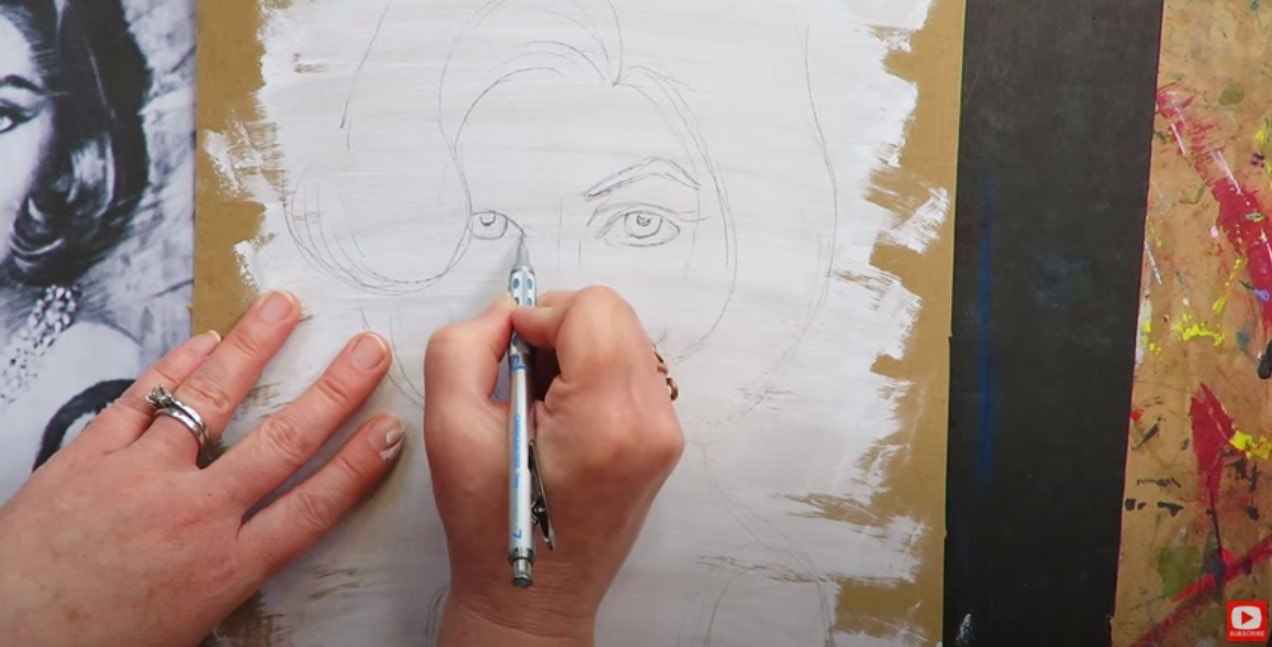
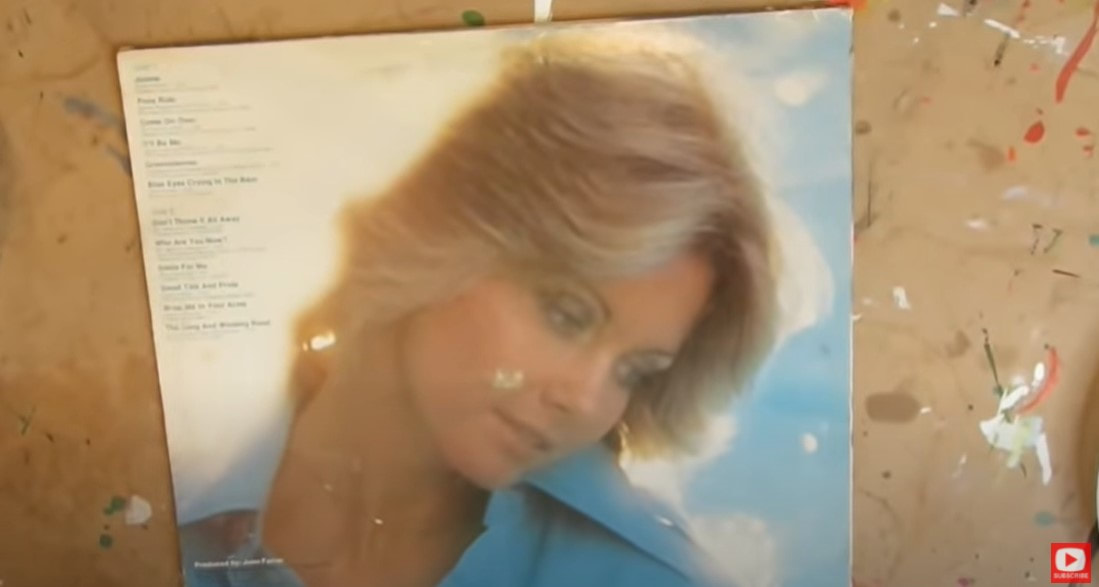
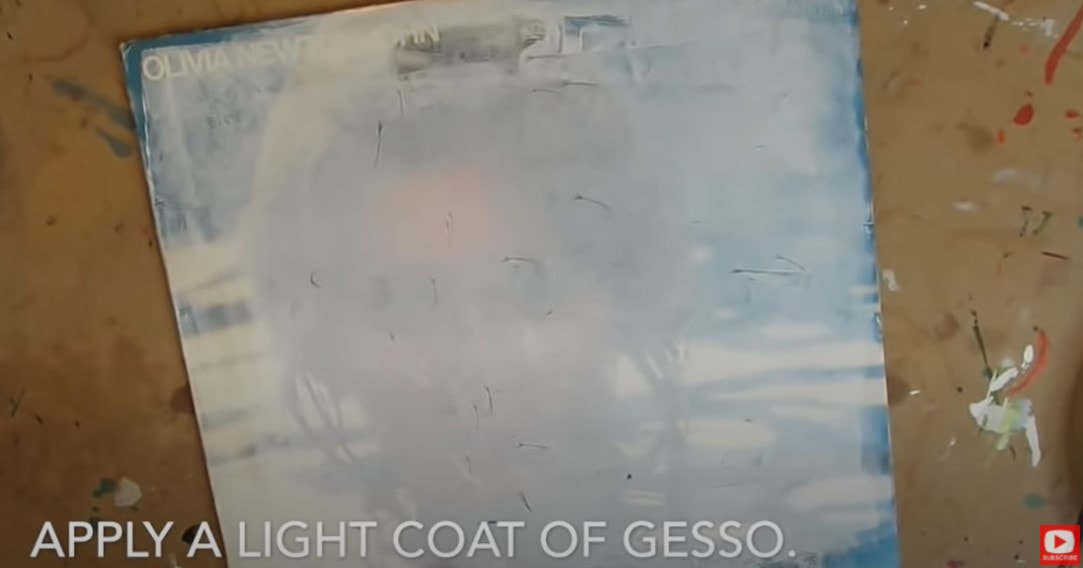
One of my tricks is to purchase old record album covers to turn them into canvas! Kinda brilliant right? They're dirt cheap and I love the square shape.
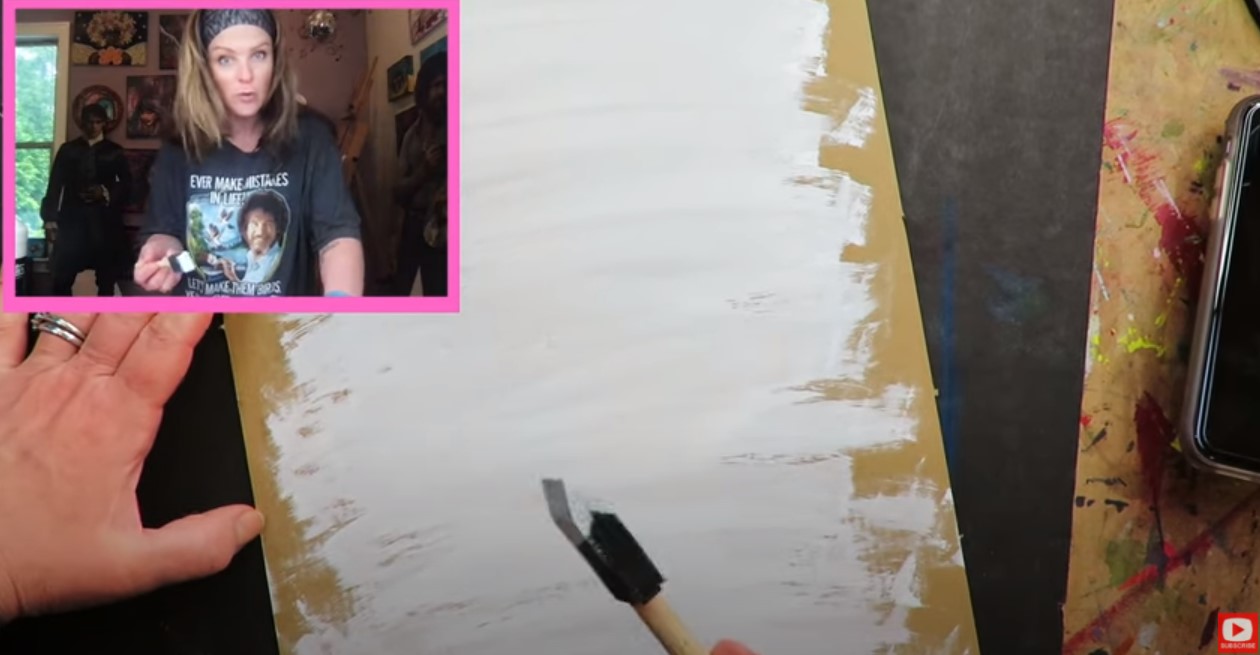
If you're upcycling any old surface like a once glossy record cover, we need to cover it with a light layer of gesso.
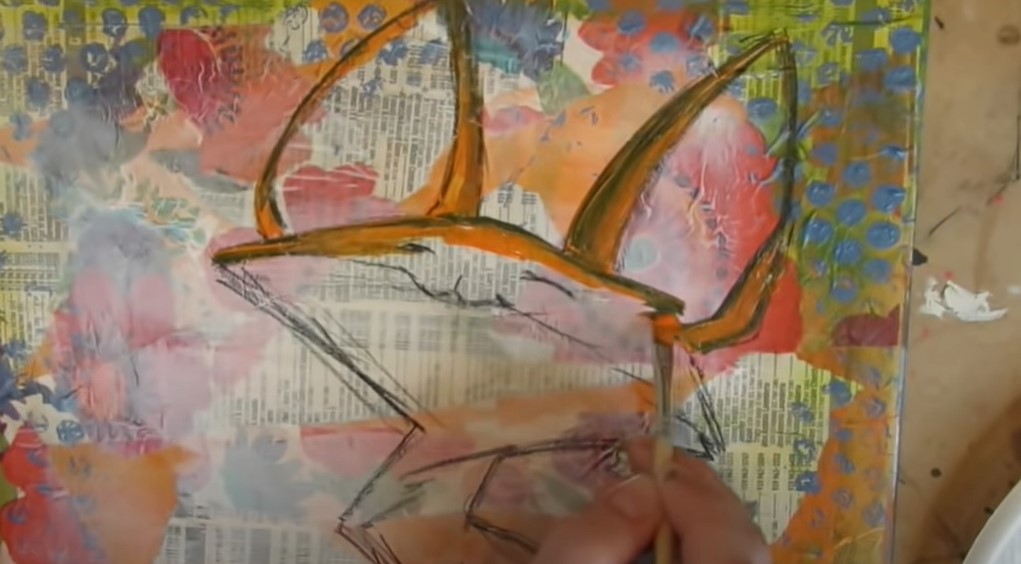
Apply a thin layer of orange acrylic paint. I love acrylic paint by Lukas Cryl. I discovered it years ago when my kids were tiny and I was REALLY on a budget. This stuff is gorgeous and lasts forever. I've been recommending it to my students ever since.
I wanted an edgey look, so instead of using a paint brush- I used the edge of an old credit card to spread the paint around. Looks cool, right? If you prefer using a paint brush, that's cool. Use whatever you have on hand. If you're looking for a new acrylic set of brushes, this is a great one.
For the fox, I ripped up a page from an old phone book. Does anyone even get these anymore?! ?


If you struggle with getting the wrinkles out of your napkin pieces when you're collaging, this video is for you. It really demos my technique of using TONS of matte medium! I pour it on so there's a lot under my napkin pieces, and then coat them on top as well. If you think you're using too much matte medium, add more :)
Once I felt happy with my painting layer, I sealed it all in with a layer of matte mod podge. Be prepared because that stabilo can activate again when your mod podge hits it.
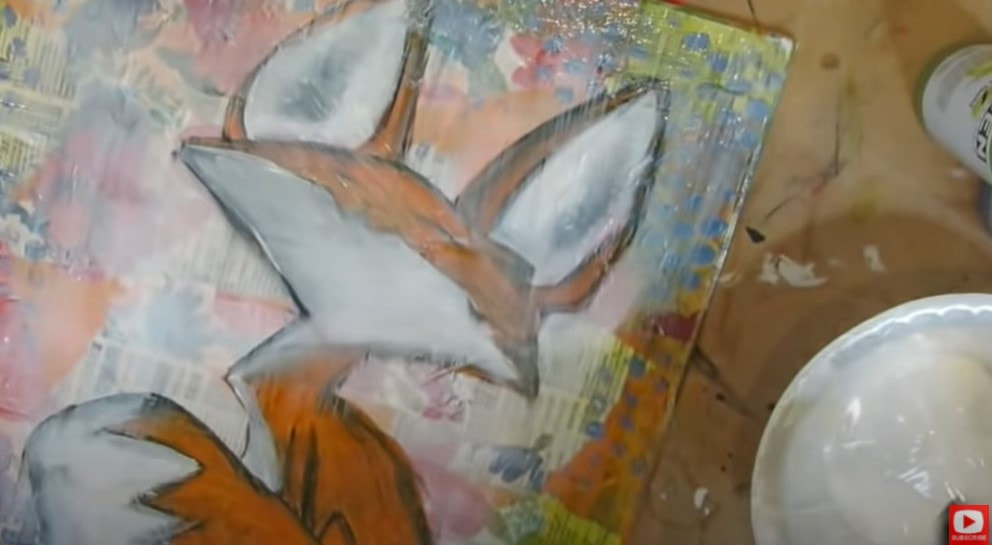
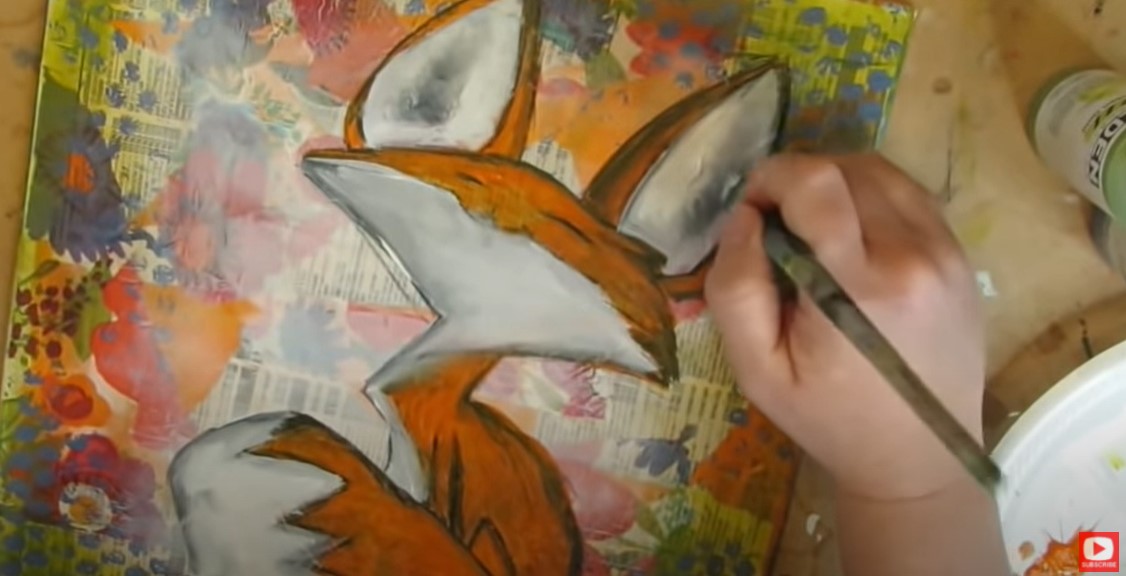
When the surface is slick and dry, it's time to "paint" with our pitt pens! I freaking LOVE this step. It's like ice skating when these babies hit your canvas! If you're following along with your Hamburger Cheatsheet, this is Layer #5.


Wanna learn TEN ways to save money with your art supplies? Check out this video. It explains how the layers in this very project can help you from buying out your local craft store :)
Thanks for hanging out with me today!
❤️ CHECK OUT ALL MY ONLINE ART CLASSES & Art Clubs
❤️ CHECK OUT ALL my art books
❤️ MY FAVORITE ART SUPPLIES on AMAZON
❤️ MY BELOVED FACEBOOK GROUP
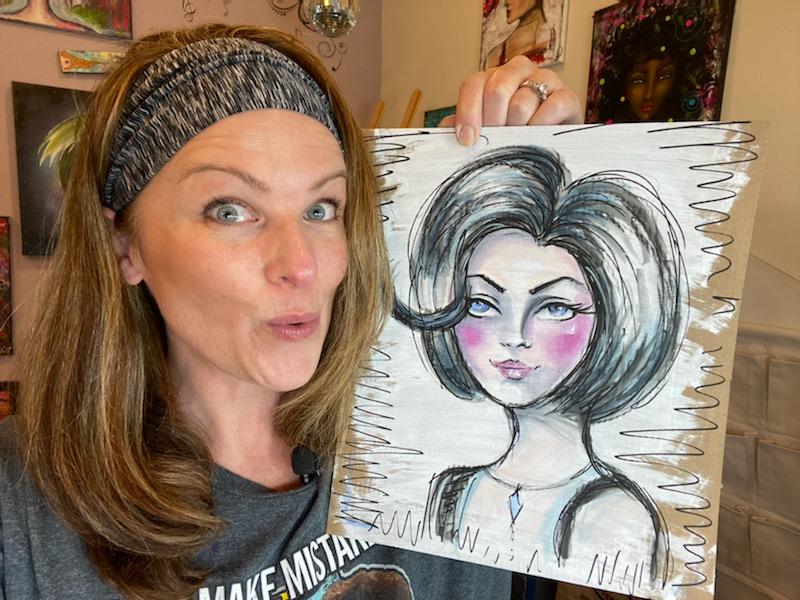
Karen Campbell
Founder of Awesome Art School. Mixed Media Artist. Author of 19 Instructional Art Books!
Posting on YouTube every single Wednesday of the year!

Whose work has appeared in...


Archives
July 2024
June 2024
May 2024
April 2024
March 2024
February 2024
January 2024
December 2023
November 2023
October 2023
September 2023
August 2023
July 2023
June 2023
May 2023
April 2023
March 2023
February 2023
January 2023
December 2022
November 2022
October 2022
September 2022
August 2022
July 2022
June 2022
May 2022
April 2022
March 2022
February 2022
January 2022
December 2021
November 2021
October 2021
September 2021
August 2021
July 2021
June 2021
May 2021
April 2021
March 2021
February 2021
January 2021
December 2020
November 2020
October 2020
September 2020
August 2020
July 2020
June 2020
May 2020
April 2020
March 2020
February 2020
January 2020
December 2019
November 2019
October 2019
September 2019
July 2019
June 2019
May 2019
April 2019
March 2019
February 2019
January 2019
December 2018
November 2018
Categories
All
#50FunFabFairies Drawing Challenge
5 Minute Drawing Practice
Acrylic Brushes
Acrylic Painting Basics
Acrylic Painting For Beginners
Acrylic Painting On Canvas
Acrylic Painting Supplies
Acrylic Painting Tutorial
Acrylic Paint Types
Alcohol Ink Painting
Alcohol Ink Tutorial
Alcohol Marker Art
Alcohol Marker Blending
Alcohol Marker Brands
Alcohol Marker Drawing
Alcohol Markers By ArtBeek
Alcohol Markers Tutorial
Altered Book
Altered Book Art Journal
ArtBeek Alcohol Markers
Art Book Reviews
Art Books I Love
Art Deco
Art Deco Drawing
Art Deco Mixed Media Projects
Art Deco Style
Art For Beginners
Art Heals
Artist Collaboration
Artist Encouragement For Beginners
Artist Positive Mindset For Beginners
Art Journal
Art Journal For Beginners
Art Journal Ideas
Art Journal Inspiration
Art Journal Page
Art Journal Techniques
Art Retreats
Art Studio Makeover
Art Supplies
Art Supply Demos
Art Supply Reviews
Art Supply Storage
Asian Eye Drawing
Beginner Drawing Projects
Beginners
Behind The Scenes
Blackwing Pencils
Blackwing Volumes
Brush Pens
Canvas Painting
Cartoon Cat Drawings
Castle Drawing Lesson
Cat Art
Celtic Collective
Charcoal Drawing
Charcoal Portrait
Christmas Watercolor Ideas
Collage
Collage Ideas
Collage Techniques
Collage Tutorial
Colored Pencils
Copic Marker Alternative
Copic Marker Art
Copic Marker Drawing
Copic Marker Tutorial
Copic Skin Tones
Copic Vs Ohuhu Alcohol Markers
Craft Gem Projects
Create Your OWN Custom Watercolor Palette
Daniel Smith
Daniel Smith Watercolor Palette
Daniel Smith Watercolors
Dip Pens
DIY Travel Watercolor Palette
Drawing
Drawing A Baby Face
Drawing Books On Amazon
Drawing Cats
Drawing Challenge
Drawing Erasers
Drawing Eyelashes
Drawing Eyes In Pencil
Drawing Faces
Drawing Faces For Beginners
Drawing Facial Features
Drawing Female Hairstyles
Drawing For Beginners
Drawing Hairstyles
Drawing Highlights
Drawing Ideas For Travel
Drawing Necks Realistically
Drawing Pencils
Drawing Tutorial
Drink & Draw
Ear Drawing Practice
Easy Acrylic Painting
Easy Drawings For Beginners
Easy Face Drawing Tutorial
Easy Mixed Media Projects
Easy Owl Painting
EASY Watercolor Tutorial
Easy Zen Doodle
Ecoline Brush Pens
Elegant Writer
Erasers
Eyelashes Drawing
Faber Castell Gelatos
Faber Castell Watercolor Markers
Facebook Live Lessons
Face Chart Inspired Drawing Tutorial
Face Drawing
Face Drawing Guidelines
Face Drawing Practice
Face Drawing Tutorial
Face-shading
Face-shape-drawing
Face-sketch
Fantasy-art-drawing
Fantasy Art Drawing Projects
Fantasy Art Painting Projects
Fashion-face-drawing-tutorial
Fashion-figure-drawing
Fashion-illustration-for-beginners
Fineliner-tips
Flip-throughs-of-my-books
Foam Head Projects!
Fountain-pen-ink
Fountain-pen-ink
Fountain-pen-ink-painting
Fountain-pen-ink-painting
Free-art-lesson
FREE Cheatsheets!
Free-drawing-lesson
Free-lesson
FREE LIVE Art Alongs
Free-watercolor-lesson
Free-watercolor-lesson
Full Length Drawing Tutorial
Full Length Face Drawing Tutorial
Full Length Face Shading Tutorial
Full Length Mixed Media Projects
Fun Fab Drawing Club
Fun-fab-fairies
Fun Fab Famous People & Paintings
Gesso-brush
Gift Cards
Gift Ideas For Artists
Gift Ideas For Beginners
Glass-dip-pens
Gouache-meaning
Graphite-transfer-paper
Halloween-face-drawing-tutorial
Halloween-projects
Hamburger
Hamburger System
Hot-dog-system
How To Add Highlights To A Drawing
How To Add Highlights To Face Drawings & Mixed Media Portraits
How To Add Shading To A Drawing
How To Art Journal
How To Become An Awesome Artist
How-to-choose-face-drawing-references
How-to-color-a-baby-face-in-copic-markers
How To Create A Watercolor Palette
How To Draw
How To Draw A 34 View Face
How-to-draw-a-babys-face
How-to-draw-a-face
How-to-draw-a-fairy
How-to-draw-a-fairy-face
How To Draw A Fun Fab Face
How-to-draw-a-male-face
How-to-draw-and-shade-a-face-in-copic-markers
How-to-draw-and-shade-a-face-in-copic-markers
How-to-draw-and-shade-a-whimsical-african-american-face
How-to-draw-and-shade-a-whimsical-african-american-face
How To Draw Anime & Manga
How-to-draw-art-deco-style
How-to-draw-asian-eyes
How-to-draw-a-smile-with-teeth
How-to-draw-bangs
How-to-draw-cartoon-cats
How-to-draw-dreadlocks
How-to-draw-ears
How-to-draw-expressions
How-to-draw-eyebrows
How To Draw Eyelashes
How To Draw Eyes Realistically
How To Draw Fairy Ears
How To Draw Figures
How To Draw Freckles
How To Draw Hair
How To Draw Lips
How To Draw Lips Realistically
How To Draw Noses Realistically
How To Draw Realistic Ears
How To Draw Teeth
How To Draw Wrinkles
How To Paint Eyelashes
How To Seal Your Work
How To Shade
How To Shade A Face In Color
How To Shade DARK Skin Tones With Alcohol Markers
How To Shade Faces With Alcohol Markers
How To Shade Faces With Tombow Markers
How To Sketch A 3 Quarter Portrait
How To Sketch A Face
How To Swatch Art Supplies
How To Transfer A Drawing
How To Use Gloves In A Bottle
How To Use Linseed Oil
How To Use Oil Pastels
LARGE Canvas Painting Technique
Lickleyhead Castle
Line Drawing
Magical Mashup
Marker Storage Solutions
Marker Tips
Martini Glass Drawing
Mermaid
Mixed Media
Mixed Media Art
Mixed Media Art Books I Love
Mixed Media Art Ideas
Mixed-media-art-journal
Mixed Media Art Journaling
Mixed Media Art Journal Tutorial
Mixed Media Art Supplies
Mixed Media Art Techniques
Mixed Media Art Tutorials
Mixed Media Backgrounds
Mixed Media Brushes
Mixed Media Canvas
Mixed Media Challenge
Mixed Media Collage
Mixed Media Collage Background
Mixed Media Collage Tutorial
Mixed Media Drawing
Mixed Media Eyes
Mixed Media Faces
Mixed Media Face Shading
Mixed Media Foam Heads
Mixed Media Girls
Mixed Media Hamburger
Mixed Media Hot Dog System
Mixed Media Ideas
Mixed Media Layering Process
Mixed Media Paintbrushes
Mixed Media Painting
Mixed Media Portraits
Mixed Media Project
Mixed Media Society
Mixed Media Techniques
Mixed Media Tutorial
Mixed Media Tutorials
Mixed Media Watercolor
Mixed Media YouTube
Monochromatic Drawing
My Favorite Art Supplies
My Favorite Watercolors
My Journey As An Artist
My Mixed Media Layering Process
New Book!
No Draw Mixed Media Art Project
Noodler's Ink
Nose Drawing Practice
Ohuhu Alcohol Markers
Oil Pastels & Acrylic Paint
Oil Pastels Brand Comparison For Beginners
Oil Pastels & Colored Pencils
Oil Pastels For Beginners
Oil Pastels + Linseed Oil
Oil Pastel Tutorial
Old Book Crafts
Owl Painting
Paint Brush Types
Painting On Canvas
Painting With Ink
Paint Markers
Palette Knife Painting
Pan Pastels
Paper Napkin Art Journal Background
Pastel Watercolor Sets
Pencil Drawing Tutorial
Pitt Pen Alternative
Portrait Drawing
Portrait Drawing Tutorial
Posca Alternatives
Posca Paint Pens
Prima Watercolor Sets
Profile Drawing
Profile Drawing Tutorial
Quadrant Method
Quick & Easy Face Drawing Tutorial
Reference Drawing
Scotland
Scottish Castle Art Retreat
Sealers Vs Fixatives
SEE INSIDE MY Art Books!
Shading Faces
Sheet Music Art
Side Profile Drawing
Side View Drawing
Silver Black Velvet Brushes
Sketching Tutorial
Skull Watercolor Tutorial
Spray Paint On Canvas Idea
Stabilo All Pencil Projects
Steampunk Drawing
Stenciling & Stamping Techniques
Three Quarter View Face
Time Lapse Drawing Video
Tissue Paper Art Journal Background
Tombow Brush Pens
Tombow Mono Zero Eraser
Tombow Skin Tone Markers
Toned Paper Drawing
Travel Art Supplies
Upcycled Art
Upcycle Old Books
Value Scale Drawing
Vintage Book Pages
Wardhill Castle
Watercolor
Watercolor And Colored Pencil
Watercolor And What Else?
Watercolor Brushes
Watercolor Fairy
Watercolor For Beginners
Watercolor Markers
Watercolor Marker Tips
Watercolor Marker Tricks For Mixed Media
Watercolor Palette Setup
Watercolor Portrait
Watercolors
Watercolor Sets I Love
Watercolor Supplies
Watercolor Techniques
Watercolor Tutorial
WatercolPainting Techniques
Watersoluble Art Supply Tricks
Water Soluble Markers
Water Soluble Pencils
What Is Mixed Media Art?
Whimsical-christmas-tree
Whimsical Face Drawing Tutorial
Whimsical-face-drawing-tutorial
Whimsical Women Of The World World Portrait Drawing Series
YouTube Drawing Channel
Youtube-giveaway
Youtube-video
Youtube-video
Zentangle Drawing Ideas
Zentangle Drawing Tips
Zentangle Drawing Tutorial
Zentangle Feather Drawing Tutorial
 RSS Feed

"Karen is flipping hilarious and she's very real...I like the way she teaches in a way that really gives you confidence, whether you're a beginner or advanced there's always something new to learn!"
- Elizabeth W. |
What Fans Are SayingKaren, you are absolutely fabulous! You make me feel like I can draw anything. I have recently retired and finally have the time to do some of the art that I have loved since I was in school. I am really at the beginning of my art journey and I hope to learn as much as I can. Thank you for all you do. |
Contact ME |