
|
Have you ever looked at art by a master artist and tried to just GUESS at how s/he created something? I have learned SO much from doing this over the years!
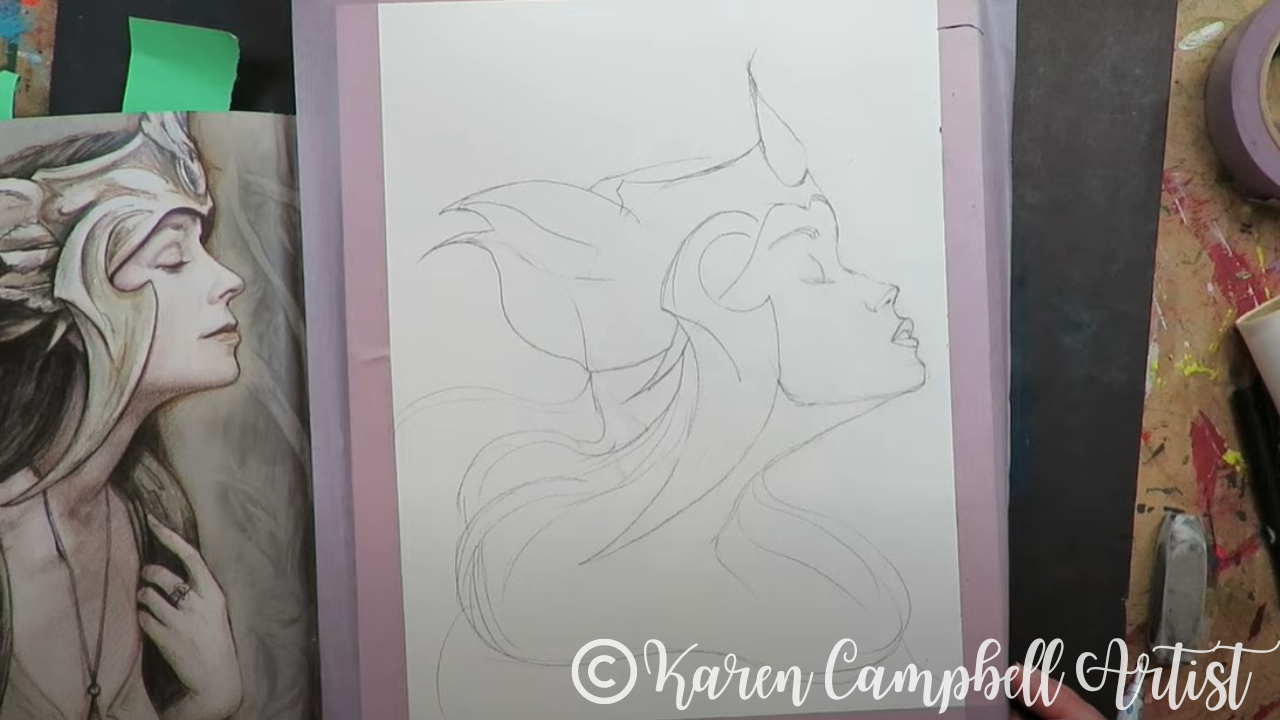
I recently developed a fantasy art drawing lesson for my Celtic Collective art club using this process and took inspiration from one of my favorite fantasy artists, Brian Froud. Stay with me till the end for some magical fountain pen ink painting!! 
Before we continue, super quick announcement: All product links are Affiliate. I may earn a small commission if you choose to order through these links but by law there is never any additional cost to the consumer for doing so. I thank you for your support
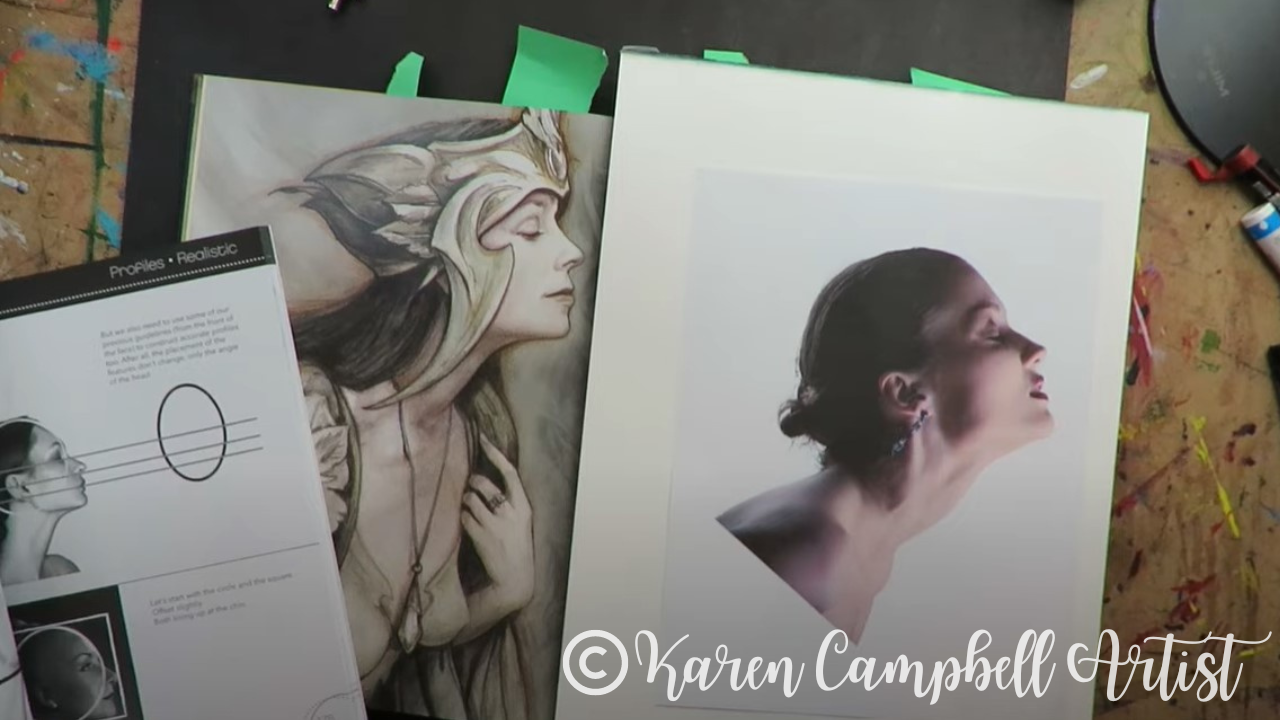
Just look at THE NECK on my face drawing reference today!! Isn't she gorgeous?! I'm using this copyright-free profile photo to guide me on the angle of the head and facial feature placement for my own drawing.
If you're not sure how to draw a side profile, the drawing portion of today's lesson is in real-time, so make sure you click over to watch, and draw along with me, step-by-step.
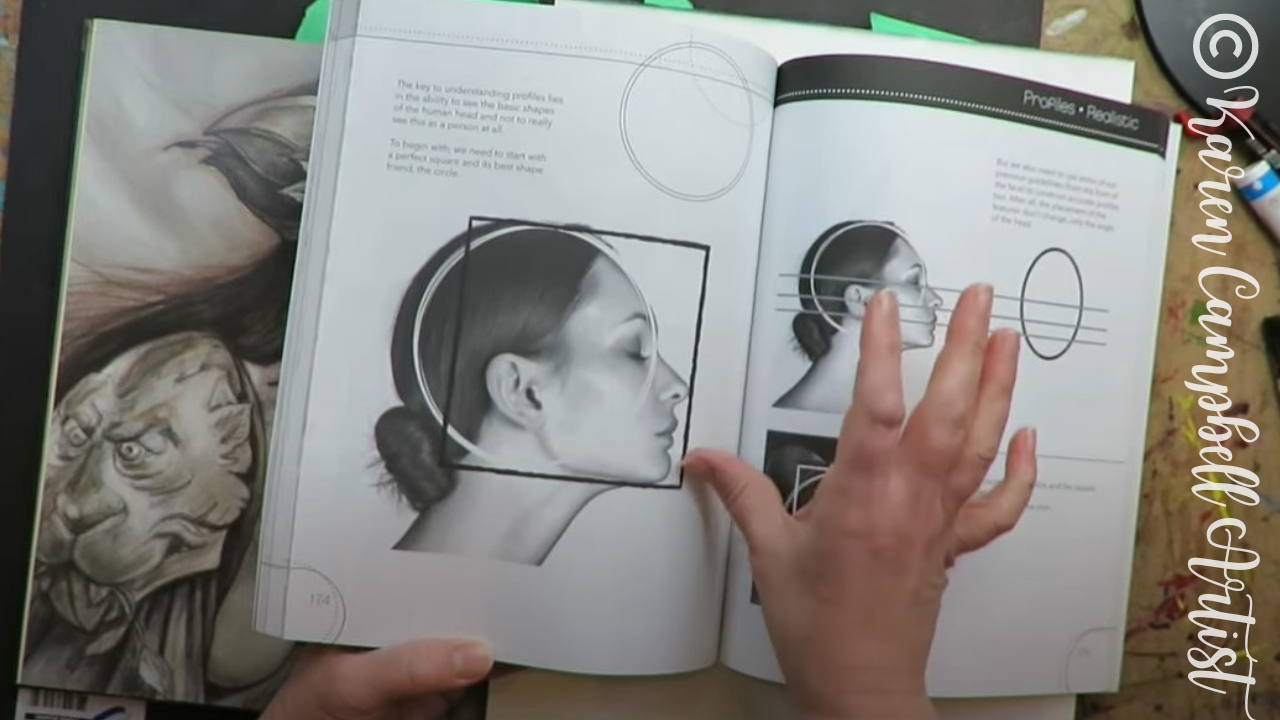
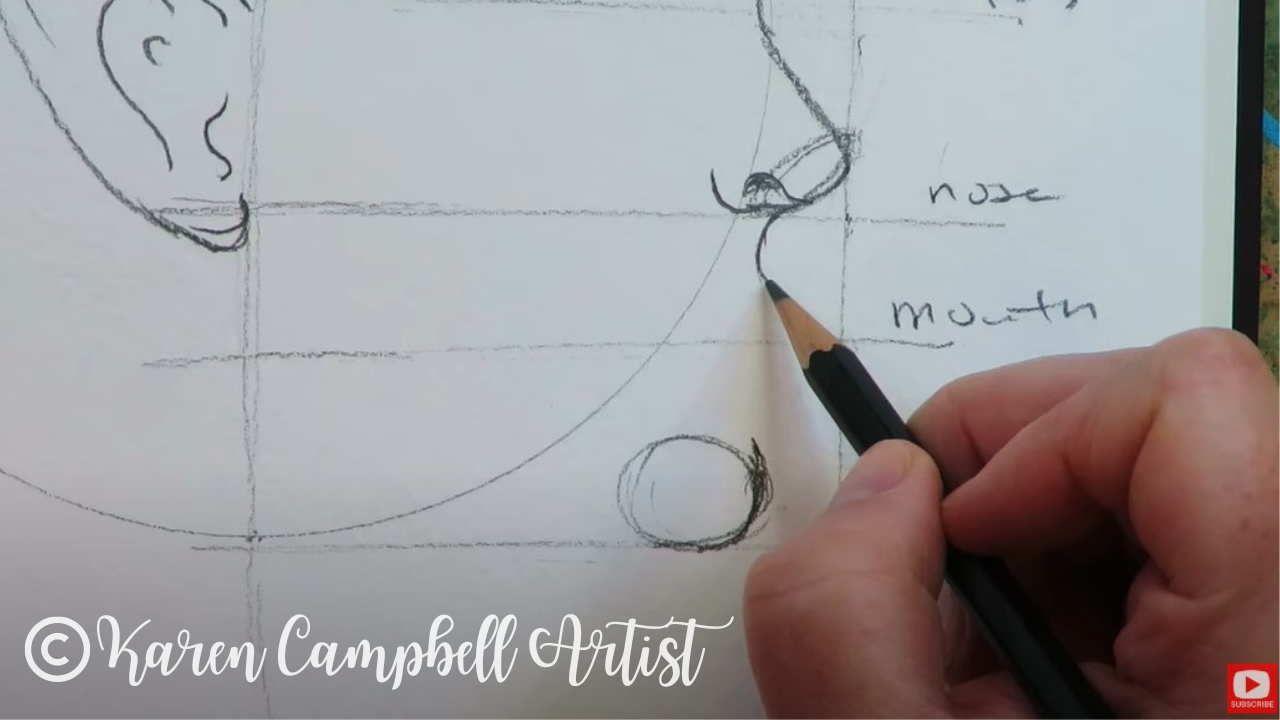
Profile guidelines get sketched in first (as always). If you have a copy of my How to Draw & Find Your Style book, I'm using the realistic profile drawing guidelines found on page 174, and starting off by sketching a circle and square onto my own paper. 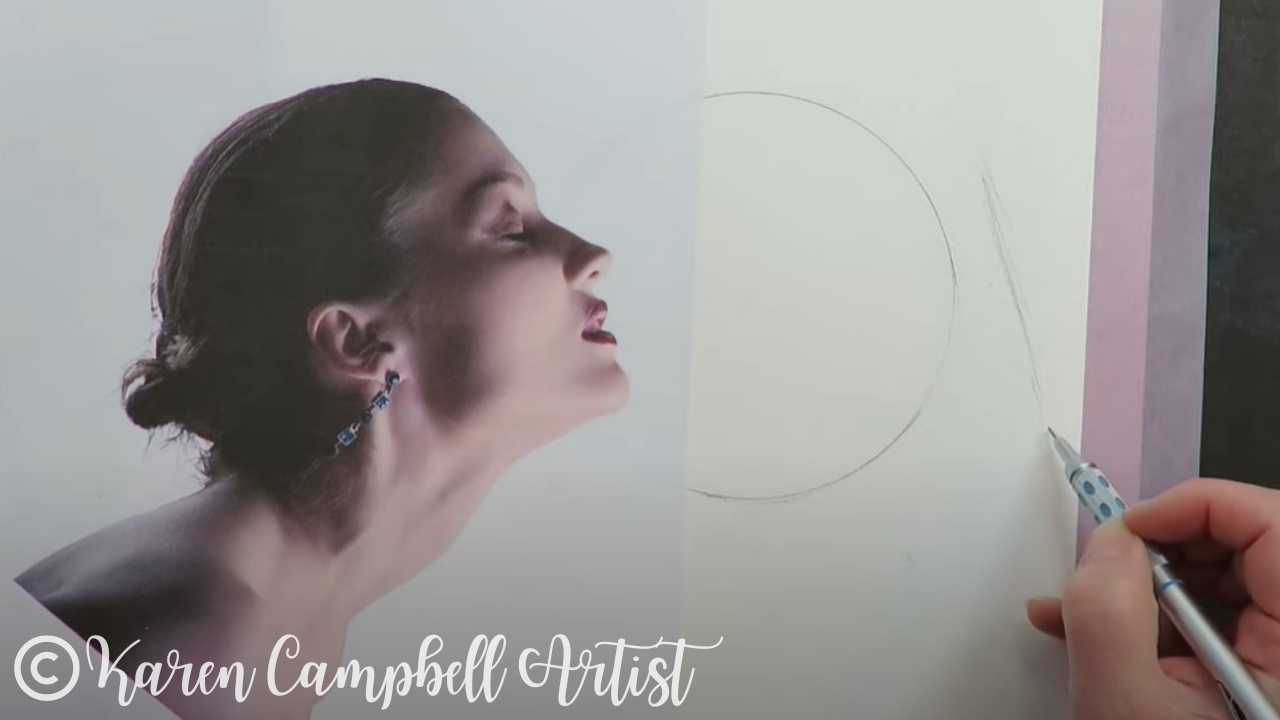
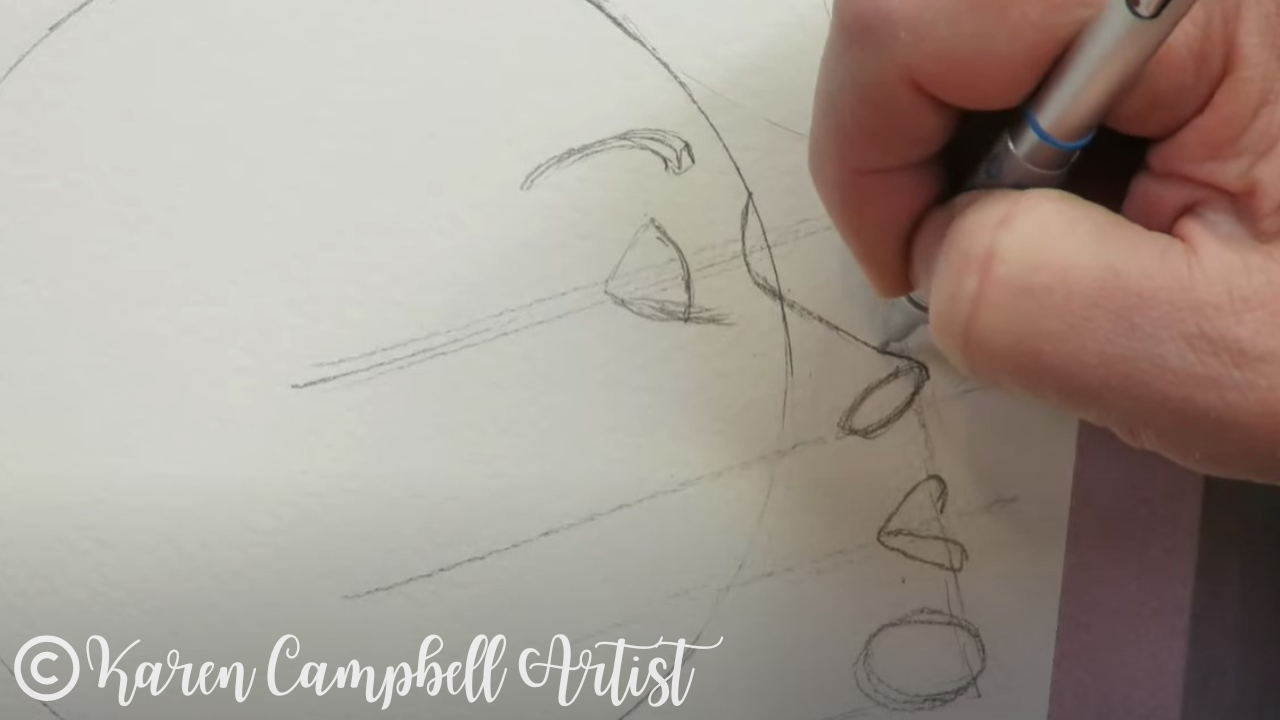
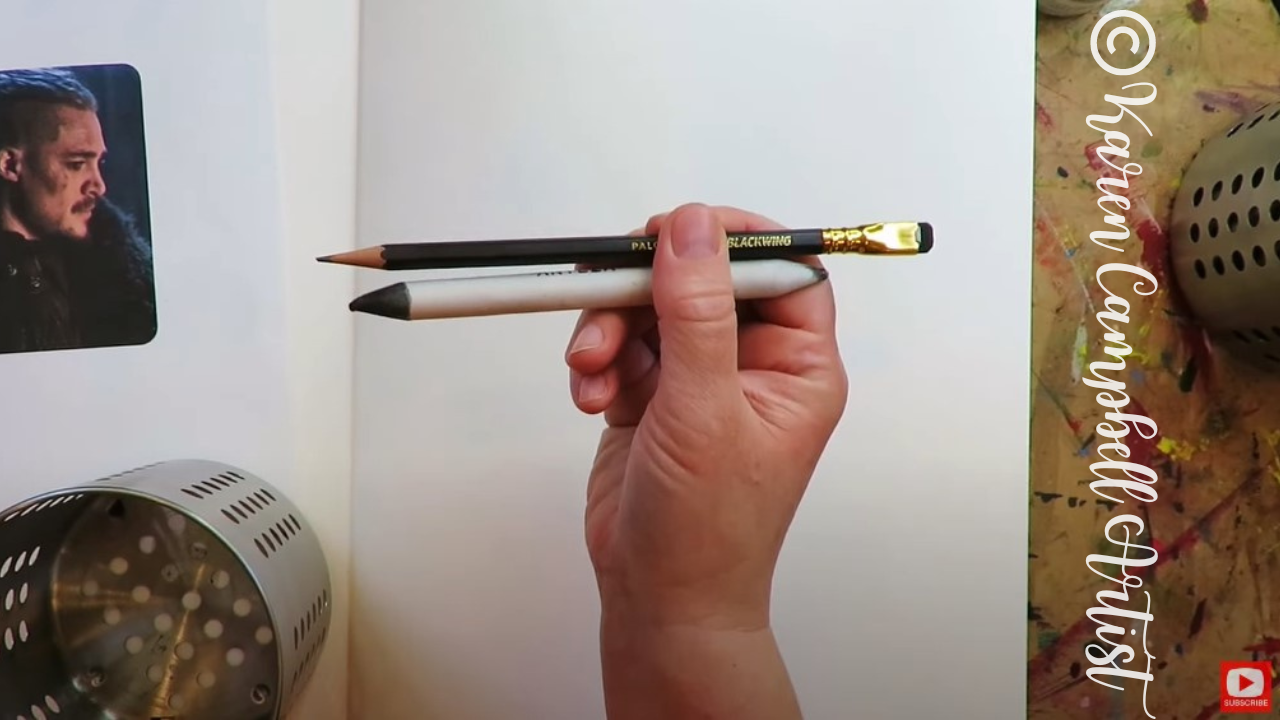
Next, I add in guidlines for the eyes, nose and lips, and begin to pencil in placeholder ovals where these facial features will go. As you may have noticed, I'm using a mechanical pencil for today's tutorial. This set by Pentel is my favorite.
Next, I begin connecting the features and erasing my guidelines. Once this part is done, I start looking to a gorgeous piece by Brian Froud for inspiration on how to draw a killer headpiece. I'll also be studying Brian's piece to guide me on shading, which I CAN'T WAIT to get started on!!
I've decided to paint my drawing using fountain pen ink. If you're new to this technique, it's amazing and super similar to working with watercolor.
As always, I'm working with my favorite watercolor brushes by Polina Bright. You can learn more about why I'm obsessed with them here, or get 10% off for yourself in Polina's shop here. These work beautifully with fountain pen ink painting as well because they hold SO MUCH ink!! 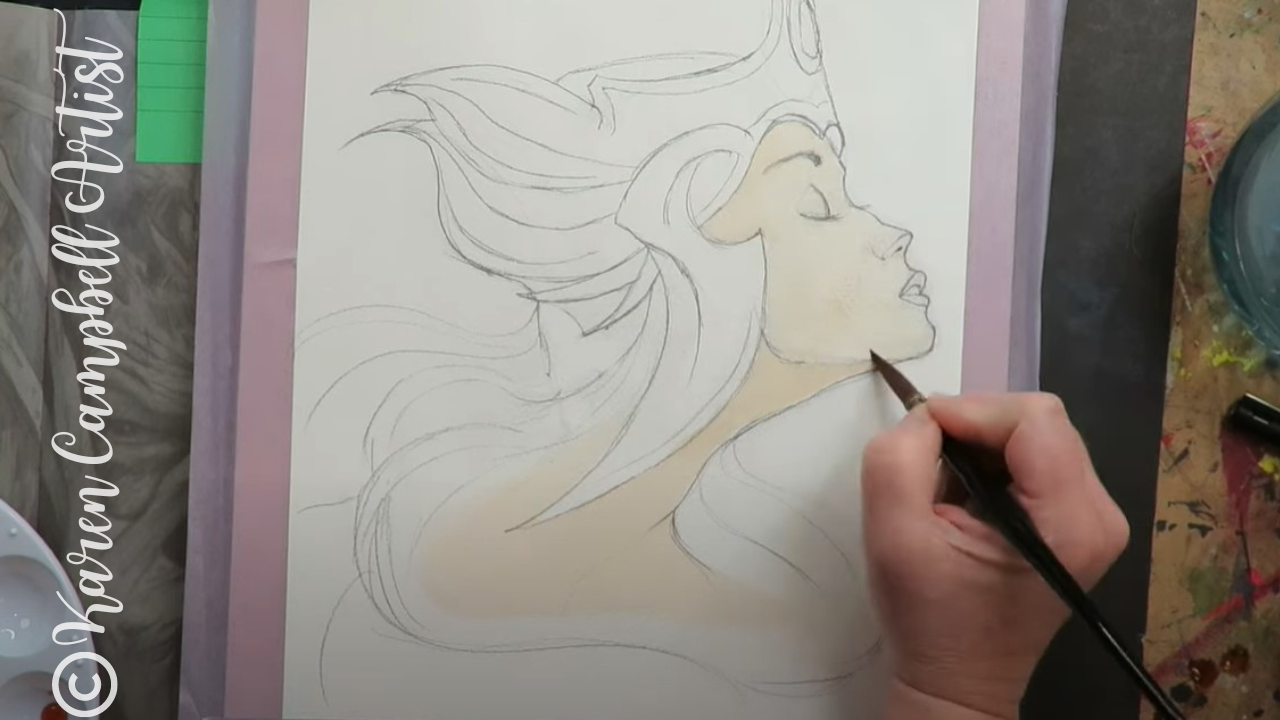
The painting part of today's project is timelapsed for your enjoyment, so kick back, relax, and watch this warrior chick come to life in minutes!!
Wanna Do the FULL Lesson in Real-Time with Me?
It's in the Celtic Collective art club over at Awesome Art School. Join the waitlist here to be notified the next time enrollment opens :) Lucy Brydon and I are having a blast over here with our students, and would LOVE for you to join us!!

Wanna Learn MORE About Fountain Pen Ink Painting?
I thought you'd never ask! Check out this playlist for MY BEST FOUNTAIN PEN INK PAINTING TIPS, or press play below...

Need More Resources?
❤️ CHECK OUT ALL my art books on AMAZON
❤️ CHECK OUT ALL my online art classes @ Awesome Art School ❤️ MY FAVORITE ART SUPPLIES on AMAZON (affiliate links) ❤️ MY BELOVED FACEBOOK GROUP
Thanks for hanging out with me today!!
0 Comments
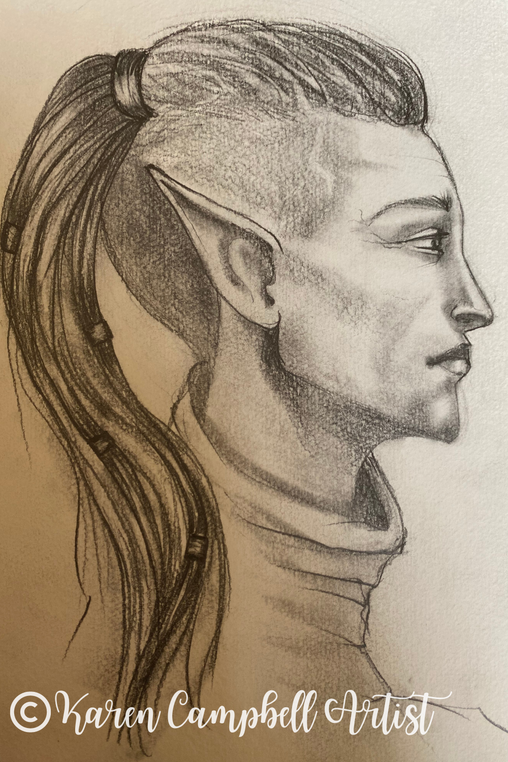
How to Draw ELF EARS in PROFILE on a HOT Male Elf Warrior (#50FunFabFairies Drawing Challenge)8/8/2022
Wanna learn how to draw elf ears in a side profile drawing of a HOT male elf warrior? Heck yeah, ya do! In lesson seven of the #50FunFabFairies drawing challenge, you'll learn how to draw a male face in profile and just how EASY it is to turn him into an elf warrior.
Make sure you bring a blending stump to today's drawing tutorial. I've got TONS of pencil shading and blending tricks up my sleeve to help you shade pencil drawings more quickly & create COOL male fantasy art hair for your own characters! Let's get this party started... 
Want easy access to today's lesson and even MORE fairy drawing ideas? Join my FREE #50FunFabFairies drawing challenge over at Awesome Art School!
Simply click the button below to receive instant access to ALL the fairy reference images for each drawing prompt (including today's elf ears drawing reference!), plus info on supplies, cheatsheets, and more! 
Wanna become a better artist? Do today's lesson (and every lesson of the challenge) five times, making a few creative alterations of your choice, and watch your skills soar as you practice fairy eyes drawing, fairy and elf ears drawing AND fairy hair drawing 50 different ways!
Before we continue, super quick announcement: All product links are Affiliate. I may earn a small commission if you choose to order through these links but by law there is never any additional cost to the consumer for doing so. I thank you for your support.
For today's drawing tutorial I'm working in my favorite 11x14" watercolor sketchbook by Strathmore. The cold press paper has a gorgeous texture to it. Cold press paper is perfect for watercolor and wet mixed media art projects. The texture is also excellent to draw on because it makes shading super easy!
To get us started on our male elf warrior drawing, we first need to sketch in our profile face drawing guidelines. If you know me- you know I'm a stickler for drawing in my guidelines EVERY time I draw a face. Guidelines aren't just for drawing realistic faces. Your whimsical drawings will have a more sophisticated look to them too, because the facial features will be more proportional. 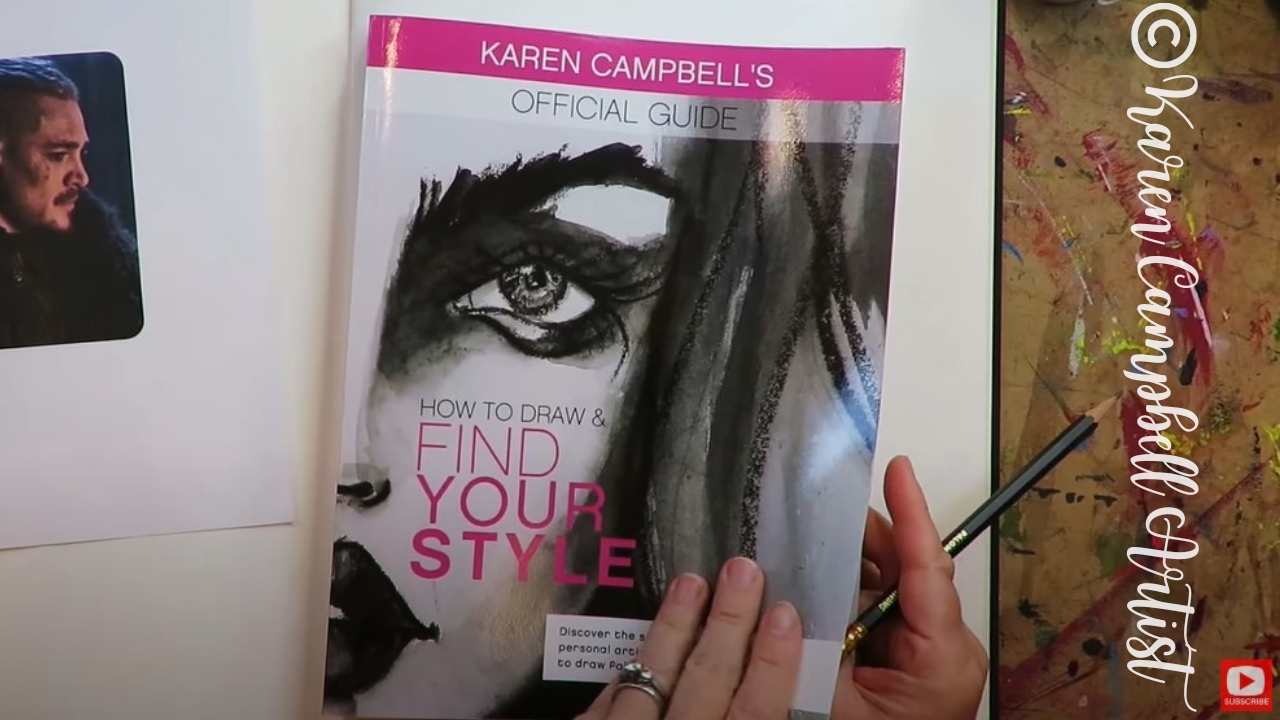
If you're not sure how to do a side profile drawing, you can grab those face drawing guidelines from two of my books (How to Draw MORE Fun Fab Faces and How to Draw & Find Your Style). The book above was on my art table, so I'm using that one in today's lesson. If you've already got this book at home, turn to page 179 to follow along.
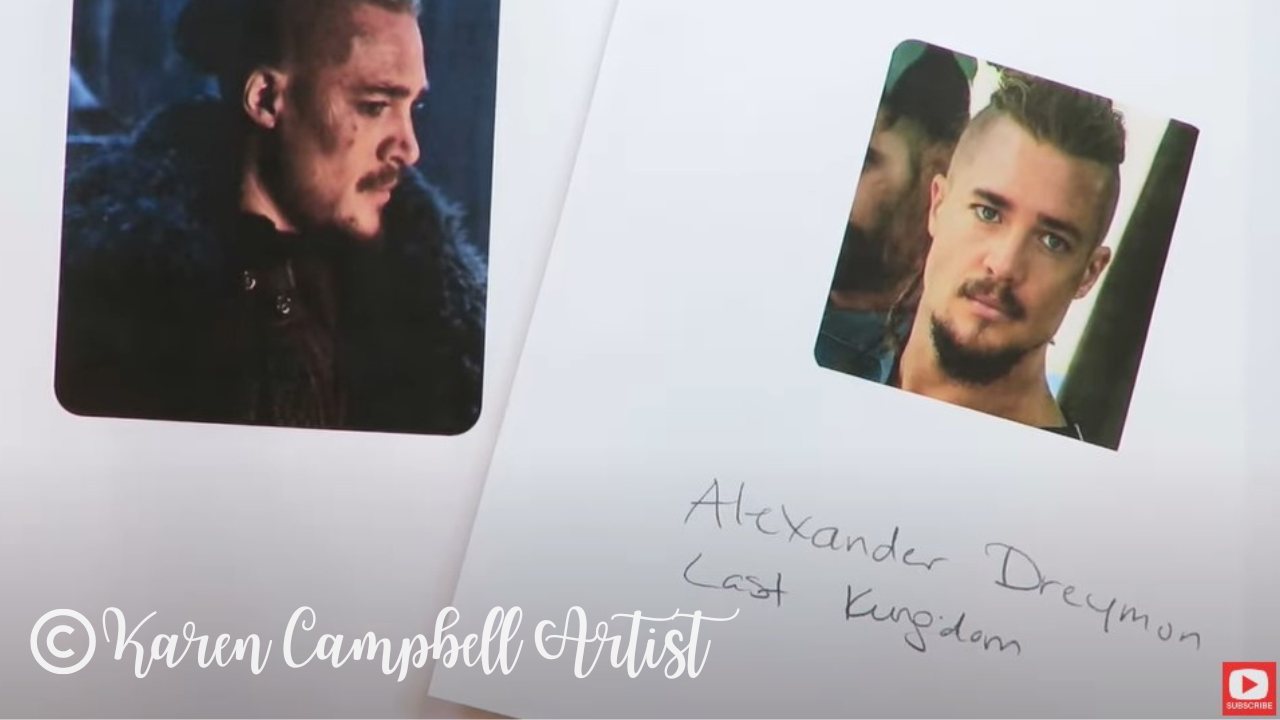
We're using a face drawing reference of Uhtred of Bebannburg (Alexander Dreymon) from The Last Kingdom because I love him and this show. Both the reference image (on the left) and my side profile drawing guidelines are in the FREE #50FunFabFairies Drawing Challenge classroom waiting for you over at Awesome Art School so you can draw along with me.
I love to start my side profile face drawings off by tracing a circle. Some people prefer to freehand this, but I figure why bother wasting time trying to recreate the perfect circle? Trace something and move on already. Am I right?!
After your circle is sketched in, it's time to mark where your eyes, nose, and mouth will sit. Make sure you click over to watch this while I do it because the placement of these lines is super important.
Not sure how to draw elf ears? Check out how EASY it is in today's step-by-step drawing tutorial. I promise you can totally do this!
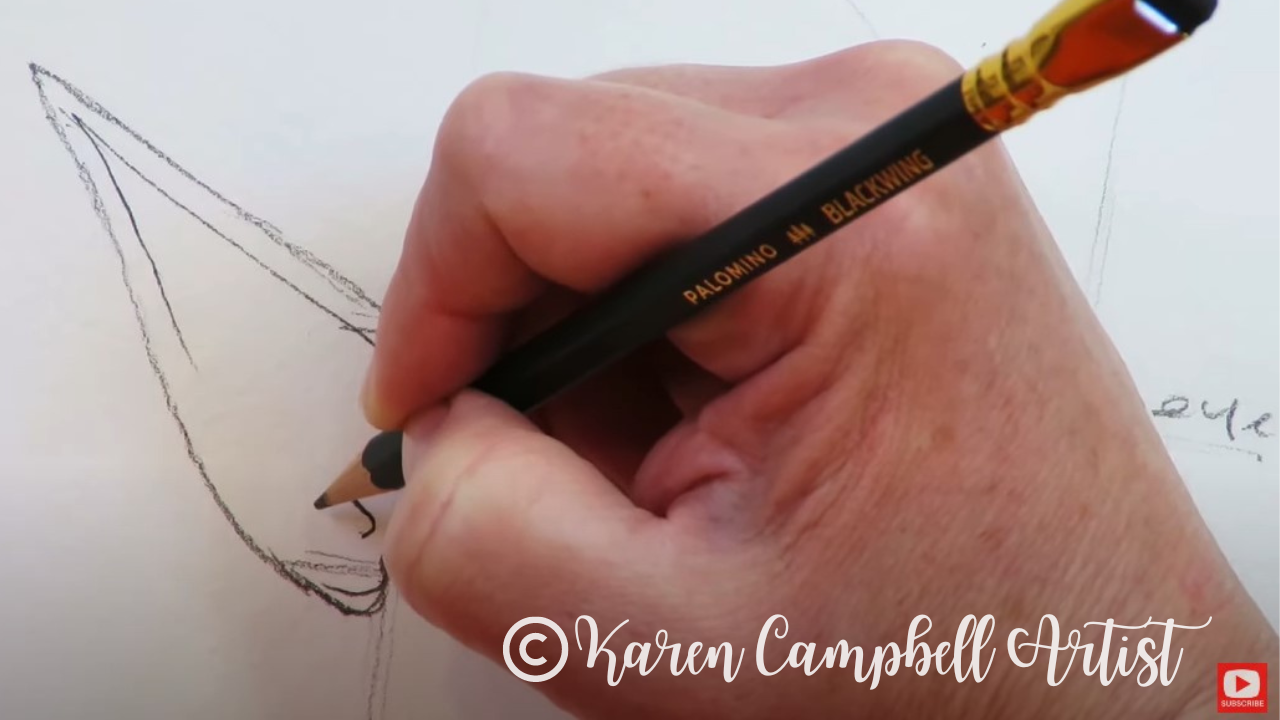
As you can see in the pic above, I'm drawing with my favorite pencil. The graphite is super soft and feels similar to a 6B to work with. One Blackwing pencil will replace an entire pencil set because you can get so many different values from it while you're shading faces just by changing the pressure of your pencil as you draw. 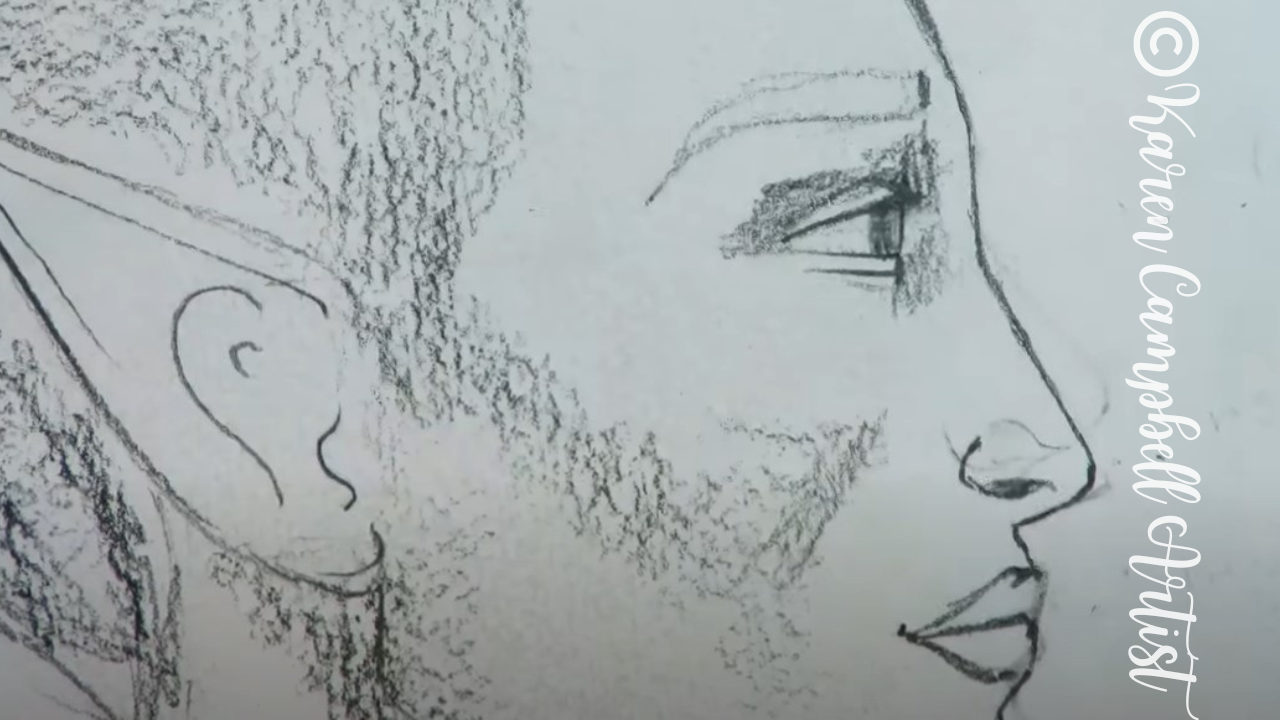
Now before you judge my quick and dirty shading above, I already know if looks like a scribble scrabble mess at this point, but I promise you - when I start using my blending stump- it's gonna get magical.
Tons of students ask me how, or if I clean my blending stumps. The answer is I DON'T clean them ever, because "the dirtier, the better" is my rule as far as blending stumps go. However, if you start blending and feel like you're kinda losing control or your drawing is getting too dark- you can absolutely switch to a cleaner blending stump to lighten things up. You can also knock some of the graphite back using an eraser. I love using my vanish eraser for this, but you can also use a kneaded eraser. 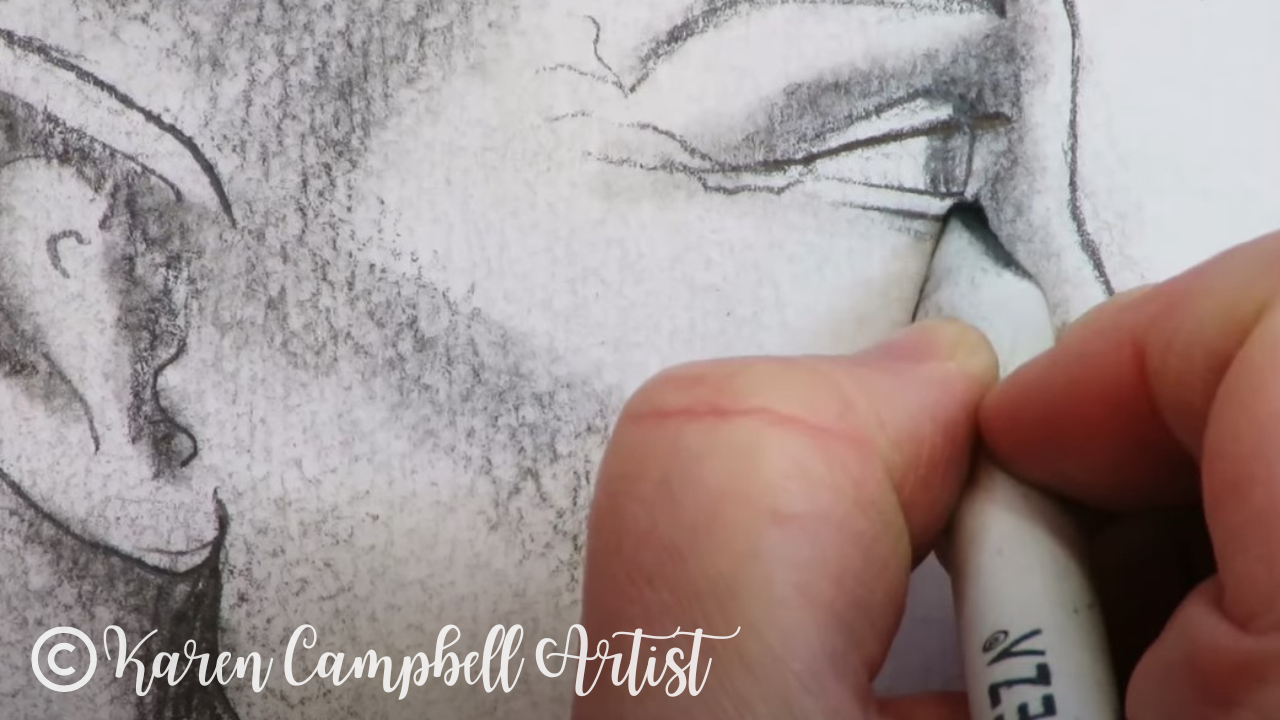
After I've blended in the first layer of shading throughout, I press my pencil down firmly to add some contrast wherever I see dramatic shadows and details in my face drawing reference image featuring the lovely Mr. Dreymon.
When you're ready to work on the hair, make sure you click over to watch this in action because I've got a lot of really cool tips to help you if you don't know how to draw male hair. 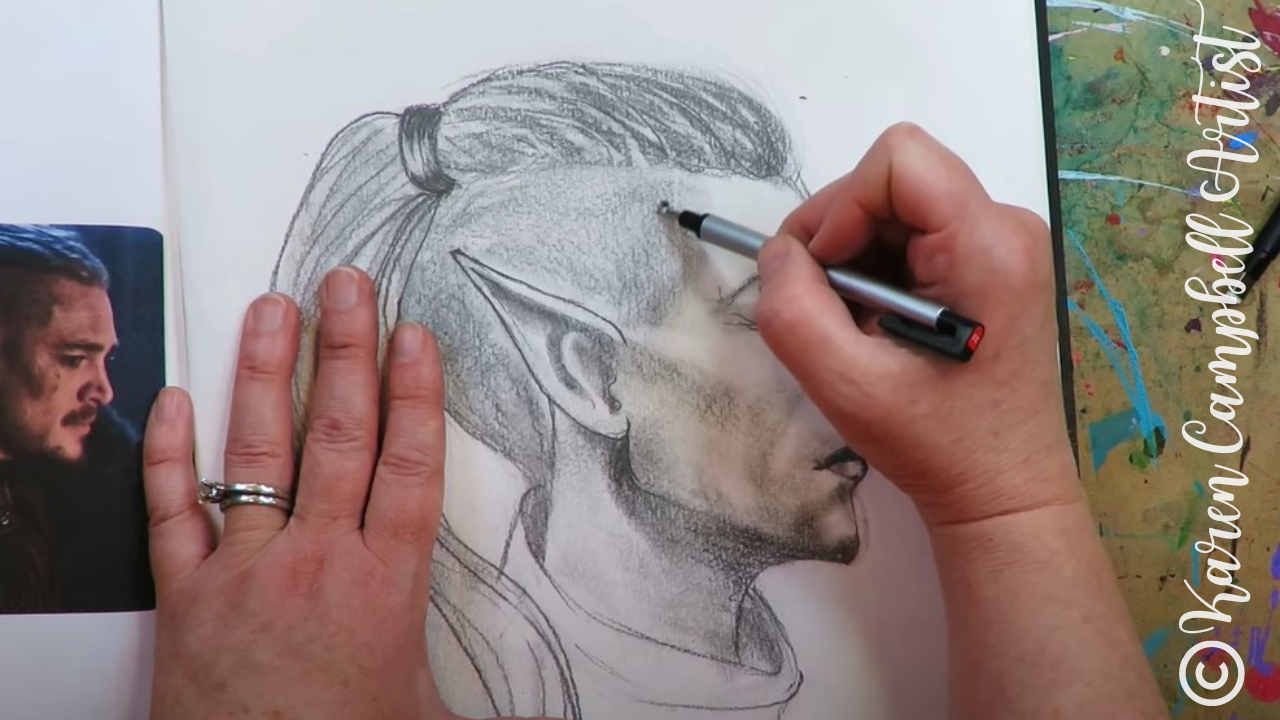
A great tool to try when you're drawing hairstyles is the Tombow Mono Zero eraser (pictured above). It's basically like a mechanical pencil, in eraser form. It's awesome for carving out highlights when you're shading faces too.
I hope you enjoyed today's free drawing tutorial on YouTube. If you're drawing along with me in this series, make sure you share a pic of your work in my Facebook Group with the hashtag #50FunFabFairies for a chance to win giveaway prizes on the 1st of the month :) I can't wait to see what YOU create!
If you're OBSESSED with fairies and fantasy art like me, you might just LOVE the Celtic Collective over at Awesome Art School that I run with my Scottish bestie, Lucy Brydon. Add your name to the waitlist to be notified when it's open for enrollment.
You might ALSO enjoy our podcast 1Scot,1 Not. We talk about everything under the sun to do with Scotland - whether it's historical, fantasy, whatever. Just a quick warning - we have a blast and are totally ourselves on the podcast, which means there is some drinking and swearing. ❤️ CHECK OUT ALL my art books on AMAZON ❤️ MY FAVORITE ART SUPPLIES on AMAZON ❤️ MY BELOVED FACEBOOK GROUP ❤️ FOLLOW ME ON INSTAGRAM HOW to DRAW & SHADE a WHIMSICAL African Face & Head Wrap in Copic Markers (Whimsical Women #11)21/12/2020 Teaching you how to draw a whimsical face is one of my FAVORITE things to do! I'm having SO much fun with the whimsical face drawing tutorials in the Whimsical Women of the World series! Not only does today's STUNNING model help us study profile drawing, we'll cover how to draw an African head wrap (including how to draw the fabric folds within it), how to draw a closed eye, and how to draw a face looking up! As always, the whimsical drawing portion of today's video is in real time so you can see exactly how I get it done!! 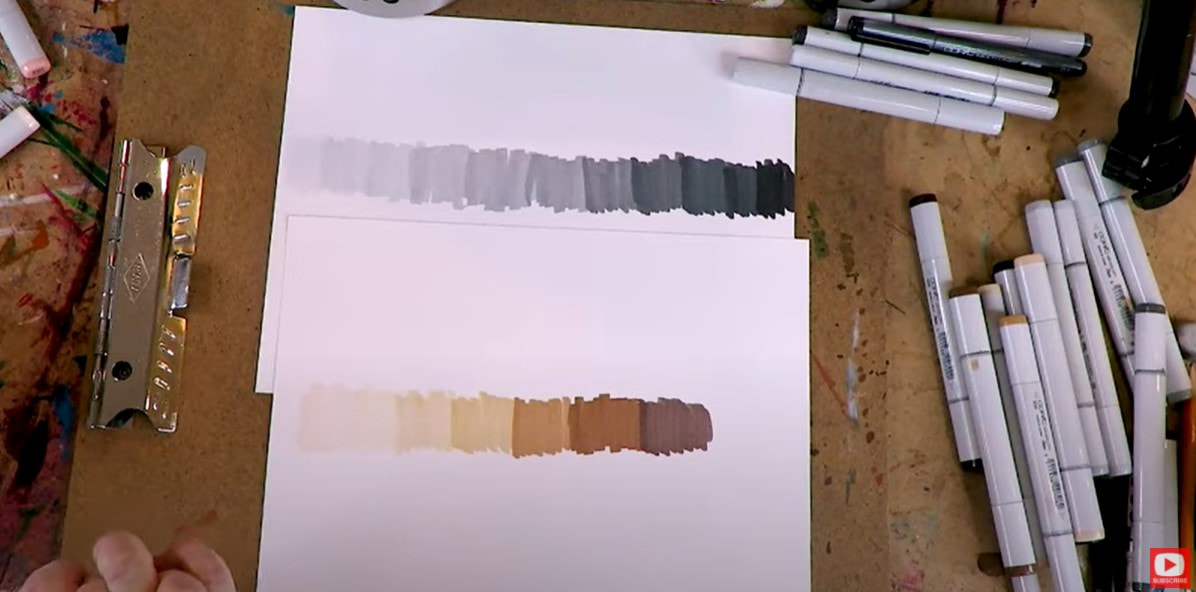 To get us started off on the right track, I'm doing a mini review of the value scale to help you understand how important this is whenever you're drawing and hoping to take your artwork to the next level. If you incorporate the lightest light ALLLLLL the way to the darkest dark, and everything inbetween... your art will be so much more sophisticated!! Real quick, before we go any further: All product links are Affiliate. I may earn a small commission if you choose to order through these links, but by law, there is never any additional cost to the consumer for doing so. I thank you for your support! 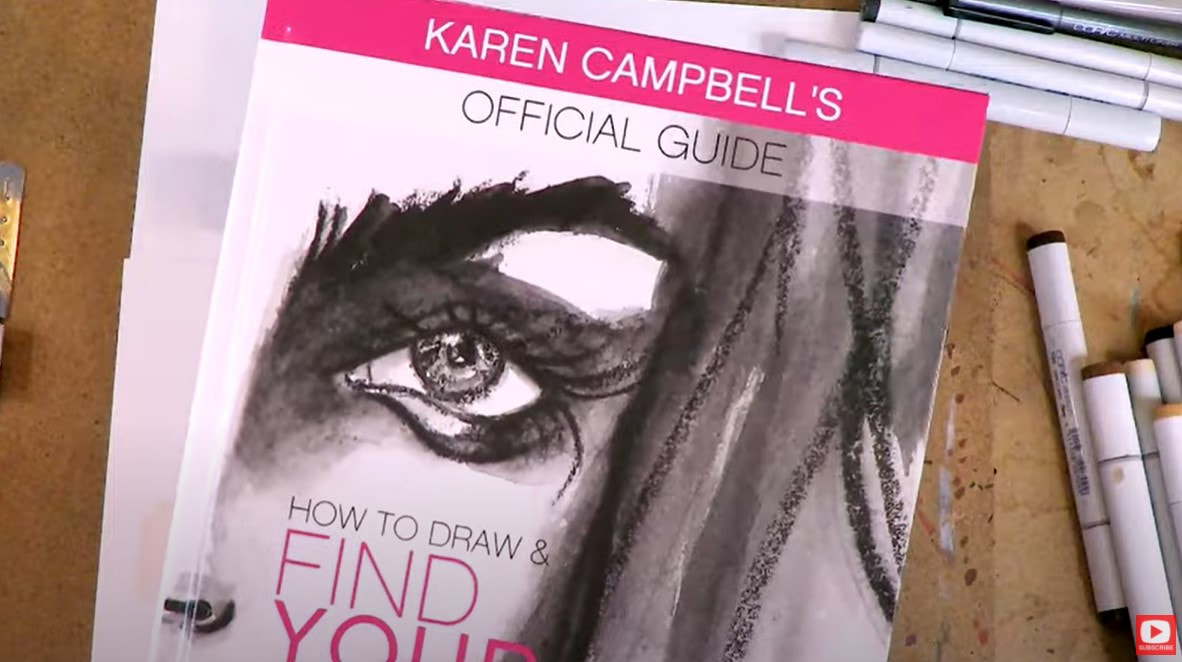 I talked about how to shade skin tones in graphite (or black and white variations of the value scale), a lot in my How to Draw & Find Your Style book because it's easiest for beginners to learn about value scale drawing in black and white first. Graduating from shading in graphite / black and white to color can be tough and trip some artists up, but it's exactly the SAME concept as grayscale- you're just essentially working in browns! HOT TIP! Be sure to create a value scale of skin tones for yourself that looks something like this before you start shading. I recommend you also write the name of the marker color next to the shade so you know exactly which one to pick up when the time comes! 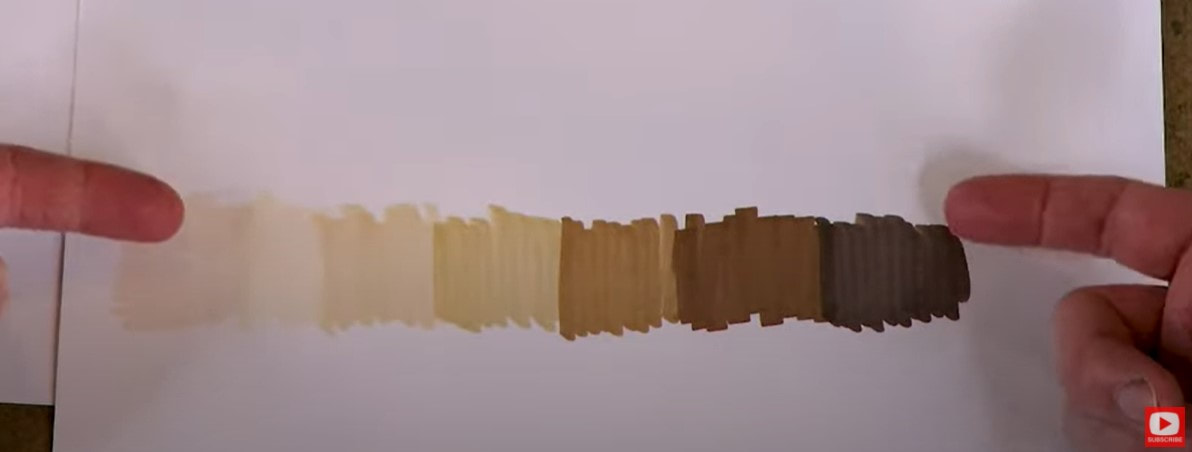 One of the reasons I have loved doing this Whimsical Women of the World portrait drawing series is because I could push myself to explore all the variations of skin tones represented in countries around the world. If you've watched me before, you know I LOVE dramatic highlights and shadows, which today's reference photo is FULL of!! If you'd like a copy of my reference photo, hop over to AwesomeArtSchool.com and click into either my YouTube & Cheatsheet Library, or the Whimsical Women of the World classroom to download the reference image from today's lesson, or any lesson from this series! If you are a member of the Fun Fab Drawing Club over at Awesome Art School, the Whimsical Women of the World classroom has already been made available to you within the club!! If you're not a member of the club, but are interested, please sign up for the waitlist, and you'll receive an email from me when the membership is open for enrollment again in the spring! 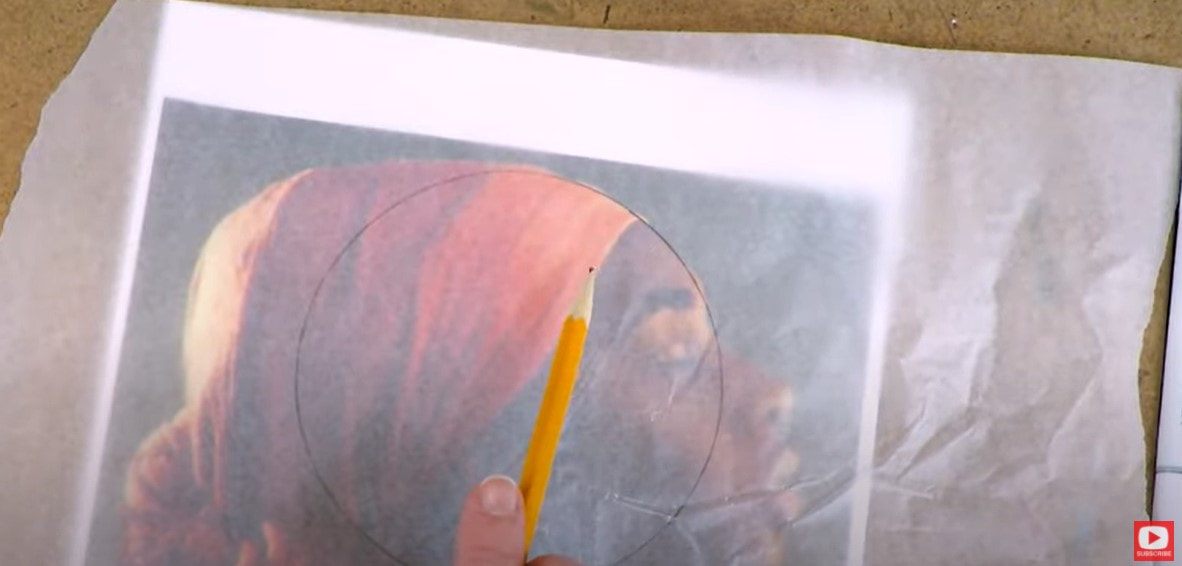 Today's portrait drawing tutorial is a profile. Instead of teaching you my "Fun Fab" approach for side profile drawing- I'm showing you a little more advanced method from my book. It's a bit more realistic. If you start watching today's tutorial and begin feeling like this is a little too advanced for you- don't worry!! The drawing projects in the Whimsical Women series ARE more advanced. But I work hard to break them down for you to keep things simple, so when you do feel ready, you can dive right in!!! If this looks fun for you but feels a little out of reach at the moment, I've got an awesome 6-part video profile drawing series on YouTube that teaches you my Fun Fab method for drawing whimsical profiles (it's more directed at beginners)!! If you'd rather start with a front facing face (most do!!) - here is the 5-part series for absolute beginners!  Profiles can feel extremely tricky to draw because of all the angle variations that make us who we are as individuals. For example, in the photo above - I've highlighted the angle of the nose to the chin to show you just how much this changes from face to face. Some faces have a pronounced angle here, some have a more subtle one, and others have barely any angle presentat all - as in the case of today's beautiful model. I find using a sheet of trace paper helps me to understand the spatial relationships on a face before I draw it. You might find this to be a helpful trick as well! It's kinda like a practice round to warm up my hand. 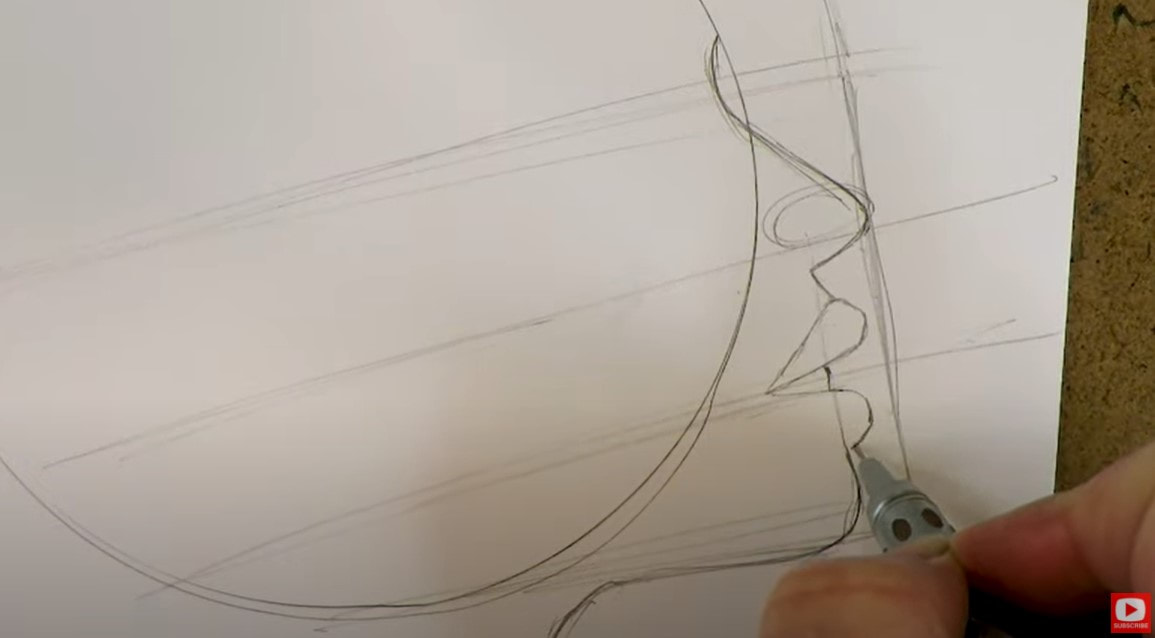 If you're not sure how to draw a closed eye, how to draw open lips, or how to draw fabric folds on a headscarf /african head wrap- be sure to click over and actually watch the portrait drawing tutorial so you can follow me in real time. For drawing fabric folds on our model's head scarf, I try to break the overall head scarf down into chunks / shapes that I can clearly see, then replicate on my paper. Since I'm doing a whimsical drawing, instead of a realistic drawing, I'm able to give myself a little grace here if things aren't perfect. Doesn't THAT feel good?! No need for perfection when you pull out your "whimsy" card!! 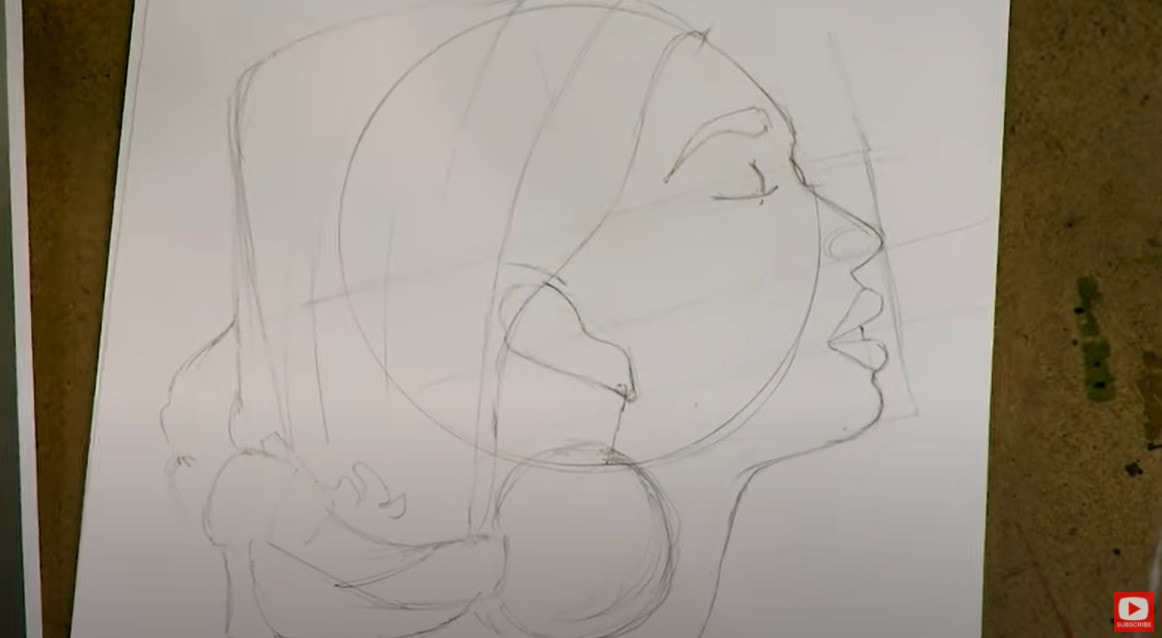 When everything is sketched in, go ahead and start erasing all your guidelines. My favorite eraser is the vanish eraser - which you can pick up for about $2 at Jerry's Artarama, or on Amazon for a bit more. If you're not using alcohol markers to color in your drawing like I am, just be sure you have a nice gradation of skin tone shades swatched out before you begin so you know what to reach for when you're ready to start incorporating each shade! We want the WHOLE value scale represented in your work, because this adds dimension and sophistication!! 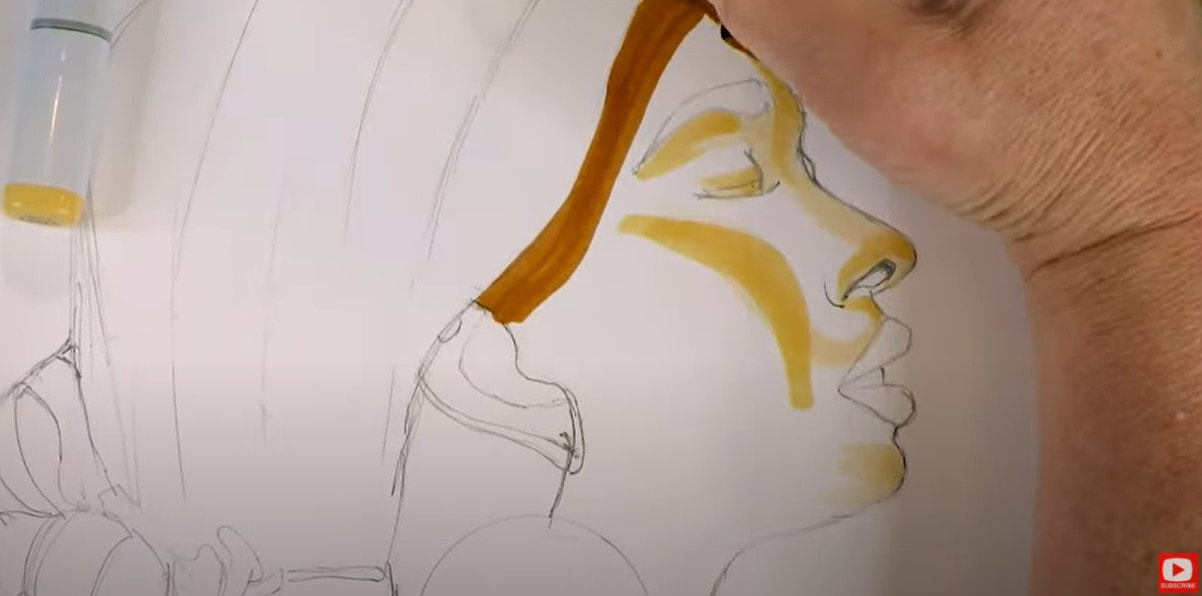 You have two choices when you're shading- either shading from light to dark or from dark to light. I've chosen to shade light to dark today- hitting the highlighted areas of her nose and chin first.  As you'll see in my work, and in your own (if you're using copic markers or another brand of alcohol markers), these can be very streaky. To reduce the streaks, it helps to lay your color down quickly so the shades blend into one another a bit when the ink is wet. You can also choose one color to shade over transitional lines to attempt to soften these lines, or add colored pencil shading over the top of your marker layers. When you're blending copic markers, you can also try shading one solid color in strokes running the opposite direction from how you originally laid down color. I often use the lightest or a medium skin tone marker when doing this to my face drawings. Be sure to watch the tutorial because I demo this today and in many of the videos from this series. 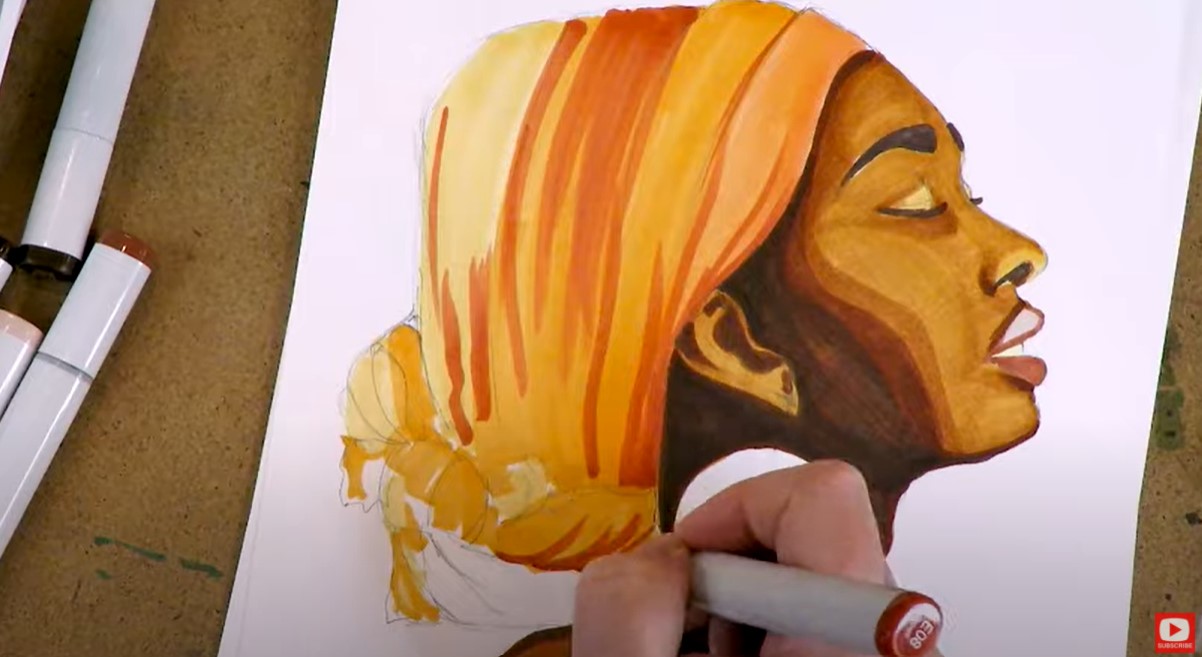 When I selected marker shades for the headscarf, I used the exact same strategy as I did for choosing skin tone markers to work with for this project. You want to choose 3-5 shades that transition nicely and can blend into one another to represent various stages of the value scale from lightest to darkest. If you're intimidated by the head wrap or not sure how to draw folds in fabric- this really is easier than it looks! I find it to be similar to drawing hair. Follow me, and I'll break it down for you. 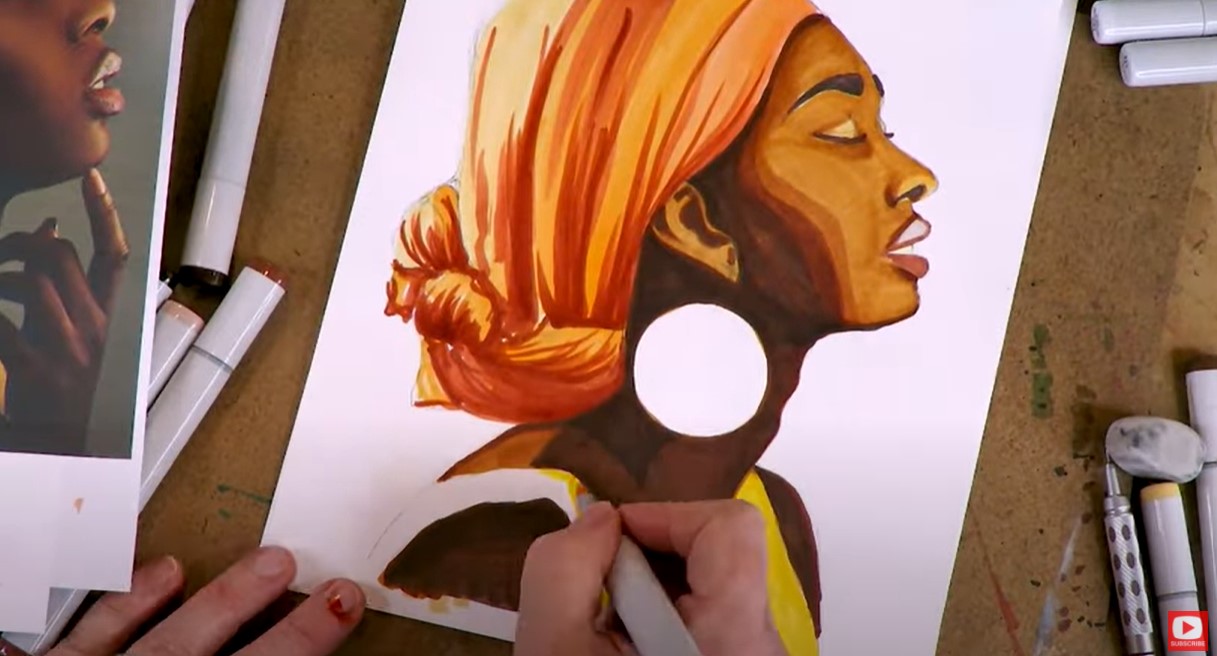 The farther I get into my project, the more layers I continue to build up on her face to eliminate some of the streakiness in my transitions. But I also discover, the model in my reference image really is much darker than I have portrayed, and I need to continue darkening the shadows and blending skin tones to do a better job replicating what I see. Be sure to take your time here. Start slowly, and gradually build up those values. Honestly, the more layers you have, the more realistsic the skin will look- because we're all made up of many colors!! So just keep working and blending until you feel like you're at a good place and happy with what you've got. 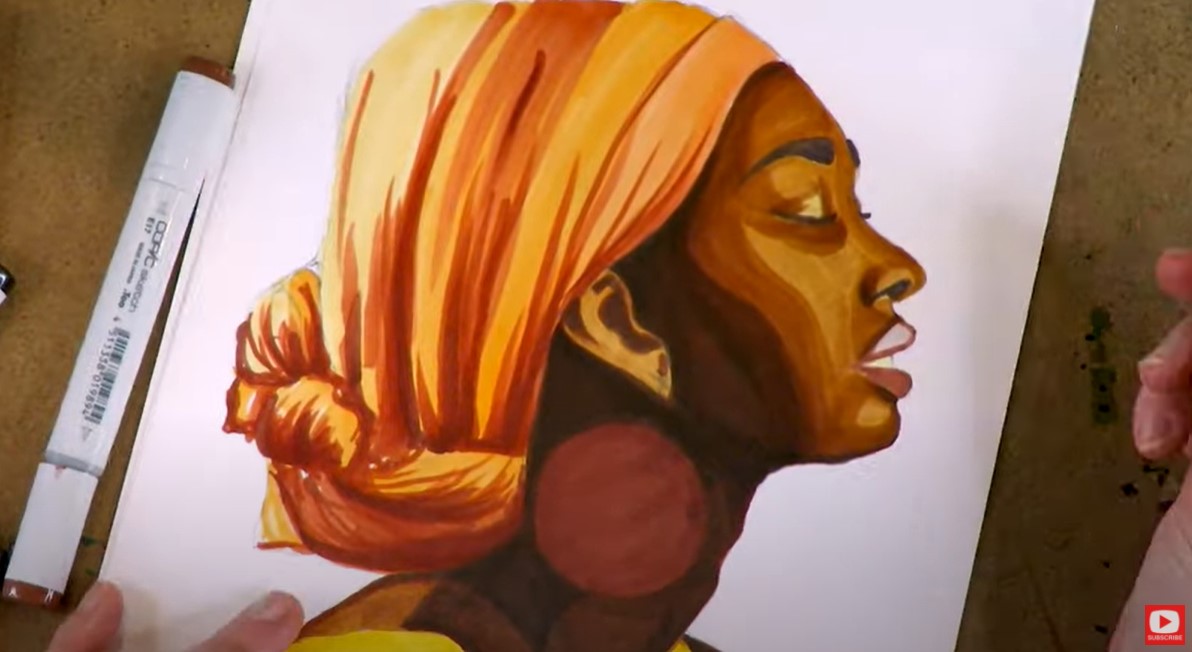 I used my pentel pocket brush for my outlining - including the detail work on her eyelashes, just as I have used it in the previous lessons. I actually had to recently change the ink cartridge on this pen and sadly, it hasn't been working the same for me as it used to!! 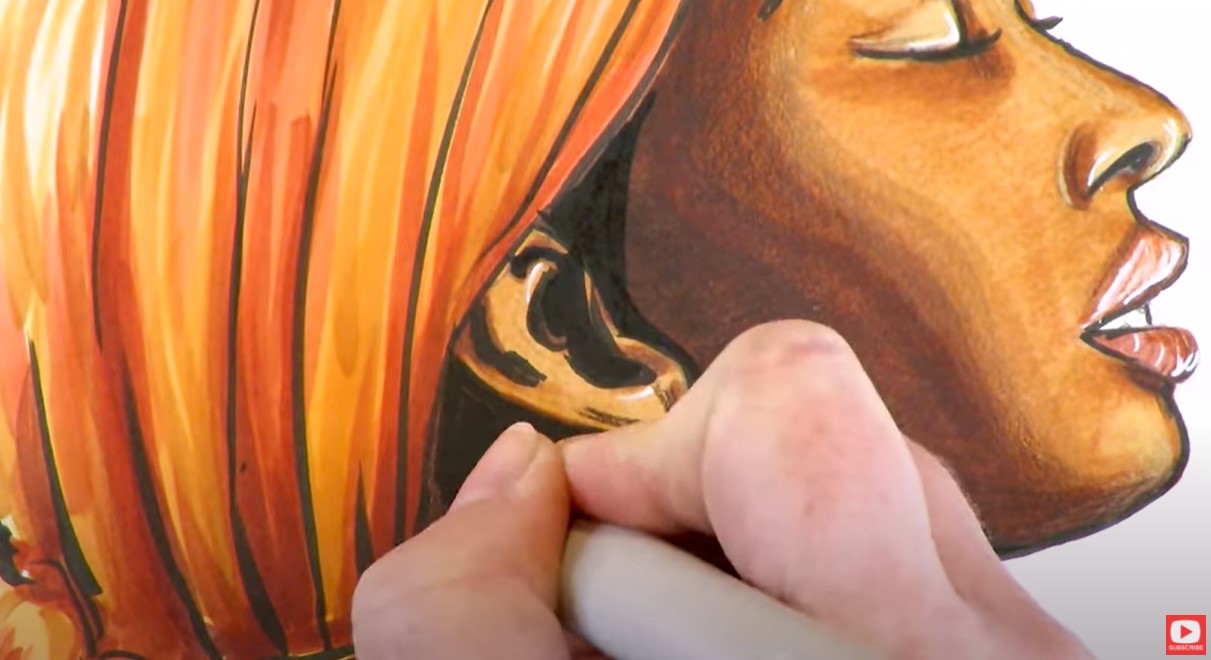 As I was working the finishing touches on today's drawing, I decided to add just a bit more shading in and around the ear, because something about it was just bothering me! I ended up adding some black and it made all the difference in the world!! Now there is really some deep, gorgeous contrast! If there is anything I've learned during this series it's you can't have too many layers!! This amazing Hammermill paper I work on can seriously take a beating with my alcohol markers and I love it!!! The paper you work on is EQUALLY important as any other art supply you invest in. I hope you enjoyed this portrait drawing lesson in copics!!! I learned a ton, and hope you did too!!! I used to STRUGGLE with my profile face drawings because they ALL LOOKED LIKE ALIENS ...  OR...had FISH LIPS!!!  If you're ready to toss your sketchbook because you don't know how to draw a face that looks "right" as a side view drawing... You're in the right place! HELP IS HERE!!! As you may know, I'm a mixed media artist, but I REALLY value the skill of drawing because it makes my mixed media foregrounds look SO much more interesting and beautiful if they are based on accurate drawing proportions of the face.  It wasn't until I wrote my second book, How to Draw MORE Fun, Fab Faces, that I really held myself accountable to finally figure out how to draw 3/4 portraits and profiles in a CLEAR, step by step way! In today's drawing tutorial I'm pulling out ALL MY TIPS for face drawing, and I'm gonna walk you through profile drawing STEP BY STEP so it's easy for you to replicate on your own at home! ALL you need to do this project right along with me is a piece of paper and a pencil - ANY pencil with an eraser will do! 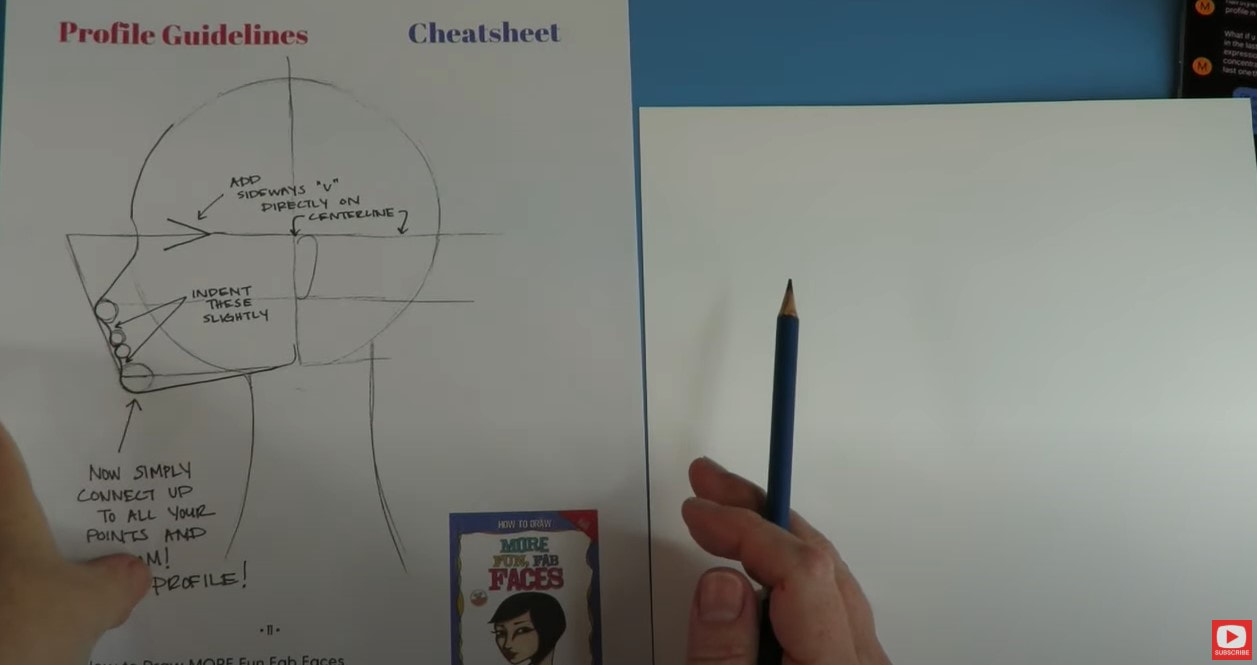 When you're working on a profile sketch, there are little tweaks you can make to help your faces look more realistic. Even if you're doing a a stylized whimsical drawing (like mine!), paying attention to angles of the face and the placement of facial features will give your drawing greater sophistication. Download a copy of my FREE Profile Face Drawing Guidelines here. After you grab your guidelines, let's get started. Don't worry- this is an EASY drawing for beginners!!! The first step is to simply draw a circle. Don't stress over it - just grab something near you that has a circular shape and trace around it. DONE! 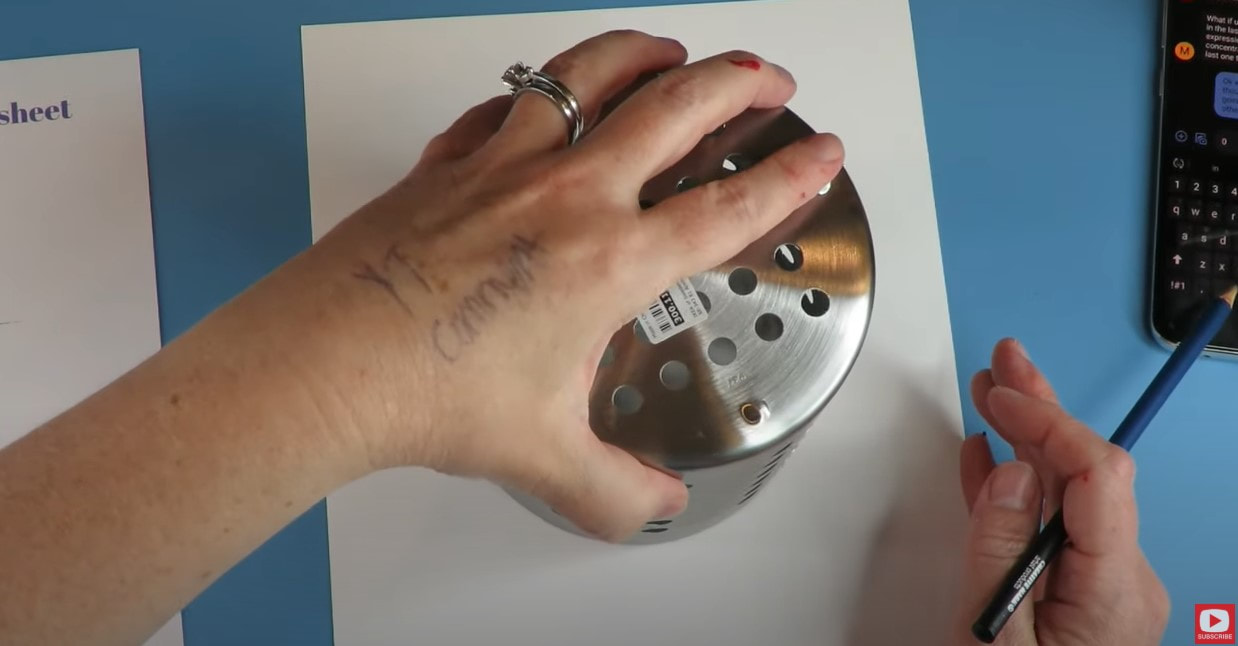 Before we sketch in your guidelines, there is something I need to show you. The angle from nose to chin varies a TON from face to face in real life. The pix below are from my book, How to Draw and Find Your Style. Look at that pink arrow focusing on the angle from nose to chin. See how it differs from the photo on the left? They are COMPLETELY different! 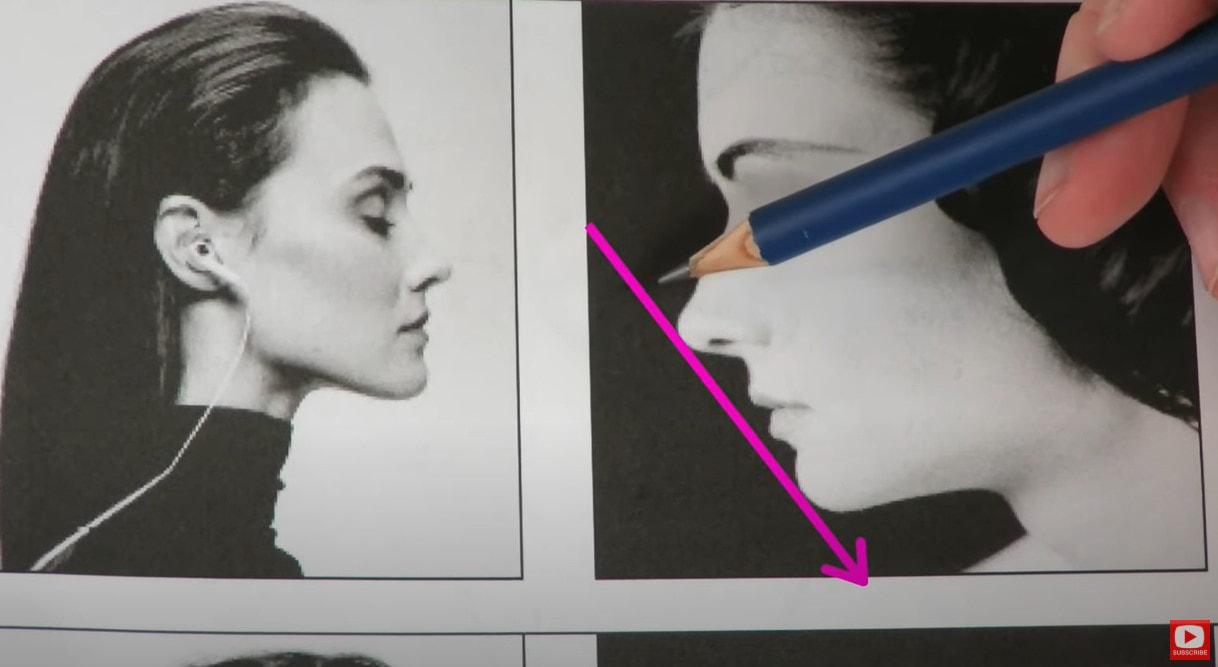 SUPER INTERESTING right?!! This is an example of one of the little nuances that trip us up as artists when we try to draw profiles! The angles are seriously tricky!!!! But we're NOT gonna let them get the better of us. How do we draw this in an easy way without having issues? CLICK HERE and I'll demonstrate for you step by step. When you sketch in these simple guidelines, it will help you focus on drawing proportions of the face- which is just a fancy way of saying YOUR girls won't look like aliens the way mine did ;) 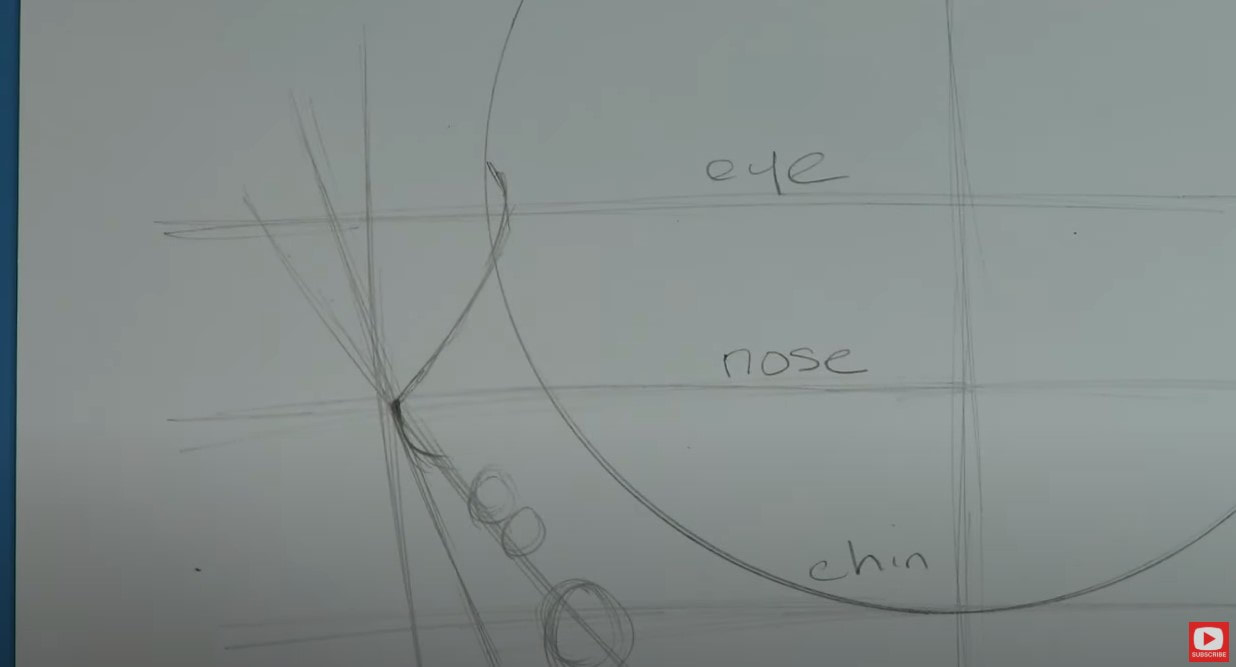 One of the biggest rules to remember about profiles is the lips should NEVER stick out beyond the nose. See how that first set of double circles (above) looks just under my rough nose sketch? Those will soon become lips ... see below! 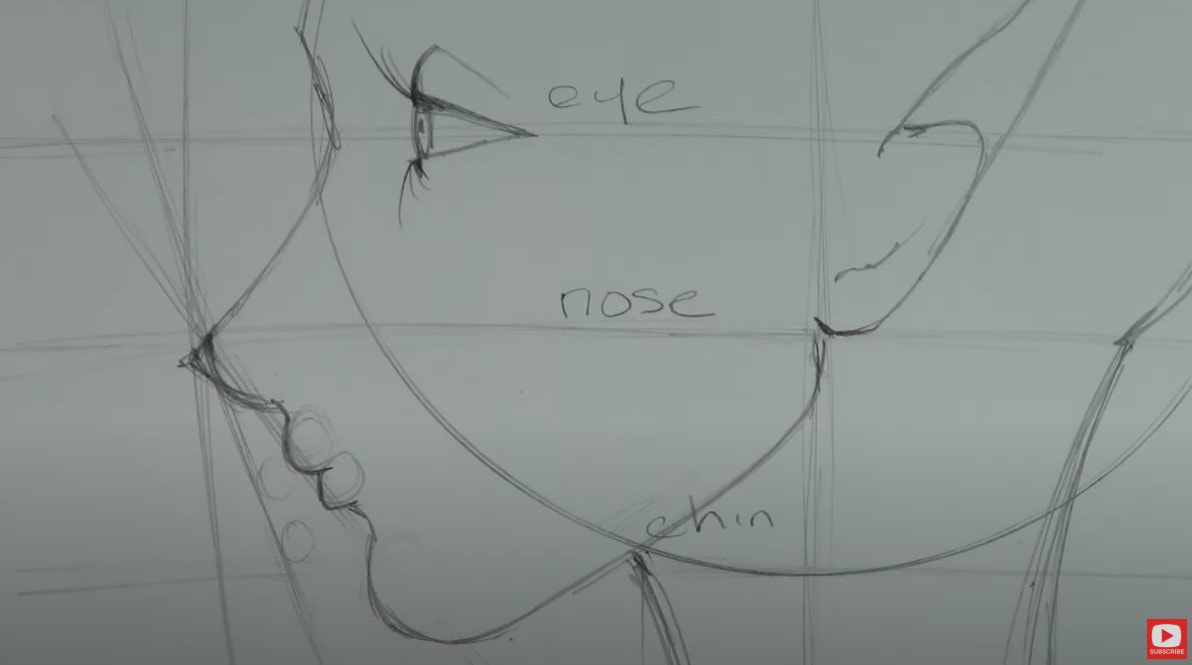 The more you work on your face drawing practice - the more these guidelines will become second nature to you. You’ll know how to draw facial proportions for your side view face sketches correctly & will have drawings in your sketchbook you can be SUPER PROUD OF!! I PROMISE!!! EVEN BETTER - it doesn't have to be hard anymore when you're armed with my Profile Face Guidelines Cheatsheet. I HOPE you have FUN with this video and find the guidelines helpful. Make sure you're drawing right along with me because that is how you will learn best- with practice!!! STAY TUNED for next week's video, because I'm gonna teach you HOW TO SHADE today's profile (see below!). And YES, of course I gave her elf ears / fairy ears because I LOVE (and DO BELIEVE in) fairies!!! 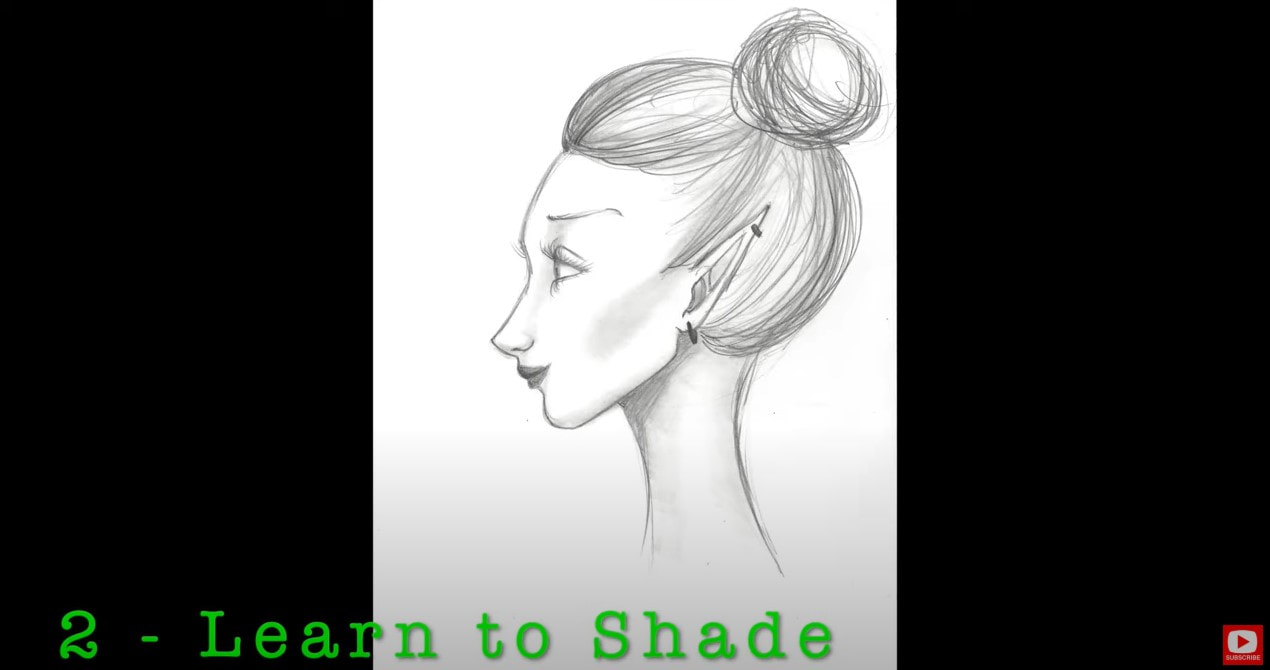 See ya over on YouTube!!! ❤️All product links are Affiliate. I may earn a small commission if you choose to order through these links but by law there is never any additional cost to the consumer for doing so. I thank you for your support! |
Karen CampbellFounder of Awesome Art School. Mixed Media Artist. Author of 19 Instructional Art Books! 
Whose work has appeared in...
   
 Archives
July 2024
Categories
All
|
 RSS Feed

"Karen is flipping hilarious and she's very real...I like the way she teaches in a way that really gives you confidence, whether you're a beginner or advanced there's always something new to learn!"
- Elizabeth W. |
What Fans Are SayingKaren, you are absolutely fabulous! You make me feel like I can draw anything. I have recently retired and finally have the time to do some of the art that I have loved since I was in school. I am really at the beginning of my art journey and I hope to learn as much as I can. Thank you for all you do. |
Contact ME |