
|
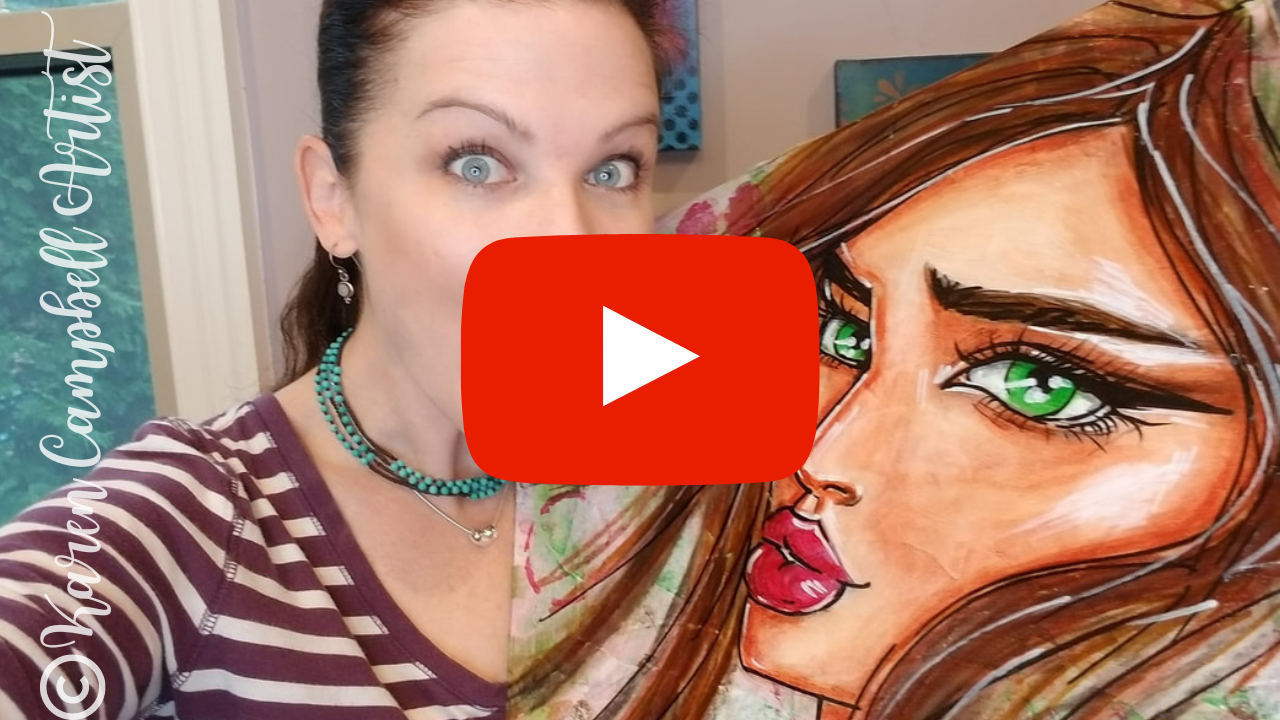
Today I'm excited to share a timelapsed version of how I made this sassy Mixed Media Marilyn Monroe, "Hamburger Style" painting, on CANVAS!!
Not sure what "Hamburger Style" is? It's my signature mixed media process - or recipe- for using my favorite, tried-and-true mixed media art supplies and layering techniques to achieve mixed media success EVERY time I sit down to create. The BEST part is how EASY this fun system is for ANYONE to replicate at home!! Check it out ... 
All product links are Affiliate. I may earn a small commission if you choose to order through these links but by law there is never any additional cost to the consumer for doing so. I thank you for your support.
Need a Cheatsheet to Follow Along?
Heck ya, you do!! Click the button below, and I'll deliver a 2-page, printable PDF straight to your inbox outlining each step of the Hamburger System.
Now that you've got your cheatsheet, let's dive into today's SUPER FUN project!!
The first layer of the Hamburger System is our "plate," or our substrate. A substrate is simply the surface we're art-ing on. In this particular project, I'm working on an 18 x 24 stretched canvas. 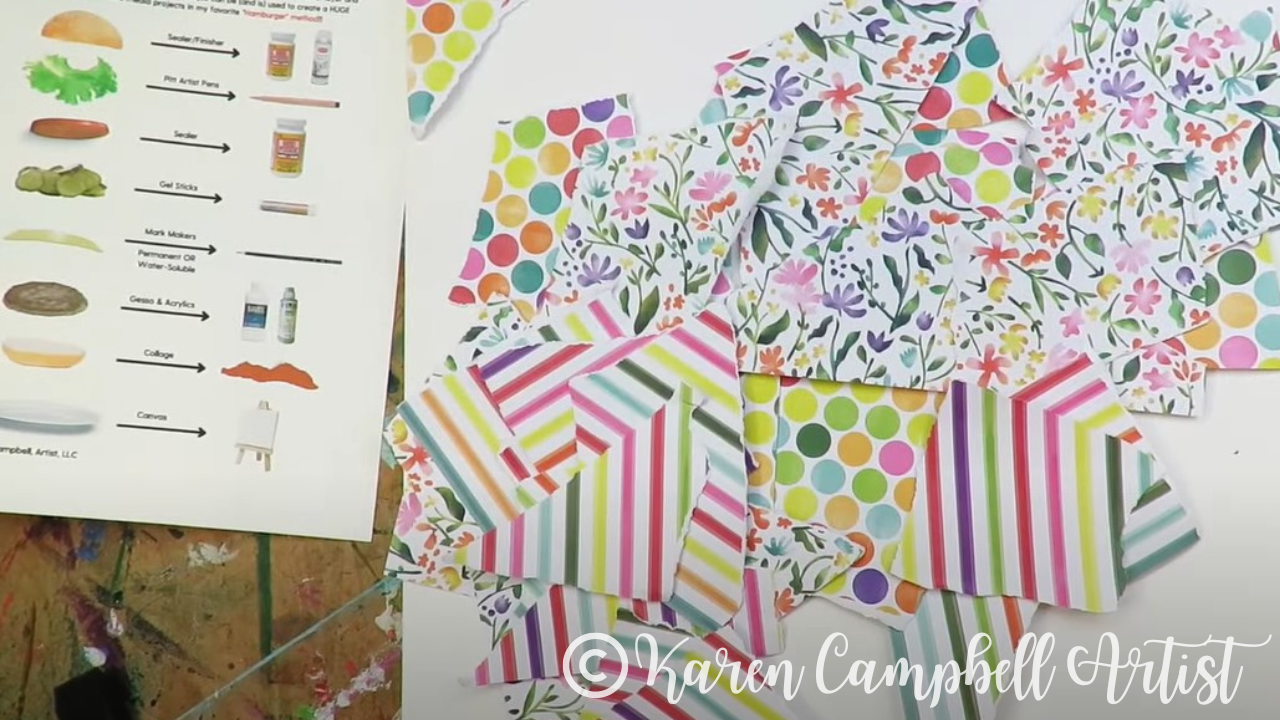
As you can see above, I've pulled three different scrapbook paper sheets in the same color scheme, and have ripped them into pieces for Layer #2 - Collage. I feel like collage is such a FUN way to get in the mood to create ANY project because there's really no rhyme or reason to it. You get to channel your inner 5-year-old, rip up stuff, and paste it around onto your canvas however you choose!
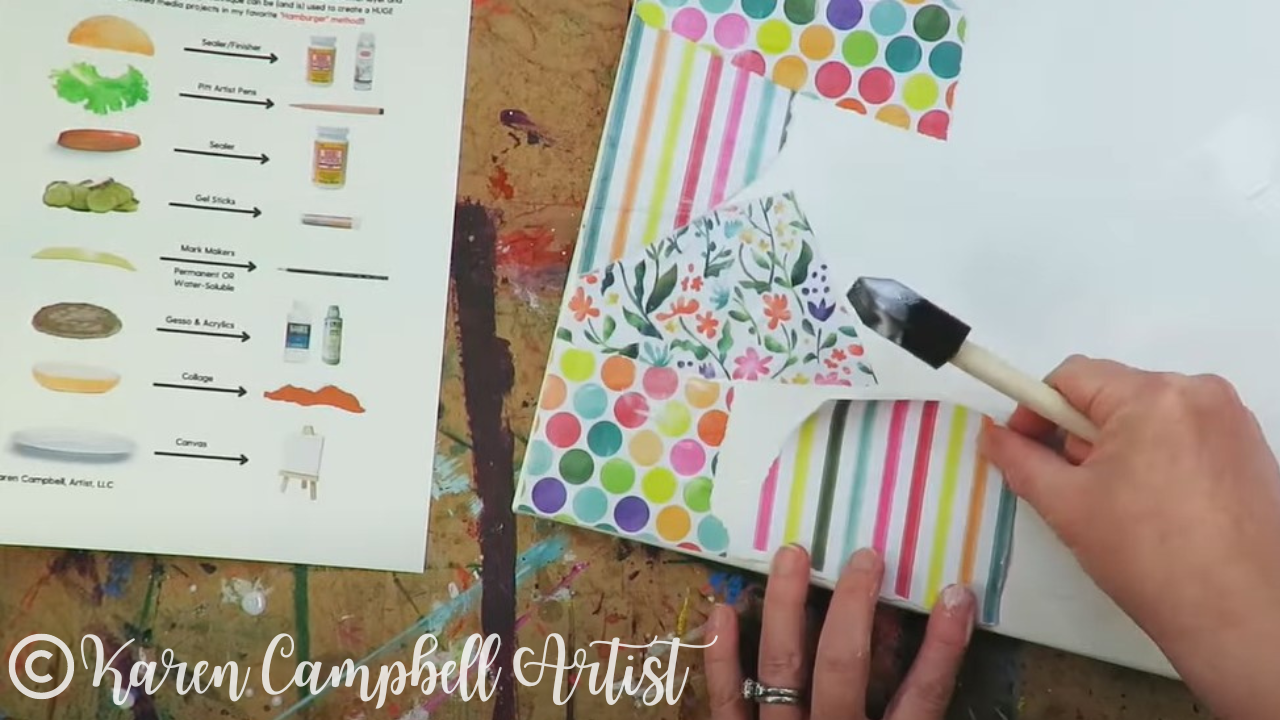
When you're ready to glue down your collage pieces, I always reach for a cheapie foam brush and my matte medium. Lots of people love mod podge (me included!), but I really prefer matte medium for my Hamburger System projects because matte medium was created to work with acrylic paint (our next layer!). It not only serves as a glue becuase of its adhesive qualities for the collage, but preps our surface to accept acrylics.
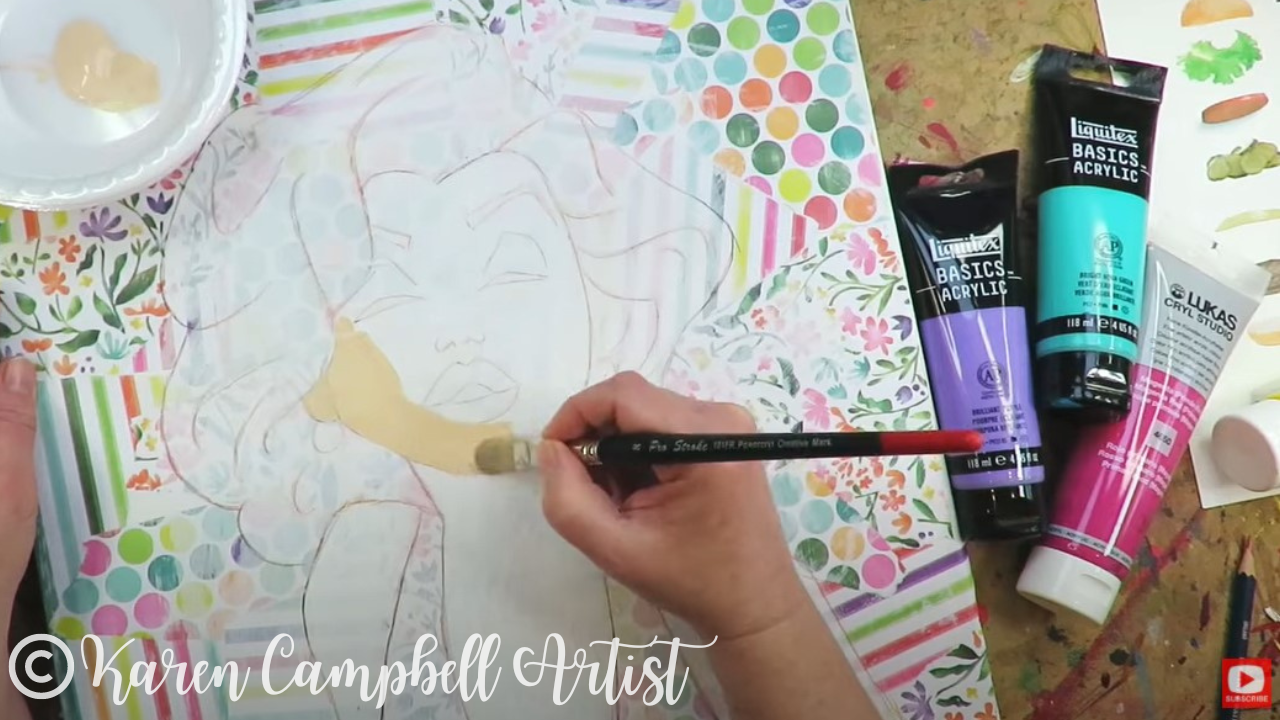
I added some white gesso in the middle of my finished collage so I could draw Marilyn in watercolor pencil (that way my lines will disappear once I start painting).
For the acrylic layer, I grabbed three tubes of Lukas acrylic that matched the color scheme in my collage, plus a skin tone. You can totally grab any of these at your local craft store or on Amazon. If you know me, I LOVE hoarding art supplies as much as the next girl, but ALWAYS recommend you use whatever you've got on hand before running off to add more supplies to your stash! 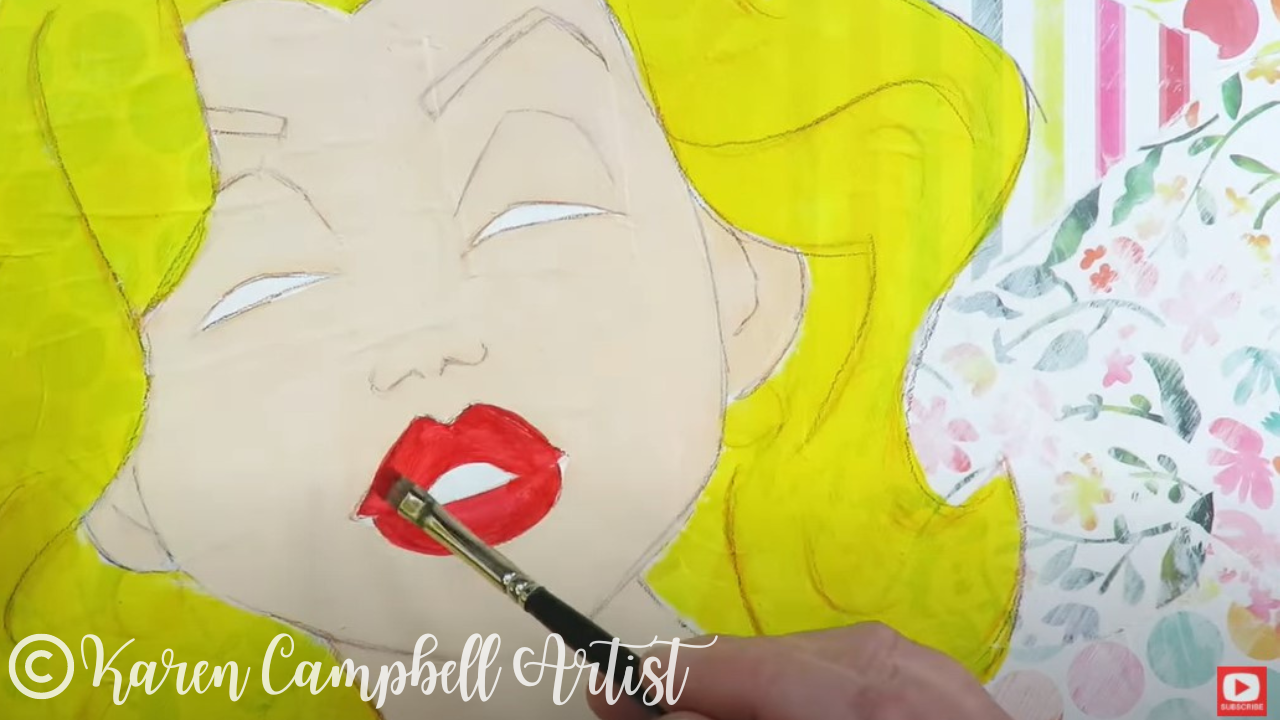
How cute is she looking already?! I seriously LOVE this project!!
Once I'm done with my acrylics, it's time for Layer #4 - gelatos and art crayons! These are SO fun for adding shadows and SO MUCH FASTER to work with than acrylics to add depth. 
After I'm done with the acrylics and gelatos, it's time for a little sealant. I grab another black foam brush for this and slap a juicy layer of mod podge all over the entire canvas. You can either get up and take a break from your project to let that dry, or use your hair dryer to get on with it like I do!
I LOVE the feeling of the dry, slick mod podge in this process. It's the perfect surface for using Pitt Pens to add some additional details and outlines throughout. They're also kinda magical because if you make a mistake, you can reach for a baby wipe and ERASE what you don't love!! Awesome right?! 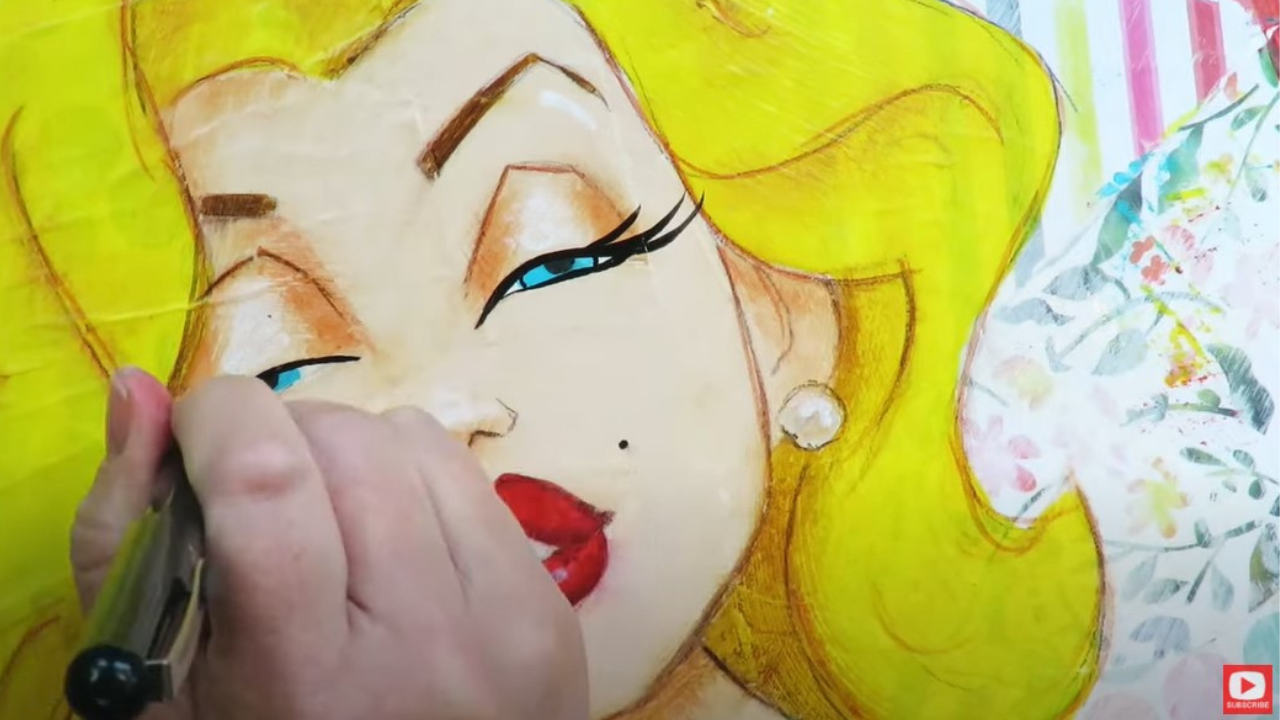
To lock your pitt pen layer in place, seal with another layer of mod podge. Next, you can add another layer of pitt pen doodles, some highlights, outlines, and give it a final seal!
So FUN and EASY, right?! 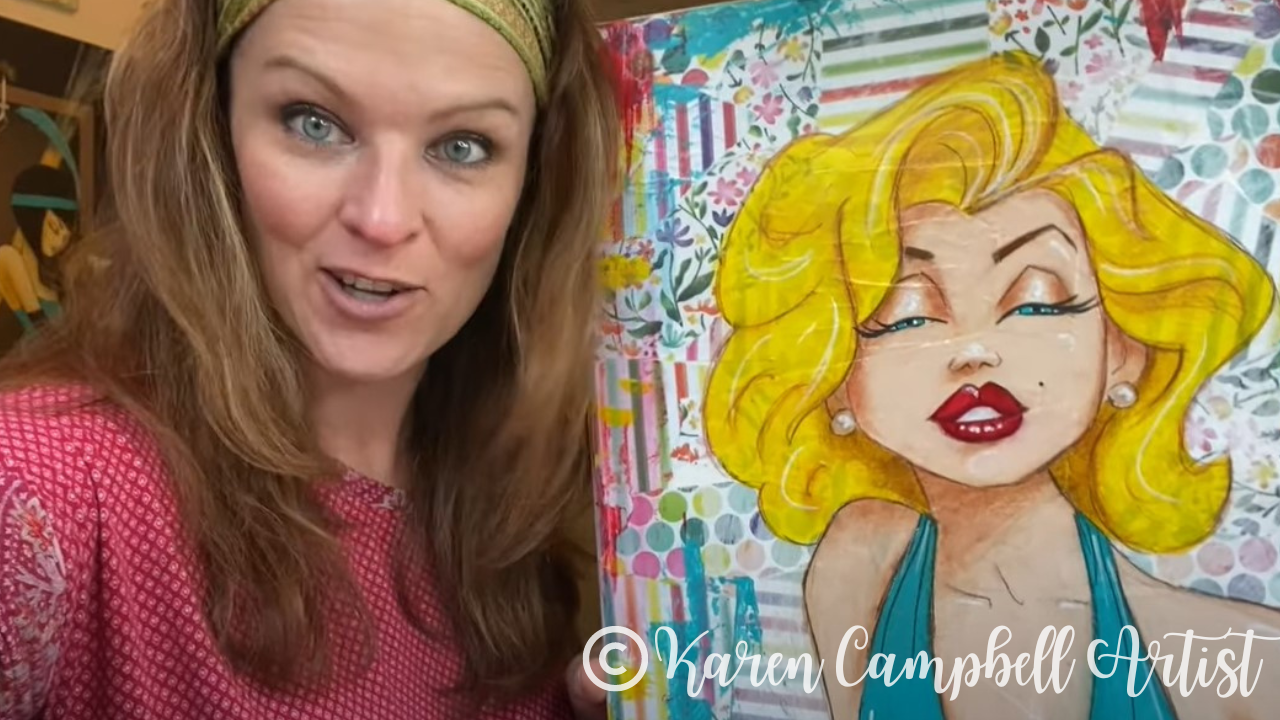
I hope you had SO much fun watching this project unfold. I had a blast creating her and would LOVE to see your work in the Facebook group if you played along!
Wanna Dive Deeper into The Hamburger System?
I LOVE teaching students how to make the Hamburger System work for them at home! I've got an entire real-time (no timelapse) YouTube series you can binge for FREE right now, that breaks each layer down into its own video!
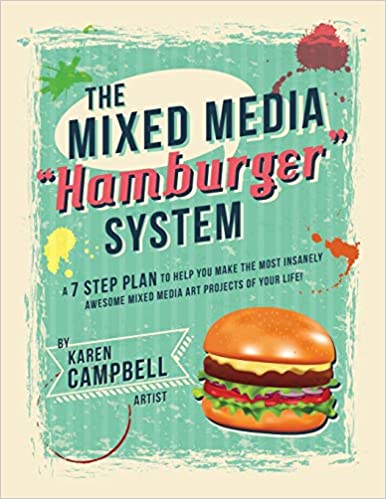
You can also grab a copy of my Hamburger System book on Amazon to set at your art table so you have EVERYTHING you could possibly need to know about art supplies, layering techniques and more right at your finger tips!
Want Access to Today's Lesson in Real-Time?
I hear ya! There's nothing QUITE like getting to do each and every step together without timelapse!! This mixed media Marilyn Monroe lesson is part of my Mixed Media Society over at Awesome Art School.
The Mixed Media Society is only open for enrollment three times/year. Add your name to the waitlist here to get notified next time we're taking on new members! Need More Resources?
1 Comment
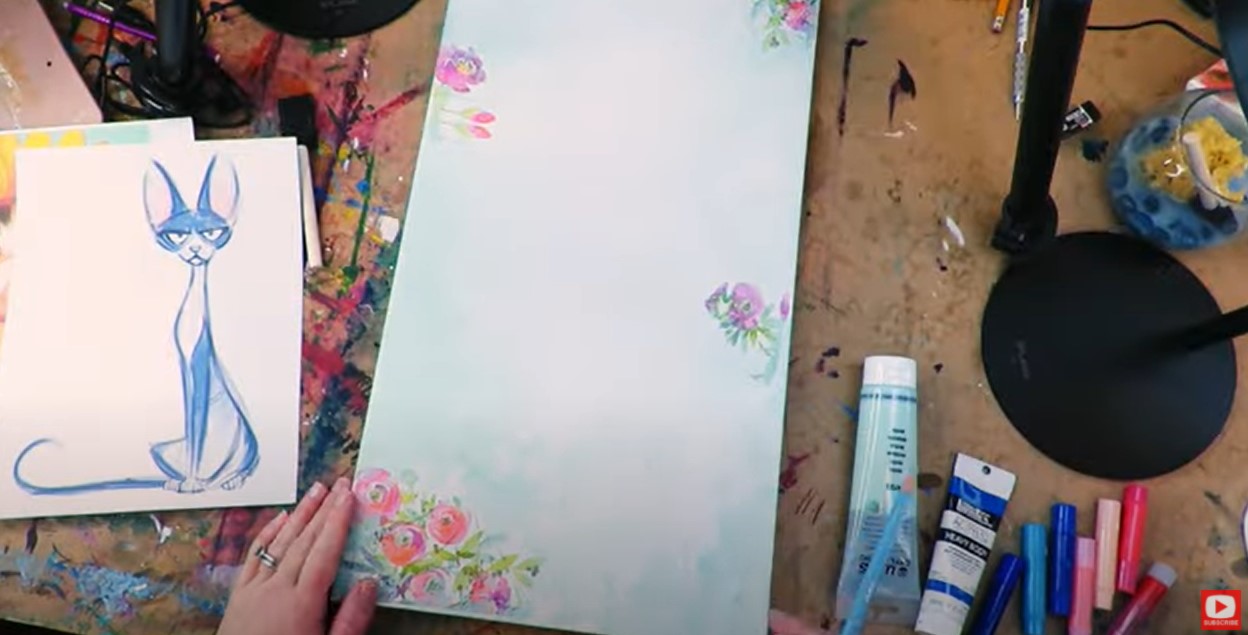
Today's mixed media on canvas is a hilarious mashup of a grumpy cat and a flower- done in my signature "Hamburger" style. There's a little bit of everything from mixed media collage using paper napkins, to mixed media drawing & acrylic painting. I had a blast! Having FUN with your art is the MOST important part! If you're having FUN, you'll create more often. The more you create - the BETTER you'll get!
If you've never done mashup art before, be sure to click over to the video to see exactly what I'm doing. It's actually REALLY easy. You just combine two or more reference images to come up with your own creation!
For my supplies, I used a tall canvas (around 12 x 36), some floral napkins for collaging with mod podge, and ALL my mixed media supply favorites from watersoluble pencils to acrylics, gelatos and pitt pens.
If you look closely at the collage portions of this piece- I was using floral napkins. The napkin pattern had a white background, so when I collaged it to my canvas, the flowers kinda melted into the background like they were always there. It was a really cool effect! Check out this link to learn more about how to do wrinkle-free mixed media collage with paper napkins. 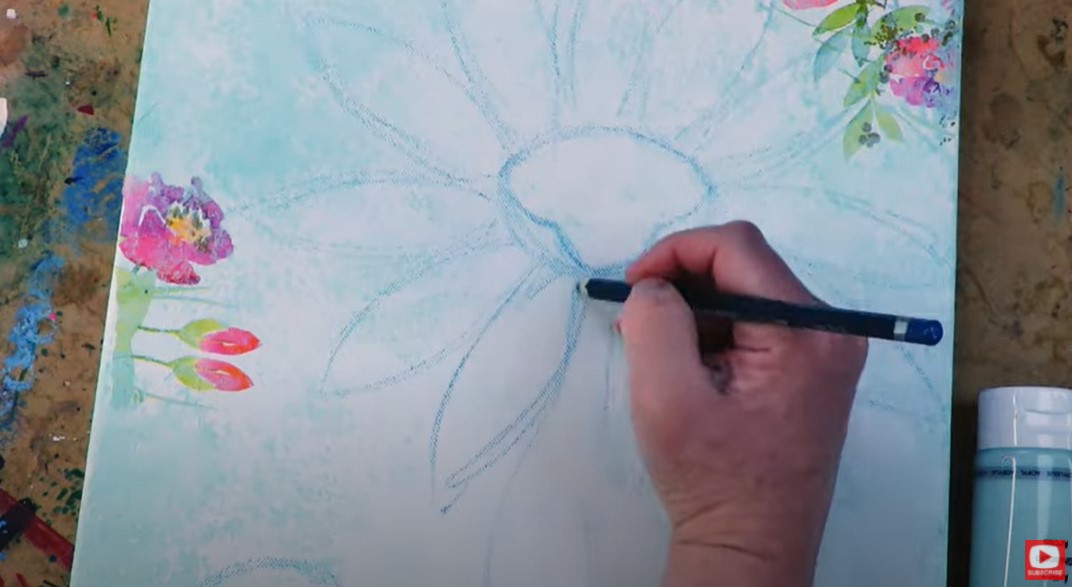
As you can see above, when I was ready to start drawing my grumpy flower cat, I used a watersoluble pencil. I think this is an awesome trick because once you start painting, your pencil lines totally melt away!
Once I got my acrylic layer down, I started adding in my gelatos (shown below) to blend in some shading with my finger and give my acrylics more dimension.
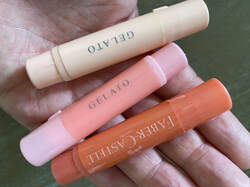
If you've never used gelatos before, they're AMAZING. I recently did a video on how to use gelatos in mixed mediat art, so be sure to check that out for my best tips.
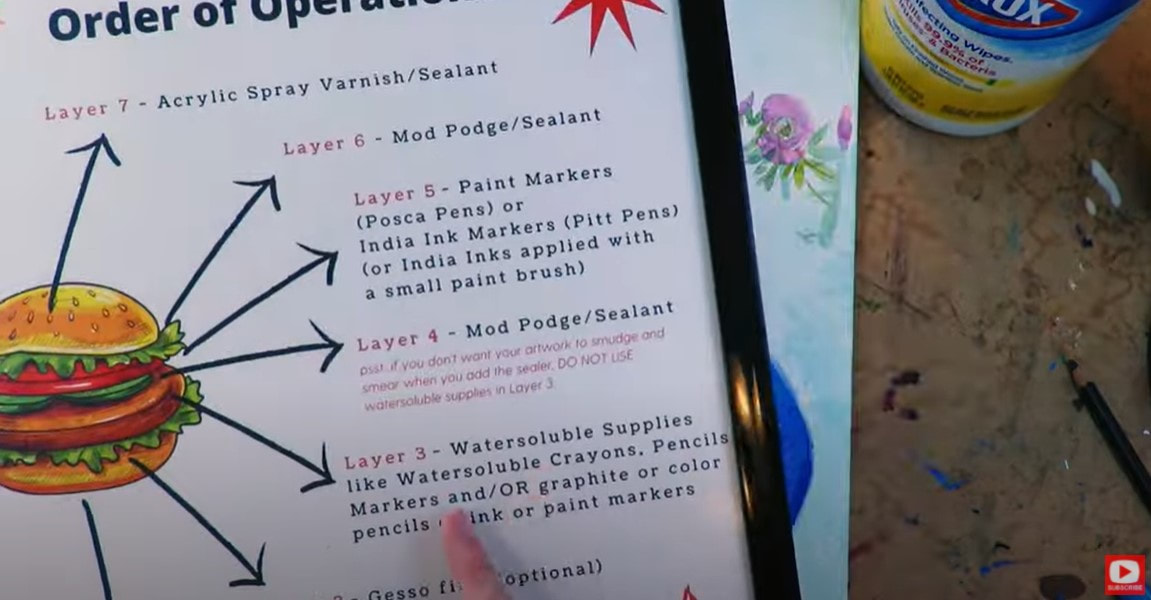
Gelatos get added in layer 3 of my Mixed Media Hamburger System. If you're not familiar with my "hamburger system," - it's what I named my layering process when I'm doing mixed media and want to play with ALL of my art supplies!
The hamburger system is SUPER helpful for beginners and anyone else who wants to learn a little more about mixed media art supplies, when to use them & which supplies work well together. Click the button below if you'd like to download my Mixed Media Hamburger cheatsheet (yup - it's totally FREE). 
If you'd like to see me explain my hamburger system to you on my Mixed Media YouTube channel, be sure to click over to this playlist.
I hope you get a kick outta today's grumpy flower cat mashup! If this is something you'd like to do with me in real time (no timelapse), this is one of MANY fun projects over in the Mixed Media Society over at Awesome Art School. We'd LOVE to have you come hang out with us!! ❤️MY ARTIST BESTIE, LUCY BRYDON & I are creating a NEW ART MEMBERSHIP together called The Celtic Collective!! Learn More & add your name to the waitlist here. Opens in TWO DAYS on July 7th! 
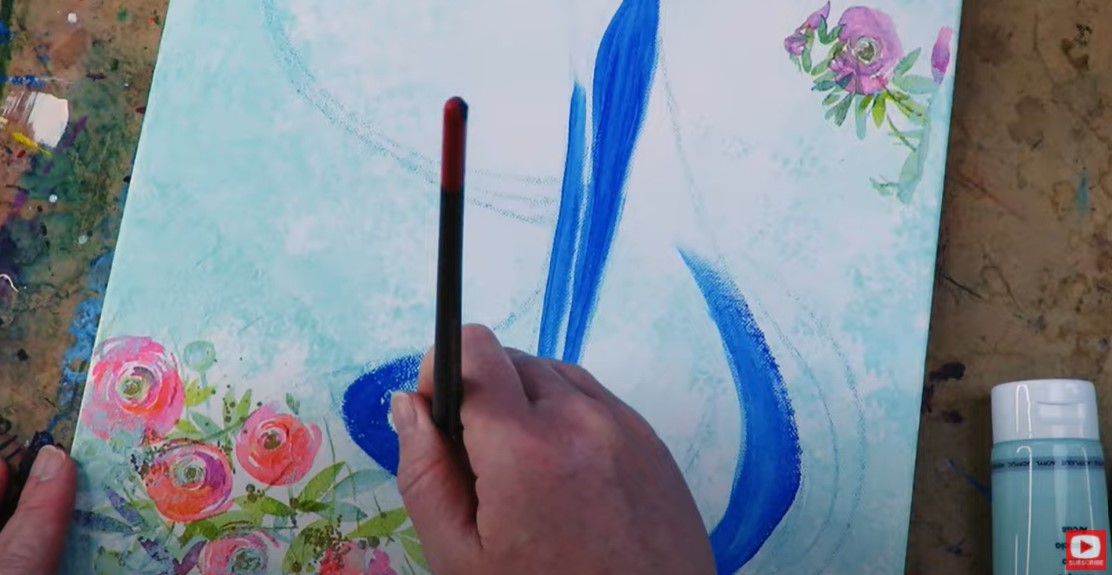
I've never tried palette knife painting with acrylic paints for one of my mixed media portraits until today! It was actually SUPER FUN!! I created some thick, edgy texture in the hair, and kept things a bit more delicate for the face using my mixed media art supply go-tos: faber castell gelatos, pitt pens & my black stabilo all pencil! Join me to see just how this MAGICAL mixed media fairy canvas comes to life!! 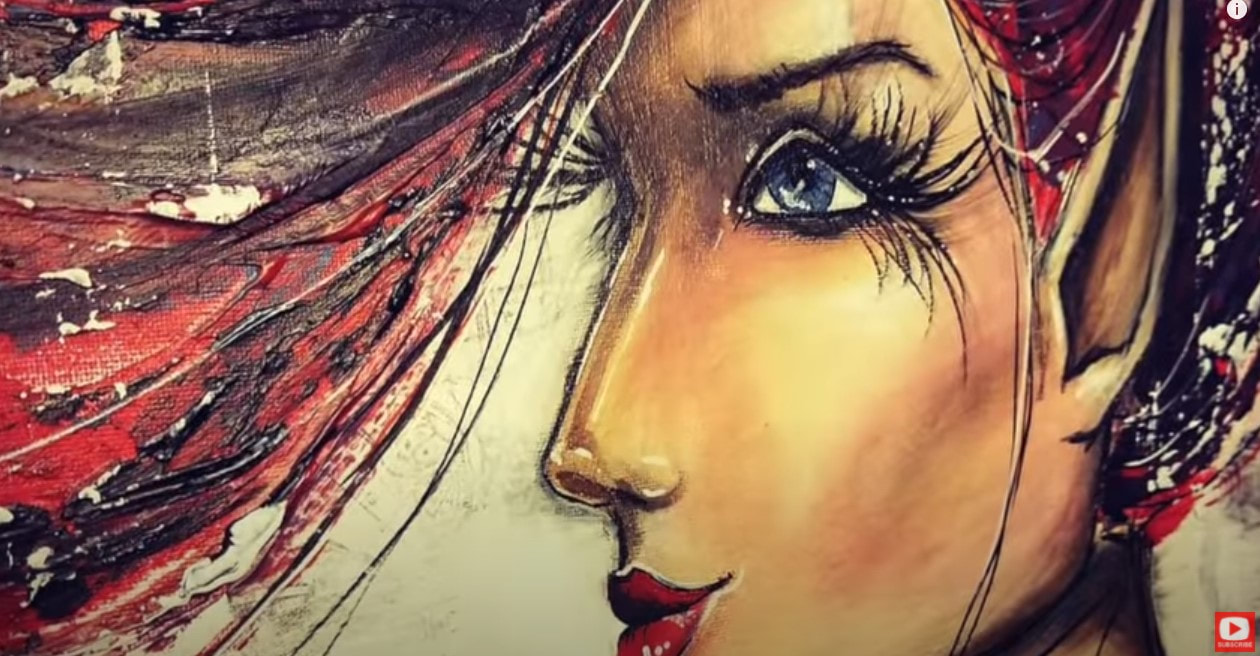 Below, I'm looking a little unsure about how the palette knife painting is gonna go for her face... LOL!  But I quickly got a LOT more into it when I started adding layers of thick red acrylic paint for hair!! 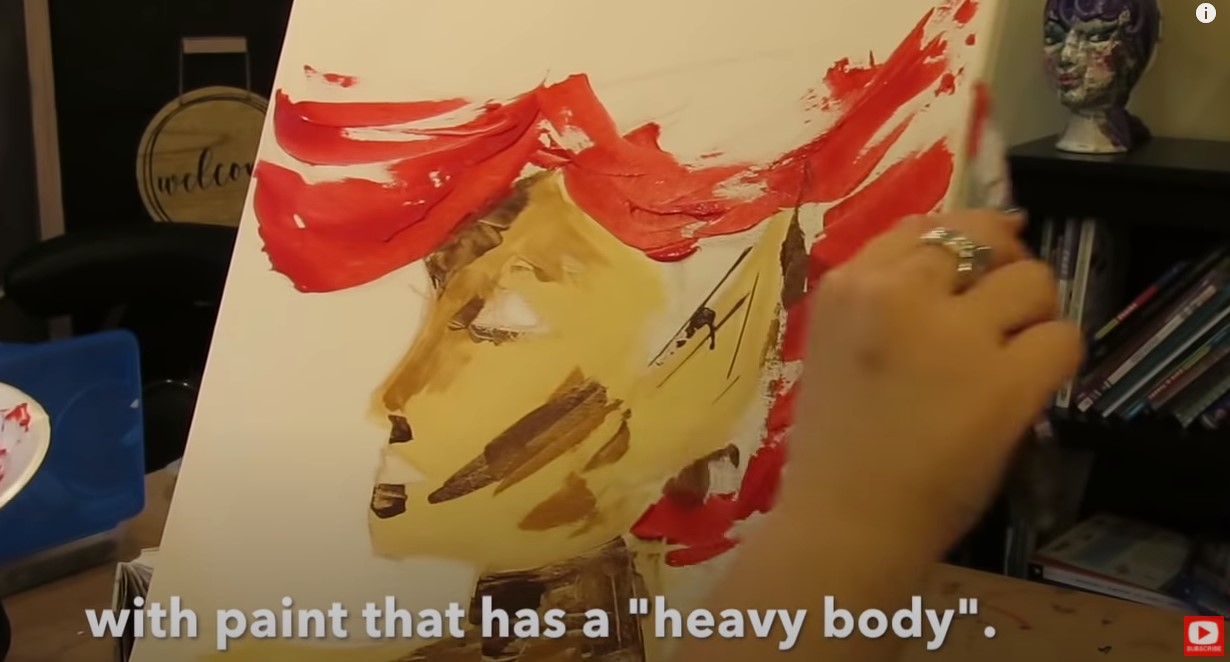 If you've been following me for a while, you probably know that most of the time I START my mixed media art projects with collage. Every once in a while I'll do my foreground subject (typically a face!!) first, and then try another collage art technique like in today's project. 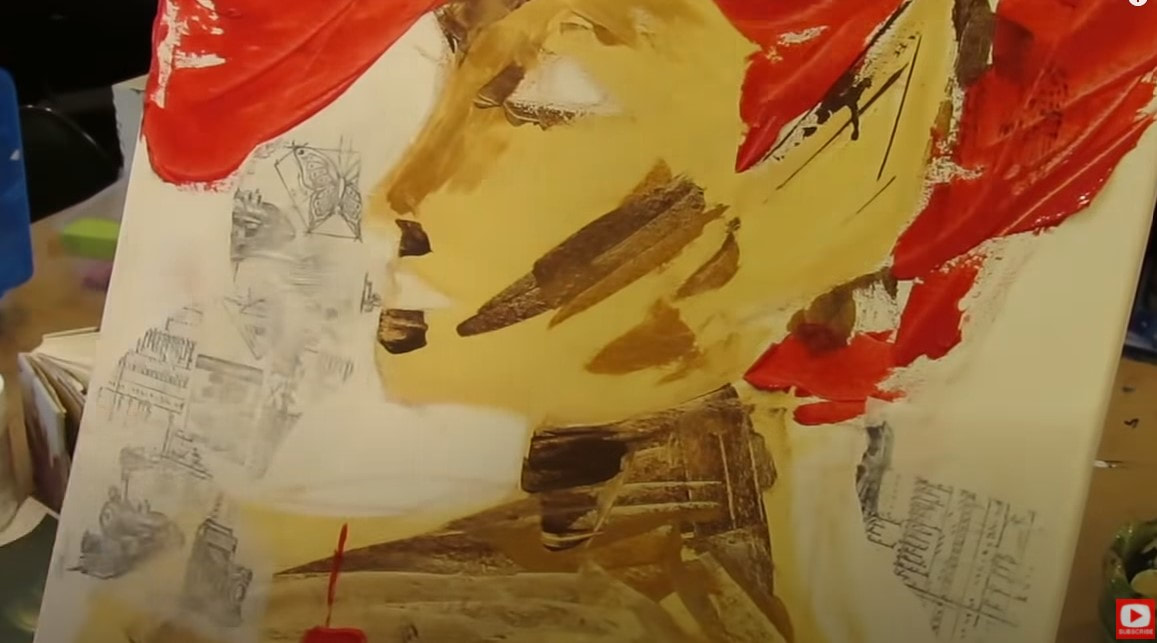 This collage paper was actually sent to me by a friend who MADE it, so I was thrilled to include it in this piece.  Are you loving "the ugly phase" on this girl?! LOL!! It makes me cringe, but oh well!! Do what I always say - JUST KEEP GOING!! This means you're about half-way done with your project!! 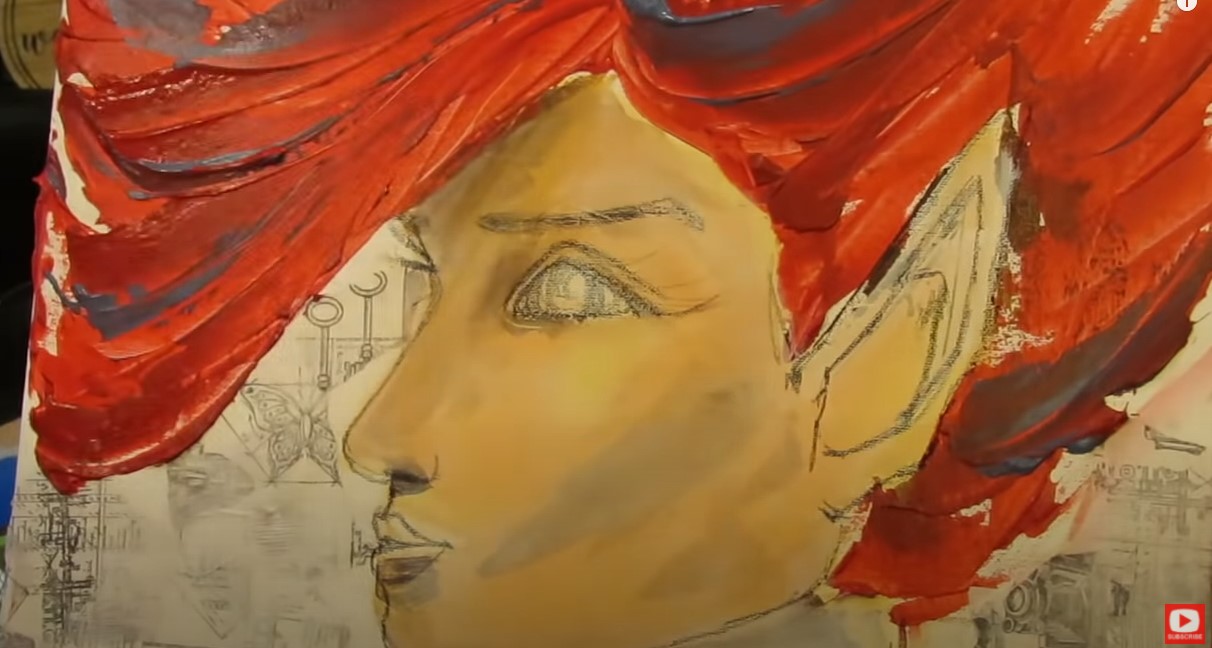 After quite a bit of blending I added back some definition to my original lines with my black stabilo all pencil and pulled out my paintbrush to activate it with a little acrylic. I LOVE how this adds shading all by itself! Cool, right?! Then it's time to play with my Faber castell gelatos! I'm in LOVE with these for creating my mixed media portraits! I recently did a video ALL about the magical goodness of gelatos and why you need to check these out if you've never played with them before.  They're amazing for shading faces. Look at that smooth complexion I've blended in below... 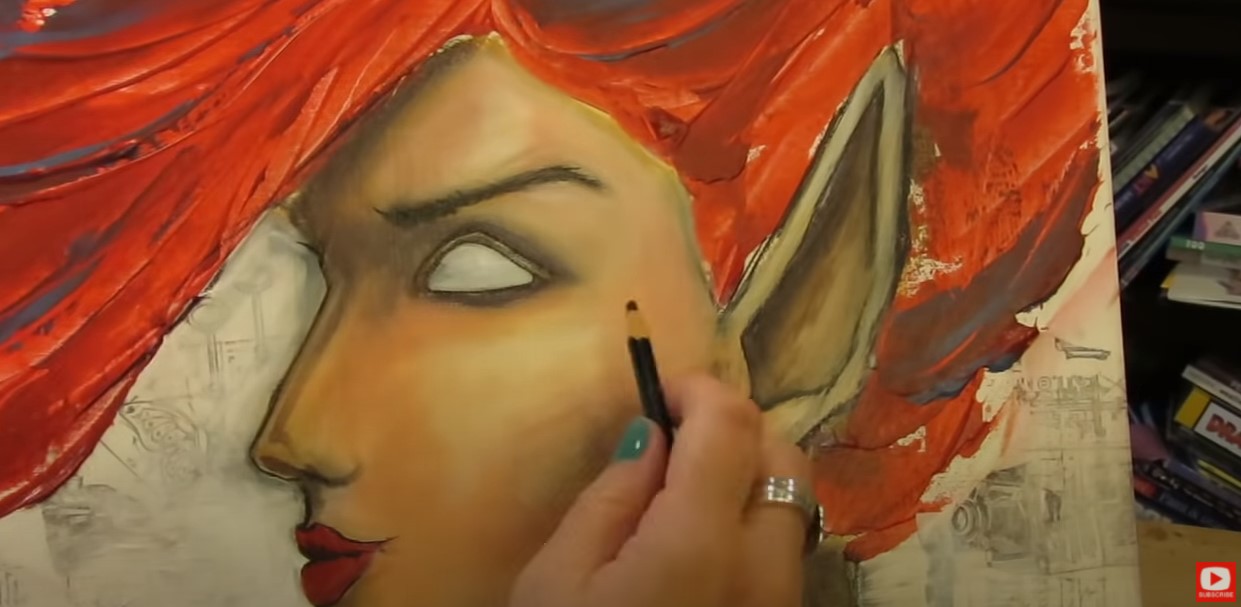 I love the contrast with her thick hair - full of texture! 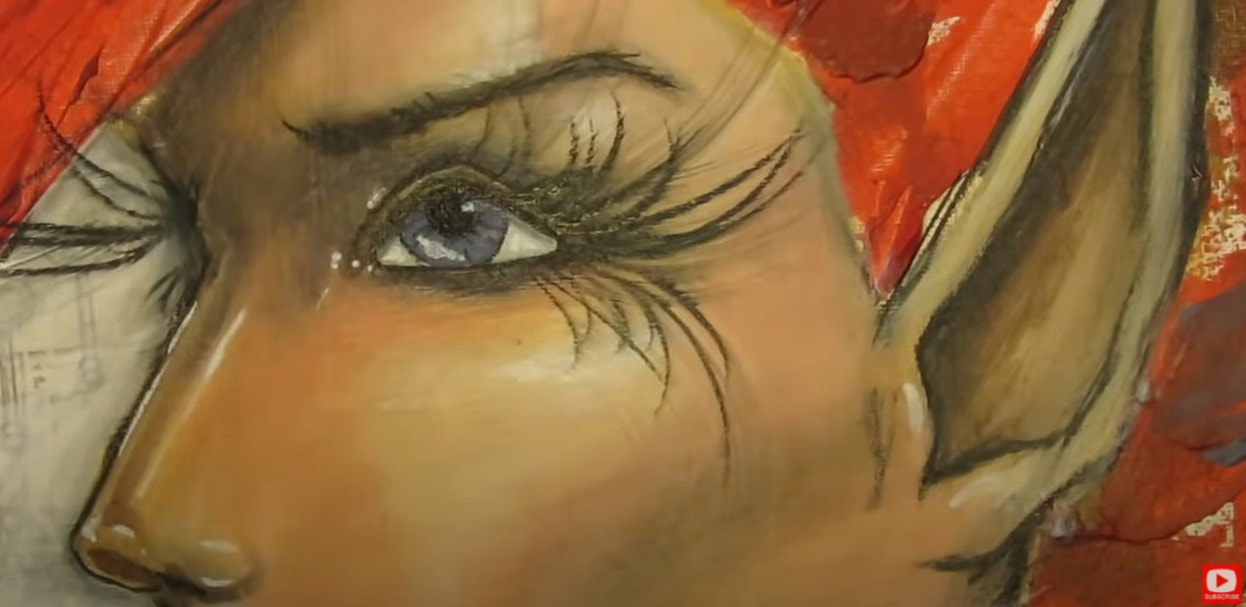 Take a look at these killer lashes up close!! Tons of people have trouble with drawing eyelashes! I KNOW these can be super tricky, so I've done a number of eyelash drawing tutorials on how to draw eyelashes successfully. Here's one on my drawing channel, and another on my mixed media channel. I've also created a free cheatsheet to help you out that you can download and use as a reference when you're practicing eyelash drawing. It teaches you how to draw eyelashes step by step, along with the THREE important things to think about every time you're drawing eyelashes. Click the button below and I'll send it straight to your inbox!  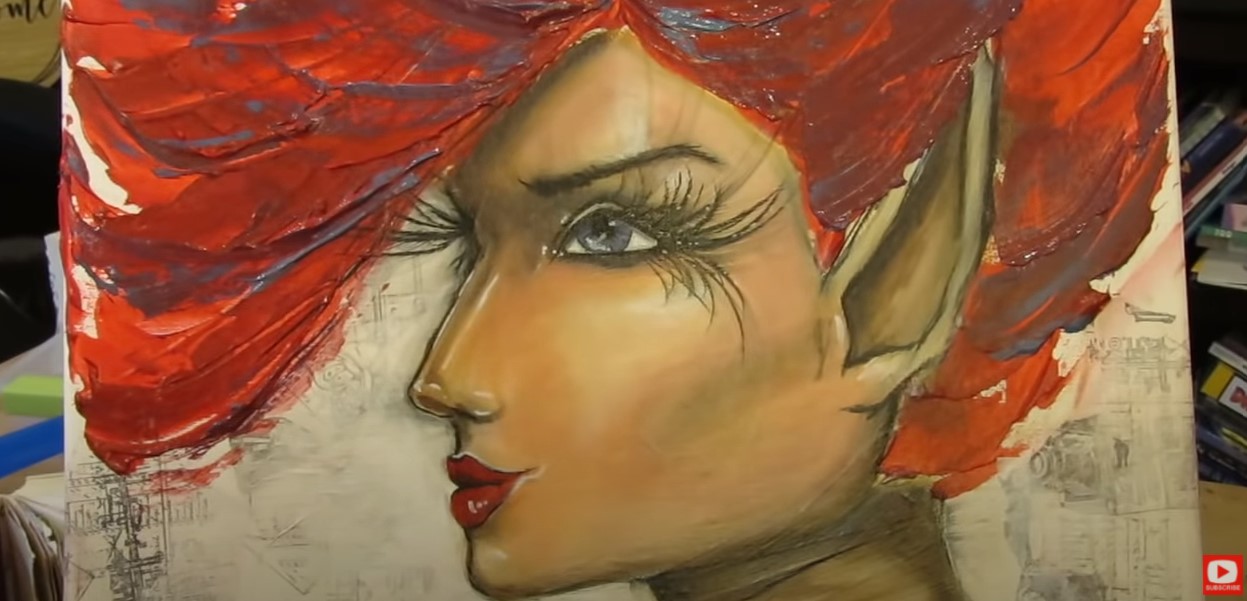 For this particular project, I used my stabilo to draw eyelashes on this girl. When I activated these lines, it created the look of more dramatic eye makeup. I'm always down with THAT! Check out the video to see how I added in some magical blues to her hair and eyes, and of course layered in my signature white highlights to make EVERYTHING POP at the end!! SO FUN!! Thanks for hanging out with me today! I hope you have a fab week!!
❤️Want FREE, immediate access to my Fun Fab Drawing Club and/or Mixed Media Society plus discounts on all my art books, sneak peek at YouTube videos and new book content, behind-the-scenes fun and MORE? Join me over on Patreon today and get HUGE PERKS in return for a small monthly donation. ❤️ CHECK OUT ALL my art books on AMAZON (available in both Kindle and Paperback) ❤️ SIGNED COPIES of my art books on ETSY ❤️ MY FAVORITE ART SUPPLIES on AMAZON ❤️ MY BELOVED FACEBOOK GROUP ❤️ FOLLOW ME ON INSTAGRAM ❤️ FOLLOW ME ON FACEBOOK You are going to LOVE THIS 3 MINUTE mixed media canvas background technique!! It is by far THE FASTEST way to knock out a vibrant background for my mixed media portraits! I typically start with collage, but sometimes I'm in the mood for something a little different. Evidentally, today it was punk, and I'm LOVING how she turned out!! 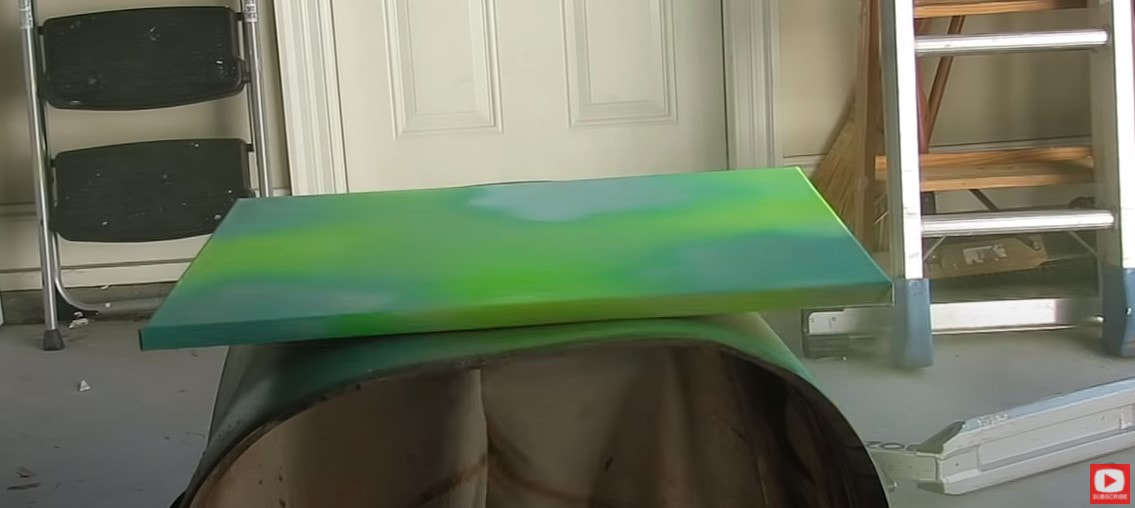 To get started, select 3-4 spray paint colors you like together, a few stencils, and head outside with your canvas. Begin by adding a few shots of color here and there, in two different shades. Then drop a stencil on top and use your third color of spray paint to start working in some fun patterns. 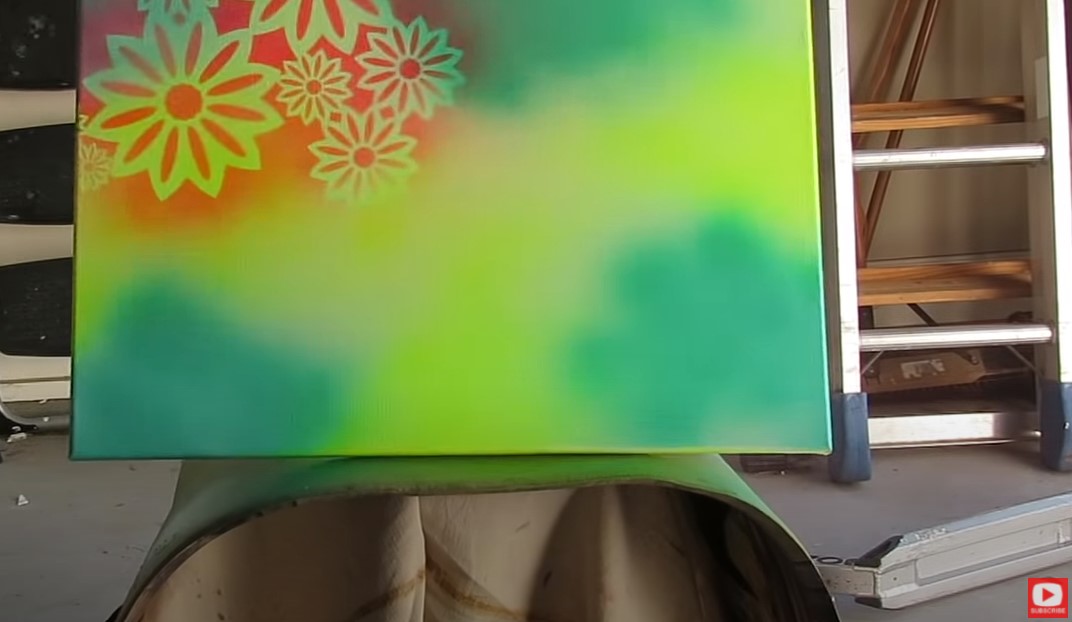 Cool, right?! There are SO many directions you can take a mixed media canvas background like this. I worked in some black with mine because I wanted it to feel edgy since I knew where the portrait for this piece was headed. This background seriously took me ALL OF THREE MINUTES. That's it. I think that might be a record, even for me!! 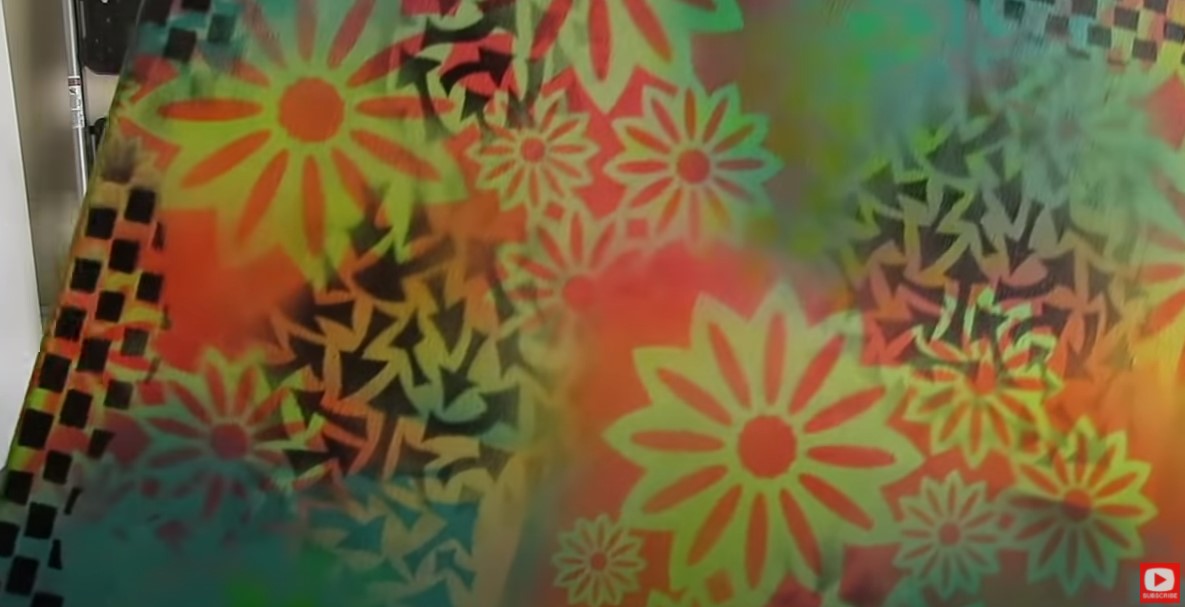 Once my canvas was dry, I pulled out my GINORMOUS magnum sharpie back in the studio, and got to work on a side profile drawing prompt from an artist friend of mine, Jenny Manno. Before we continue, super quick announcement! All product links noted below are Affiliate. I may earn a small commission if you choose to order through these links, but by law there is never any additional cost to the consumer for doing so. I only reccommend products I actually use and love. Thank you for your support! 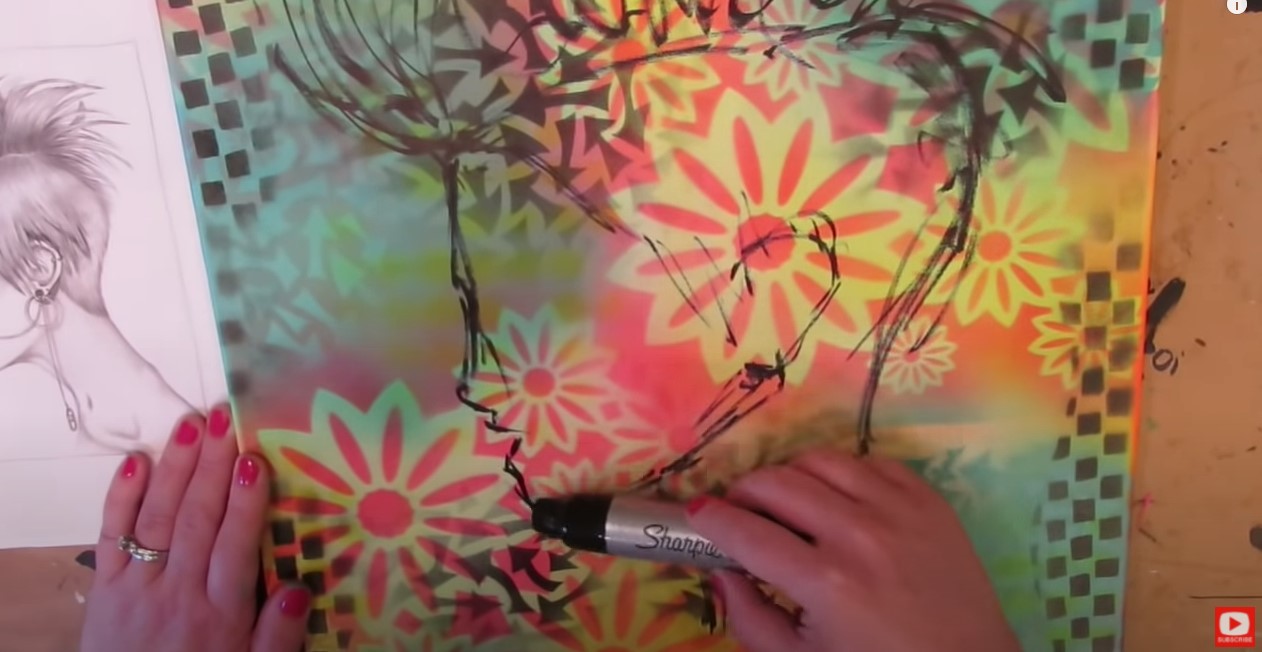 Just a word of caution... if you're not used to doing profile drawings, I definitely DON'T recommend using a sharpie!! Especially one this big!! In all seriousness, if you're new to side profile drawing, it's NOT as hard as you think it is. You probably just need someone to break it down for you so it doesn't feel so overwhelming. Then you just need a little practice. I have TONS of resources to help you with profiles! Feel free to check out this playlist on my YouTube Drawing channel for beginners. You'll learn how to do side profile drawing step by step in pencil. You can also check out my book, How to Draw MORE Fun Fab Faces, over on Amazon. This is PERFECT for beginners who want to learn how to draw profiles step by step (even kids!!).  Once I finished my initial drawing, I got my gesso going inside the face and just around the outer edge of her face shape to knock the background back just a bit. Then I painted a thin layer of flesh colored craft paint on the face. If you've been watching me for a while - you know I'm NOT super patient, LOL! Layering with gesso and acrylic paints really can take forever, and I don't usually have the patience for that. Because I have the neeeeeed for speed, I developed this cool technique to add color to my mixed media portraits QUICKLY, using my gelatos by Faber Castell! See the light pink in the face below, where it looks like blush has been applied to her cheek? That's from my gelatos! I blended it with my finger and it literally took me TWO seconds. 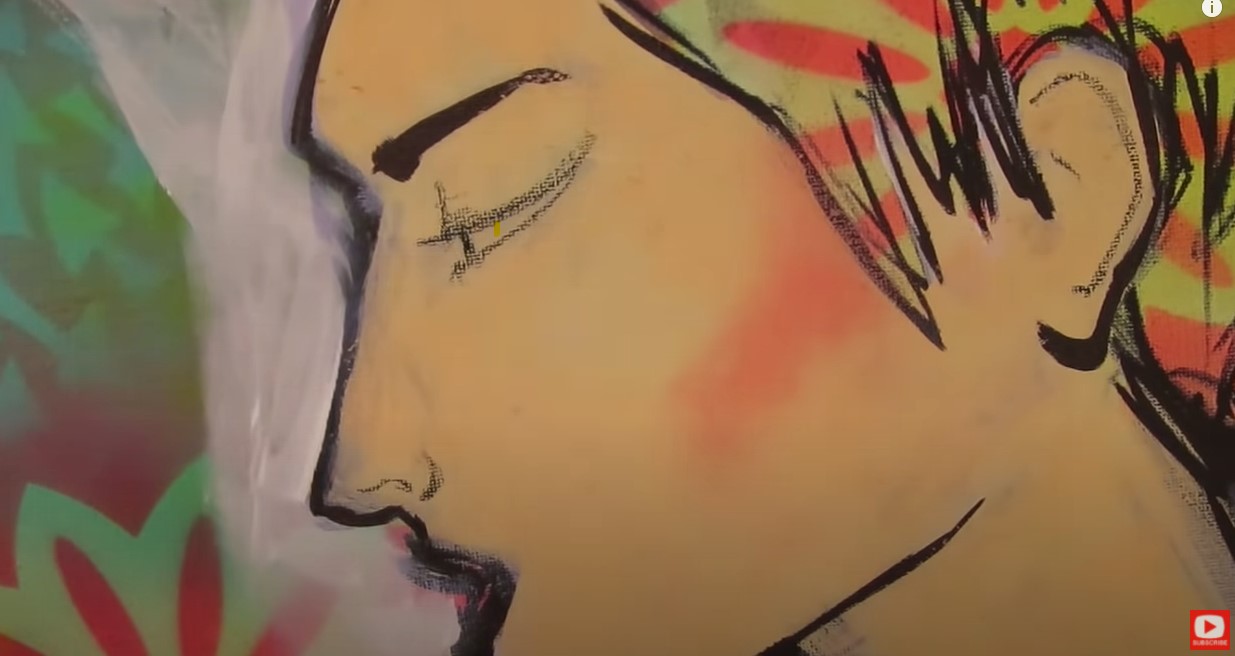 If you want to see this gelatos technique slowed down in REAL TIME, I just did a product demo with my Faber Castell Gelatos, so you definitely need to check that out! If you haven't tried them before on your own, this is my favorite set. FYI, beware of the metallic version if you want to follow me with this technique, because sadly they don't work!  If you're watching this project unfold (and I HOPE you do!!), I actually struggled a little with the skin tone and decided I wanted a clean slate to work with, so pulled out my gesso and started again with my fun gelatos technique. In the pic above, you can see it's looking SO much better, so that ended up being a great move! Keep that in mind- if something doesn't go quite right- there are a MILLION ways to fix something, so DON'T give up. Keep pushing through!! In the world of mixed media art, gesso is your friend in more ways than one!! 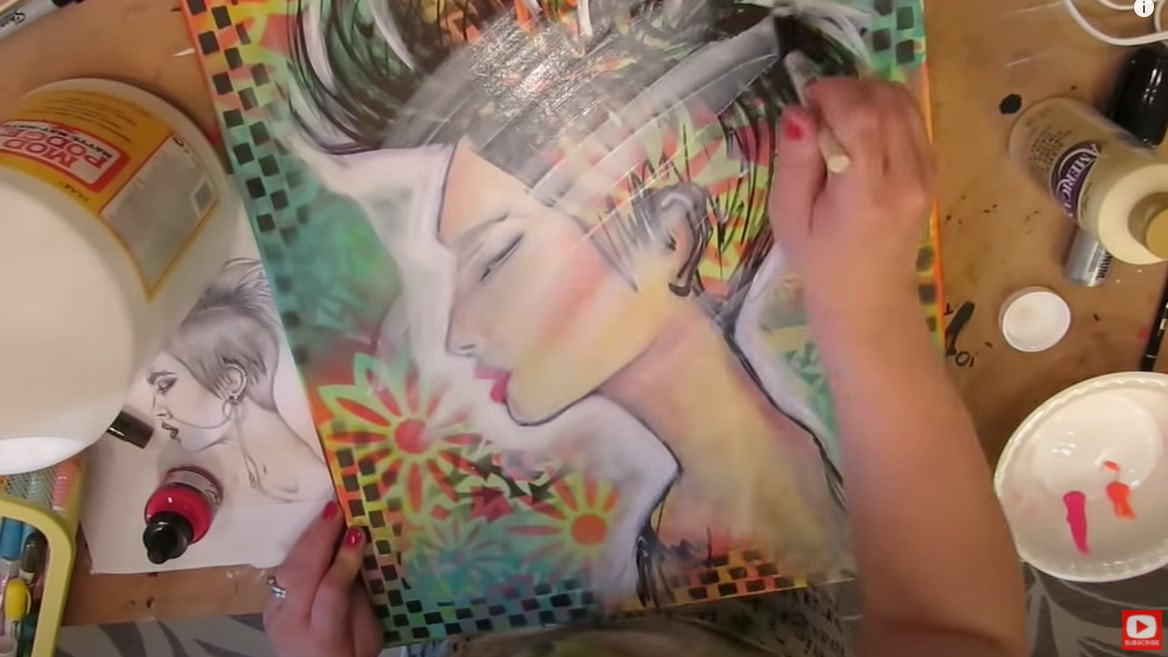 When I'm switching gears from mixed media painting to mixed media DRAWING... I seal my whole canvas with one of my favorite mixed media art supplies - mod podge! I buy this stuff by the gallon!! When the mod podge has dried, my canvas is slippery and has been prepped beautifully for playing with pitt pens. I love using my pitt pens to help me when shading a face (mixed media style). I use them in a similar way to my gelatos. I layer some color and blend with my fingertip. 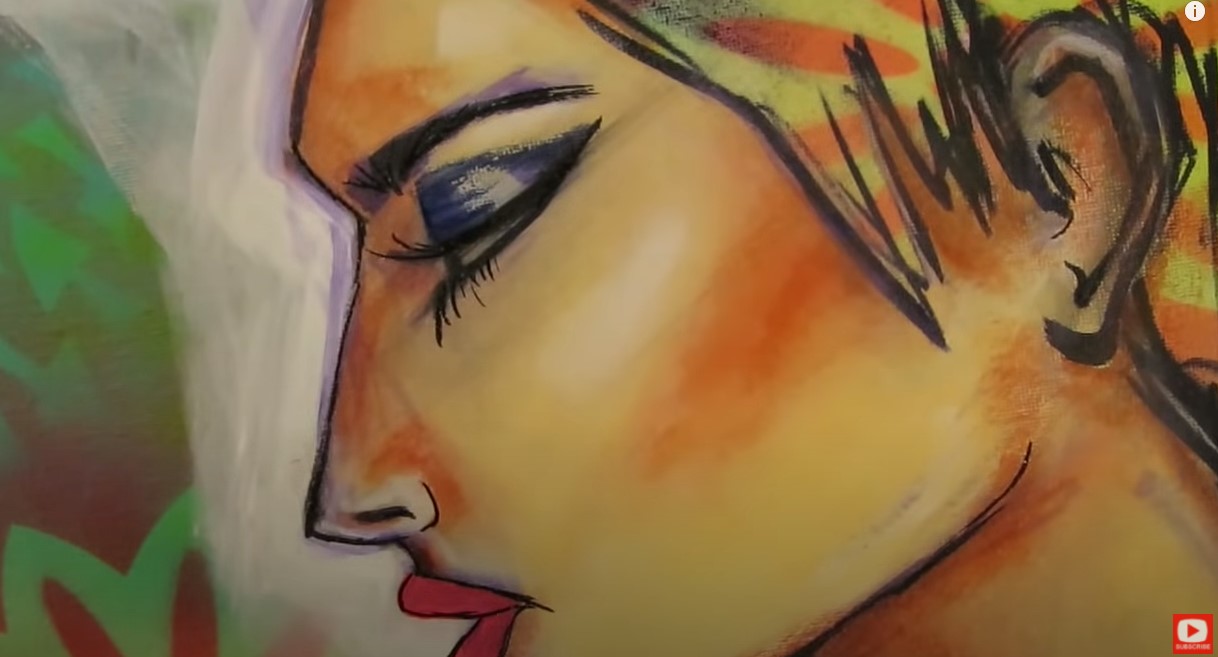 What's REALLY cool about working with pitt pens over mod podge, is you can ERASE things you don't like with a simple baby wipe! Amazing, right?! The art supply layering system I'm using in today's project is something I lovingly refer to as my mixed media "Hamburger System." I compare layering my supplies to the way you layer toppings for the perfect burger! I've actually got an entire FUN YouTube series of tutorials, cheatsheets, and even wrote a mixed media art BOOK about it!! Download the FREE, one-page cheatsheet that explains it all by clicking the button below. I'll send it straight to your inbox so you can print it and keep it at your art table for reference to help you with your own mixed media layering. 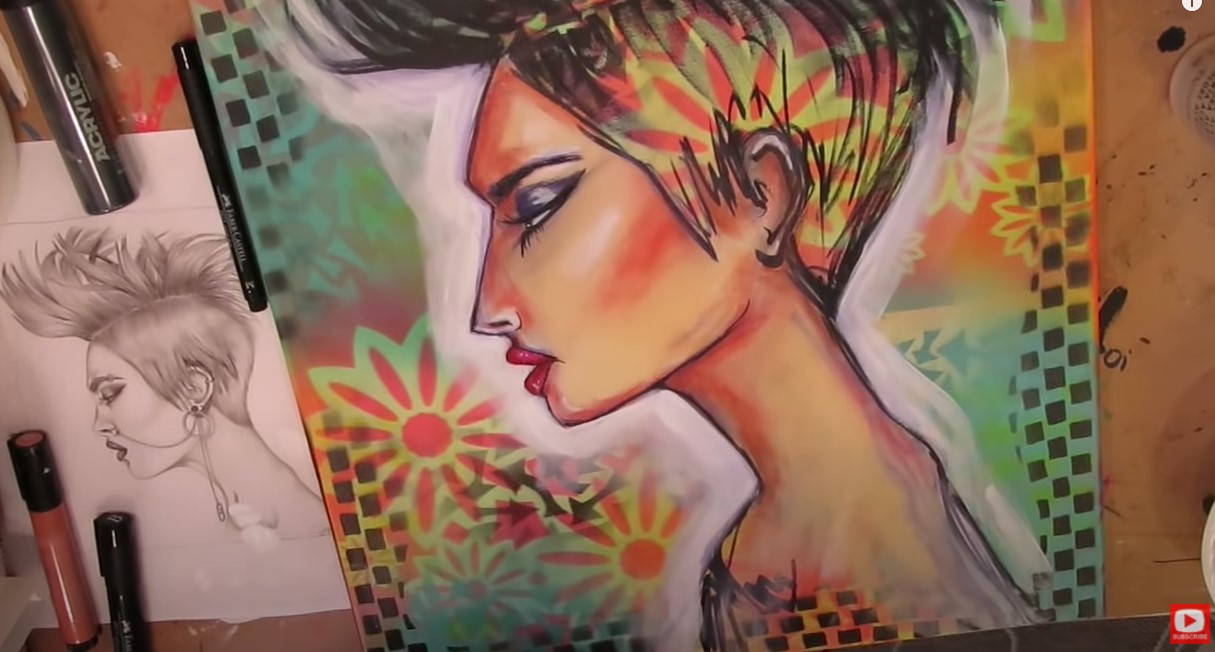 When I'm using my hamburger system for layering and am happy with something I've done, I seal my work with another layer of mod podge to ensure it won't move, then hit it with my hair dryer so I can do a bit more doodling. 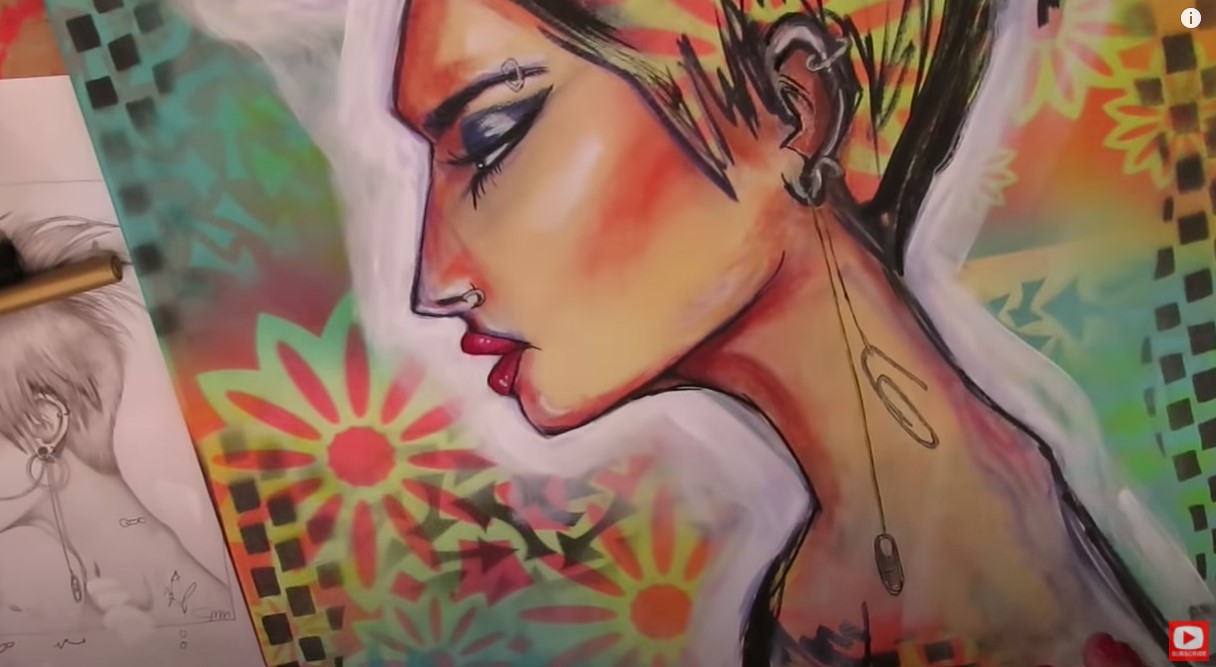 My last step is always grabbing a white sharpie or posca pen to add highlights throughout. I LOVE the drama this adds to my mixed media portraits. 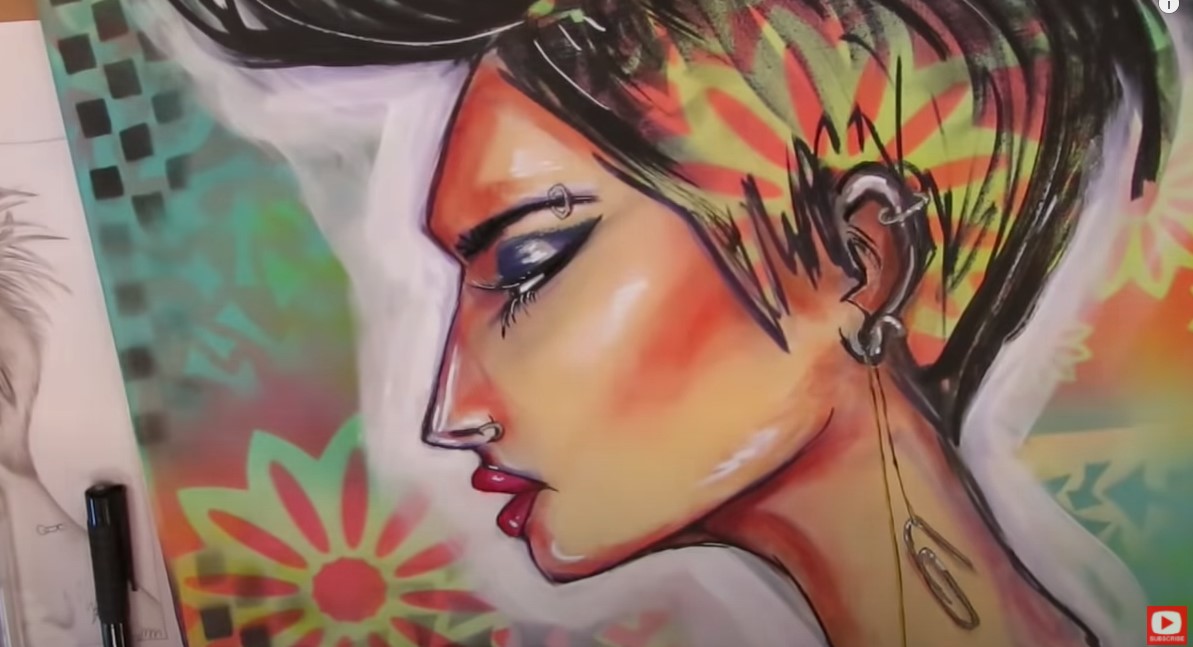 I hope you enjoy watching this video!! I had a blast doing this project!!
❤️Want FREE, immediate access to my Fun Fab Drawing Club and/or Mixed Media Society plus discounts on all my art books, sneak peek at YouTube videos and new book content, behind-the-scenes fun and MORE? Join me over on Patreon today and get HUGE PERKS in return for a small monthly donation. ❤️ CHECK OUT ALL my art books on AMAZON (available in both Kindle and Paperback) ❤️ SIGNED COPIES of my art books on ETSY ❤️ MY FAVORITE ART SUPPLIES on AMAZON ❤️ MY BELOVED FACEBOOK GROUP ❤️ FOLLOW ME ON INSTAGRAM ❤️ FOLLOW ME ON FACEBOOK Drawing eyelashes on mixed media portraits can feel super intimidating because it's probably one of the LAST things you add to your masterpiece! So many of my students ask how to paint eyelashes that look realistic and just what paintbrush or supplies work the best, because they know I've tested them ALL!! Before I demo my secret weapon, we need to talk for a hot minute about how to draw eyelashes step by step...  If you're just learning how to draw eyelashes, or if drawing eyelashes is something you feel you want to improve upon, you need my free HOW to DRAW EYELASHES Cheatsheet. Simply click the button below, and I'll send it straight to your inbox! 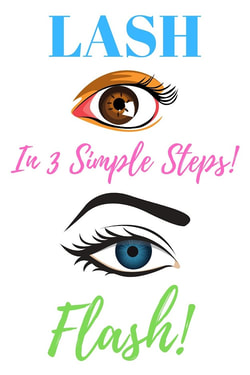 The first thing to keep in mind when drawing eyelashes is DIRECTIONALITY. As you can see in my sketch below, I start by drawing a set of parentheses on the outer edges of both the top and bottom eyelids. One of the first things to keep in mind when you're drawing eyelashes, is directionality. I think of eyelashes like parentheses, and curve my outtermost eyelash on either side accordingly. The midpoint of your eye drawing is where the directionality of your individual eyelash lines will change. That midpoint lash will basically be a straight line, followed by consecutive lashes flicking out in opposite directions, like you can see below. 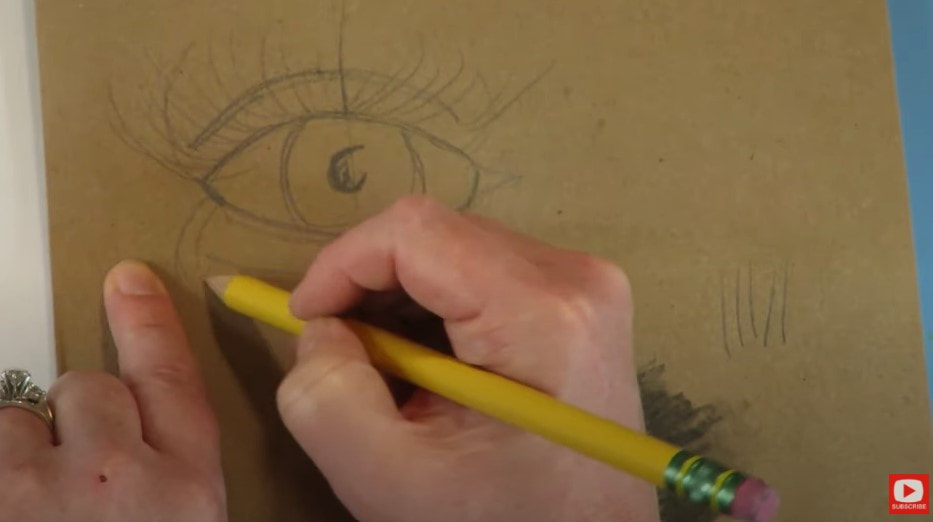 Once you fill your lashes in on the top lid, repeat the process you followed for the lash line on the bottom eyelid. The second important part of drawing GORGEOUS eyelashes has to do with the amount of pressure you apply with your pencil (or whatever you're drawing with!). You begin each lash line with MORE pressure, then flick up and out according to whatever directionality each eyelash needs to go. Confused yet?! WATCH the VIDEO ;) It makes WAY more sense when you see it in action.... Once you have all the eyelashes drawn in for the top and bottom eyelids, it's time to take a second pass across each lid line, because as humans - we have TONS of eyelashes! And let's be real...you want the girl you're drawing to have fab lashes, right?! Let's glam her up!! While you're adding in a second set of lashes on each lid line, be sure to vary the length of each line. This is how our eyelashes are in real life. If you look closely - they're all different lengths. Paying attention to that little detail will make the eyelashes you draw look even more realistic! 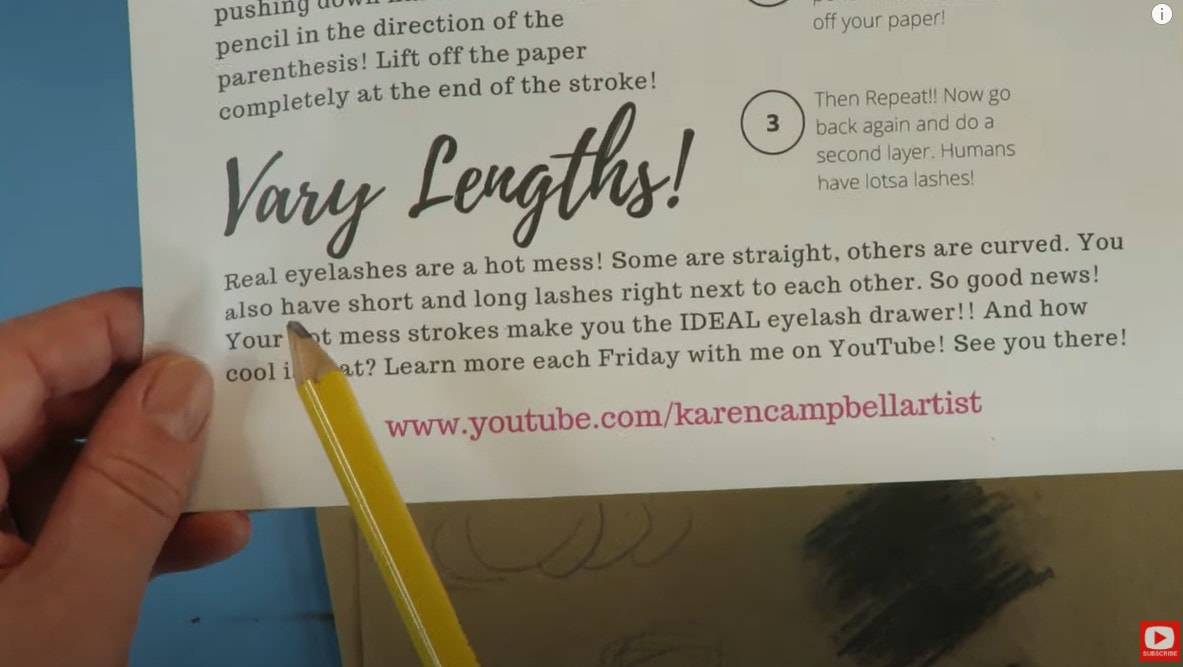 Did you grab your FREE How to Draw Eyelashes Cheatsheet yet? Make sure you click on that link, and I'll send it straight to your inbox. It's SUCH a helpful reference to keep on your art table. Now... how do you put all take this amazing-ness into action for your MIXED MEDIA PORTRAITS?! I'm so glad you asked!! Let me introduce you to my secret weapon!! Before we continue, super quick announcement: All product links are Affiliate. I may earn a small commission if you choose to order through these links but by law there is never any additional cost to the consumer for doing so. I thank you for your support. 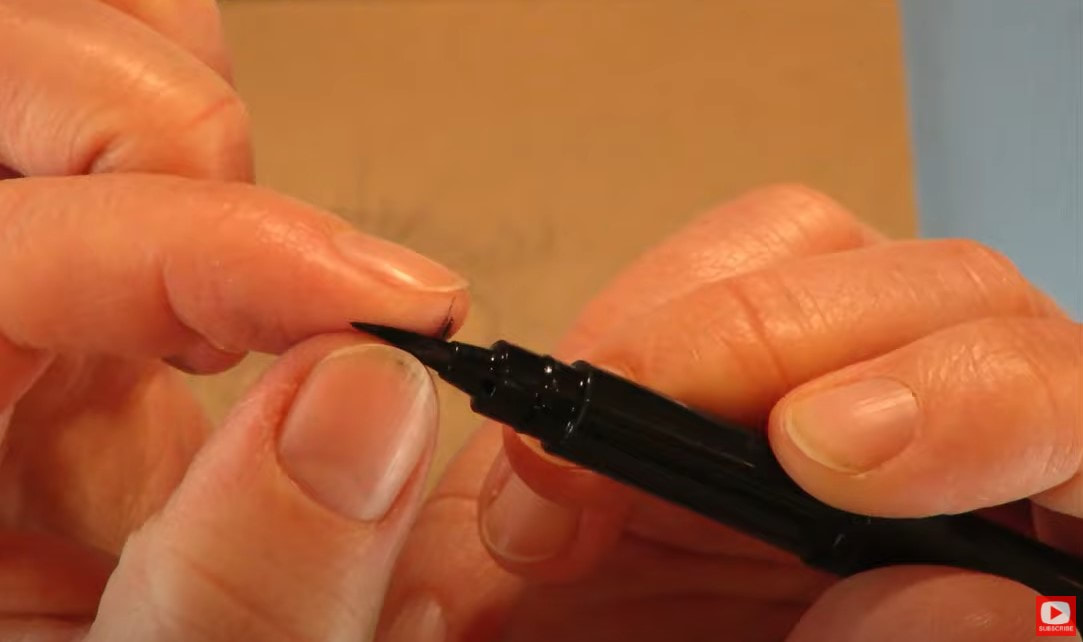 I'm in LOVE with the pentel pocket brush pen. Here's why... First of all, I love this pen because it contains permanent ink. This is extremely important to me in mixed media work because I have lots of layering going on with sealants, etc. I NEED my ink at this point to be permanent. If I want to add a final sealant over the pretty eyelashes I've just drawn, I KNOW the ink I just laid down with the pentel pocket brush pen isn't going anywhere! 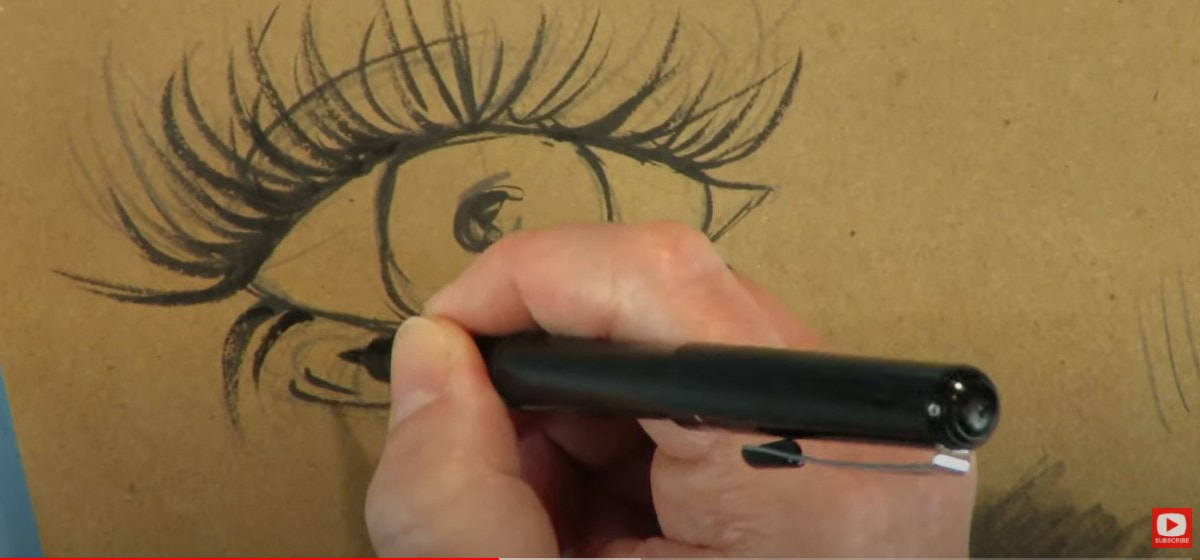 One of the cool things about this pen is the tip of it is actually like a very fine brush. That means it applies like a paintbrush! Lastly - it's just a beautifully crafted pen!! I will give you a tiny warning about this pen though... it's super sensitive, and honestly takes a bit of practice to get a feel for it at first. You'll want to play around with it in your sketchbook before using it right out of the box on your latest mixed media canvas! Just draw a bunch of practice eyes in your sketchbook and see what kind of pressure and look you like best! HOT TIP! If you're struggling to control the pentel pocket brush, use a black pitt pen marker in a brush nib that feels more secure for you. After today's little eyelash lesson, I'll take you straight over to put this into practice on one of my mixed media hamburger system girls! This particular piece is from a couple of years ago- before I discovered my fav little pocket brush. Watch as I add these lashes in real time - using directionality, pressure, and varying my lash lengths. This cute little pen is also awesome for touching up eyebrows for a little added drama. 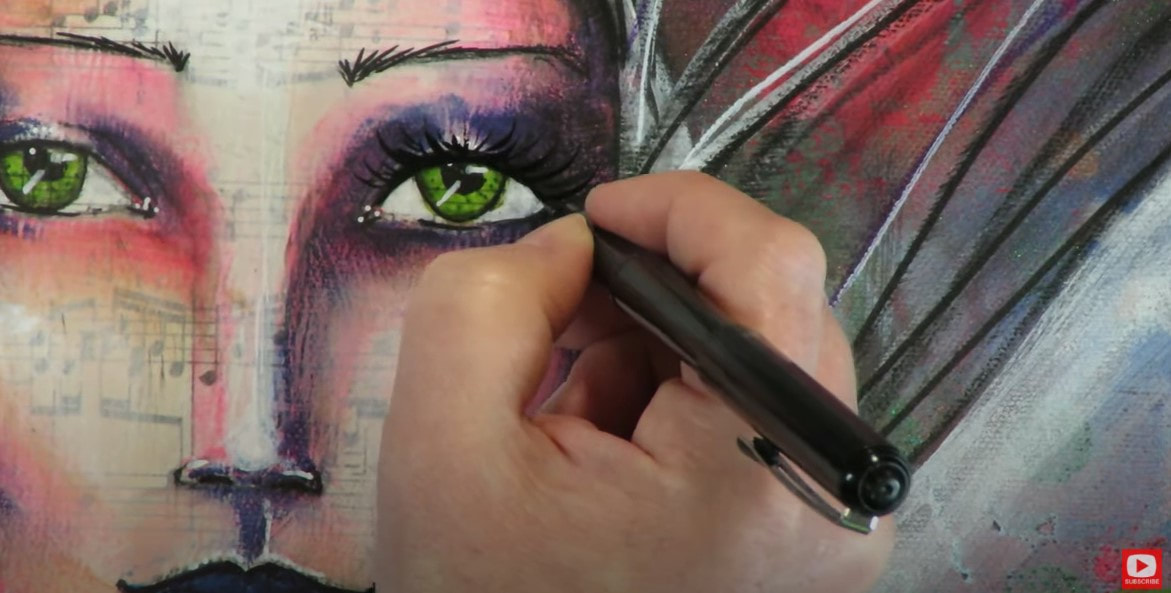 Come on over to YouTube and practice your eyelash drawing with me!! If you're a member of either the Fun Fab Drawing Club or Mixed Media Society (YAY!! I'm so happy you're here!!!), the Eyelashes Cheatsheet is already in your membership guide!!  I hope today's free drawing lesson helps you create mixed media lashes you are PROUD OF!! See ya next week ;) |
Karen CampbellFounder of Awesome Art School. Mixed Media Artist. Author of 19 Instructional Art Books! 
Whose work has appeared in...
   
 Archives
July 2024
Categories
All
|
 RSS Feed

"Karen is flipping hilarious and she's very real...I like the way she teaches in a way that really gives you confidence, whether you're a beginner or advanced there's always something new to learn!"
- Elizabeth W. |
What Fans Are SayingKaren, you are absolutely fabulous! You make me feel like I can draw anything. I have recently retired and finally have the time to do some of the art that I have loved since I was in school. I am really at the beginning of my art journey and I hope to learn as much as I can. Thank you for all you do. |
Contact ME |