
|
Today's mixed media on canvas is a hilarious mashup of a grumpy cat and a flower- done in my signature "Hamburger" style. There's a little bit of everything from mixed media collage using paper napkins, to mixed media drawing & acrylic painting. I had a blast! Having FUN with your art is the MOST important part! If you're having FUN, you'll create more often. The more you create - the BETTER you'll get!
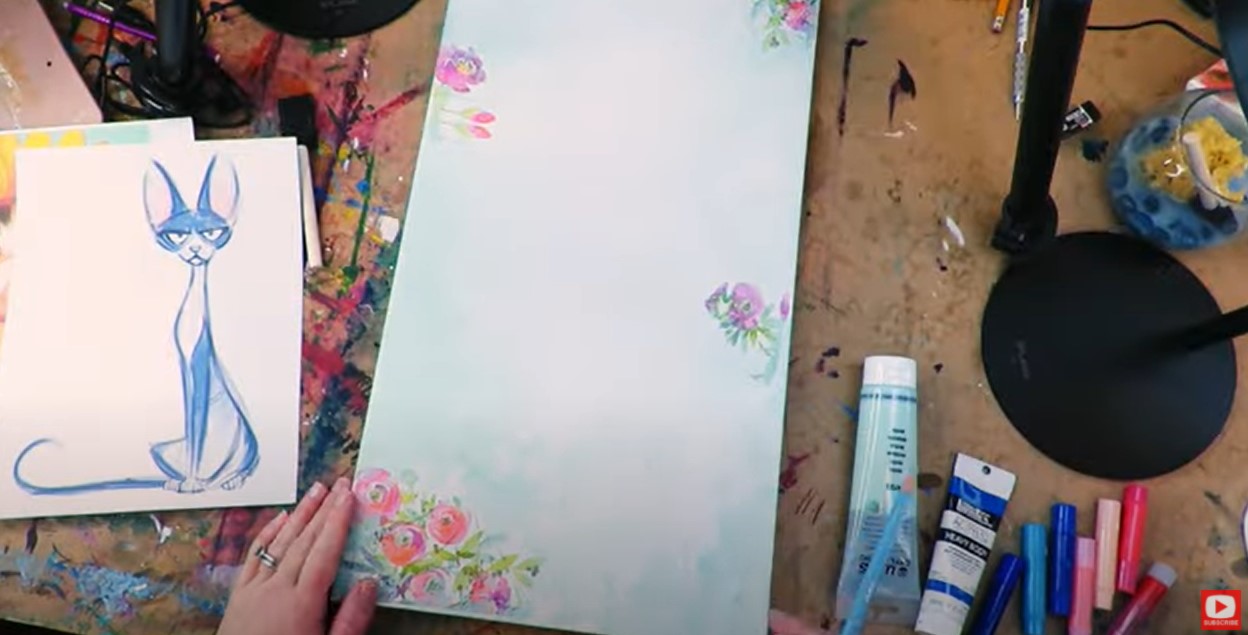
If you've never done mashup art before, be sure to click over to the video to see exactly what I'm doing. It's actually REALLY easy. You just combine two or more reference images to come up with your own creation!
For my supplies, I used a tall canvas (around 12 x 36), some floral napkins for collaging with mod podge, and ALL my mixed media supply favorites from watersoluble pencils to acrylics, gelatos and pitt pens.
If you look closely at the collage portions of this piece- I was using floral napkins. The napkin pattern had a white background, so when I collaged it to my canvas, the flowers kinda melted into the background like they were always there. It was a really cool effect! Check out this link to learn more about how to do wrinkle-free mixed media collage with paper napkins. 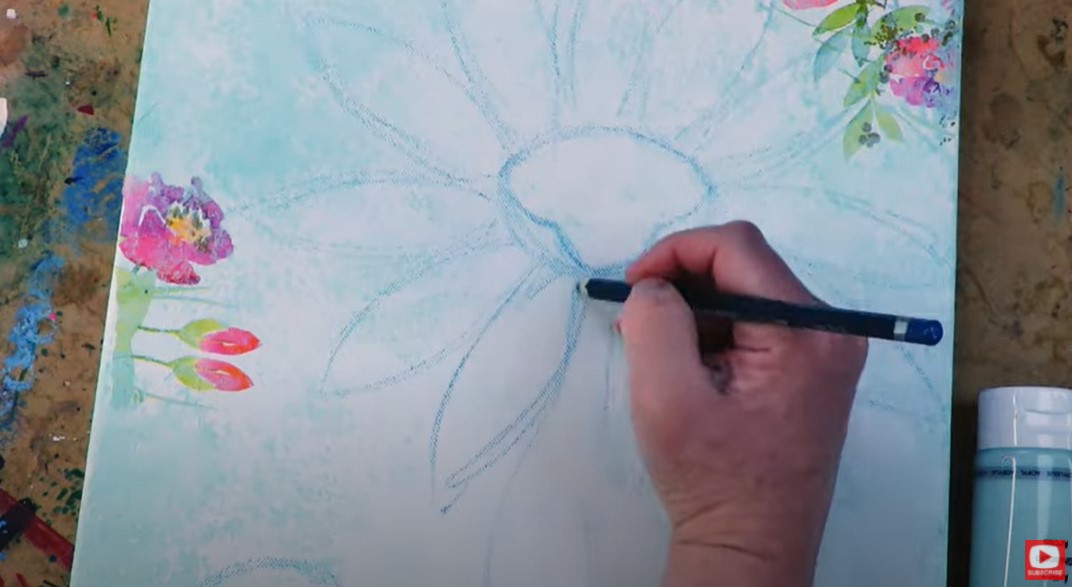
As you can see above, when I was ready to start drawing my grumpy flower cat, I used a watersoluble pencil. I think this is an awesome trick because once you start painting, your pencil lines totally melt away!
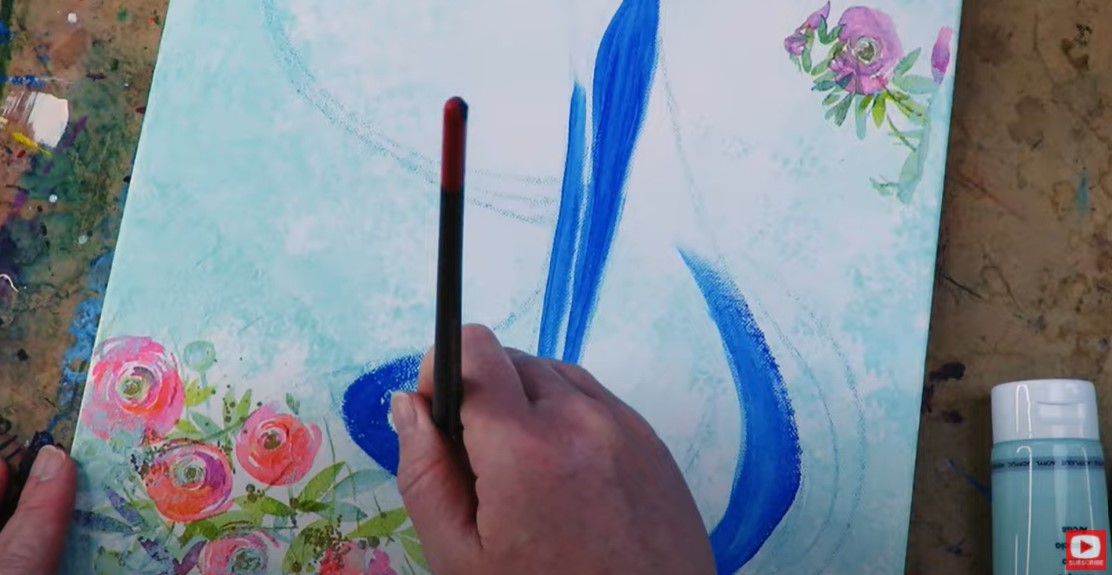
Once I got my acrylic layer down, I started adding in my gelatos (shown below) to blend in some shading with my finger and give my acrylics more dimension.
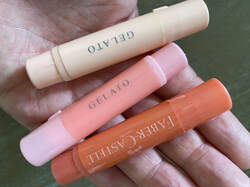
If you've never used gelatos before, they're AMAZING. I recently did a video on how to use gelatos in mixed mediat art, so be sure to check that out for my best tips.
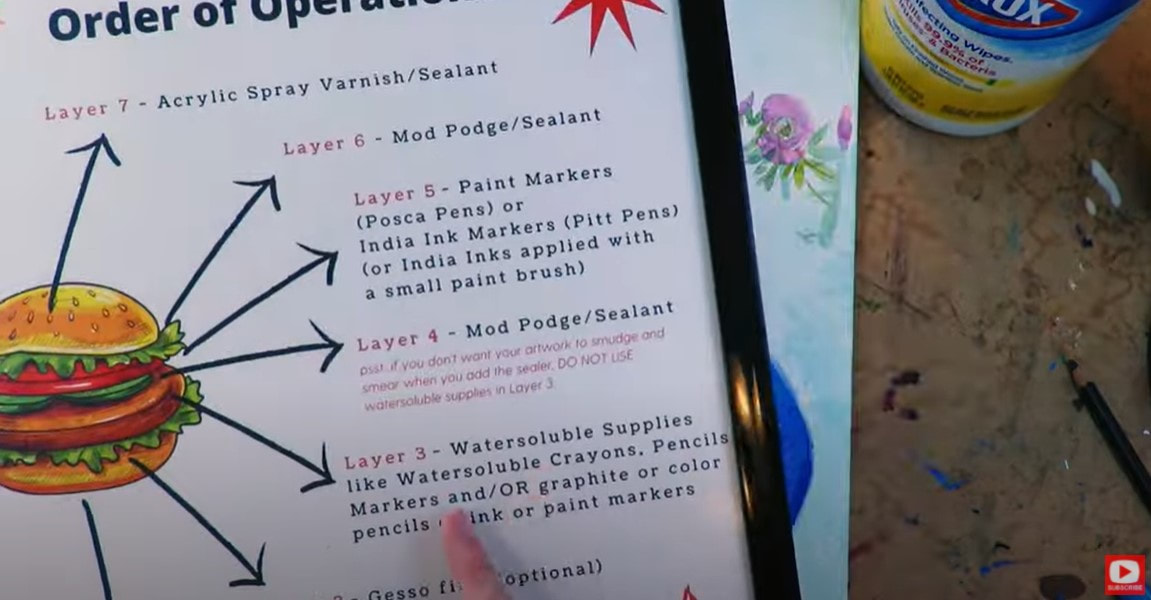
Gelatos get added in layer 3 of my Mixed Media Hamburger System. If you're not familiar with my "hamburger system," - it's what I named my layering process when I'm doing mixed media and want to play with ALL of my art supplies!
The hamburger system is SUPER helpful for beginners and anyone else who wants to learn a little more about mixed media art supplies, when to use them & which supplies work well together. Click the button below if you'd like to download my Mixed Media Hamburger cheatsheet (yup - it's totally FREE). 
If you'd like to see me explain my hamburger system to you on my Mixed Media YouTube channel, be sure to click over to this playlist.
I hope you get a kick outta today's grumpy flower cat mashup! If this is something you'd like to do with me in real time (no timelapse), this is one of MANY fun projects over in the Mixed Media Society over at Awesome Art School. We'd LOVE to have you come hang out with us!! ❤️MY ARTIST BESTIE, LUCY BRYDON & I are creating a NEW ART MEMBERSHIP together called The Celtic Collective!! Learn More & add your name to the waitlist here. Opens in TWO DAYS on July 7th! 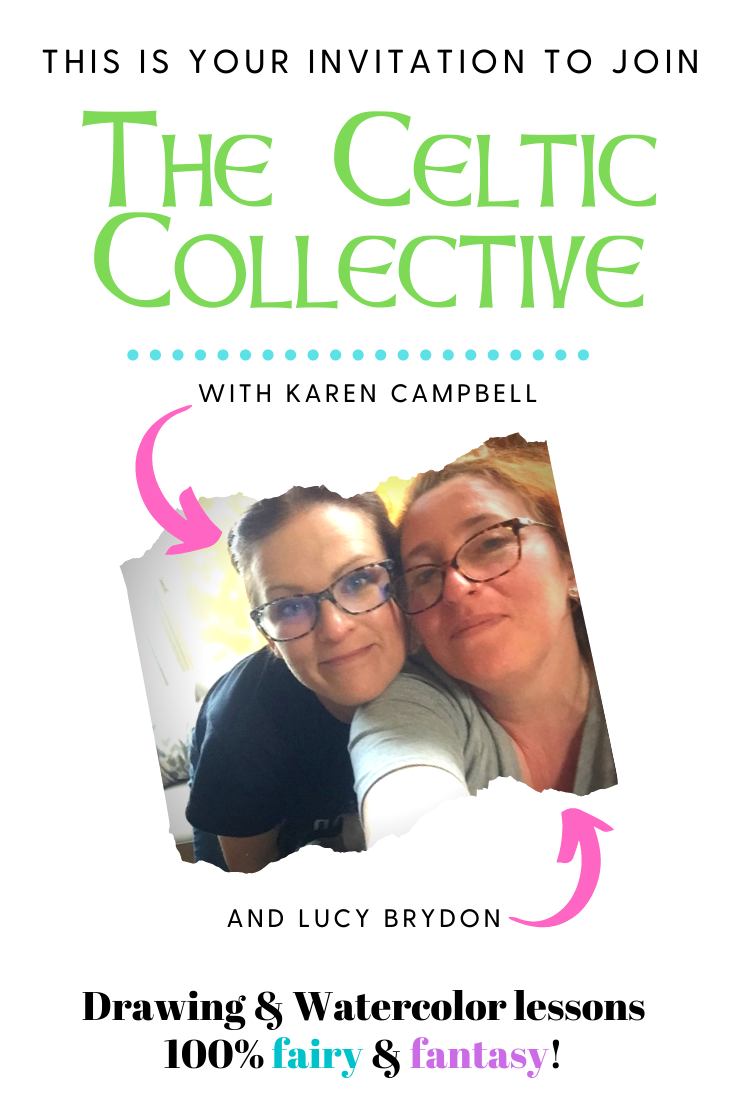
0 Comments
I've never tried palette knife painting with acrylic paints for one of my mixed media portraits until today! It was actually SUPER FUN!! I created some thick, edgy texture in the hair, and kept things a bit more delicate for the face using my mixed media art supply go-tos: faber castell gelatos, pitt pens & my black stabilo all pencil! Join me to see just how this MAGICAL mixed media fairy canvas comes to life!! 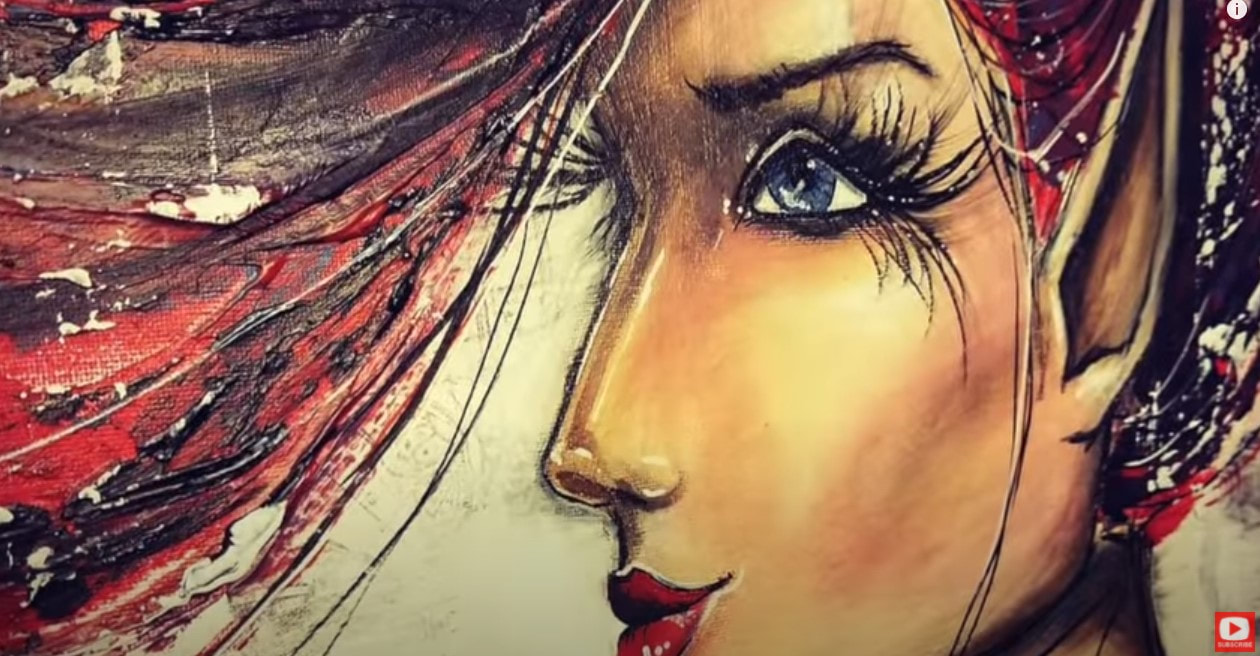 Below, I'm looking a little unsure about how the palette knife painting is gonna go for her face... LOL! 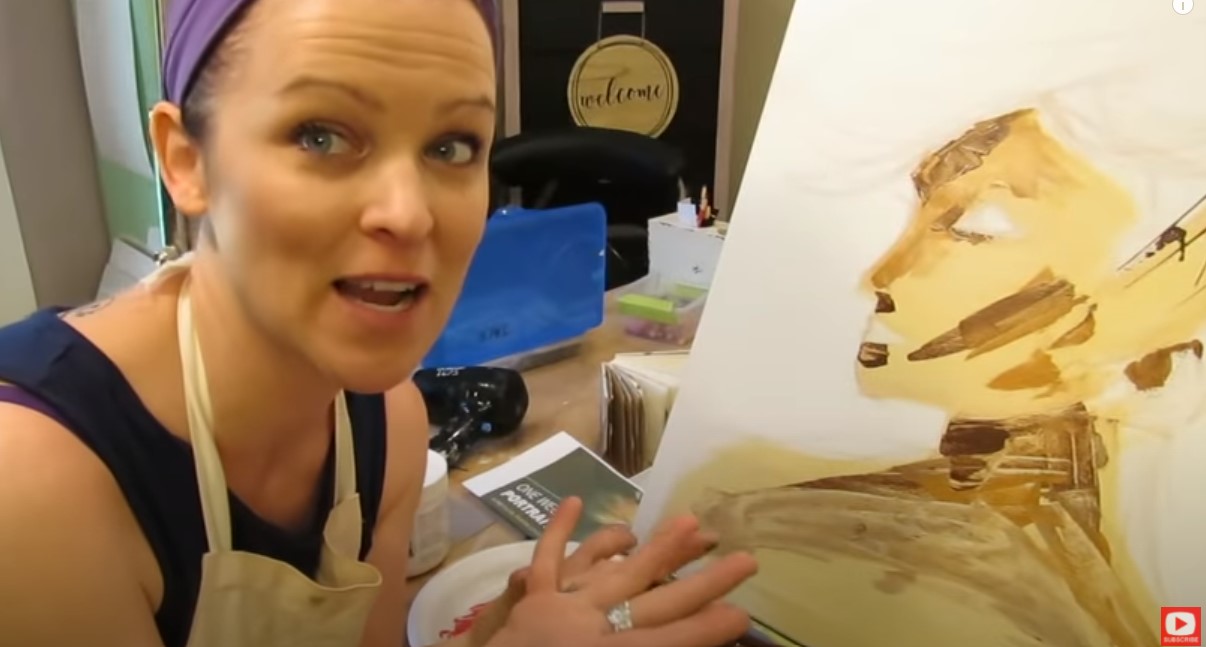 But I quickly got a LOT more into it when I started adding layers of thick red acrylic paint for hair!! 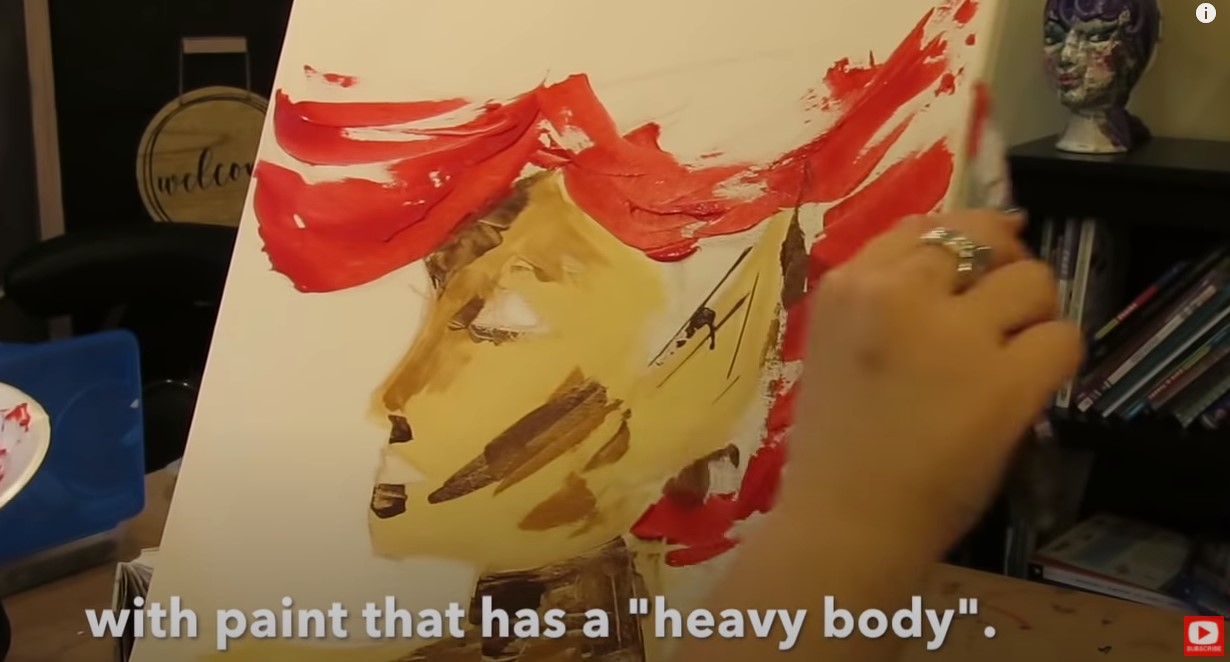 If you've been following me for a while, you probably know that most of the time I START my mixed media art projects with collage. Every once in a while I'll do my foreground subject (typically a face!!) first, and then try another collage art technique like in today's project. 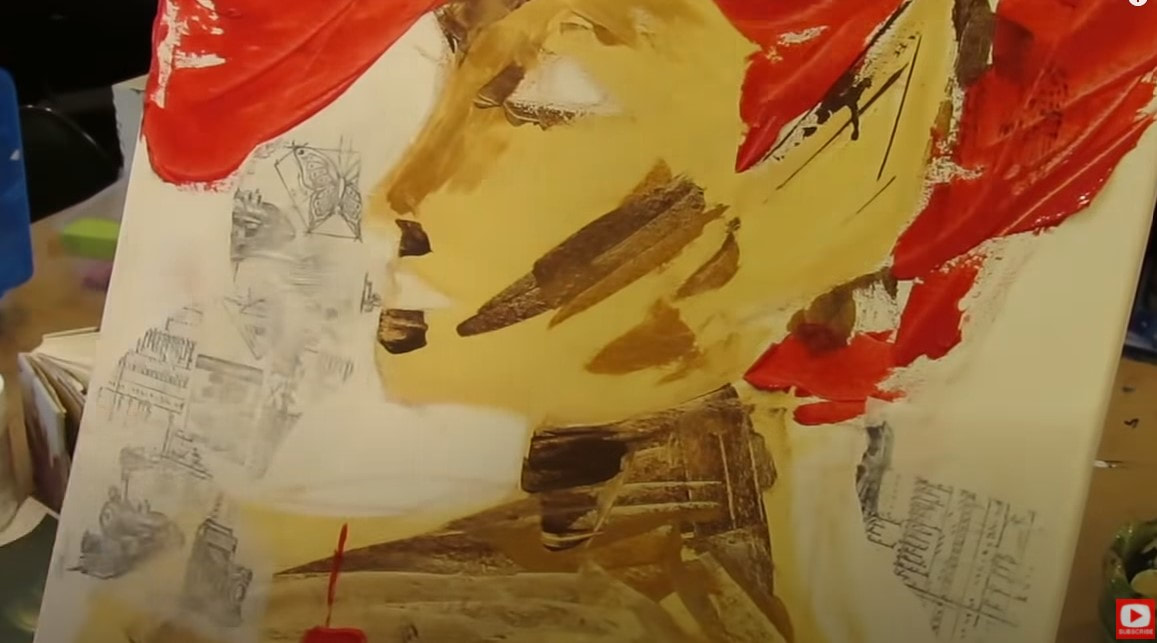 This collage paper was actually sent to me by a friend who MADE it, so I was thrilled to include it in this piece.  Are you loving "the ugly phase" on this girl?! LOL!! It makes me cringe, but oh well!! Do what I always say - JUST KEEP GOING!! This means you're about half-way done with your project!! 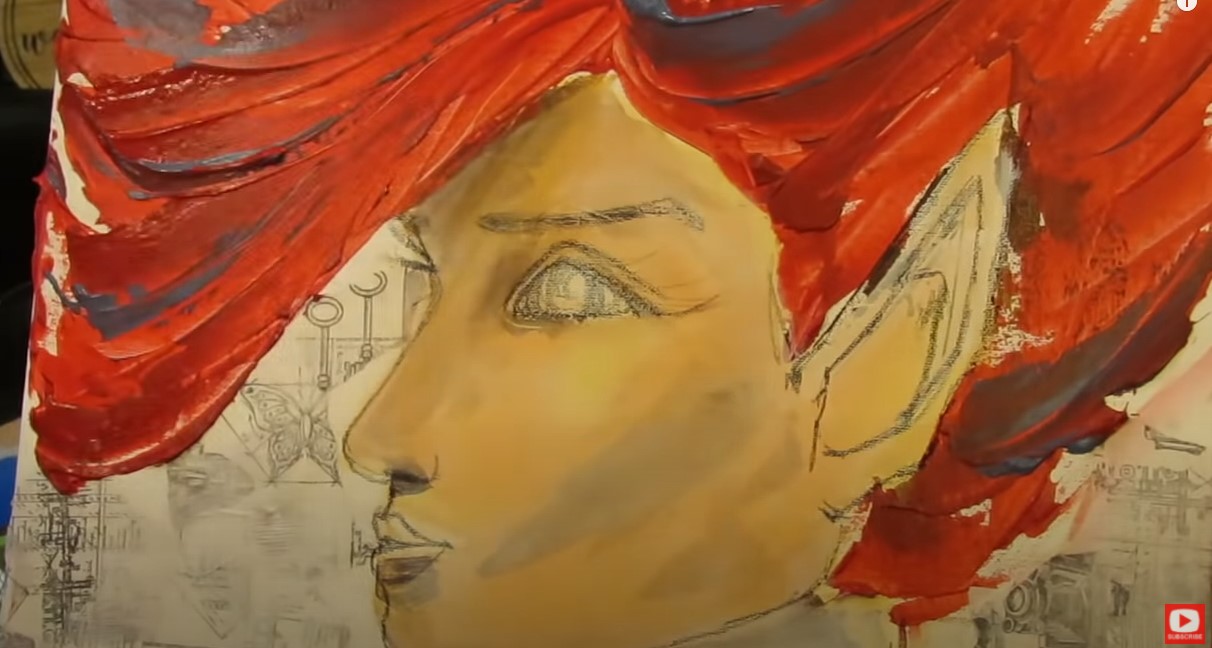 After quite a bit of blending I added back some definition to my original lines with my black stabilo all pencil and pulled out my paintbrush to activate it with a little acrylic. I LOVE how this adds shading all by itself! Cool, right?! Then it's time to play with my Faber castell gelatos! I'm in LOVE with these for creating my mixed media portraits! I recently did a video ALL about the magical goodness of gelatos and why you need to check these out if you've never played with them before.  They're amazing for shading faces. Look at that smooth complexion I've blended in below... 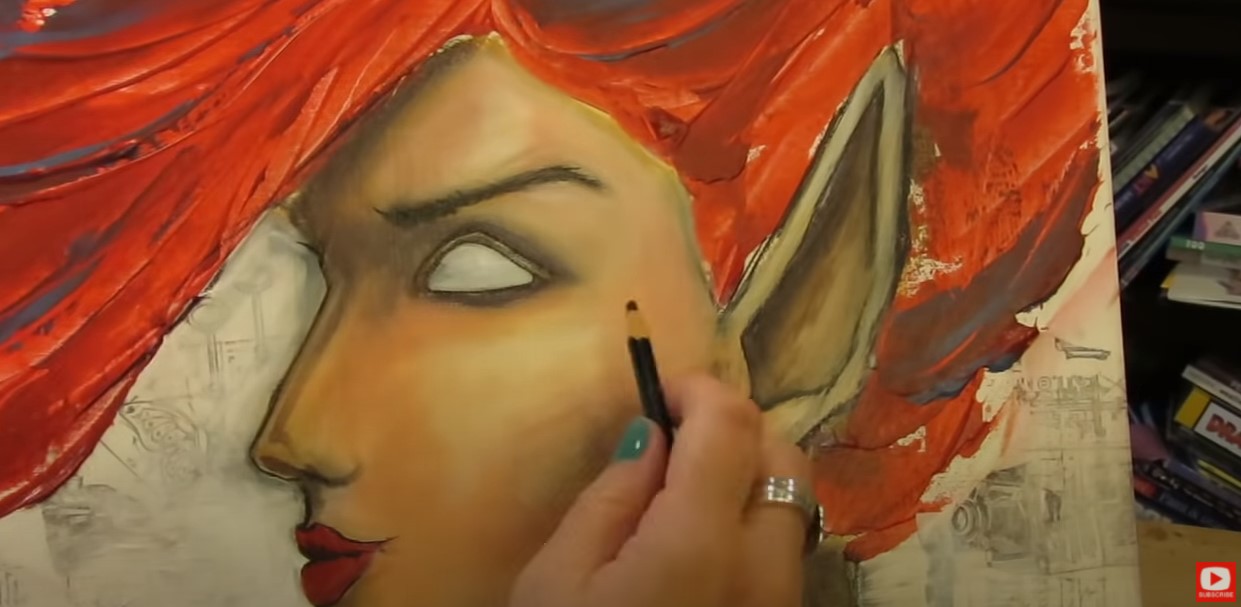 I love the contrast with her thick hair - full of texture! 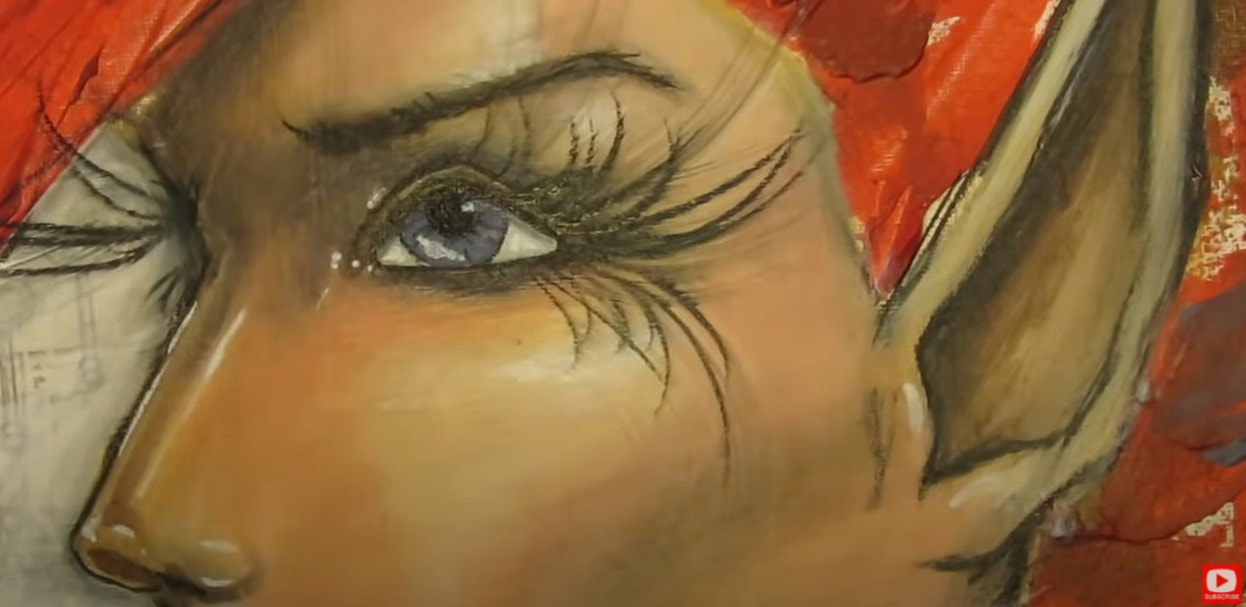 Take a look at these killer lashes up close!! Tons of people have trouble with drawing eyelashes! I KNOW these can be super tricky, so I've done a number of eyelash drawing tutorials on how to draw eyelashes successfully. Here's one on my drawing channel, and another on my mixed media channel. I've also created a free cheatsheet to help you out that you can download and use as a reference when you're practicing eyelash drawing. It teaches you how to draw eyelashes step by step, along with the THREE important things to think about every time you're drawing eyelashes. Click the button below and I'll send it straight to your inbox!  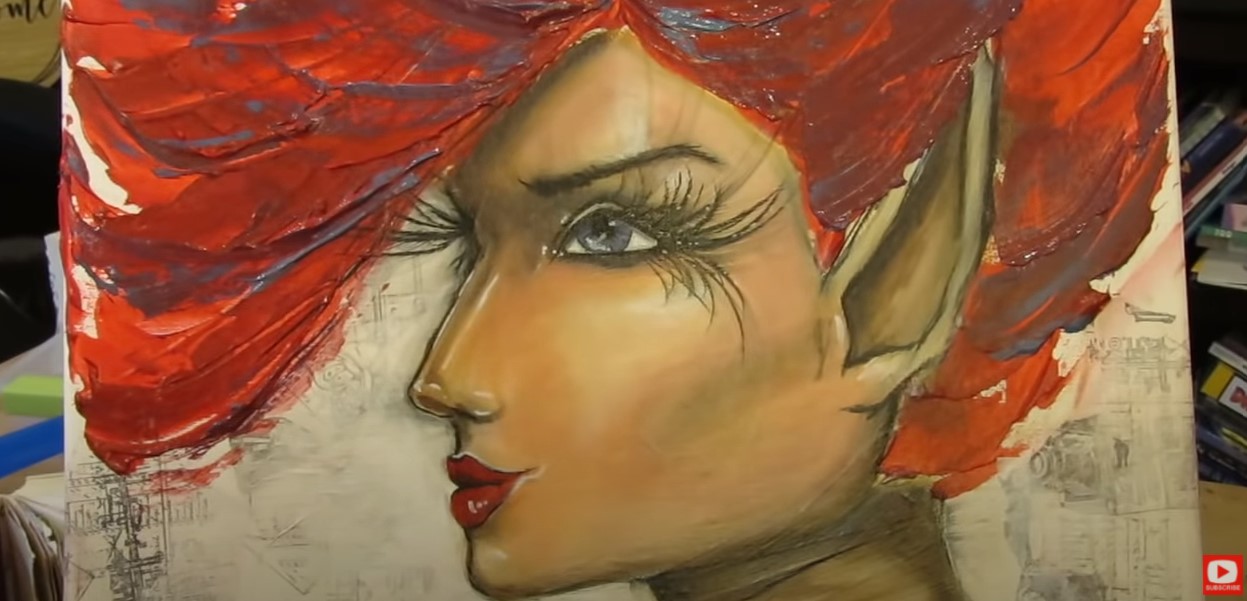 For this particular project, I used my stabilo to draw eyelashes on this girl. When I activated these lines, it created the look of more dramatic eye makeup. I'm always down with THAT! Check out the video to see how I added in some magical blues to her hair and eyes, and of course layered in my signature white highlights to make EVERYTHING POP at the end!! SO FUN!! Thanks for hanging out with me today! I hope you have a fab week!!
❤️Want FREE, immediate access to my Fun Fab Drawing Club and/or Mixed Media Society plus discounts on all my art books, sneak peek at YouTube videos and new book content, behind-the-scenes fun and MORE? Join me over on Patreon today and get HUGE PERKS in return for a small monthly donation. ❤️ CHECK OUT ALL my art books on AMAZON (available in both Kindle and Paperback) ❤️ SIGNED COPIES of my art books on ETSY ❤️ MY FAVORITE ART SUPPLIES on AMAZON ❤️ MY BELOVED FACEBOOK GROUP ❤️ FOLLOW ME ON INSTAGRAM ❤️ FOLLOW ME ON FACEBOOK Derwent Inktense Pencils are water soluble pencils that ALSO claim to be PERMANENT once dry. I've actually never tried inktense pencils in my Hamburger system and decided to test this permanent claim out first to see if it's true. Get ready for a SHOCKER in today's mixed media art supply demo!! 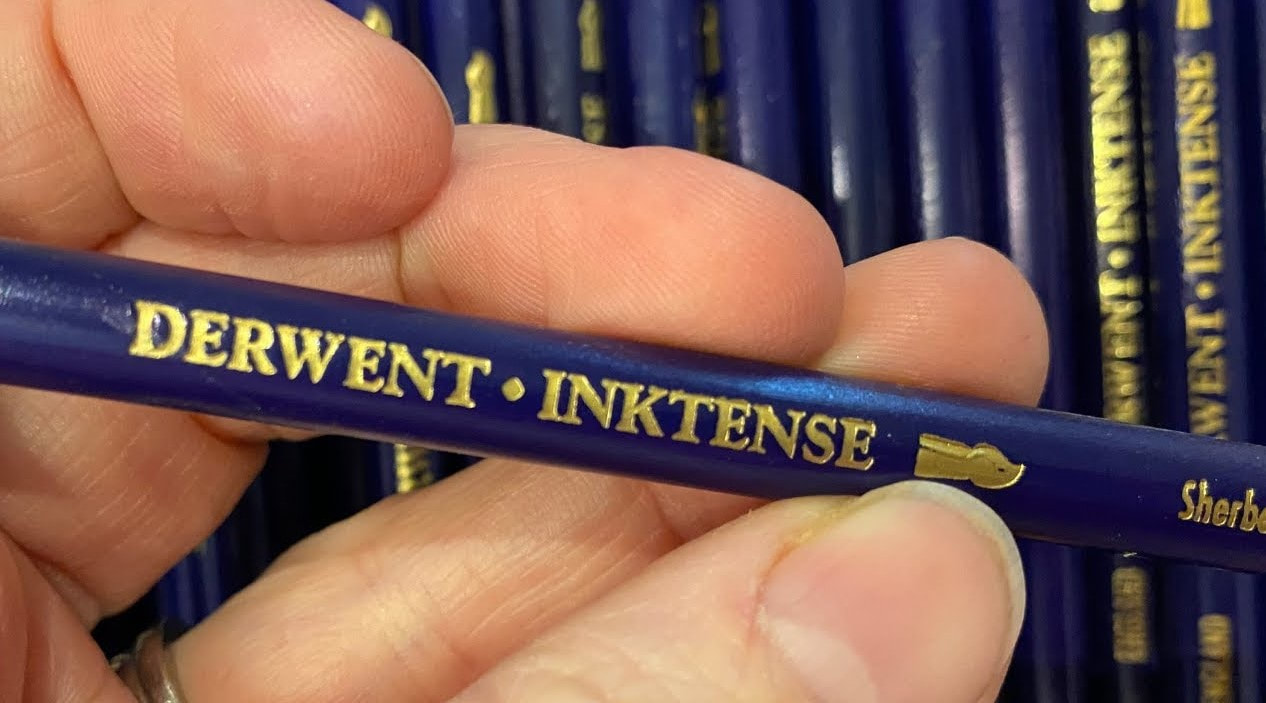 Inktense water soluble pencils are filled with a "magical" ink - that's why they're called "inktense" instead of watercolor pencils. Confession: I never work with Derwent inktense pencils other than to occasionally use them like I would use a watercolor pencil! I decided today's test was the perfect opportunity to try a variety of water soluble pencils vs watercolor pencils to see which ones move the most when I attempt to reativate them all a second time!  If you've got a copy of my hamburger system cheatsheet, water soluble supplies can be used in layer three, OVER your collage and paint layers. Not sure what my Hamburger System is? It's my signature mixed media layering process! I compare layering my supplies to the way you layer toppings for the perfect burger! I've got an entire FUN YouTube series of tutorials, cheatsheets, and even wrote a mixed media art BOOK about it!! Download the FREE, one-page cheatsheet that explains it all by clicking the button below.  I'll send it straight to your inbox so you can print it and keep it at your art table for reference to help you with your own mixed media layering.  I've collected a ton of watercolor pencils and watersoluble pencils over the years because these are one of my favorite ways to draw something cute, and add a little quick shading with watercolor effects. I've lined up 10 watercolor and watersoluble pencils for today's Derwent Inktense review. 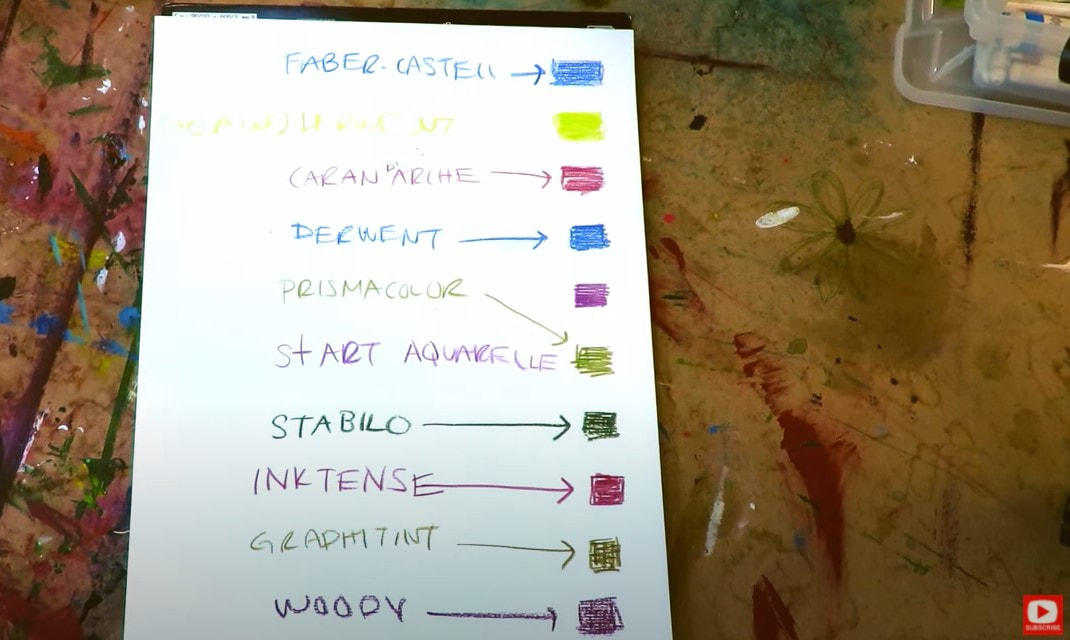 So far I'm loving how the Aquatones (also by Derwent) are activating. Sadly, this product is becoming hard to find though. There's a rumor it was discontinued, so if you go hunting for them, you might have a hard time. 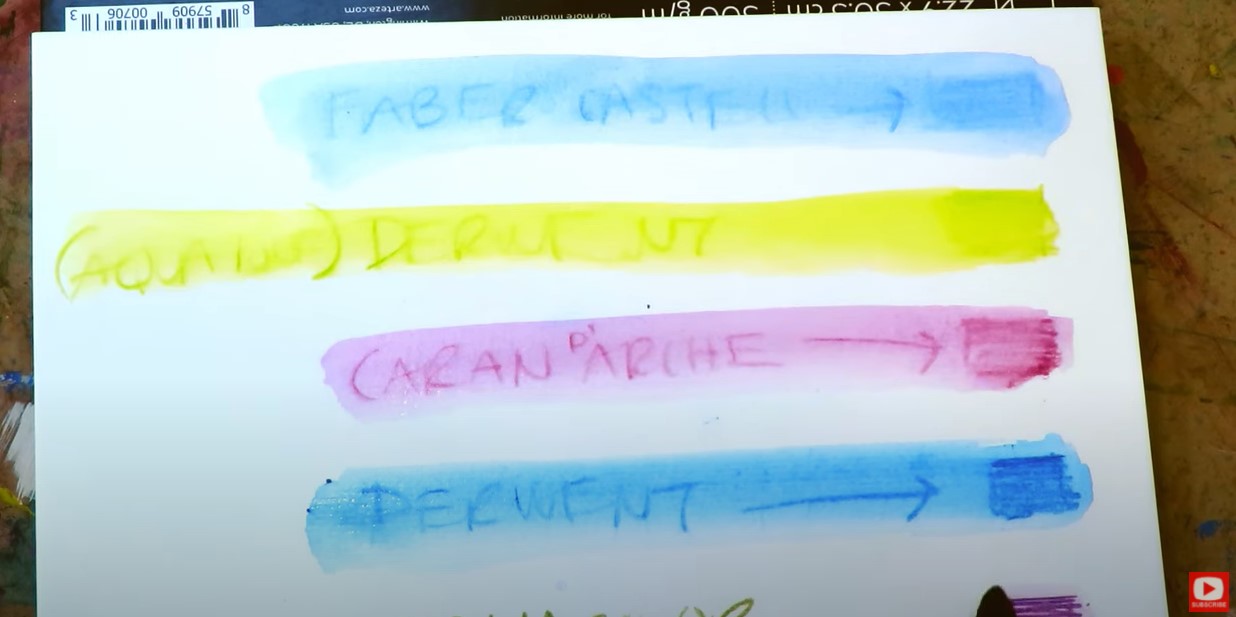 As you can see in today's mixed media art supply demo, even after I activate all the products, you can still see the pencil line from each one (except for the aquatones - which really seem to melt as soon as the water hits them). 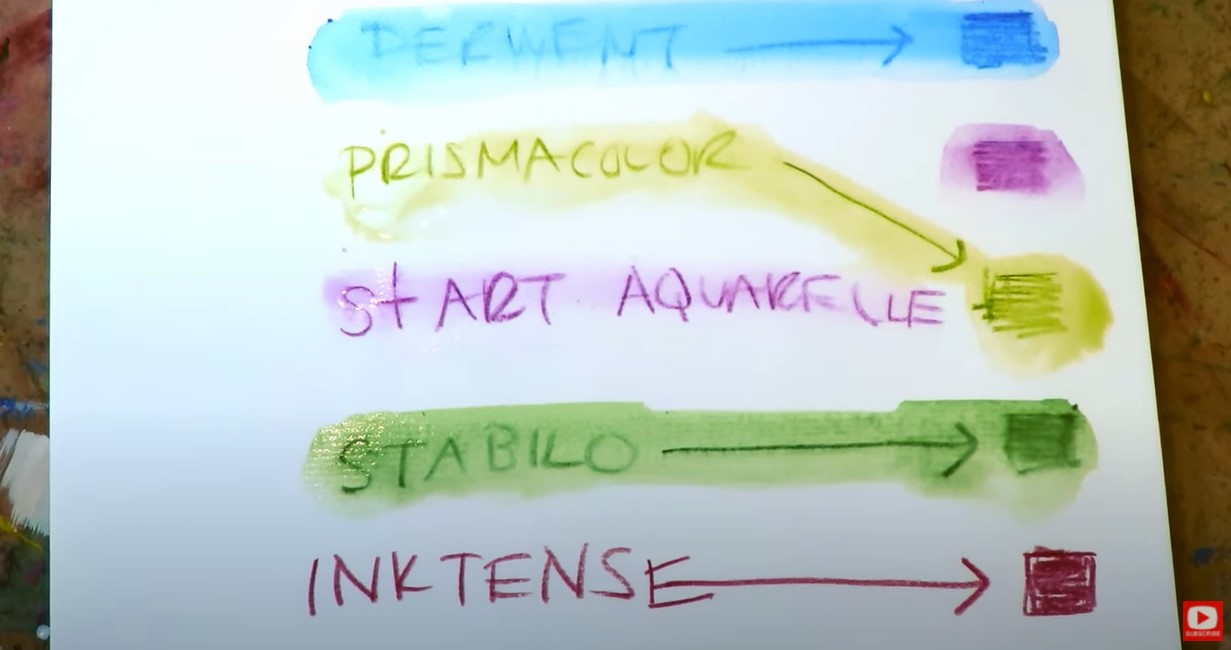 This is a super cool effect if you like the look of mixed media drawing and still want pencil lines to be visible in your work. If you don't - you may prefer to reach for a watercolor marker, because that pigment will totally dissolve for you. After I activated each product, I hit the page with my hairdryer to make sure each one is fully dry. 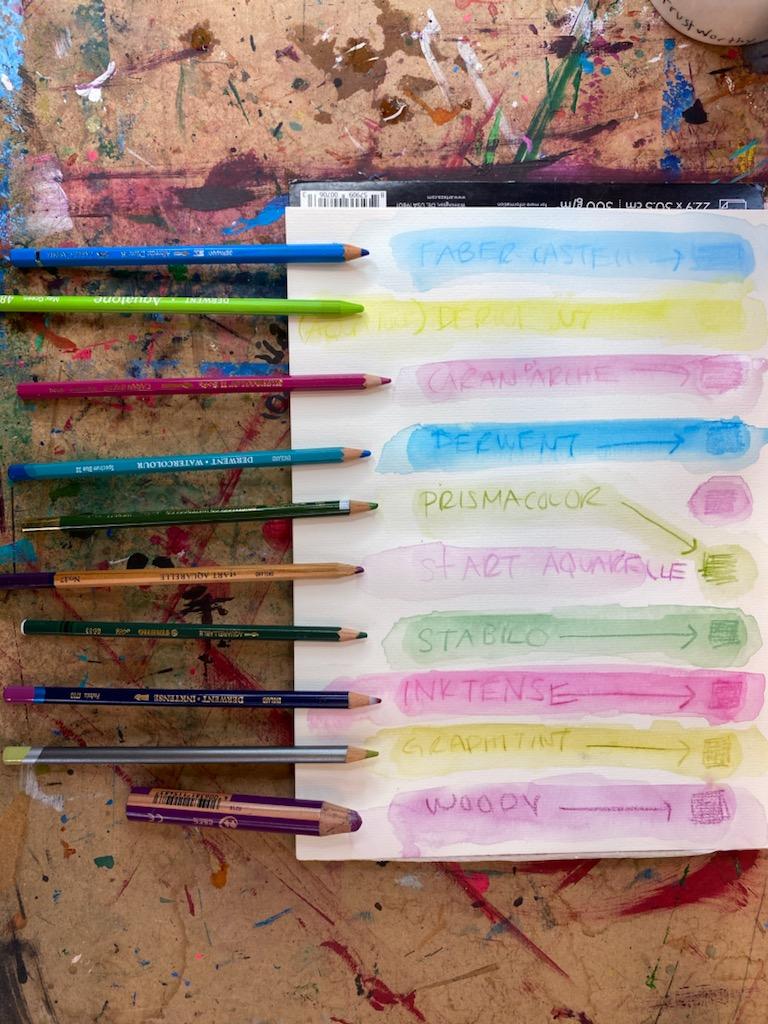 Once I dried everything and came back to rewet, the Derwent Aquatones (woodless pencil), Watercolor and Derwent Graphitint are the MOST watersoluble. I tested the inktense pencils last! CLICK OVER to watch the video and find out if they live up to their marketing claim ... is the ink permanent, or will it move? Thanks for hanging out with me today! I hope you have a fab week!!
❤️Want FREE, immediate access to my Fun Fab Drawing Club and/or Mixed Media Society plus discounts on all my art books, sneak peek at YouTube videos and new book content, behind-the-scenes fun and MORE? Join me over on Patreon today and get HUGE PERKS in return for a small monthly donation. ❤️ CHECK OUT ALL my art books on AMAZON (available in both Kindle and Paperback) ❤️ SIGNED COPIES of my art books on ETSY ❤️ MY FAVORITE ART SUPPLIES on AMAZON ❤️ MY BELOVED FACEBOOK GROUP ❤️ FOLLOW ME ON INSTAGRAM ❤️ FOLLOW ME ON FACEBOOK You are going to LOVE THIS 3 MINUTE mixed media canvas background technique!! It is by far THE FASTEST way to knock out a vibrant background for my mixed media portraits! I typically start with collage, but sometimes I'm in the mood for something a little different. Evidentally, today it was punk, and I'm LOVING how she turned out!! 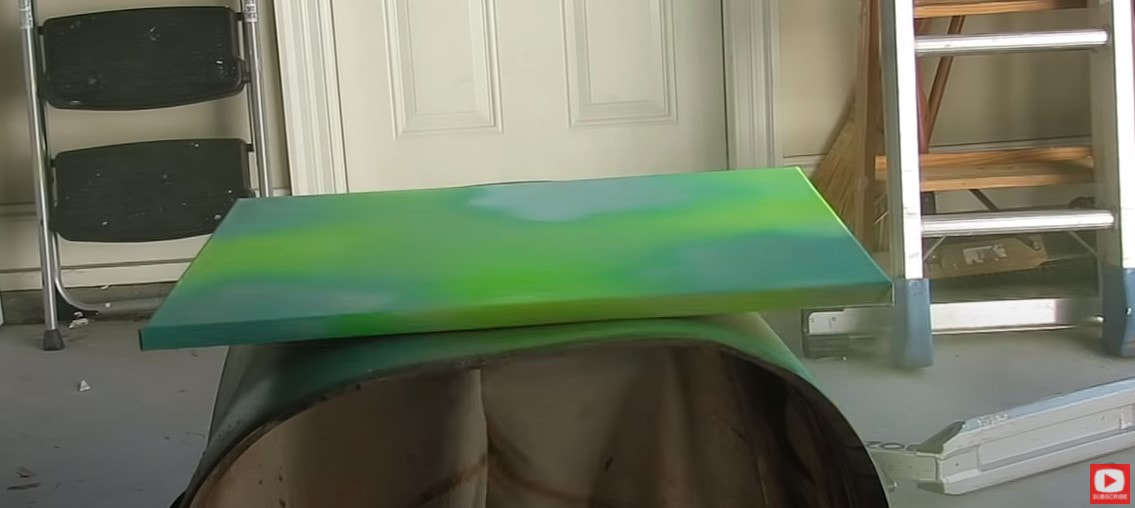 To get started, select 3-4 spray paint colors you like together, a few stencils, and head outside with your canvas. Begin by adding a few shots of color here and there, in two different shades. Then drop a stencil on top and use your third color of spray paint to start working in some fun patterns. 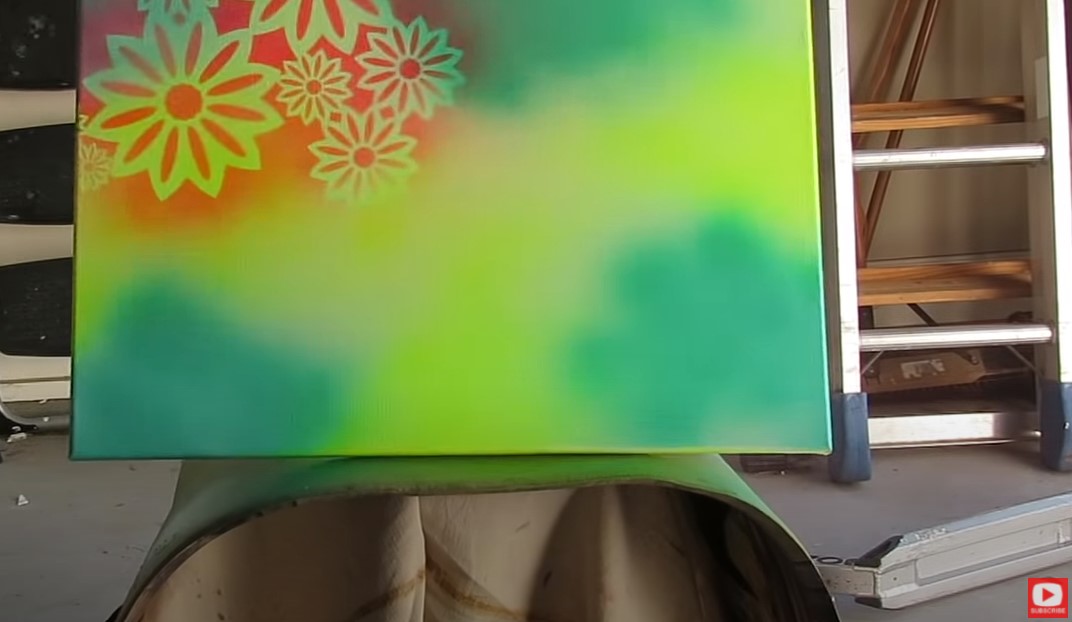 Cool, right?! There are SO many directions you can take a mixed media canvas background like this. I worked in some black with mine because I wanted it to feel edgy since I knew where the portrait for this piece was headed. This background seriously took me ALL OF THREE MINUTES. That's it. I think that might be a record, even for me!! 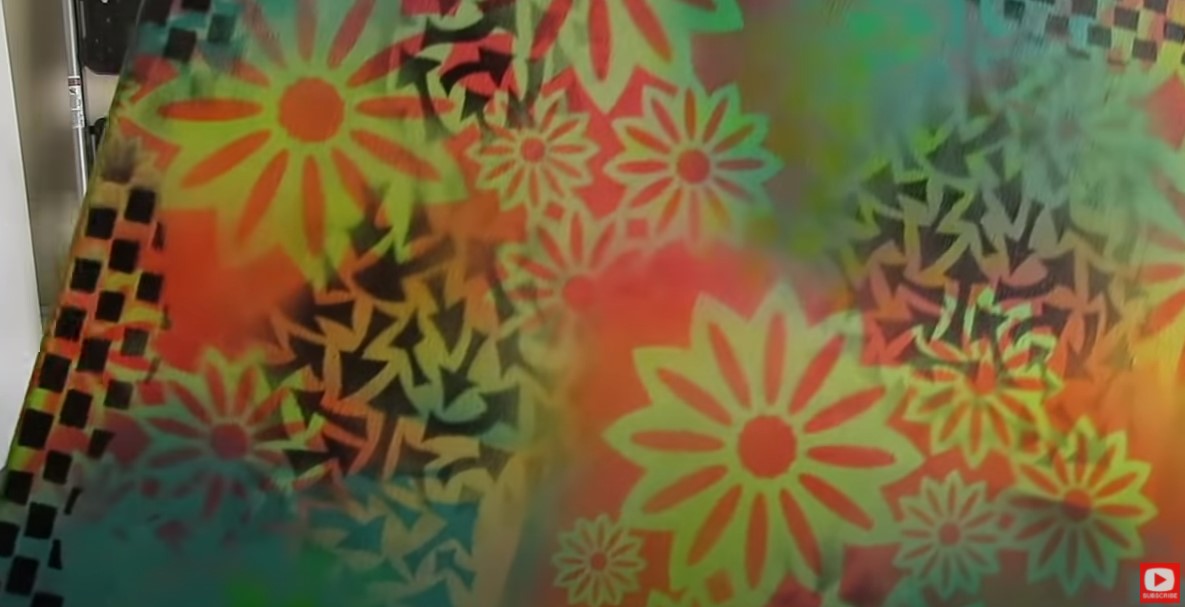 Once my canvas was dry, I pulled out my GINORMOUS magnum sharpie back in the studio, and got to work on a side profile drawing prompt from an artist friend of mine, Jenny Manno. Before we continue, super quick announcement! All product links noted below are Affiliate. I may earn a small commission if you choose to order through these links, but by law there is never any additional cost to the consumer for doing so. I only reccommend products I actually use and love. Thank you for your support! 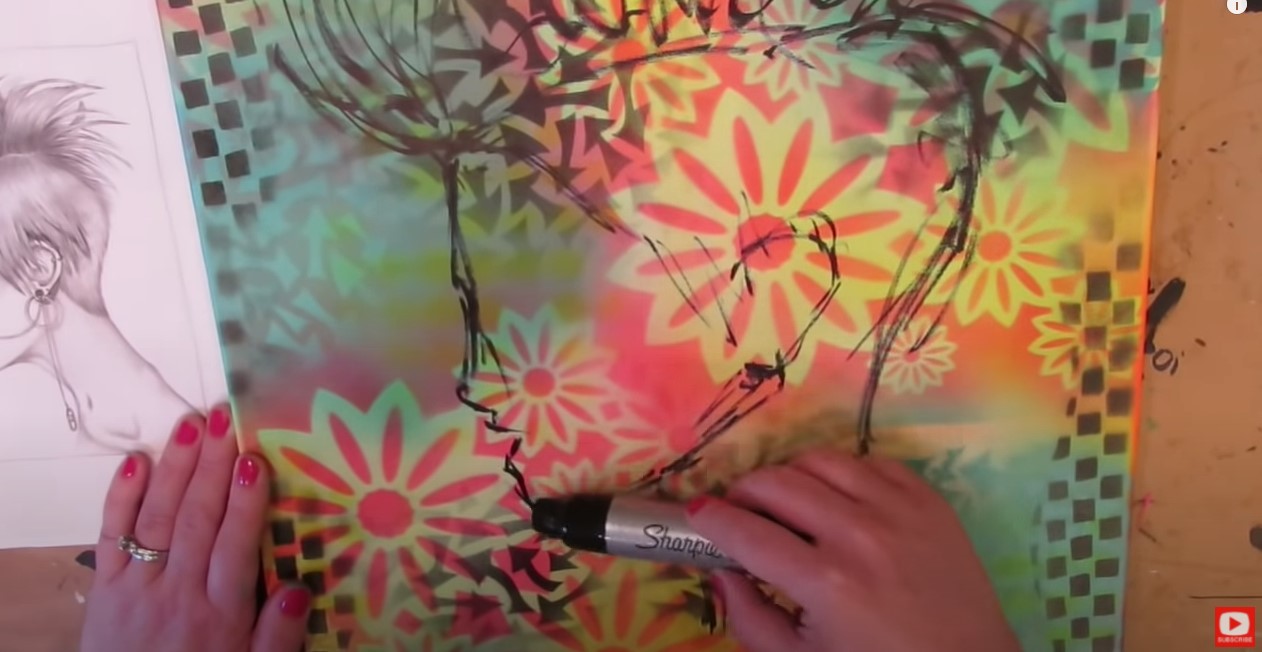 Just a word of caution... if you're not used to doing profile drawings, I definitely DON'T recommend using a sharpie!! Especially one this big!! In all seriousness, if you're new to side profile drawing, it's NOT as hard as you think it is. You probably just need someone to break it down for you so it doesn't feel so overwhelming. Then you just need a little practice. I have TONS of resources to help you with profiles! Feel free to check out this playlist on my YouTube Drawing channel for beginners. You'll learn how to do side profile drawing step by step in pencil. You can also check out my book, How to Draw MORE Fun Fab Faces, over on Amazon. This is PERFECT for beginners who want to learn how to draw profiles step by step (even kids!!).  Once I finished my initial drawing, I got my gesso going inside the face and just around the outer edge of her face shape to knock the background back just a bit. Then I painted a thin layer of flesh colored craft paint on the face. If you've been watching me for a while - you know I'm NOT super patient, LOL! Layering with gesso and acrylic paints really can take forever, and I don't usually have the patience for that. Because I have the neeeeeed for speed, I developed this cool technique to add color to my mixed media portraits QUICKLY, using my gelatos by Faber Castell! See the light pink in the face below, where it looks like blush has been applied to her cheek? That's from my gelatos! I blended it with my finger and it literally took me TWO seconds. 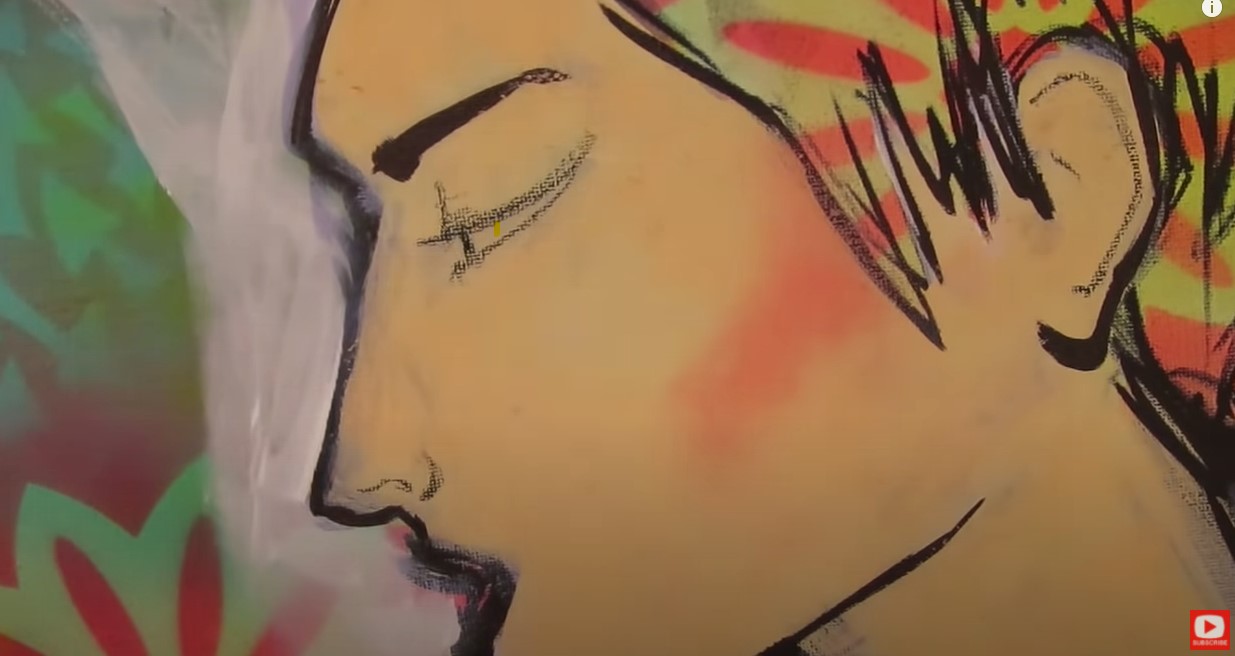 If you want to see this gelatos technique slowed down in REAL TIME, I just did a product demo with my Faber Castell Gelatos, so you definitely need to check that out! If you haven't tried them before on your own, this is my favorite set. FYI, beware of the metallic version if you want to follow me with this technique, because sadly they don't work!  If you're watching this project unfold (and I HOPE you do!!), I actually struggled a little with the skin tone and decided I wanted a clean slate to work with, so pulled out my gesso and started again with my fun gelatos technique. In the pic above, you can see it's looking SO much better, so that ended up being a great move! Keep that in mind- if something doesn't go quite right- there are a MILLION ways to fix something, so DON'T give up. Keep pushing through!! In the world of mixed media art, gesso is your friend in more ways than one!! 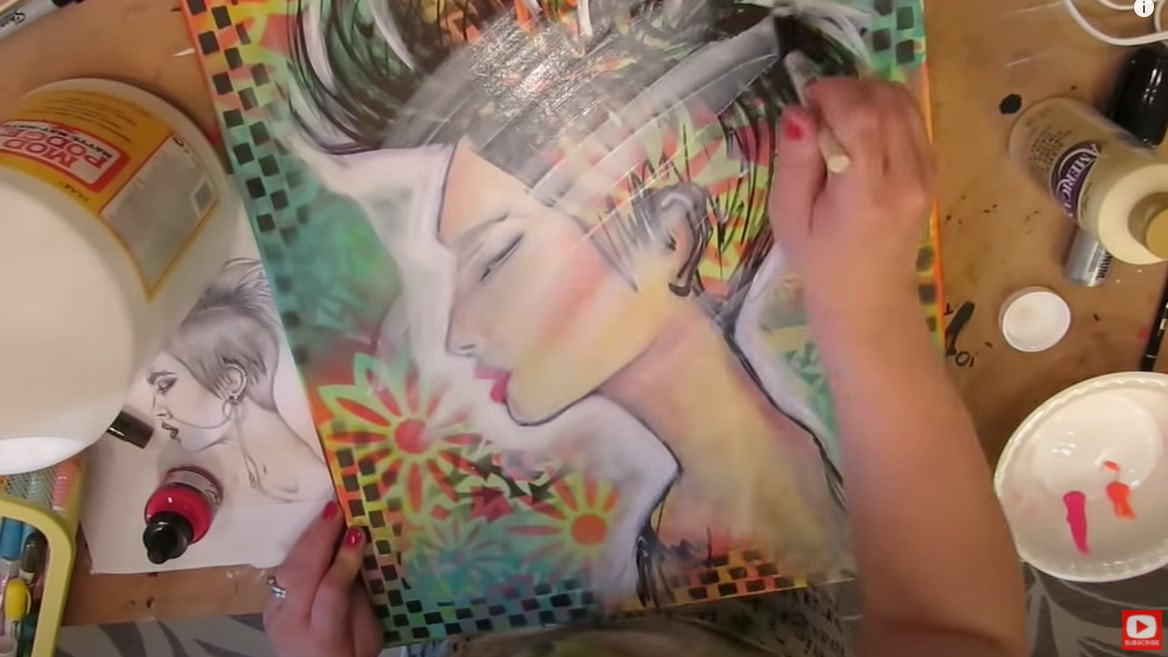 When I'm switching gears from mixed media painting to mixed media DRAWING... I seal my whole canvas with one of my favorite mixed media art supplies - mod podge! I buy this stuff by the gallon!! When the mod podge has dried, my canvas is slippery and has been prepped beautifully for playing with pitt pens. I love using my pitt pens to help me when shading a face (mixed media style). I use them in a similar way to my gelatos. I layer some color and blend with my fingertip. 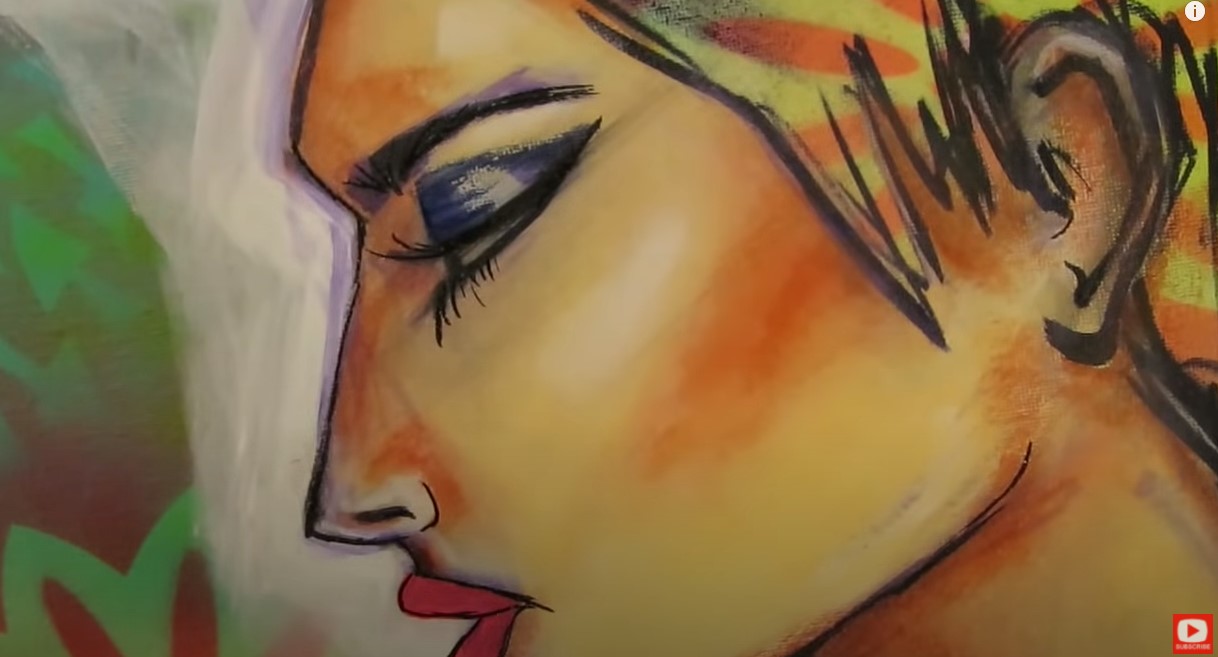 What's REALLY cool about working with pitt pens over mod podge, is you can ERASE things you don't like with a simple baby wipe! Amazing, right?! The art supply layering system I'm using in today's project is something I lovingly refer to as my mixed media "Hamburger System." I compare layering my supplies to the way you layer toppings for the perfect burger! I've actually got an entire FUN YouTube series of tutorials, cheatsheets, and even wrote a mixed media art BOOK about it!! Download the FREE, one-page cheatsheet that explains it all by clicking the button below. I'll send it straight to your inbox so you can print it and keep it at your art table for reference to help you with your own mixed media layering. 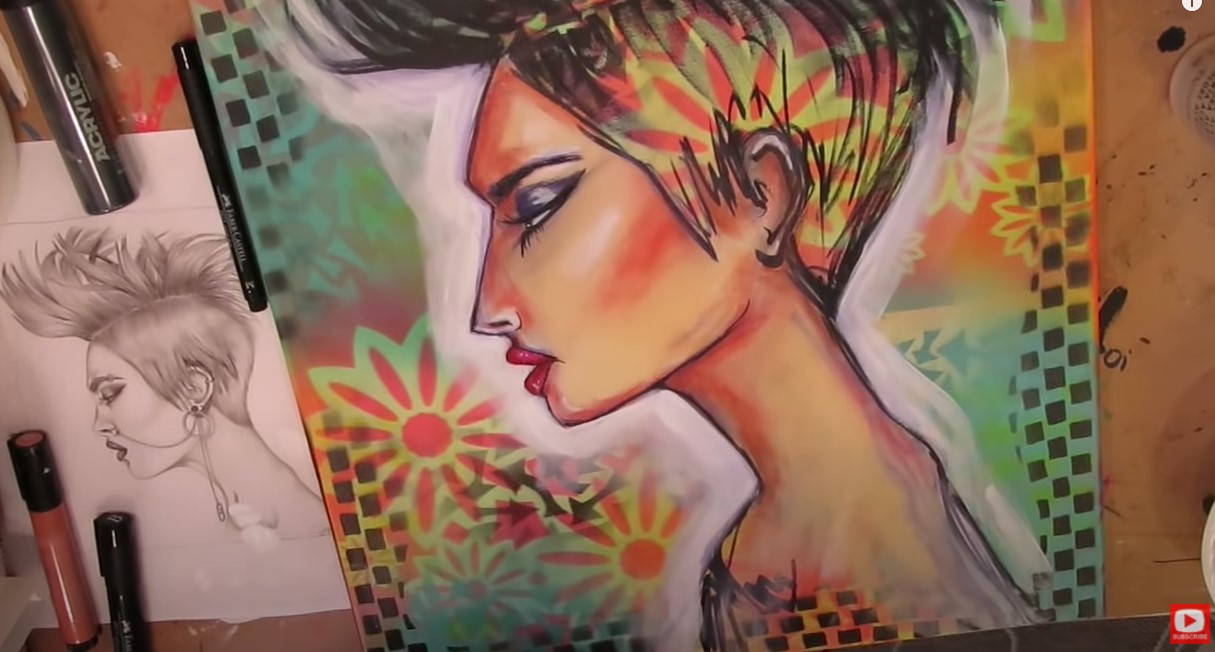 When I'm using my hamburger system for layering and am happy with something I've done, I seal my work with another layer of mod podge to ensure it won't move, then hit it with my hair dryer so I can do a bit more doodling. 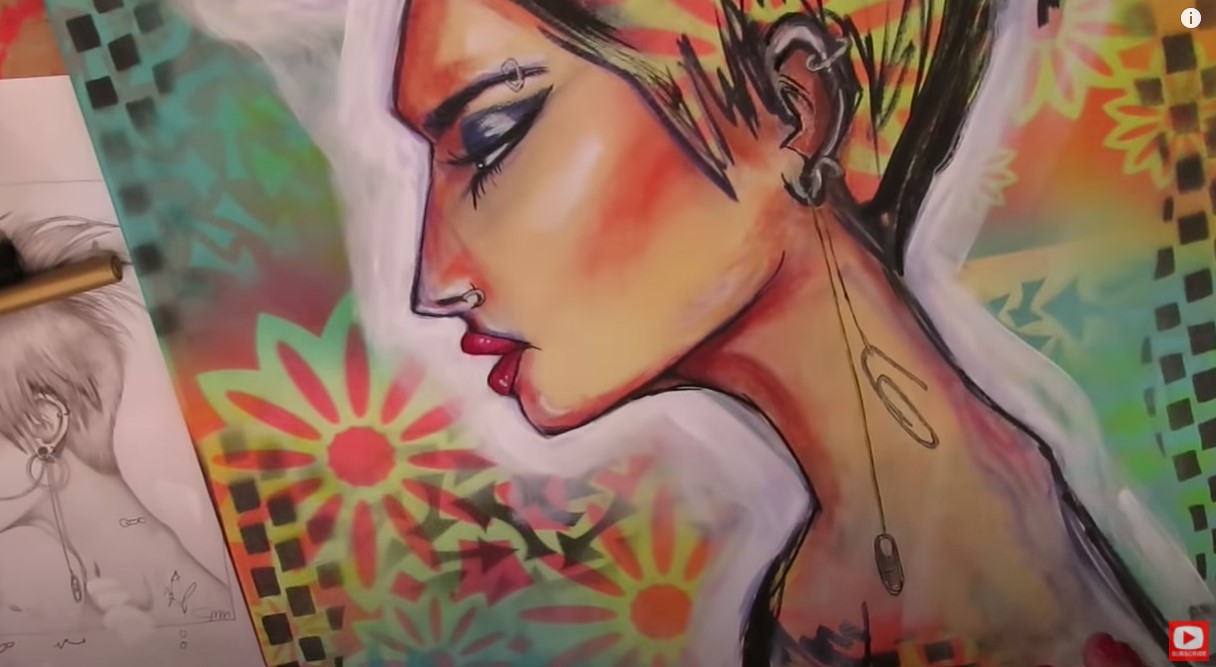 My last step is always grabbing a white sharpie or posca pen to add highlights throughout. I LOVE the drama this adds to my mixed media portraits. 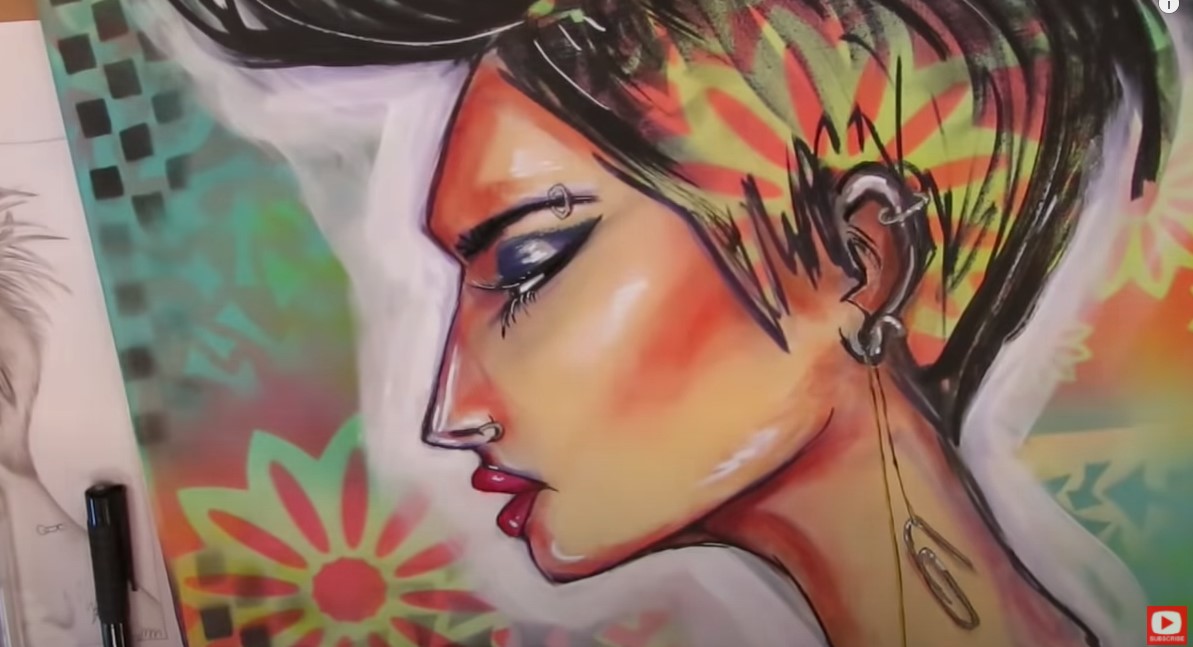 I hope you enjoy watching this video!! I had a blast doing this project!!
❤️Want FREE, immediate access to my Fun Fab Drawing Club and/or Mixed Media Society plus discounts on all my art books, sneak peek at YouTube videos and new book content, behind-the-scenes fun and MORE? Join me over on Patreon today and get HUGE PERKS in return for a small monthly donation. ❤️ CHECK OUT ALL my art books on AMAZON (available in both Kindle and Paperback) ❤️ SIGNED COPIES of my art books on ETSY ❤️ MY FAVORITE ART SUPPLIES on AMAZON ❤️ MY BELOVED FACEBOOK GROUP ❤️ FOLLOW ME ON INSTAGRAM ❤️ FOLLOW ME ON FACEBOOK Faber Castell Gelatos are one of my all time FAVORITE art supplies. Lots of mixed media artists aren't quite sure how to use them, or only associate gelatos with background work. In today's art supply demo, I'll show you why they're a MUST HAVE in my studio + the QUICK & EASY way I use them to create MAGICAL mixed media portraits. If you're a beginner in the world of mixed media art, or just curious about what gelatos can do for you - today's video is a MUST SEE!!  Before we continue, super quick announcement! All product links noted below are Affiliate. I may earn a small commission if you choose to order through these links, but by law there is never any additional cost to the consumer for doing so. I only reccommend products I actually use and love. Thank you for your support! 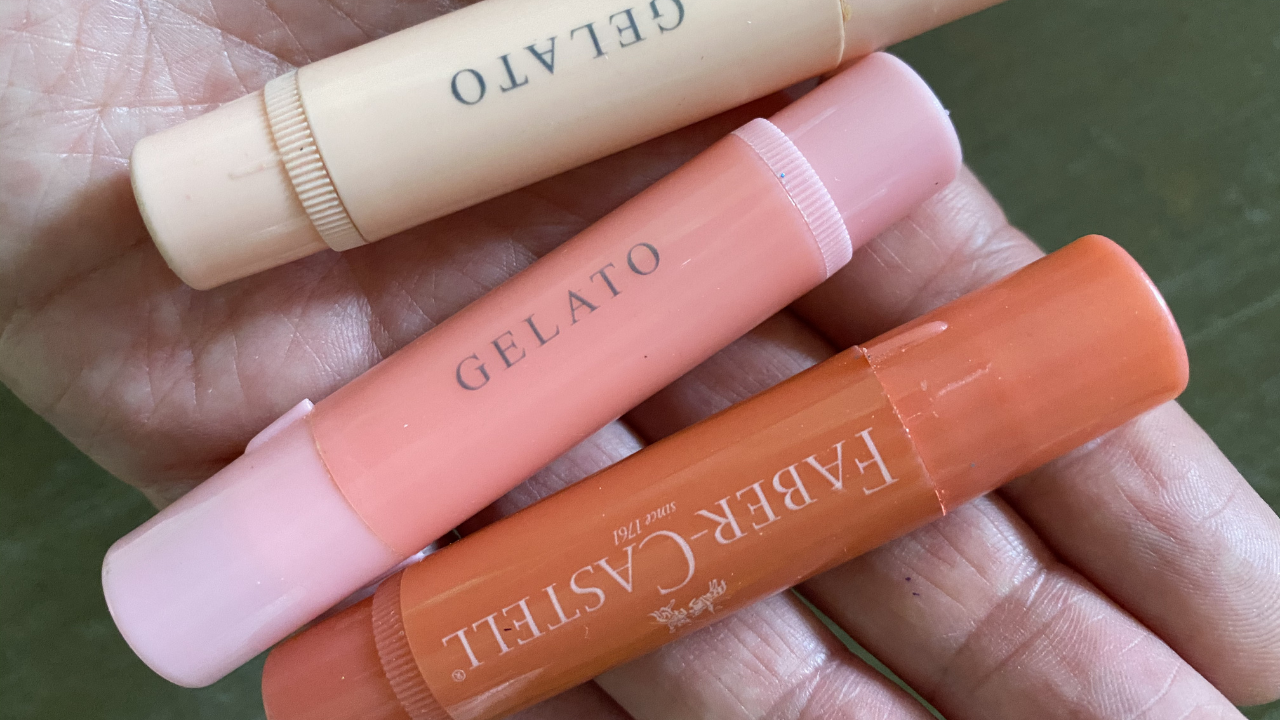 When students first start working with me, they often ask, what are gelatos? Gelatos are a fun art supply made by a fine art supplies company called Faber Castell! Gelatos are supposed to be a fine art product, but I think a lot of artists would probably put them into the "craft" category because they are not light fast. If you haven't seen these before, they kinda look like a tube of chapstick with a blunt tip. 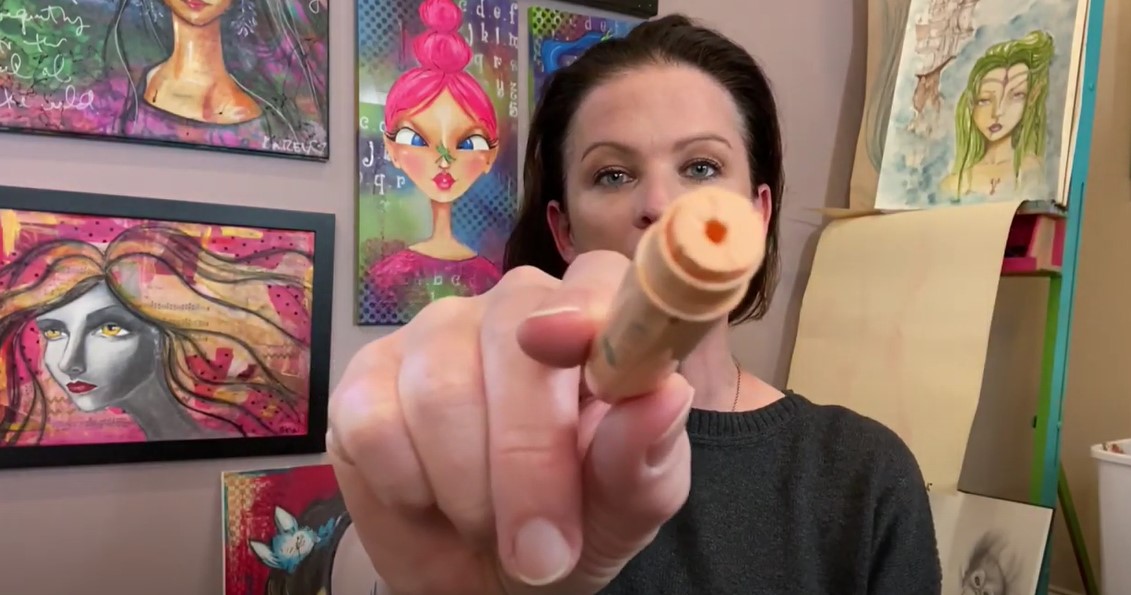 Gelatos come in a wide range of colors. They even have a metallic line. I do want to caution you if you're drawn to metallics. If you follow me and have picked up the Faber castell gelatos metallic set, hoping to use them like I do in my Mixed Media "Hamburger" projects, unfortunately they DON'T work. So just be forewarned, if you want to play along with me- the metallic version has been tested, and sadly failed. Pick up the flat/matte set and you'll be good to go! In fact, here is my favorite. It's got all the skin tones I love, and I think you'll REALLY enjoy yourself!! Not sure what my Hamburger System is? It's my signature mixed media layering process! Lots of people struggle with understanding their mixed media art supplies and how they work best together. It's really not that hard once someone shows you how! I compare layering my supplies to the way you layer toppings for the perfect burger! I've got an entire FUN YouTube series of tutorials, cheatsheets, and even wrote a mixed media art BOOK about it!! Download the FREE, one-page cheatsheet that explains it all by clicking the button below. I'll send it straight to your inbox so you can print it and keep it at your art table for reference to help you with your own mixed media layering.  If you haven't worked with them before, gelatos are a watersoluble product. That means if you put them down on a piece of paper and add water to them - they WILL melt and move around on you. There are a lot of other products on the market that work just like gelatos- including Marabu art crayons (they can really smear on you) and Distress crayons (not lightfast at all, so I quit using them).  What I LOVE about gelatos is they're not AS watersoluble as these other brands. The way that I like to use them is for accentuating the shading and tones on top of my acrylics. They blend out just perfectly, and I'll show you in today's video. I think they're AMAZING for adding skin tone shading, or adding any shading on any subject you're featuring in your mixed media projects! 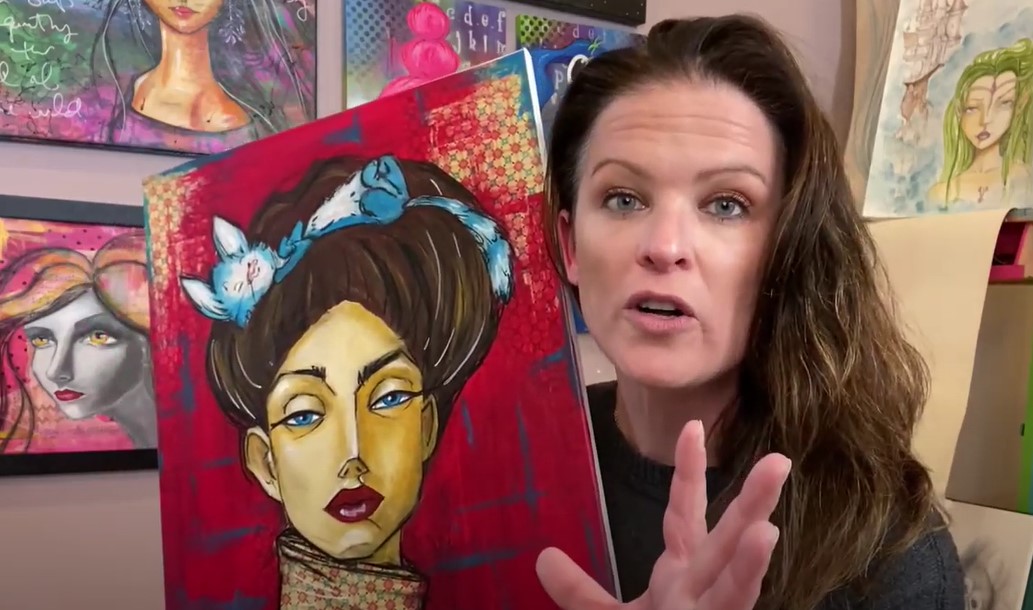 Personally I love mixed media projects to be fast and FUN!! And I want to see an instant success. For me, Faber-Castell gelatos DO just that. I don't have to spend TONS of time blending my acrylic paints, I can just work some gelatos on top of my acryilcs, it's super easy, and BOOM. Gorgeous shading, every time! Watch the video to see where I've used gelatos specifically in this cute mixed media face and in the one above. 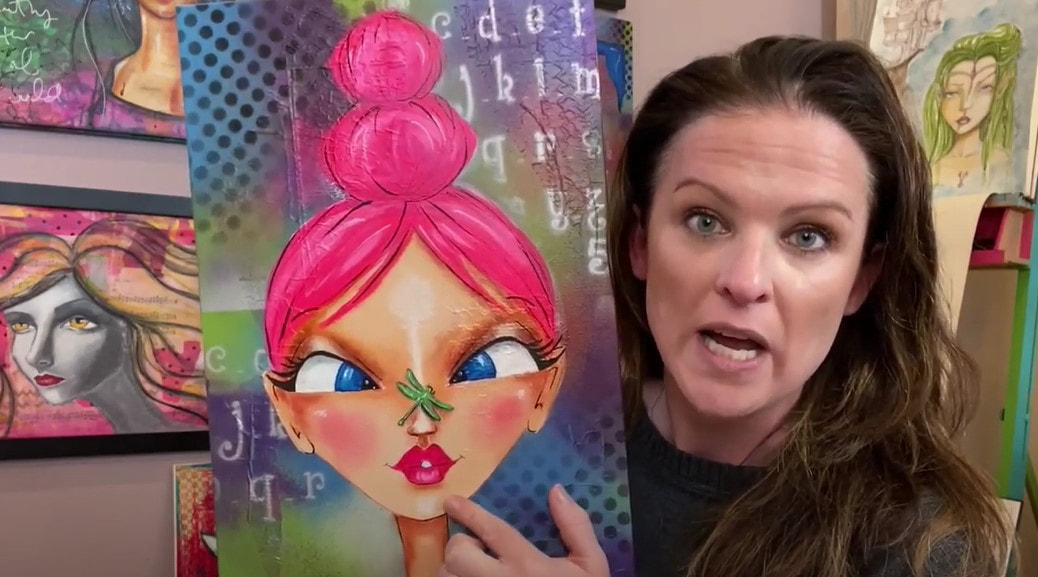 Now, let's move on to the product demo! CLICK over to the video so you can see exactly what I'm talking about ;) To get the demo started, I painted an acrylic head shape in four different skin tone shades using craft paints. Using craft paint is totally normal for me when I'm doing skin tones because I love how the paint that comes out of the bottle in the prefect skin tone I'm looking for in a base coat. I don't have to mix a thing! Then I add 2-3 shades of gelatos on top for shading, and they look amazing! 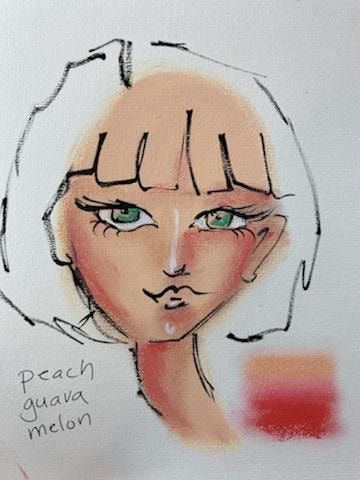 I noted the gelato shades I used in the above girl off to the side, and showed you just how EASY it is to blend with these on the right. They totally melt right into each other. And this is without adding anything to them. 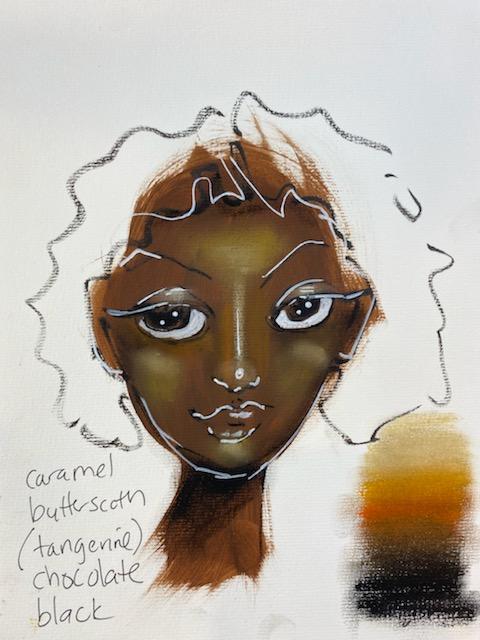 In this one I used five shades of gelatos instead of three because I just couldn't stop! LOL! I love these things. Isn't that the most beautiful blend off colors off to the right? I told you these things were magical for mixed media work!! 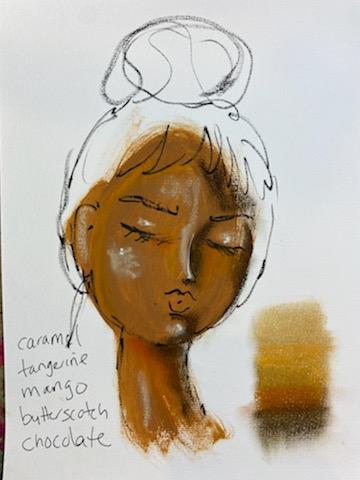 So fun!! I love how these shades blend together for a rich medium skin tone. You really can add such a rich layer of color to your faces and I'm not kidding... it only takes a couple of strokes and a little blending with your finger and you're done. SO much faster than doing countless layers of blending with your acrylics!! The highlights throughout this face (above) were done in the color caramel. Using white would've been too strong here. Make sure you try incorporating tangerine if you're playing with darker skin tones because it REALLY adds a beautiful effect. 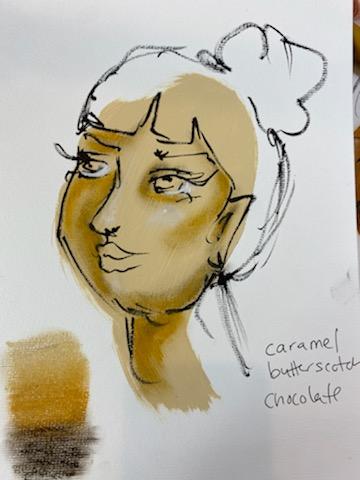 And here is the last one! Just a different direction from the first pale skinned girl. This one goes more into the yellow color family and butterscotch. If you look closely, you'll see a few white highlights I added with my white gelato. This has a very soft effect. And again, SUPER easy and fast. Especially if you're only using three shades! 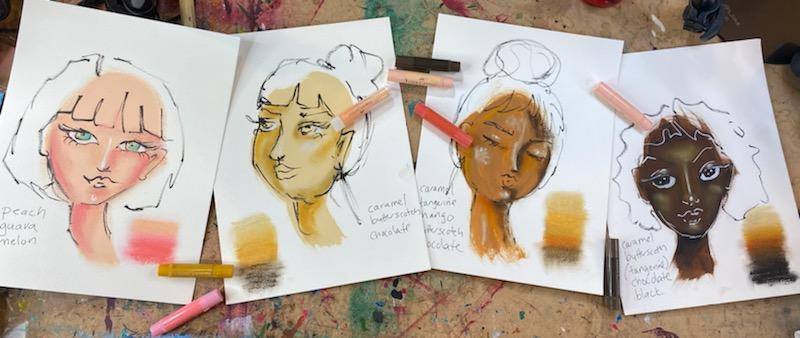 Now! If this was a "real" mixed media project for me (not just a value scale demo showing you how I love to use gelatos)... there are a lot more steps I take to tie a project together. Be sure you click over to the video to see a quick demo of what comes next. I know tons of people have questions about how to SEAL faber castell gelatos! I have found they do fantastic with a layer of mod podge on top! Check this out...  but this STILL isn't the end... There's even MORE!! If you want to see what comes next, click over to watch my Hamburger System playlist after today's video, and I'll take you layer by layer through the entire SUPER FUN process!! Thanks for hanging out with me today! I hope you have a fab week!!
❤️Want FREE, immediate access to my Fun Fab Drawing Club and/or Mixed Media Society plus discounts on all my art books, sneak peek at YouTube videos and new book content, behind-the-scenes fun and MORE? Join me over on Patreon today and get HUGE PERKS in return for a small monthly donation. ❤️ CHECK OUT ALL my art books on AMAZON (available in both Kindle and Paperback) ❤️ SIGNED COPIES of my art books on ETSY ❤️ MY FAVORITE ART SUPPLIES on AMAZON ❤️ MY BELOVED FACEBOOK GROUP ❤️ FOLLOW ME ON INSTAGRAM ❤️ FOLLOW ME ON FACEBOOK Today I'm spilling ALL my Mixed Media Painting SECRETS about WHY ACRYLIC PAINTS are best for layering. If you're a beginner in the world of mixed media art, or just curious about how many crazy types of acrylic paint are out there to help you make a little mixed media MAGIC - today's video is FOR YOU!  One of the biggest questions/complaints I get from my students has to do with using watercolors in mixed media art. They always ask me WHERE in the Hamburger System to put their beloved watercolors, and WHY their watercolors "won't sit still" if they try to put mod podge over them. If you know me, you know I LOVE some special time with my luscious Daniel Smith watercolors, Noodler's Ink, or really ANY watersoluble product I can get my hands on (black stabilo all, anyone?!) The thing about watersoluble art supplies is... they are DESIGNED to move, not stay put - even if they're fully dry. Even something as simple as putting a layer of mod podge OVER watercolors to "seal" them...isn't gonna work. And right here is where I get most of the complaints from my watercolor lovers. I'm a watercolor lover as much as the next girl. But, when it comes to acrylic painting vs watercolor for mixed media layering, acrylic paints win hands down because they DON'T MOVE. They dry to a plastic, nonporous surface. What this means in the world of mixed media is that acrylics are AMAZING for layering (something we do a LOT of as mixed media artists)! Acrylic paints are non-watersoluble, and don't re-activate. That fact alone makes them magical to TONS of artists.  My biggest advice to my watercolor lovers is to ... learn to USE (or love!) ACRYLICS whenever you intend to do lots of layering for your mixed media art!! Don't worry, there are SO many types of acrylic paint out there. I'm actually gonna show you some THIN acrylics that behave kinda like watercolors, so stay with me!! Here's a mixed media art example of a piece I created with some unique layering. AND, I did my collage later at a different point than I normally would if I were using my Hamburger System. 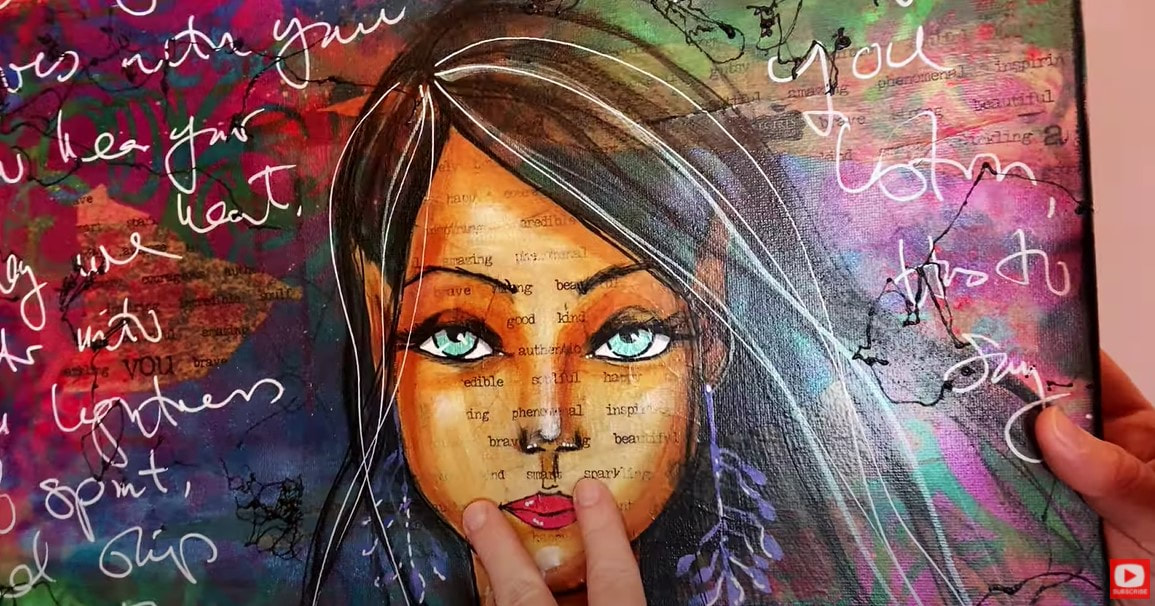 I typically love to start my mixed media art projects with collage. In the above mixed media portrait, I started with a layer of acrylic SPRAY PAINT (super FUN process)! Then I collaged over that, did some more acrylic painting, and collaged over that AGAIN. The reason I could do that is because I was using acrylic paints! Speaking of my Hamburger System, I've got a 1 page cheatsheet of this layering system I can send to you if you like. Simply click the button below, and I'll send it straight to your email!  There are LOTS of options when it comes to the types of acrylic paints on the market. Beginners, listen up, because this will help you understand your mixed media painting supplies SOOO much! Each brand has a range of products you can try, depending on the type of effect you're in the mood for. Additionally, most brands also have a "student" grade (like Liquitex Basics, featured below), if you don't want to spend a fortune on acrylic painting supplies. 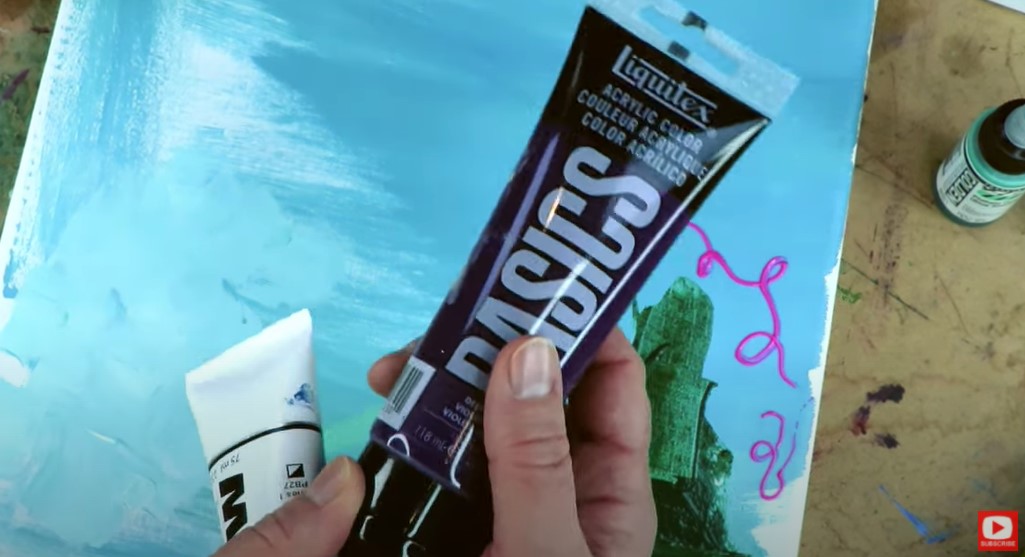 I pulled together a wide variety of options to show you for today's acrylic painting demo so you have an idea of what each one does in case you're interested in trying them! 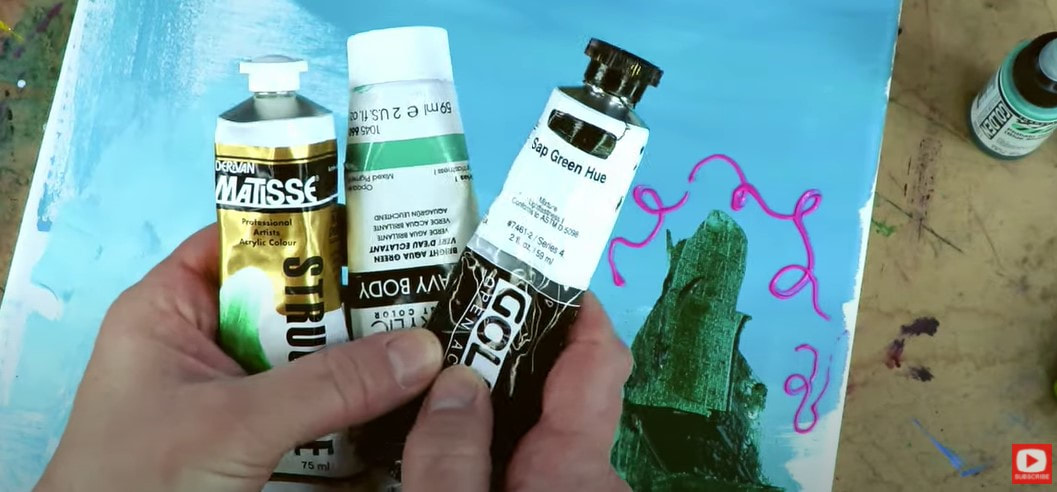 If you like the look of something chunky, you might want to try knife painting, or using a "heavy bodied" acrylic paint. This type of acrylic paint keeps its form, is very thick and opaque. Most heavy body acrylics come in tubes like the ones above. HOWEVER...there are also heavy bodied paints that come in an applicator like the one below! Check out this fun 3D Liner by Sennelier! This is a fine art product (that means it's light fast, and not moving around). It goes on kina like "puffy paints" for adults!! How fun is THAT?! You've gotta see how this works! 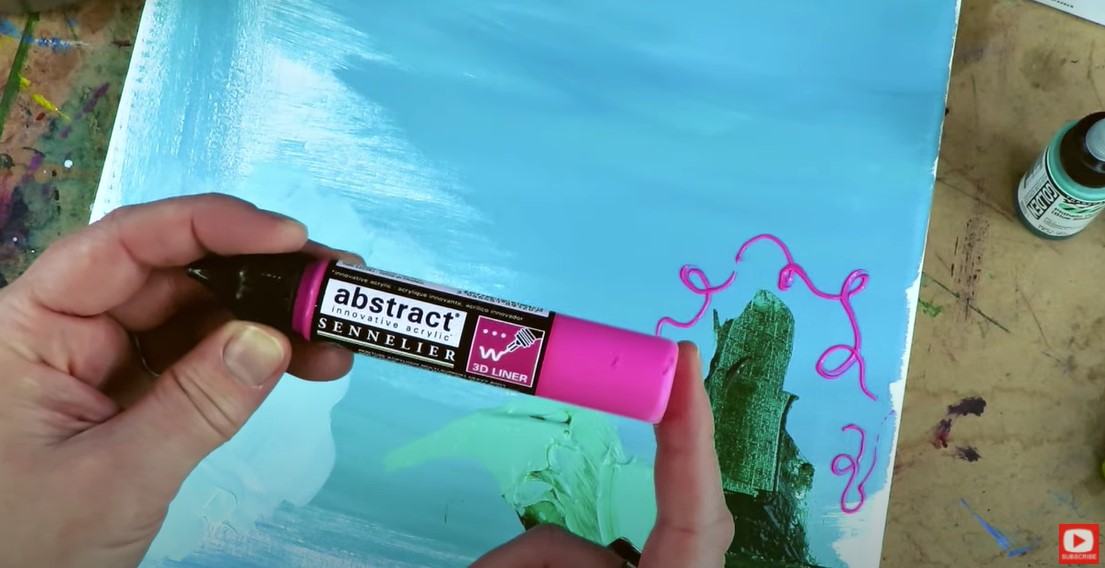 If you're interested in trying a softer bodied acrylic you might be interested in trying a line from Matisse called "Flow." It has a nice consistency to it, but if you're into knife painting, this isn't going to give you the texture you'll find in a heavy body acrylic. Not only do the consistencies of acrylic paints vary, but their sheen will as well. Take a look at these GORGEOUS iridescents by Arteza!! 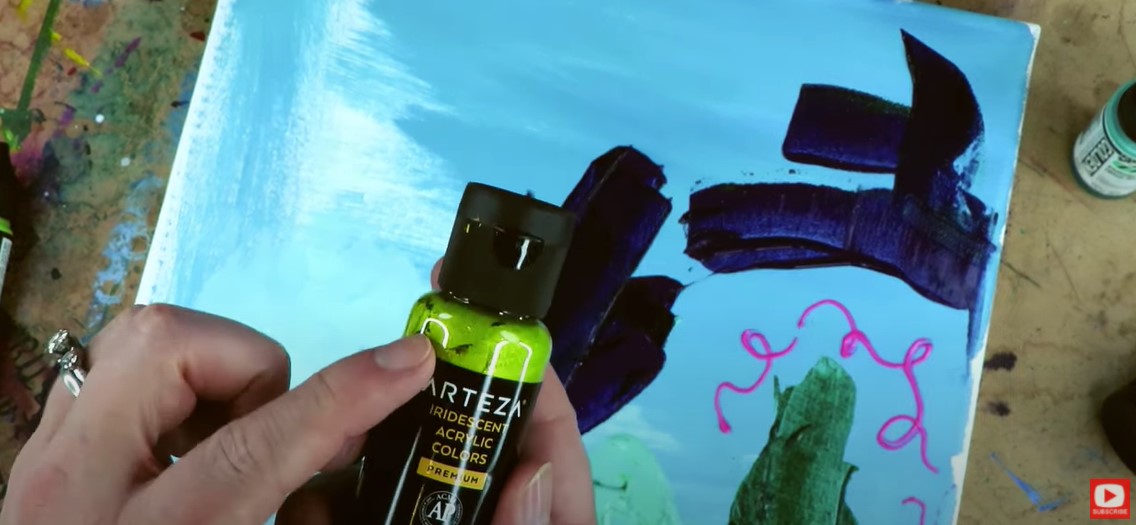 While you definitely can add acrylic painting mediums to your paints to get results like this, I tend to be in the kinda girl who wants to grab a bottle, know what to expect from it, and go!! This is just pure fun. I mean, look at that GREEN!! 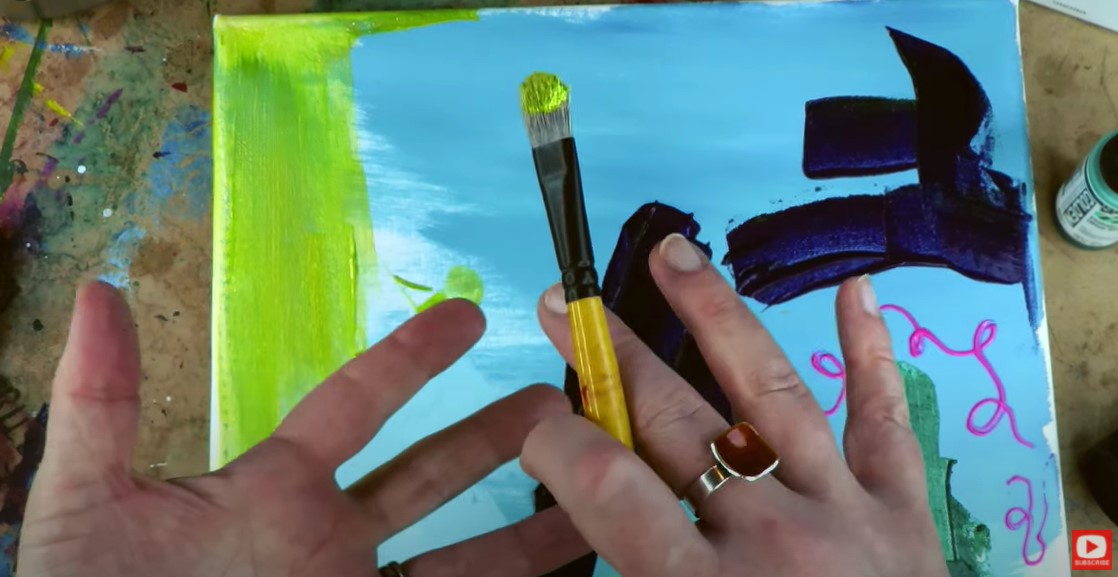 In addition to soft bodied acrylics, there are fluid or "high flow" acrylics. These are heading into the direction of a consistency similar to watercolors, and where my watercolor lovers need to listen up! If you are one of the peeps adding water to your acrylic paints to get a thinner consistency out of them, please stop :) I say this with LOVE. Adding water will alter the chemical makeup of your acrylics. For the most part, it's just going to dilute your colors so they won't be as vibrant as they would be in their natural state...right out of the tube. You may not know this, but I don't even wet my paintbrushes prior to using my acrylics. Speaking of acrylic paintbrushes, if you need help understanding what paintbrushs to use, you'll want to check out this video. There are TONS of variations out there, so this will help to set you on the right path. 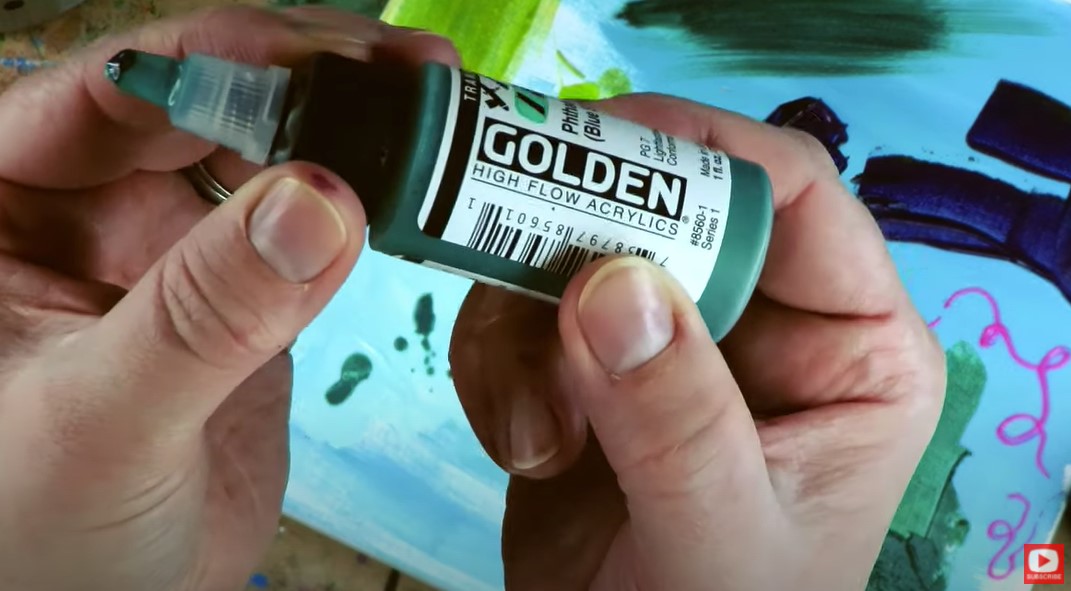 Golden makes a great line of fluid acrylics and even has some awesome transparent acrylics if you enjoy the look of a thinner wash. If you are interested in creating an effect similar to watercolors, but using acrylics- I recommend reaching for "high flow acrylics." If you're in the mood for something EVEN "drippier," you have to try Liquitex acrylic inks! Make sure you click over to watch this video so you can SEE the drips!!! SERIOUSLY soooo fun!! 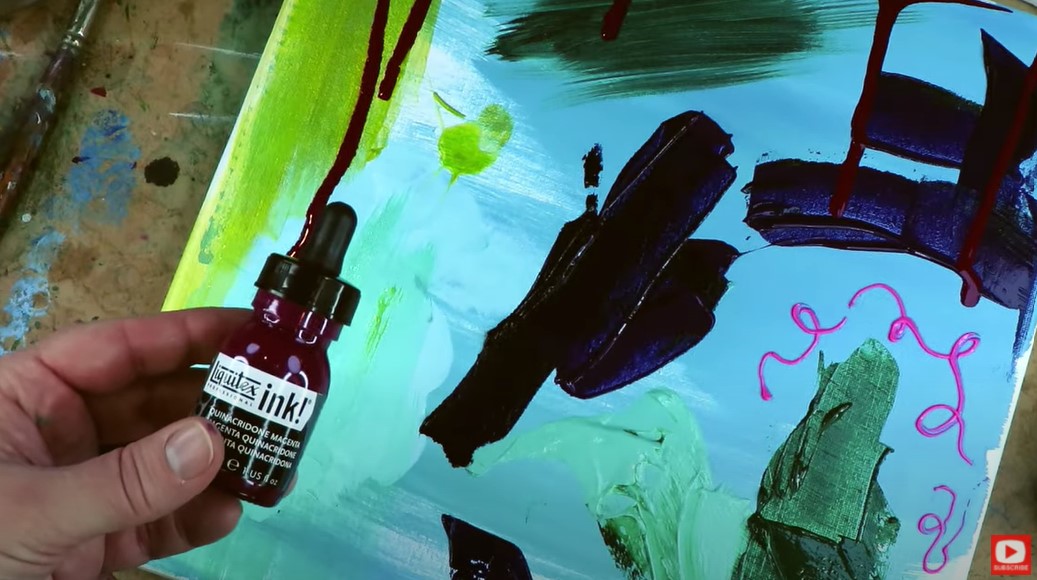 Liquitex even put their professional, artist grade ink into some GIANT markers for us to play with (see below). 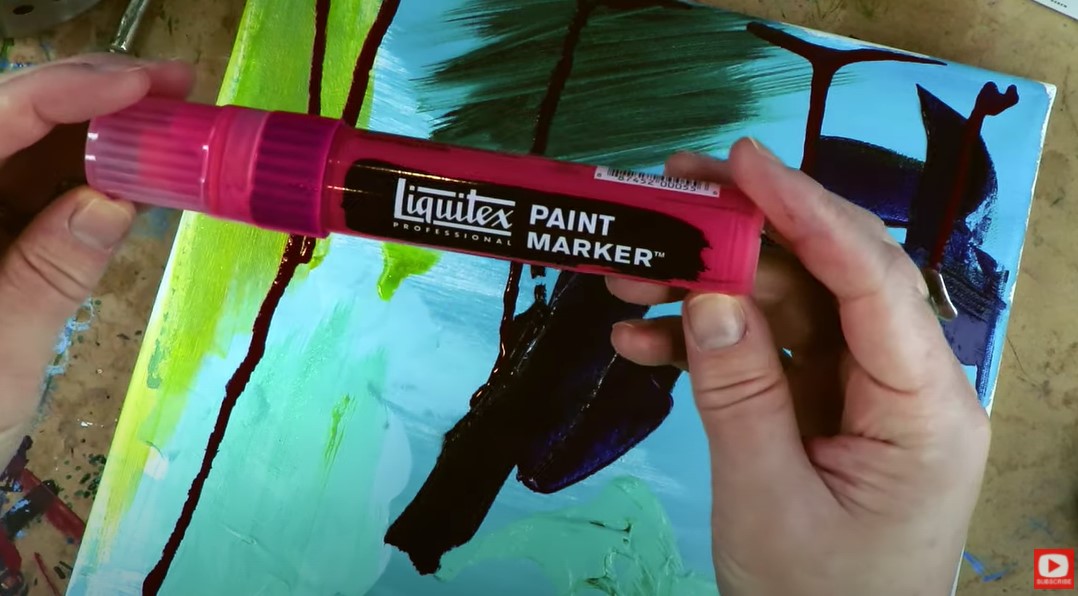 Who doesn't want a ginormous, hot pink marker FULL of paint?! These can help you make some quick splatters with zero effort. 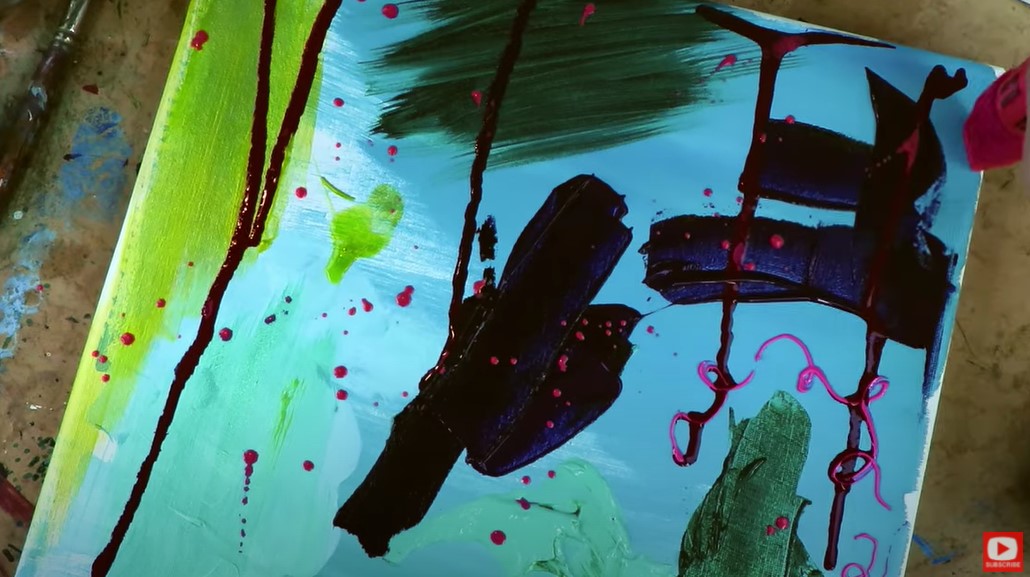 Another fun acrylic product to try is called acrylic gouache. This is super matte when dry, and very flat. Gouache actually comes in different forms, and may be something you've tried if you're into watercolor or have done any classes with my favorite Scottish bud, Lucy Brydon. Liquitex has an awesome, artist grade acrylic gouache that is light fast and has a fun applicator tip you can play with. 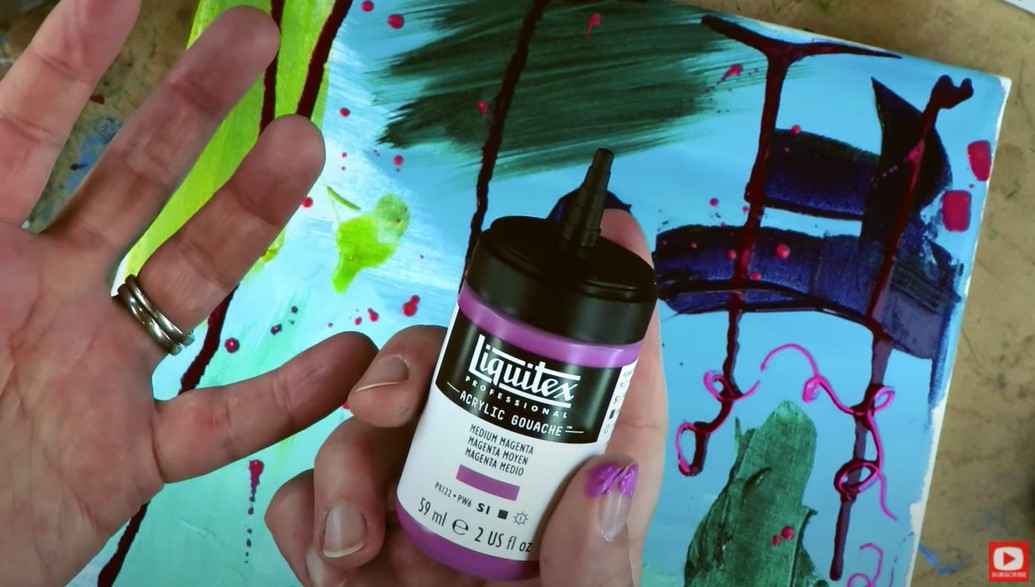 While you absolutely can go out and buy a collection of ALL these acrylic painting supplies, you DON'T have to, because acrylic paints have a HUGE collection of mediums that were made just for this purpose - to change the properties of acrylic paints!! How cool is that?!  There are literally DOZENS of acrylic painting mediums you can try. The ones I pulled to show you are a handful of my favorites. Sometimes there is a ratio of how much medium should be added to how much acrylic paint, so be sure you read the instructions on the side of your bottle to get the best effects. 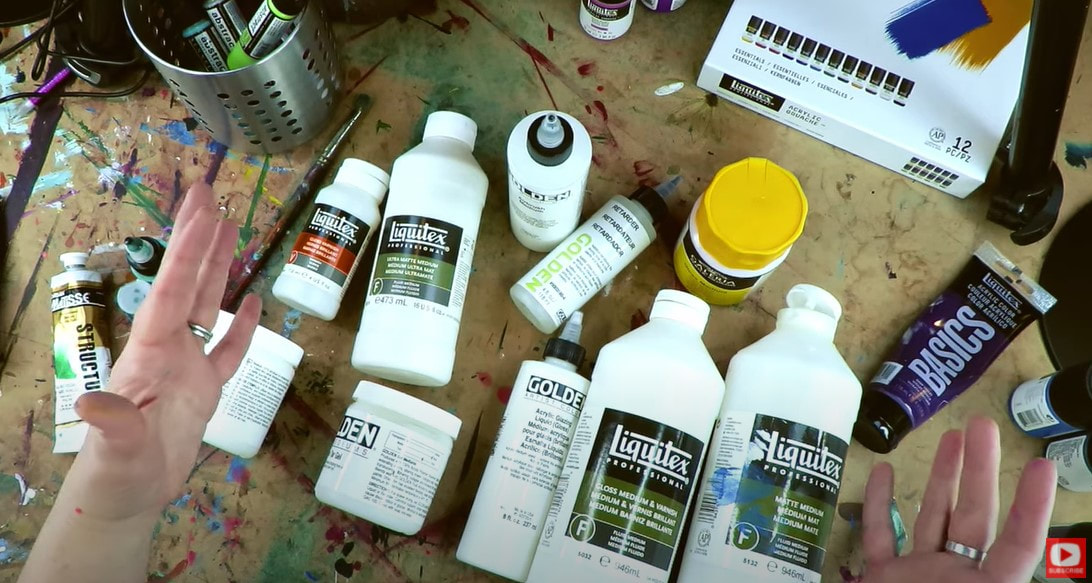 If you're interested in the flat look of gouache, you might want to try Ultra Matte Medium by Liquitex. If you watch my mixed media YouTube channel, you know I use matte medium all the time as an adhesive for my collage pieces, but it can also tone down the glossiness of your acrylic paints. 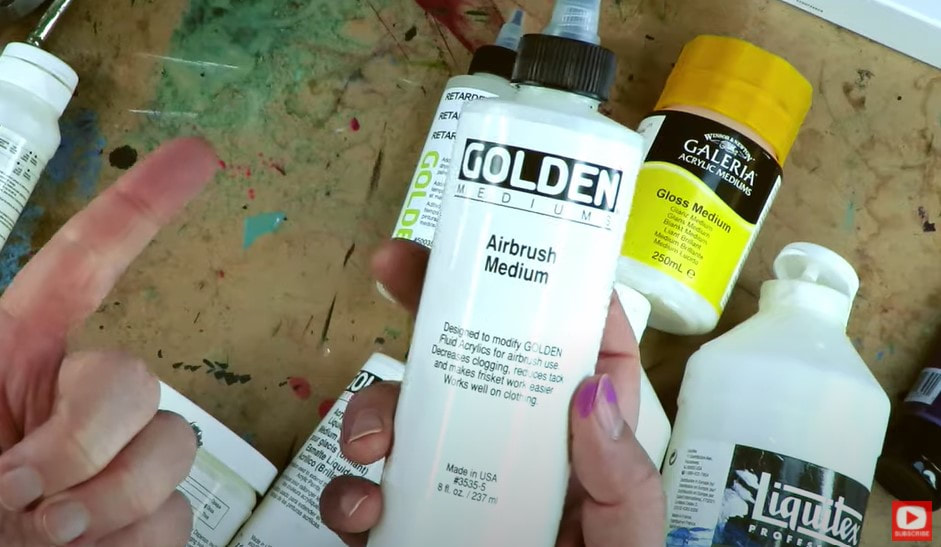 If you want to try thinning your acrylics, Golden makes a great airbrush medium that will thin your acrylic paints without diluting the pigment of your color! So if you're one of my friends who reaches for water to thin your paints...stop! PLEASE use this instead!!  If you want your acrylics to behave more like oils, you can lengthen the drying time by adding a retarder. 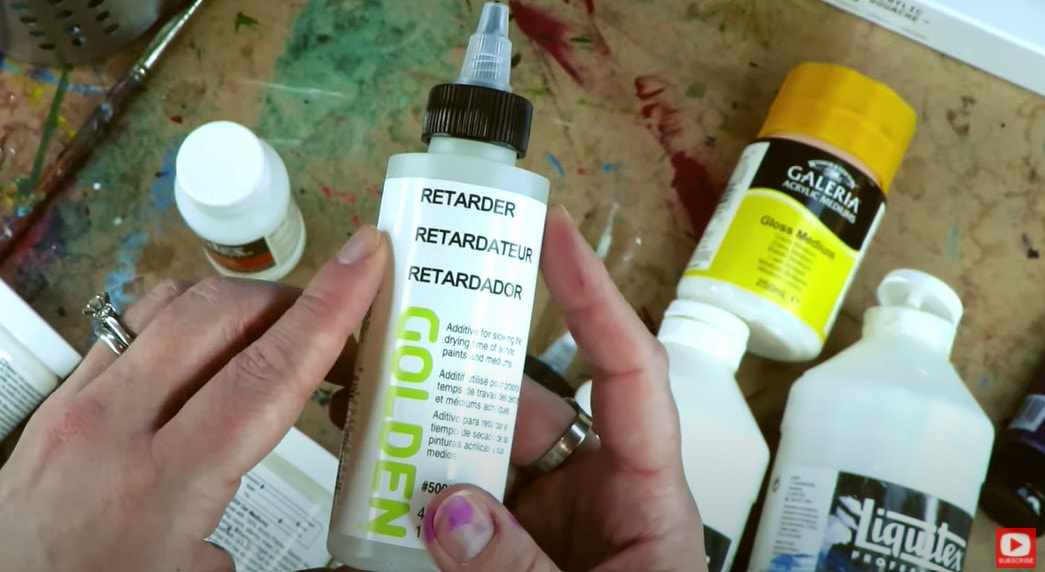 If you want to get drizzly with your paint while playing with textures, you can add Clear Tar Gel by Golden to your acrylics! 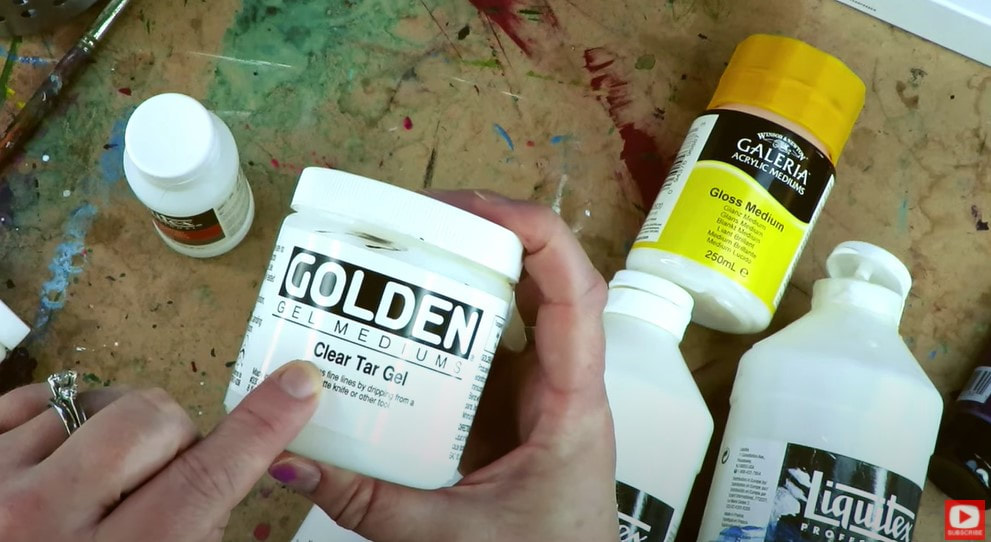 PHEW!! That's a LOT of products!! Of course there are more, but this is a helpful foundation of acrylic painting basics and will DEFINITELY get ya started. Make sure you click over to actually WATCH this video because it helps to see what each product actually does on canvas! Are you in the mood to do some acrylic painting now?! I thougt so!! If you need a simple acrylic painting tutorial for beginners, this one is FREE, super cute and FUN!  Interested in doing some acrylic painting at home, or looking for acrylic painting online classes? This one is perfect for beginners if you're ready to step up your game!!
Thanks SO much for hanging out with me today!! I hope you have a wonderful week!!! ❤️Want FREE, immediate access to my Fun Fab Drawing Club and/or Mixed Media Society plus discounts on all my art books, sneak peek at YouTube videos and new book content, behind-the-scenes fun and MORE? Join me over on Patreon today and get HUGE PERKS in return for a small monthly donation. ❤️ CHECK OUT ALL my art books on AMAZON (available in both Kindle and Paperback) ❤️ SIGNED COPIES of my art books on ETSY ❤️ MY FAVORITE ART SUPPLIES on AMAZON ❤️ MY BELOVED FACEBOOK GROUP ❤️ FOLLOW ME ON INSTAGRAM ❤️ FOLLOW ME ON FACEBOOK
Gesso vs Absorbent ground? Which one would you reach for if you're in the mood to do a little watercoloring in your mixed media art journal and feel the need to prep the surface first? Today I'm doing a little experiment in my own art journal so you don't have to! We'll compare how watercolor on gesso looks on an art journal page vs. how watercolor looks on a page prepped with golden absorbent ground!

If you've never started an art journal on your own before (GASP!!!) You're missing out on SO MUCH FUN!!
SO many people think about trying something like art journaling and never follow through with it. A lot of them get intimidated by that big empty white page, or ALL the empty white pages in a journal. If you're one of these people - this is so common. I can help you to get over that hurdle so you can start having FUN with art!! Click the button below to get my FREE pdf to give you the KICK IN THE PANTS you need to start art journaling ;) It's filled with tons of tips and advice from not only me, but one of my artsy idols - Bob Ross! We'll have you "breaking the blank page" and creating in no time!!!
Before we continue, super quick announcement: If you're in the market for new art supplies, or curious what I'm using, supply links are included below. All product links are Affiliate. I may earn a small commission if you choose to order through these links but by law there is never any additional cost to the consumer for doing so. I thank you for your support!

I love Liquitex gesso for my mixed media work, so that is what I'll be using for today's little experiment. Because gesso is specifically MADE for acrylic paints, it preps any surface you want to work on for acrylic paints. I also love to use white gesso as a replacement for white acrylic paint when I'm creating my mixed media portraits because it's more transparent than your typical white acrylic paint, and I love the way that looks when I'm doing mixed media art - especially if there is a collage in the background! For the purpose of today's demo, I'm testing how gesso works with watercolor so you don't have to!! I've decided to start these art journal pages off with a bit of simple collage in the background. Colorful, patterned napkins are one of my go-tos for collage art. I find they're easier to work with if you pull the layers apart so you're only working with one ply. If you're curious about how to do wrinkle free mixed media collage backgrounds with paper napkins, I recently did a YouTube tutorial on that- so be sure to check it out if you missed it and simply hate those wrinkles!! 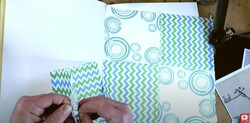
I almost always use matte medium as my collage adhesive whether I'm working in my mixed media art journal or on canvas. If you'd like to know more about WHY matte medium is typically what I reach for, check out this mixed media art tutorial on my YouTube channel for the side by side comparison of matte medium vs mod podge.
Today I'm working in one of my Strathmore watercolor art journal because I absolutely LOVE this for mixed media art journaling. I also love to work big, so I buy the 11" x 14" version. It's filled with 140 pound cold press (cold press paper has texture to it - it's not smooth) watercolor paper. If you're art-ing along with me (and I hope you do!!!)- be sure to take care when selecting your paper, journals, or whatever substrate you choose to work on. It's EQUALLY important as the art supplies you are using. 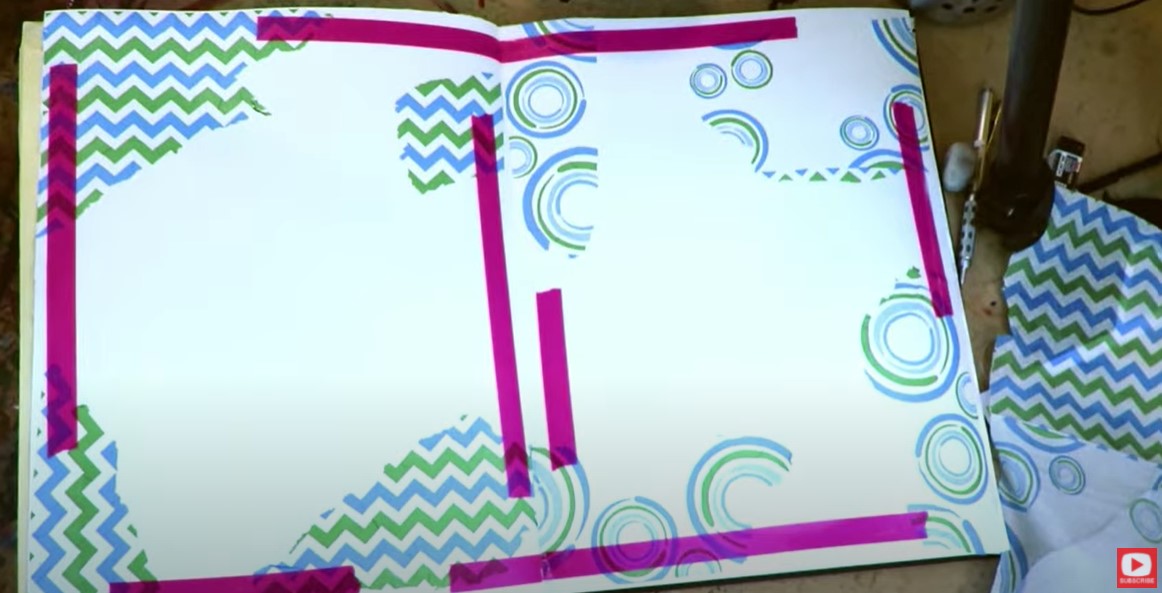
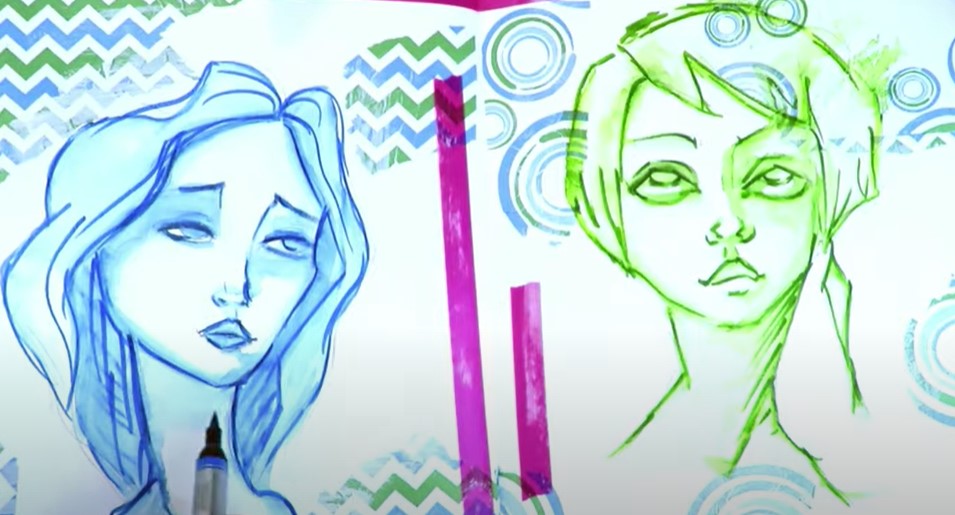
I felt like these collage pages needed some bright color so added some hot pink washi tape then got right to it - covering the middle of my left side journal page with gesso, and the right side with absorbent ground.
I feel like a lot of mixed media artists skip over absorbent ground all together, so I want to make sure you know what it does and how to use it if you enjoy watersoluble art supplies. 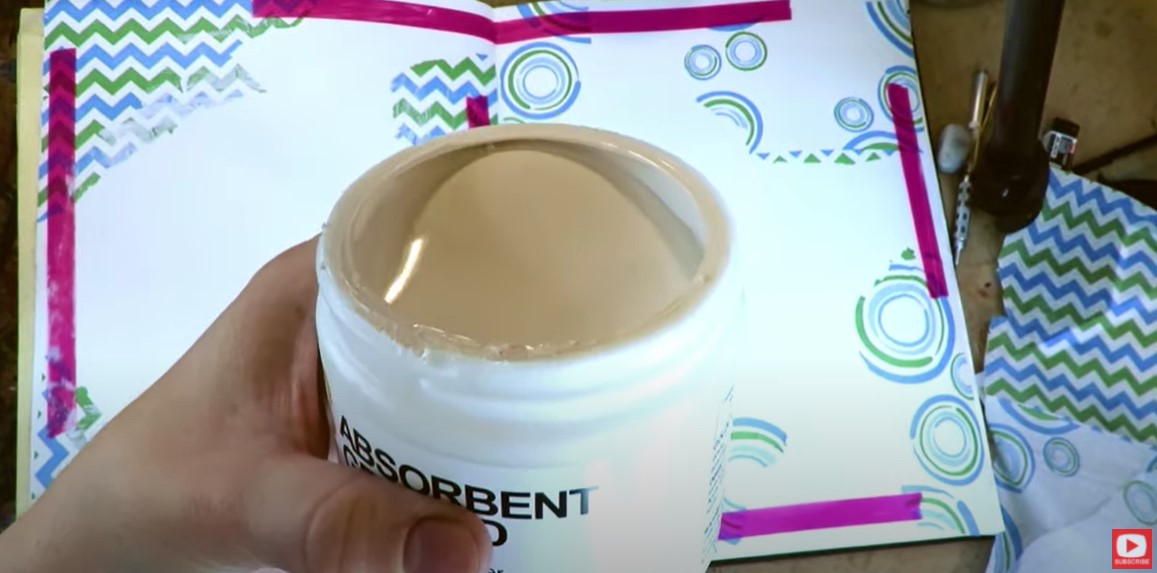
Golden's absorbent ground has basically the same consistency as Liquitex Gesso, and has the same level of transparency to it - which I love, because I enjoy a little collage art peaking through the face of whatever mixed media girl I'm painting into the foreground of my art journal pages!
Just so you know, absorbent ground can be added to basically ANY surface that normally wouldn't "play nicely" with watersoluble supplies (even wood!). It's especially awesome if you like to upcycle old books into altered book art journals and enjoy watercoloring! Typically I will do two coats of absorbent ground to keep the coverage fairly light and transparent. When I'm using gesso, I typically do one coat for the same reason. Acrylic paint dries itself into a plastic so it doesn't need heavy priming. Watercolors need a little more baby-ing. I hit both pages with my hair dryer to dry them. Once dry, I can feel right away with my hands how much smoother the right side page of my paper is because of the Absorbent Ground. The gesso on the left side really kind of preserves the original texture of my cold press paper, while the absorbent ground minimizes the texture and makes it feel more like hot press watercolor paper. 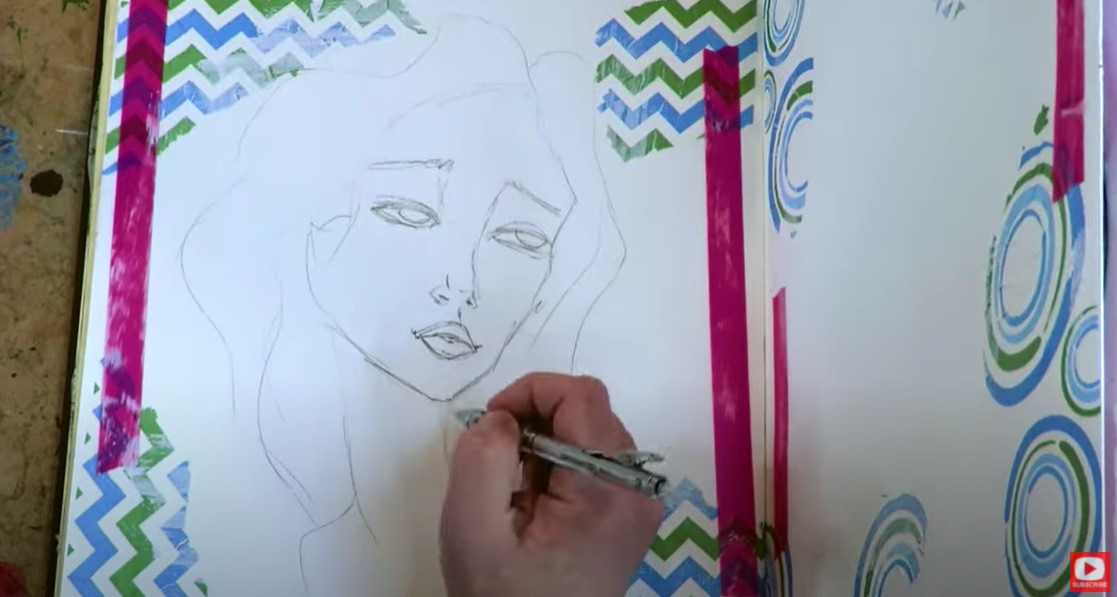
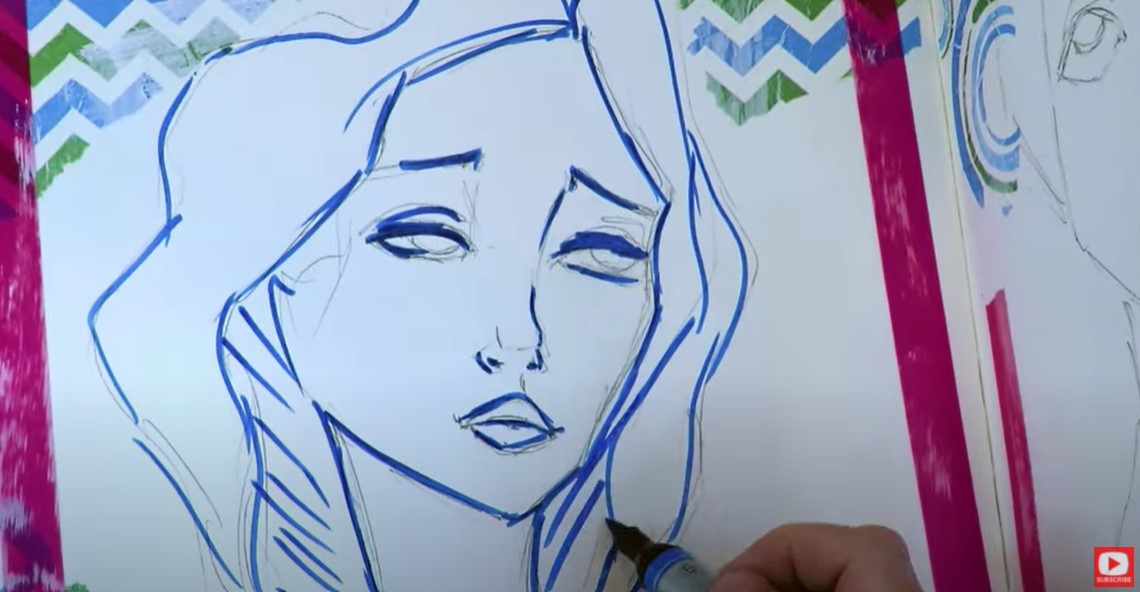
I sketched a simple face on both pages in pencil, and doodled on top of that with my watercolor markers.
When I start brushing some water onto the gesso side of my paper to activate the watercolor marker lines (see below - it's the side in blue), I can still see some of the texture from the paper poking through underneath it. Both the paint and any water I add stay very much on the surface due to the gesso. It blocks the paper from absorbing the color or the water, so the paint just pools on top. My brush can move the pools around, but the paper can't absorb it, which isn't a desirable effect to me.
It's not "wrong" in any way- it's just not how I prefer to work with these supplies, so let's test out the absorbent ground page to see how things go over there... 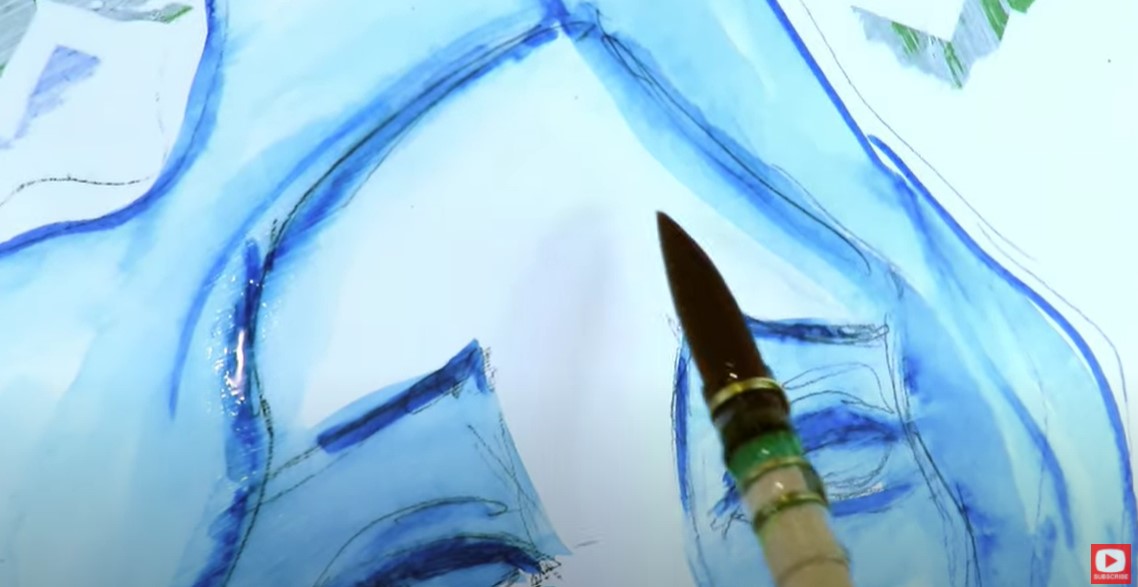
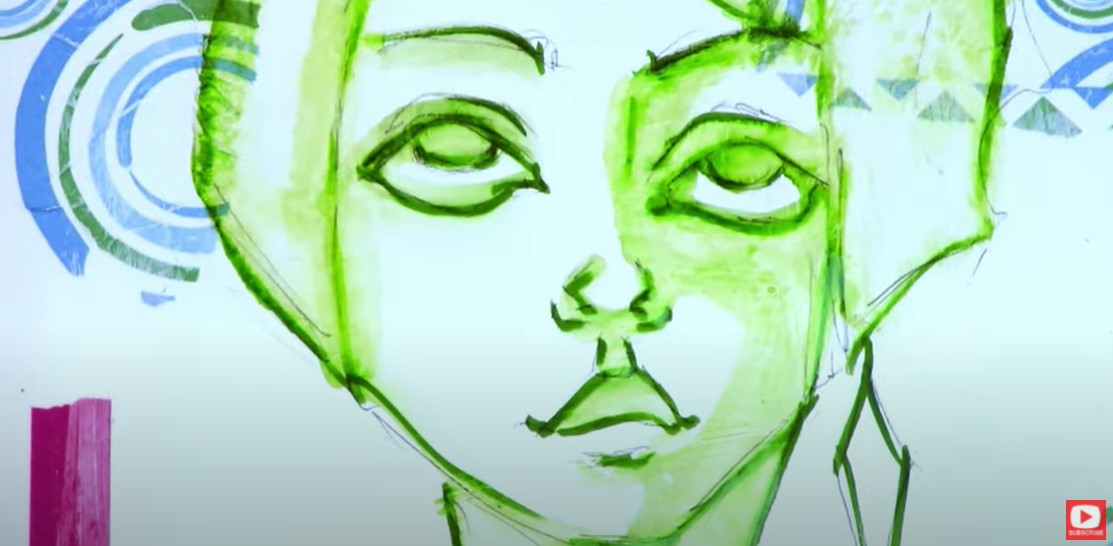
On the absorbent ground side (in green, below), when I activate my lines with water, there is definitely less pooling of paint and water. You can see this for sure when I attempt to soften a "hard edge" by reactivating a line that had started to dry. The surface feels a bit more predictable to work on with watercolor and is much easier to blend on - both of which, I really like and prefer.
These effects may not matter to you, but if you are someone who likes to go back in and blend lines out, touch things up, etc., absorbent ground is really gonna be your friend. It allows watersoluble mediums (any art supply you can activate with water) to really behave as they typically would on watercolor paper.
It's funny - I posted a sneak peek of this project early over on Instagram and a ton of followers - even my professional artist friends - actually asked me about the markers I was using! In case you're interested too - they're watercolor markers by Faber Castell, and I just love them! They are a bit more expensive because they are a fine art product, but they're worth it in my book, and they won't fade over time because they're light fast.
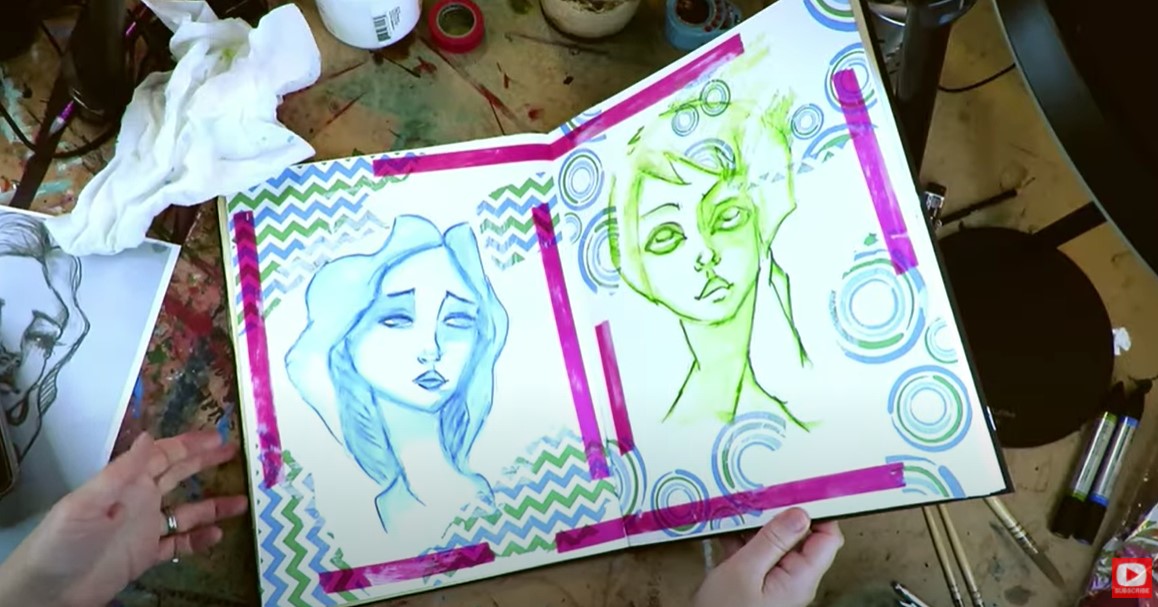
These two are in what I lovingly refer to as "the ugly phase" (above!), which means they're about half way done, and not looking nearly as beautiful as they will if I keep on layering my supplies and pushing through till the end!
After a few more layers with the watercolor markers, I decide to go in and doodle on top of my girls with pen because I LOVE the way pen looks on top of watercolor! 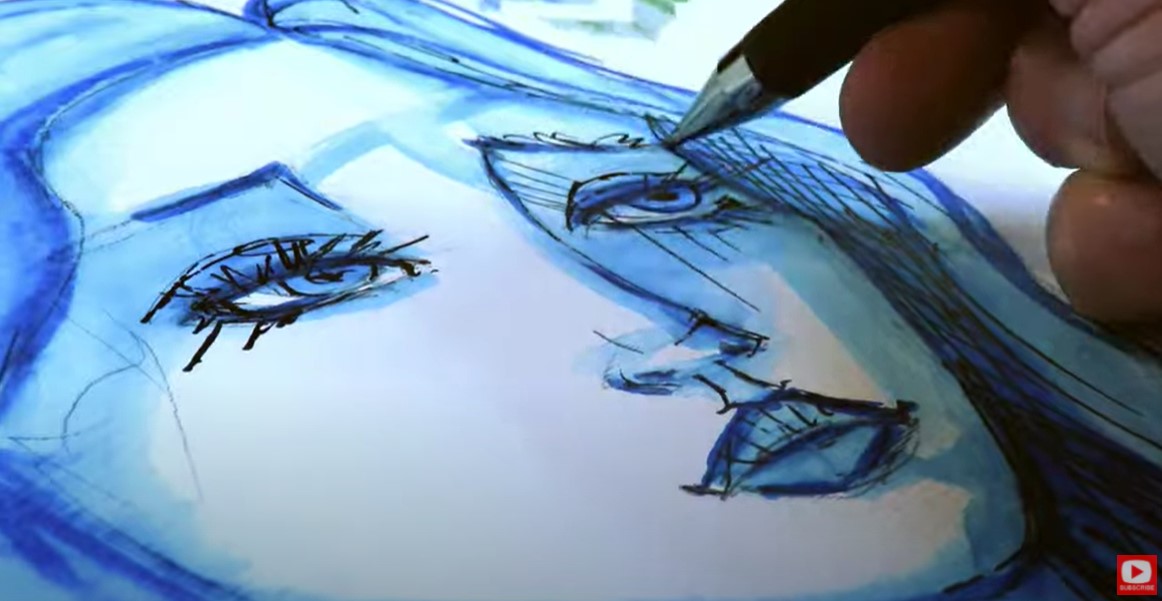
Make sure you actually watch the video for today's demo to see for yourself what I experienced. I'm a big fan of learning about how an art supply behaves and using it in that way so I don't just make a mess!
LOVE MIXED MEDIA & ART JOURNALING? Learn more about the Mixed Media Society and join the waitlist to get notified when I'm open for enrollment! ❤️ CHECK OUT ALL my art books on AMAZON ❤️ MY FAVORITE ART SUPPLIES on AMAZON ❤️ MY BELOVED FACEBOOK GROUP ❤️ FOLLOW ME ON INSTAGRAM |
Karen CampbellFounder of Awesome Art School. Mixed Media Artist. Author of 18 Instructional Art Books! 
   
 Archives
April 2024
Categories
All
|
 RSS Feed

"Karen is flipping hilarious and she's very real...I like the way she teaches in a way that really gives you confidence, whether you're a beginner or advanced there's always something new to learn!"
- Elizabeth W. |
What Fans Are SayingKaren, you are absolutely fabulous! You make me feel like I can draw anything. I have recently retired and finally have the time to do some of the art that I have loved since I was in school. I am really at the beginning of my art journey and I hope to learn as much as I can. Thank you for all you do. |
Contact ME |