
|
*All product links are affiliate & for U.S. residents only.*
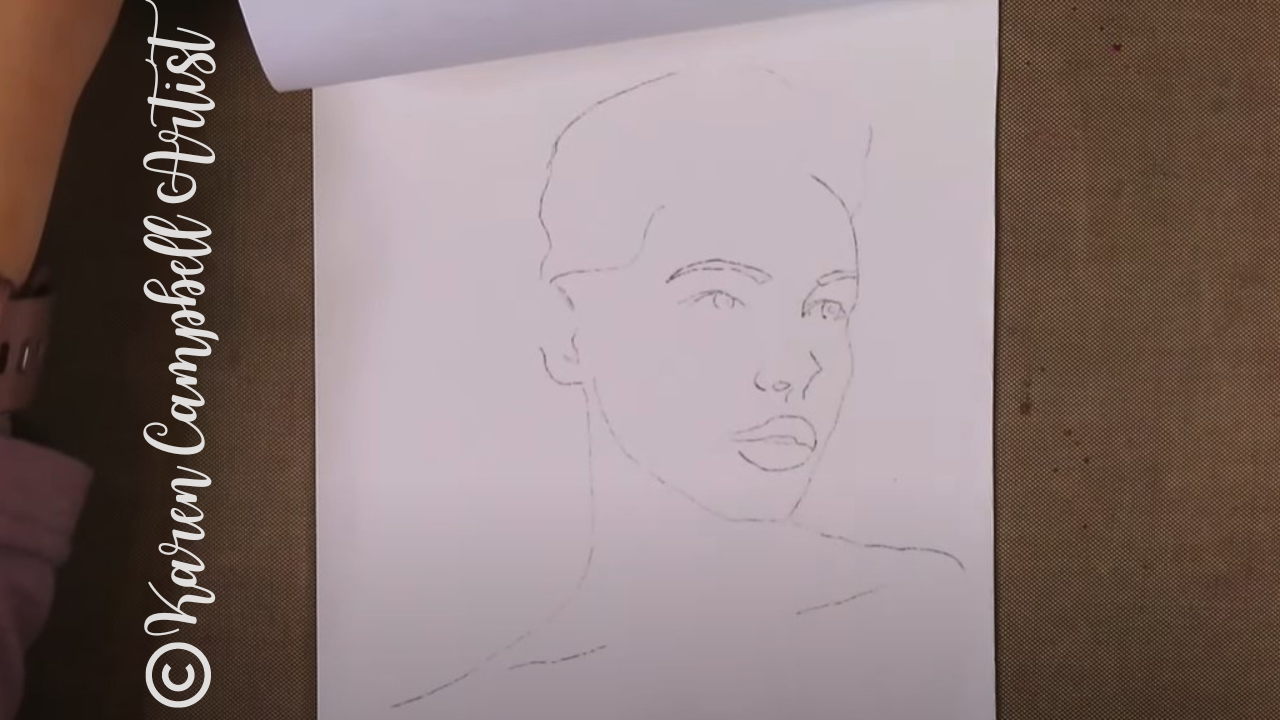
Hey there, creative soul! If you love drawing semi-realistic faces as much as I do, or have been looking for the PERFECT face drawing tutorial for beginners, you're in the right place!!
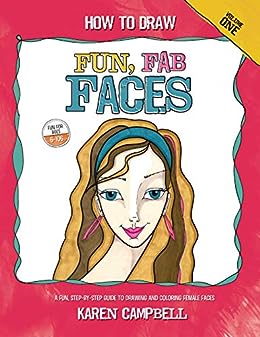
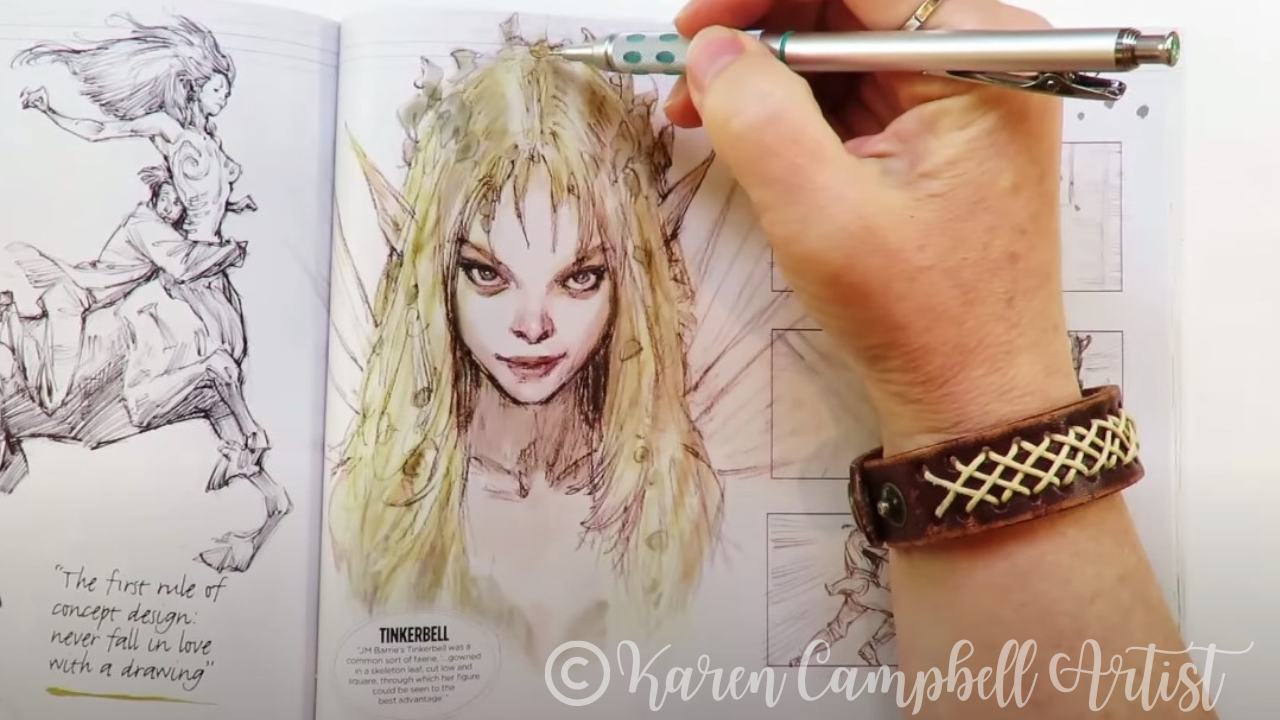
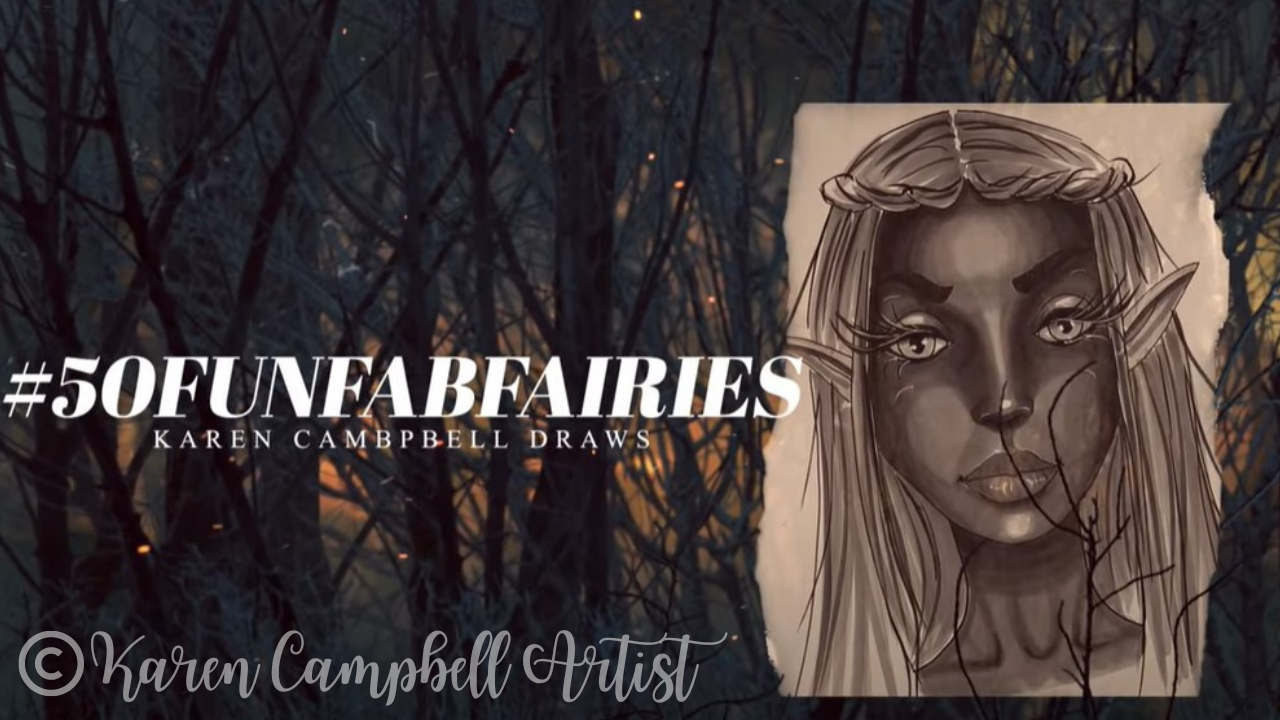
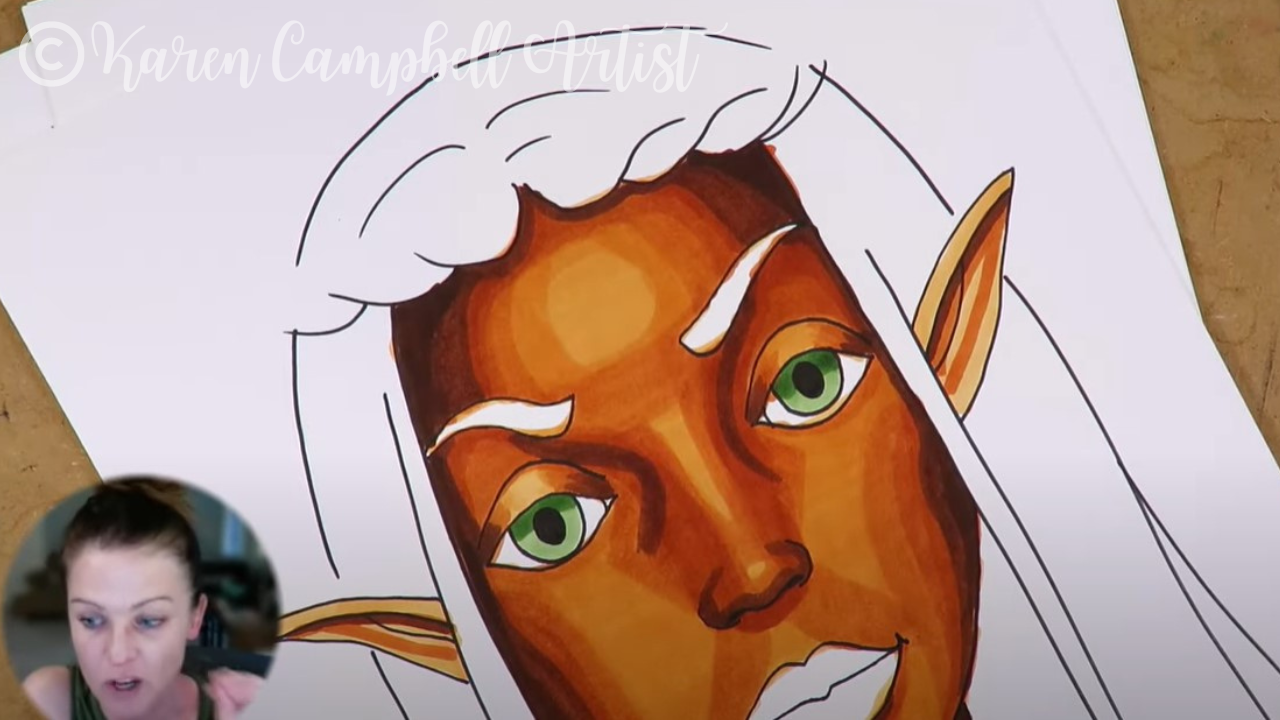
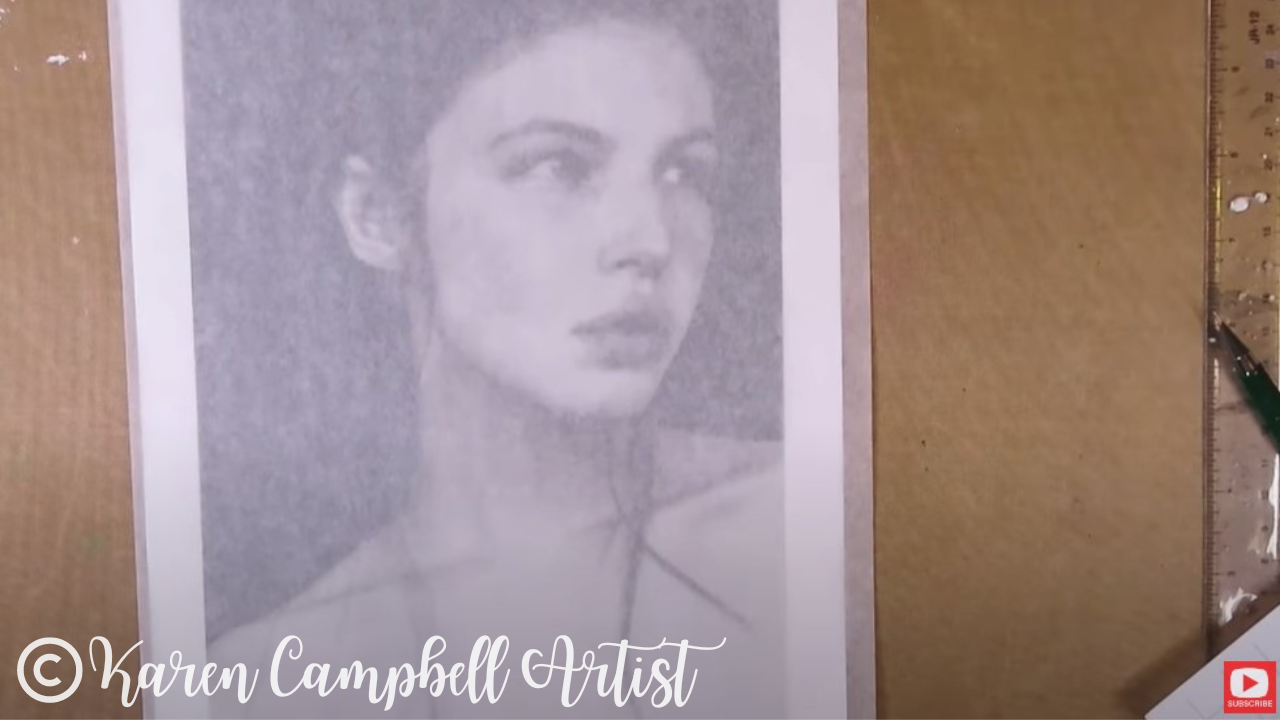
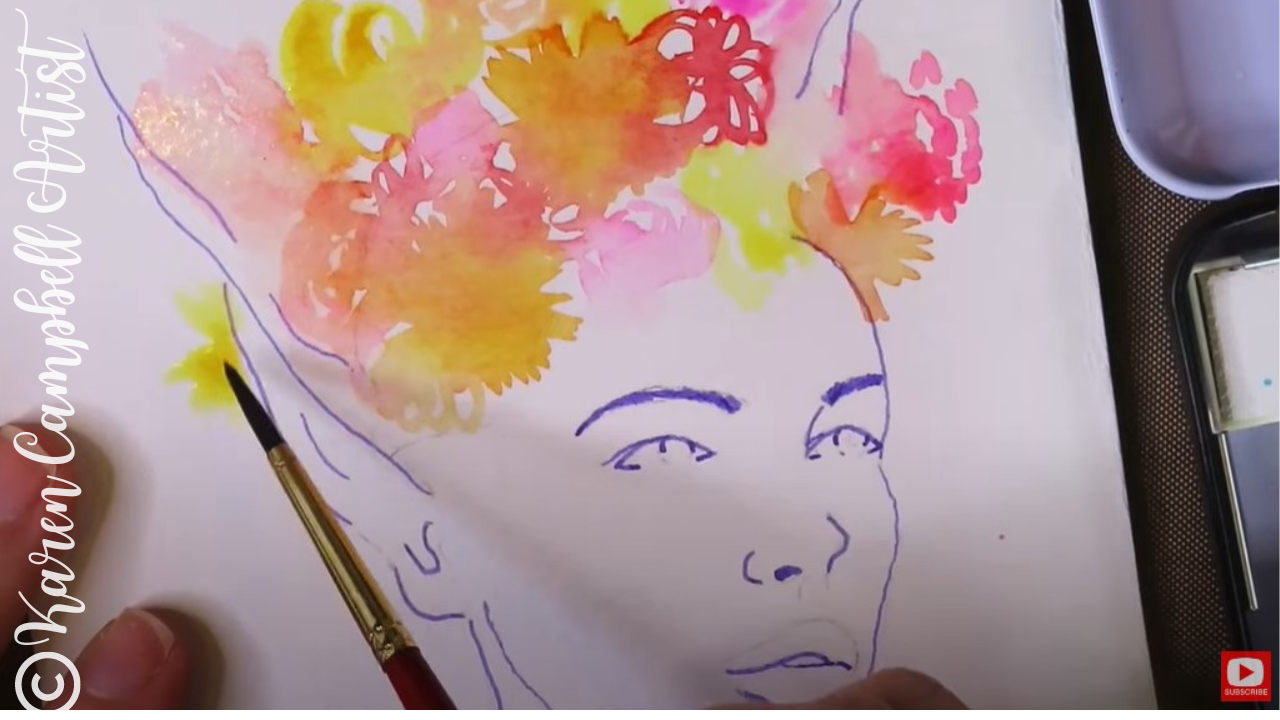
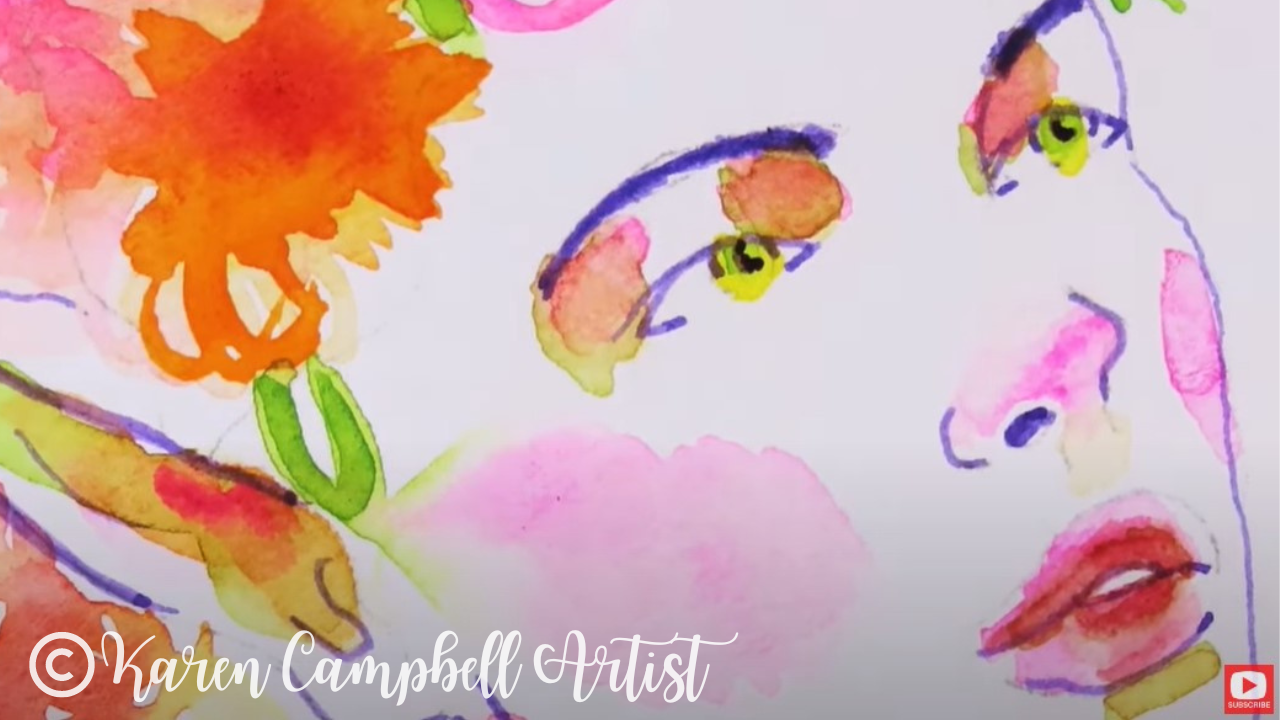
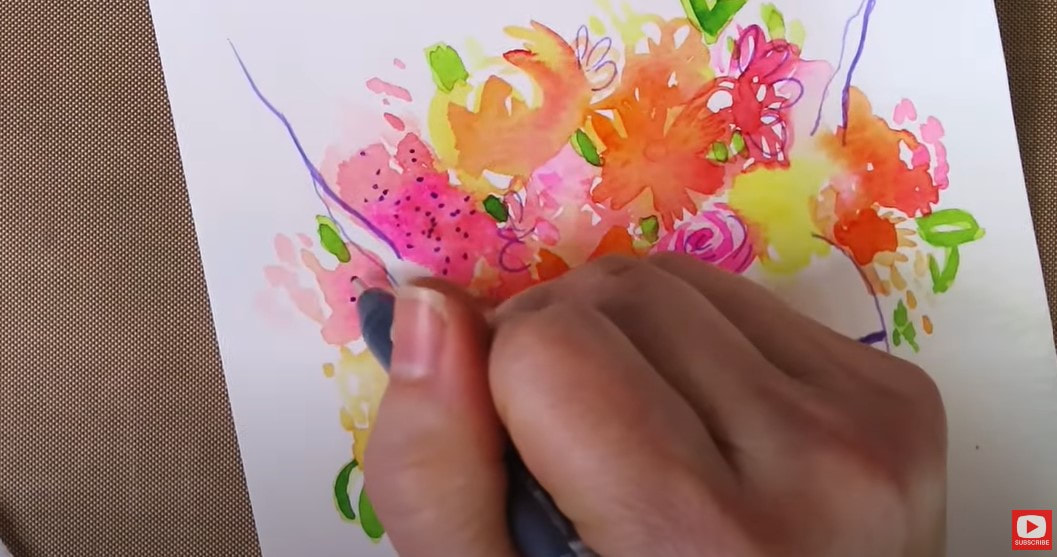
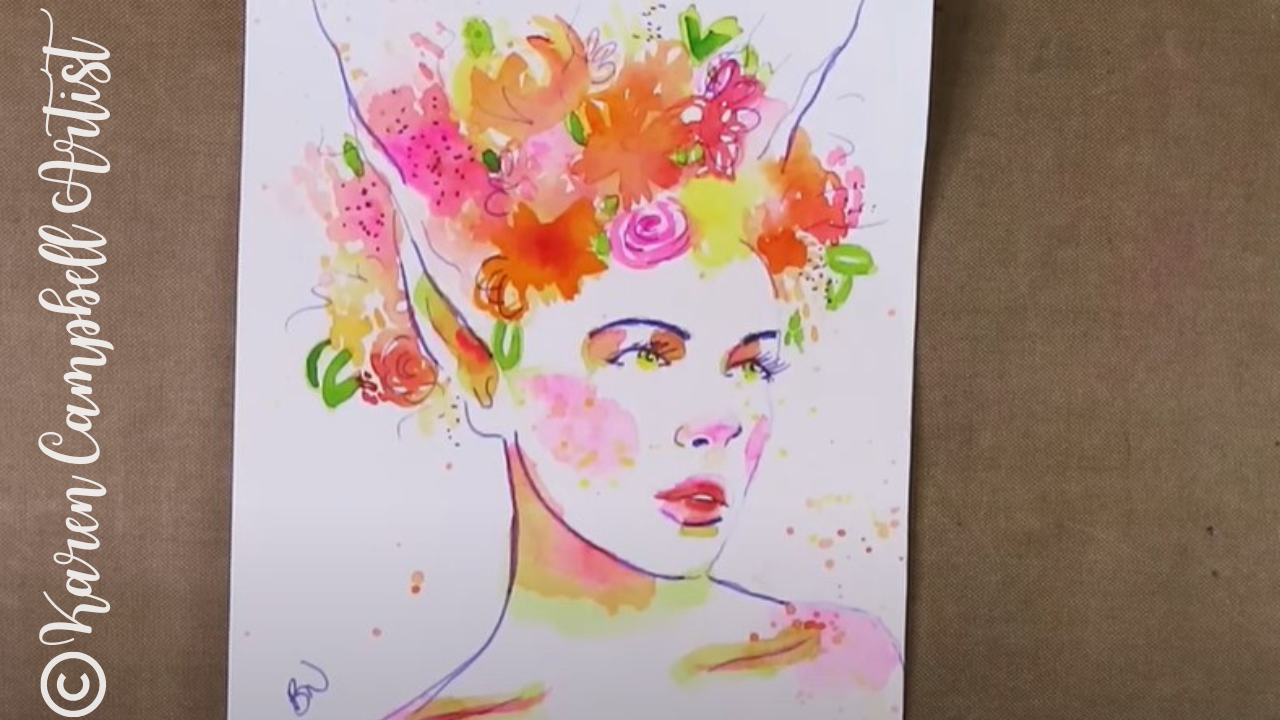
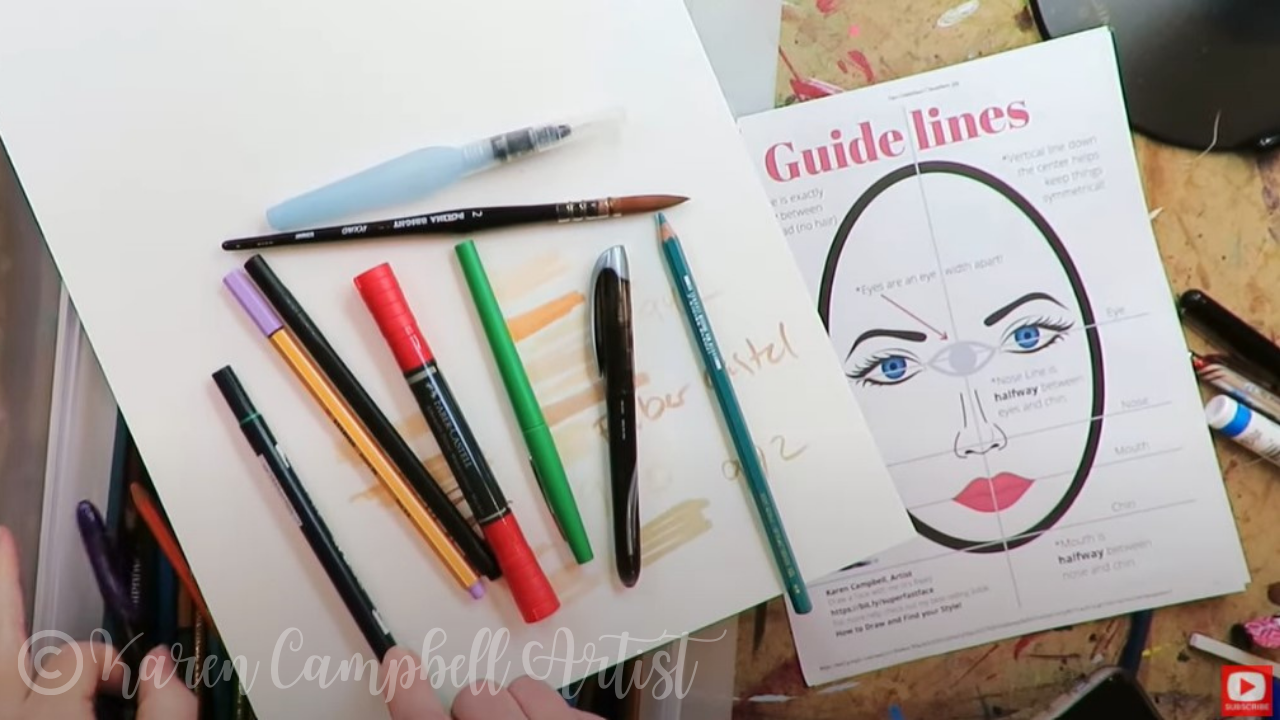
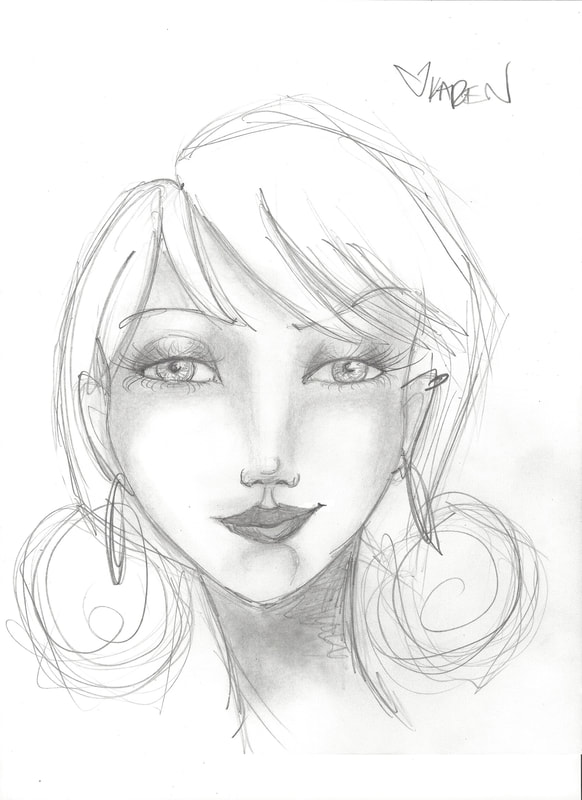
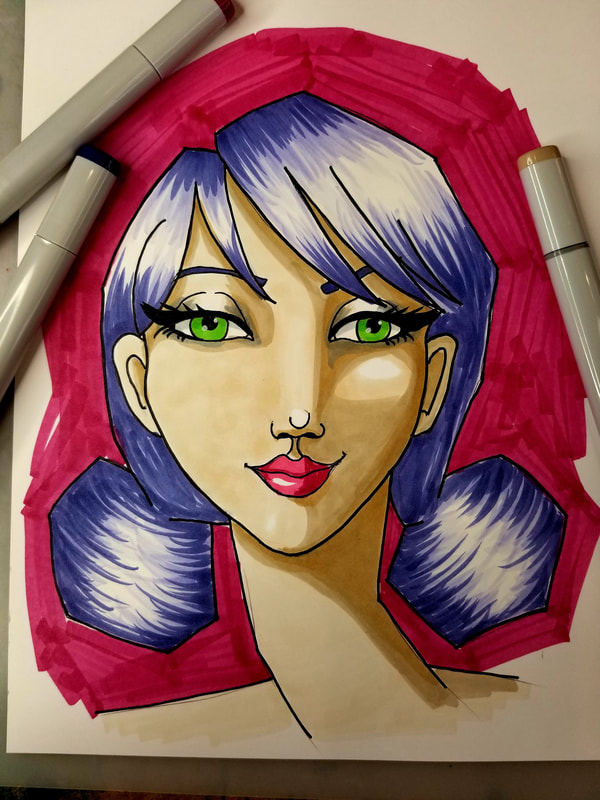
Today we're drawing another cutie in my signature "Fun, Fab style" from my very first published book, How to Draw Fun Fab Faces. In this QUICK & EASY face drawing tutorial, I'll take you step-by-step through my process of drawing a simple face in pencil using my whimsical face drawing guidelines. Last week, we did a similar drawing and colored her in with greyscale alcohol markers over on my Mixed Media YouTube channel. This time, we'll do our shading in COLOR using Tombow Markers and water. Grab the closest pencil and a sheet of watercolor paper (if you wanna color along using Tombows and water later). 
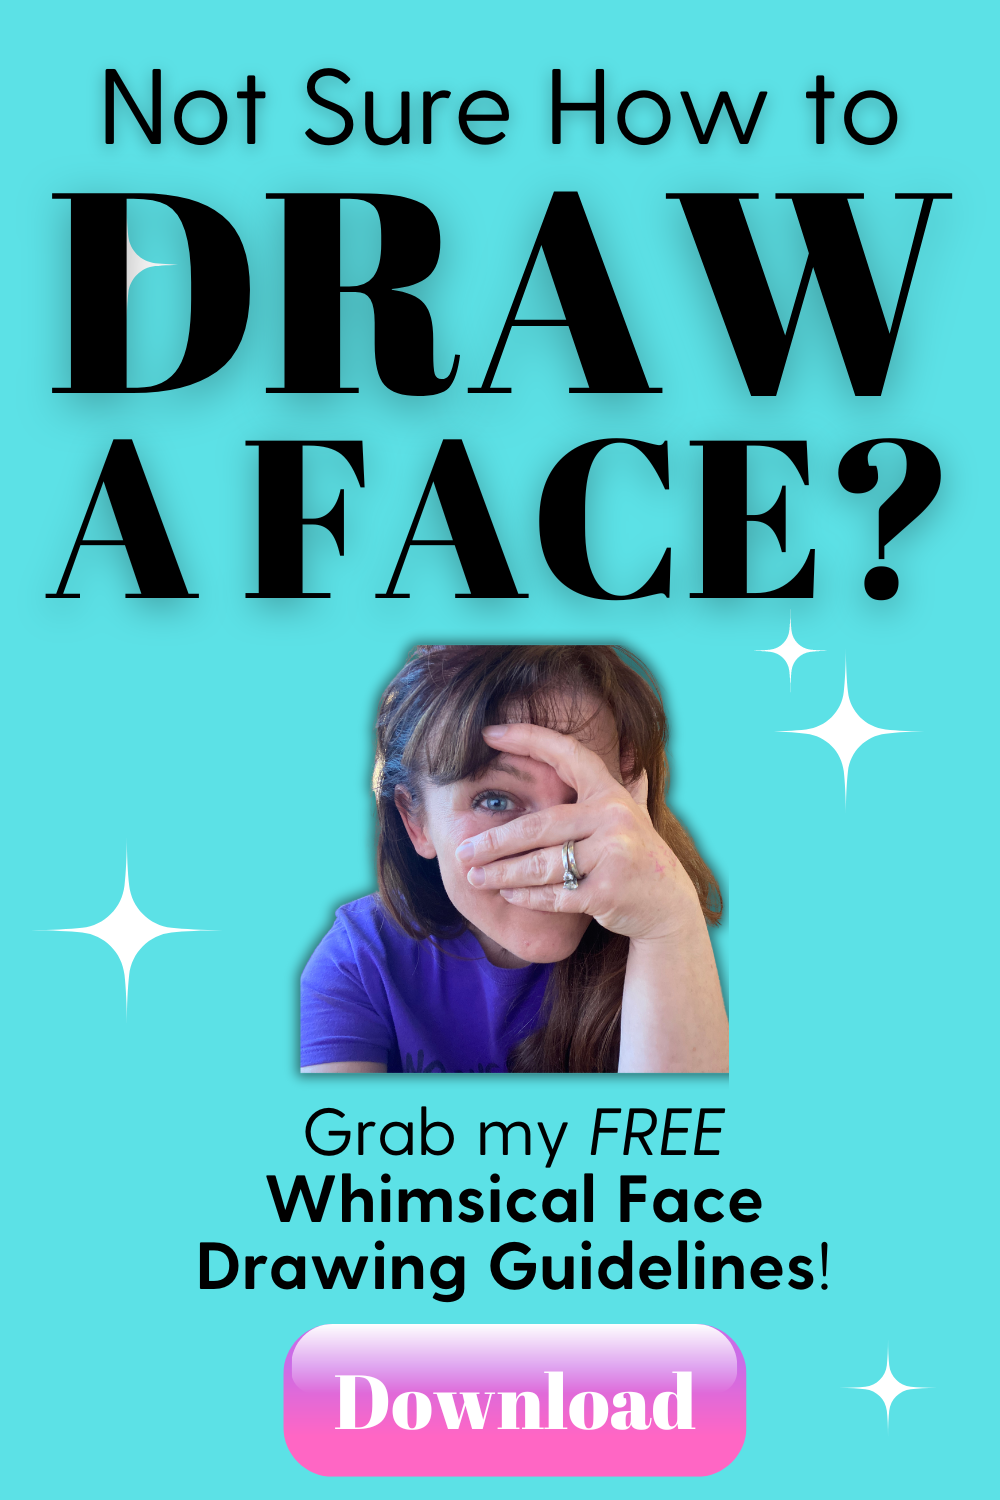
Need My FREE Face Drawing Guidelines?
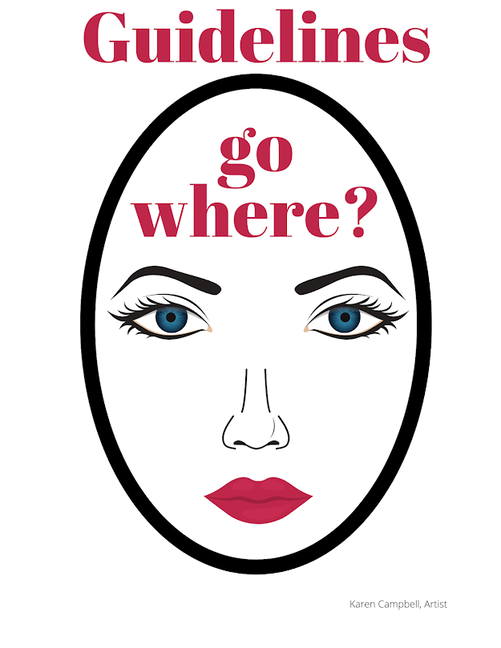
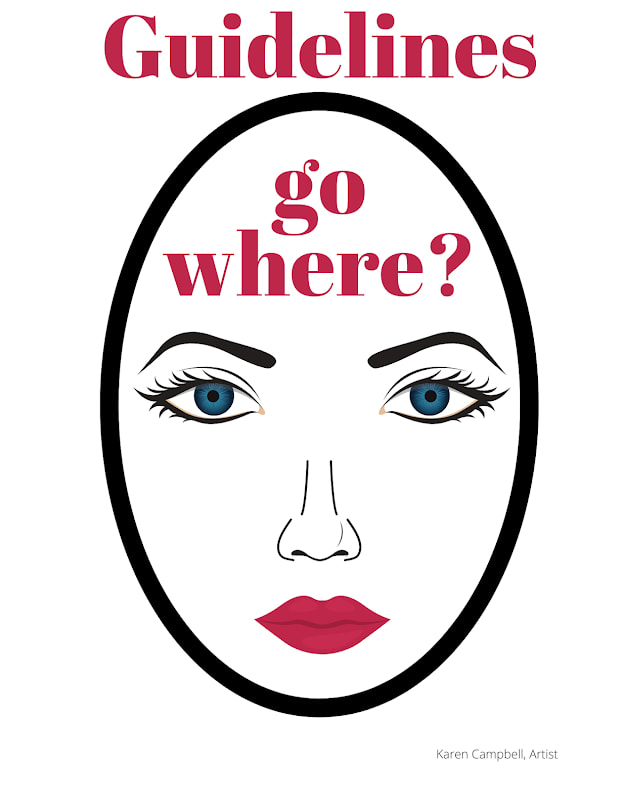
If you want to make your face drawings look MORE realistic, it's important to ALWAYS use face drawing guidelines. This will help your faces look more proportional because the facial features you draw will be in the right spots!
Grab a PDF of my FREE Face Drawing Guidelines Cheatsheet HERE, or click the button below! Then meet me right back here for the drawing tutorial. 
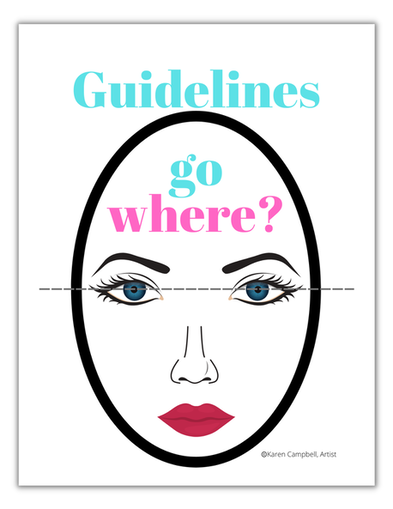
Already have my face drawing guidelines, butwould love a DIFFERENT FREEBIE? Grab a different one here :)
Ready to Draw? Let's Go!
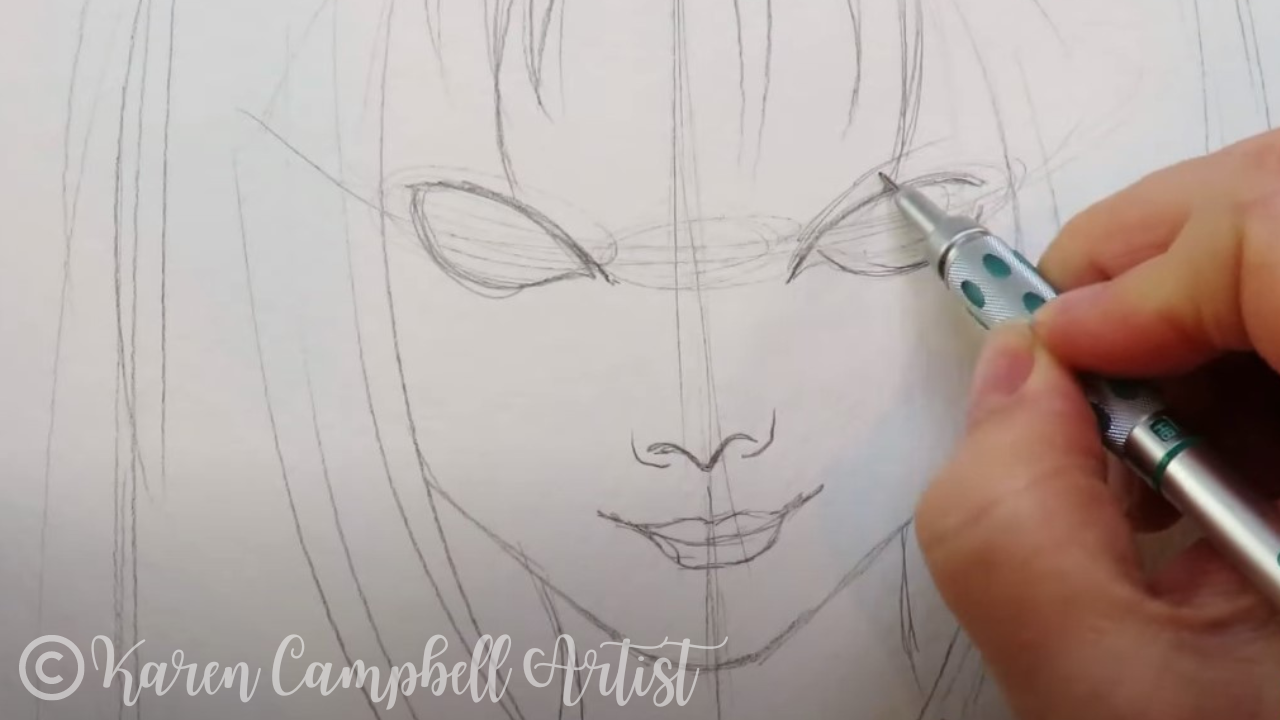
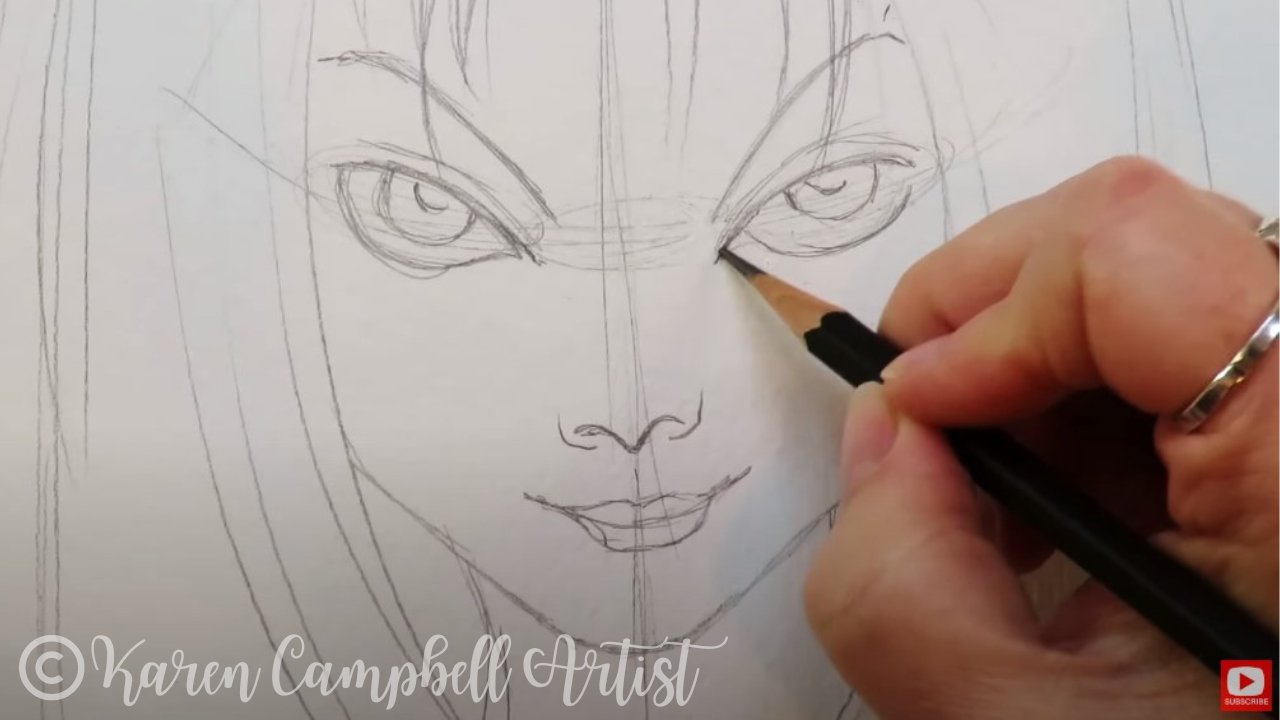
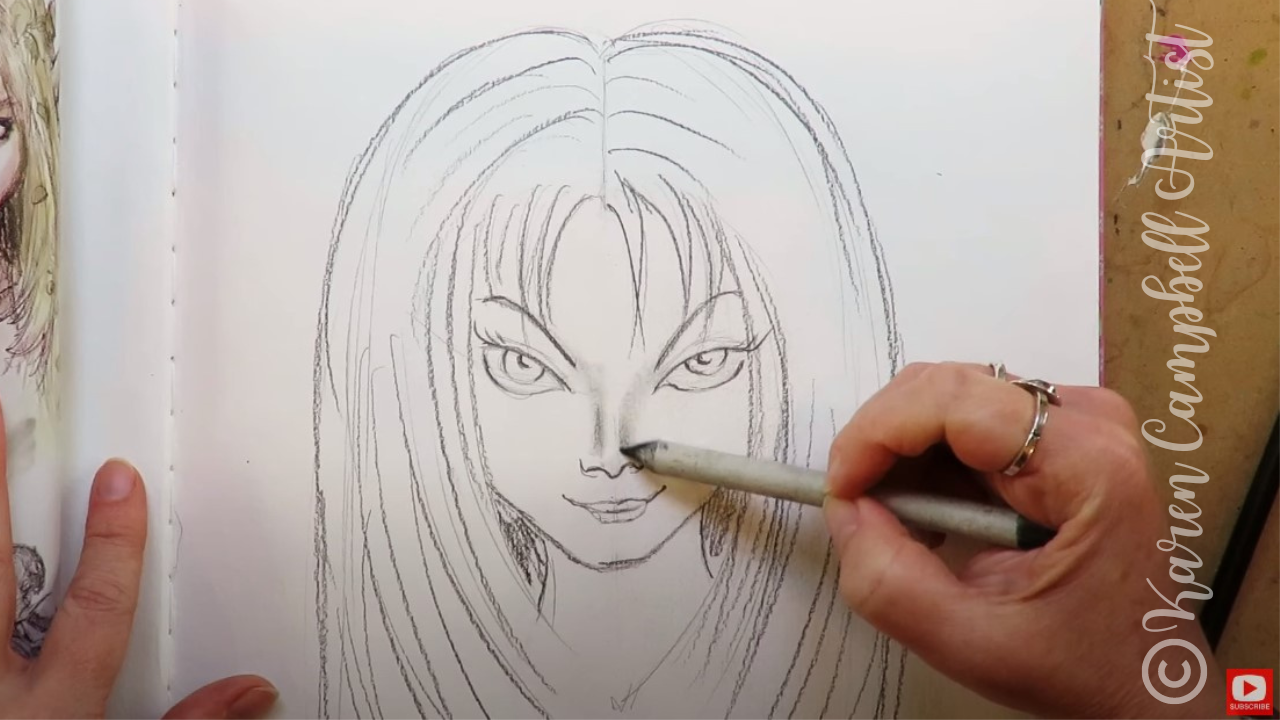
Make sure you click over to the video to see the drawing process happening in action. It totally helps!
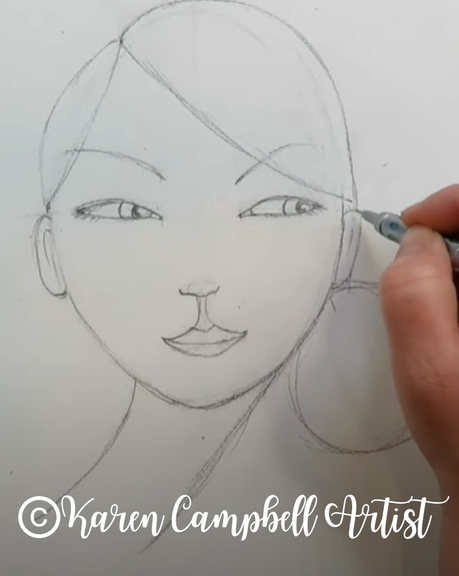
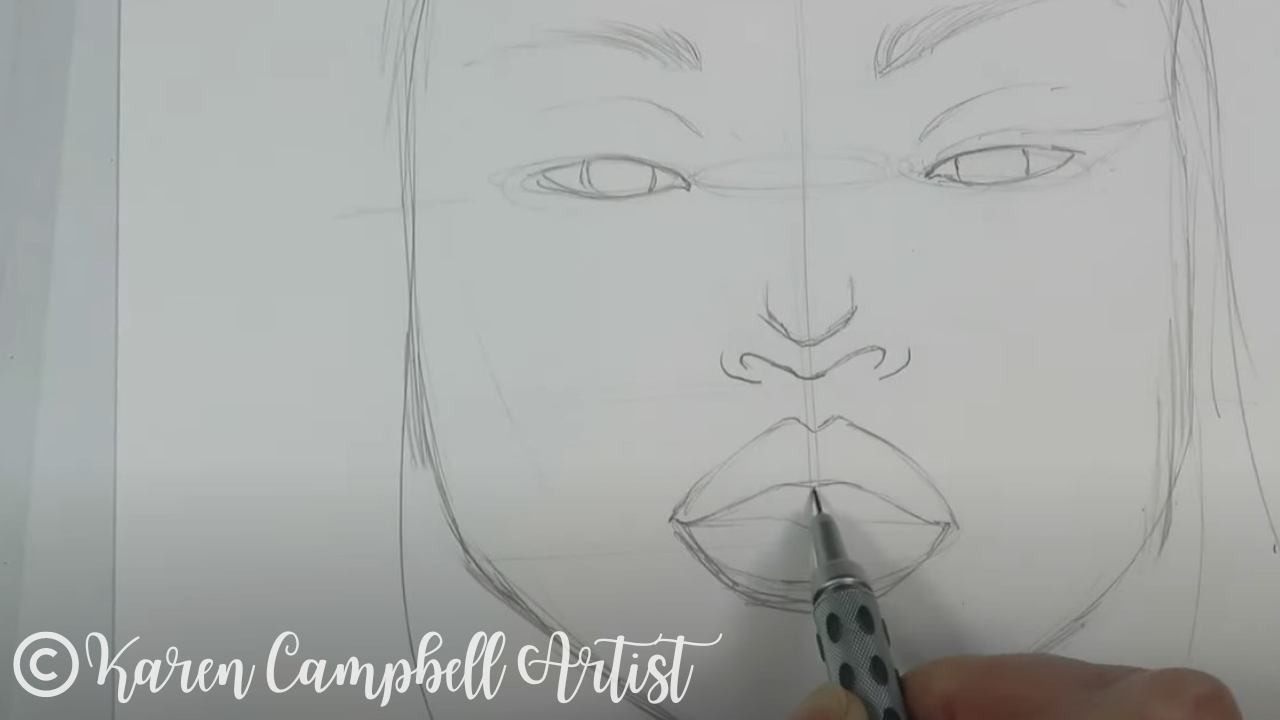
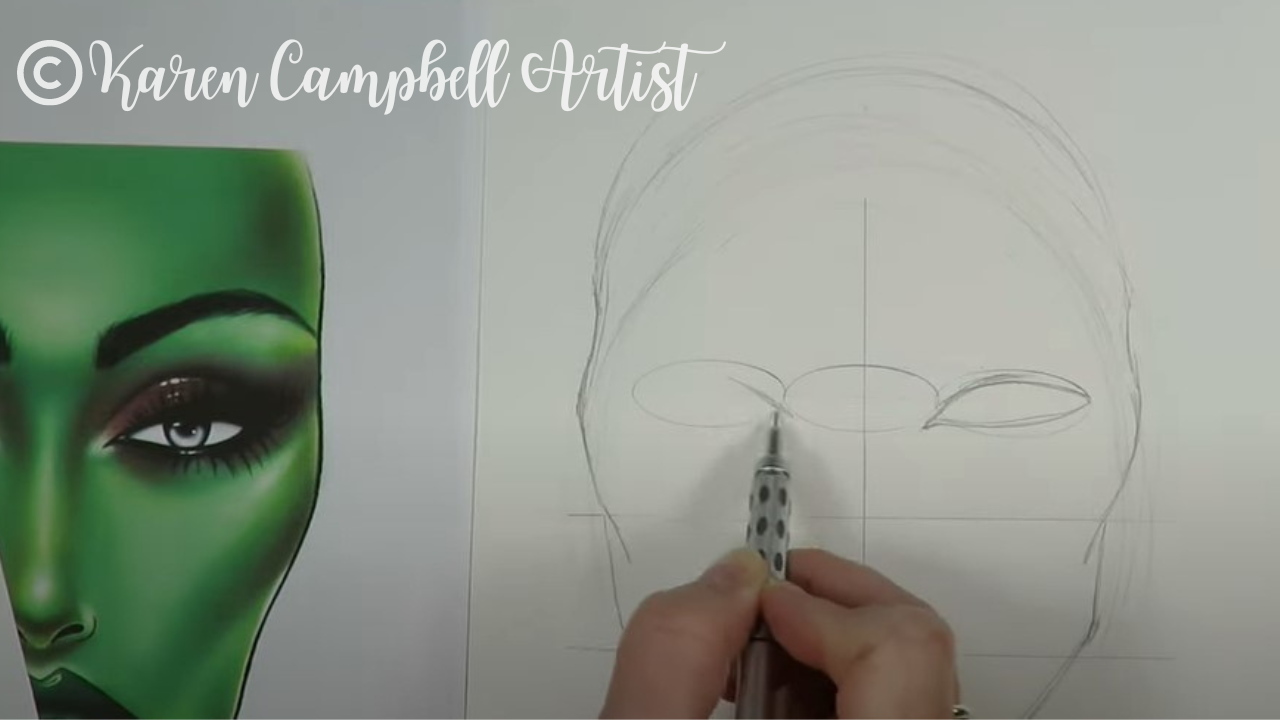
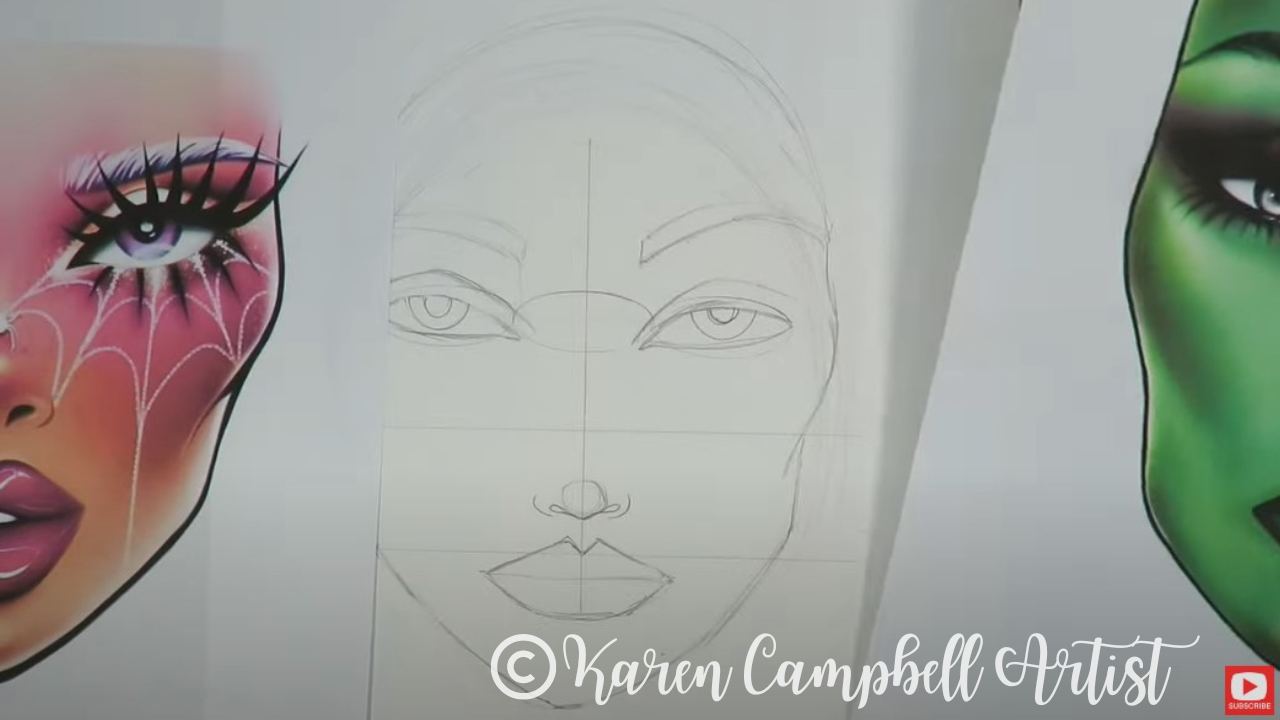
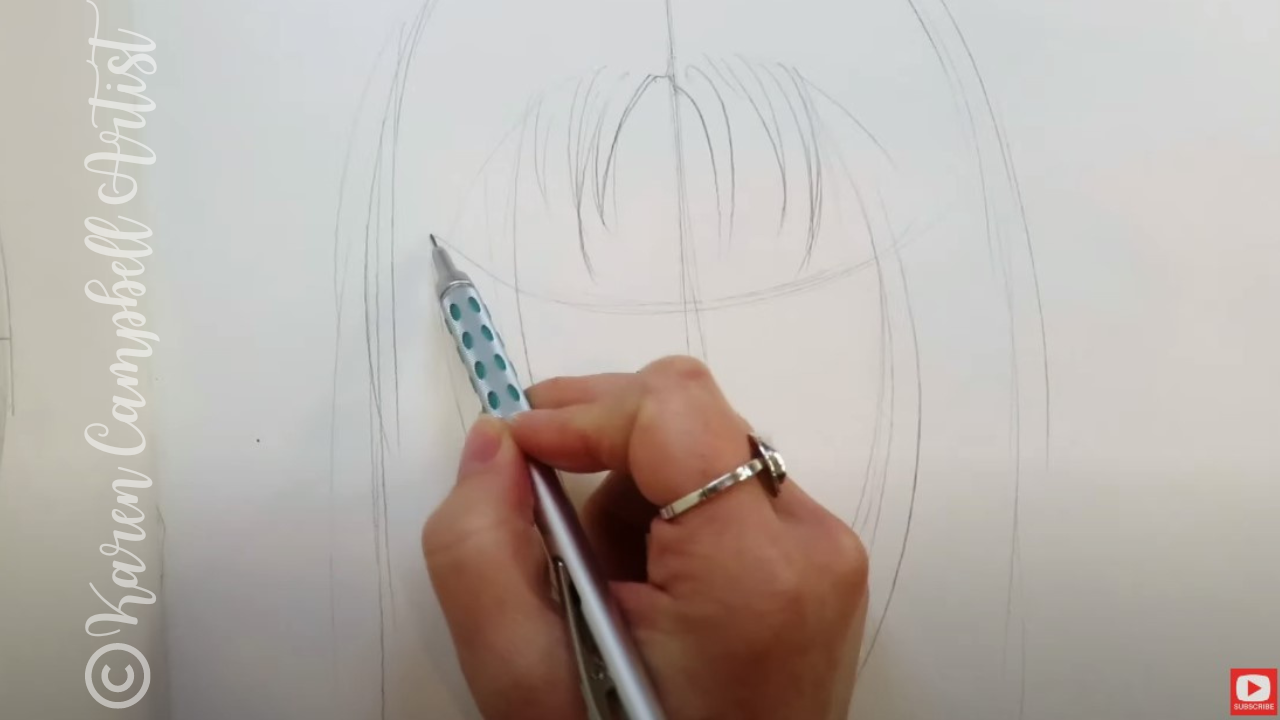
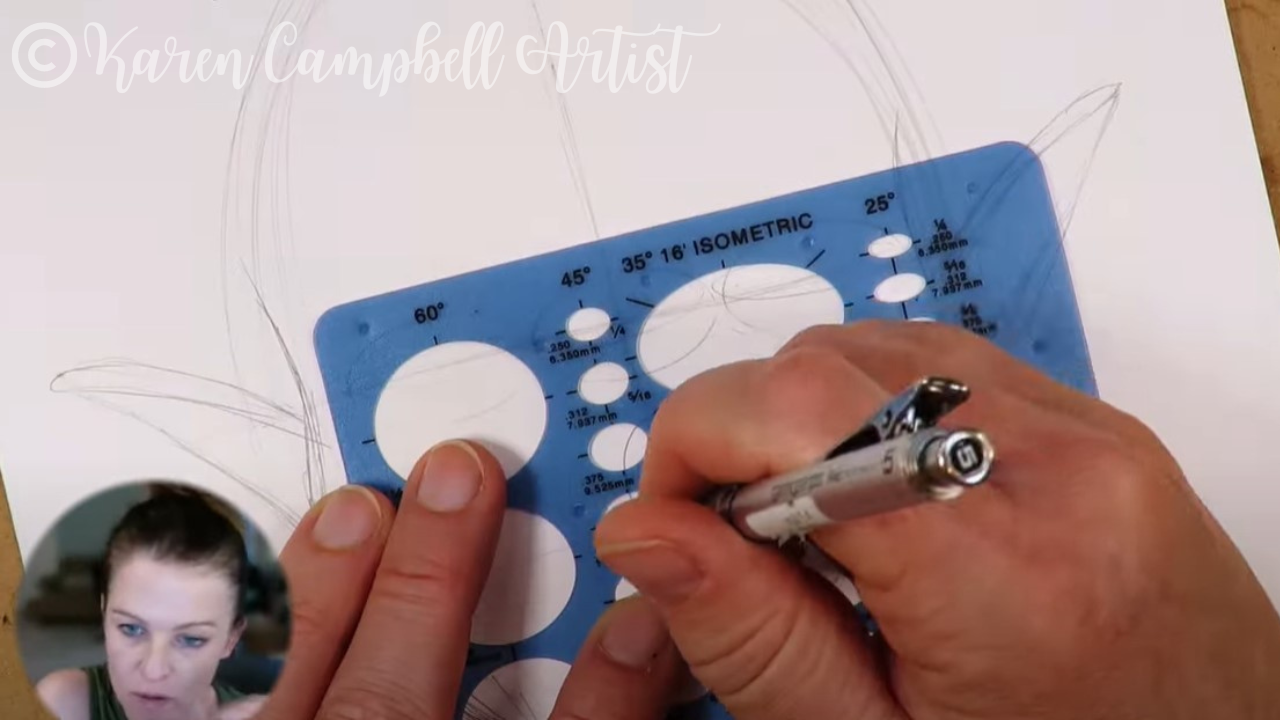
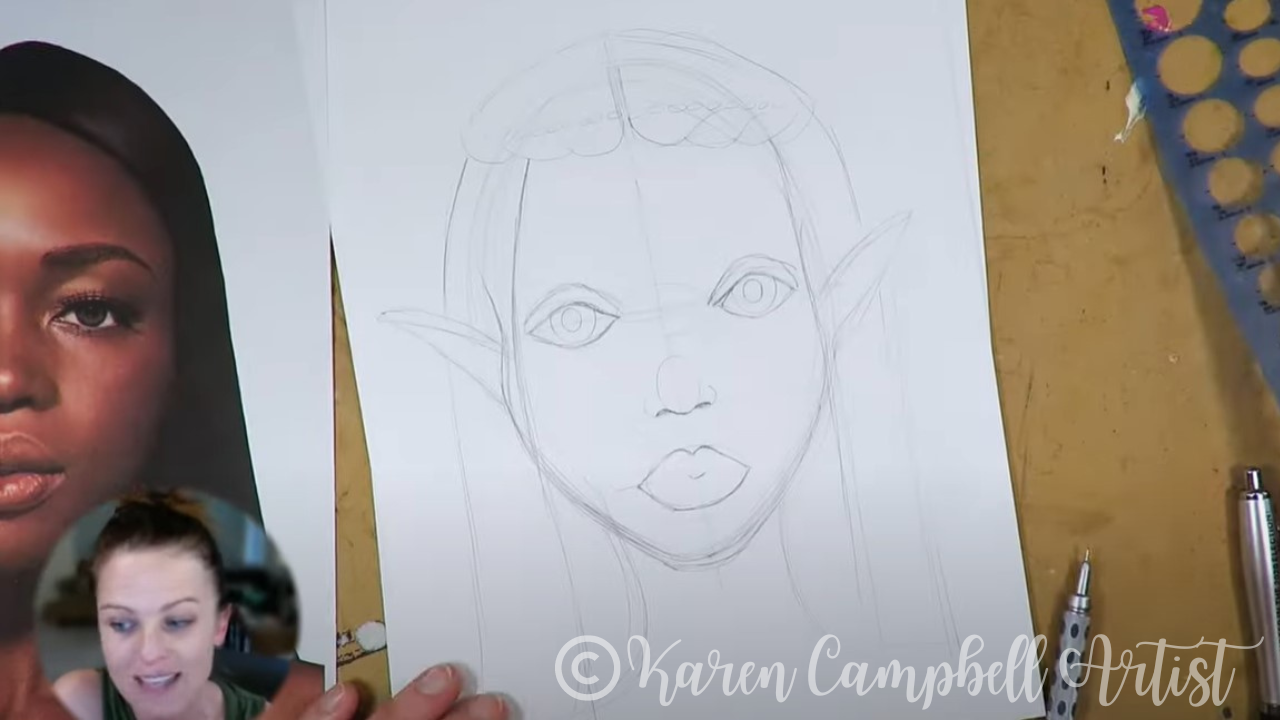
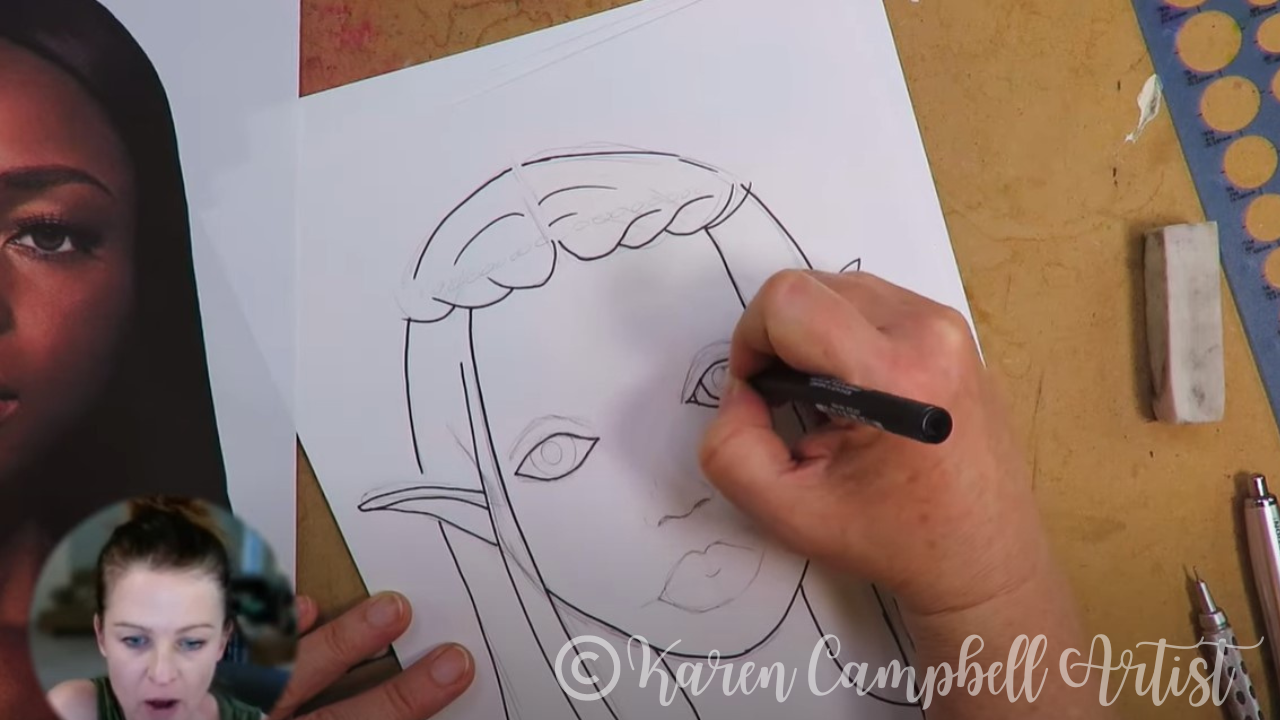
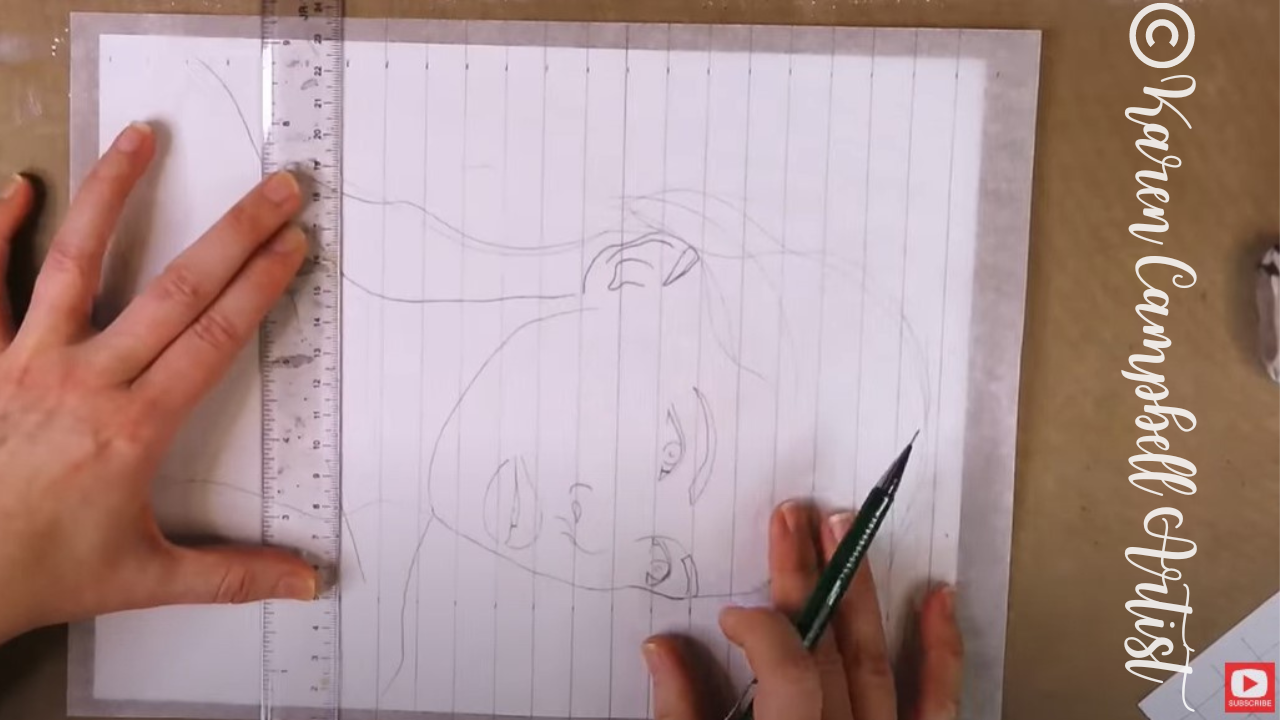
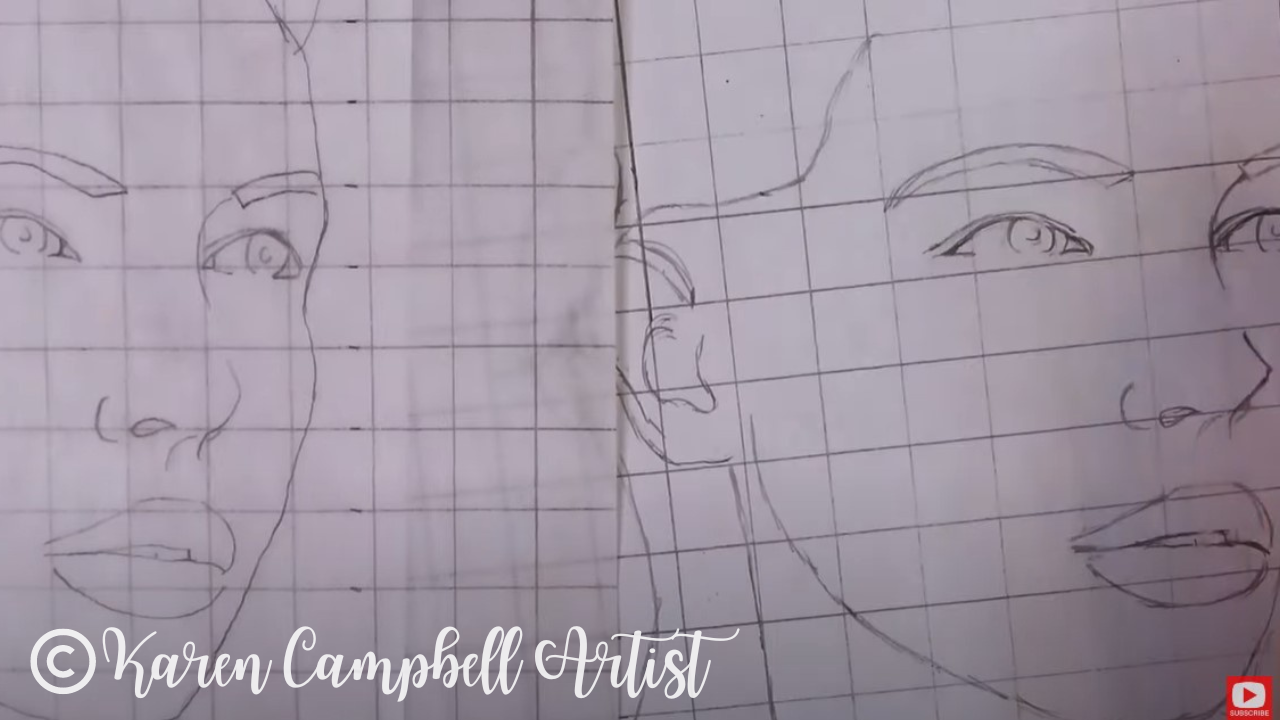
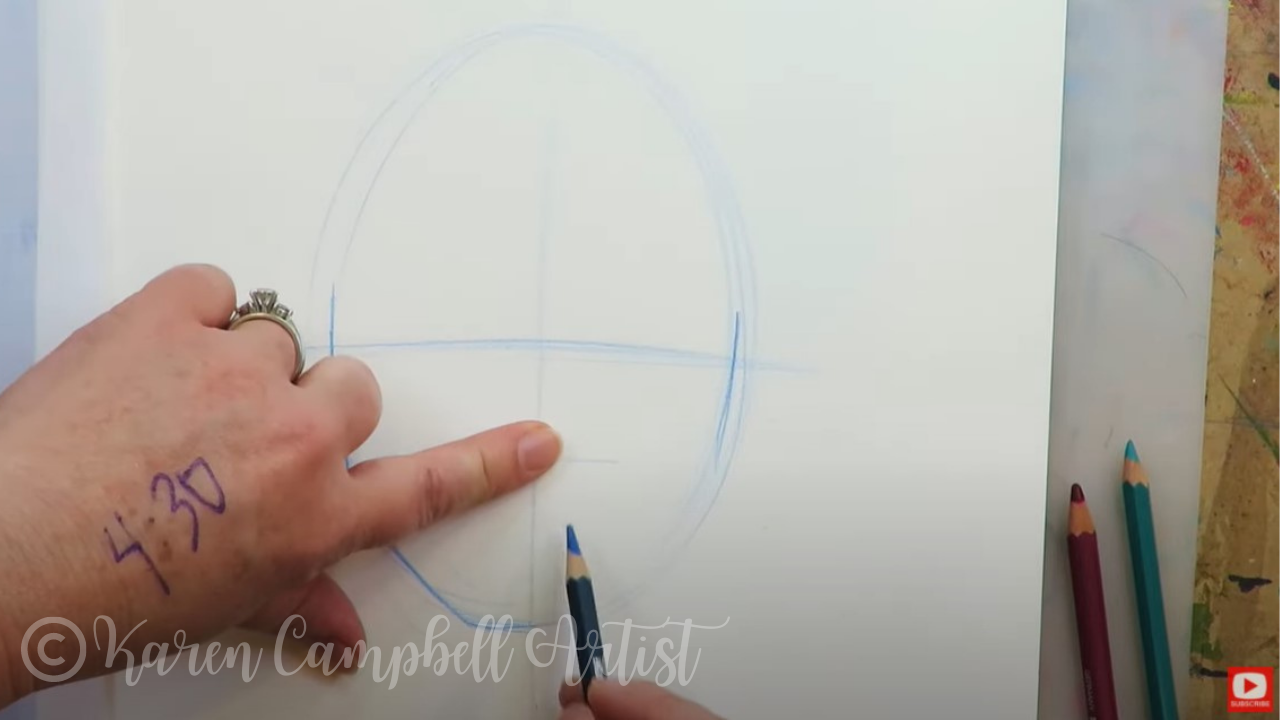
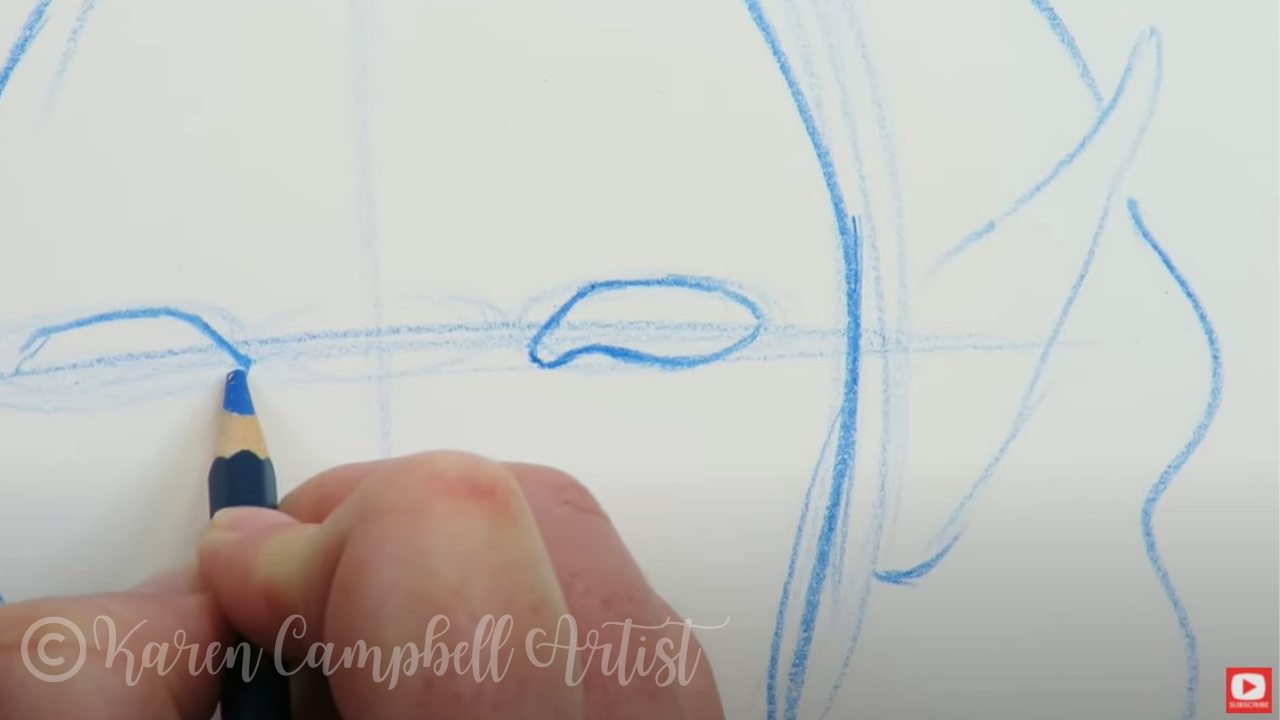
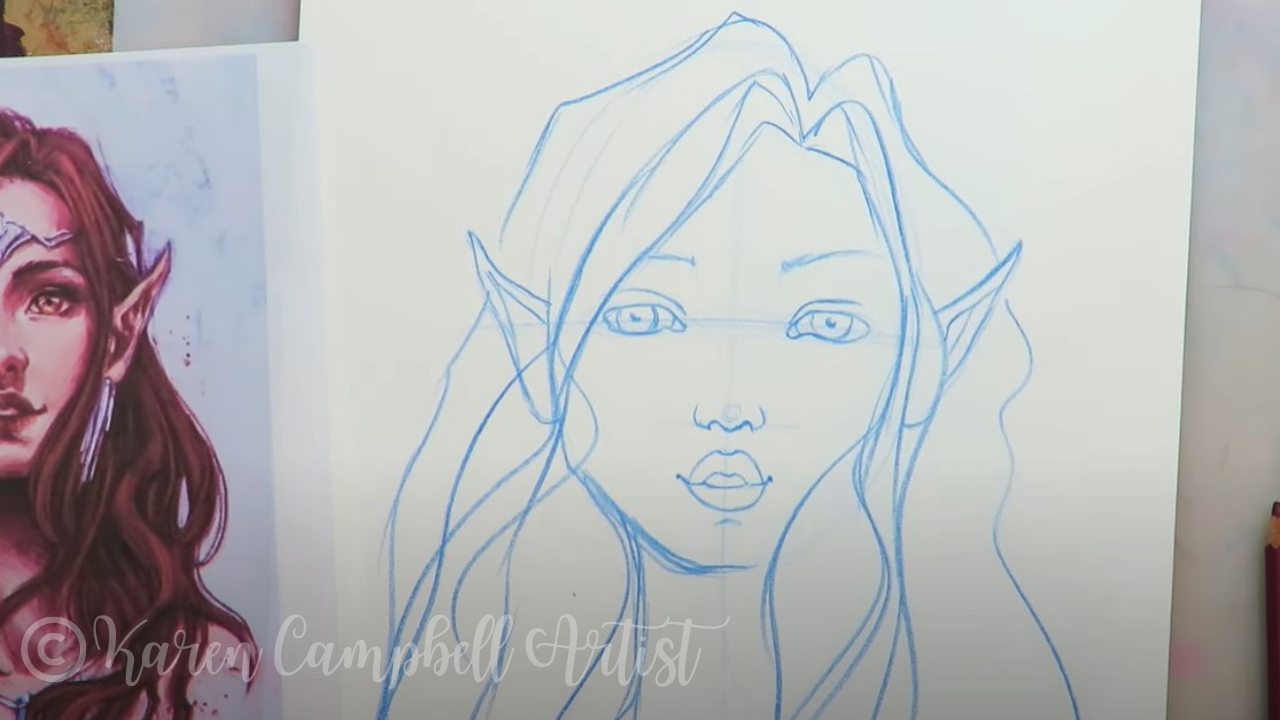
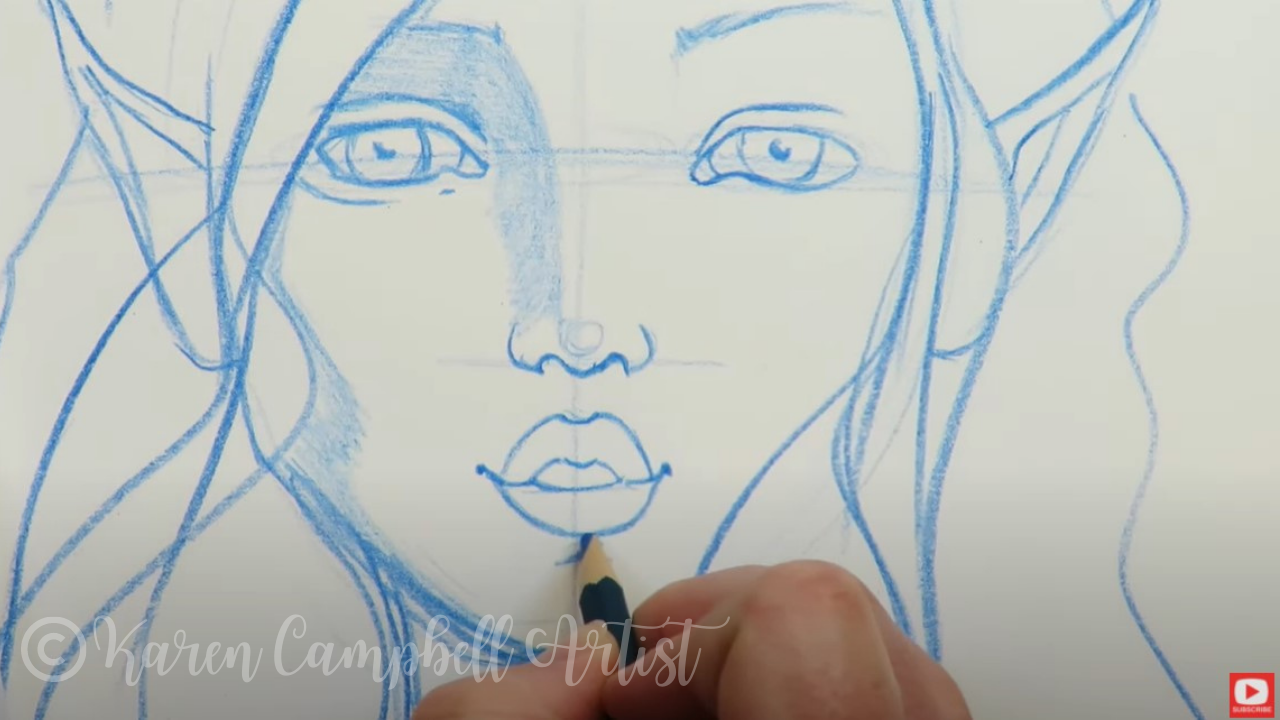
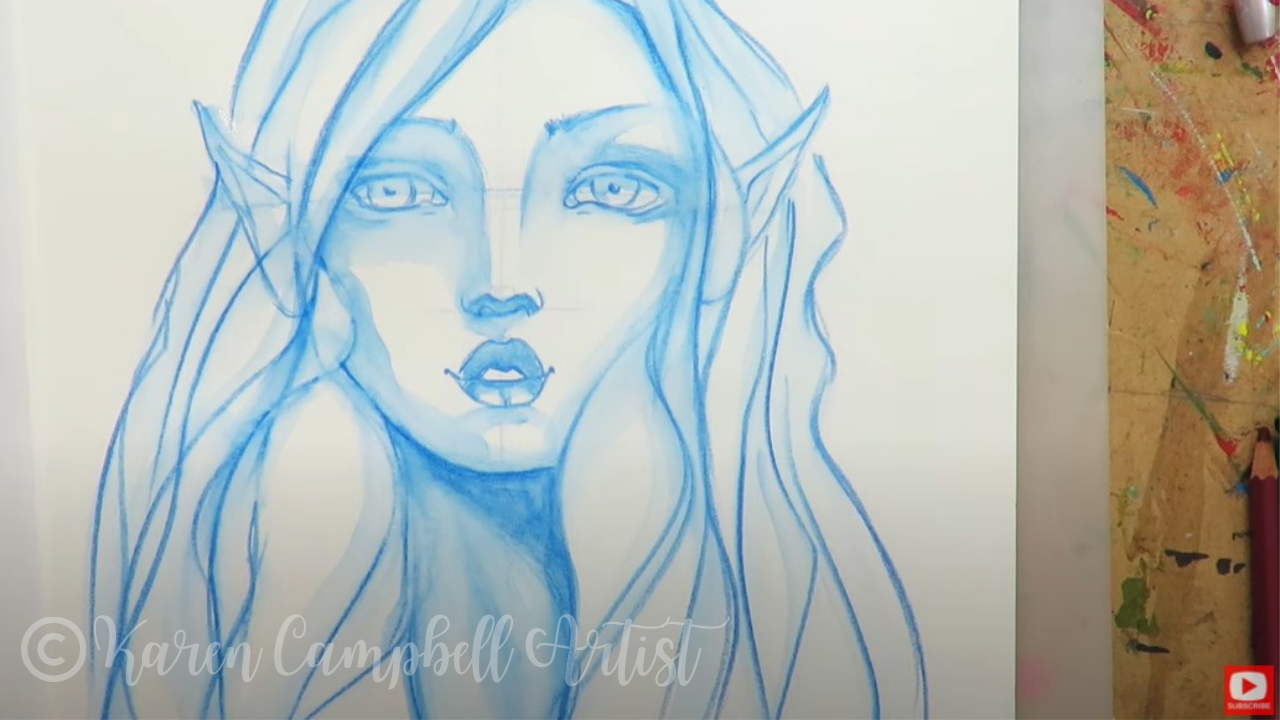
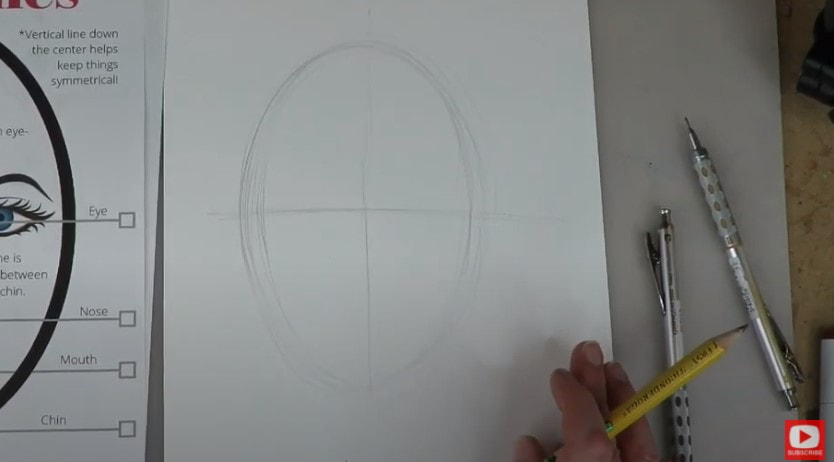
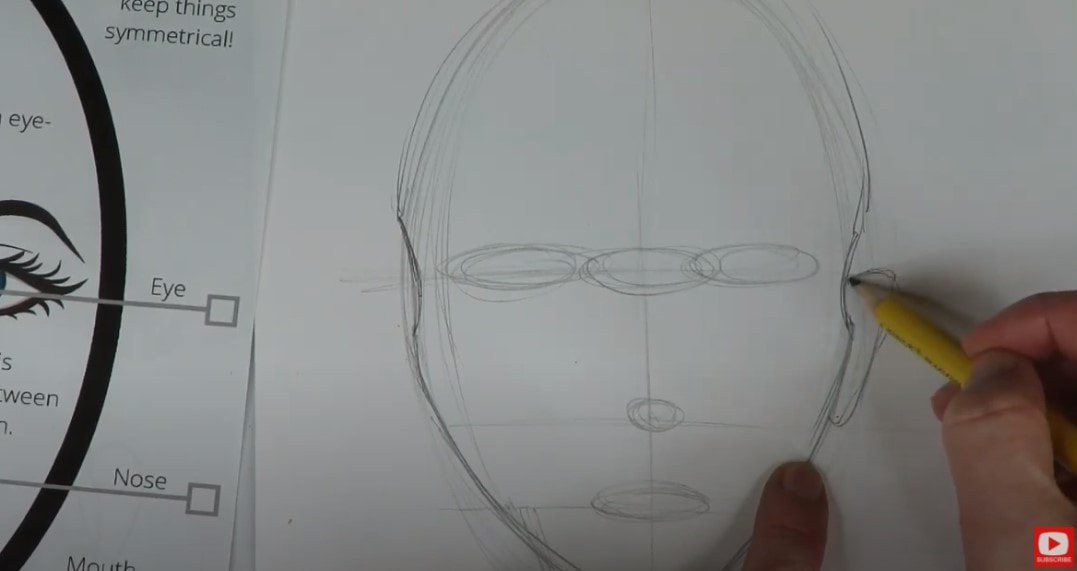
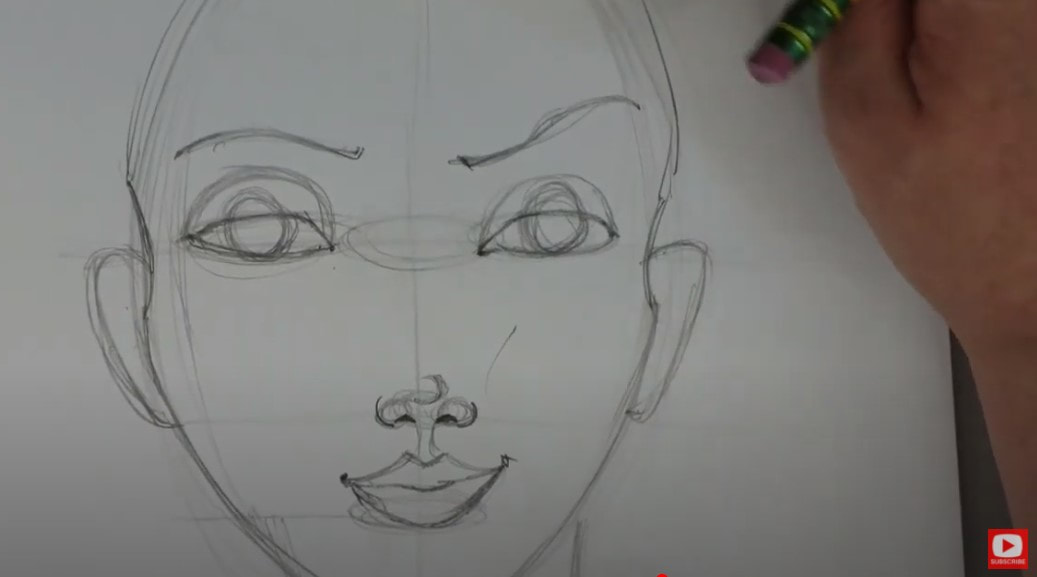
I started today's face drawing off the way I do all of them - by drawing a TON of ovals. Eventually one of them begins to emerge like a nice, solid face shape. After it does, we just need to add a cute and curvy, whimsical neck, and divide the face into quadrants to establish the position of key features like eyes, nose, and mouth. 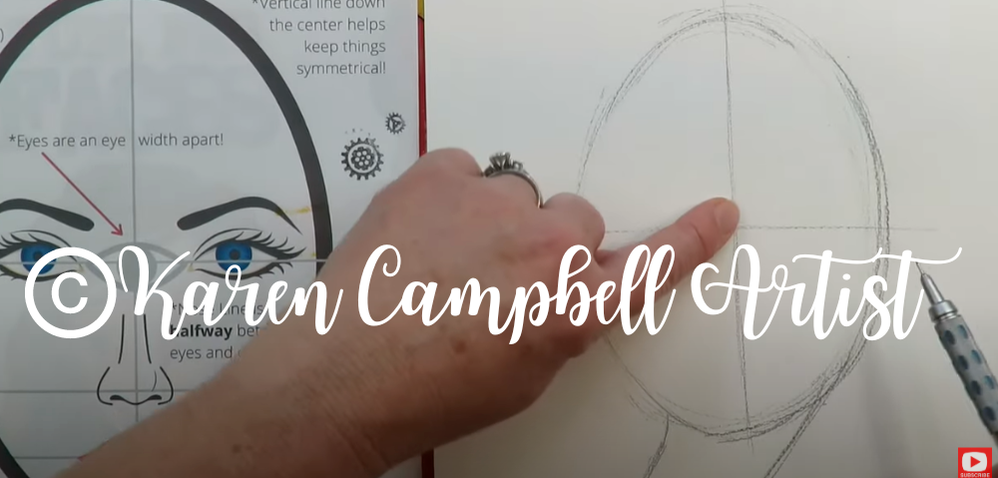
As you follow along with the video, you'll witness the transformation of a blank sheet into a delightful face just FULL of personality - in less than 20 minutes! Awesome, right?!
If you love the book shown in today's video - it's available on Amazons worldwide and has TONS of fun face drawing project ideas for beginners. CHECK IT OUT HERE.
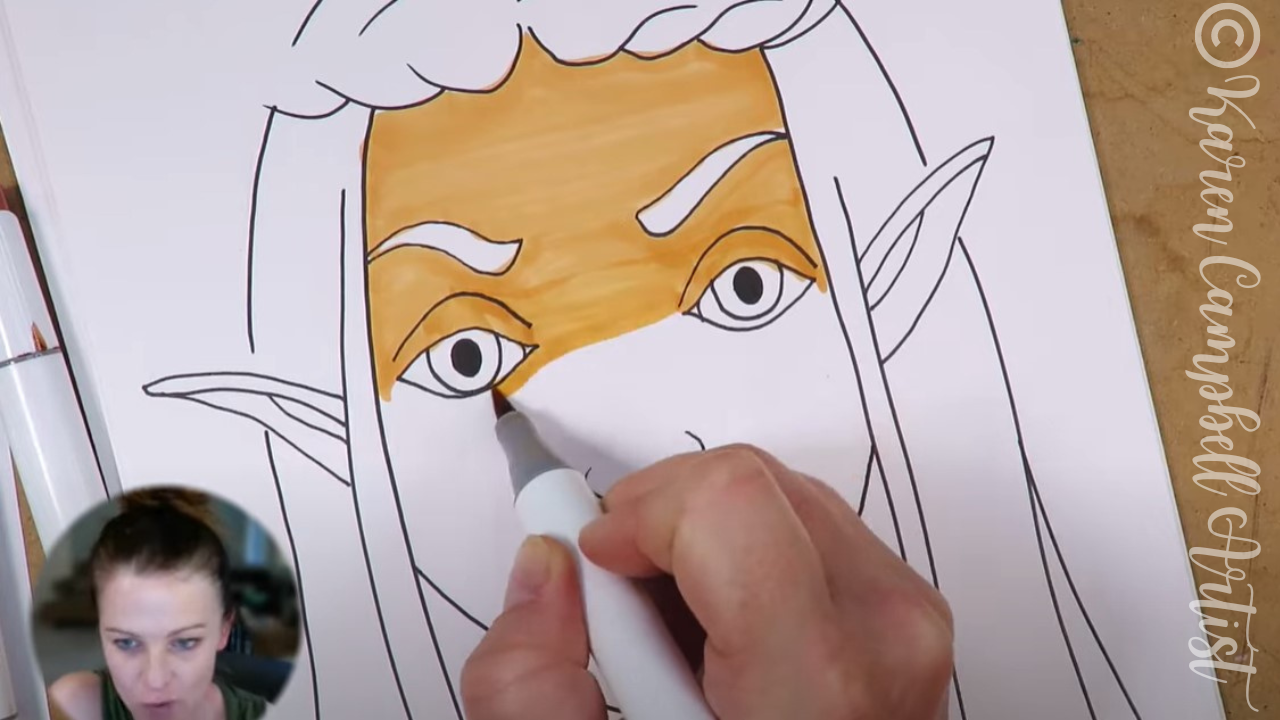
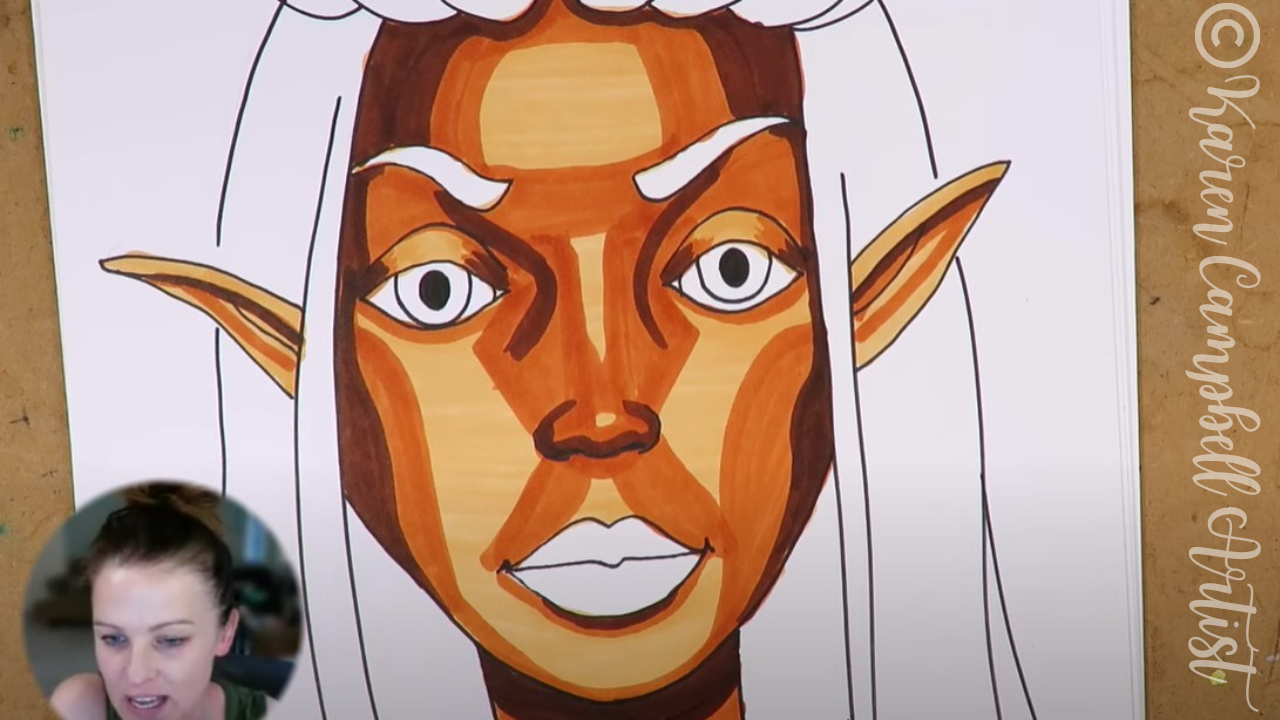
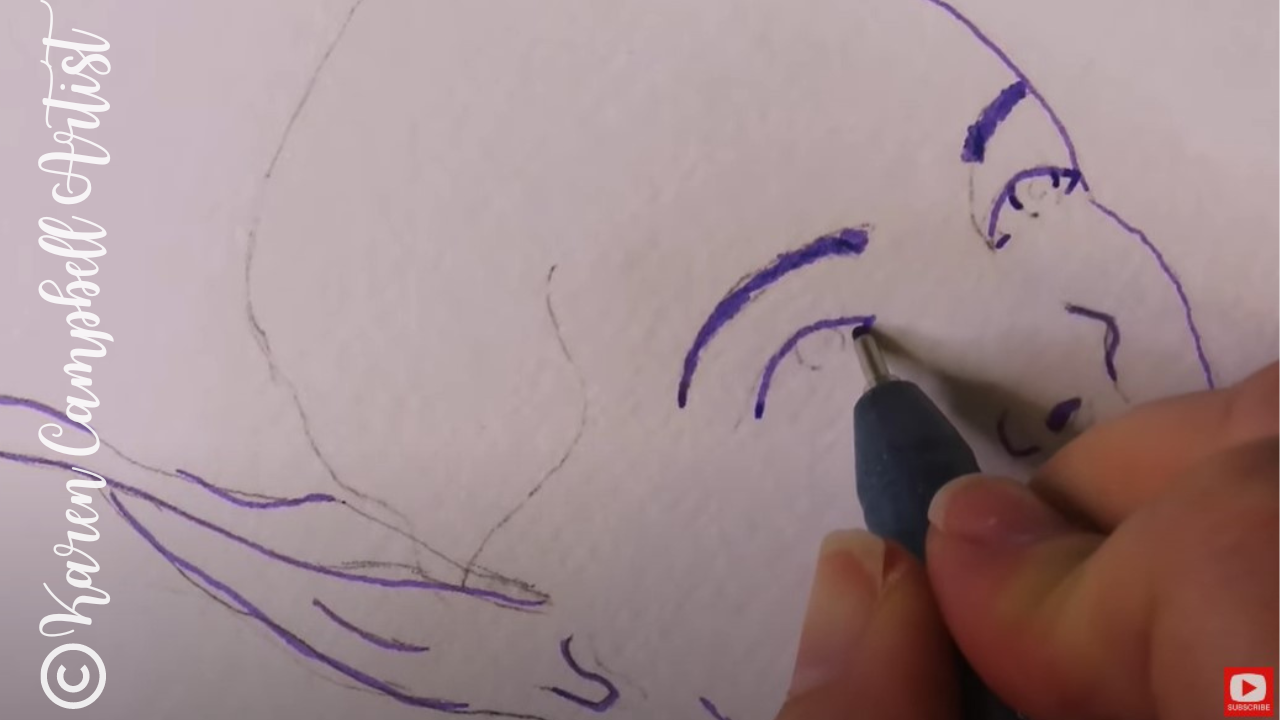
After your adorable drawing is done, it's time to color her in on my mixed media channel using Tombows and water!
LOVED This Fun & Easy Face Drawing Tutorial?
Sharing is caring!!
If YOU loved this cute face drawing project, share the JOY drawing gave you with an artsy friend or someone who's ALWAYS wanted to learn how to draw, but still hasn't given it a shot. Here's the video link to copy and paste into a text or email: https://youtu.be/6c3y3MdM9Kk. If you're watching the video on YouTube using your phone, try this! 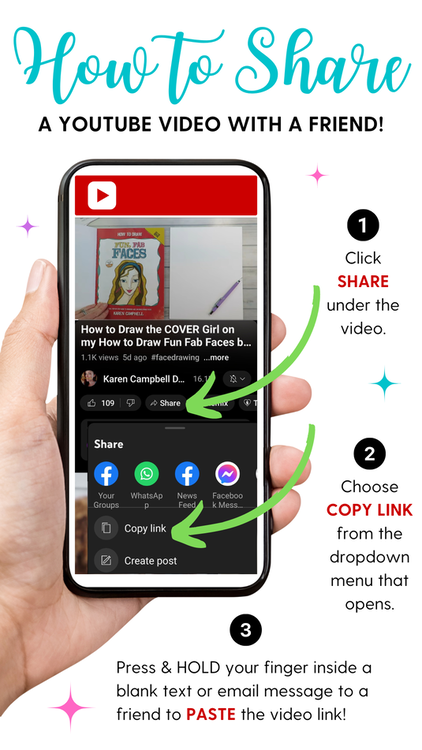
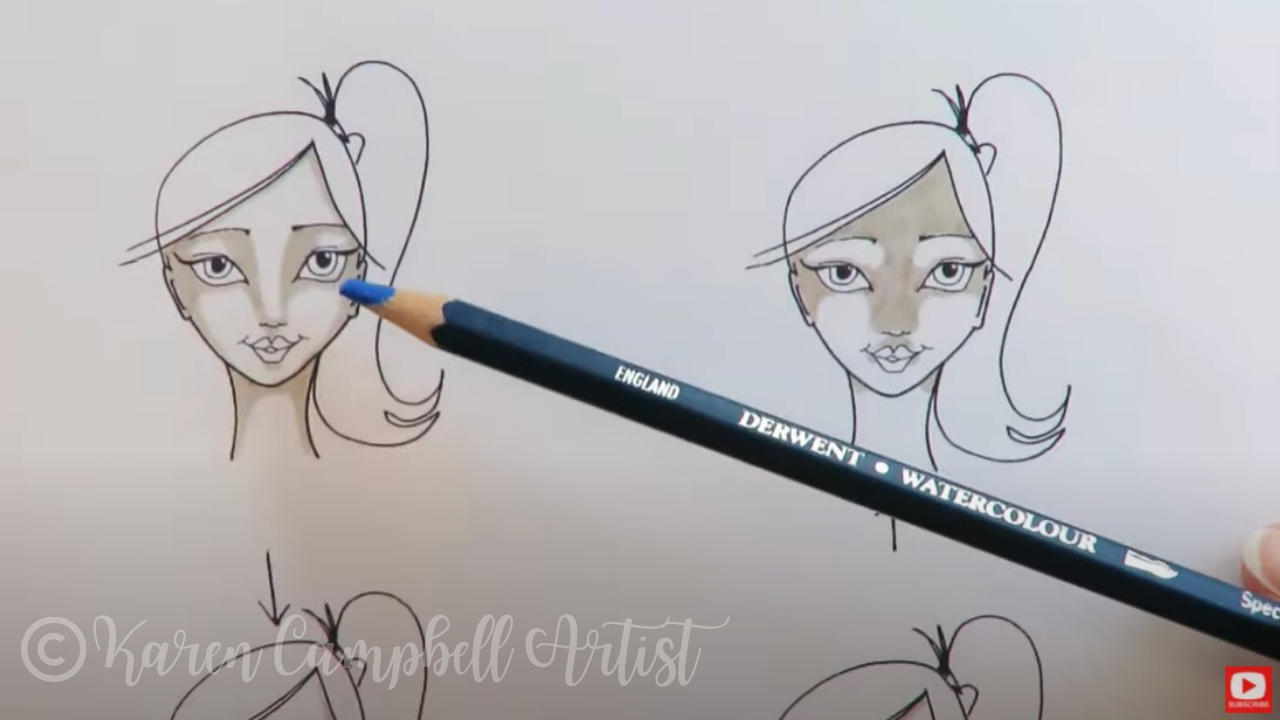
Ready to Color Her In with Tombows?Looking for Something Else?
0 Comments
Why Cheap Alcohol Markers are AWESOME **PLUS** 11 HOT Marker TIPS! (FaceChart Inspired Art No. 4)30/11/2022
When it comes to alcohol markers, I keep noticing there is such a HUGE range in price points. WHY is THAT?! For example, I bought a 5-pack Copic Sketch Marker set in grayscale that comes with a fine liner, for $38 (~$6.33/marker) on Amazon. Recently I also grabbed a 6-pack grayscale set of alcohol markers FOR $5 at my local Five & Below shop. You can't really beat the price at less than $1/marker.
But...will they perform? Let's find out!! 
I seriously HOPE you are drawing along with me today! Face charts make amazing face drawing references!!
But before you even attempt drawing the fun makeup in today's reference, you NEED to make sure your facial features are proportional! How do you do that?! With my FREE whimsical face drawing guidelines! Click the button below and I'll send them straight to your inbox! 
Before we continue, super quick announcement: All product links are Affiliate. I may earn a small commission if you choose to order through these links but by law there is never any additional cost to the consumer for doing so. I thank you for your support.
Whenever I get new markers, I've gotta swatch 'em to see what I've got! I compared the Five & Below cheapies with my neutral grayscale set of copic sketch markers (see how they compare below). The top line is the cheapies (that set came with one additional marker, so score!), and the bottom line is my copics.
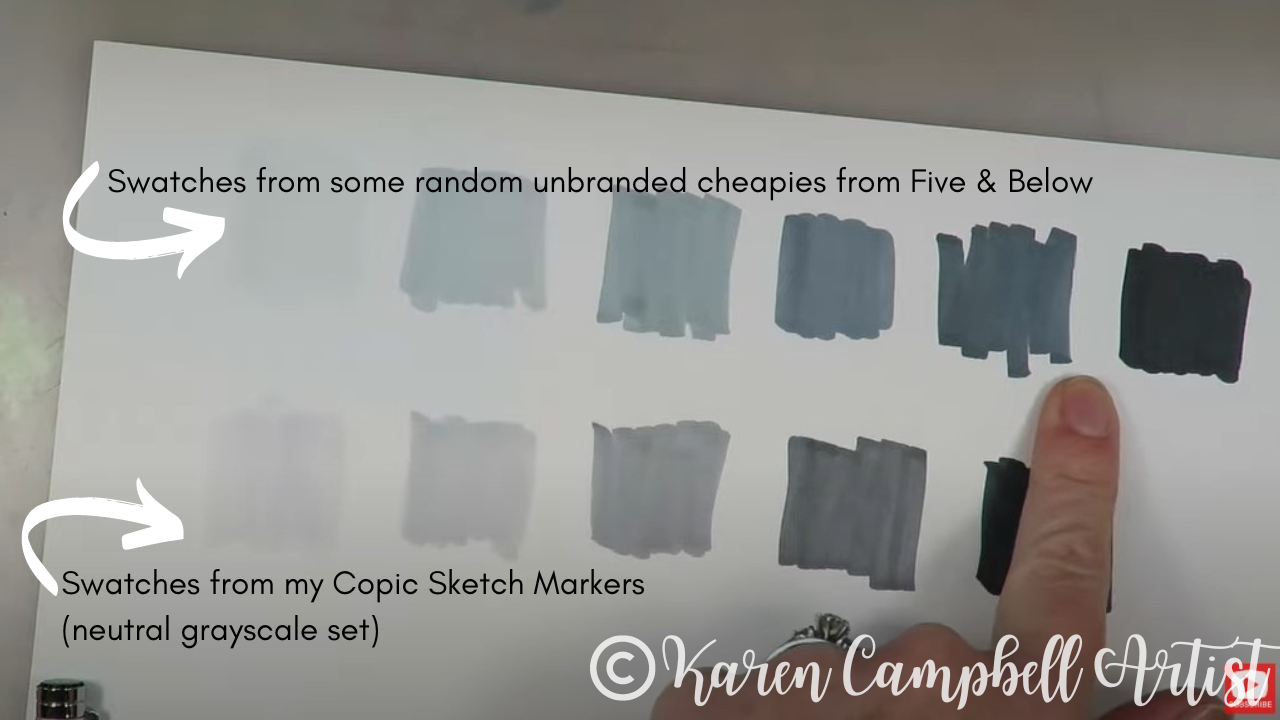
I love the gradation and the value scale range included in both sets, but I gotta say - whenever you can get MORE colors - I tend to gravitate toward that option, so way to go Five & Below!
However, I also REALLY love how Copic included one of their black fineliners in this set. The fineliner they included retails for about $12 on its own - so adding this to their grayscale pack is really pretty generous. 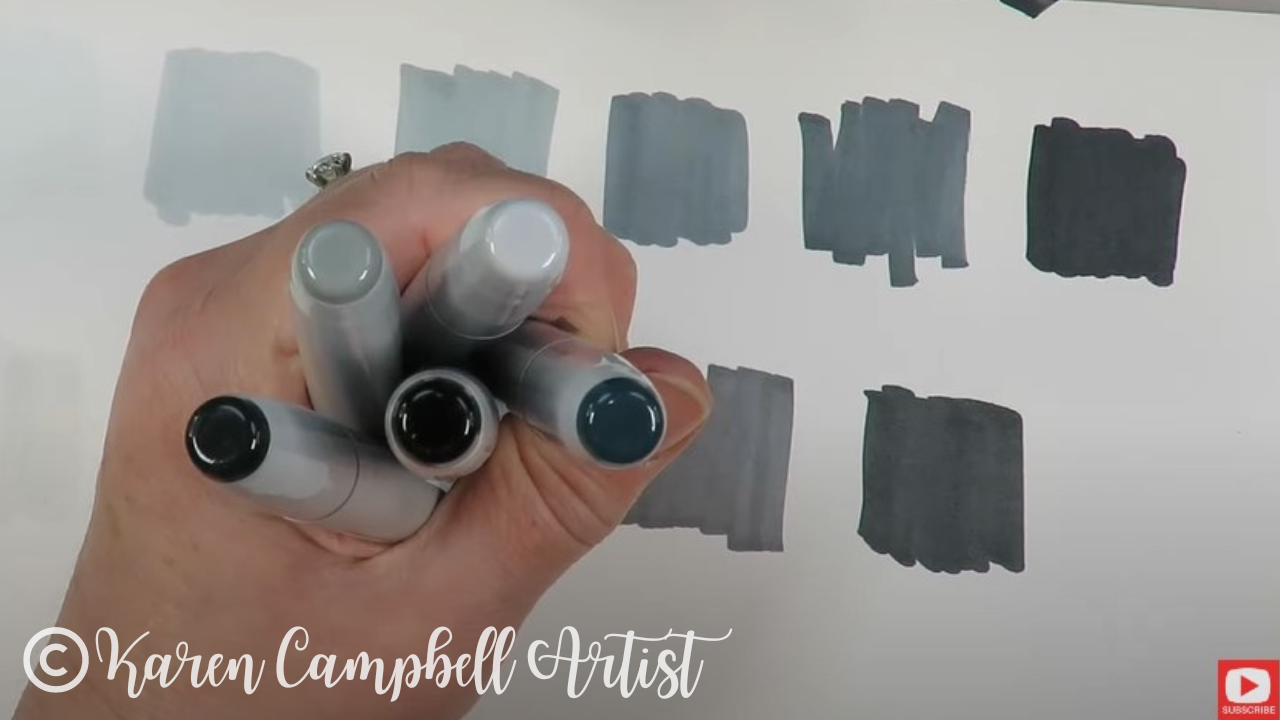
Whoever manufactured the cheapies from Five & Below DID cut some corners by producing their alcohol markers without labels. Kinda hilarious. At least the opposite sides of these caps have labels so I don't have to swatch again every time I grab a marker!!
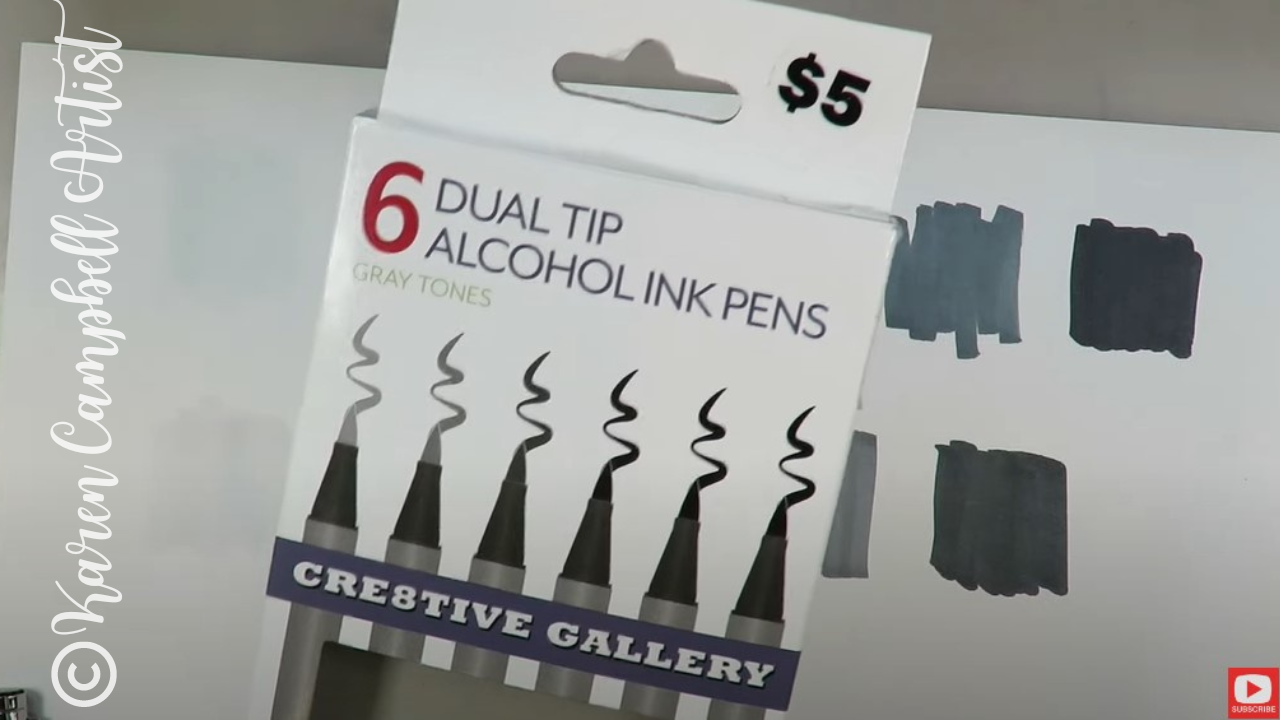
In terms of quality- the nibs in this set are great, and the ink is nice and juicy, so these were definitely worth picking up. I have no idea how readily available this specific pack of alcohol markers are, but I guess my general advice is not to shy away from grabbing a set of cheapie alcohol markers when you find them at your local dollar or craft store.
Pretty much every set I've picked up, I've been happily surprised by in terms of quality. Now let's see how they PERFORM in an actual project! 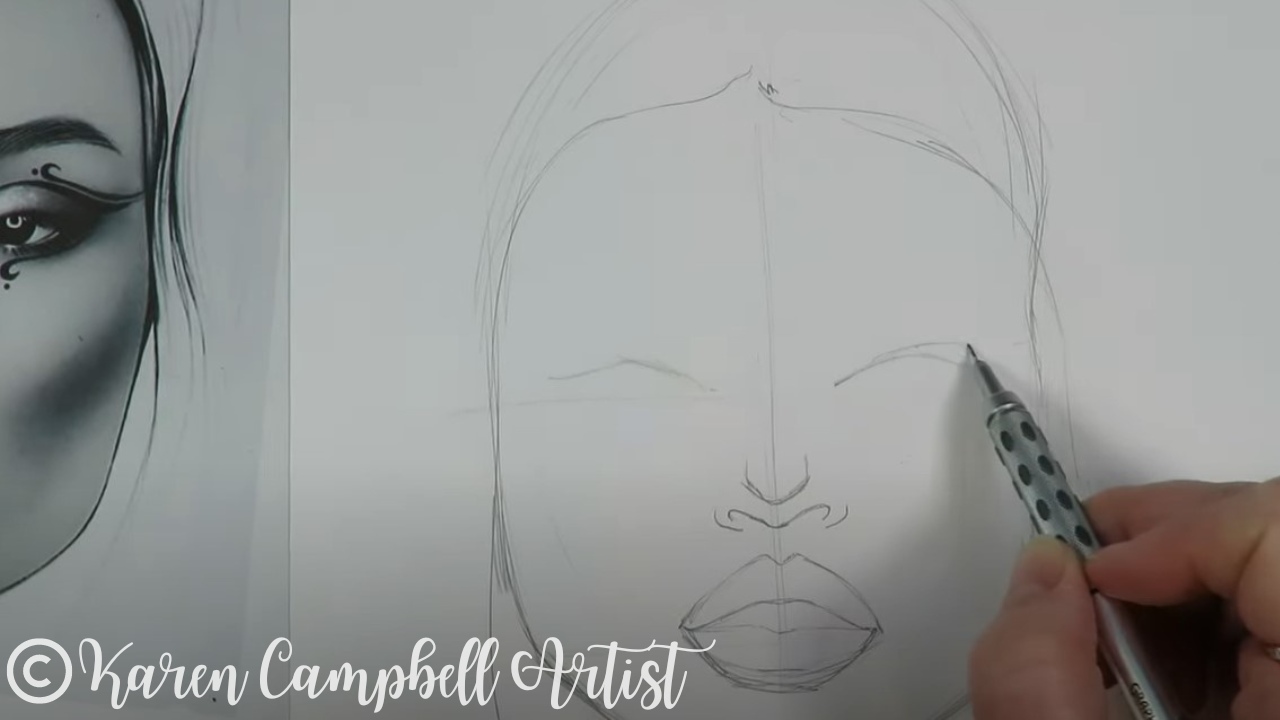
Make sure you click over to see today's face chart inspired drawing tutorial so you can DRAW ALONG with me!! Don't just sit back and watch - go grab your markers and come draw with me!
Need today's face drawing reference? Grab today's along with the last 3 in this series right here in my YouTube & Cheatsheet Library.
Definitely check out today's YouTube drawing tutorial because I give you TONS of hot tips for shading faces with alcohol markers that will help you tremendously - whether you're new to alcohol markers as a medium or not!
Shockingly, as soon as I started today's face shading with my cheapie alcohol markers, I was surprised to discover they felt identical to my copics. I KNOW!! This is a big deal, because if you've been following me for a while you KNOW how much I love my copics and ohuhus!!
Today's project has once again solidified my opinion that copic marker alternatives are WORTH trying! And really, price point doesn't seem to matter as much as you might think as far as this medium is concerned.
I've shared TONS of copic marker alternative product reviews for you here on YouTube, but hope YOU have confidence to try out whatever you find, especially if you're on a budget. You DON'T have to stop drawing, even when money is tight. 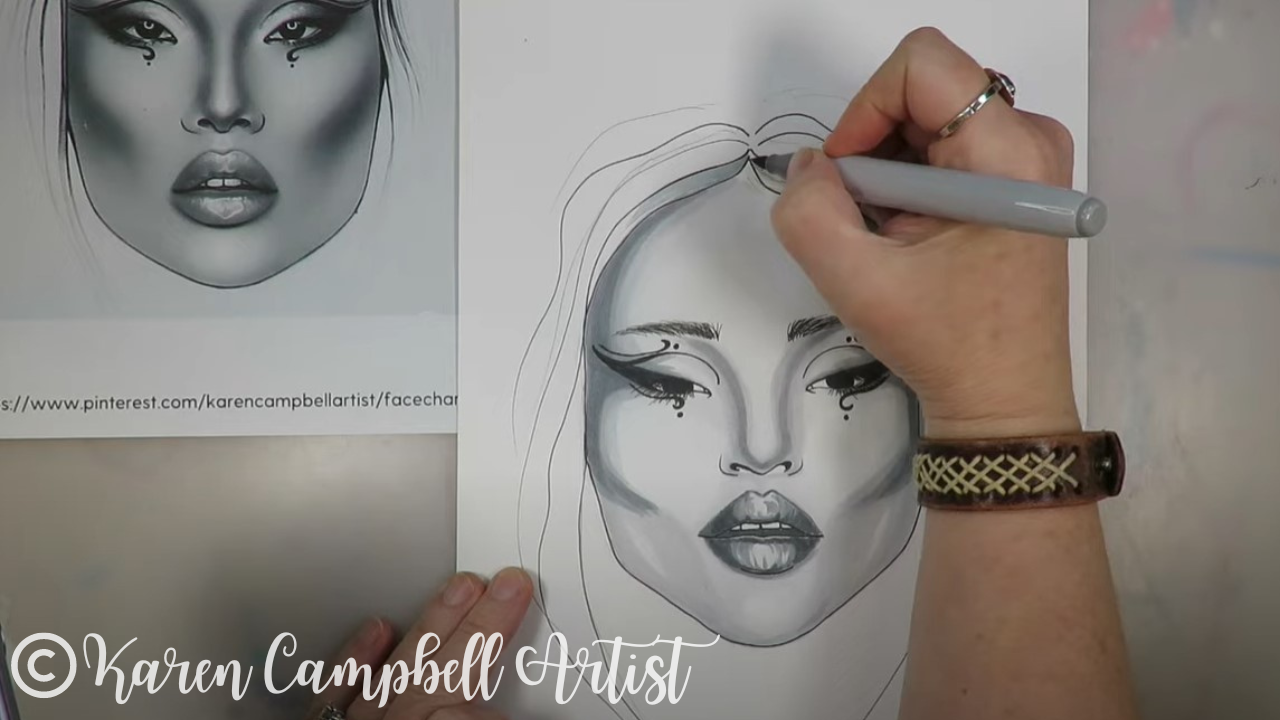
If you've never tried shading a face in alcohol markers, maybe you're addicted to shading faces in pencil - TRY today's free face drawing lesson. It's filled with tips to help you along.
If you're nervous to try shading faces with alcohol markers, especially when it comes to layering in darker shades, you REALLY CAN go at it slowly by adding multiple layers of the SAME shade over and over again. Your piece WILL get darker wherever you've added additional layers, and there's very little risk if you're afraid of screwing up :) Plus- if you're hanging out with me on YouTube (or in one of my online art classes or clubs at Awesome Art School) you're NEVER alone, I'm right there by your side doing the project with you from start to finish!
Thanks for hanging out with me today! If you drew along with me, make sure to share your work so we can give you some love over in my Facebook Group!!
LOVING the whole face chart inspired drawing tutorial thing? Here's a playlist with MORE of them for ya!! NEED MORE resources to get your creative juices flowing? ❤️ CHECK OUT ALL my art books on AMAZON ❤️ CHECK OUT ALL my online art classes @ Awesome Art School ❤️ MY FAVORITE ART SUPPLIES on AMAZON (affiliate links) ❤️ MY BELOVED FACEBOOK GROUP
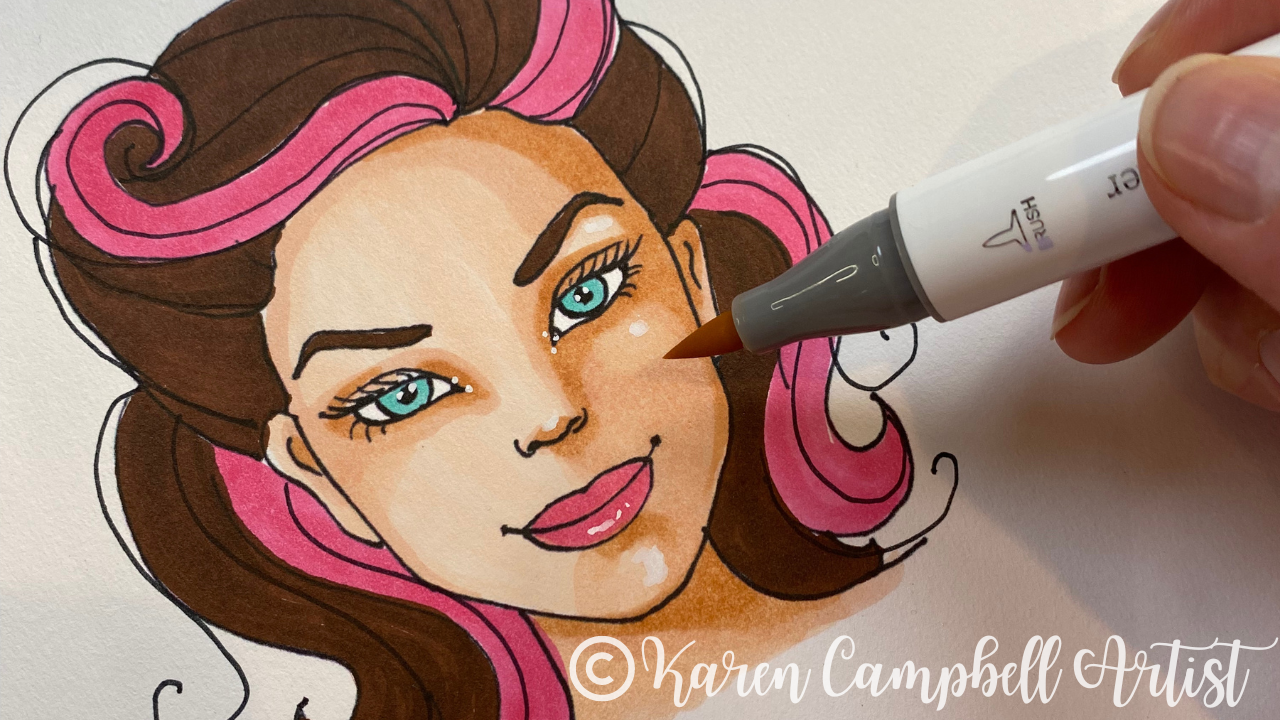
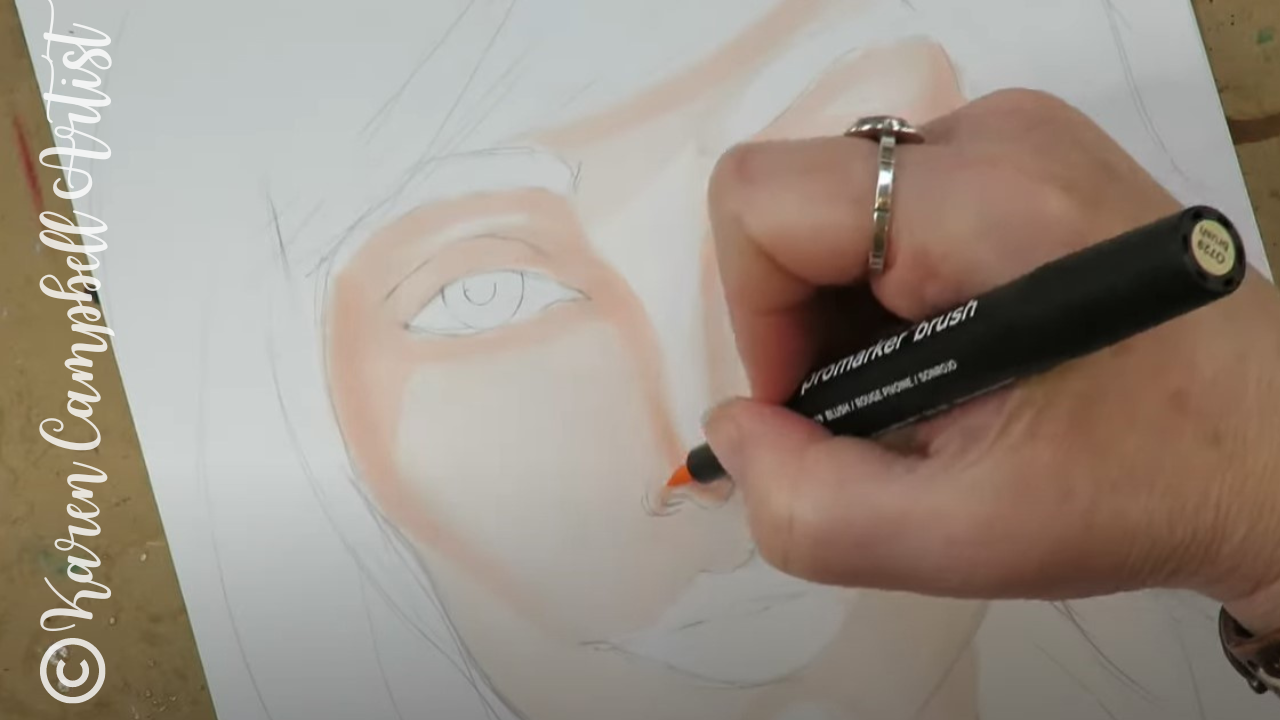
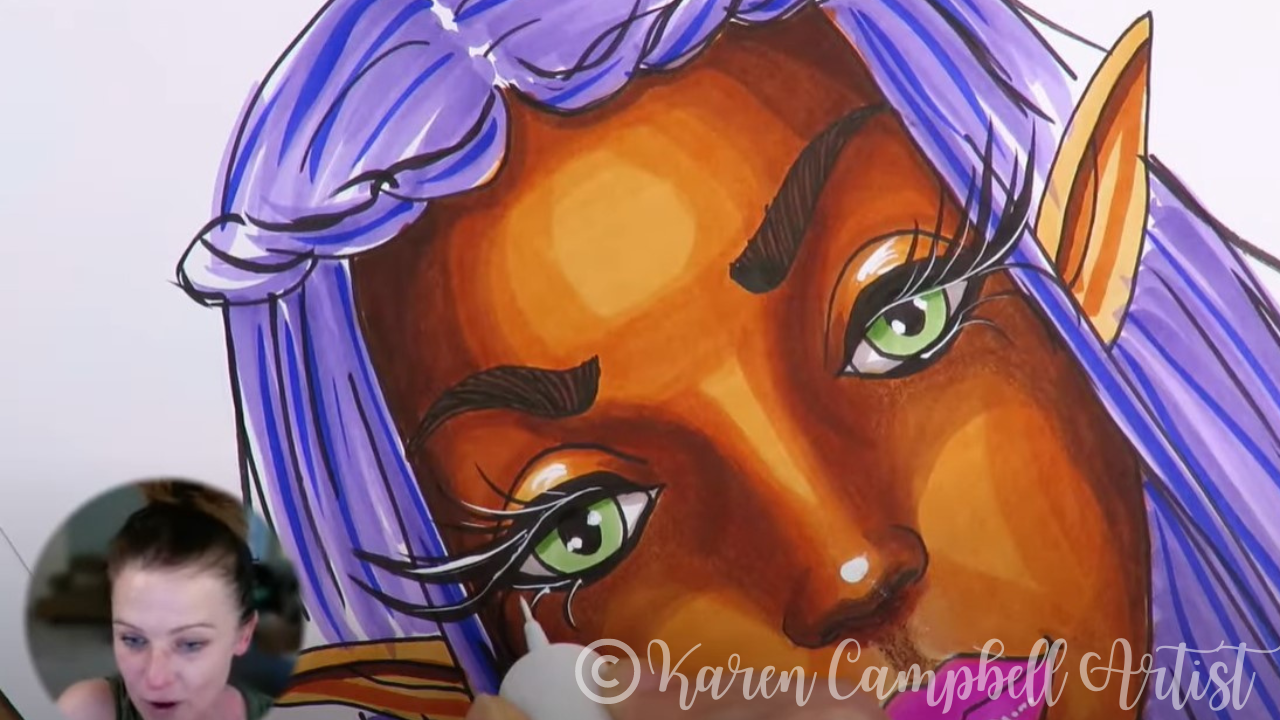
In today's drawing tutorial, I'm trying an expensive new set of skin tone markers by Winsor Newton called ProMarkers. I have high expectations for these alcohol markers because Winsor Newton is a top-of-the-line, fine art brand for artists.
I'm curious to see how ProMarkers compare to the go-to alcohol marker brands I reach for every day. My biggest question today is ARE PROMARKERS WORTH IT?! 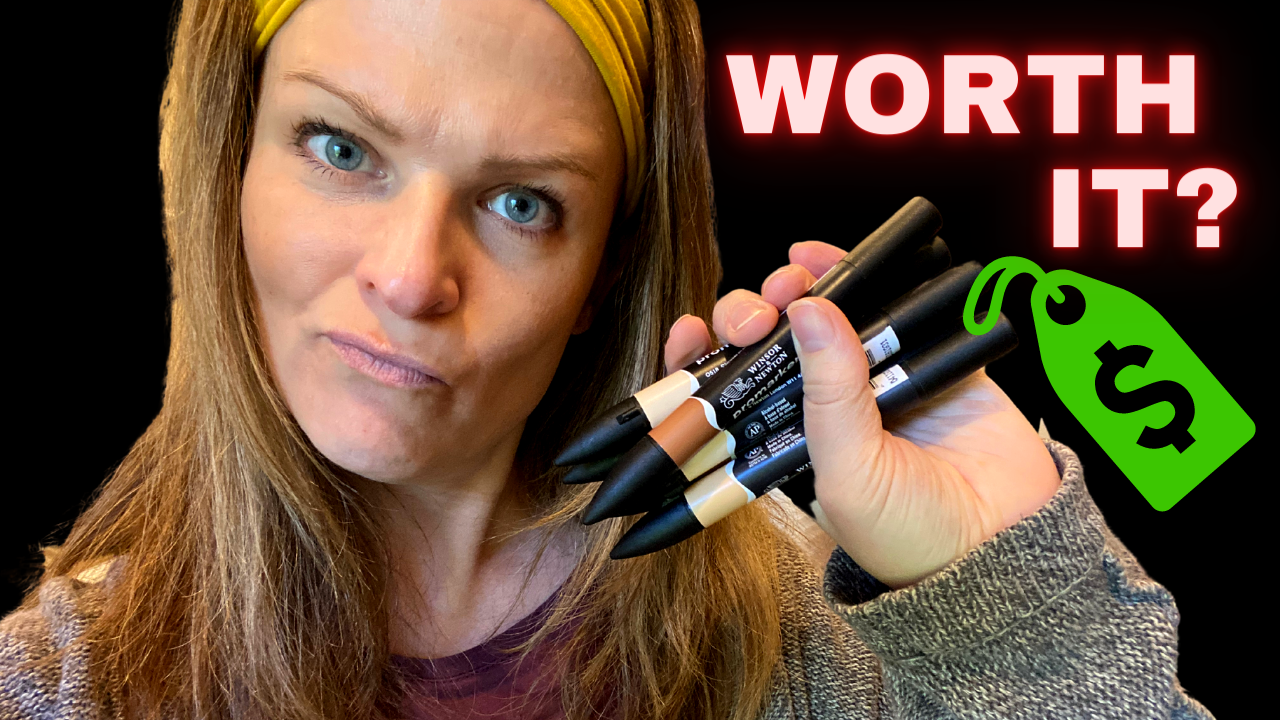
Wanna draw along today, but not quite sure how to draw a face, or how to make the facial features look proportional? It's WAY easier than you think!
Simply click the button below to download my FREE whimsical face drawing guidelines. I never start a face drawing without them! 
Before we continue, super quick announcement: All product links are Affiliate. I may earn a small commission if you choose to order through these links but by law there is never any additional cost to the consumer for doing so. I thank you for your support.
I've been shading the faces I draw with alcohol markers for years, and
am constantly testing new brands to ensure I'm recommending art supplies with the BEST VALUE for my students over at Awesome Art School. After testing a million brands of alcohol markers, I've discovered expensive isn't always better, and multiple brands of alcohol markers can be used successfully on the same project - regardless of price point. 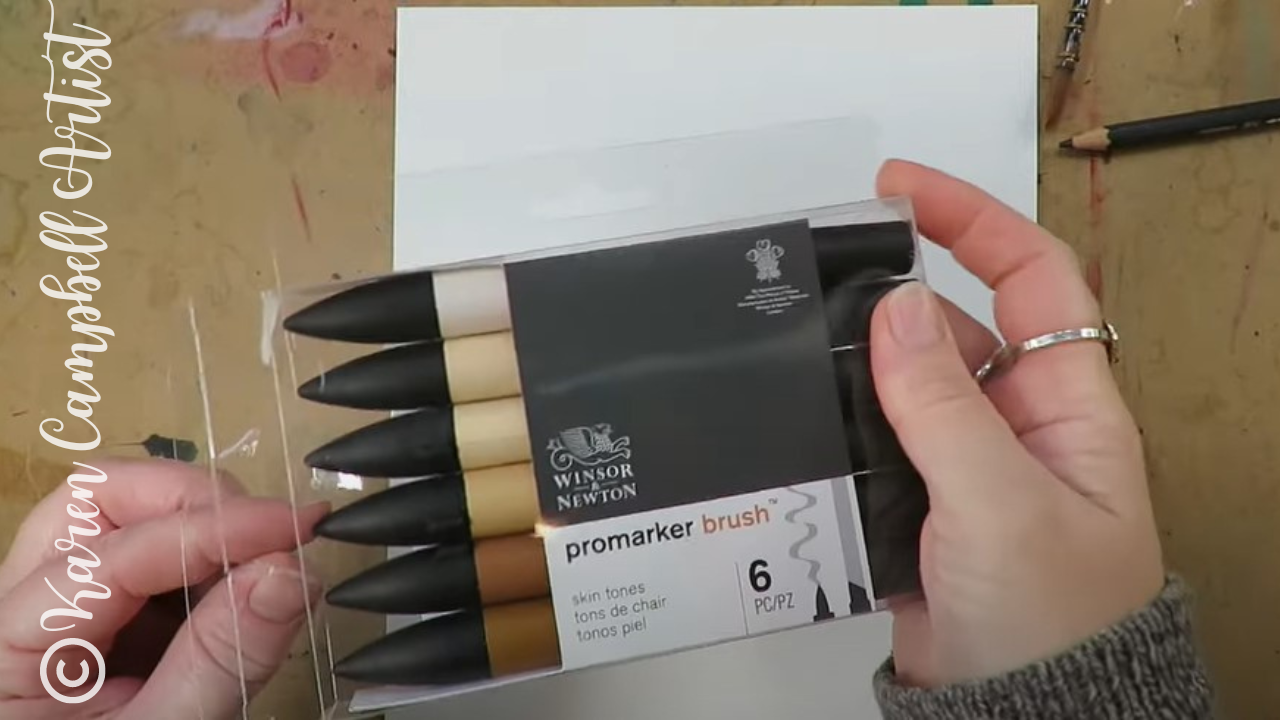
The ProMarker set I'm demo-ing today runs around $30 on Amazon and contains six skin tone alcohol markers. Depending on your budget, this might not sound too bad, until you start comparing ProMarkers to less expensive brands like Ohuhu, which will give you a full 30 more markers for just $9 more!
I don't know about you, but I want MORE COLORS to play with, so will choose that every time! 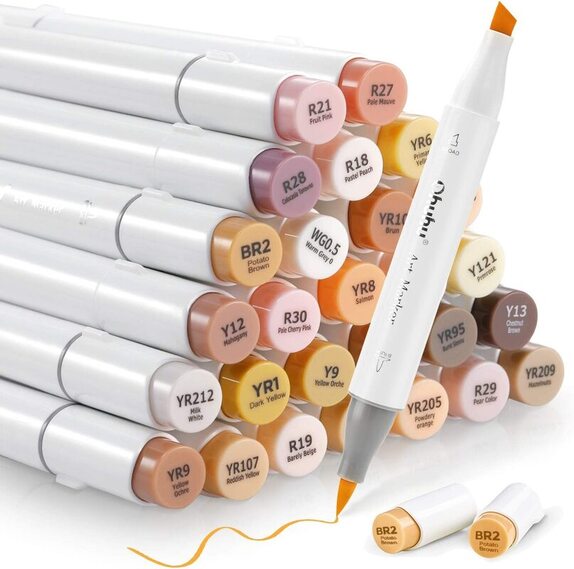
If you're sensitive to smells, you may want to steer clear of ProMarkers. They definitely have more of an odor to them than I notice from my Ohuhus or Copics.
This Promarker set has dual nibs like most alcohol markers. There's a brush tip on one side and a chisel tip on the opposite. Right away I noticed how flexible the brush nib felt. Not sure if I'm gonna love this or get annoyed with it while shading larger areas!
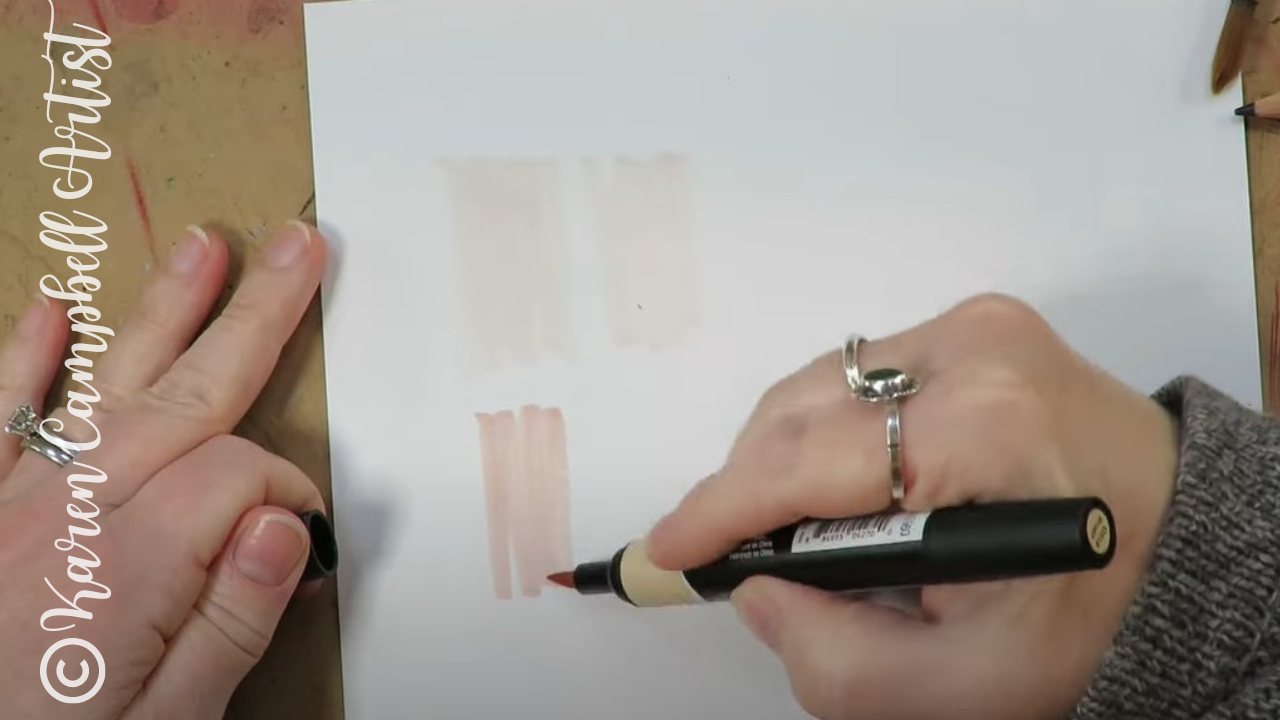
While swatching, I was seriously surprised by the shades Winsor Newton selected for this palette. If you've been following me for a while, or have a copy of my book, Skin Tone Secrets, you know I always recommend selecting three shades of the same color in light, medium and dark to shade ANYTHING.
These subtle variations in color will help give your drawings dimension and make them look more sophisticated. As far as skin tone colors in the Promarkers set of 6 are concerned, I'm not impressed because I can only find two shades in this palette that will truly go together as my light and medium skin tones. The darker markers included are too big of a jump from the medium shades for most artists to use successfully - as you can see below. 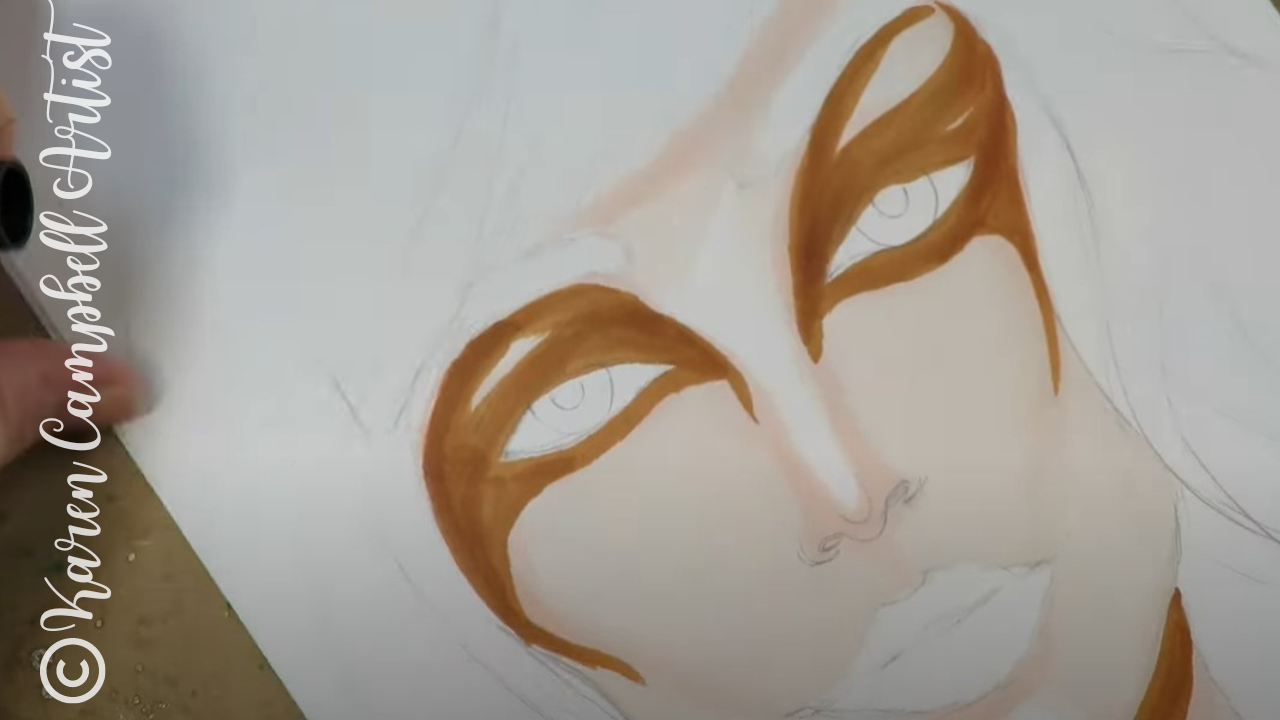
If you watch the video, I'll show you the face chart I selected as today's drawing reference. It has super dramatic makeup in rich fall colors, but my first layer of brown makeup and shadows looks intimidating, even to me!
I keep going though, because I know the only way out of this is more layers of shading, blending, and doodling. If you'd like a copy of today's drawing reference, you can grab that as a PDF in my YouTube & Cheatsheet Library over at Awesome Art School. 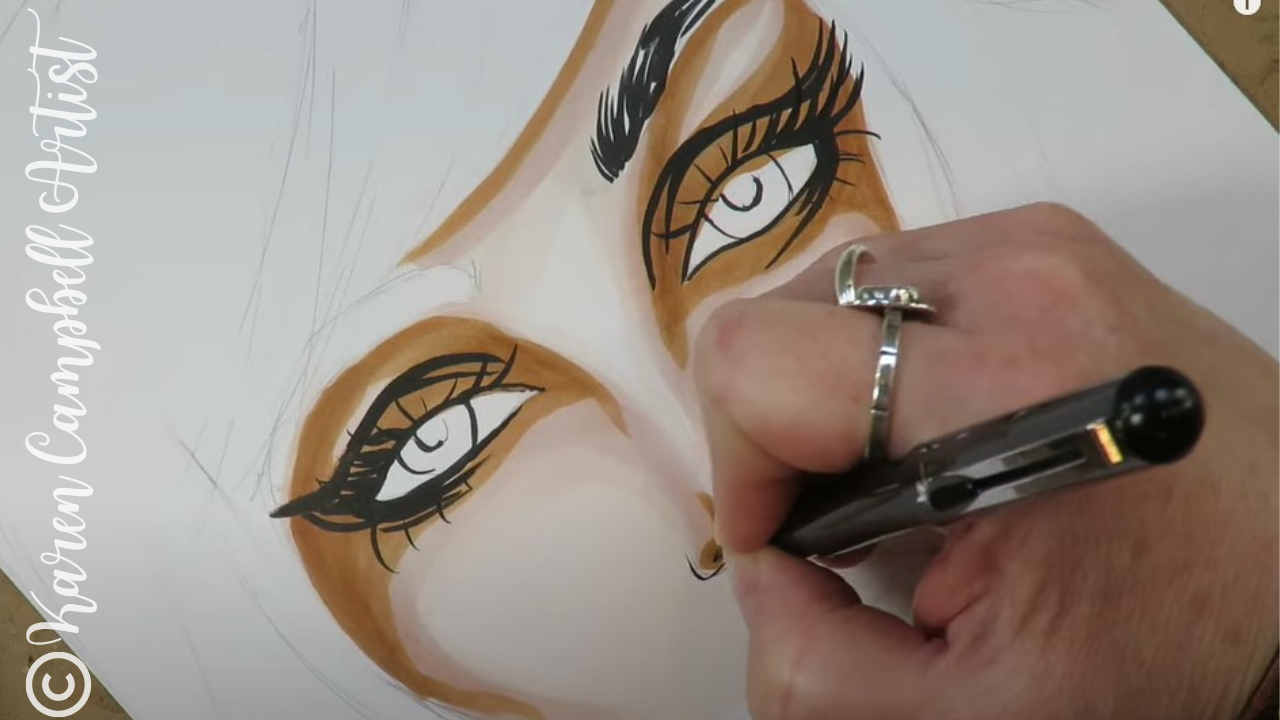
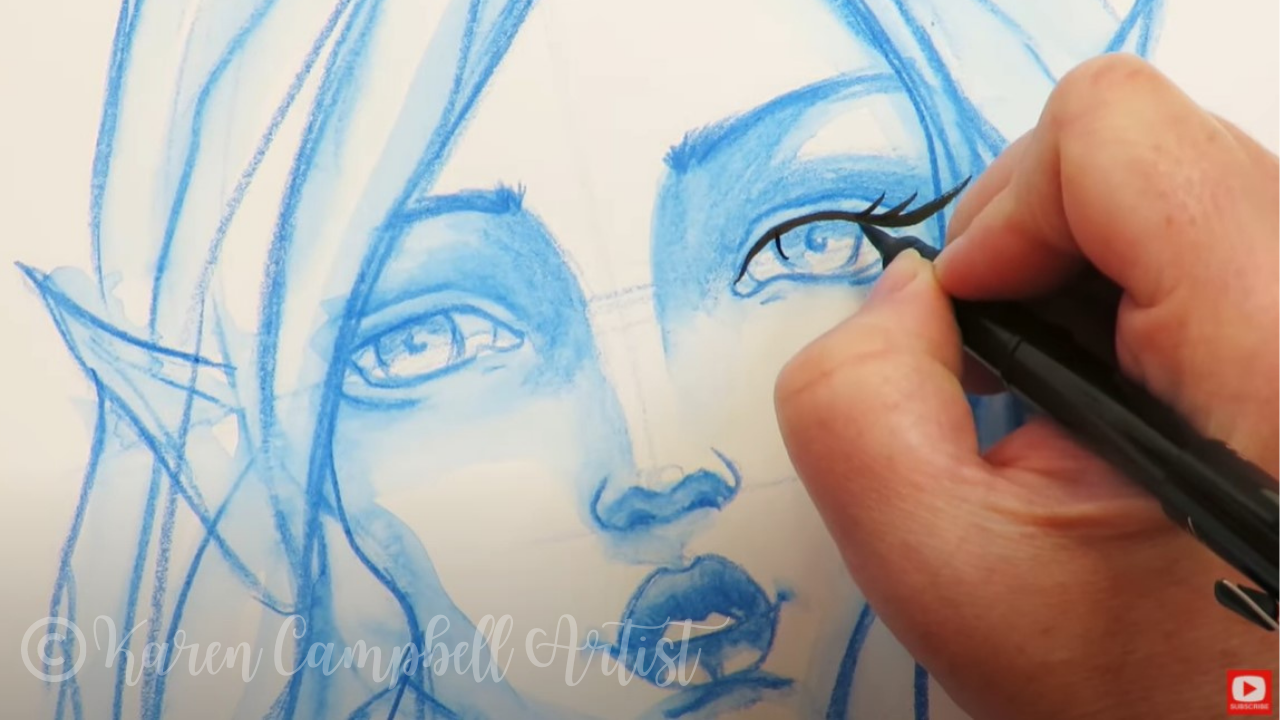
Once I've added detail to the eyes and eyelashes with my Pentel Pocket Brush, the darkest skin tone shading begins to push into the background and becomes less intimidating.
I use my Pentel pocket brush pen for drawing eyelashes on all the faces I draw and paint. It's amazing but has a bit of a learning curve to it. If you need help with it or want to learn how to draw gorgeous eyelashes, check out this video. 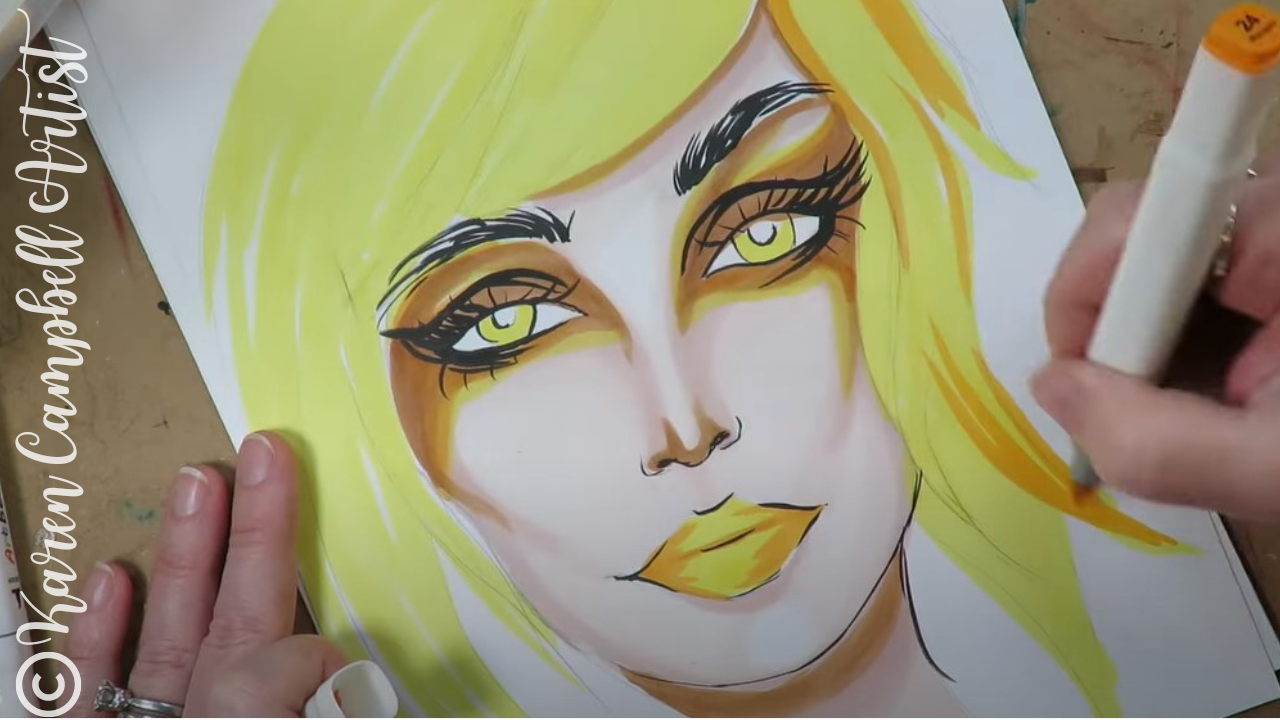
Make sure you click over to the video to get my final thoughts on this skin tone ProMarkers set by Winsor Newton.
As you'll see, I did end up getting annoyed with the brush nib on these markers. They just felt too flimsy and flexible to me so I switched sides and continued the project with the chisel tip for greater control. 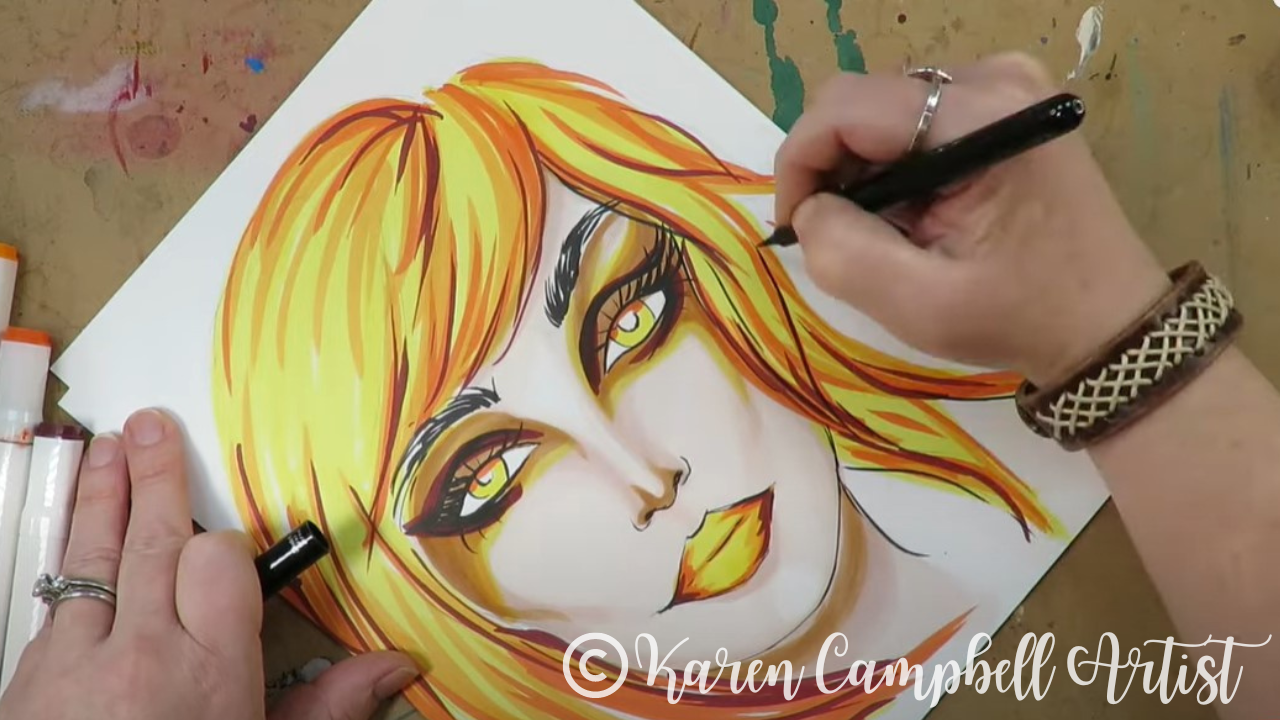
I hope you found today's product review and demo helpful, and I sincerely hope you take a minute to stop and draw along with me in today's video!
See ya next week!!
Need more resources to get your creative juices flowing?
❤️ CHECK OUT ALL my art books on AMAZON ❤️ CHECK OUT ALL my online art classes @ Awesome Art School ❤️ MY FAVORITE ART SUPPLIES on AMAZON (affiliate links) ❤️ MY BELOVED FACEBOOK GROUP
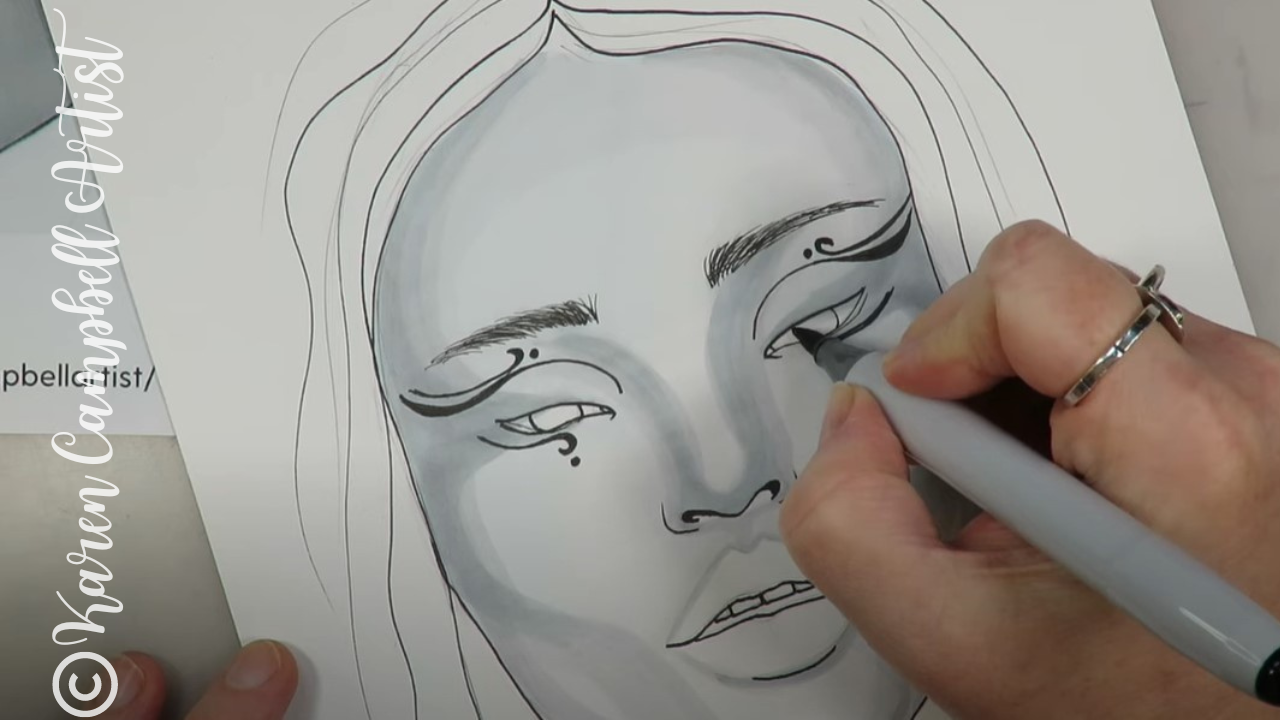
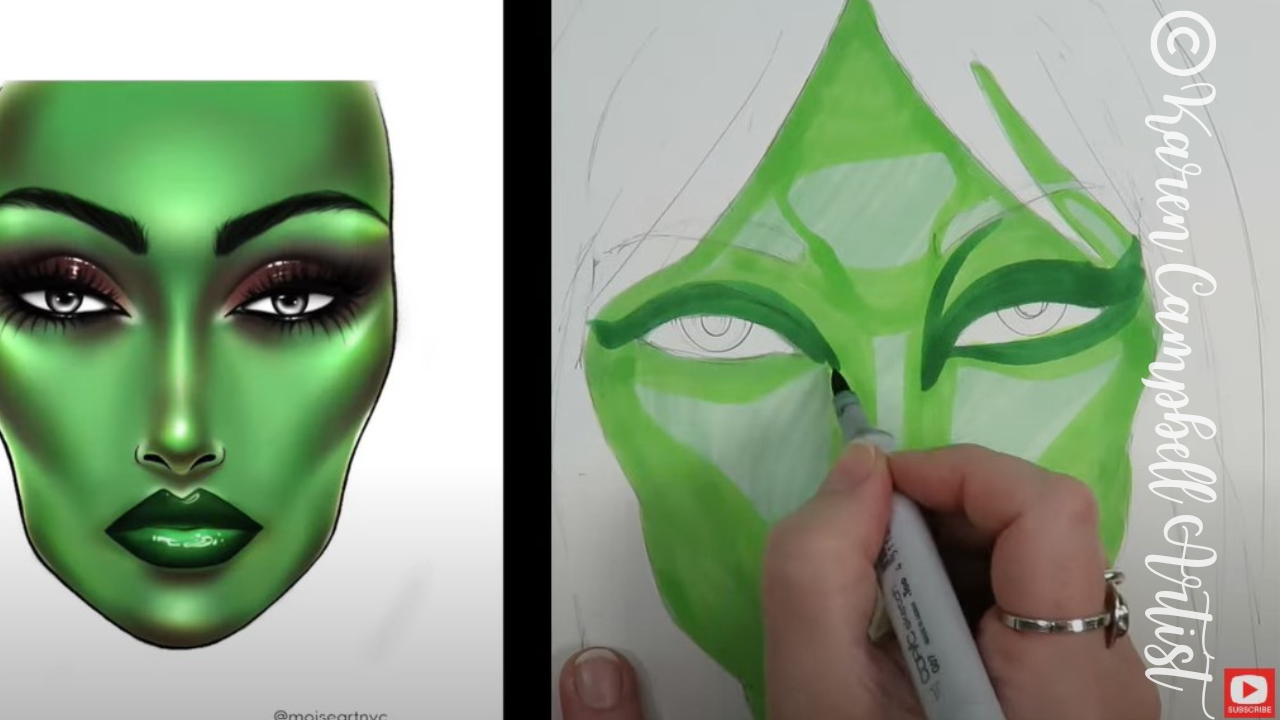
Halloween is right around the corner, so I thought it would be super FUN to create an original drawing with inspiration from TWO fashion face charts! Not sure what a face chart is? No problem. I can't wait to introduce you to them in today's Halloween Drawing project!
Go grab a sheet of bristol, a pencil, and let's draw! 
New to drawing faces? Or have trouble making them look proportional? It's WAY easier than you think.
Simply click the button below to download my FREE Whimsical Face Drawing Guidelines. I'll email them right over! 
Then check your email, print out the guidelines and meet me right back here for today's FUN Halloween fashion face drawing tutorial.
If you're TOTALLY brand new at drawing faces, you might wanna do this project first :) What's a Face Chart?
If you're not familiar with what a face chart is - I want to explain that right off the bat. Face charts are basically drawings of fashion faces that have been used since the 80s by makeup artists to plan out the makeup they'd like to do on their clients.
Tons of these are floating around online from individual makeup artists to big makeup companies like MAC. I think they're gorgeous and often print them out as drawing references to inspire me with new drawing ideas. Isn't this one stunning?! 
It one was done by someone I follow on Instagram, @sonya_miro. I used one of her Halloween makeup looks to inspire me for the spiderweb makeup in today's drawing.
If you'd like to get a copy of the face charts I'm using in this lesson, I've added them to my YouTube & Cheatsheet Library over at Awesome Art School. Use the coupon code YOUTUBESUB to save 25%.
|
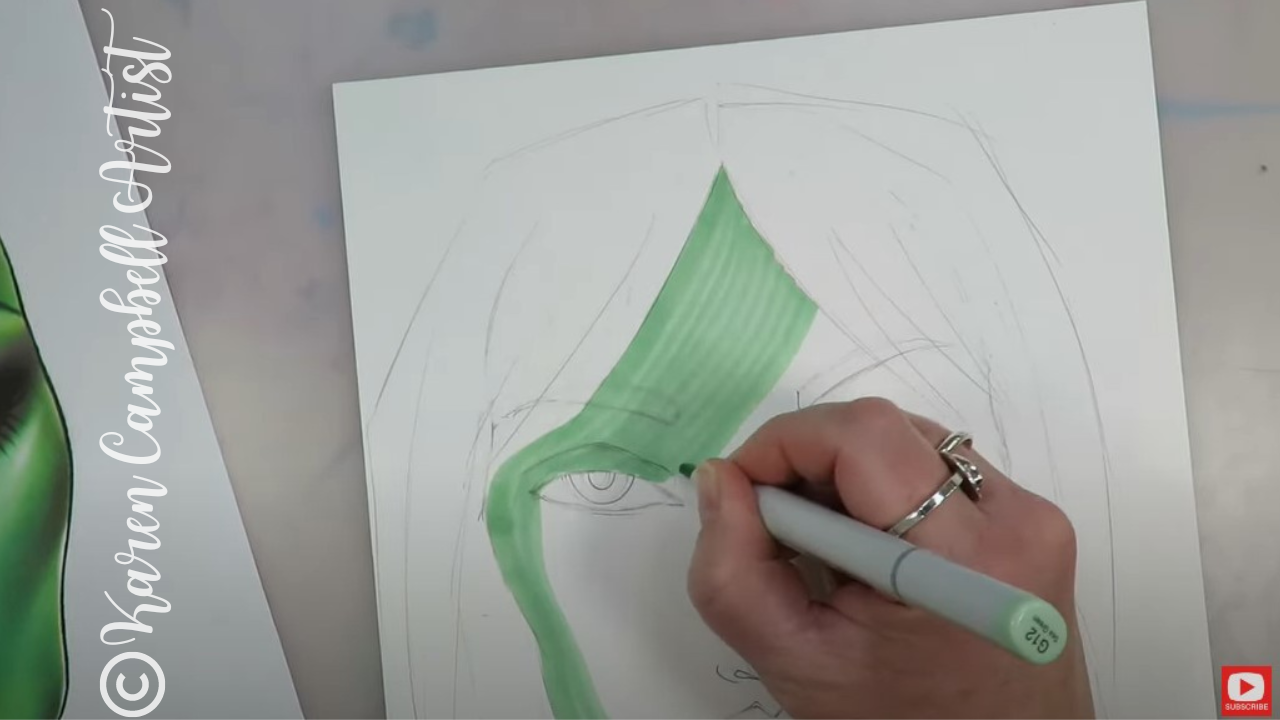
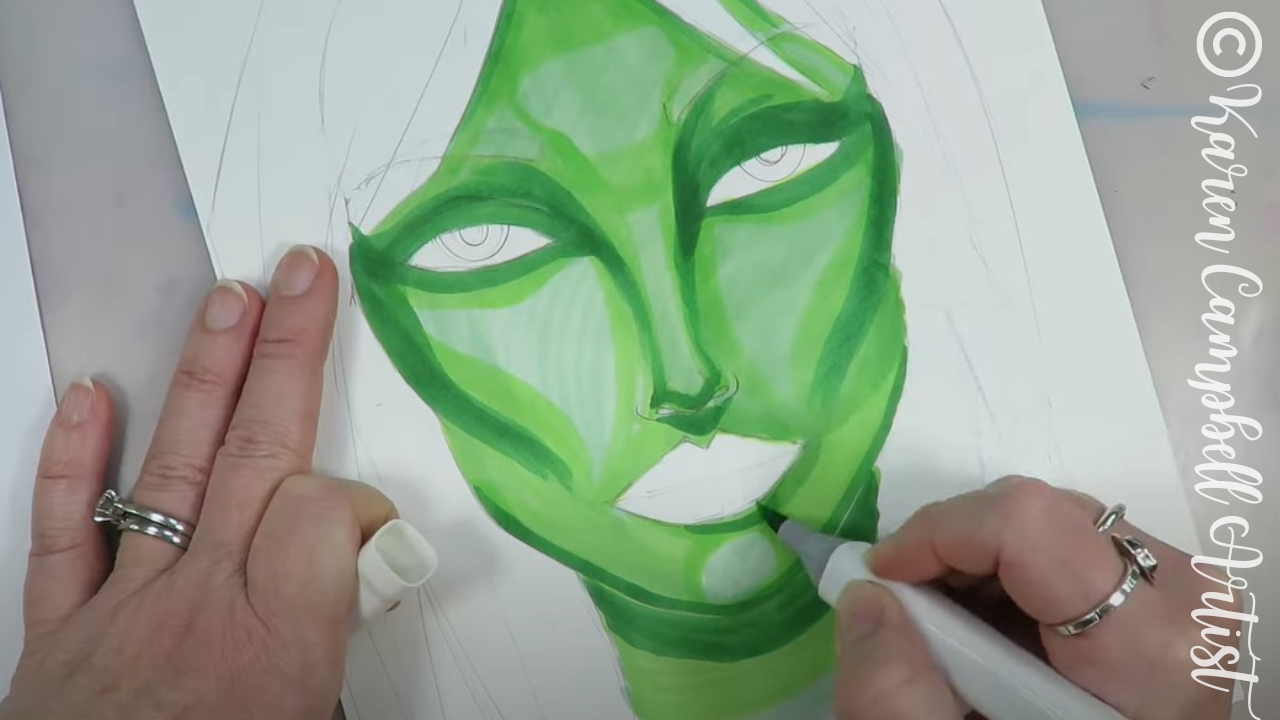
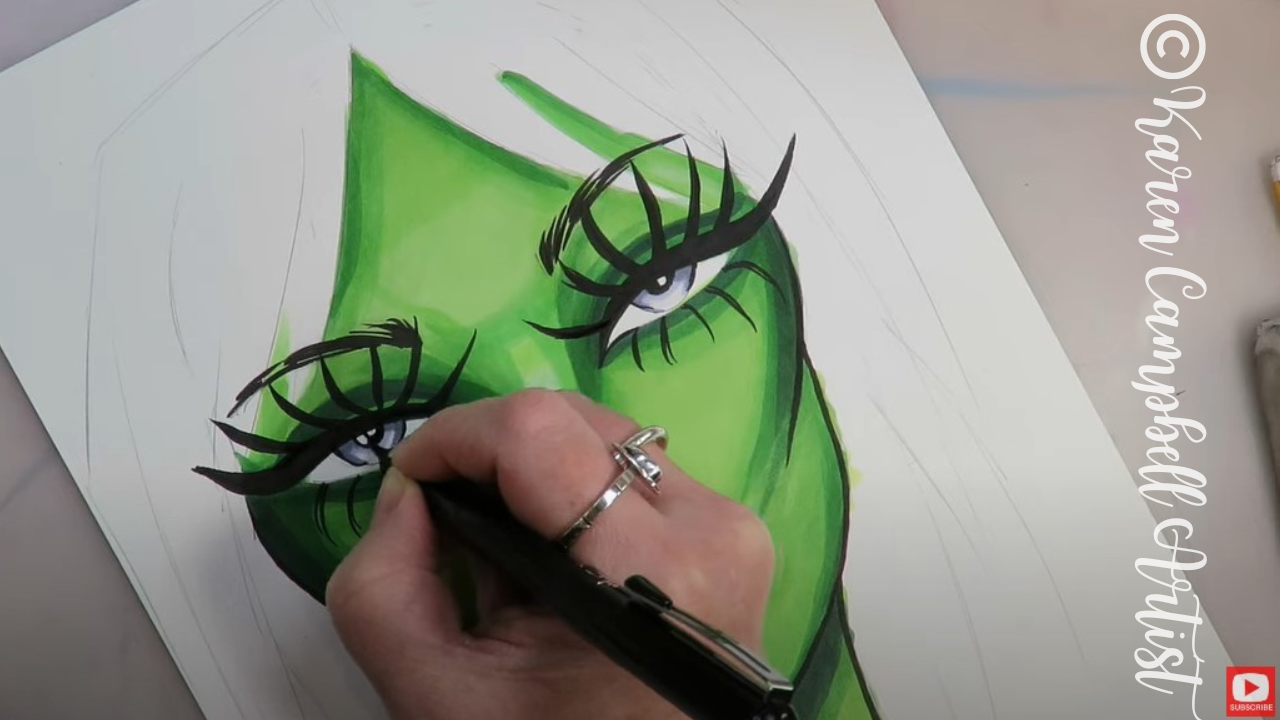
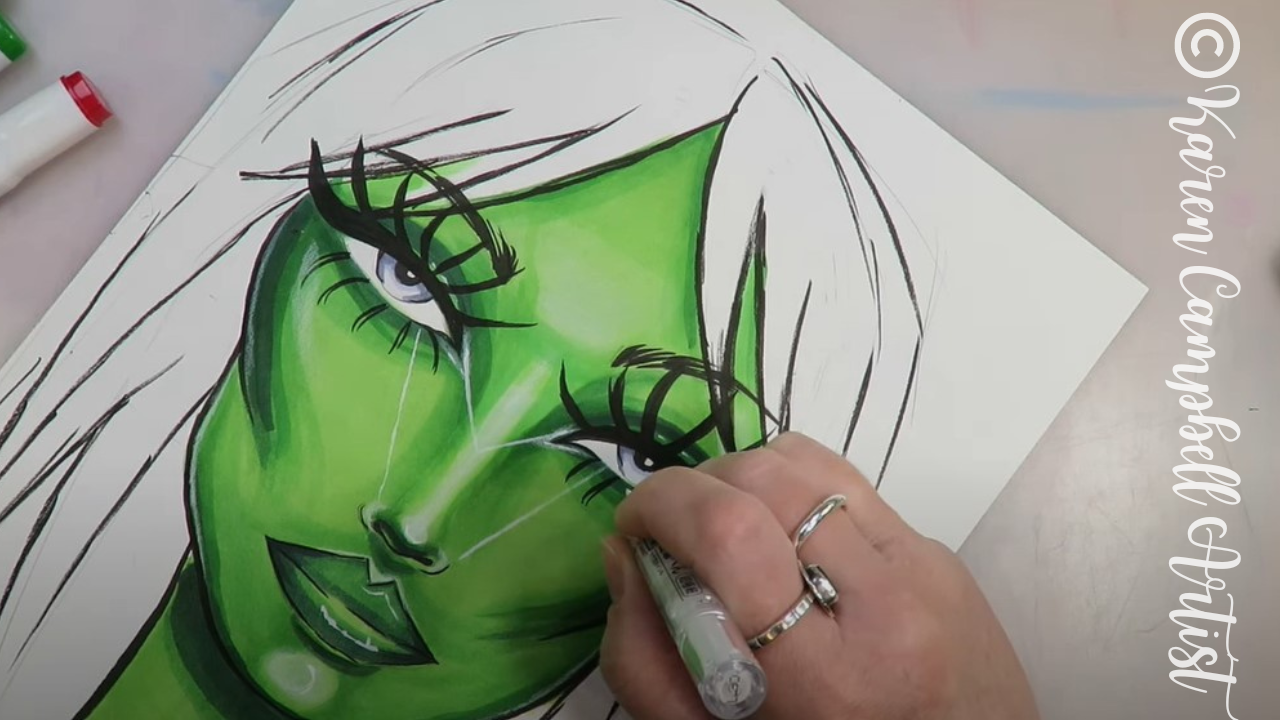


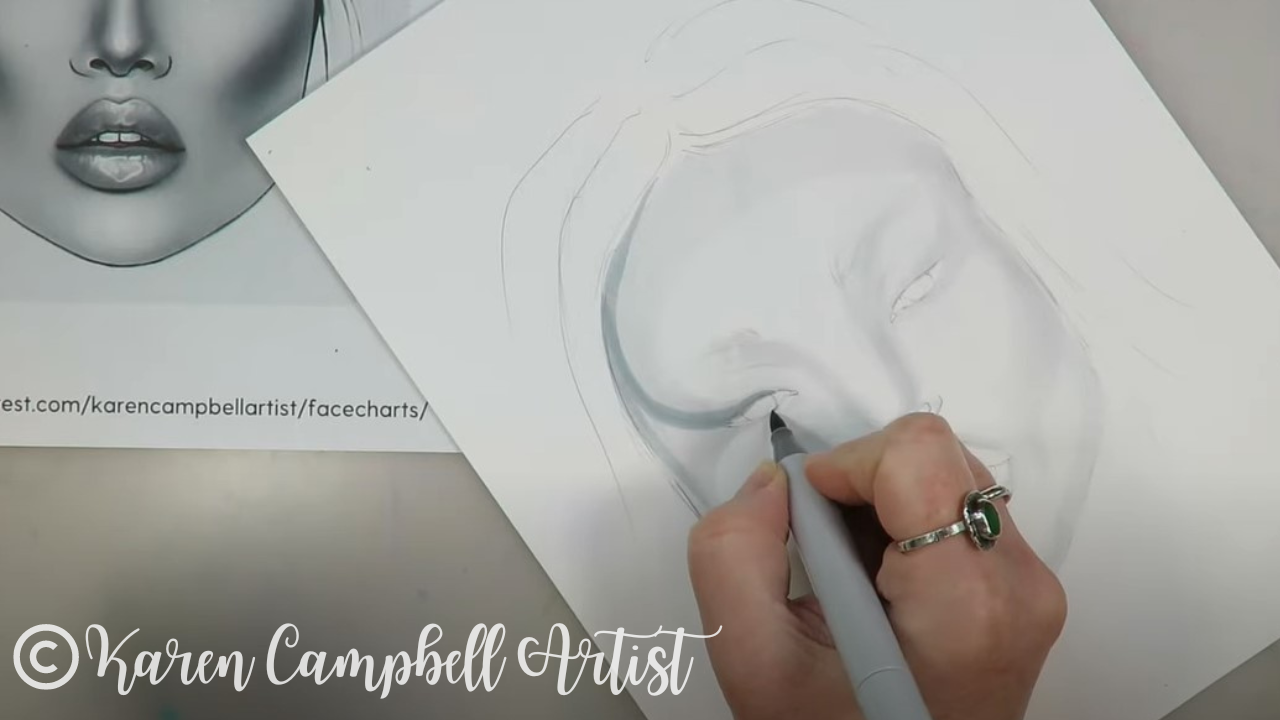
When your drawing is done - keep on watching so you can take your drawing one step further. First, we'll shade her and add dimension with pencil...
Then, I'll teach you how to shade a face using alcohol markers!
❤️ CHECK OUT ALL my art books on AMAZON
❤️ MY FAVORITE ART SUPPLIES on AMAZON
❤️ MY BELOVED FACEBOOK GROUP
❤️ FOLLOW ME ON INSTAGRAM

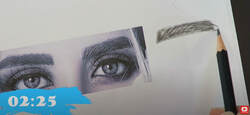
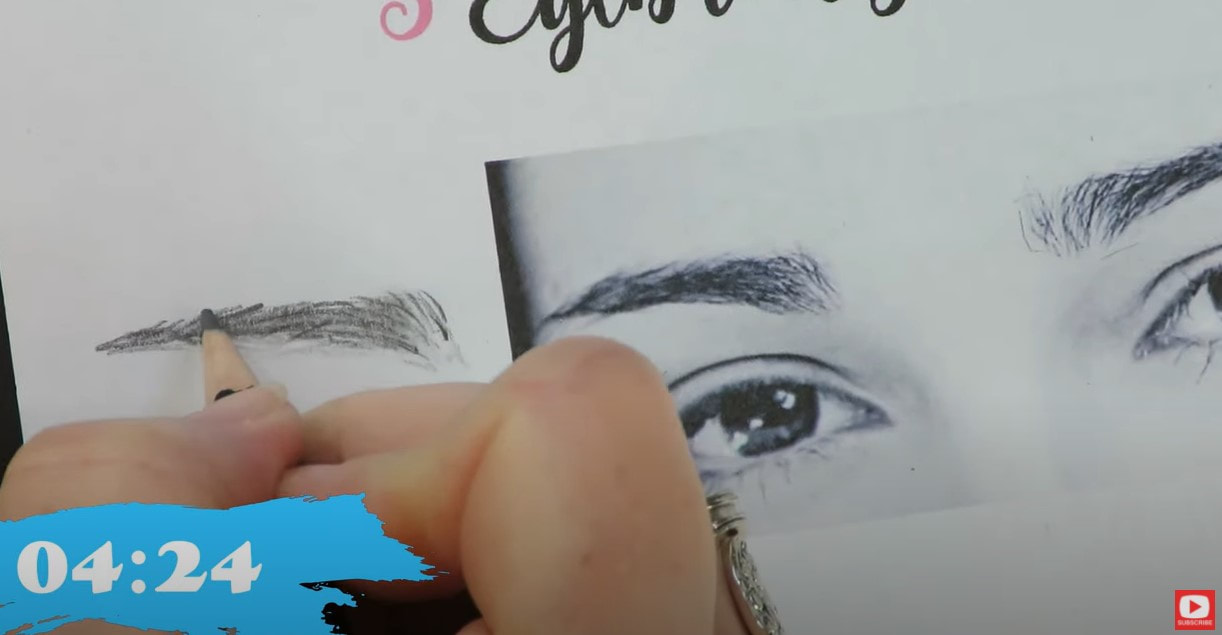
You'll see a stop watch going in the bottom of my screen. It's not here to stress anyone out. It's just to remind me not to spend more than 5 minutes with any one reference image.
Before we continue, super quick announcement: All product links are Affiliate. I may earn a small commission if you choose to order through these links but by law there is never any additional cost to the consumer for doing so. I thank you for your support!
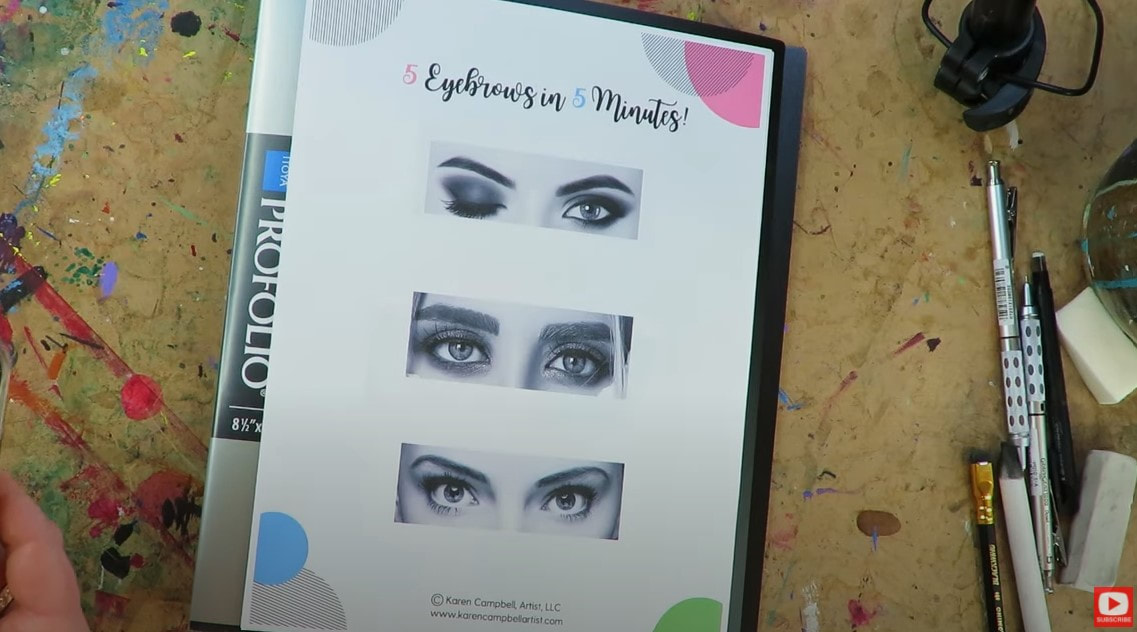
1. Eyebrow Shape
2. Value
3. Details
For my supplies today- I'm just using my favorite Blackwing pencil - it's like a soft 4B, and super smooth to work with. You're also gonna need a blending stump, an eraser (I love my vanish eraser and the tombow mono eraser).
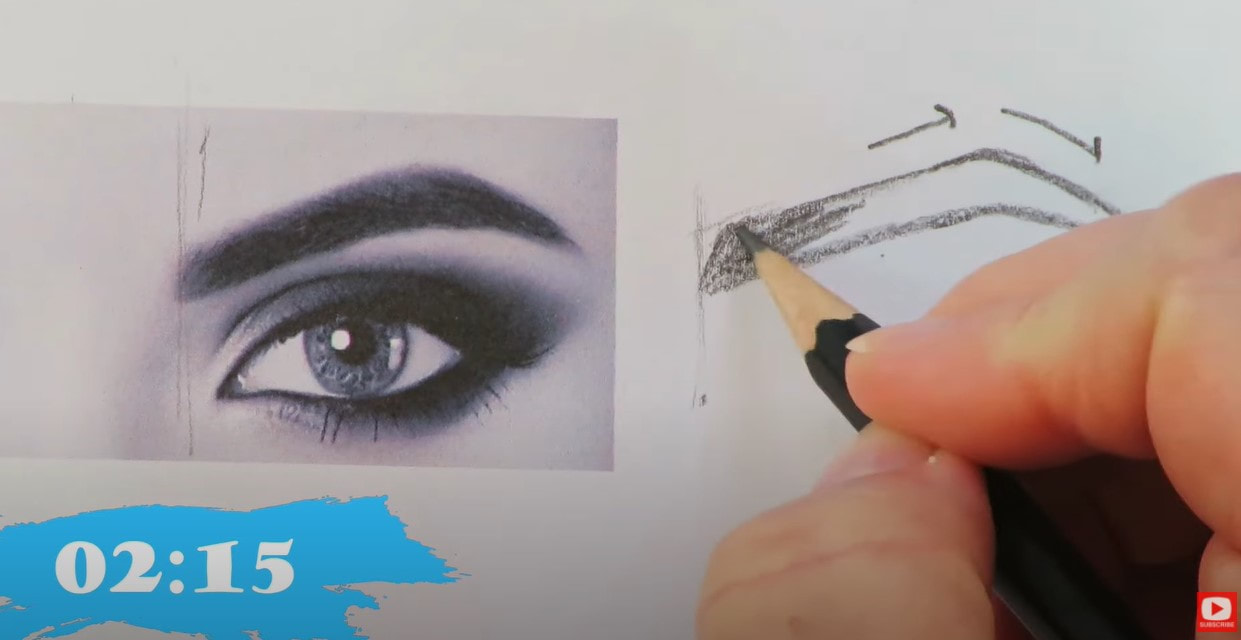
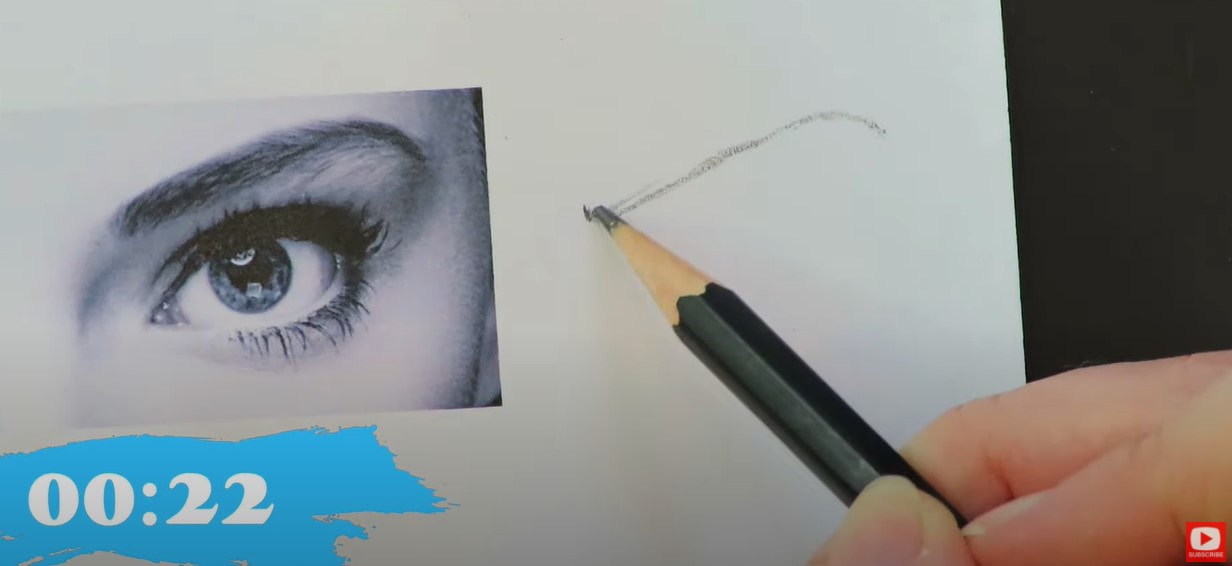
QUICK TIP: When you're ready to draw the individual hairs on the eyebrow, make sure your pencil tip is really sharp, or switch to a mechanical pencil.
Doing drawing practice like this with drawing reference photos and cheatsheets can help you think of new ways to draw from your imagination later.
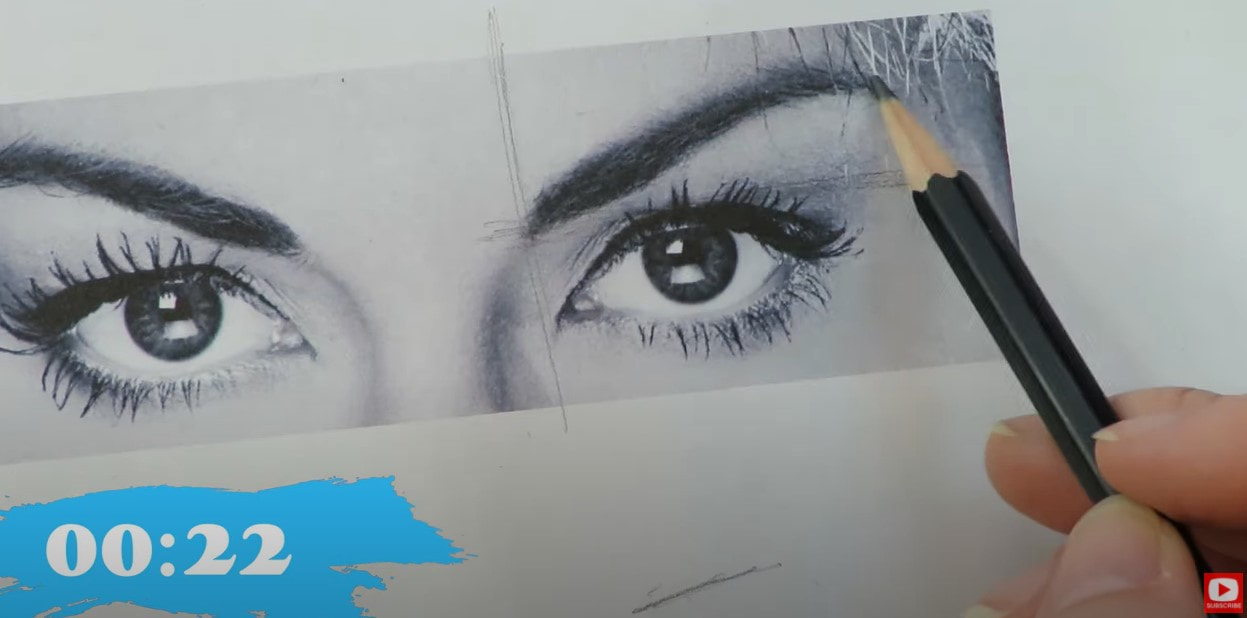
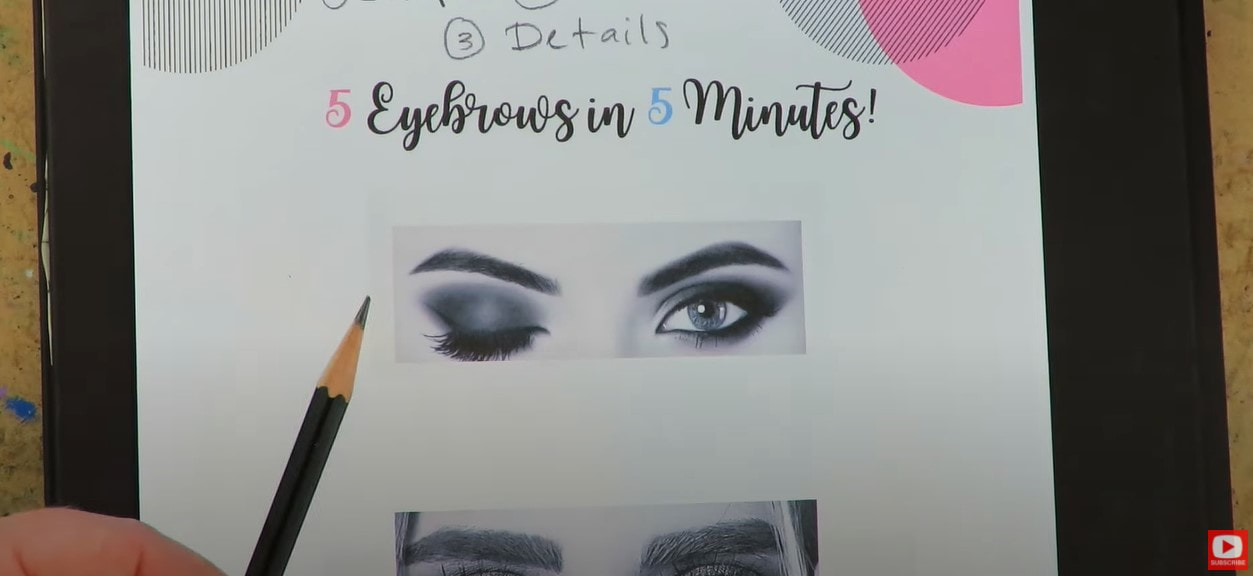
I hope you find these eyebrow drawing references helpful for your own face drawing practice. Remember to grab my cheatsheet so you can do your drawing practice right on the drawing worksheet like me. This drawing worksheet is part of my 5 in 5 Facial Features Drawing Series on my YouTube drawing channel.
In case you missed that- it's a super helpful 6-part video series on how to draw facial features with a worksheet of drawing references to go with each feature.
We worked on how to draw realistic eyes, how to draw realistic noses, how to draw realistic lips, ears, how to draw different face shapes and how to draw fun female hairstyles in 5 minutes.
I popped these new eyebrow drawing worksheets at the end of my drawing packet. You'll also see worksheets for how to draw necks - that's coming up on my YouTube channel soon, so stay tuned for that!
Thanks for hanging out with me today!
CLICK HERE to SIGN UP for the WORKSHOP and take advantage of my special 60% OFF Coupon Code before September 27th
If you do plan to join me for this upcoming workshop, one of the mixed media art supplies I ALWAYS use is faber castell gelatos. I have heard from a number of my students that they can't get their hands on gelatos, so I just did a video on my mixed media YouTube channel about Faber Castell Gelatos Alternatives, and test a huge variety of gel crayons out for you so YOU don't have to! Make sure you check this out before the workshop starts on September 27th.
See ya there!!
❤️ CHECK OUT ALL my art books on AMAZON
❤️ MY FAVORITE ART SUPPLIES on AMAZON
❤️ MY BELOVED FACEBOOK GROUP
❤️ FOLLOW ME ON INSTAGRAM
Karen Campbell
Founder of Awesome Art School. Mixed Media Artist. Author of 19 Instructional Art Books!
Posting on YouTube every single Wednesday of the year!

Whose work has appeared in...


Archives
July 2024
June 2024
May 2024
April 2024
March 2024
February 2024
January 2024
December 2023
November 2023
October 2023
September 2023
August 2023
July 2023
June 2023
May 2023
April 2023
March 2023
February 2023
January 2023
December 2022
November 2022
October 2022
September 2022
August 2022
July 2022
June 2022
May 2022
April 2022
March 2022
February 2022
January 2022
December 2021
November 2021
October 2021
September 2021
August 2021
July 2021
June 2021
May 2021
April 2021
March 2021
February 2021
January 2021
December 2020
November 2020
October 2020
September 2020
August 2020
July 2020
June 2020
May 2020
April 2020
March 2020
February 2020
January 2020
December 2019
November 2019
October 2019
September 2019
July 2019
June 2019
May 2019
April 2019
March 2019
February 2019
January 2019
December 2018
November 2018
Categories
All
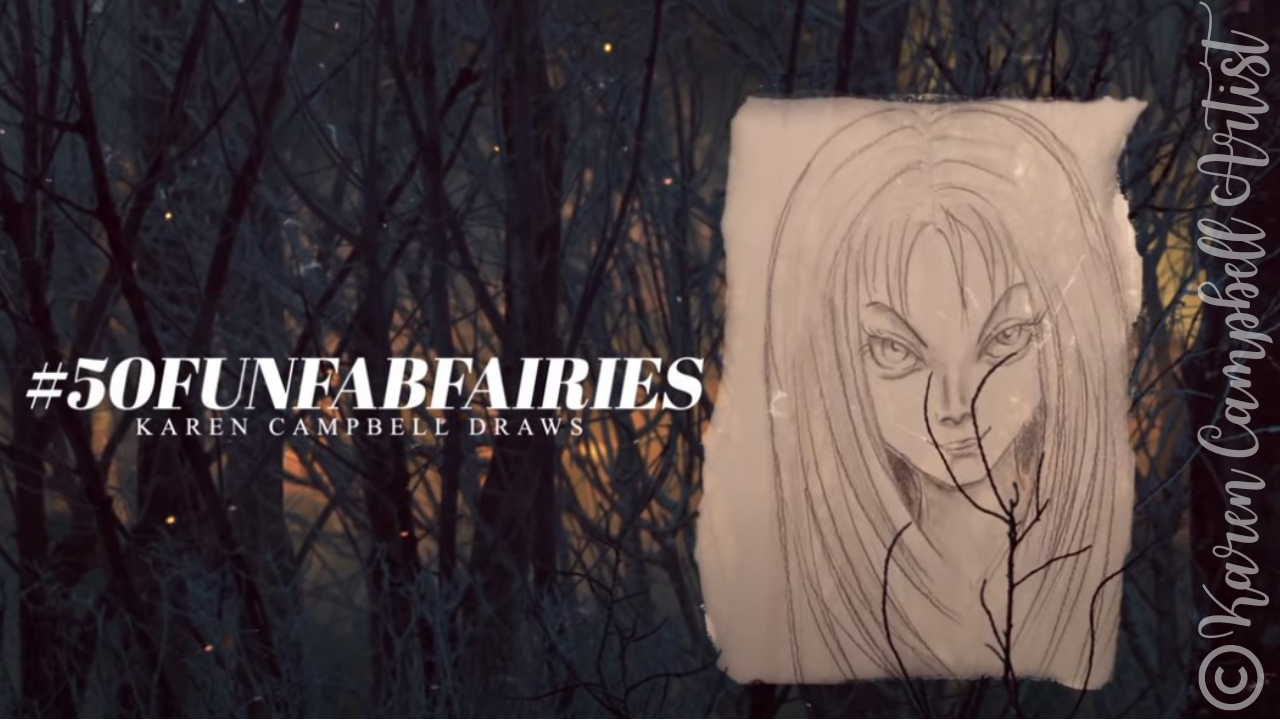
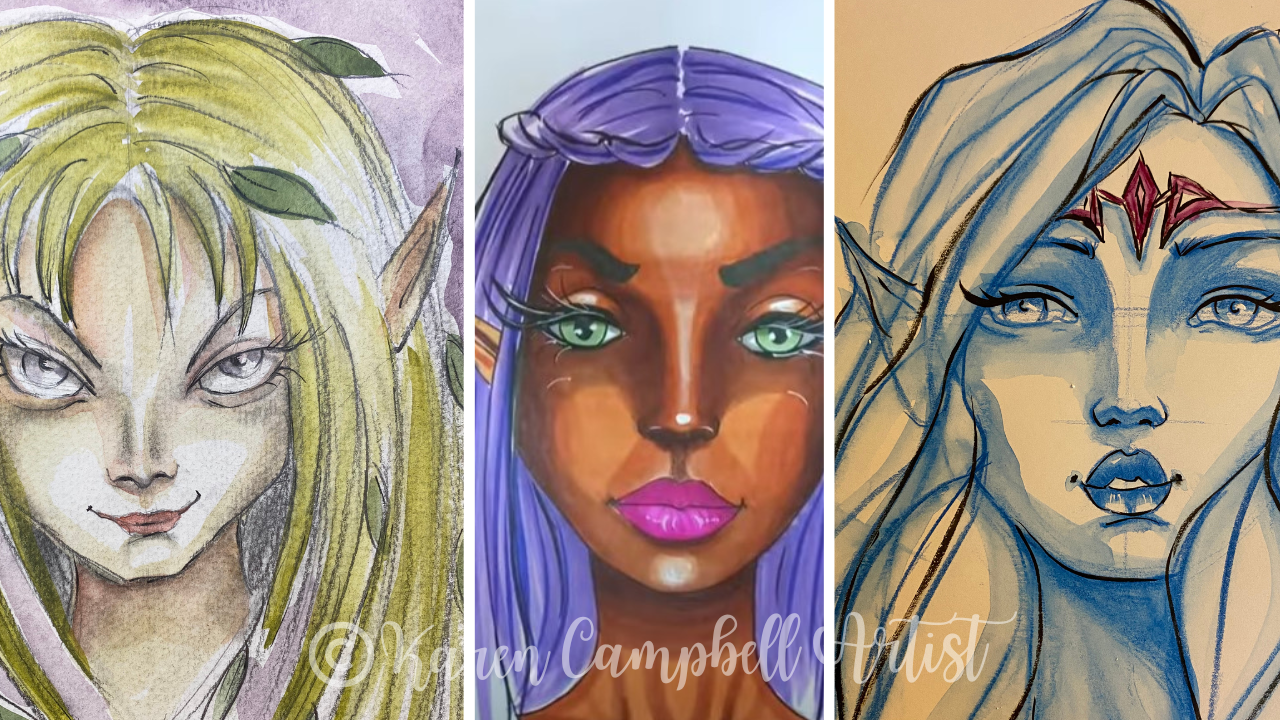
#50FunFabFairies Drawing Challenge
5 Minute Drawing Practice
Acrylic Brushes
Acrylic Painting Basics
Acrylic Painting For Beginners
Acrylic Painting On Canvas
Acrylic Painting Supplies
Acrylic Painting Tutorial
Acrylic Paint Types
Alcohol Ink Painting
Alcohol Ink Tutorial
Alcohol Marker Art
Alcohol Marker Blending
Alcohol Marker Brands
Alcohol Marker Drawing
Alcohol Markers By ArtBeek
Alcohol Markers Tutorial
Altered Book
Altered Book Art Journal
ArtBeek Alcohol Markers
Art Book Reviews
Art Books I Love
Art Deco
Art Deco Drawing
Art Deco Mixed Media Projects
Art Deco Style
Art For Beginners
Art Heals
Artist Collaboration
Artist Encouragement For Beginners
Artist Positive Mindset For Beginners
Art Journal
Art Journal For Beginners
Art Journal Ideas
Art Journal Inspiration
Art Journal Page
Art Journal Techniques
Art Retreats
Art Studio Makeover
Art Supplies
Art Supply Demos
Art Supply Reviews
Art Supply Storage
Asian Eye Drawing
Beginner Drawing Projects
Beginners
Behind The Scenes
Blackwing Pencils
Blackwing Volumes
Brush Pens
Canvas Painting
Cartoon Cat Drawings
Castle Drawing Lesson
Cat Art
Celtic Collective
Charcoal Drawing
Charcoal Portrait
Christmas Watercolor Ideas
Collage
Collage Ideas
Collage Techniques
Collage Tutorial
Colored Pencils
Copic Marker Alternative
Copic Marker Art
Copic Marker Drawing
Copic Marker Tutorial
Copic Skin Tones
Copic Vs Ohuhu Alcohol Markers
Craft Gem Projects
Create Your OWN Custom Watercolor Palette
Daniel Smith
Daniel Smith Watercolor Palette
Daniel Smith Watercolors
Dip Pens
DIY Travel Watercolor Palette
Drawing
Drawing A Baby Face
Drawing Books On Amazon
Drawing Cats
Drawing Challenge
Drawing Erasers
Drawing Eyelashes
Drawing Eyes In Pencil
Drawing Faces
Drawing Faces For Beginners
Drawing Facial Features
Drawing Female Hairstyles
Drawing For Beginners
Drawing Hairstyles
Drawing Highlights
Drawing Ideas For Travel
Drawing Necks Realistically
Drawing Pencils
Drawing Tutorial
Drink & Draw
Ear Drawing Practice
Easy Acrylic Painting
Easy Drawings For Beginners
Easy Face Drawing Tutorial
Easy Mixed Media Projects
Easy Owl Painting
EASY Watercolor Tutorial
Easy Zen Doodle
Ecoline Brush Pens
Elegant Writer
Erasers
Eyelashes Drawing
Faber Castell Gelatos
Faber Castell Watercolor Markers
Facebook Live Lessons
Face Chart Inspired Drawing Tutorial
Face Drawing
Face Drawing Guidelines
Face Drawing Practice
Face Drawing Tutorial
Face-shading
Face-shape-drawing
Face-sketch
Fantasy-art-drawing
Fantasy Art Drawing Projects
Fantasy Art Painting Projects
Fashion-face-drawing-tutorial
Fashion-figure-drawing
Fashion-illustration-for-beginners
Fineliner-tips
Flip-throughs-of-my-books
Foam Head Projects!
Fountain-pen-ink
Fountain-pen-ink
Fountain-pen-ink-painting
Fountain-pen-ink-painting
Free-art-lesson
FREE Cheatsheets!
Free-drawing-lesson
Free-lesson
FREE LIVE Art Alongs
Free-watercolor-lesson
Free-watercolor-lesson
Full Length Drawing Tutorial
Full Length Face Drawing Tutorial
Full Length Face Shading Tutorial
Full Length Mixed Media Projects
Fun Fab Drawing Club
Fun-fab-fairies
Fun Fab Famous People & Paintings
Gesso-brush
Gift Cards
Gift Ideas For Artists
Gift Ideas For Beginners
Glass-dip-pens
Gouache-meaning
Graphite-transfer-paper
Halloween-face-drawing-tutorial
Halloween-projects
Hamburger
Hamburger System
Hot-dog-system
How To Add Highlights To A Drawing
How To Add Highlights To Face Drawings & Mixed Media Portraits
How To Add Shading To A Drawing
How To Art Journal
How To Become An Awesome Artist
How-to-choose-face-drawing-references
How-to-color-a-baby-face-in-copic-markers
How To Create A Watercolor Palette
How To Draw
How To Draw A 34 View Face
How-to-draw-a-babys-face
How-to-draw-a-face
How-to-draw-a-fairy
How-to-draw-a-fairy-face
How To Draw A Fun Fab Face
How-to-draw-a-male-face
How-to-draw-and-shade-a-face-in-copic-markers
How-to-draw-and-shade-a-face-in-copic-markers
How-to-draw-and-shade-a-whimsical-african-american-face
How-to-draw-and-shade-a-whimsical-african-american-face
How To Draw Anime & Manga
How-to-draw-art-deco-style
How-to-draw-asian-eyes
How-to-draw-a-smile-with-teeth
How-to-draw-bangs
How-to-draw-cartoon-cats
How-to-draw-dreadlocks
How-to-draw-ears
How-to-draw-expressions
How-to-draw-eyebrows
How To Draw Eyelashes
How To Draw Eyes Realistically
How To Draw Fairy Ears
How To Draw Figures
How To Draw Freckles
How To Draw Hair
How To Draw Lips
How To Draw Lips Realistically
How To Draw Noses Realistically
How To Draw Realistic Ears
How To Draw Teeth
How To Draw Wrinkles
How To Paint Eyelashes
How To Seal Your Work
How To Shade
How To Shade A Face In Color
How To Shade DARK Skin Tones With Alcohol Markers
How To Shade Faces With Alcohol Markers
How To Shade Faces With Tombow Markers
How To Sketch A 3 Quarter Portrait
How To Sketch A Face
How To Swatch Art Supplies
How To Transfer A Drawing
How To Use Gloves In A Bottle
How To Use Linseed Oil
How To Use Oil Pastels
LARGE Canvas Painting Technique
Lickleyhead Castle
Line Drawing
Magical Mashup
Marker Storage Solutions
Marker Tips
Martini Glass Drawing
Mermaid
Mixed Media
Mixed Media Art
Mixed Media Art Books I Love
Mixed Media Art Ideas
Mixed-media-art-journal
Mixed Media Art Journaling
Mixed Media Art Journal Tutorial
Mixed Media Art Supplies
Mixed Media Art Techniques
Mixed Media Art Tutorials
Mixed Media Backgrounds
Mixed Media Brushes
Mixed Media Canvas
Mixed Media Challenge
Mixed Media Collage
Mixed Media Collage Background
Mixed Media Collage Tutorial
Mixed Media Drawing
Mixed Media Eyes
Mixed Media Faces
Mixed Media Face Shading
Mixed Media Foam Heads
Mixed Media Girls
Mixed Media Hamburger
Mixed Media Hot Dog System
Mixed Media Ideas
Mixed Media Layering Process
Mixed Media Paintbrushes
Mixed Media Painting
Mixed Media Portraits
Mixed Media Project
Mixed Media Society
Mixed Media Techniques
Mixed Media Tutorial
Mixed Media Tutorials
Mixed Media Watercolor
Mixed Media YouTube
Monochromatic Drawing
My Favorite Art Supplies
My Favorite Watercolors
My Journey As An Artist
My Mixed Media Layering Process
New Book!
No Draw Mixed Media Art Project
Noodler's Ink
Nose Drawing Practice
Ohuhu Alcohol Markers
Oil Pastels & Acrylic Paint
Oil Pastels Brand Comparison For Beginners
Oil Pastels & Colored Pencils
Oil Pastels For Beginners
Oil Pastels + Linseed Oil
Oil Pastel Tutorial
Old Book Crafts
Owl Painting
Paint Brush Types
Painting On Canvas
Painting With Ink
Paint Markers
Palette Knife Painting
Pan Pastels
Paper Napkin Art Journal Background
Pastel Watercolor Sets
Pencil Drawing Tutorial
Pitt Pen Alternative
Portrait Drawing
Portrait Drawing Tutorial
Posca Alternatives
Posca Paint Pens
Prima Watercolor Sets
Profile Drawing
Profile Drawing Tutorial
Quadrant Method
Quick & Easy Face Drawing Tutorial
Reference Drawing
Scotland
Scottish Castle Art Retreat
Sealers Vs Fixatives
SEE INSIDE MY Art Books!
Shading Faces
Sheet Music Art
Side Profile Drawing
Side View Drawing
Silver Black Velvet Brushes
Sketching Tutorial
Skull Watercolor Tutorial
Spray Paint On Canvas Idea
Stabilo All Pencil Projects
Steampunk Drawing
Stenciling & Stamping Techniques
Three Quarter View Face
Time Lapse Drawing Video
Tissue Paper Art Journal Background
Tombow Brush Pens
Tombow Mono Zero Eraser
Tombow Skin Tone Markers
Toned Paper Drawing
Travel Art Supplies
Upcycled Art
Upcycle Old Books
Value Scale Drawing
Vintage Book Pages
Wardhill Castle
Watercolor
Watercolor And Colored Pencil
Watercolor And What Else?
Watercolor Brushes
Watercolor Fairy
Watercolor For Beginners
Watercolor Markers
Watercolor Marker Tips
Watercolor Marker Tricks For Mixed Media
Watercolor Palette Setup
Watercolor Portrait
Watercolors
Watercolor Sets I Love
Watercolor Supplies
Watercolor Techniques
Watercolor Tutorial
WatercolPainting Techniques
Watersoluble Art Supply Tricks
Water Soluble Markers
Water Soluble Pencils
What Is Mixed Media Art?
Whimsical-christmas-tree
Whimsical Face Drawing Tutorial
Whimsical-face-drawing-tutorial
Whimsical Women Of The World World Portrait Drawing Series
YouTube Drawing Channel
Youtube-giveaway
Youtube-video
Youtube-video
Zentangle Drawing Ideas
Zentangle Drawing Tips
Zentangle Drawing Tutorial
Zentangle Feather Drawing Tutorial
 RSS Feed

"Karen is flipping hilarious and she's very real...I like the way she teaches in a way that really gives you confidence, whether you're a beginner or advanced there's always something new to learn!"
- Elizabeth W. |
What Fans Are SayingKaren, you are absolutely fabulous! You make me feel like I can draw anything. I have recently retired and finally have the time to do some of the art that I have loved since I was in school. I am really at the beginning of my art journey and I hope to learn as much as I can. Thank you for all you do. |
Contact ME |