
|
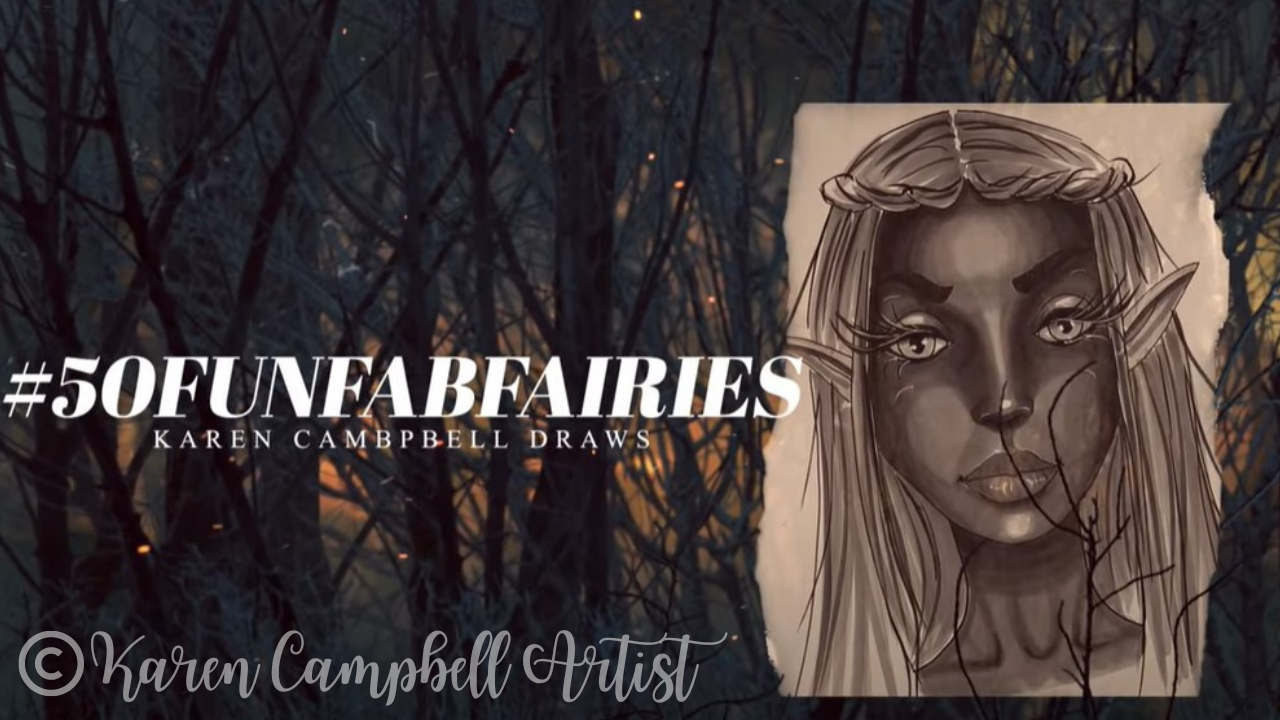
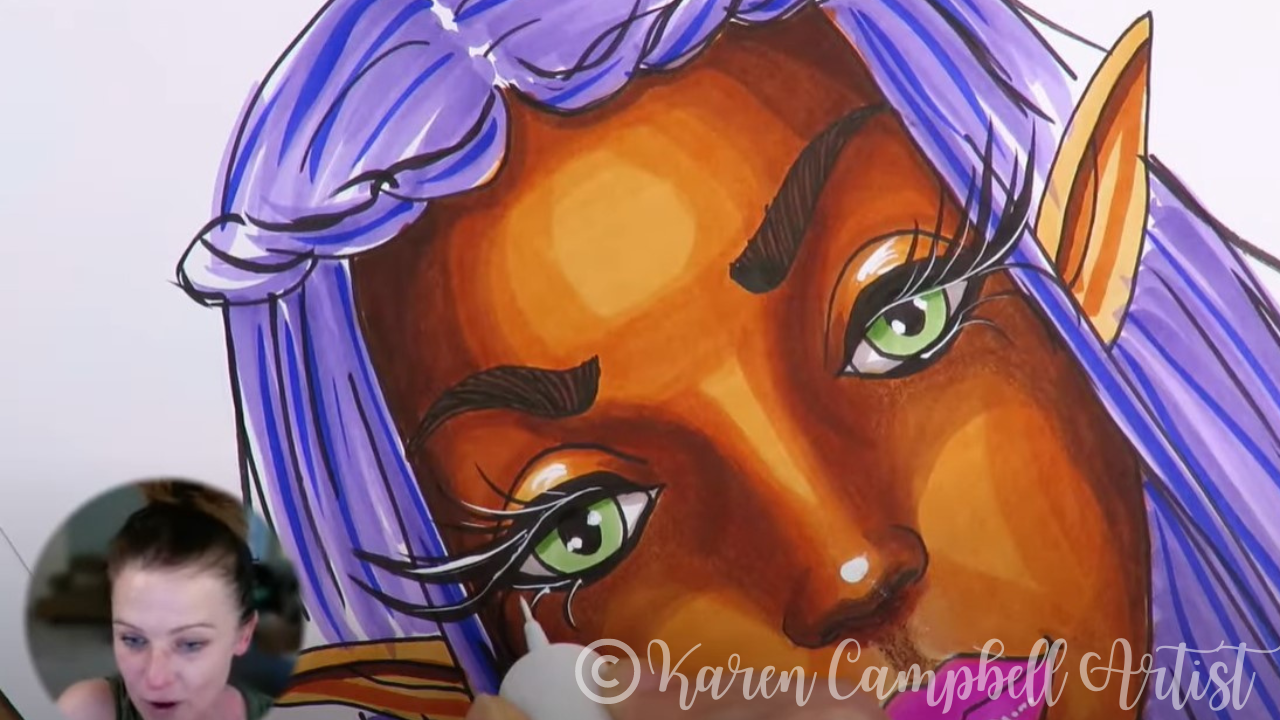
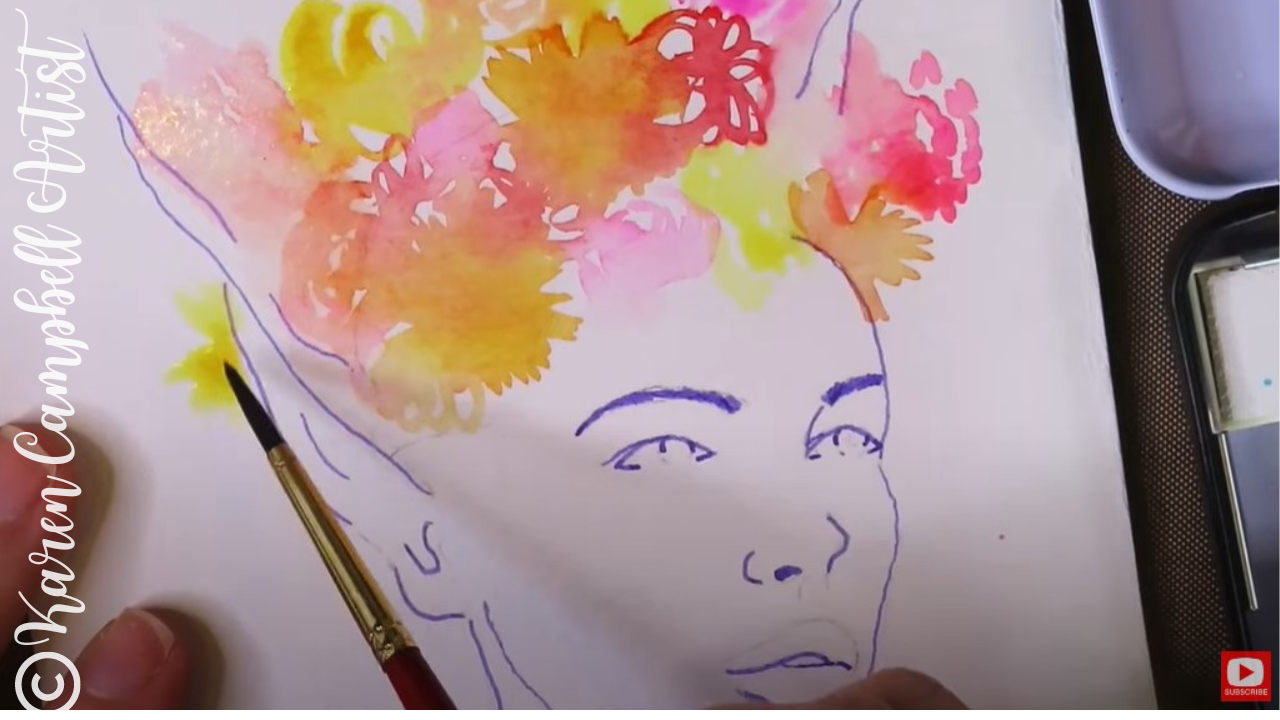
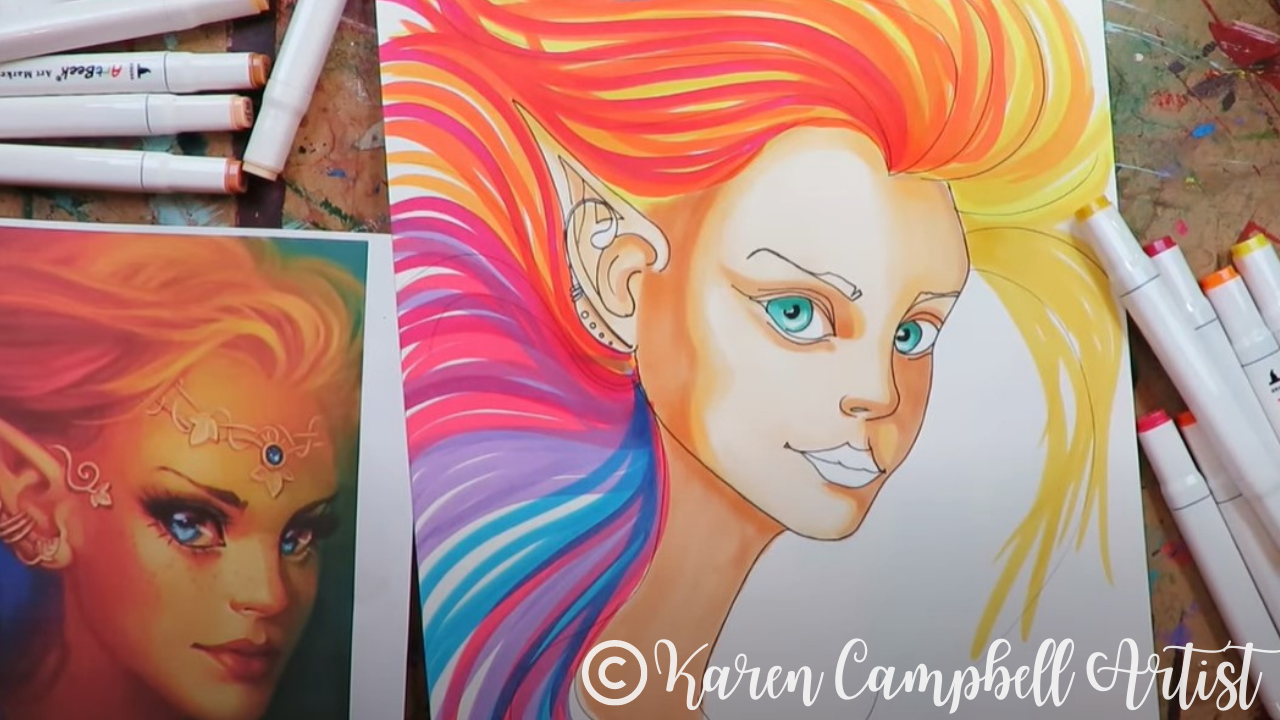
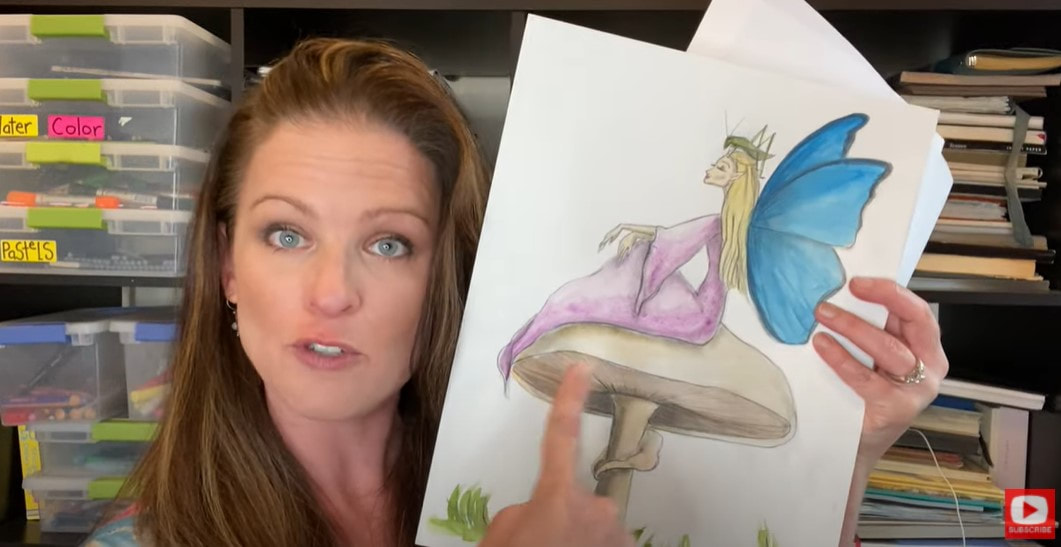
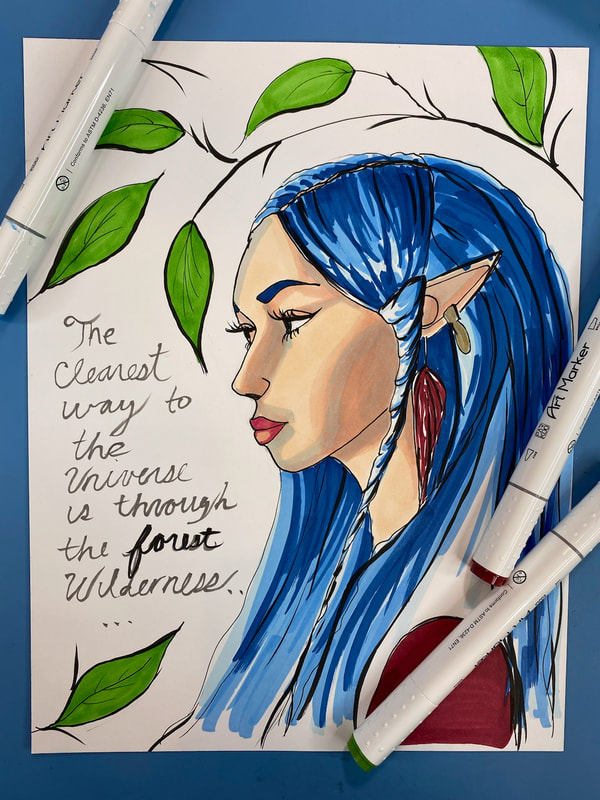
Ever combine inspiration from 2 fairy drawing images to create your own magical drawing? I do it ALL the time when I'm drawing faces and fairies! If you've never done this before, I can't wait to show you how simple it is in lesson 9 of my #50FunFabFairies drawing challenge.
Today's fairy drawing tutorial is step-by-step and easy enough for beginners. Don't have tan toned paper or a fancy drawing pencil? Use the back of a paper grocery bag, a school pencil, and draw along with me anyway! 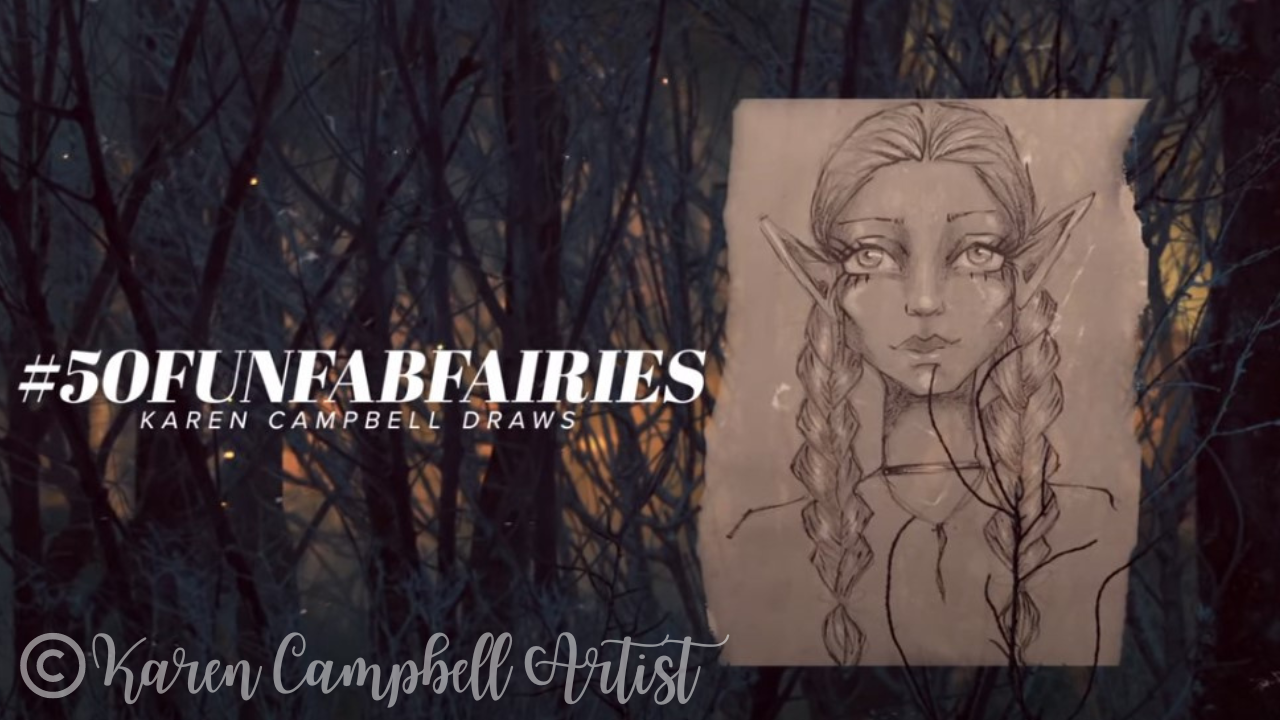
Want easy access to today's fairy drawing images and even MORE fairy drawing ideas? Join my FREE #50FunFabFairies drawing challenge over at Awesome Art School!
Simply click the button below to receiveinstant access to ALL the fairy drawing images for each drawing prompt, plus info on supplies, cheatsheets, and more! 
Wanna become a better artist? Do today's lesson (and every lesson of the challenge) five times, making a few creative alterations of your choice, and watch your skills soar as you practice fairy eyes drawing, fairy and ears drawing AND fairy hair drawing 50 different ways.
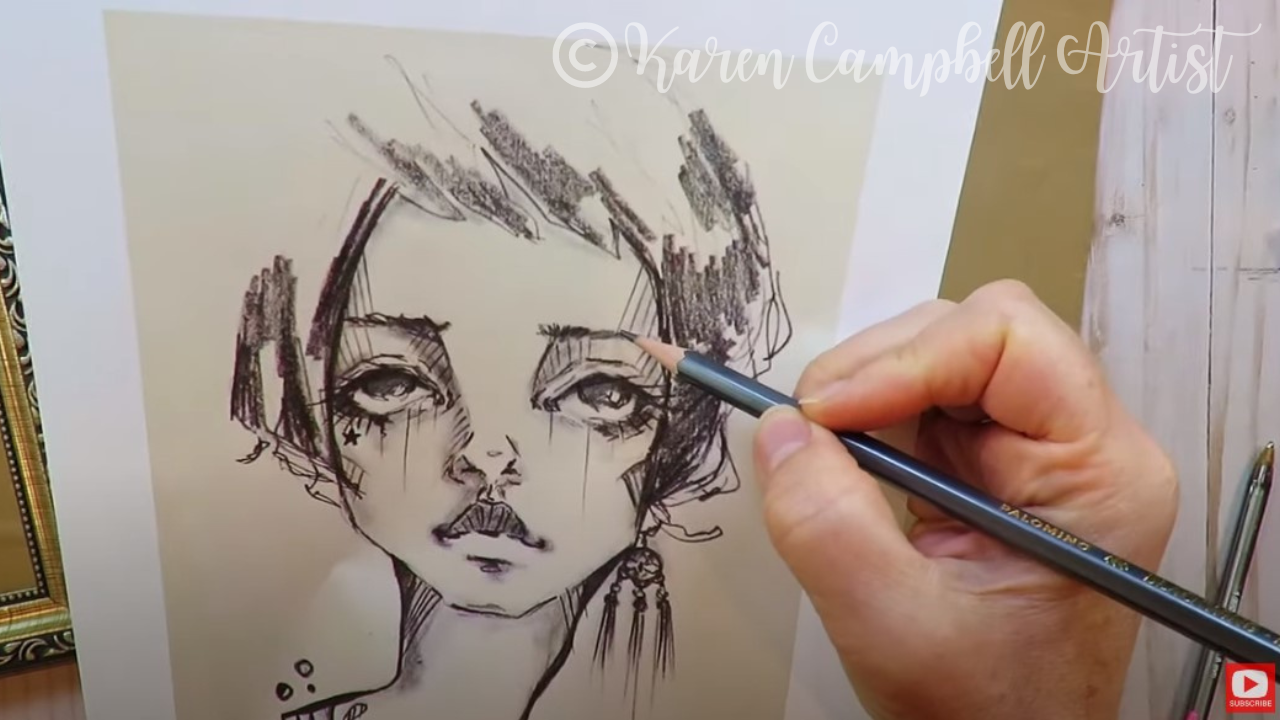
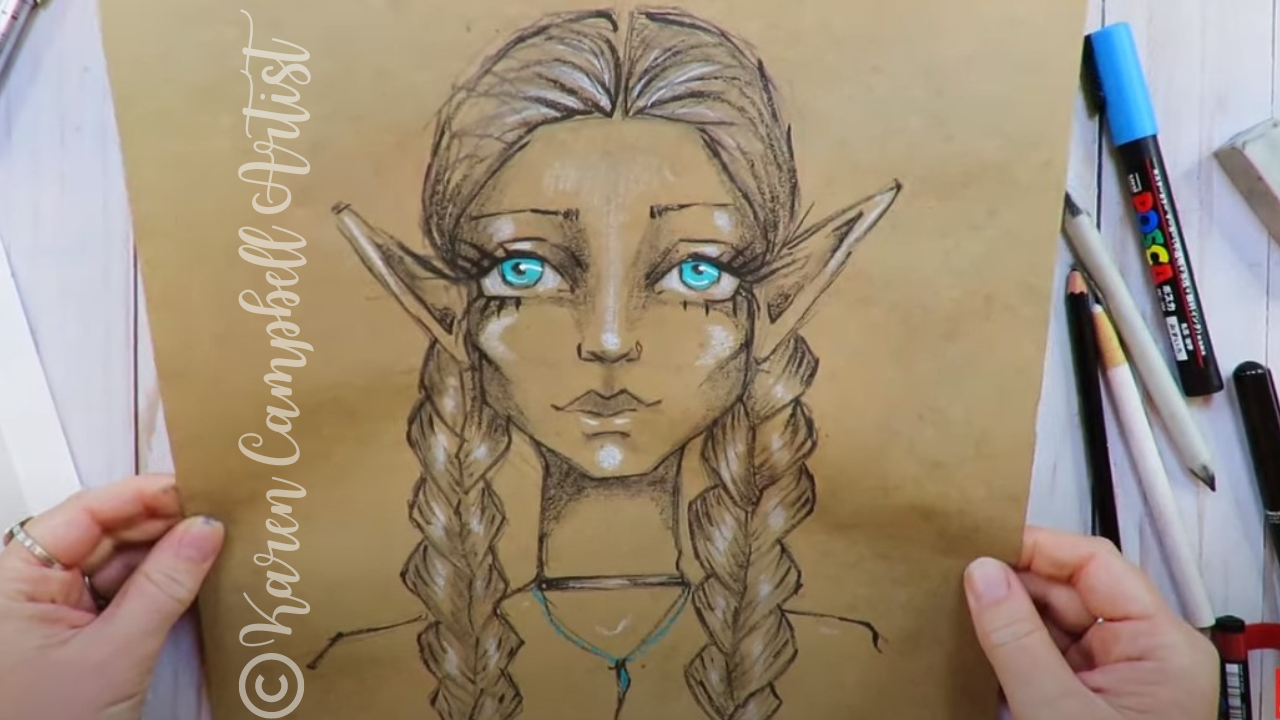
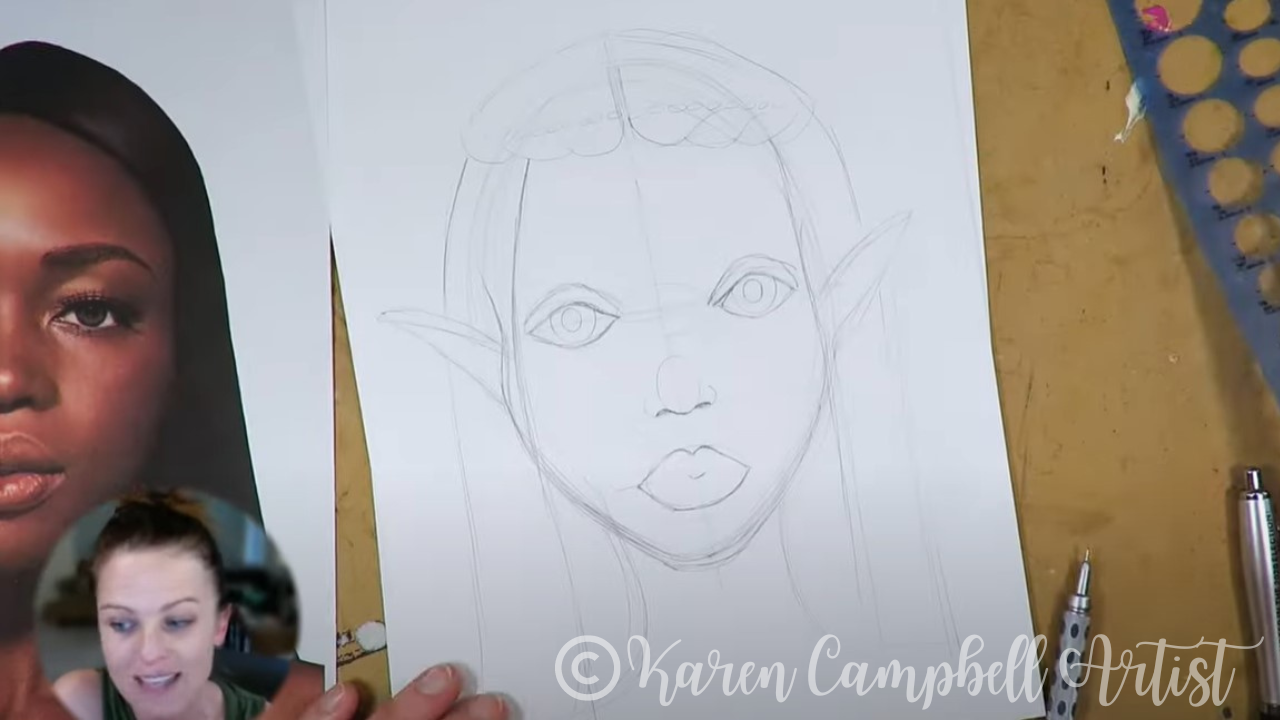
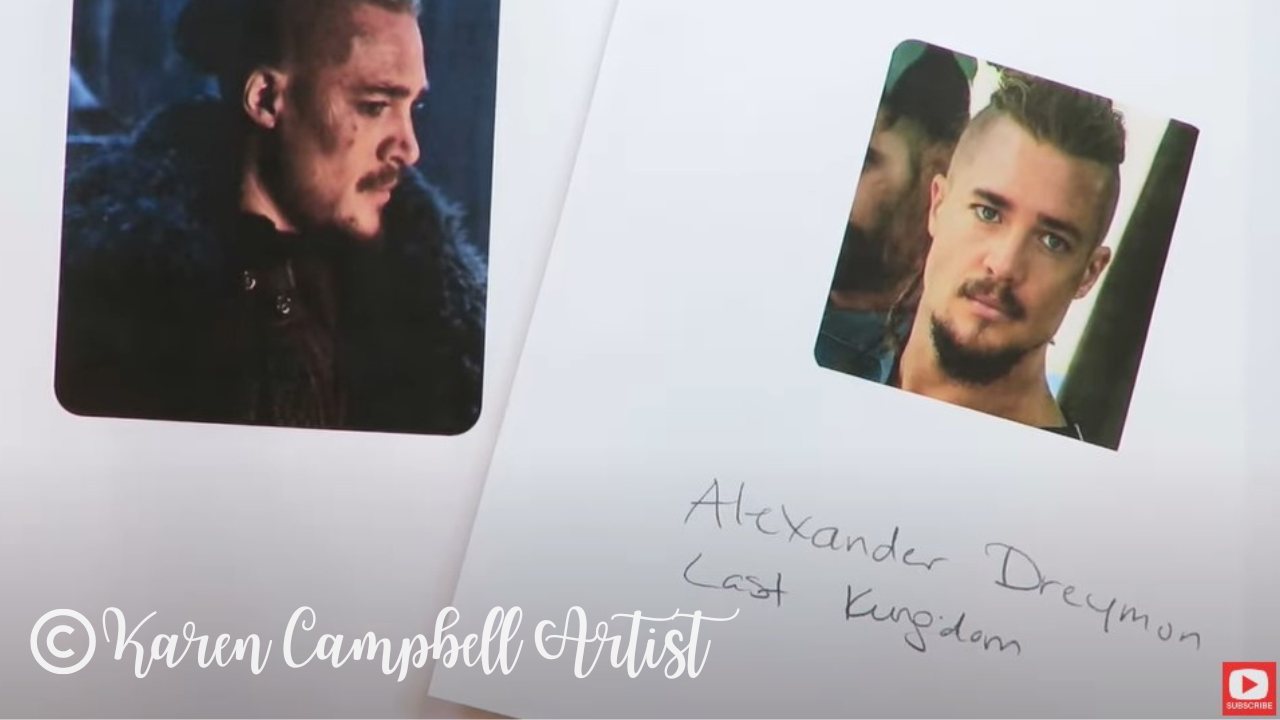
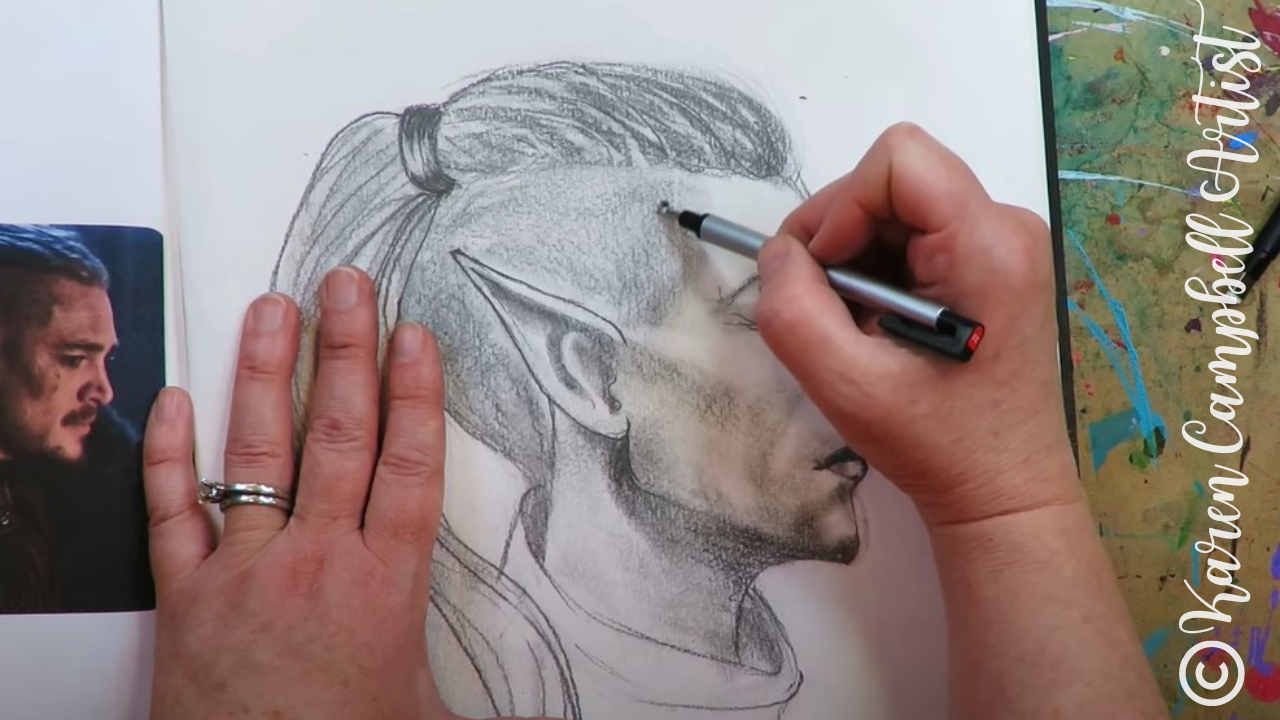
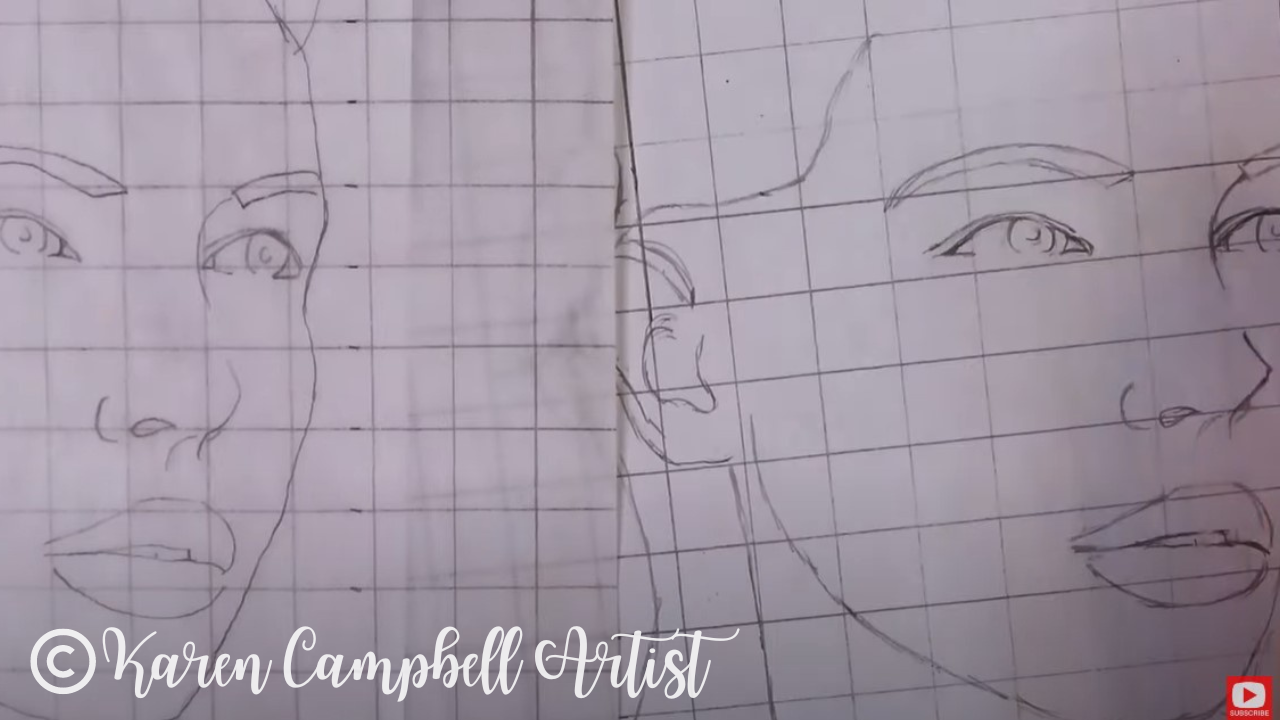
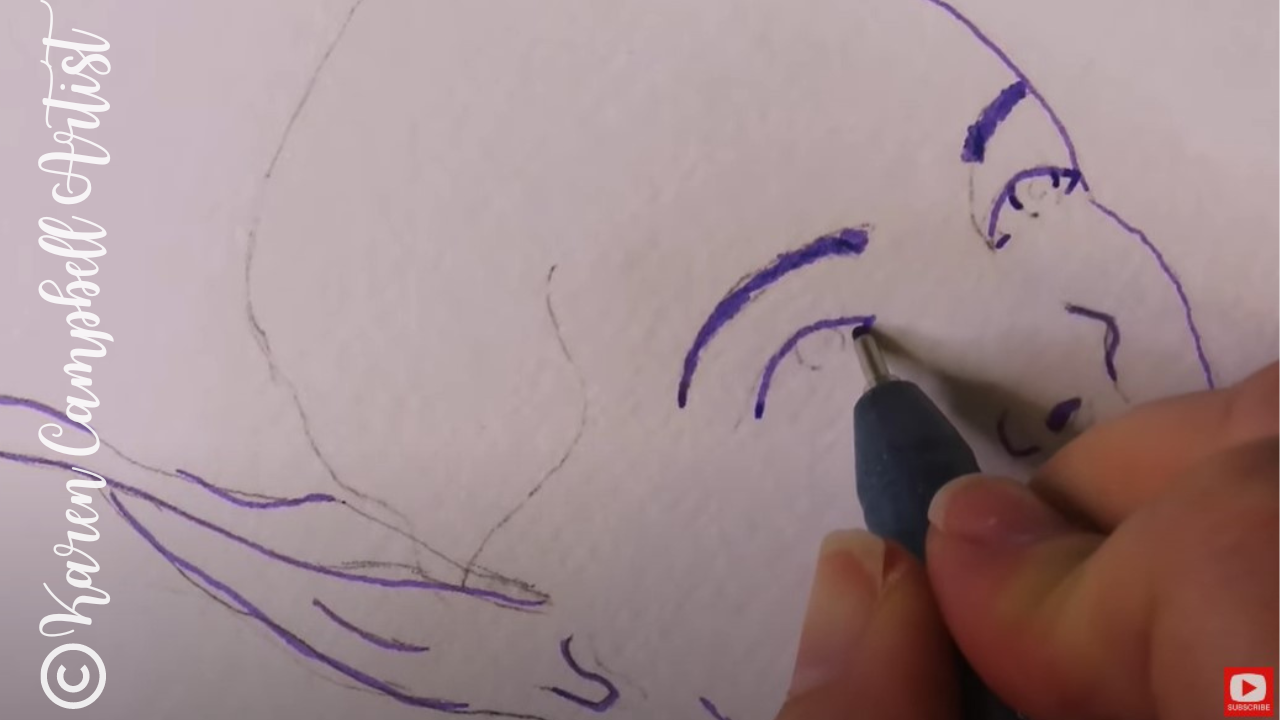
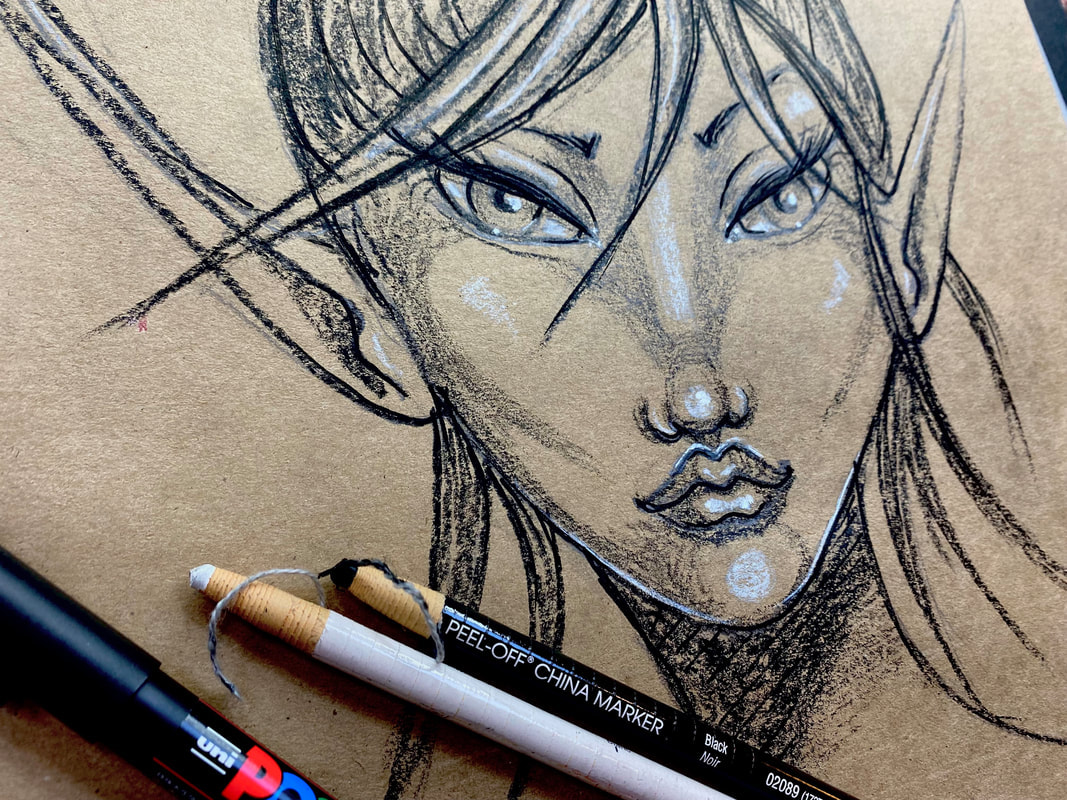
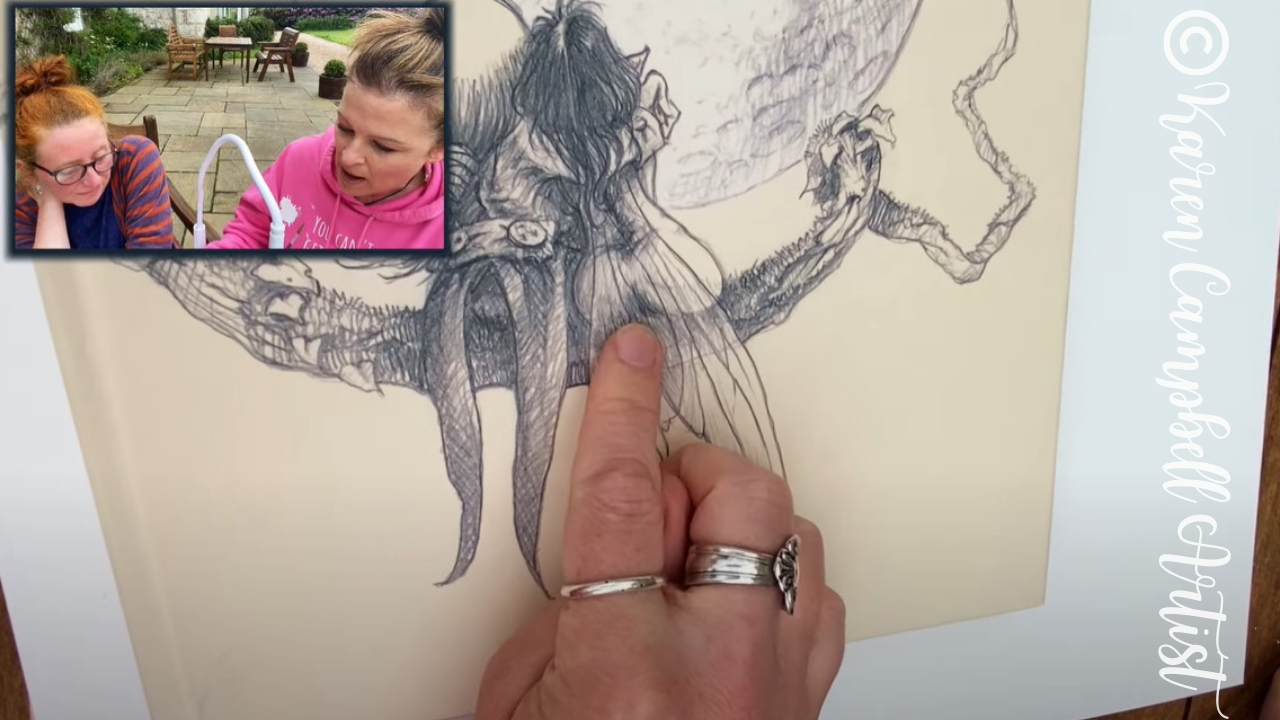
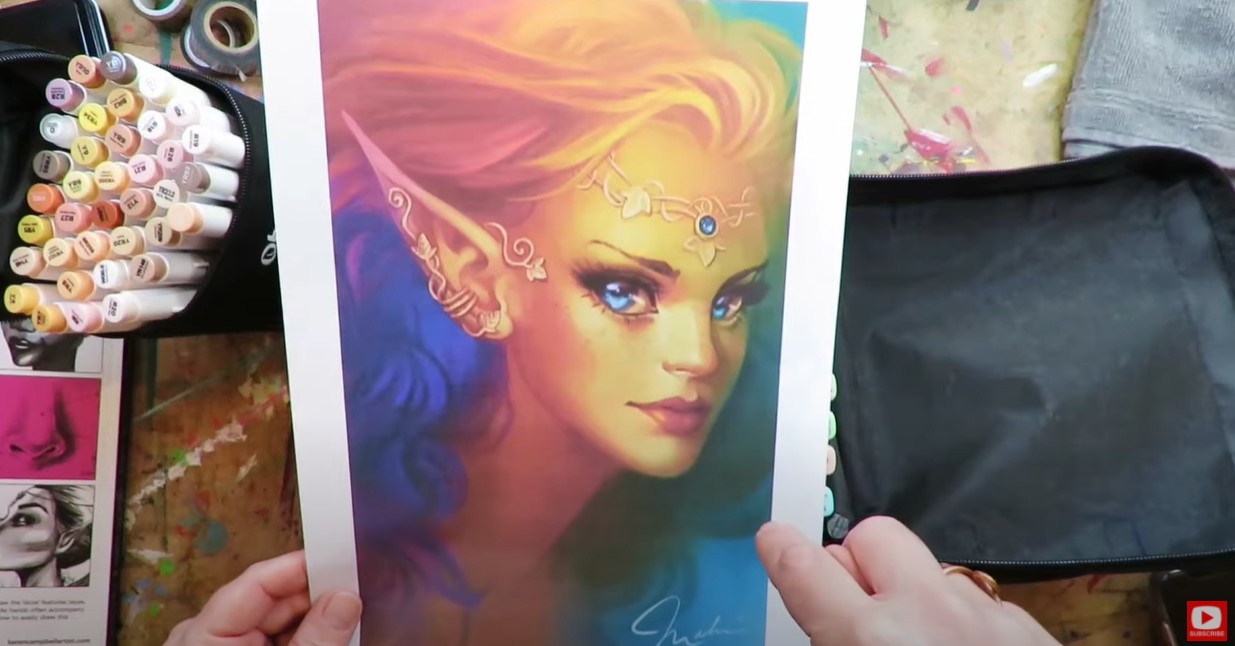
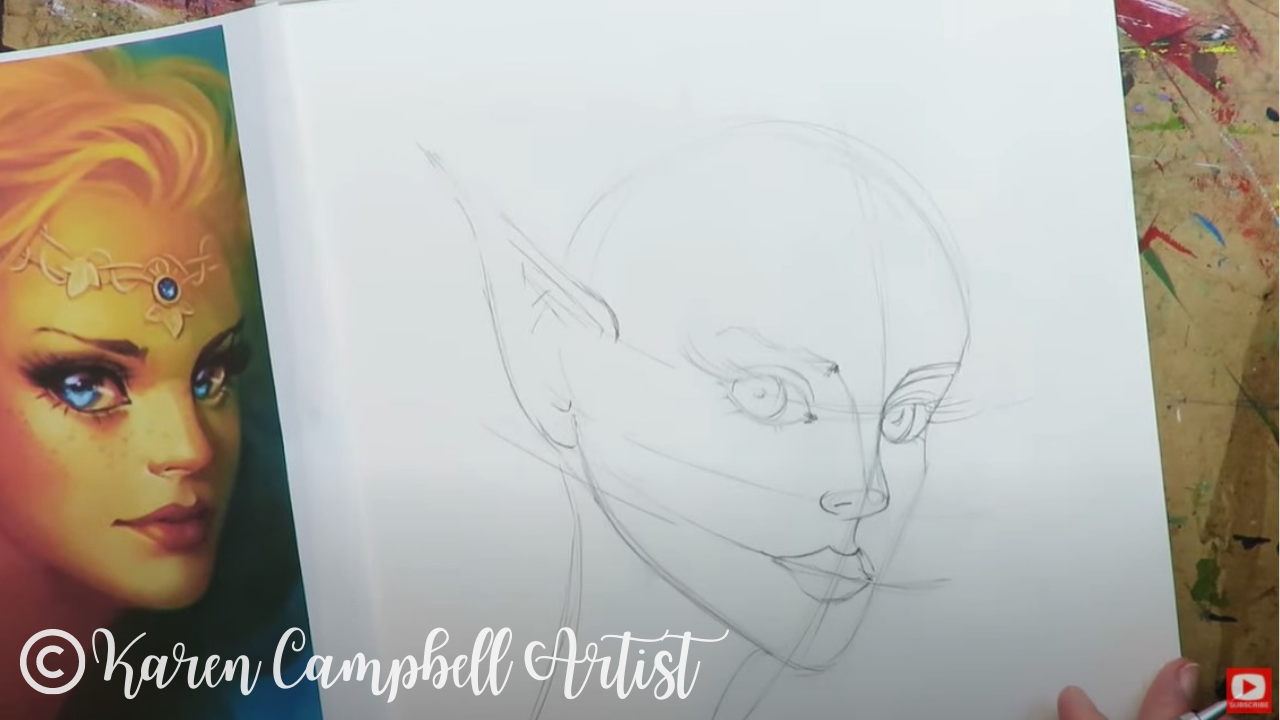
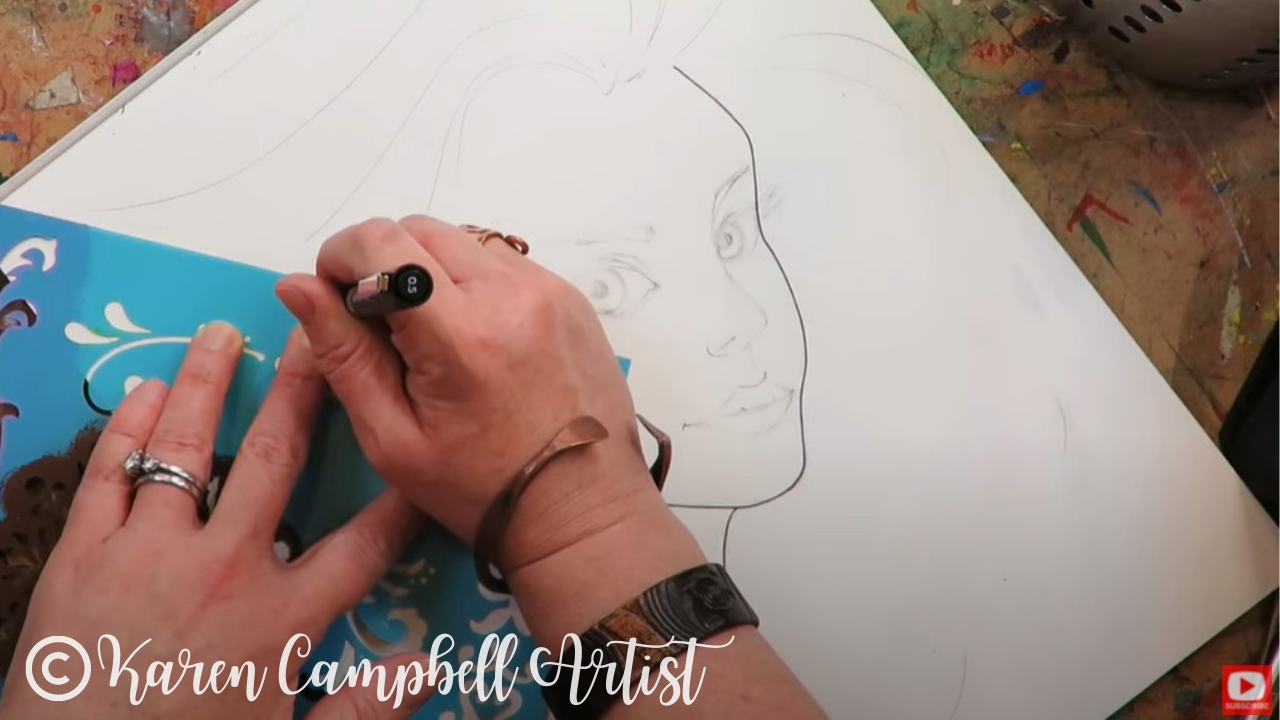
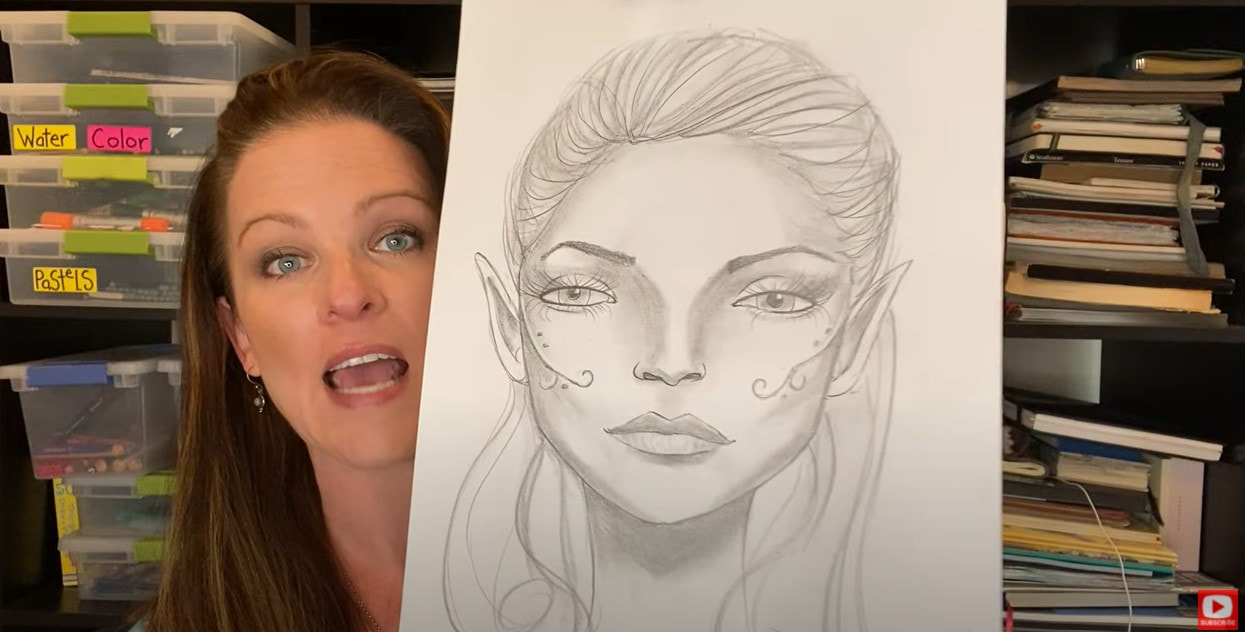
I'm using this face drawing reference (by artist Anna Tsvell), to inspire the face shading that I'd like to do today in my own drawing. I love this messy, edgy approach - like how Anna used the side of her pencil for a little shading in the hair, and how she's created funky lines to indicate shadows on the face.
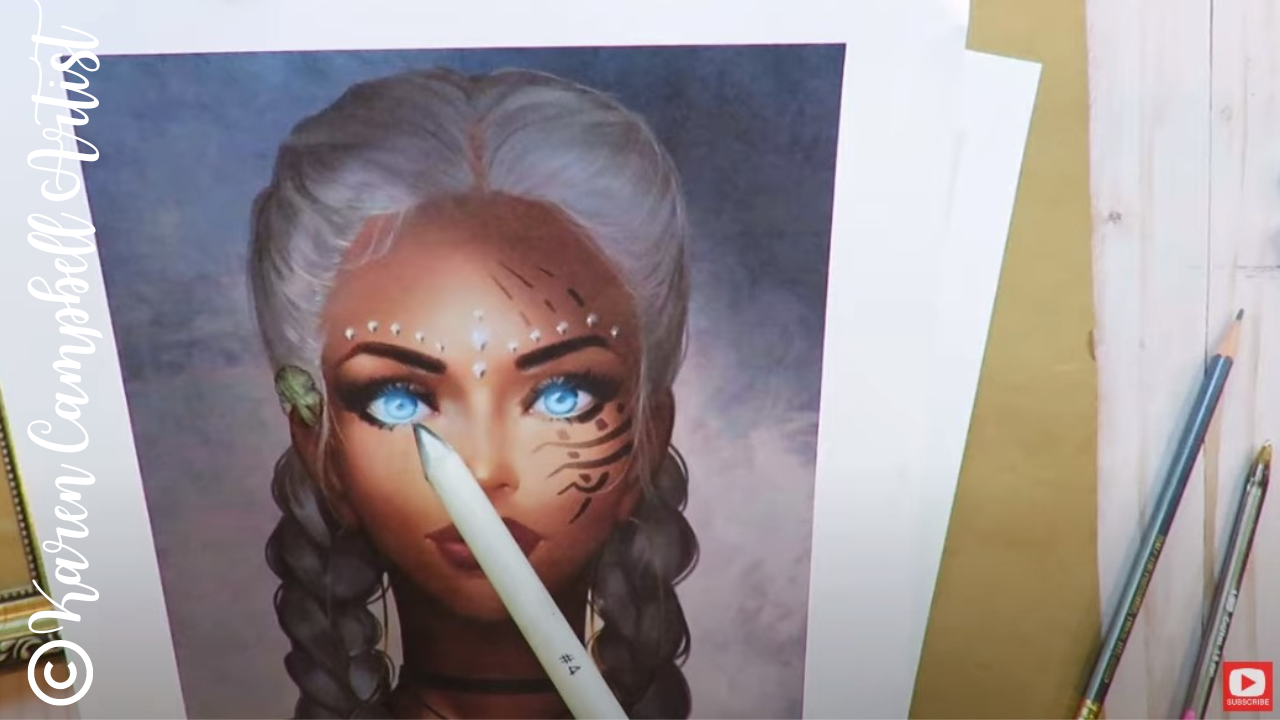
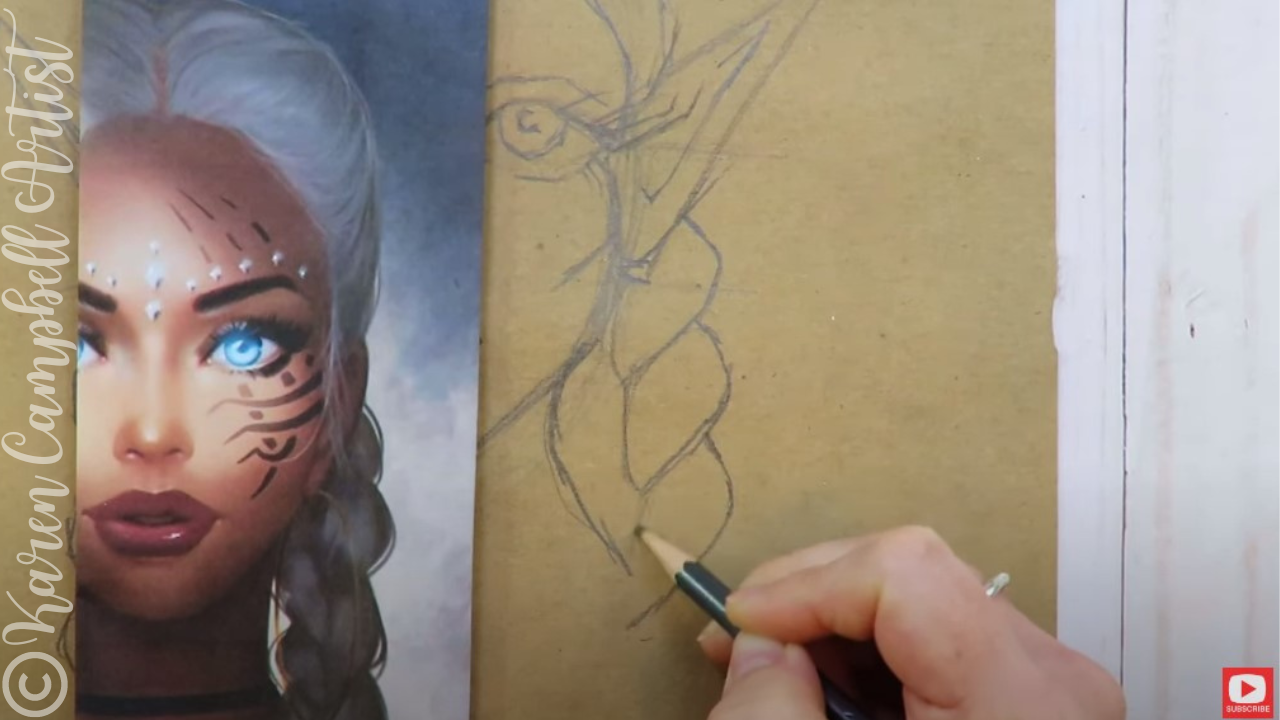
My second drawing reference today is by artist Monika Andruszkiewicz. I'm in love with the braided hairstyle and glowing eyes she's drawn!
For today's lesson, I'm using some random craft paper I had lying around my studio. There's nothing special about it - it's just what I had nearby. Use the back of a paper grocery bag if you want, or if you have a pad of tan toned paper at home - use a sheet of that. I don't care what supplies you're using, I just care IF YOU'RE DRAWING ALONG WITH ME, because that is how you'll grow as an artist.
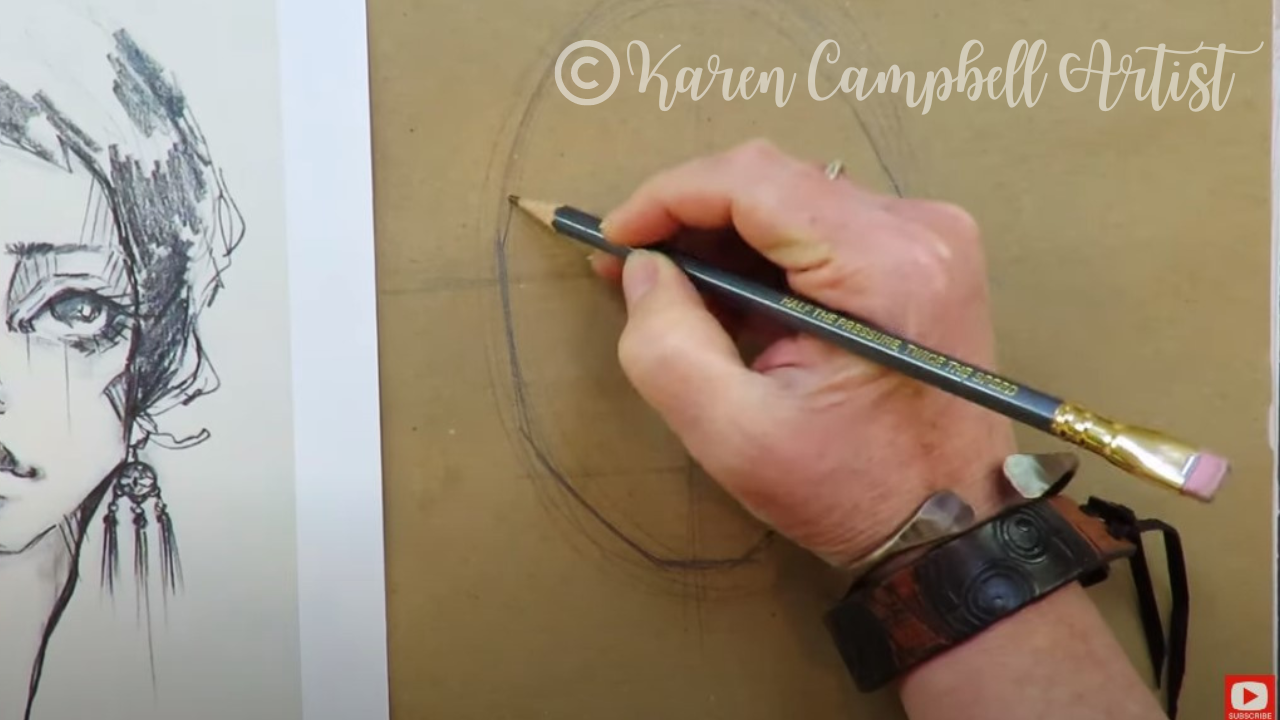
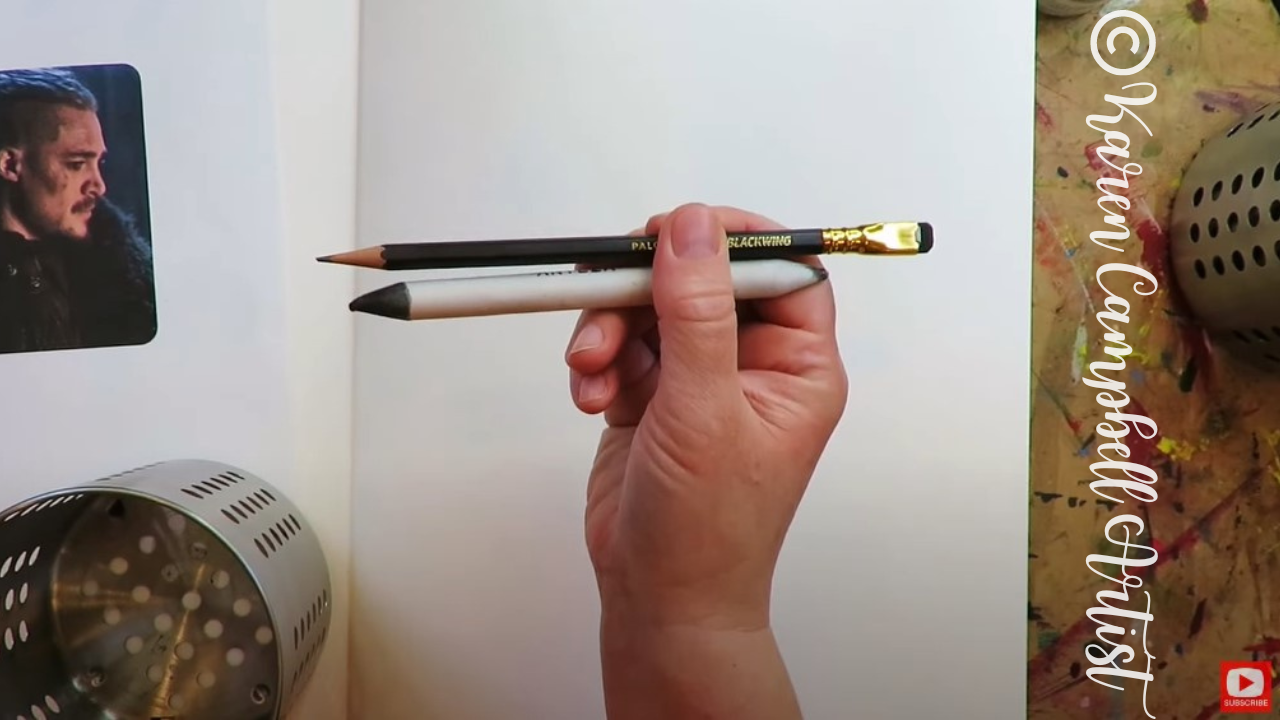
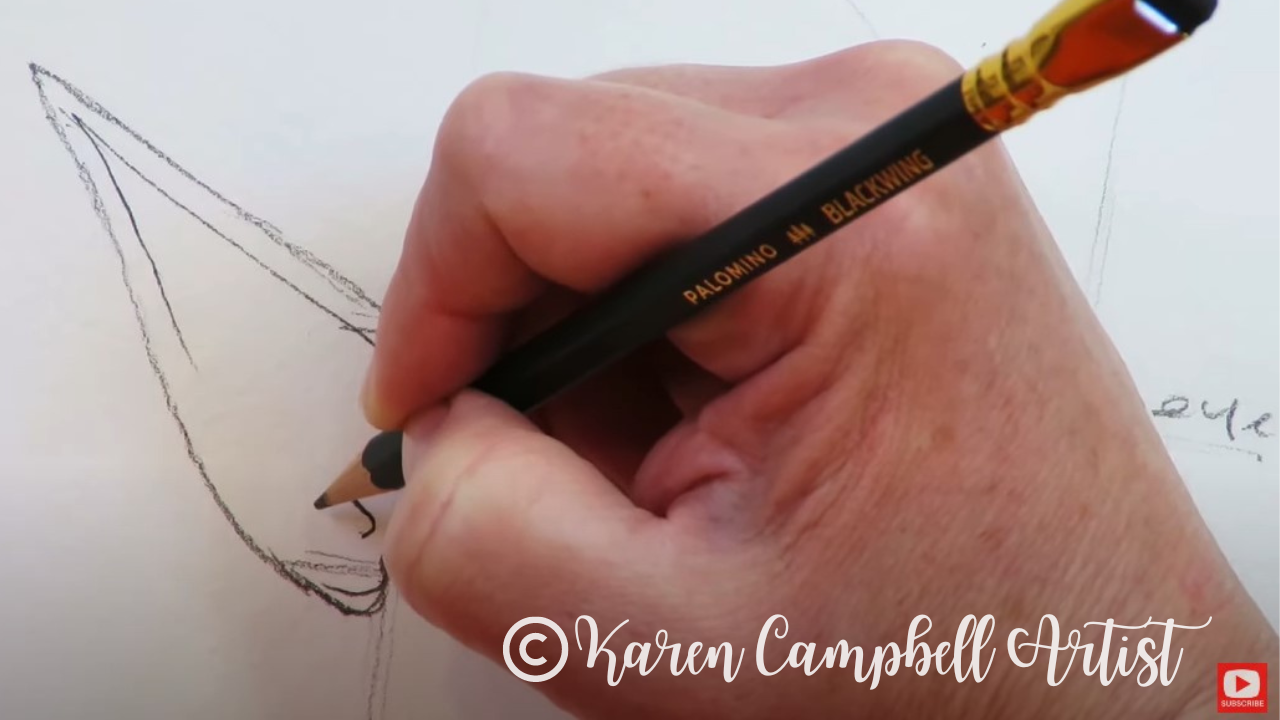
I'm using my favorite blackwing pencil to draw for this lesson. Blackwings are super fancy drawing pencils, and feel like butter on your paper. You totally don't need them. It's fine to use whatever pencil you have on hand.
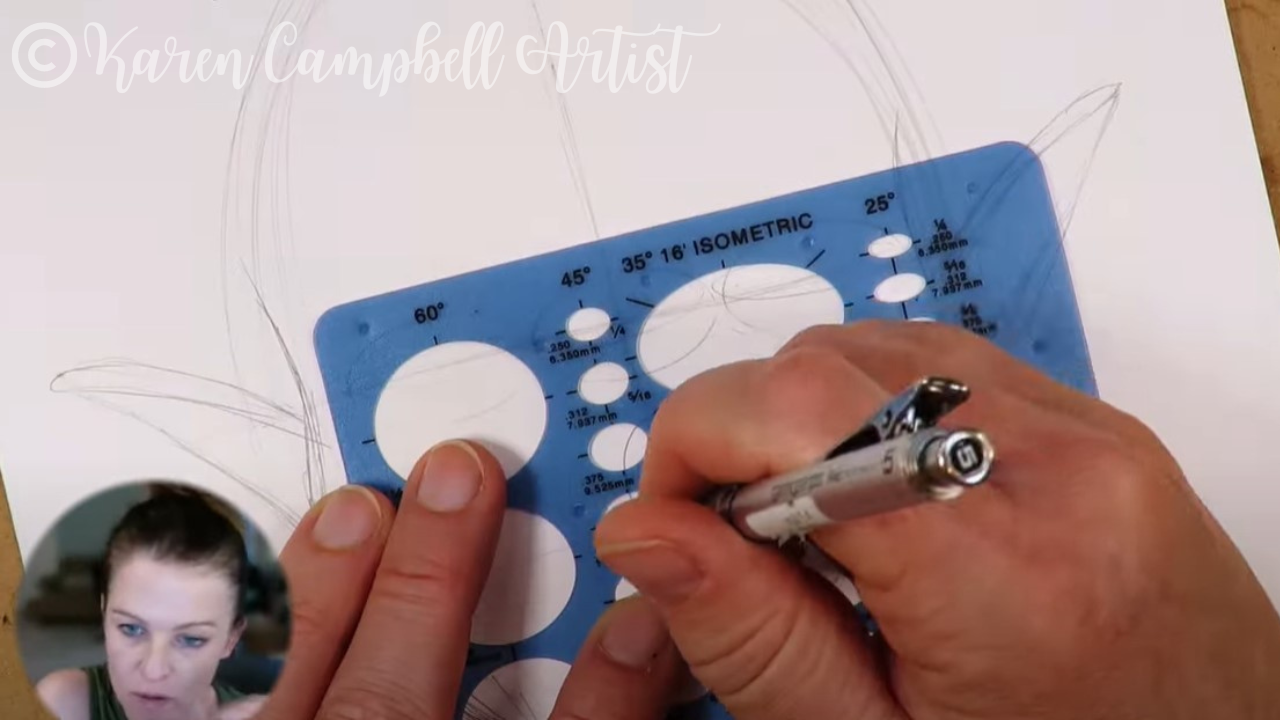
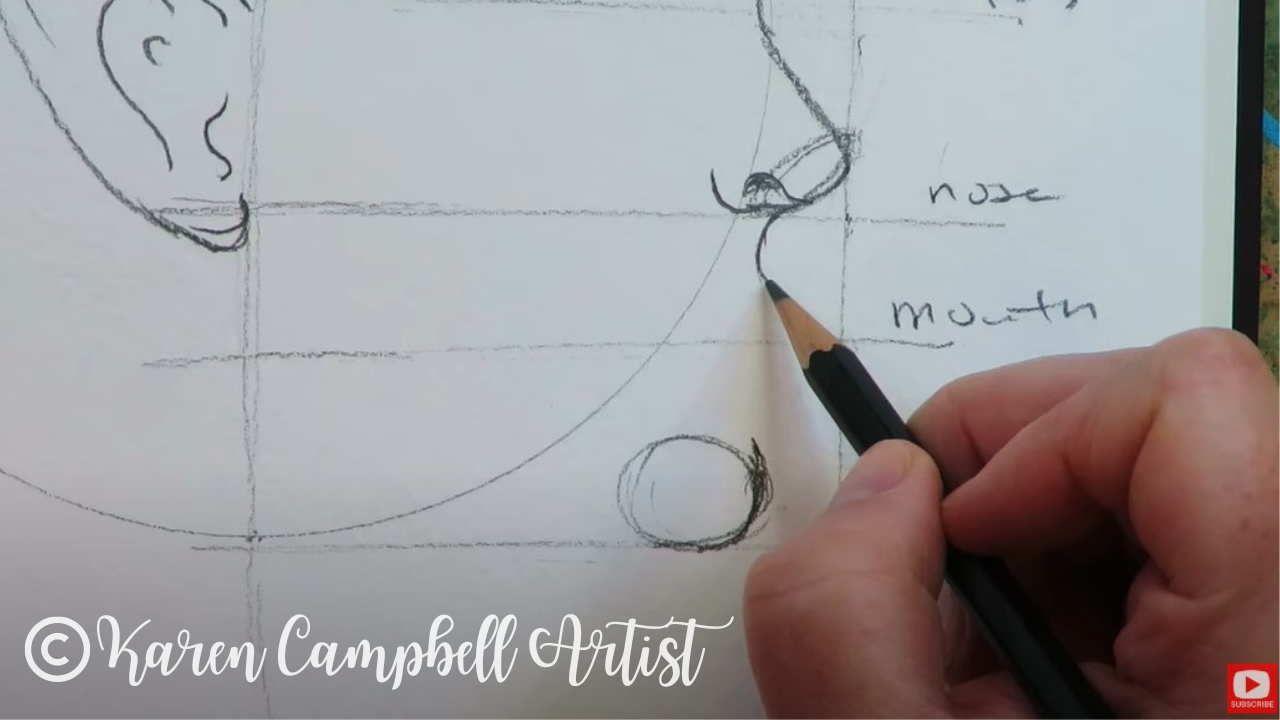
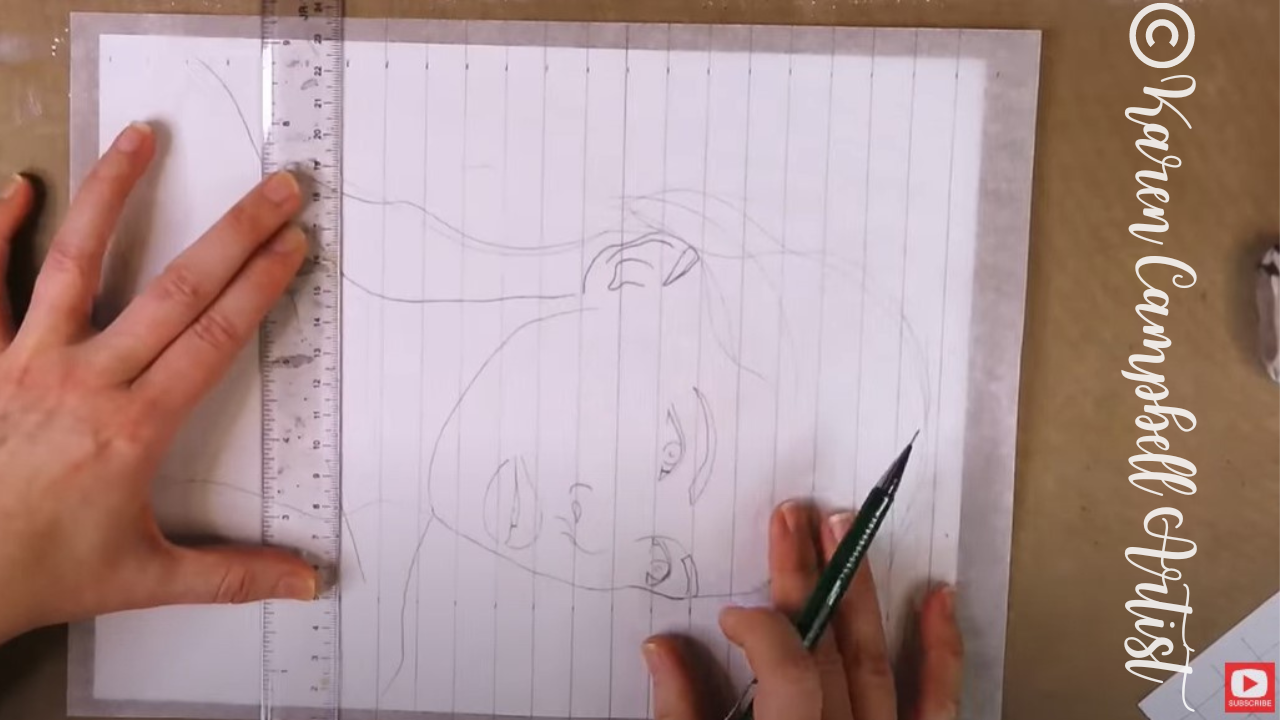
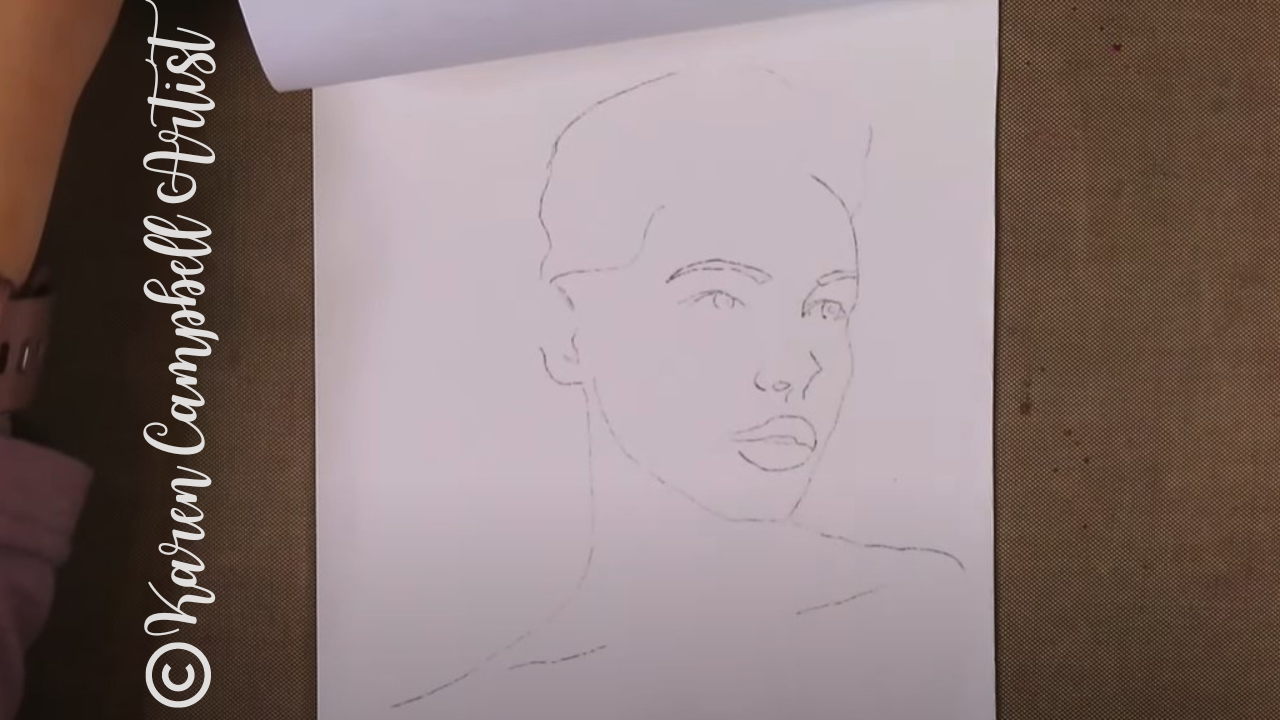
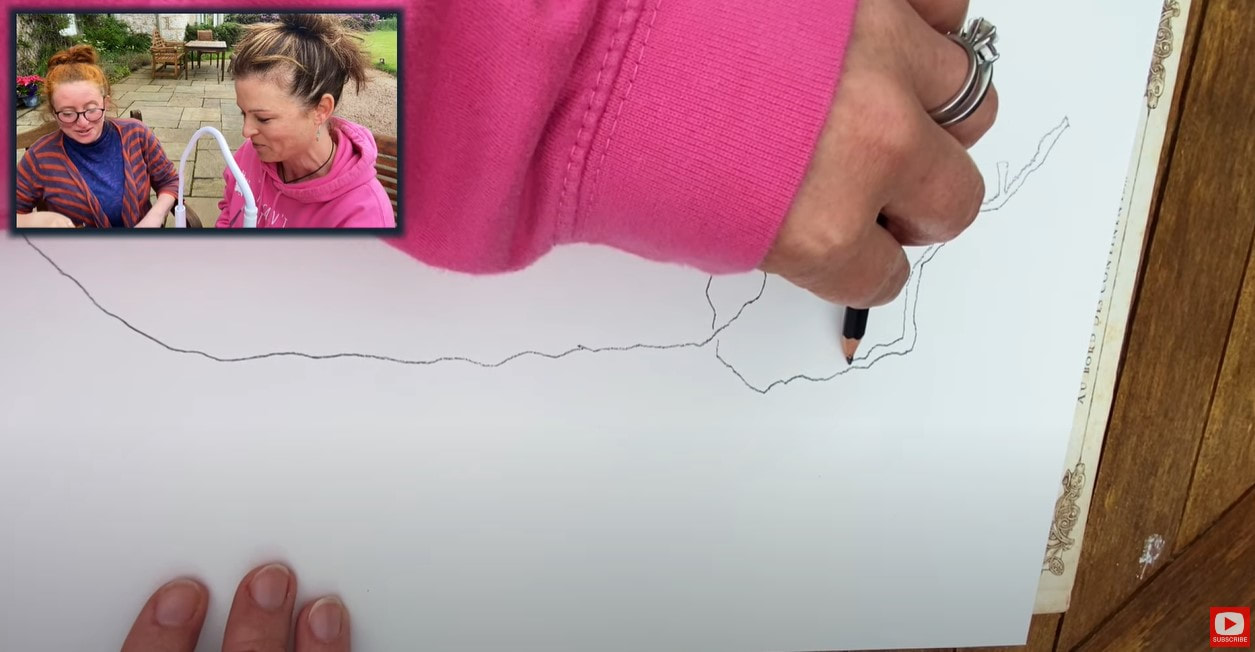
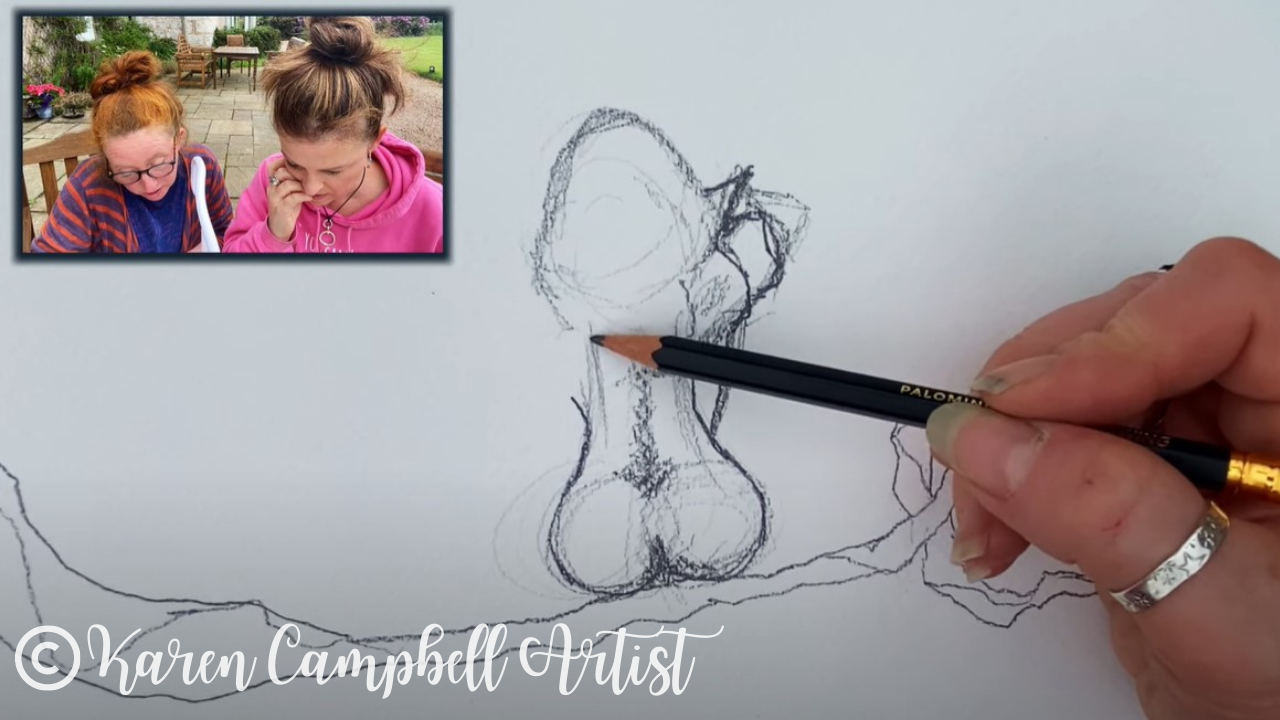
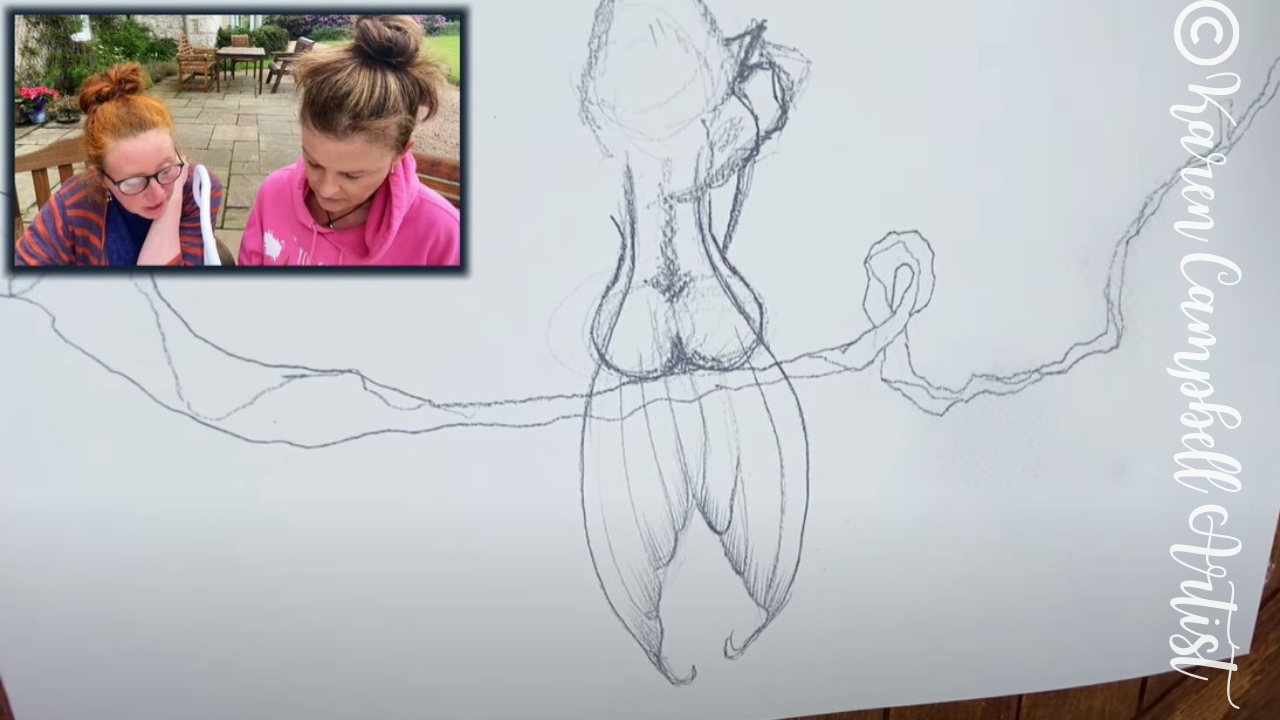
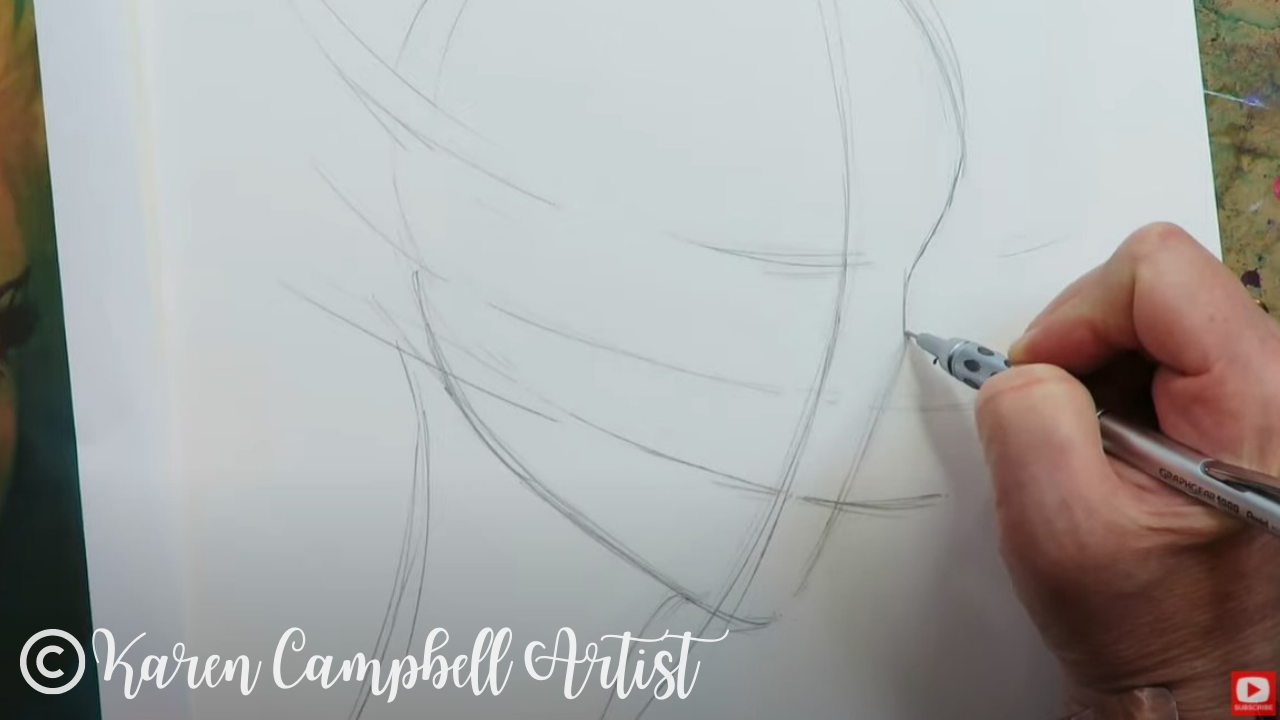
After I sketch in my oval for the face, I drop in my face drawing guidelines. If you're not familiar with face drawing guidelines (I NEVER draw a face without them!), these are available for FREE in my #50FunFabFairies classroom (also FREE) over at Awesome Art School. Never drawn a face before? Here's a quick face drawing tutorial for total beginners that shows you exactly how to use my face drawing guidelines. Feel free to check that out and then pop back to this lesson to try drawing a fairy. 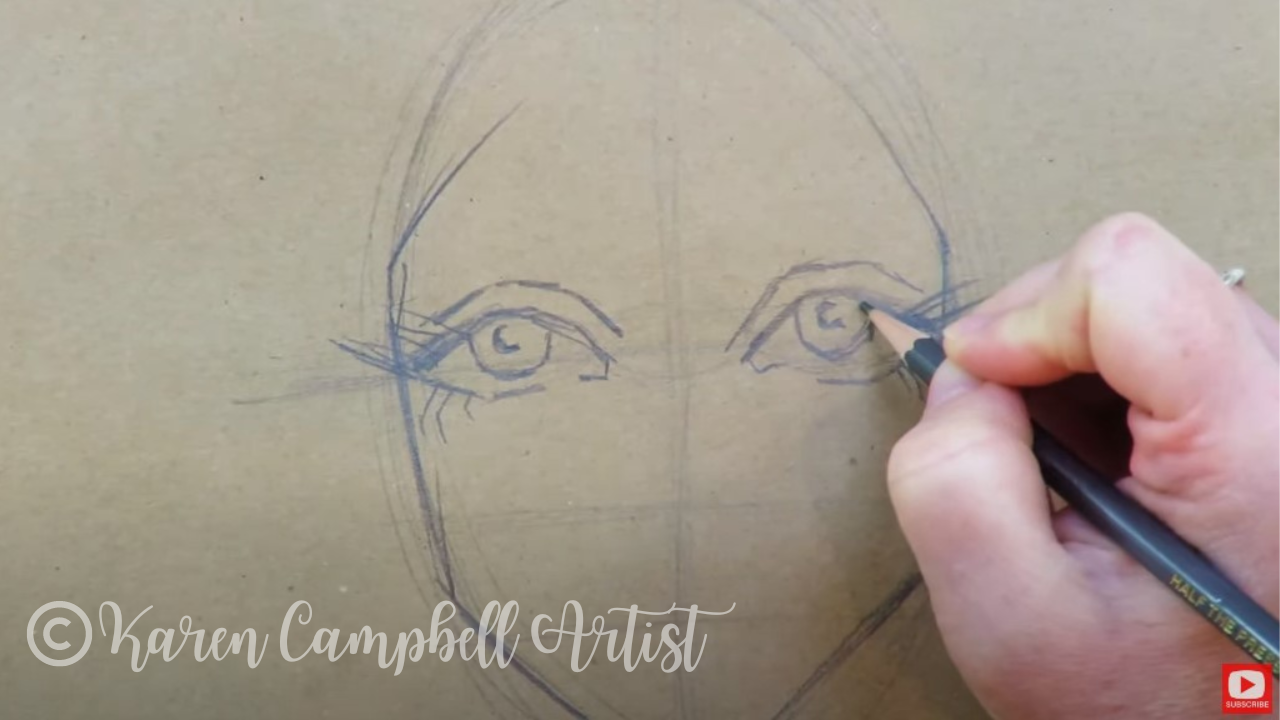
Make sure you watch this video to see the drawing process in action - especially when I sketch in her eyes. They're very angular and widely spaced compared to what I typically do.
Neither of these awesome reference images have fairy ears, even though I'm using them as fairy drawing references. That's totally fine, because I love to go rogue and make stuff up as I draw.
If you're unsure how to draw fairy ears, click over to the video because it's all step-by-step. 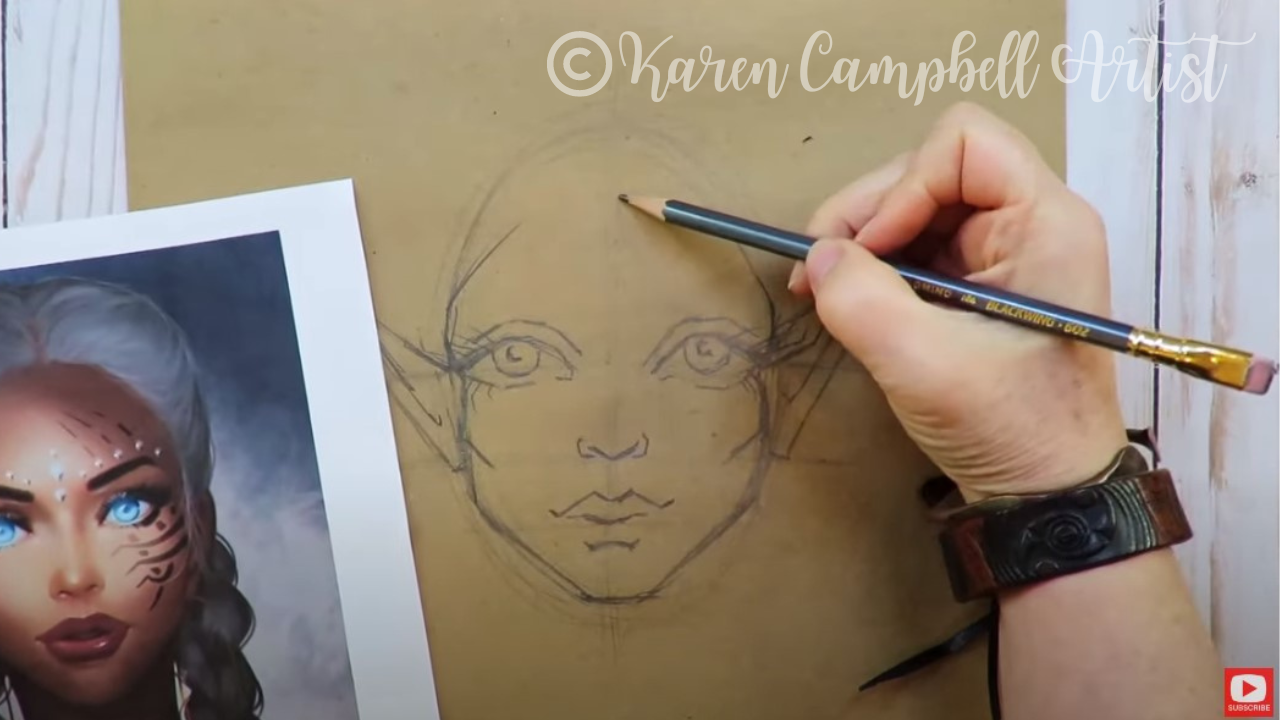
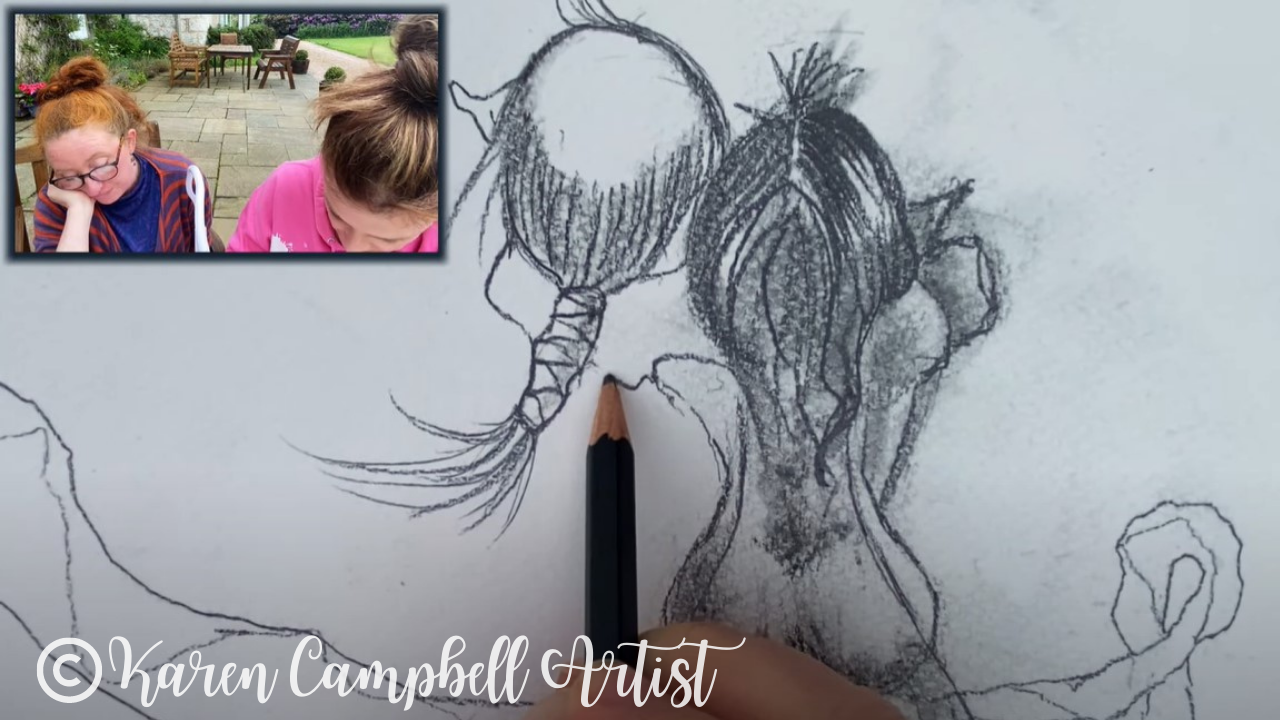
I haven't drawn braids in forever, so I'll really be studying my drawing reference with this hairstyle. I'm a firm believer in using reference photos and drawings for anything and everything you don't know how to draw.
There is NOTHING wrong with studying a photo or someone else's drawing to learn. Never feel bad about it! You are developing your own observational skills as an artist.
The only thing that could be wrong with using someone else's work as a reference, is if you copy every single detail of the reference and try to pass your work off as an original idea, or worse yet- if you try to sell it. Copyrights are there for a reason and SO important to artists. I'm a huge stickler about always crediting original artists. If you're just learning to draw at home and using a piece for inspiration and your own enjoyment - don't worry about it. Just make sure to always give that original artist credit if you ever share your work online as many do in my Facebook group. 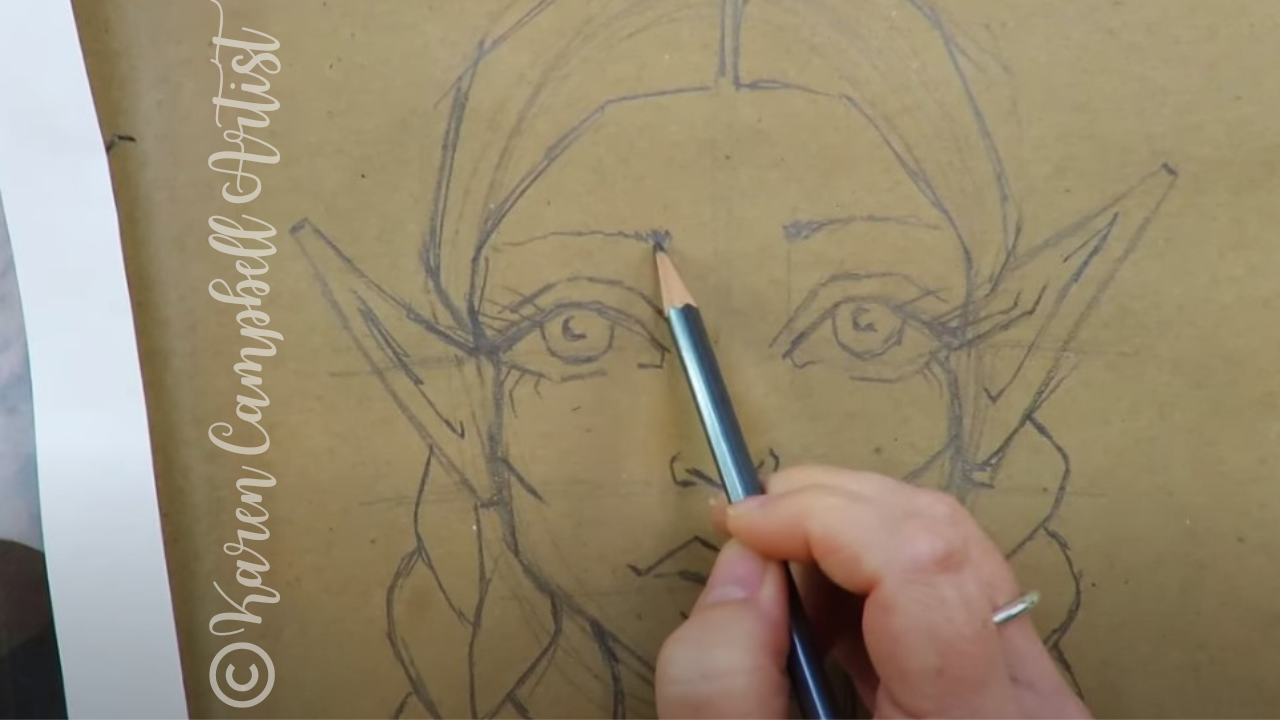
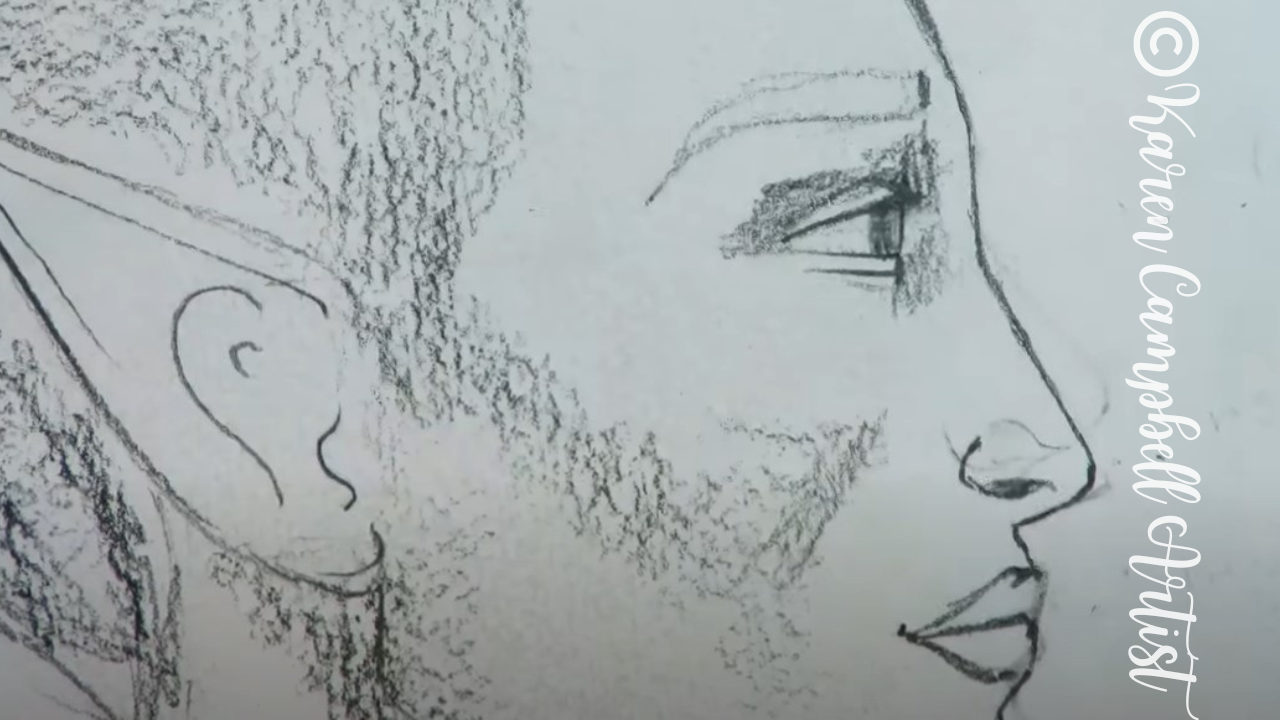
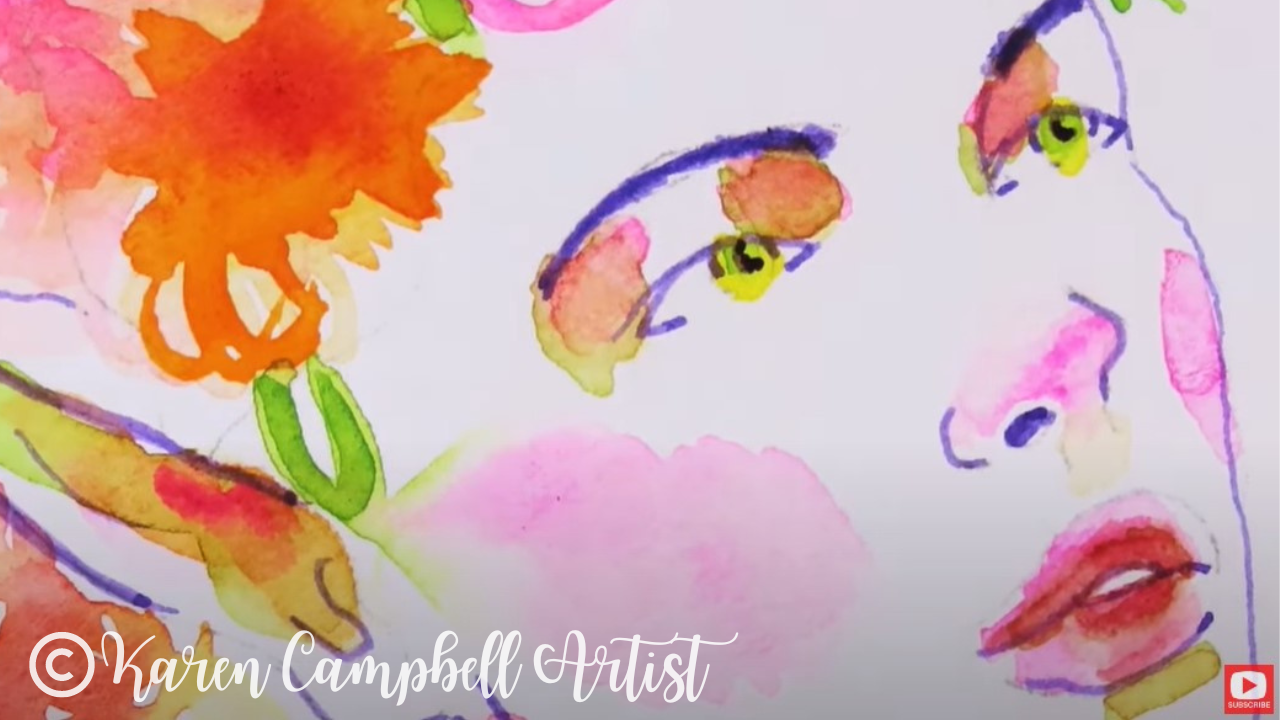
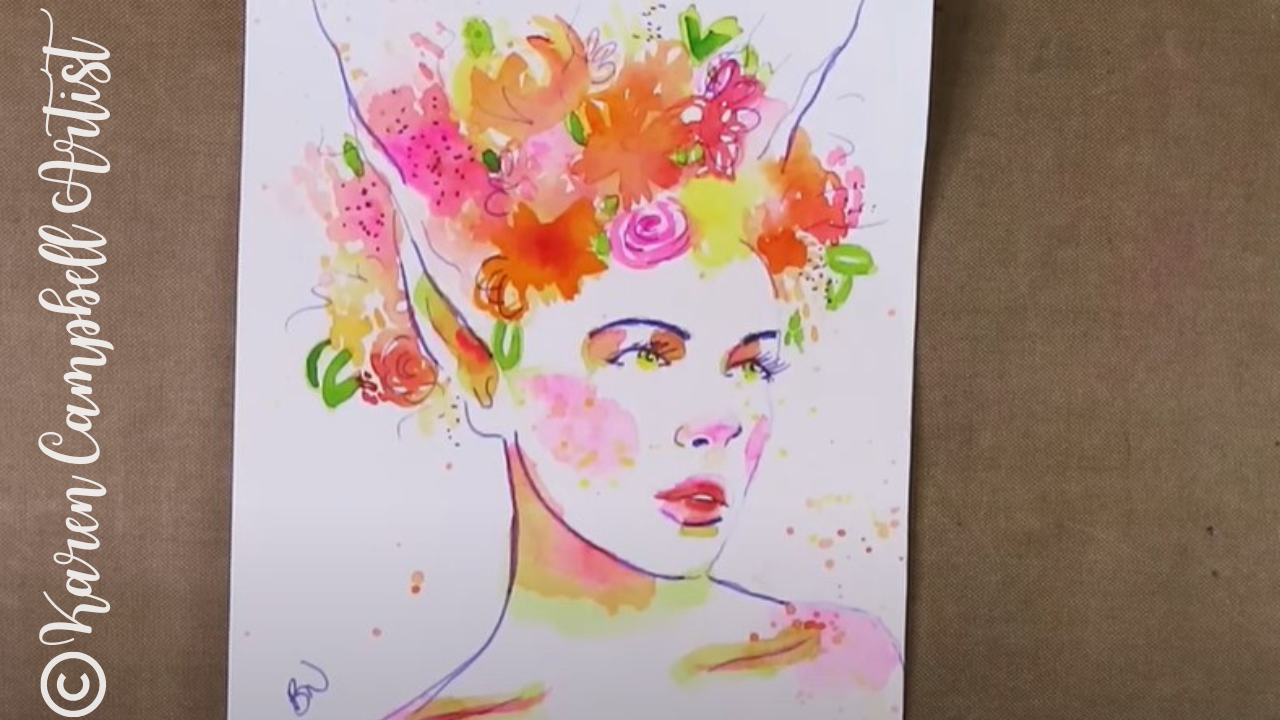
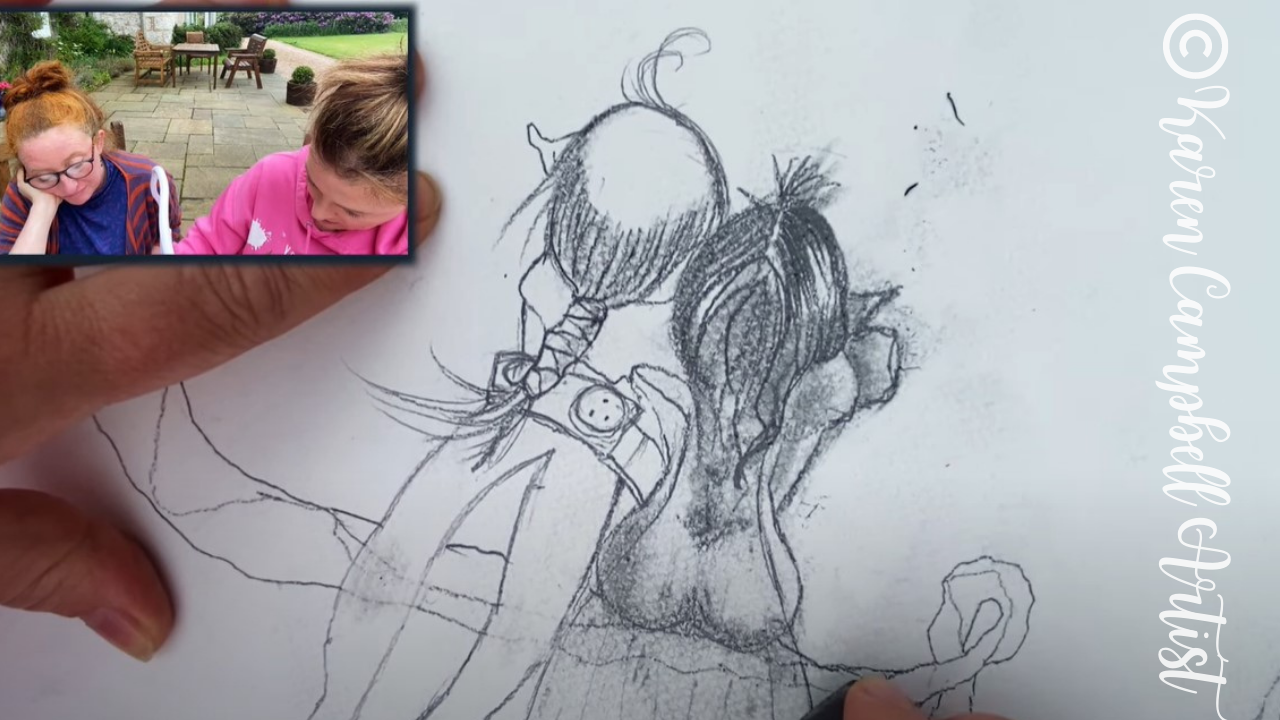
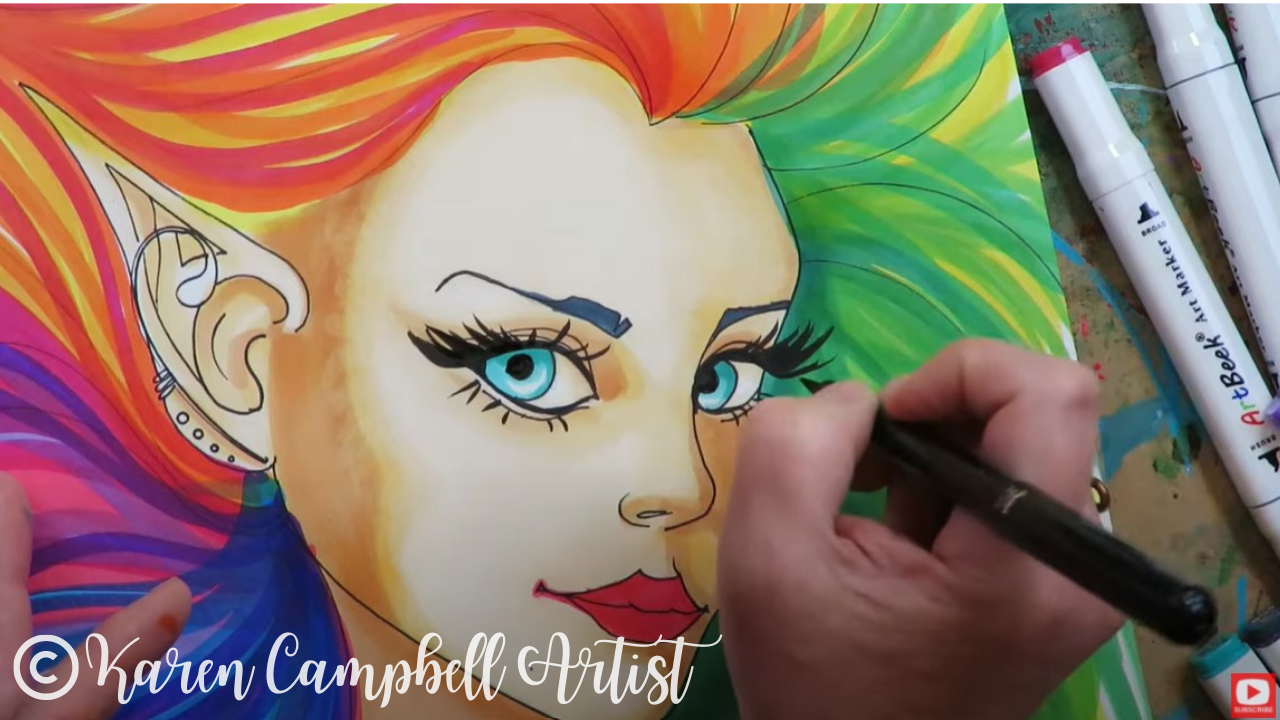
When I got to the eyebrows for today's fairy, I decided to try the look from one of my references of a really thin, scraggly eyebrow. Look at how these completely change her expression (above)! My fairy looks super timid now, which I wasn't even going for, but now love.
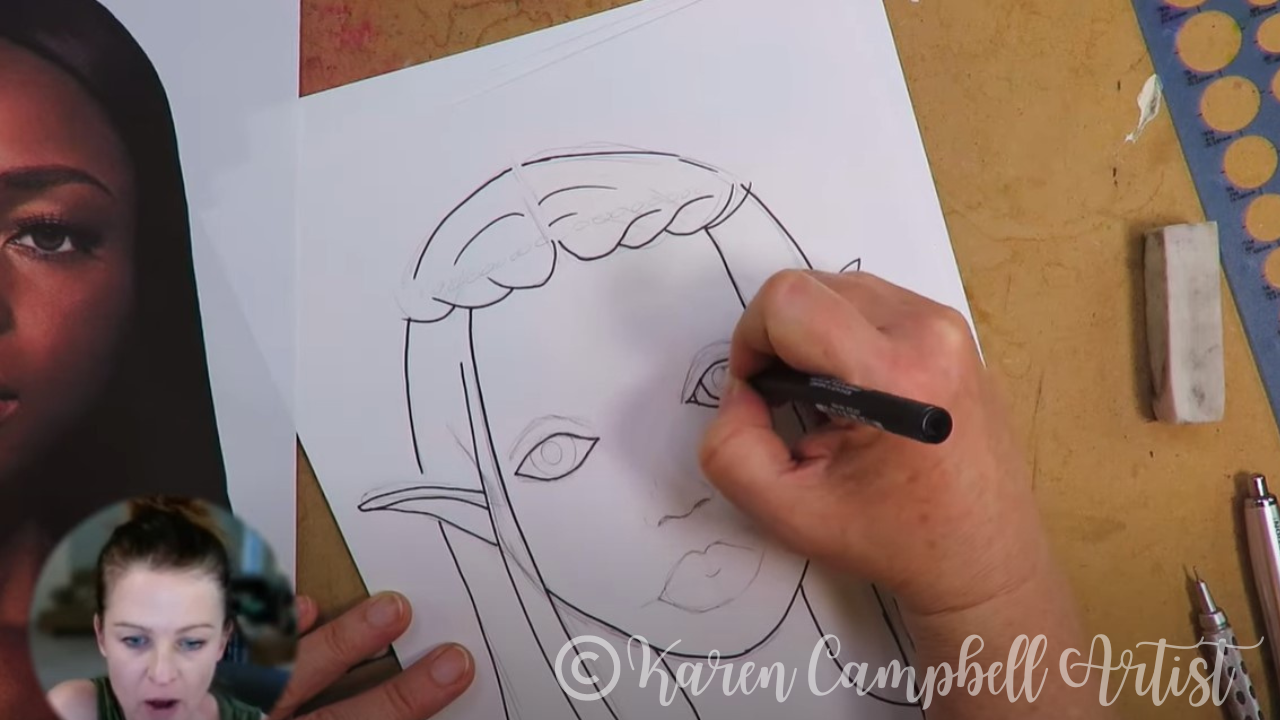
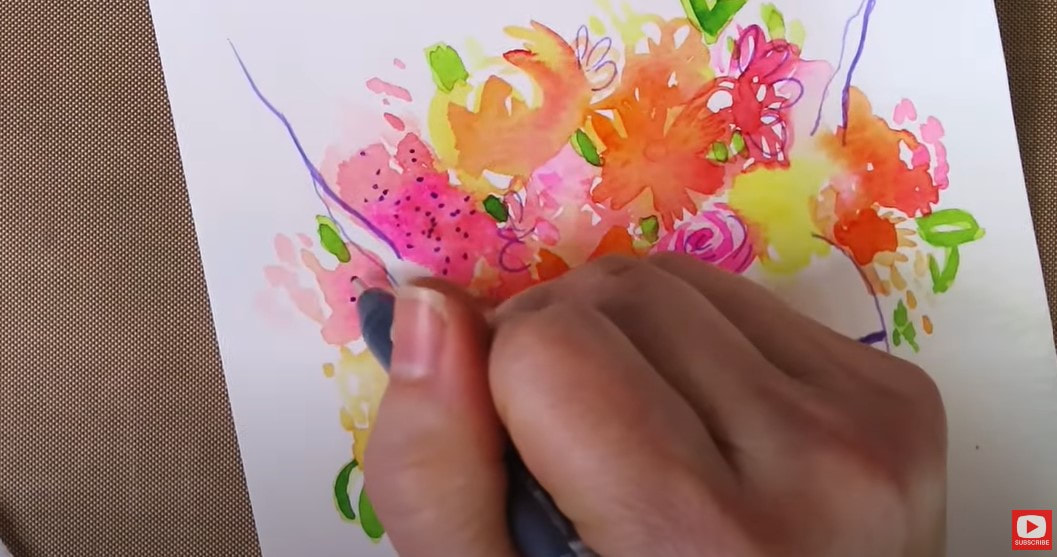
After the drawing was complete, I started adding funky lines to the braided sections to get the shading started. I kinda love this whole "not being precious" theme for about my project today! I hope you're giving this a try with me at home - especially if you're someone who is ALWAYS "precious" with your art ;)
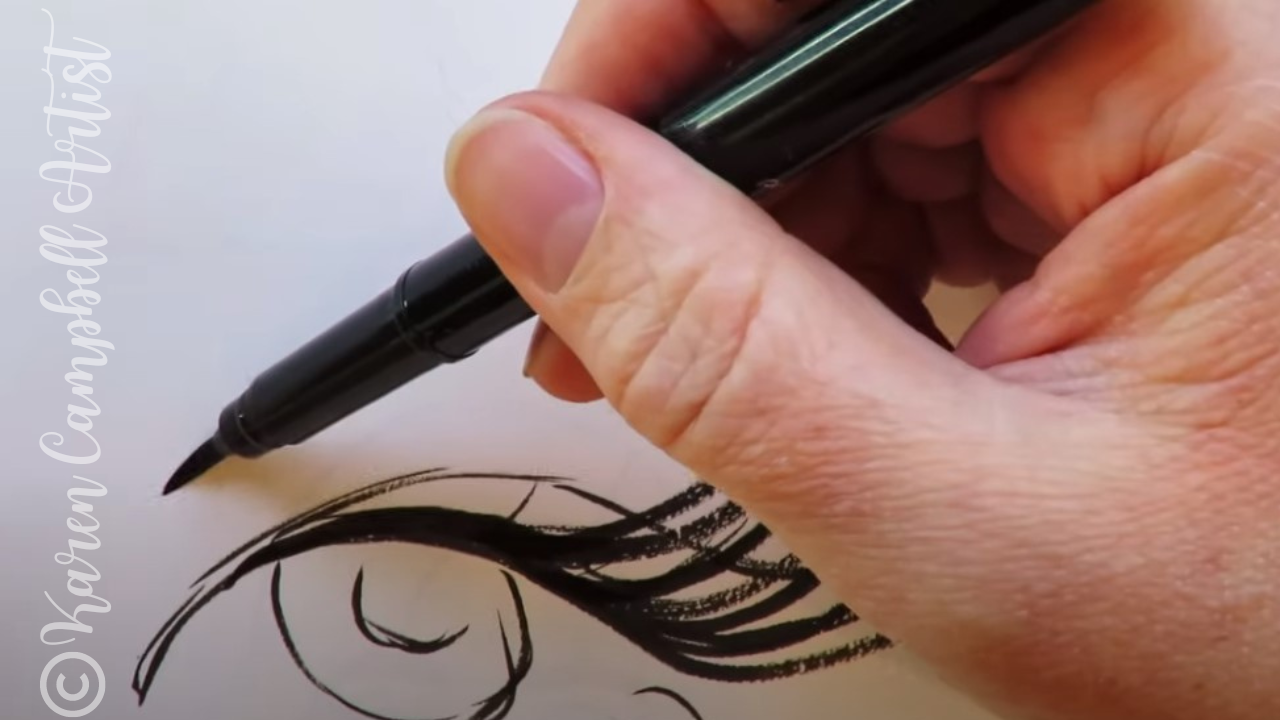
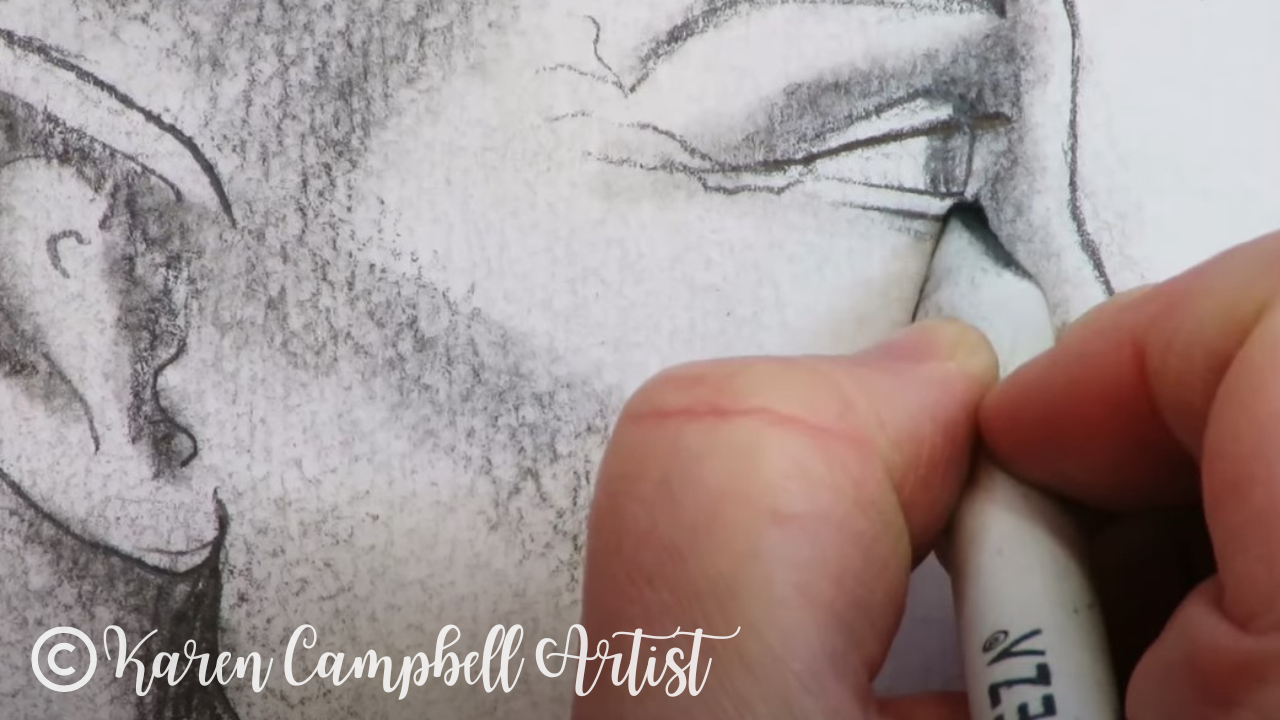
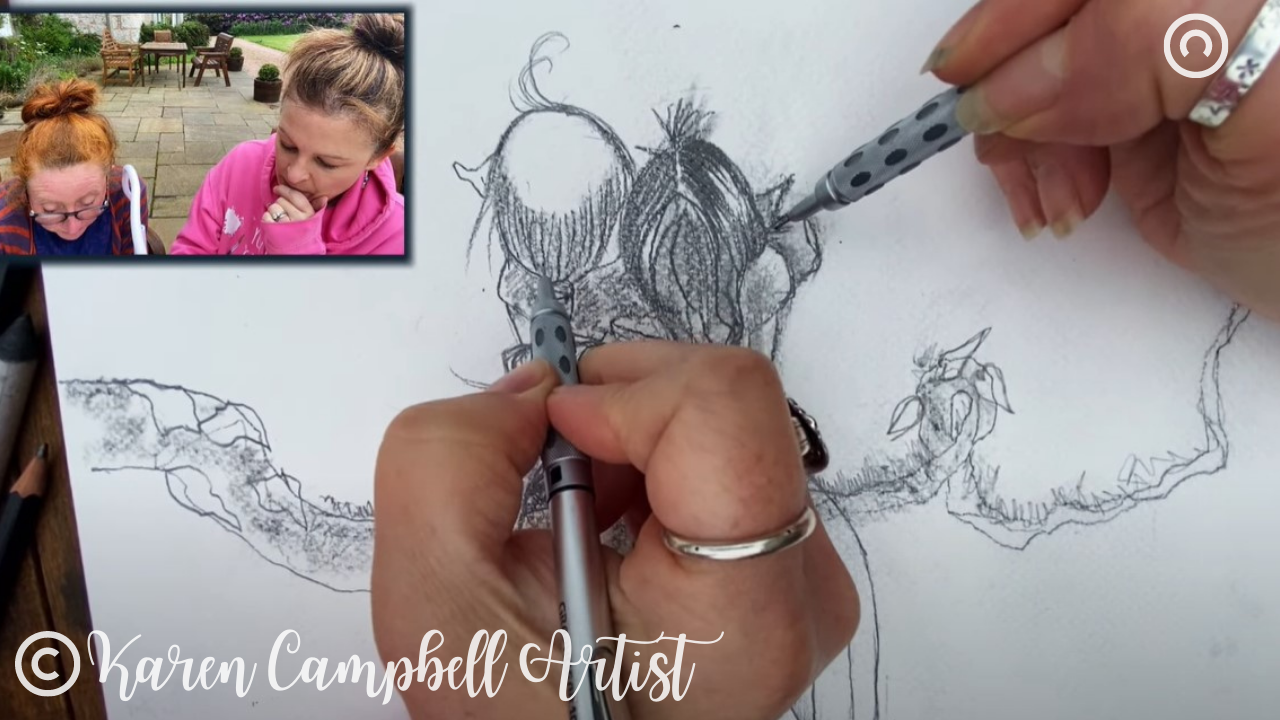
If you've been following me for a while you know I'm obsessed with my pentel pocket brush pen for eyelash drawing and outlining. I really love it because it has actual bristles like a paintbrush instead of a marker nib that's shaped like a paintbrush tip. Depending on how you change your pressure as you're drawing - you'll get different line weights, all from one drawing tool. Super fun!
Not sure how to draw eyelashes? Watch this video and grab my free eyelash drawing cheatsheet. 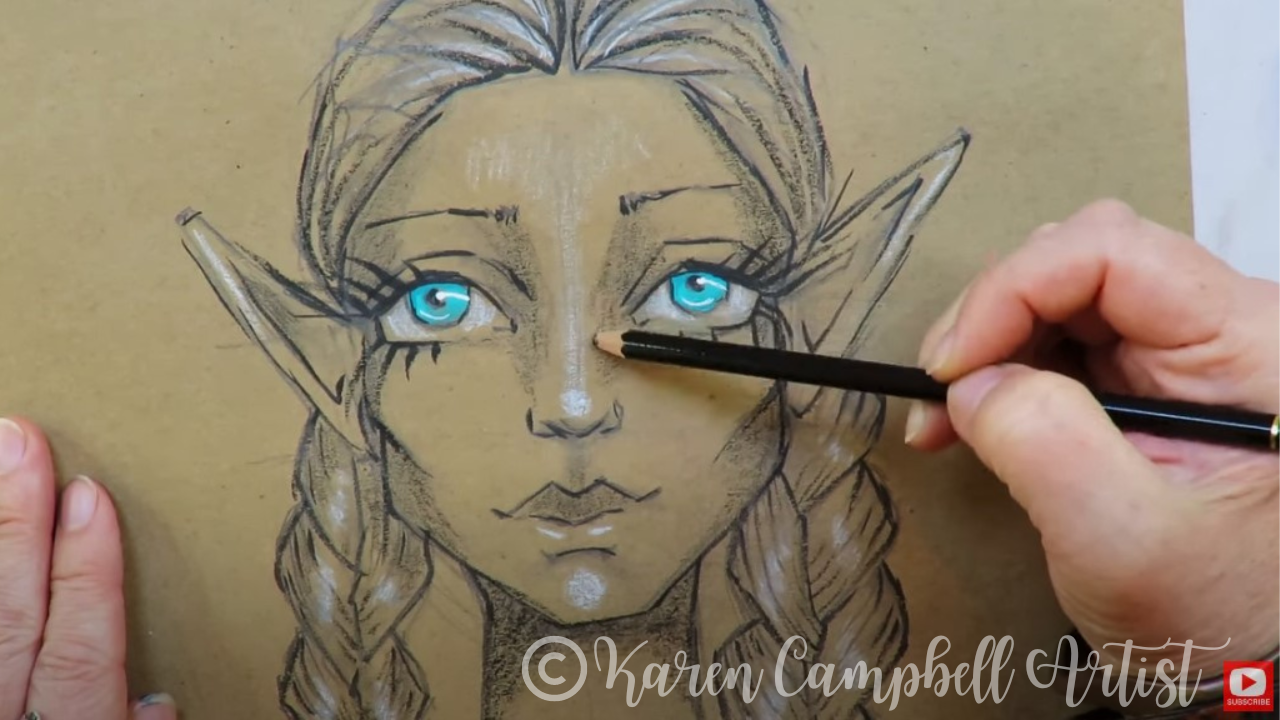
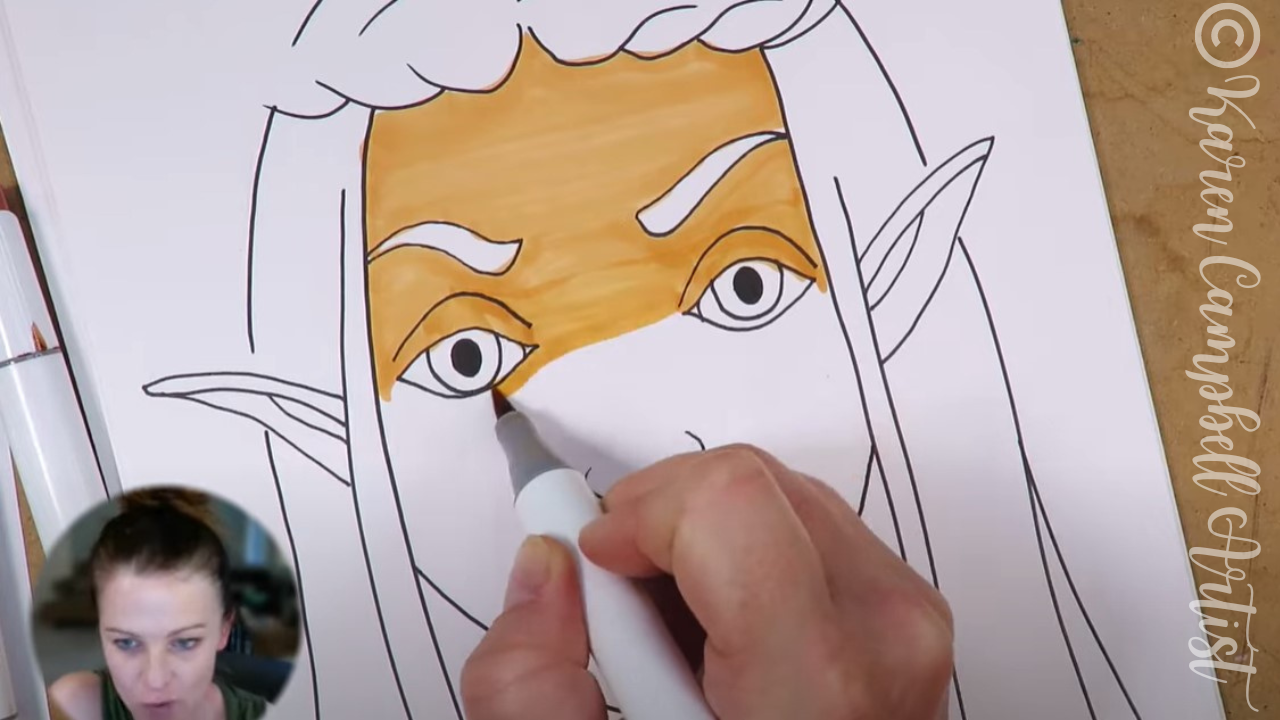
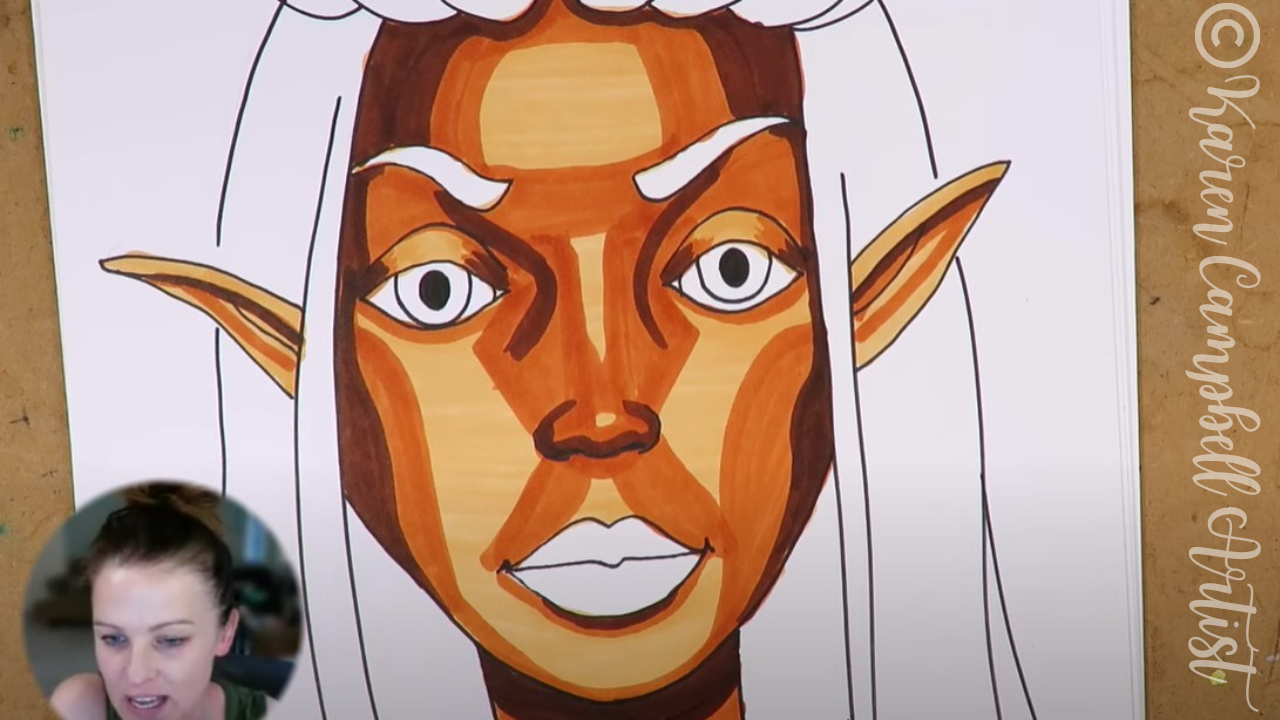
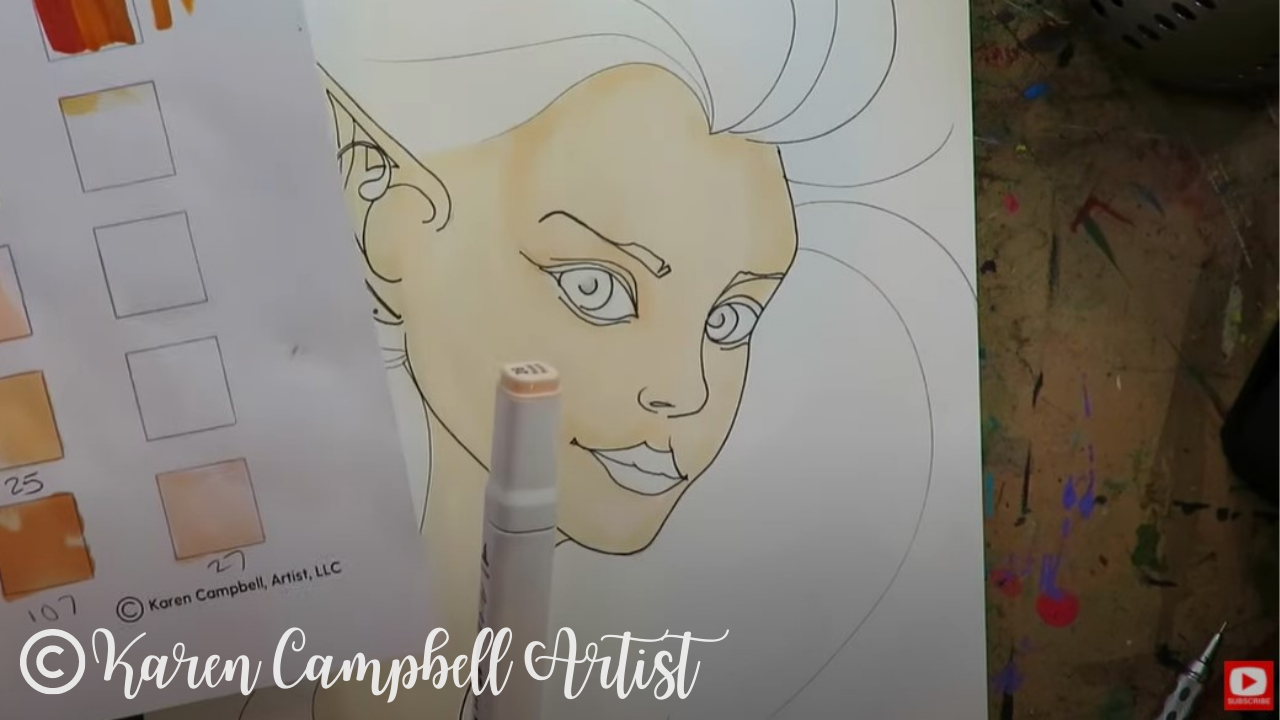
I felt like my drawing needed more contrast so added shading with my black stabilo all pencil, China markers, and my white posca pen. I also got super crazy and added color to my fairy's eyeballs with straight-up acrylic paint!
Thanks for hanging out with me today! I can't wait to see your version of today's lesson in theFacebook group:)
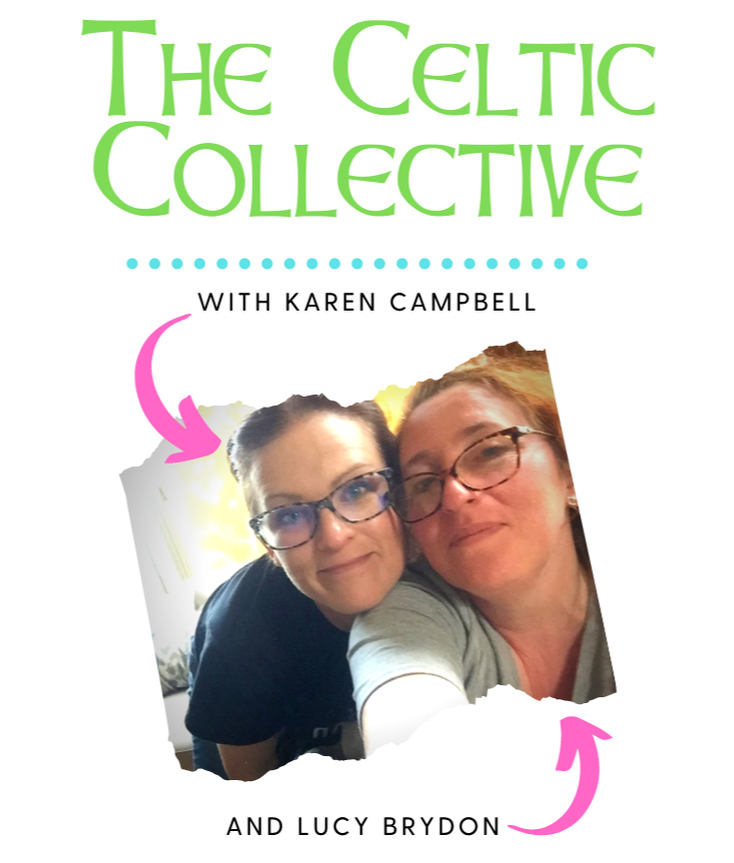
If you're OBSESSED with fairies and fantasy art like me, you might just LOVE the Celtic Collective over at Awesome Art School that I run with my Scottish bestie, Lucy Brydon. Add your name to the waitlist to be notified when it's open for enrollment.
You might ALSO enjoy our podcast 1Scot,1 Not. We talk about everything under the sun to do with Scotland - whether it's historical, fantasy, whatever. Just a quick warning - we have a blast and are totally ourselves on the podcast, which means there is some drinking and swearing. ❤️ CHECK OUT ALL my art books on AMAZON ❤️ MY FAVORITE ART SUPPLIES on AMAZON ❤️ MY BELOVED FACEBOOK GROUP ❤️ FOLLOW ME ON INSTAGRAM
0 Comments
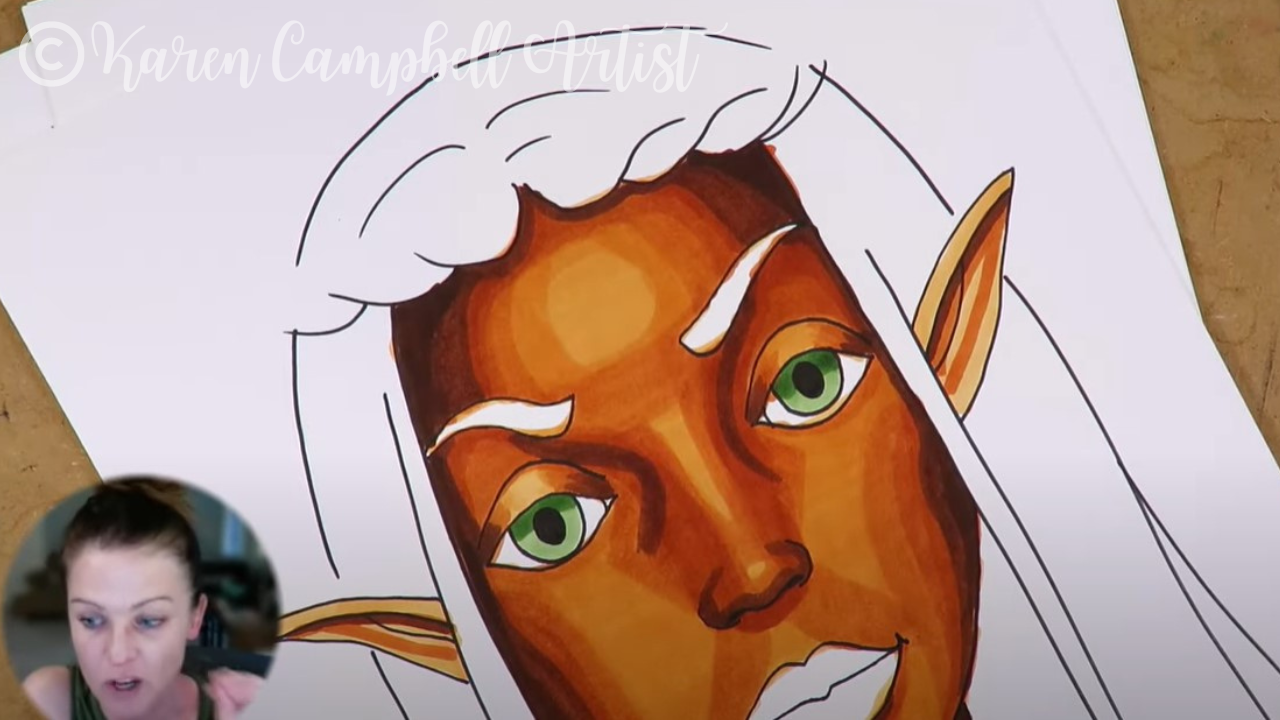
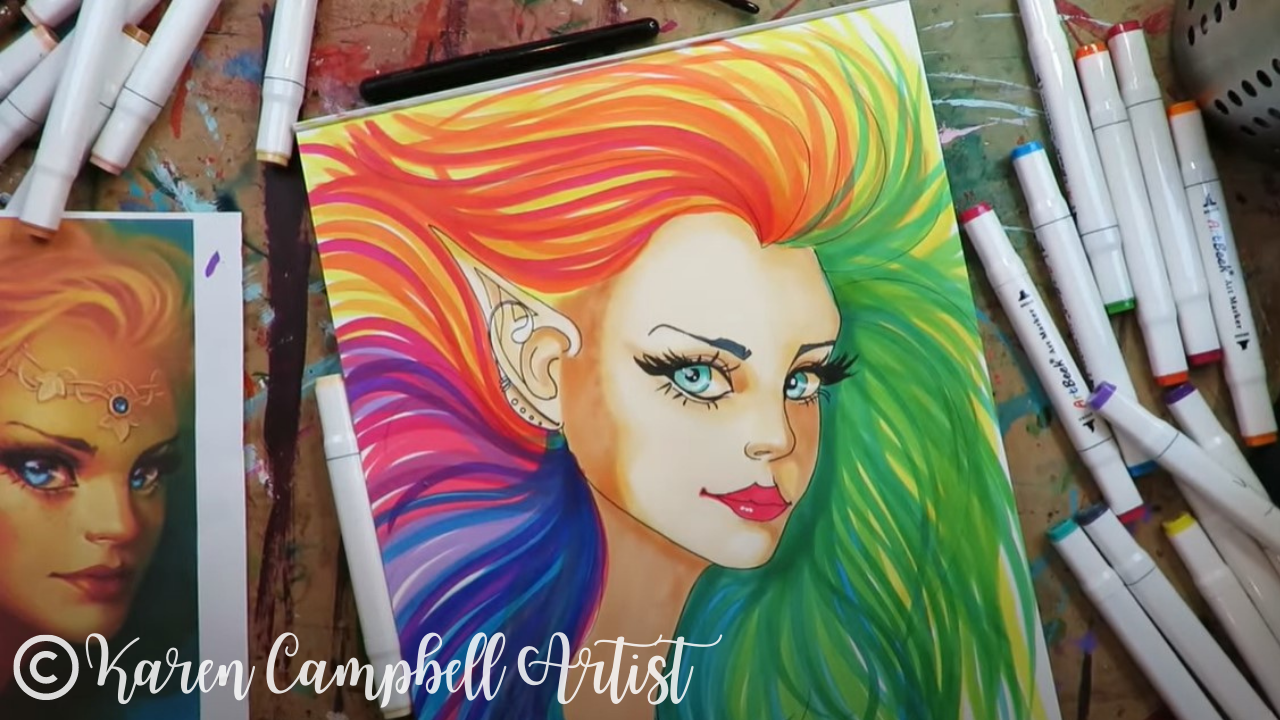
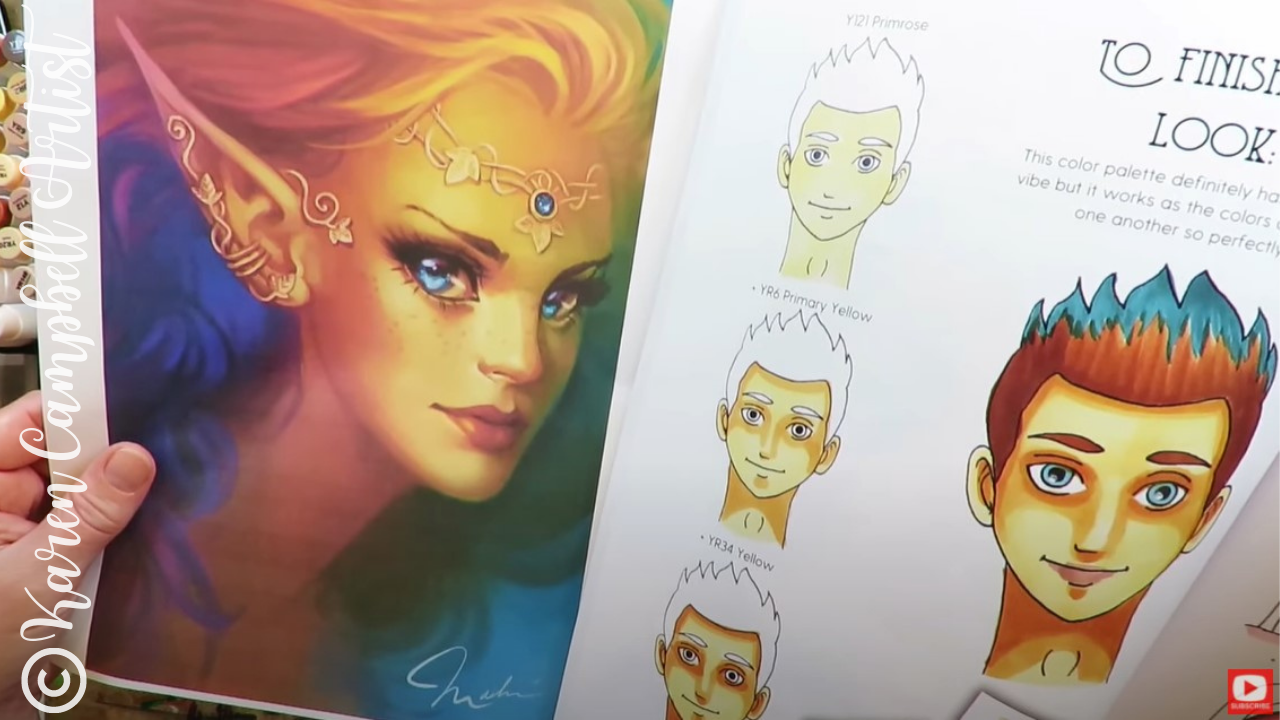
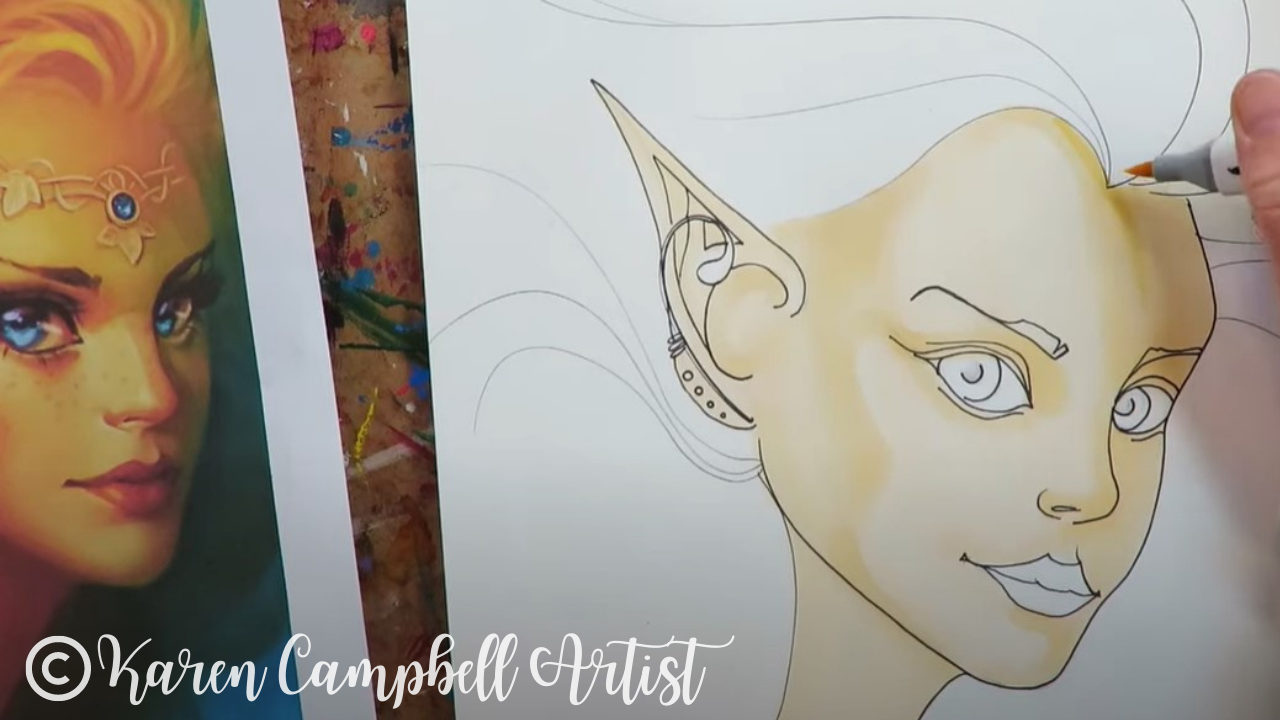
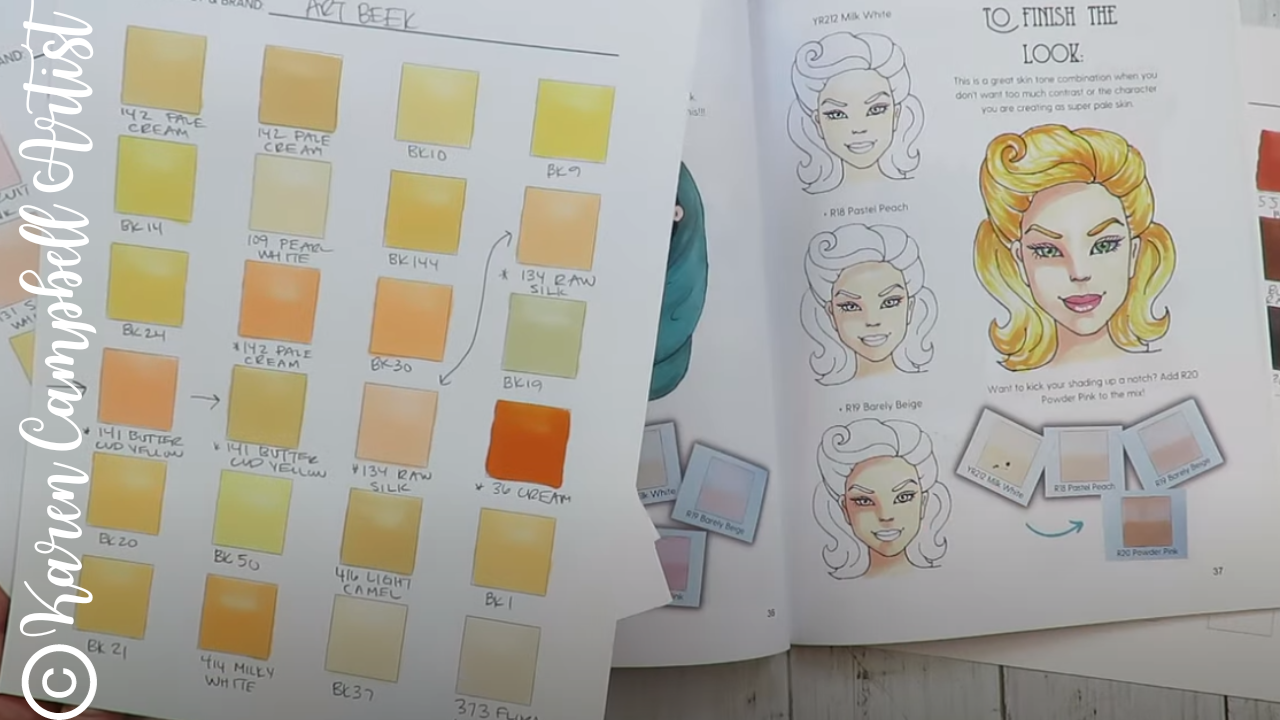
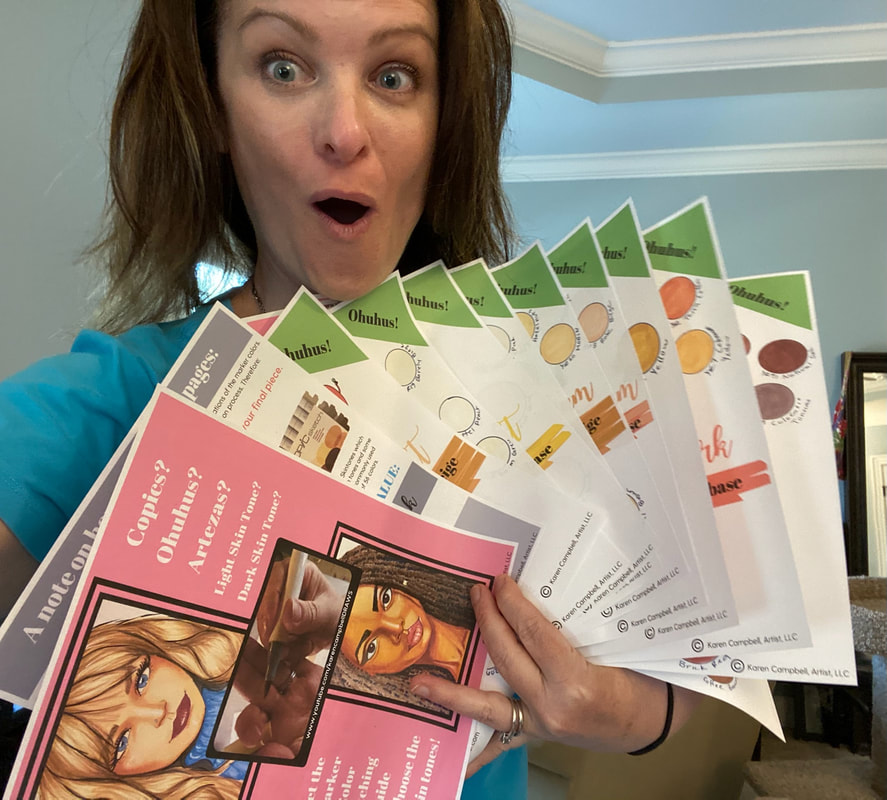
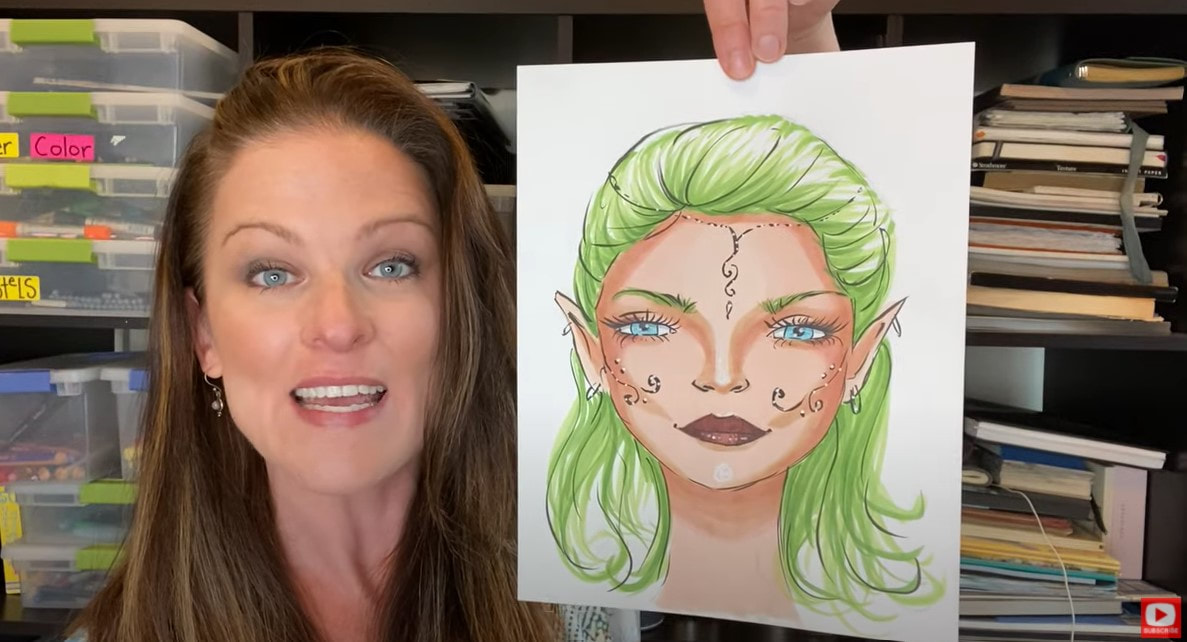
SCARED of your DARK skin tone markers? You are NOT alone! The process for shading faces with dark skin is EXACTLY the same as shading faces with light skin tone markers. Press play to CONQUER these fears once and for all and to see my BEST alcohol marker blending tips in action. Playing along with my #50FunFabFairies drawing challenge? Today's FAIRY face drawing and shading tutorial is lesson 8!
Want easy access to today's lesson and even MORE fairy drawing ideas? Join my FREE #50FunFabFairies drawing challenge over at Awesome Art School!
Simply click the button below to receive instant access to ALL the fairy reference images for each drawing prompt (including today's elf ears drawing reference!), plus info on supplies, cheatsheets, and more! 
Wanna become a better artist? Do today's lesson (and every lesson of the challenge) five times, making a few creative alterations of your choice, and watch your skills soar as you practice fairy eyes drawing, fairy and elf ears drawing AND fairy hair drawing 50 different ways!
Before we continue, super quick announcement: All product links are Affiliate. I may earn a small commission if you choose to order through these links but by law there is never any additional cost to the consumer for doing so. I thank you for your support.
|


 | Categories |
If you'd like to see what other references I used and watch the entire process unfold I made a sweet video of the process, voiceover and timelapsed for your enjoyment (and so that it doesn't take up too much of your precious time).
I hope you enjoy!
Karen Campbell
Founder of Awesome Art School. Mixed Media Artist. Author of 19 Instructional Art Books!
Posting on YouTube every single Wednesday of the year!

Whose work has appeared in...


Archives
July 2024
June 2024
May 2024
April 2024
March 2024
February 2024
January 2024
December 2023
November 2023
October 2023
September 2023
August 2023
July 2023
June 2023
May 2023
April 2023
March 2023
February 2023
January 2023
December 2022
November 2022
October 2022
September 2022
August 2022
July 2022
June 2022
May 2022
April 2022
March 2022
February 2022
January 2022
December 2021
November 2021
October 2021
September 2021
August 2021
July 2021
June 2021
May 2021
April 2021
March 2021
February 2021
January 2021
December 2020
November 2020
October 2020
September 2020
August 2020
July 2020
June 2020
May 2020
April 2020
March 2020
February 2020
January 2020
December 2019
November 2019
October 2019
September 2019
July 2019
June 2019
May 2019
April 2019
March 2019
February 2019
January 2019
December 2018
November 2018
Categories
All
#50FunFabFairies Drawing Challenge
5 Minute Drawing Practice
Acrylic Brushes
Acrylic Painting Basics
Acrylic Painting For Beginners
Acrylic Painting On Canvas
Acrylic Painting Supplies
Acrylic Painting Tutorial
Acrylic Paint Types
Alcohol Ink Painting
Alcohol Ink Tutorial
Alcohol Marker Art
Alcohol Marker Blending
Alcohol Marker Brands
Alcohol Marker Drawing
Alcohol Markers By ArtBeek
Alcohol Markers Tutorial
Altered Book
Altered Book Art Journal
ArtBeek Alcohol Markers
Art Book Reviews
Art Books I Love
Art Deco
Art Deco Drawing
Art Deco Mixed Media Projects
Art Deco Style
Art For Beginners
Art Heals
Artist Collaboration
Artist Encouragement For Beginners
Artist Positive Mindset For Beginners
Art Journal
Art Journal For Beginners
Art Journal Ideas
Art Journal Inspiration
Art Journal Page
Art Journal Techniques
Art Retreats
Art Studio Makeover
Art Supplies
Art Supply Demos
Art Supply Reviews
Art Supply Storage
Asian Eye Drawing
Beginner Drawing Projects
Beginners
Behind The Scenes
Blackwing Pencils
Blackwing Volumes
Brush Pens
Canvas Painting
Cartoon Cat Drawings
Castle Drawing Lesson
Cat Art
Celtic Collective
Charcoal Drawing
Charcoal Portrait
Christmas Watercolor Ideas
Collage
Collage Ideas
Collage Techniques
Collage Tutorial
Colored Pencils
Copic Marker Alternative
Copic Marker Art
Copic Marker Drawing
Copic Marker Tutorial
Copic Skin Tones
Copic Vs Ohuhu Alcohol Markers
Craft Gem Projects
Create Your OWN Custom Watercolor Palette
Daniel Smith
Daniel Smith Watercolor Palette
Daniel Smith Watercolors
Dip Pens
DIY Travel Watercolor Palette
Drawing
Drawing A Baby Face
Drawing Books On Amazon
Drawing Cats
Drawing Challenge
Drawing Erasers
Drawing Eyelashes
Drawing Eyes In Pencil
Drawing Faces
Drawing Faces For Beginners
Drawing Facial Features
Drawing Female Hairstyles
Drawing For Beginners
Drawing Hairstyles
Drawing Highlights
Drawing Ideas For Travel
Drawing Necks Realistically
Drawing Pencils
Drawing Tutorial
Drink & Draw
Ear Drawing Practice
Easy Acrylic Painting
Easy Drawings For Beginners
Easy Face Drawing Tutorial
Easy Mixed Media Projects
Easy Owl Painting
EASY Watercolor Tutorial
Easy Zen Doodle
Ecoline Brush Pens
Elegant Writer
Erasers
Eyelashes Drawing
Faber Castell Gelatos
Faber Castell Watercolor Markers
Facebook Live Lessons
Face Chart Inspired Drawing Tutorial
Face Drawing
Face Drawing Guidelines
Face Drawing Practice
Face Drawing Tutorial
Face-shading
Face-shape-drawing
Face-sketch
Fantasy-art-drawing
Fantasy Art Drawing Projects
Fantasy Art Painting Projects
Fashion-face-drawing-tutorial
Fashion-figure-drawing
Fashion-illustration-for-beginners
Fineliner-tips
Flip-throughs-of-my-books
Foam Head Projects!
Fountain-pen-ink
Fountain-pen-ink
Fountain-pen-ink-painting
Fountain-pen-ink-painting
Free-art-lesson
FREE Cheatsheets!
Free-drawing-lesson
Free-lesson
FREE LIVE Art Alongs
Free-watercolor-lesson
Free-watercolor-lesson
Full Length Drawing Tutorial
Full Length Face Drawing Tutorial
Full Length Face Shading Tutorial
Full Length Mixed Media Projects
Fun Fab Drawing Club
Fun-fab-fairies
Fun Fab Famous People & Paintings
Gesso-brush
Gift Cards
Gift Ideas For Artists
Gift Ideas For Beginners
Glass-dip-pens
Gouache-meaning
Graphite-transfer-paper
Halloween-face-drawing-tutorial
Halloween-projects
Hamburger
Hamburger System
Hot-dog-system
How To Add Highlights To A Drawing
How To Add Highlights To Face Drawings & Mixed Media Portraits
How To Add Shading To A Drawing
How To Art Journal
How To Become An Awesome Artist
How-to-choose-face-drawing-references
How-to-color-a-baby-face-in-copic-markers
How To Create A Watercolor Palette
How To Draw
How To Draw A 34 View Face
How-to-draw-a-babys-face
How-to-draw-a-face
How-to-draw-a-fairy
How-to-draw-a-fairy-face
How To Draw A Fun Fab Face
How-to-draw-a-male-face
How-to-draw-and-shade-a-face-in-copic-markers
How-to-draw-and-shade-a-face-in-copic-markers
How-to-draw-and-shade-a-whimsical-african-american-face
How-to-draw-and-shade-a-whimsical-african-american-face
How To Draw Anime & Manga
How-to-draw-art-deco-style
How-to-draw-asian-eyes
How-to-draw-a-smile-with-teeth
How-to-draw-bangs
How-to-draw-cartoon-cats
How-to-draw-dreadlocks
How-to-draw-ears
How-to-draw-expressions
How-to-draw-eyebrows
How To Draw Eyelashes
How To Draw Eyes Realistically
How To Draw Fairy Ears
How To Draw Figures
How To Draw Freckles
How To Draw Hair
How To Draw Lips
How To Draw Lips Realistically
How To Draw Noses Realistically
How To Draw Realistic Ears
How To Draw Teeth
How To Draw Wrinkles
How To Paint Eyelashes
How To Seal Your Work
How To Shade
How To Shade A Face In Color
How To Shade DARK Skin Tones With Alcohol Markers
How To Shade Faces With Alcohol Markers
How To Shade Faces With Tombow Markers
How To Sketch A 3 Quarter Portrait
How To Sketch A Face
How To Swatch Art Supplies
How To Transfer A Drawing
How To Use Gloves In A Bottle
How To Use Linseed Oil
How To Use Oil Pastels
LARGE Canvas Painting Technique
Lickleyhead Castle
Line Drawing
Magical Mashup
Marker Storage Solutions
Marker Tips
Martini Glass Drawing
Mermaid
Mixed Media
Mixed Media Art
Mixed Media Art Books I Love
Mixed Media Art Ideas
Mixed-media-art-journal
Mixed Media Art Journaling
Mixed Media Art Journal Tutorial
Mixed Media Art Supplies
Mixed Media Art Techniques
Mixed Media Art Tutorials
Mixed Media Backgrounds
Mixed Media Brushes
Mixed Media Canvas
Mixed Media Challenge
Mixed Media Collage
Mixed Media Collage Background
Mixed Media Collage Tutorial
Mixed Media Drawing
Mixed Media Eyes
Mixed Media Faces
Mixed Media Face Shading
Mixed Media Foam Heads
Mixed Media Girls
Mixed Media Hamburger
Mixed Media Hot Dog System
Mixed Media Ideas
Mixed Media Layering Process
Mixed Media Paintbrushes
Mixed Media Painting
Mixed Media Portraits
Mixed Media Project
Mixed Media Society
Mixed Media Techniques
Mixed Media Tutorial
Mixed Media Tutorials
Mixed Media Watercolor
Mixed Media YouTube
Monochromatic Drawing
My Favorite Art Supplies
My Favorite Watercolors
My Journey As An Artist
My Mixed Media Layering Process
New Book!
No Draw Mixed Media Art Project
Noodler's Ink
Nose Drawing Practice
Ohuhu Alcohol Markers
Oil Pastels & Acrylic Paint
Oil Pastels Brand Comparison For Beginners
Oil Pastels & Colored Pencils
Oil Pastels For Beginners
Oil Pastels + Linseed Oil
Oil Pastel Tutorial
Old Book Crafts
Owl Painting
Paint Brush Types
Painting On Canvas
Painting With Ink
Paint Markers
Palette Knife Painting
Pan Pastels
Paper Napkin Art Journal Background
Pastel Watercolor Sets
Pencil Drawing Tutorial
Pitt Pen Alternative
Portrait Drawing
Portrait Drawing Tutorial
Posca Alternatives
Posca Paint Pens
Prima Watercolor Sets
Profile Drawing
Profile Drawing Tutorial
Quadrant Method
Quick & Easy Face Drawing Tutorial
Reference Drawing
Scotland
Scottish Castle Art Retreat
Sealers Vs Fixatives
SEE INSIDE MY Art Books!
Shading Faces
Sheet Music Art
Side Profile Drawing
Side View Drawing
Silver Black Velvet Brushes
Sketching Tutorial
Skull Watercolor Tutorial
Spray Paint On Canvas Idea
Stabilo All Pencil Projects
Steampunk Drawing
Stenciling & Stamping Techniques
Three Quarter View Face
Time Lapse Drawing Video
Tissue Paper Art Journal Background
Tombow Brush Pens
Tombow Mono Zero Eraser
Tombow Skin Tone Markers
Toned Paper Drawing
Travel Art Supplies
Upcycled Art
Upcycle Old Books
Value Scale Drawing
Vintage Book Pages
Wardhill Castle
Watercolor
Watercolor And Colored Pencil
Watercolor And What Else?
Watercolor Brushes
Watercolor Fairy
Watercolor For Beginners
Watercolor Markers
Watercolor Marker Tips
Watercolor Marker Tricks For Mixed Media
Watercolor Palette Setup
Watercolor Portrait
Watercolors
Watercolor Sets I Love
Watercolor Supplies
Watercolor Techniques
Watercolor Tutorial
WatercolPainting Techniques
Watersoluble Art Supply Tricks
Water Soluble Markers
Water Soluble Pencils
What Is Mixed Media Art?
Whimsical-christmas-tree
Whimsical Face Drawing Tutorial
Whimsical-face-drawing-tutorial
Whimsical Women Of The World World Portrait Drawing Series
YouTube Drawing Channel
Youtube-giveaway
Youtube-video
Youtube-video
Zentangle Drawing Ideas
Zentangle Drawing Tips
Zentangle Drawing Tutorial
Zentangle Feather Drawing Tutorial
 RSS Feed

"Karen is flipping hilarious and she's very real...I like the way she teaches in a way that really gives you confidence, whether you're a beginner or advanced there's always something new to learn!"
- Elizabeth W. |
What Fans Are SayingKaren, you are absolutely fabulous! You make me feel like I can draw anything. I have recently retired and finally have the time to do some of the art that I have loved since I was in school. I am really at the beginning of my art journey and I hope to learn as much as I can. Thank you for all you do. |
Contact ME |