
|
I have a confession to make. I have kind of a love-hate relationship with zentangling! Ok, there! I've said it!! Now, before you call the "Zentangle police" on me, let me explain.
There are aspects of Zentangling that I absolutely adore!! The intricate designs, the meditative process, the flow state it induces—pure bliss. But there are also parts of it that I struggle with. The strict rules, the insistence on a certification (in order to TEACH it), the pressure to make every piece a masterpiece with cramped, tiny patterns... it all feels a little suffocating to me!! One of the things that irks me the most is the distinction between doodling and Zentangling. According to the Zentangle Association, "doodling is mindless and haphazard," while "Zentangling is mindful and deliberate." But isn’t art subjective? Who’s to say what constitutes "mindless" or "mindful"? Nevertheless, despite my reservations, I’ve found ways to make zentangling work for me. So, for all you fellow love-hate zentanglers or wanna-be zentanglers out there who've shied away for some of the same reasons, I’ve come up with SIX TIPS to help you navigate the world of zentangling with ease, and maybe even a hint of enjoyment! 
*All product links affiliate & for U.S. residents only.*
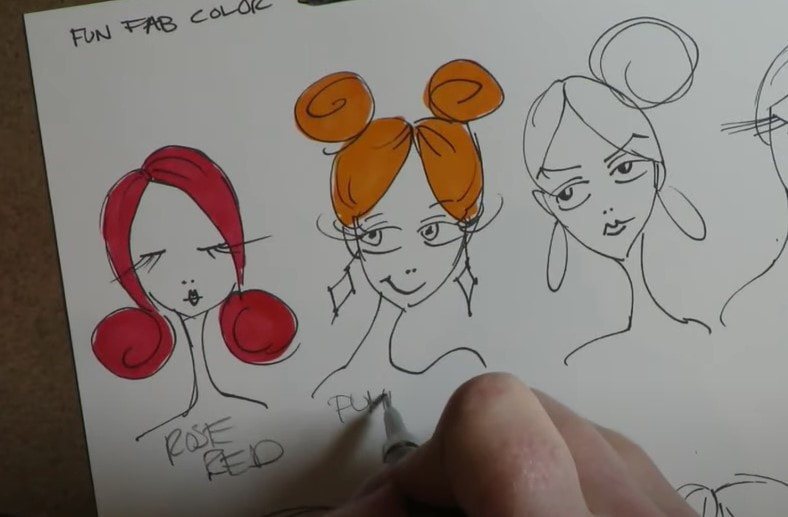
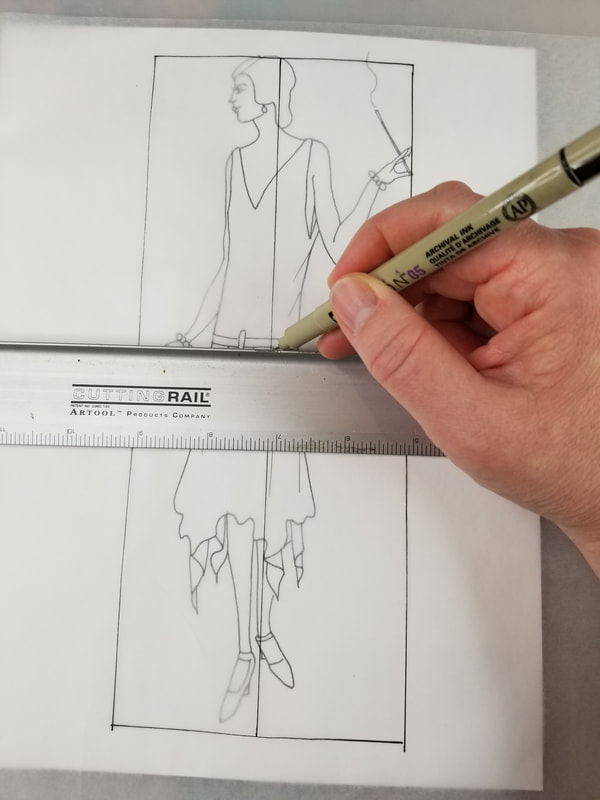
1Draw Something Pretty FIRST
Before diving into the tangled web of Zentangle, start by drawing something that brings you joy. It could be a flower, a leaf, or even just some squiggly lines. The key is to create a foundation that you genuinely like, setting the stage for your Zentangle adventure.
In today's video, I kept things SUPER simple and linear -using only stencils and a ruler to create my drawing. 
2Section it Off
Break your canvas into manageable sections that make visual sense. This not only helps in organizing your design but also adds clarity to the final piece. Don’t be afraid to introduce new elements to create additional sections and enhance the overall composition.

3Work on a Larger Scale
Bigger is easier, trust me on this one. Working on a larger scale gives you more room to breathe and allows for greater flexibility in your designs. Experiment with varying line weights to add depth and visual interest to your creations!
One of the easiest ways to change up your line weights is by using pens or markers with a variety of nib sizes! You'll get your work done faster and it looks SO cool! Plus... it's FUN!! I've always been a sharpie lover and have ALL the sizes. If you prefer a fineliner, these are my FAVES by Molotow! They're AWESOME for zen doodling and tangling!! 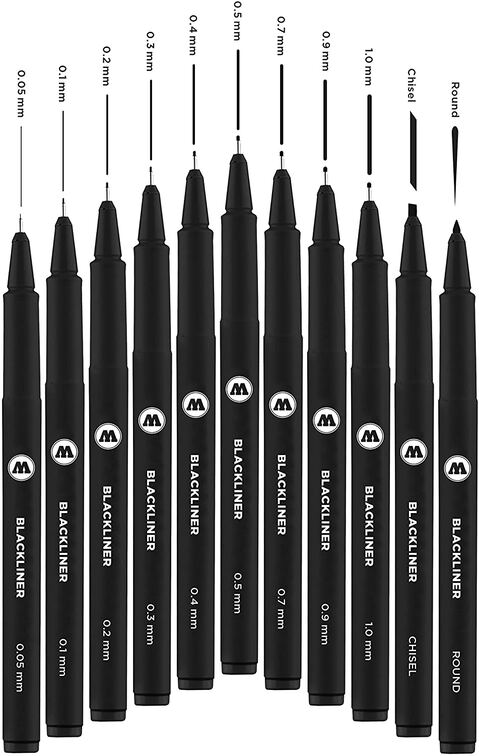
4Keep It Simple
Forget complex patterns and intricate designs. Stick to super easy shapes YOU ALREADY KNOW, like circles, lines, and squiggles. The goal is to enjoy the process without getting bogged down by unnecessary complexity.
Do it how YOU want to do it, not how a book or someone else is telling you how to do it (unless you want to!!). 
5Embrace the Power of Black
Don’t shy away from filling in spaces with solid black. It’s a LEGIT way to add depth and contrast to your zentangle. And hey, if you’re feeling adventurous, throw in some white accents for an extra pop of contrast! You can ALSO embrace the idea of using COLORED pens and markers. Who said zentangle drawings had to be in all black and white anyway?!

6If You Hate It, Don’t Do It
This one’s a game-changer. If Zentangle isn’t bringing you joy, if it feels like a chore rather than a creative outlet, then it’s okay to walk away. Remember, art should be fun, not frustrating. Give yourself permission to explore other mediums and techniques until you find what truly lights you up.
So there you have it, my six tips for surviving—and maybe even thriving—in the world of zentangle drawing! Whether you’re a seasoned tangler or a hesitant beginner, I hope these tips inspire you to approach your art with a newfound sense of freedom and joy.
And to the Zentangle police out there... don’t come after me. I swear I’m a good person. I’m goo:) Alright, time to dive back into my tangled masterpiece. Until next time, happy tangling! 
Love Drawing Faces or Never Tried & Wanna Learn?You're in the RIGHT place!! If you feel like you'd really like to dive into learning how to draw faces, whimsical girls, and basically ANYTHING from scratch - check out the Fun Fab Drawing Club with me over at Awesome Art School! I've got an amazing library of online course content with online art lessons in drawing for ALL skill levels with an added curriculum just for beginners. We'd love to have you join us! Looking for Something Else?
0 Comments
While I was creating a lesson for the Fun Fab Drawing Club the other day, I was having so much fun, I decided to do a similar lesson as a Draw Along party in my Facebook Group!
In case you missed that, or aren't on Facebook, I'm dropping the video on my YouTube Drawing channel as well :) Today's FREE martini glass drawing lesson has a little twist to give us a teensy challenge... 1. No drawing in pencil 2. No drawing freehand Sound fun?! Let's get started!! 
Before we continue, super quick announcement: All product links are Affiliate. I may earn a small commission if you choose to order through these links but by law there is never any additional cost to the consumer for doing so. I thank you for your support.
Drawing Supplies for Today
Since we're not drawing in pencil, you might want to grab a few fineliners in different nibs (thicknesses). My favorite fineliner set is by Molotow, below.

Since I plan to use alcohol markers to color in my martini glass drawing, I'm working on a super smooth sheet of cardstock that is similar to Bristol (but waaaaay cheaper).
Next, you're gonna want a straight edge. You can easily use the edge of a book, or whatever you have lying around. Try NOT to reach for a ruler, because I don't want you to start measuring stuff :) I'm using a triangle for my straight edge and NOT measuring on purpose to keep the vibe FUN and wonky! 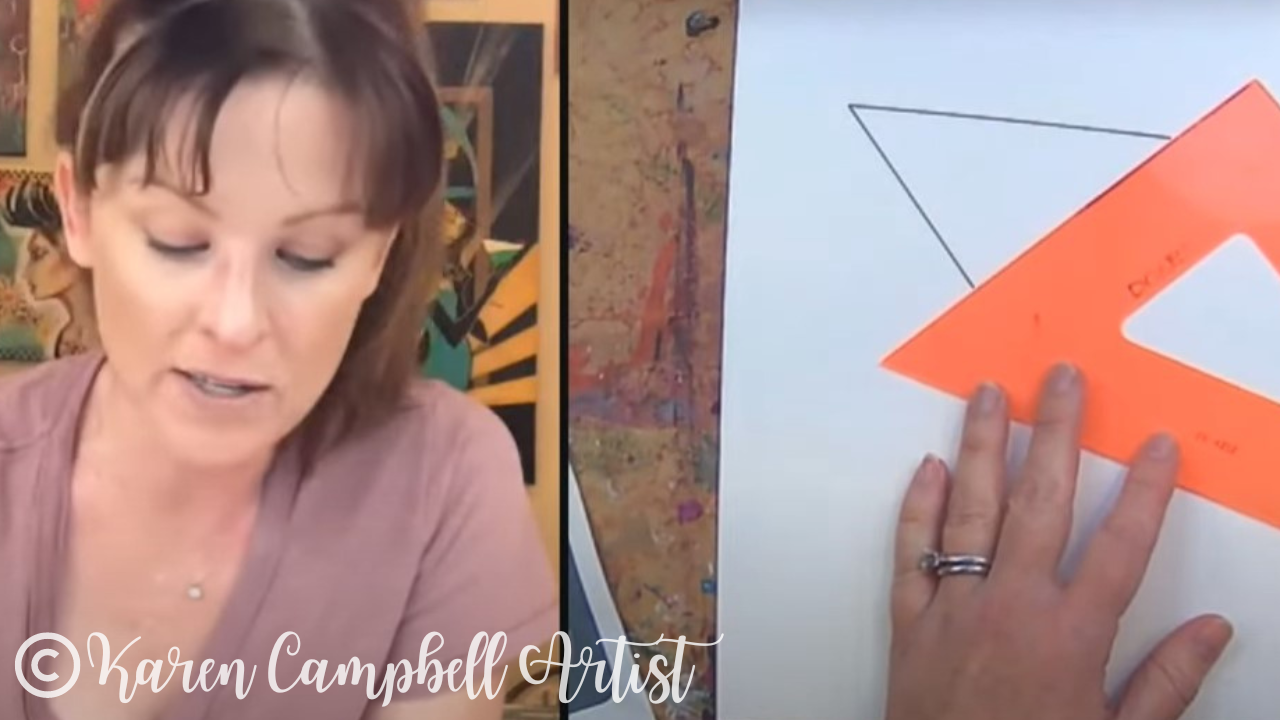
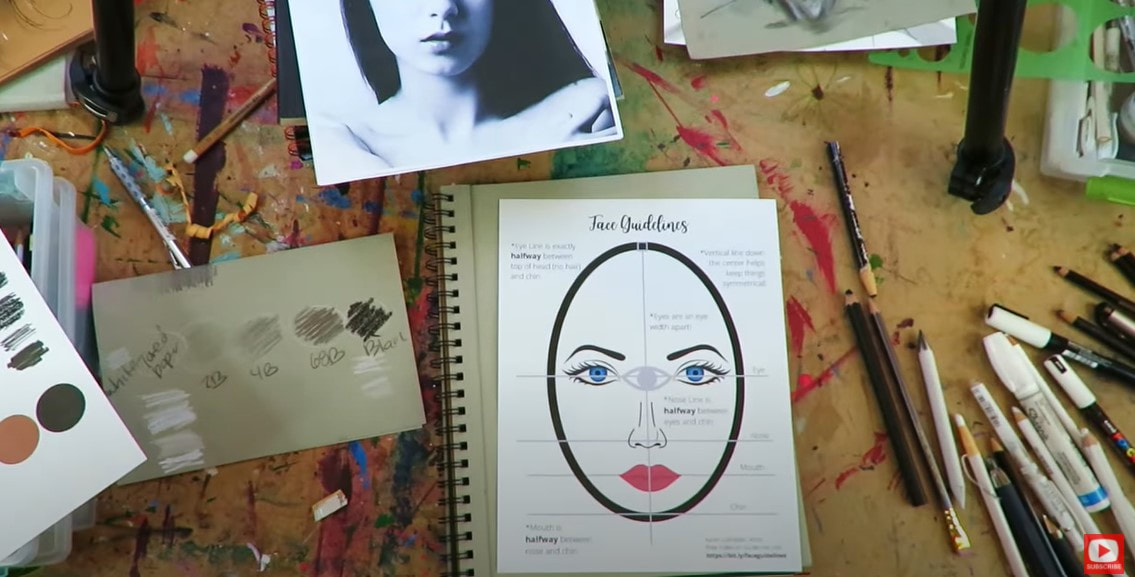
I've also got my ellipse and circle templates nearby. I use BOTH of these constantly when drawing faces.
The ellipses are perfect for dropping in facial feature placeholders when I'm sketching in my face drawing guidelines at the beginning of a project. I love using the circle template whenever I'm drawing eyes to help me draw quick irises and pupils (because who wants to spend forever trying to draw a perfect circle?! NOT ME!!). 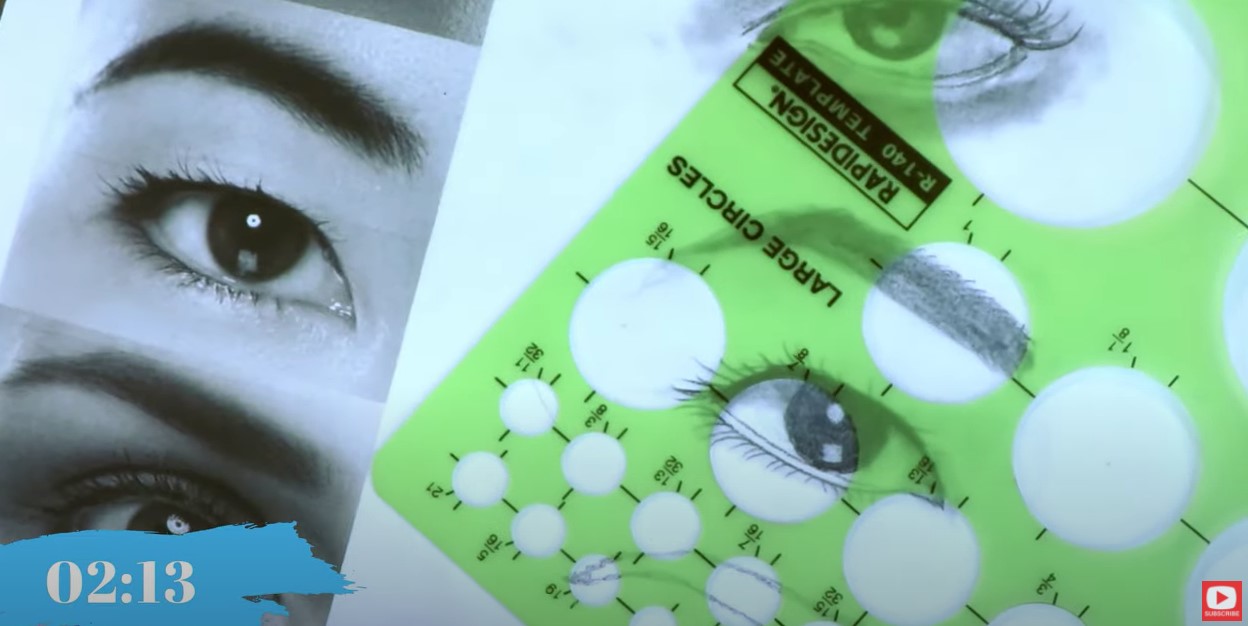
If you don't have templates like this, it's totally fine! Use whatever you have lying around in the shape of a circle that you can trace.
My last "supply" for today is seriously just a bunch of cocktail drawing reference images to provide me with a little inspiration and get my creative juices flowing. 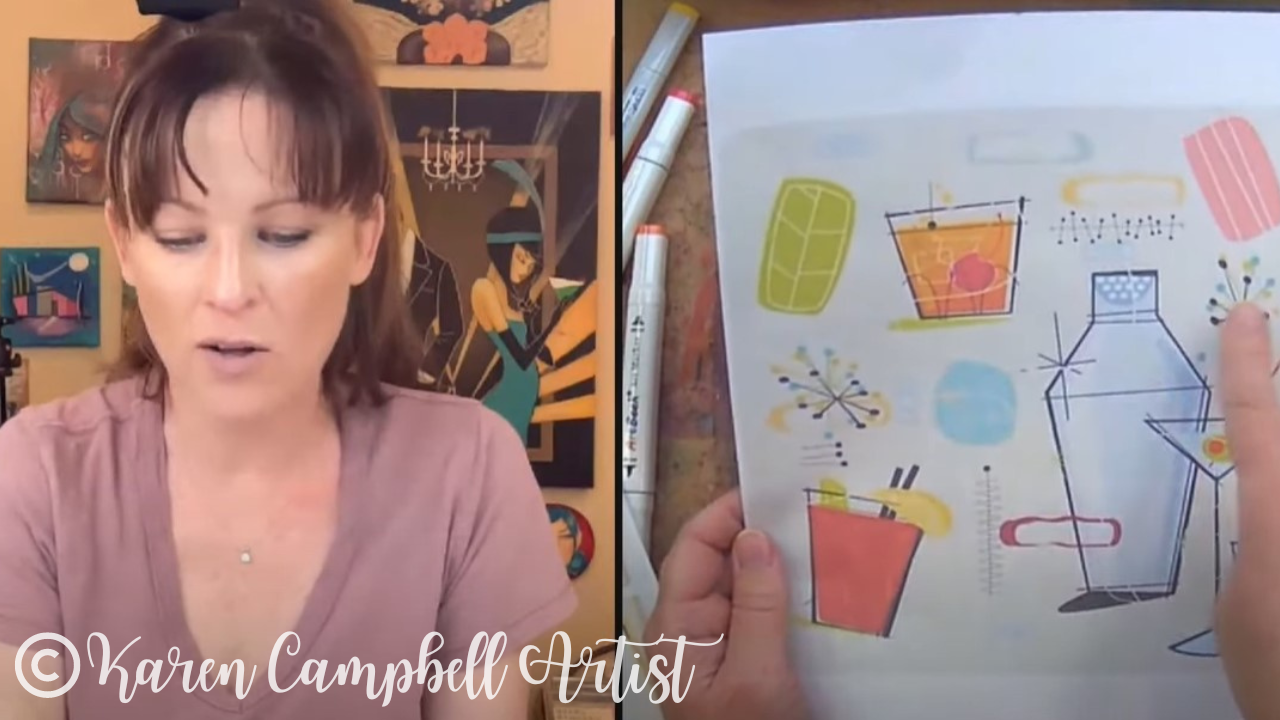
After you've grabbed your supplies, make sure to click over to the video because everything in today's FREE drawing tutorial is step-by-step, and in real-time so you can draw along with me from home :)
How to Make Your Line Drawing Even COOLER!
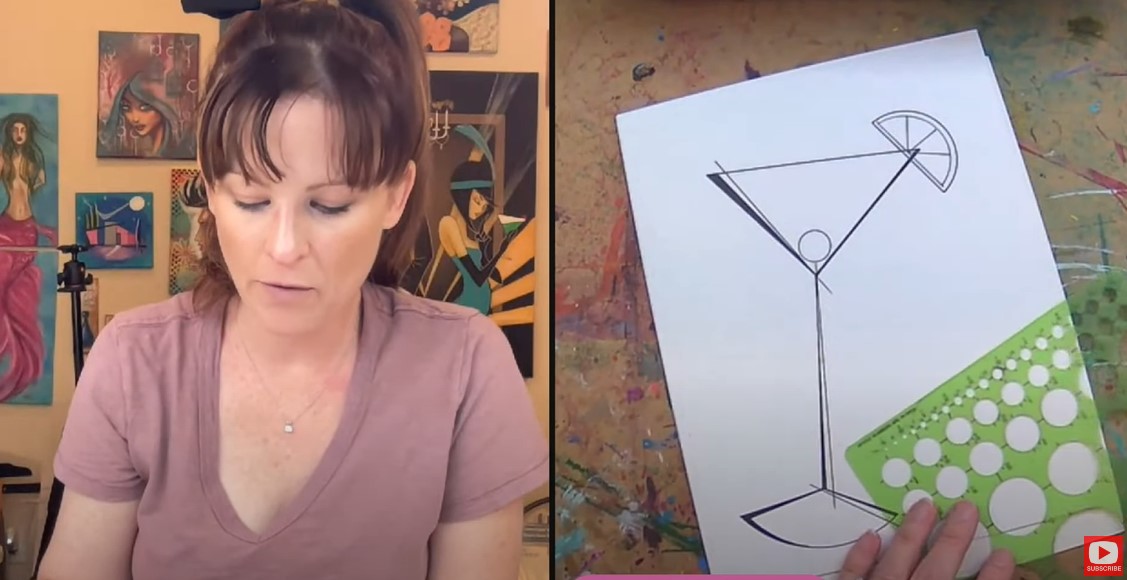
Once you've got your basic martini glass drawing done, it's time to take your drawing from simple and plain... to awesome! We do that by varying LINE WEIGHT throughout the drawing.
Line variation is super easy to achieve. You can either use fineliners in a variety of nibs (thicknesses), or you can add some wonky lines with a straight edge like I'm doing in today's video, and then color them in! You're definitely gonna wanna see this in action! 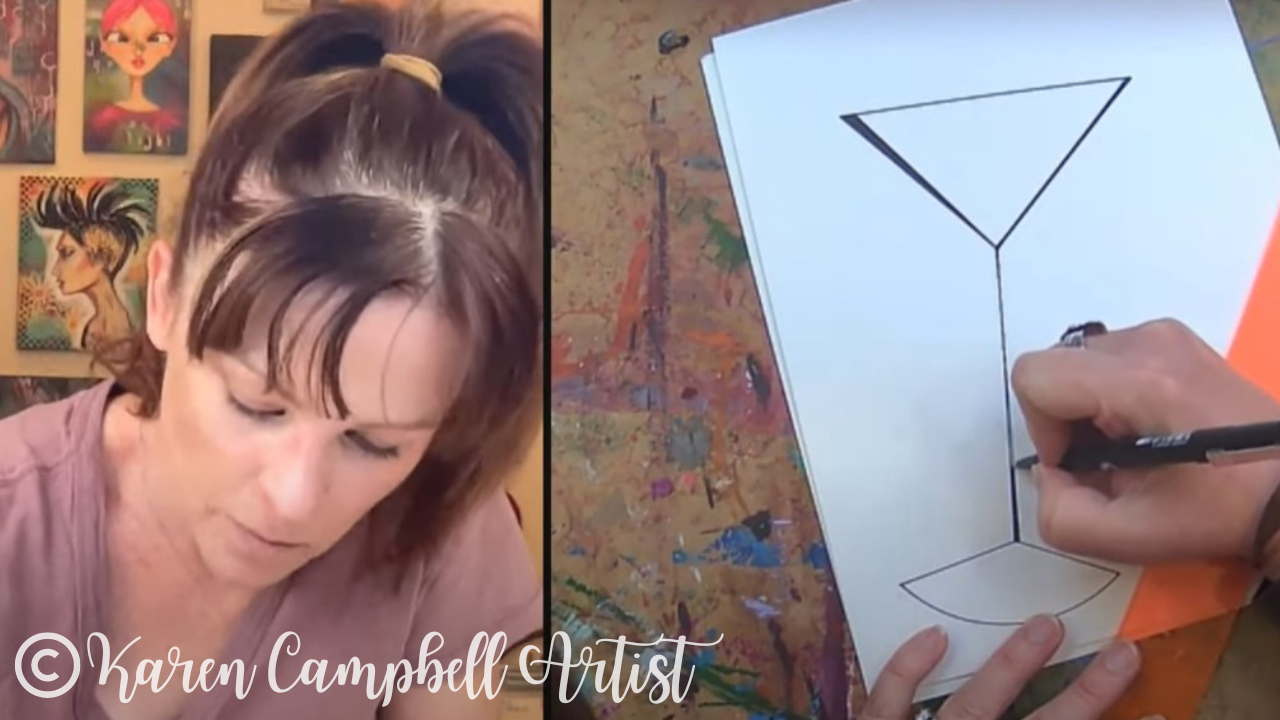
Once you've got some line variation going on in your drawing, you can add even more interest with the addition of a few action lines. Action lines are common in cartoons and anime drawings to indicate movement or energy. I like to use a thinner fineliner for these, like a 0.4.
HOT TIP: Make sure you wipe your straight edge off BEFORE adding action lines around the martini glass because we don't want any excess ink smearing onto your drawing once your template hits the page again.

Once the action lines are in place, it's time for some fruity embellishments, because who doesn't love a little fruit inside a sassy drink?!
Let's Add Color
The first rule of thumb for coloring ANYTHING is to swatch! You can use a piece of scrap paper off to the side of your drawing, or download my FREE Fun Fab Swatch Sheet to make things even more interesting!

I used to hate swatching and think it was boring, but trust me, there's nothing worse than grabbing a marker or tube of paint based on the cap, only to find a completely unexpected color popping onto your page! I've learned this the hard way time and again!
Your future self will thank you for swatching!! 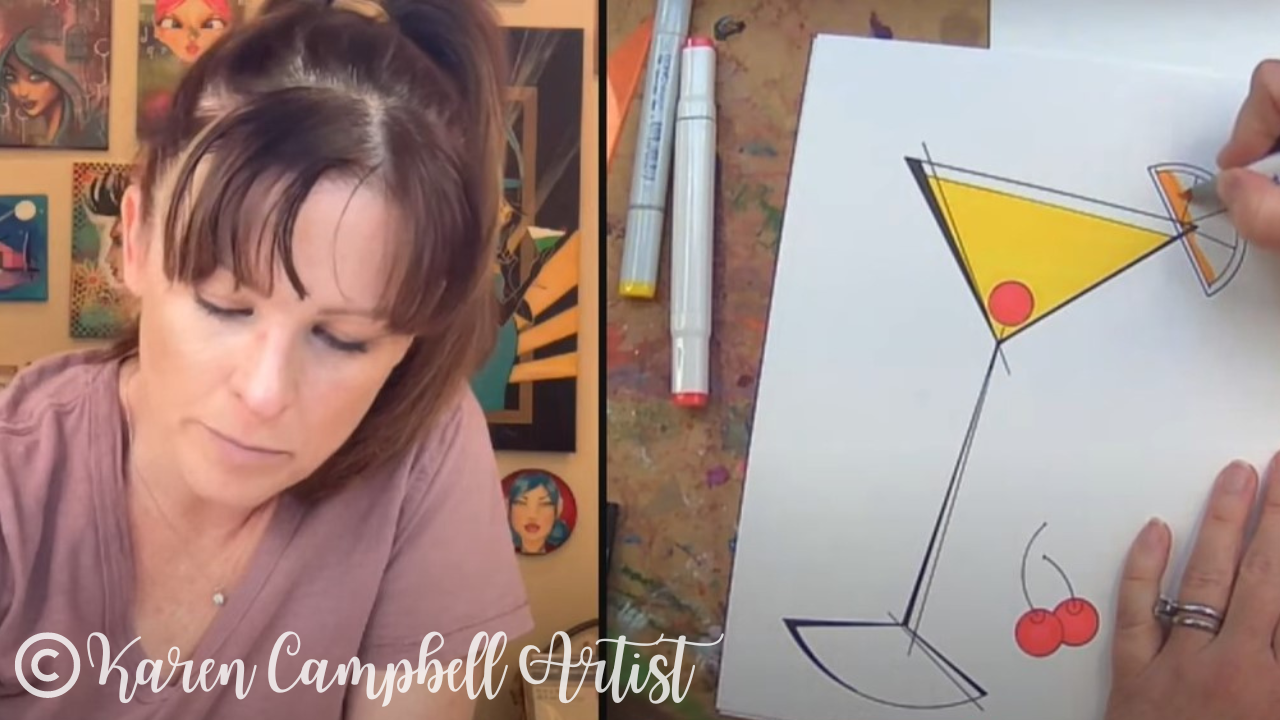
If you don't have any alcohol markers at home, don't sweat it. Use whatever art supply you have from colored pencils to watercolor!
Wanna Learn MORE About Alcohol Markers?
In case you don't know this about me yet, I'm OBSESSED with alcohol marker art!! I love using my Copics and Ohuhus for shading faces, fairies, art deco fashions, and everything in between!!
Over the years, I've tried just about every alcohol marker brand from dollar store cheapies to my beloved Copics, and have learned a ton along the way. Check out this playlist to watch my BEST ALCOHOL MARKER COLORING TIPS in action, learn about blending, mixing alcohol markers with other media, and SO MUCH MORE!! 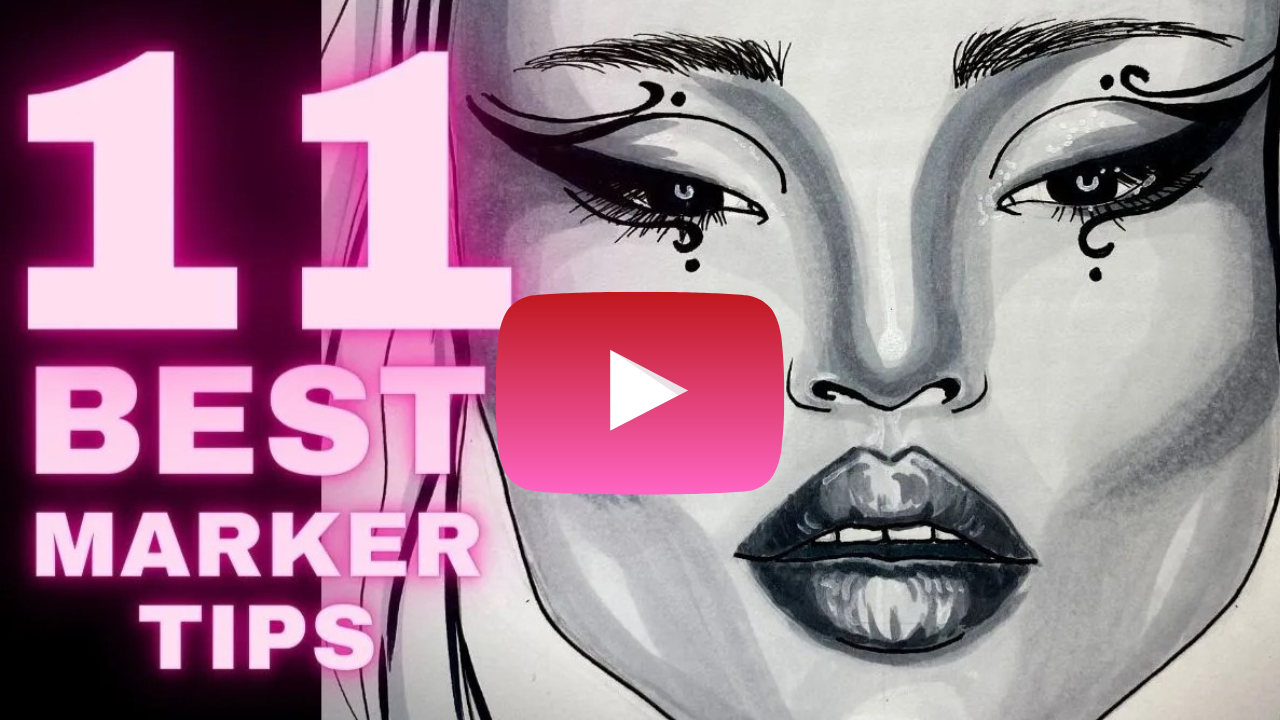
Need More Real-Time Drawing Lessons?
I've got TONS!! Go check out the Fun Fab Drawing Club over at Awesome Art School. There are SO many fun lessons just waiting for you to enjoy!!
Need More Resources?
Need an EASY pencil shading drawing tutorial that's simple enough to do even if you've never tried shading a drawing before? You're in the right place!
Today we're creating 3 line drawings & taking them to the next level by adding a simple shadow with one of the easiest pencil shading techniques I've learned to date.
If you feel comfortable with the line drawings and shading practice in today's video, I'd LOVE to teach you how easy it is to draw a simple FACE in pencil.
I make cheatsheets and videos for EVERYTHING - especially when it comes to drawing faces! Click the button below to request my FREE whimsical face drawing guidelines, and I'll email them right over. 
After you print your guidelines cheatsheet, here's a playlist of FREE face drawing videos from my YouTube drawing channel so we can practice drawing and shading simple faces together, step by step.
Let's get back to today's lesson!
If you've been following either of my YouTube channels lately, you know I've been introducing you to some of my favorite art books - showing a flip through, and then trying an entire project or demo-ing a technique from the book. The book I'm featuring this week on my drawing channel is actually more of a mixed media book, but there is a BRILLIANT pencil shading technique for beginners in it that I just had to share with you. 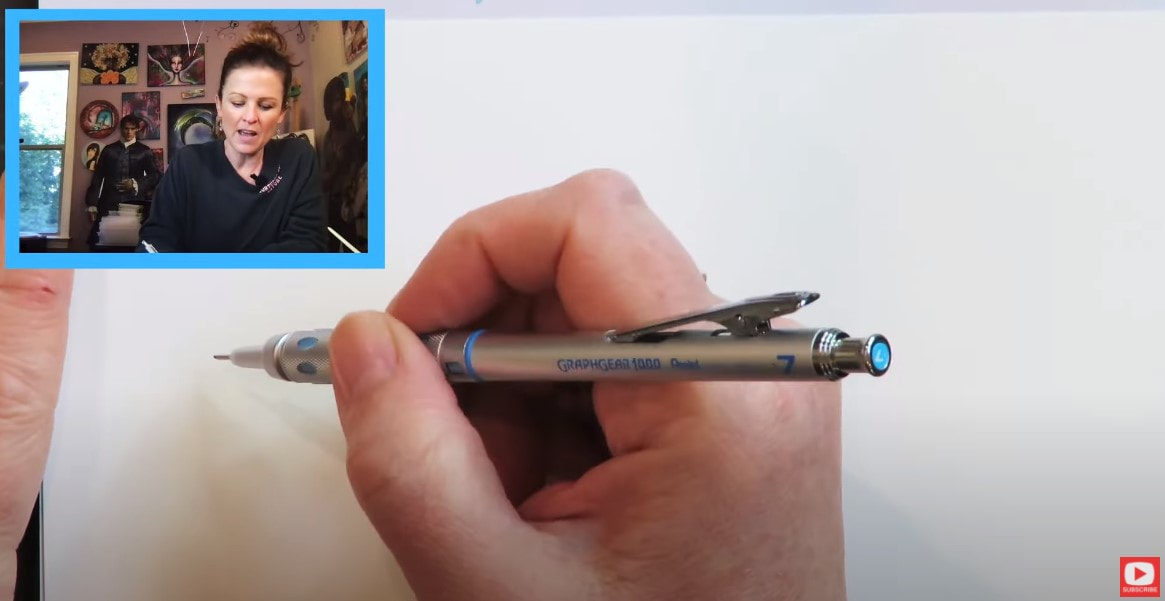
Before we continue, super quick announcement: All product links are Affiliate. I may earn a small commission if you choose to order through these links but by law there is never any additional cost to the consumer for doing so. I thank you for your support.
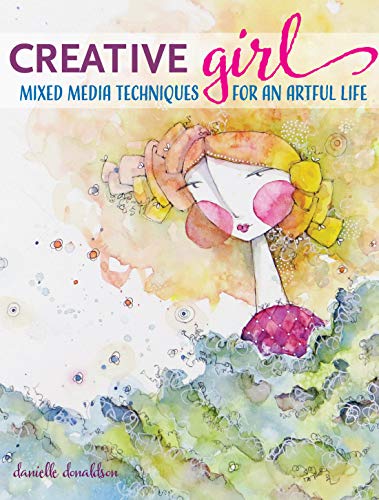
Danielle Donaldson's Creative Girl: Mixed Media Techniques for an Artful Life is simply gorgeous (if the book isn't available on Amazon, you can also find it here).
I actually love this book so much that I featured it last week while doing the watercolor trees for beginners project on my mixed media channel. Today, I'm sharing Danielle's super simple analogy of adding shading to a drawing at "5 o'clock." 
On page 54 of her book, Danielle says "Shadows are the thickest at 5 o'clock." I decided to try this shading technique out on three simple line drawings.
First, I drew the water bowl sitting on my art table with a paint brush inside. Then I picked up a blending stump (remember - the dirtier, the better when it comes to blending stumps), and thickened the shadow at an imaginary 5 o'clock position of my water bowl. 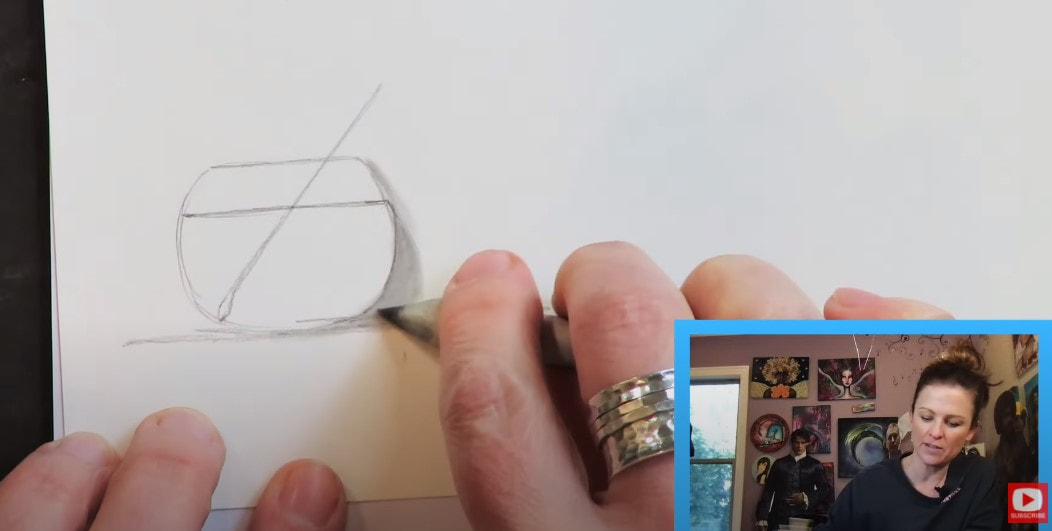
Here's another shot showing you what I'm imagining in my head...
Right where the imaginary hour hand of the clock is pointing to 5 is where I'm thickening the shadow with my blending stump. 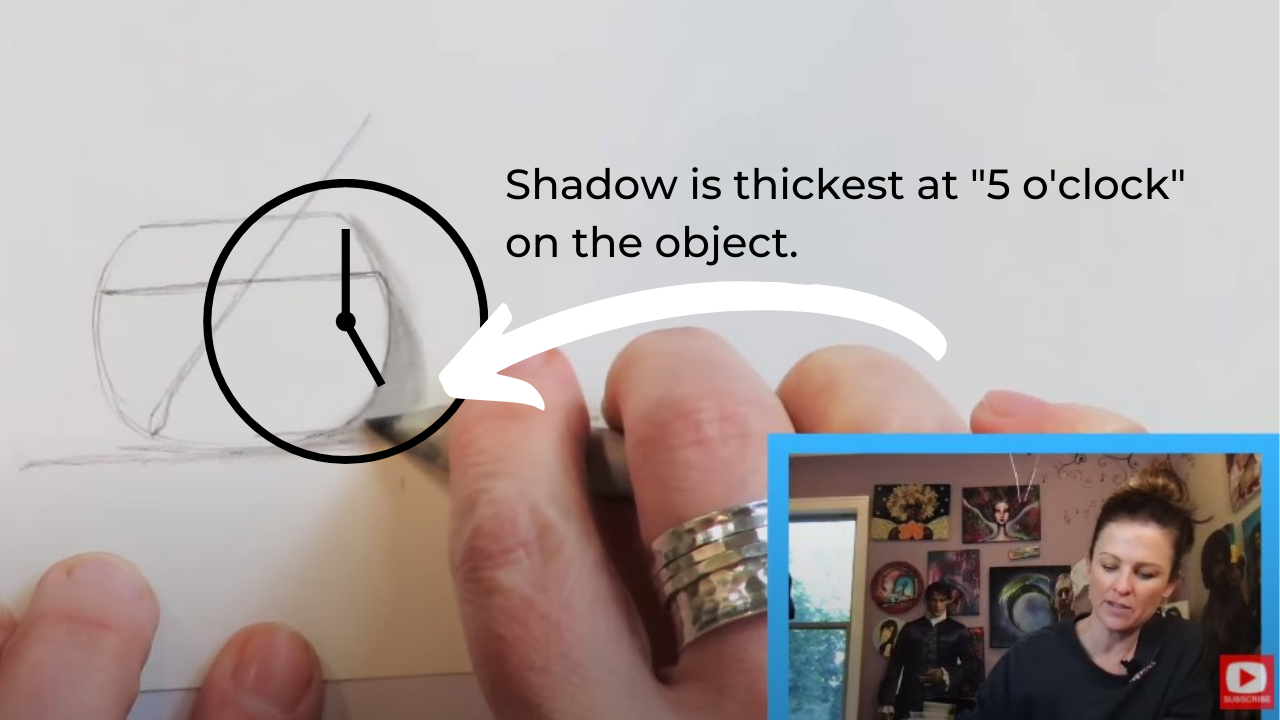
Below is another example of this easy shading technique for beginners on a line drawing of a flower vase.
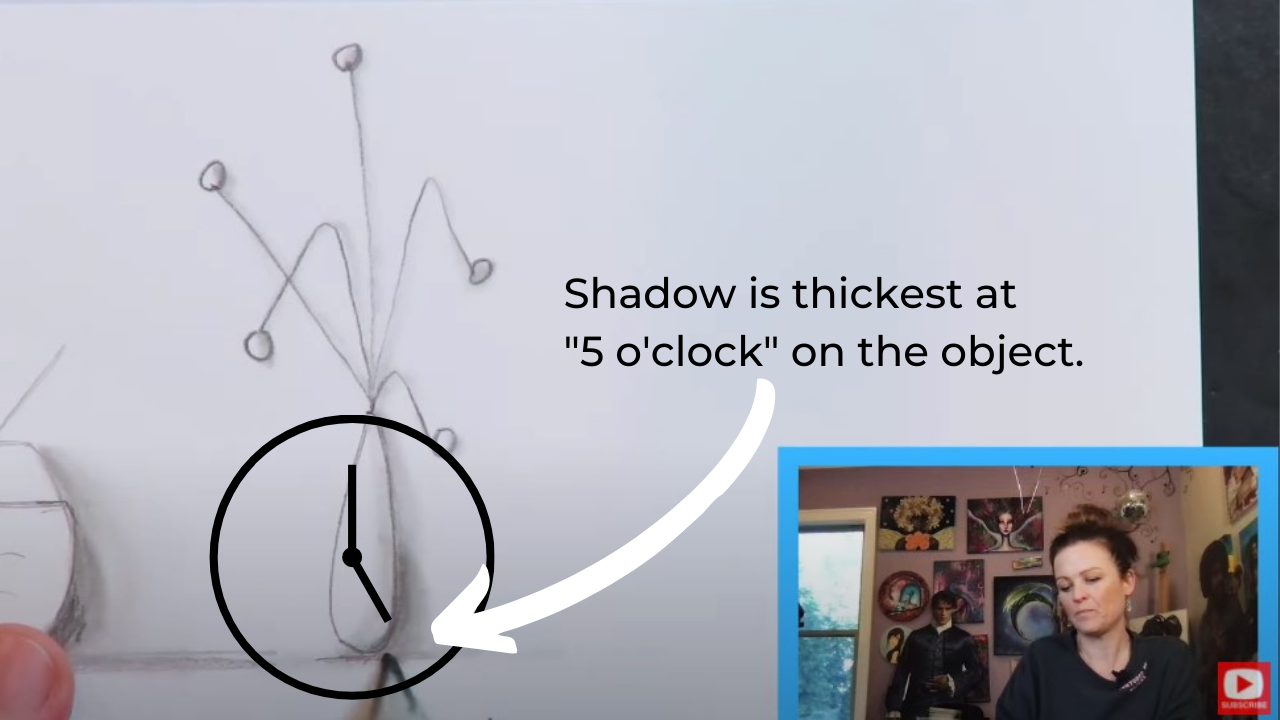
Isn't that the easiest concept to imagine so you know exactly where to add shadows to your drawing?! I think it's brilliant.
My final doodle example for today, below, is of a cat - inspired by my art studio "terror," Tippie (she's just recently claimed my art table as her own)! When I look at all three drawings together, I immediately notice how all the shading looks consistent, showing shadows off to the lower right. This is a really important concept to think about for beginner artists. 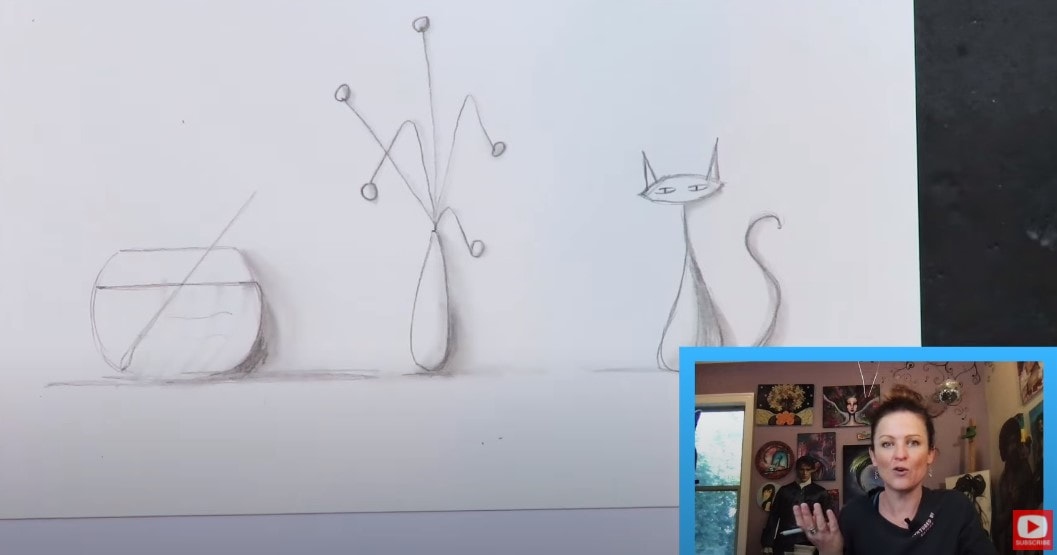
Your work will look more sophisticated if you your shadows are all drawn in the same direction, like they're all being hit by the same light source. It makes more sense visually, and can make even simple whimsical, or semi-realistic drawings like these, look more advanced.
Make sure you watch today's video to see these simple shading techniques in action. And grab a pencil and piece of paper before you press play so we can do this together!
Stay with me till the end for a quick flip through of Danielle's adorable book. Thanks for hanging out with me today!! When you watch the video, you'll hear me mention my Retro Redezvous Art Party. While the live portions of the Retro Party have passed, the lessons are still available at Awesome Art School, here. If you are a member of an Awesome Art School club (The Fun Fab Drawing Club, Mixed Media Society, or Celtic Collective), you've been given access to these lessons for free as a membership perk. Enjoy!! Happy drawing! ❤️ CHECK OUT ALL MY ONLINE ART CLASSES & Art Clubs ❤️ CHECK OUT ALL my art books ❤️ MY FAVORITE ART SUPPLIES on AMAZON ❤️ MY BELOVED FACEBOOK GROUP
Need a FUN handmade bookmark design that's step by step and EASY enough to do even if you've never tried drawing before? You're in the right place!
In today's drawing video, you'll get a sneak peek at one of my favorite drawing books filled with inspiring dangle art drawings (similar to zentangling, but even easier). I'll show ya what inspired this bookmark tutorial, then go grab some markers & draw along with me as I guide you through this CUTE handmade bookmark design idea - perfect for artists of ALL levels to enjoy!
If you're new to drawing and coloring with markers, make sure you grab my FREE Swatch Sheet so you can swatch your markers out before we get to the coloring portion of today's project. Simply click on the button below, and I'll send it straight to your email!


Before we continue, super quick announcement: All product links are Affiliate. I may earn a small commission if you choose to order through these links, but by law, there is never any additional cost to the consumer for doing so. I thank you for your support!
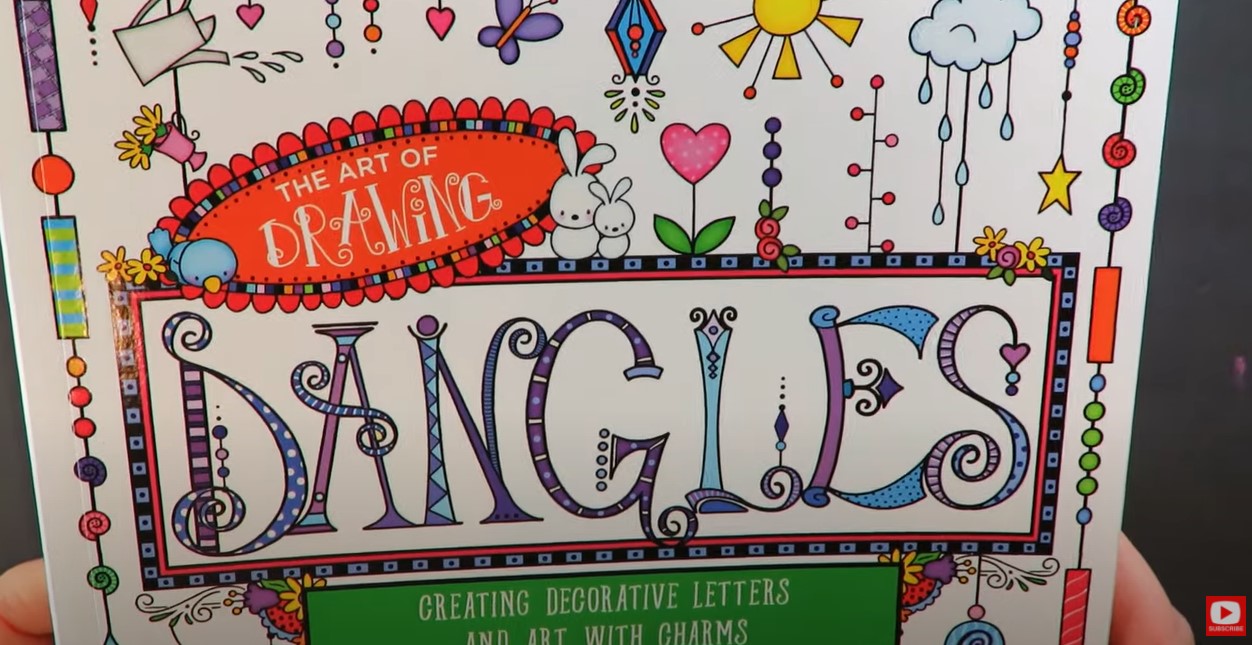
Today I'm reviewing a drawing book filled with fun dangle art called The Art of Dangles by Olivia A. Kneibler.
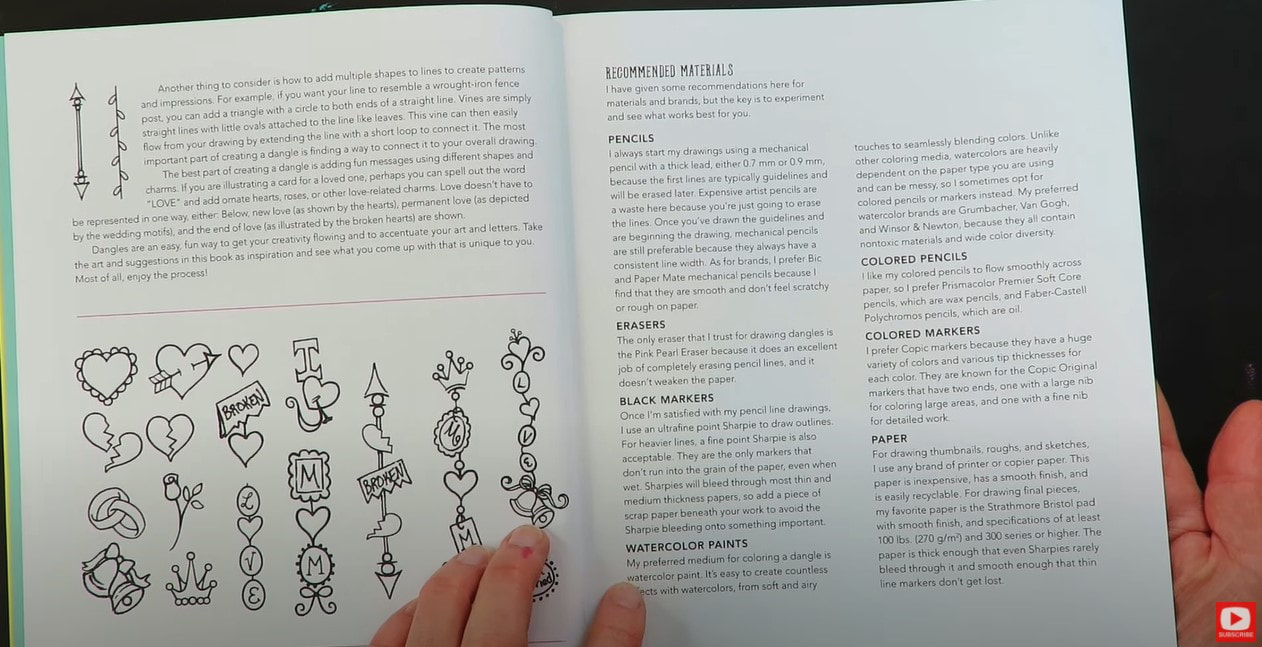
What's a dangle? They're basically what they sound like - a line with decorative embellishments, tiny shapes, or charms hanging from them. They're adorable hanging from letters, and you can create super FUN projects out of them, like today's bookmark!

I actually enjoy drawing dangles more than I like zentangling because they're SO simple! Zentangling is super fun, but can get a little fussy for me. If you'd like to try a simple zentangle art project with me - be sure to check out this video and art book review from last week. That project and today's are excellent beginner drawing lessons.
The only criticism I have of today's book is that everything in it has been drawn digitally. I love drawing by hand and teaching beginner drawing lessons, so that's my only tiny complaint.
One of the reasons I really love drawing by hand and appreciate hand drawn art is because of the imperfections that come out of them. You don't see those in digital art. Everything is much more "perfect." Don't get me wrong- I have a serious appreciation for digital drawings too - I just prefer things to be hand drawn. 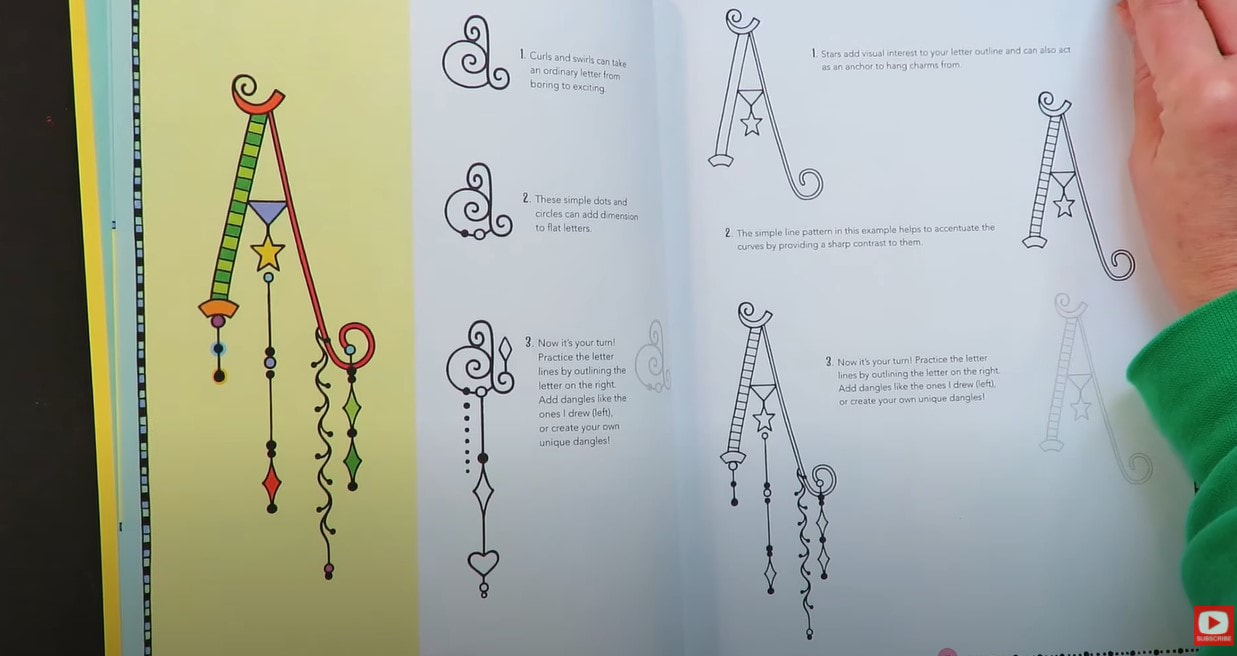
Regardless of my preference, I think the author does a fantastic job of providing inspirational drawing ideas to try. She shows how-to's for the entire alphabet in her book, and includes dangles from each letter in upper and lower case. There isn't a ton of step by step direction- but it's totally enough to get you going, whether you want to create along with her in black and white, or in color.

If you have anything coming up that you need a personalized gift for, and want to create something for someone with their name on it - this book would be an excellent asset to help you get started with some amazing ideas.
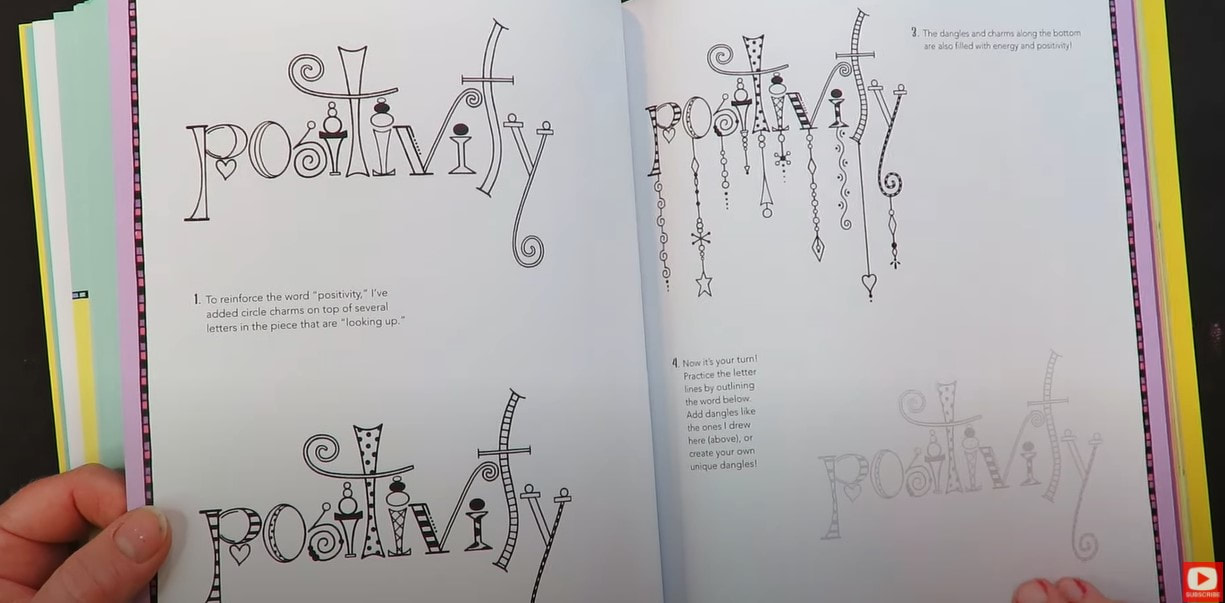
There are also some fun examples of words showing you how to put creative letters together, and where to add some cute zentangle patterns and dangles.
The book closes with tons of adorable dangle projects you can create from roses, trees and snowflakes to random shapes and mandalas, followed by an index of charms and geometric dangles you can use as thought starters to get your own creativity going.
I felt inspired to combine two of my favorite dangle art projects from this book into one, and decided to do a handmade bookmark design.
To create my project- I'm just using a sheet of hammermill cardstock (it's equivalent to Bristol- just WAY cheaper). I also used a WATER BASED black fineliner to outline my drawing before coloring with my copics.
HOT TIP: If you use a water based fineliner prior to coloring with alcohol markers, the black marker won't bleed (don't use sharpies for this because they are alcohol based). If you're new to my world - I've been collecting my copic markers for years (because they cost an arm and a leg!). I LOVE using my copics, but I highly recommend using what you can afford and/or have on hand. Ohuhus are an excellent copic marker alternative and cost much less per marker if you'd like to start a cheaper alcohol marker collection. 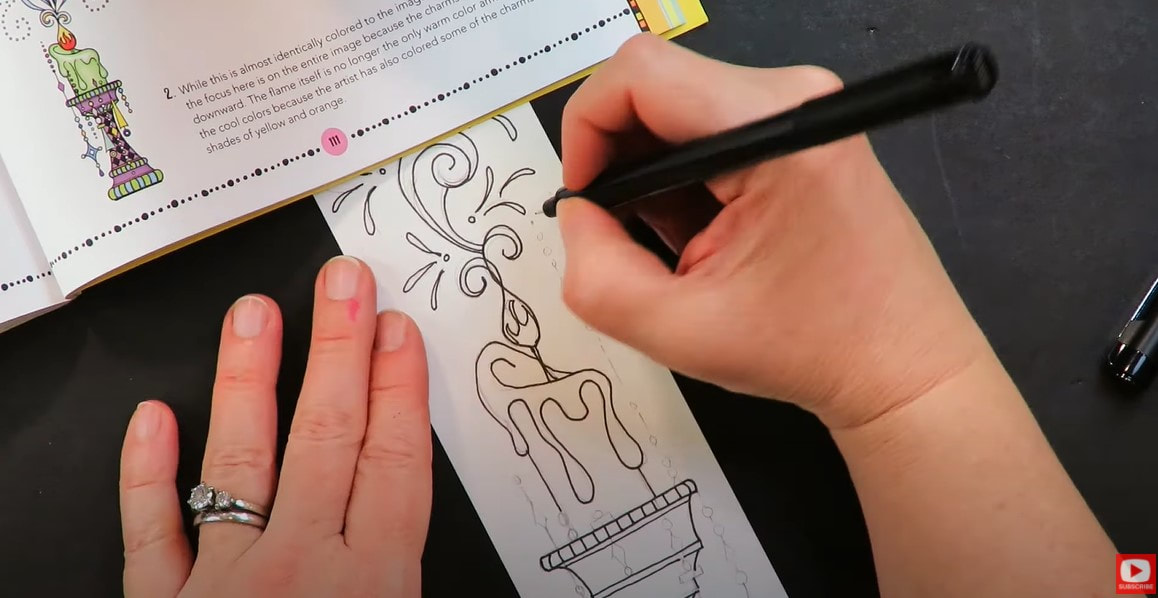
I finished my coloring off by adding in my signature white highlights using my white sharpie paint pen (a white posca paint pen works just as beautifully here- the sharpie is just what I had on the table at the time of filming).
Thanks for hanging out with me today! If you'd like to learn a little more about drawing, I've got the PERFECT event coming up and would LOVE for you to attend! SIGN UP FOR MY ART RETRO RENDEZVOUS with this special link for just $15. Beginners welcome (even if you've NEVER drawn a thing before). It's 5 days, filled with 10 beginner drawing lessons for you to enjoy! Here's a sneak preview of the projects... 
I hope to see you there!! ❤️ CHECK OUT ALL MY ONLINE ART CLASSES & Art Clubs ❤️ CHECK OUT ALL my art books ❤️ MY FAVORITE ART SUPPLIES on AMAZON ❤️ MY BELOVED FACEBOOK GROUP
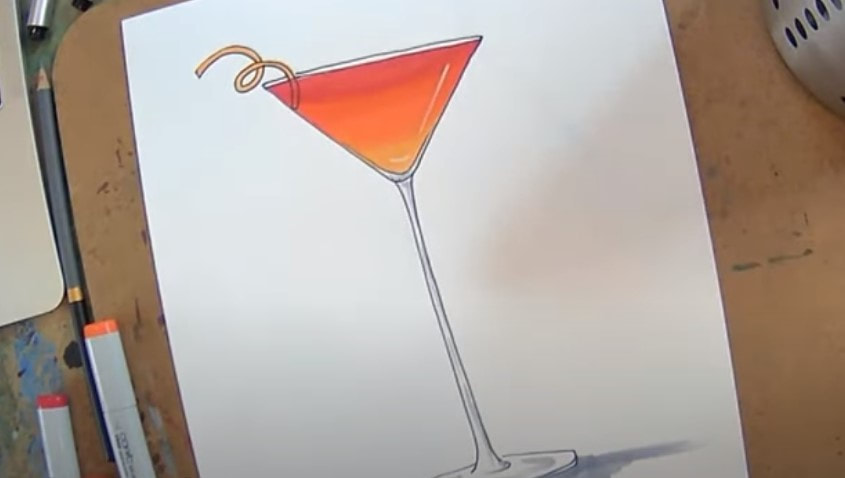
This martini glass drawing tutorial is SO fun & easy! Pour yourself a drink & come hang out with me for our own little draw & paint party. If you love art deco style already - you'll LOVE seeing a glimpse of the projects in my recently released trilogy of Learn to Draw Art Deco Style books. Then, I'll show you how to draw a martini glass and shade it 2 different ways- once using Noodler's Ink (it's basically like watercoloring!), and the other using my favorite alcohol markers (copics)!!
Before we continue, super quick announcement: All product links are Affiliate. I may earn a small commission if you choose to order through these links but by law there is never any additional cost to the consumer for doing so. I thank you for your support! 
In 2020, I went down a serious 1920s -1930s / art deco rabbit hole just for me. I fell in love with the styles and just had a blast getting into the fashion, figures, hats, shoes, jewelry, furniture, pets, men, cars and cocktails of that era!
During that time period I published not one, but THREE Art Deco Drawing books (1, 2, 3). 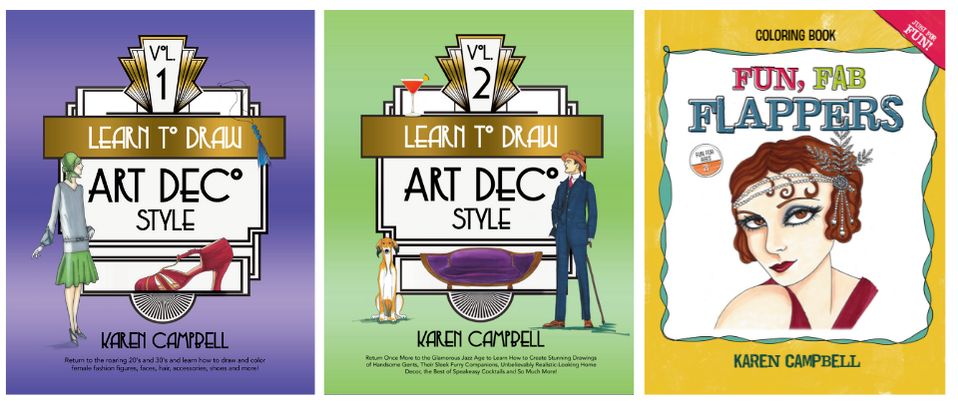
What's fun about these books is I do have a lot of FREE videos on YouTube to accompany the book, so if you've ordered a book and see a little film icon in the corner- make sure you check that link out because there is a video lesson you can play while you work your way through lessons in the book.
I used a lot of watercolor, alcohol markers, and fountain pen inks. In each of these books you'll even find a few fun facts about this time in history because I'm a bit of a vintage history nerd! And when I look stuff up, I've gotta share!! I love everything OLD!
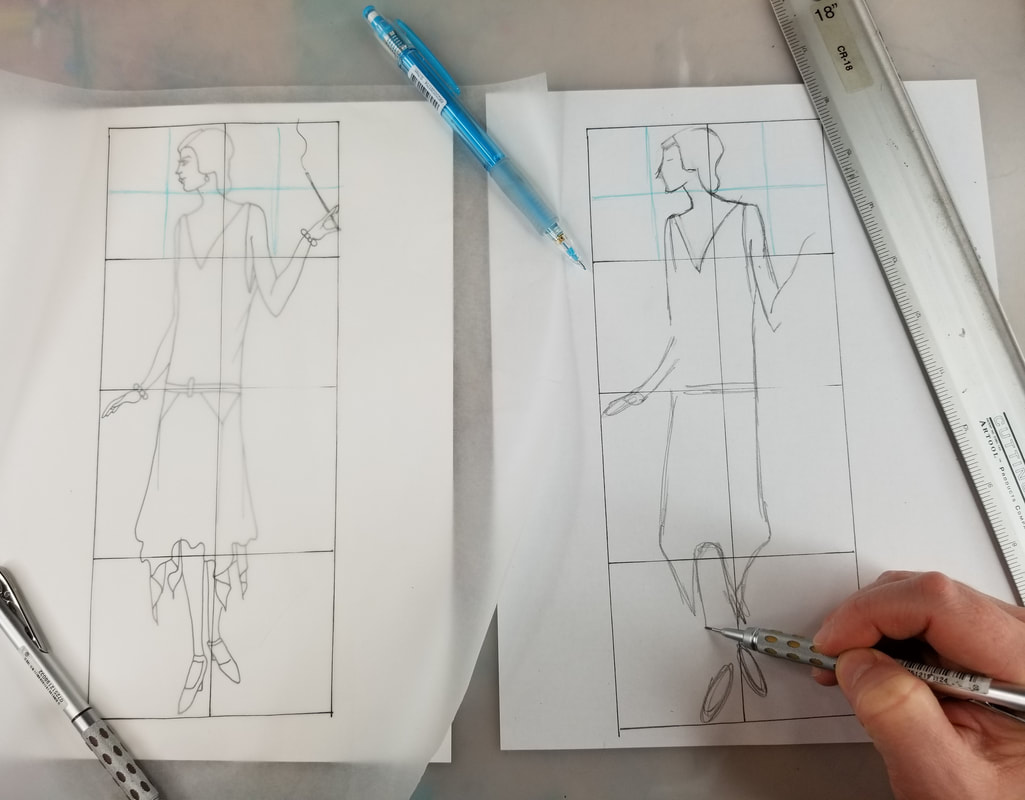
Volume #1 is super "girly" with lots of fashion, shoes and jewelry. In this book I go in depth about how to use my Quadrant Method for drawing figures too, so if you've been wondering how to draw figures easily - this is a great way for beginners to get started!
In my second volume, I'll teach you how to draw male figures as well as popular dogs and cats from the Art Deco era. If you're not sure how to draw a dog or how to draw a cat, I teach you how to use my Quadrant Method for this as well. It's SUPER easy!!
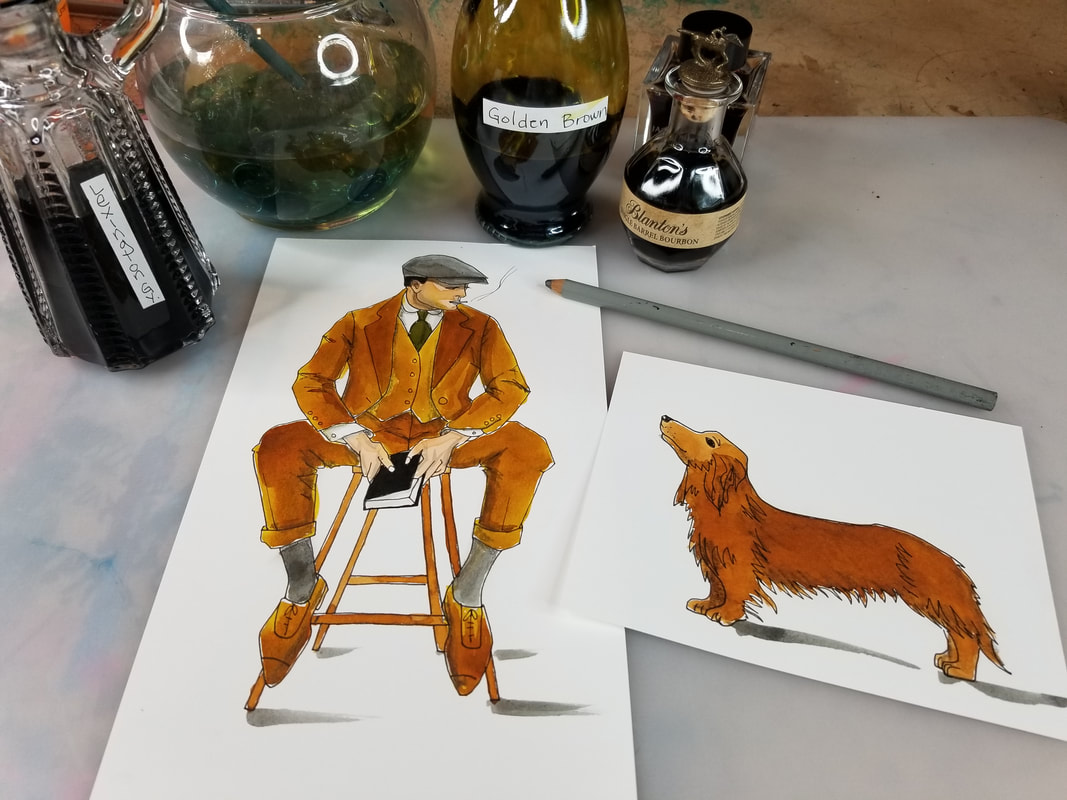
Art deco furniture was GORGEOUS, so you'll find quite a few fun pieces in this volume as well. If you've been following me for a while, you may already know I've got an obsession of painting with fountain pen inks!
I find fountain pen ink to be even MORE vibrant than my favorite Daniel Smith watercolors, and I love to just dip my watercolor brush straight into the bottle to get some serious pigment onto my paper. 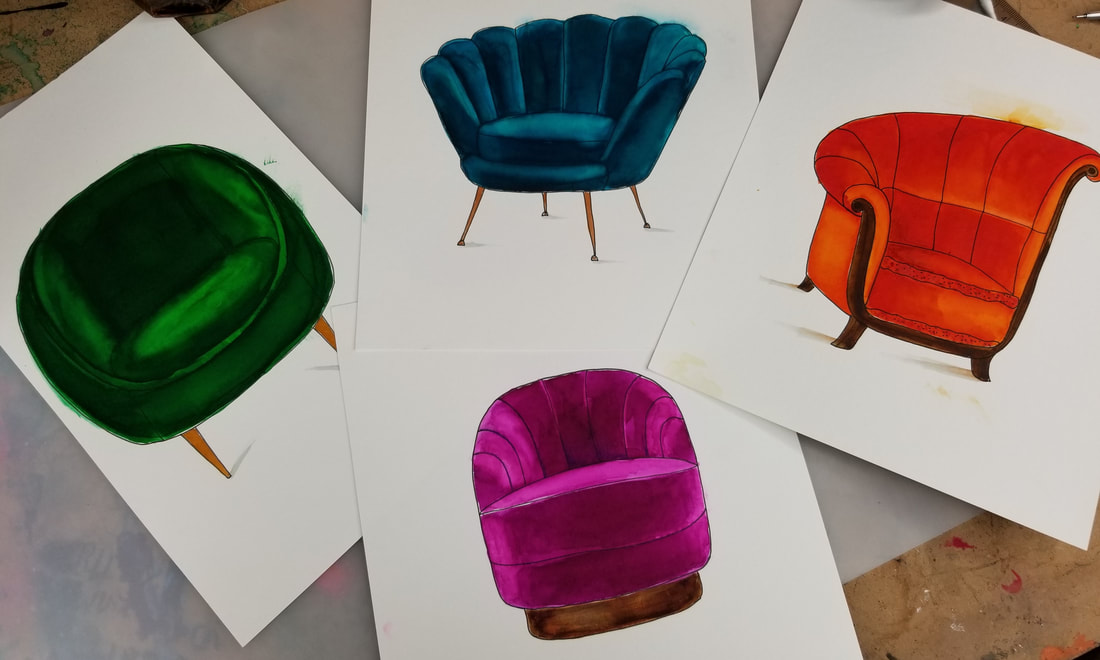
When I was painting the Art Deco furniture projects for this book, I felt my fountain pen inks really made the velvet I was rendering look realistic! You kinda have to see it to believe it.
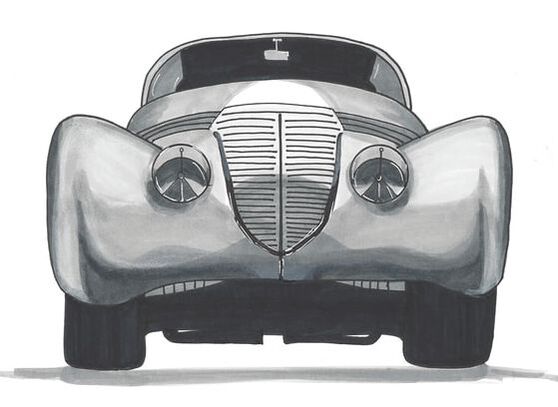
I wrapped up Volume #2 of Learn to Draw Art Deco style with a chapter on cars and cocktails from this era. It's really remarkable how realistic some of these drawings look!
You can totally achieve this too when you learn how to layer your art supplies properly. Even if you're a beginner- you can do this! I'll show you how and keep each project step by step, so even beginners just learning how to draw feel comfortable!
To dotoday's full length drawing tutorial with me - all you need is a sheet of watercolor paper (if you want to color your martini using a wet medium like watercolor), or a sheet of bristol, card stock, or marker paper if you'd like to shade your martini in alcohol markers.
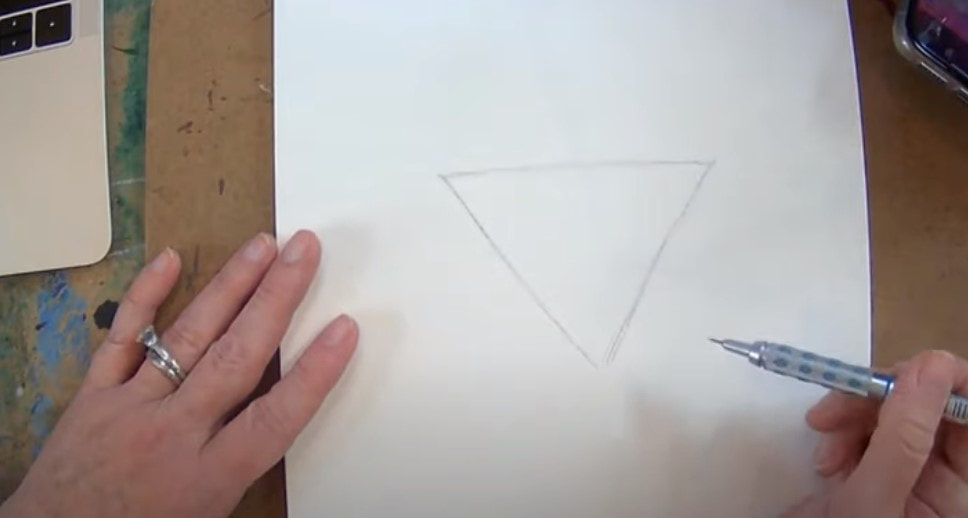
Be sure to click over to the video to draw with me in real time (22:22). The drawing itself is fairly simple, so if you're a beginner interested in learning how to draw - this project is perfect for you!
We're starting with an upsidedown triangle and adding a stem. Once everything is sketched in, I pulled out my Habannero Fountain Pen Ink and simply started coloring in the liquid for my martini. If you're not sure how to paint with fountain pen inks, just follow me. It's basically the same as using watercolors - just richer. 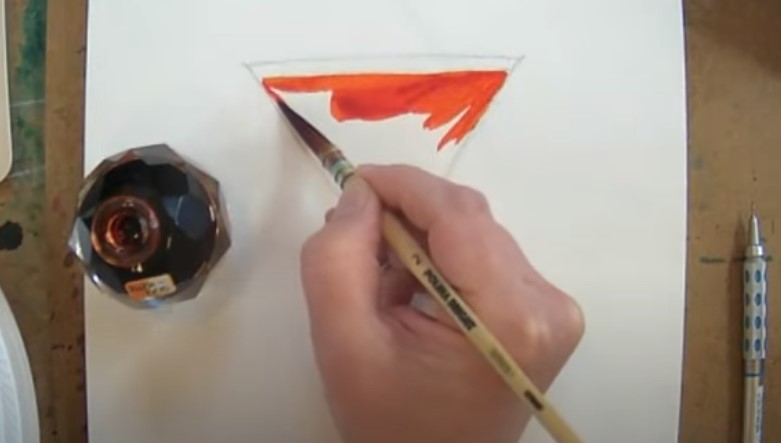
If you don't have any fountain pen ink, you can definitely use Dr. Martin's acrylic ink in a similar way or watercolors.
Click over to the video to see how I shade the stem of the glass. I often reach for my Daniel Smith Hermatite Genuine. This is a really soft gray. You can also just really water down some Bloodstone Genuine or Payne's Gray as well to paint a fine line down the stem of the glass. 
If you'd like to see the same project done in alcohol markers while your ink painting is drying, click over to the video (42:00). If you enjoy the look of outlining in your work and are going to shade with alcohol markers, you can outline your glass before or after you shade.
If you choose to outline first, make sure you're NOT working with an alcohol based fineliner because it will bleed. The fineliner should be pigment based or water based (warning: SHARPIES will bleed, so don't use these). Check out my Amazon Shop of favorite art supplies for drawing and mixed media. I recommend Moltows for outlining with copics or other alcohol markers. 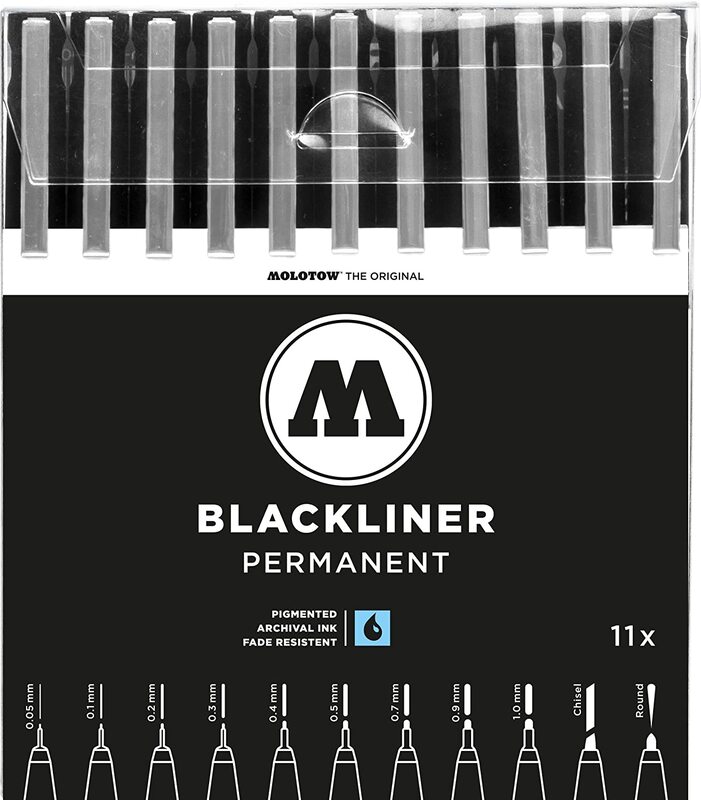
Make sure you swatch your alcohol marker shades off to the side so you know ahead of time that they will blend well together. Before your start shading in marker, be sure to erase your graphite because your markers will drag that around and smear.
HOT TIP: To ease your shading transitions between marker shades, just keep on layering because each top layer rewets the bottom layers and helps them blend. You can also use your lightest of the three colors to blend, or work in a layer of colored pencil, followed by some highlights with a posca paint pen. Click over to this video for more tips on how to copic marker blending!
Make sure you click over to the video because I walk you through both versions of this project step by step!
Thanks for hanging out with me today!!
❤️ CHECK OUT ALL my art books on AMAZON ❤️ MY FAVORITE ART SUPPLIES on AMAZON ❤️ MY BELOVED FACEBOOK GROUP ❤️ FOLLOW ME ON INSTAGRAM Mixed media collage backgrounds with tissue paper are EASY to create and can add gorgeous texture to your mixed media art journal. Today’s video is a 45 minute, FULL LENGTH mixed media project, so if you love collage mixed media art & mixed media tutorials - this is for YOU! I know what you’re thinking about collaging art journal backgrounds with tissue paper ... those WRINKLES, those BUBBLES, or worse yet - the rips!! Don’t worry - I've got collage techniques that will make your thin tissue paper BEHAVE so the texture of your collage background can PEEK through your mixed media portrait, without taking over your whole art journal page!  To get some inspiration flowing for this project, I flipped back through one of my favorite art journals of all time. I discovered every single page had started with collage! I don't think I even knew that before!! For me, collage is something I naturally gravitate to - to start a project. It's like a mindless art warmup. It sets the color scheme for my project, gives me a second to breathe and takes me to my creative happy place!! Before we continue, super quick announcement: All product links are Affiliate. I may earn a small commission if you choose to order through these links, but by law there is never any additional cost to the consumer for doing so. I thank you for your support! 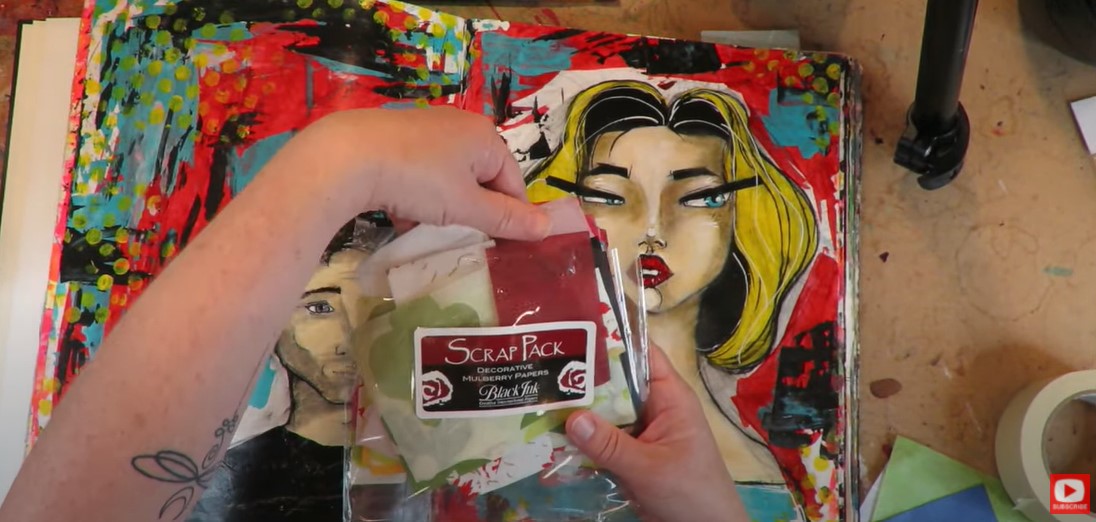 Like I often do, today, I'm working in my Strathmore Watercolor Journal because every single page of this sucker can really take a beating! This is my 4th one THIS YEAR!! I use them for drawing, watercolor, ink, juicy mixed media layering- this paper can take ALL of it. I found this little scrap pack pictured above, and decided to use these cute little tissue paper squares to get going on today's art journal page background. Shockingly, I chose to line them up a bit methodically. If you've been hanging out with me for a while, you know this is SO NOT ME, and I can see you laughing right now at how much this challenges me! When I do collage - no matter what material I'm working with- I spread out my pieces fairly evenly and "take turns" alternating colors and patterns, to spread the love! 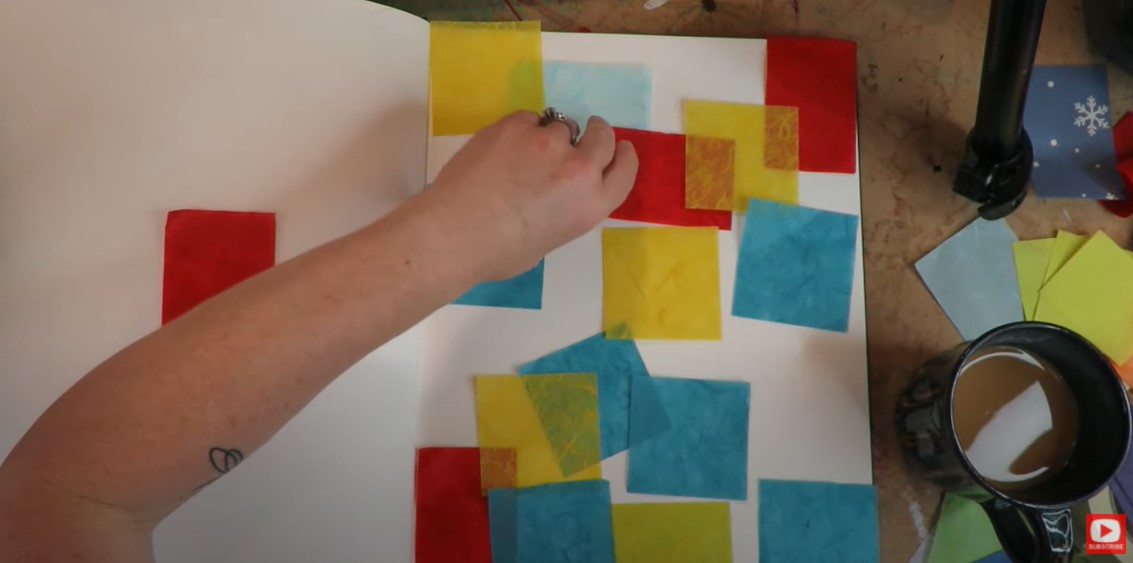 Tissue paper is REALLY porous, so it's fantastic for collage because the adhesive really soaks in. I'm using matte medium for my adhesive- for SO many reasons. I know I can sound like a broken record here - but it's so awesome for mixed media collage -especially if you plan to paint with acrylics on top, or even think you might go that route. If you're a mod podge fan (like me!), don't worry - I have plenty of times I reach for that as well, just not usually for my first layer. If you haven't seen my video about how to know when to use Mod Podge vs Matte Medium - it's super helpful! Now...onto today's mixed media background with tissue paper! If you've done tissue paper collage and had any issues in the past, I HEAR YOU! It's super easy to get not only WRINKLES, but bubbles. You definitely don't want bubbles because those can pop and leave a hole in your piece. If you've experienced tissue paper ripping in the past while you're collaging art backgrounds in your art journals or on mixed media canvases - I've got some tricks up my sleeve for YOU! 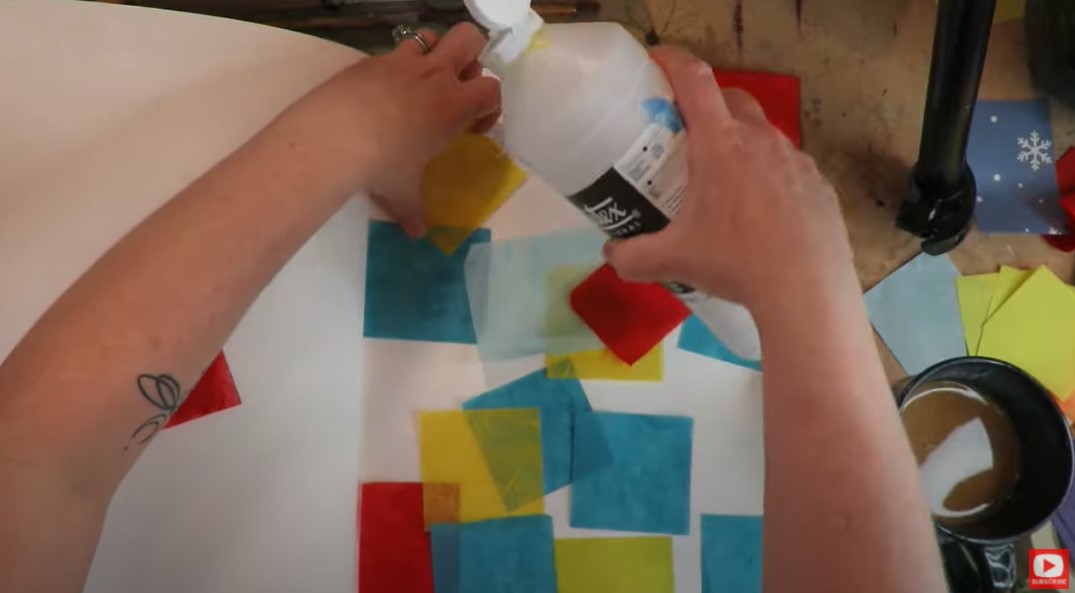 My BIGGEST SECRET is actually so simple... Use a TON of adhesive. That's it! Seriously!! I've got so many students and artsty friends who use their products sparingly. This is one you DON'T want to be precious with ;) If you want to make an AWESOME mixed media collage background (and that's what we want, or why are we doing this?!), you need to use a TON of product. In this case- matte medium- both under AND over your collage chunks! 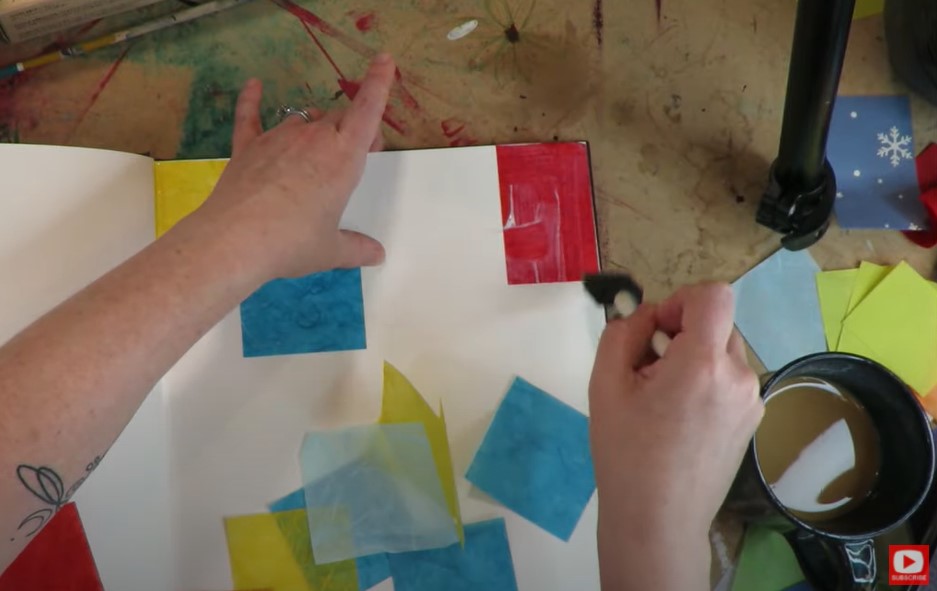 If you're new to mixed media - you'll soon find out, it's equally as much about creative problem solving as it is about planning and execution. I'm ALWAYS running into issue I need to solve, and today is no exception. Take a look at this.... 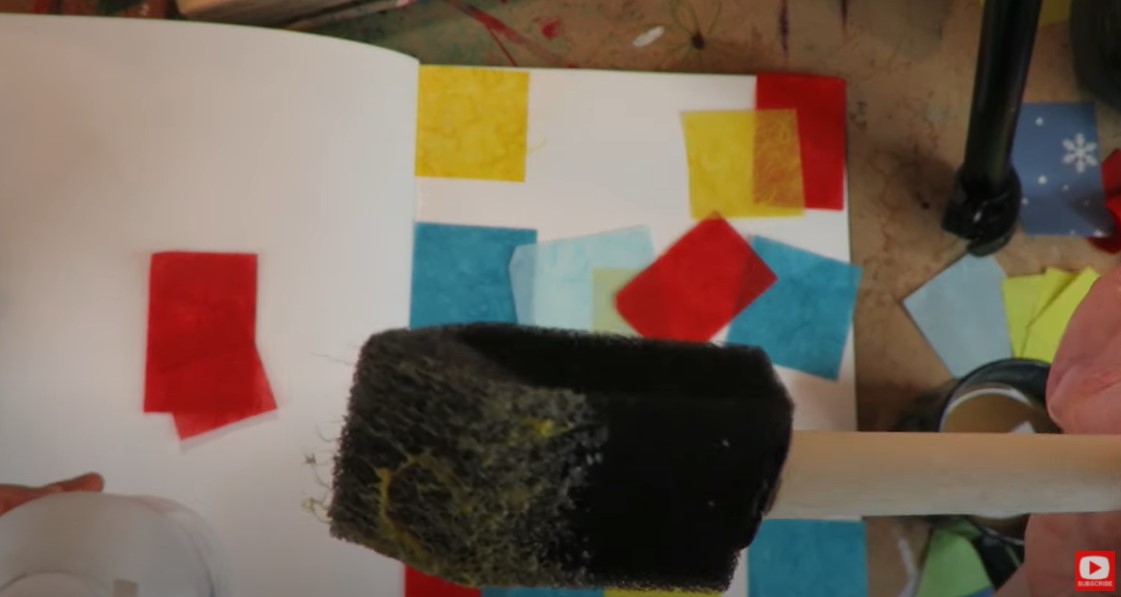 I know the pic is a little fuzzy, but you can TOTALLY see there are fibers from my tissue paper scraps hanging off the edge of my foam brush. EWWWW! I had NO idea that was gonna happen. But I was already in it to win it. I kept going and tried to use this time to think about how I could intentionally work WITH the fibers or bury them! I know things always have a way of working out, so didn't stress. When these happen to you (AND THEY WILL!) just keep your confidence up, learn to pivot, and go with the flow! A solution will present itself to you. While I was thinking about these crazy tissue paper fibers, I started thinking about the other types of tissue paper I could've used including my favorite Tim Holtz collage tissue paper. Suddenly, I had a solution. 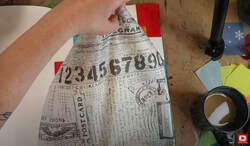 I tried a few different sheets of tissue paper from my Tim Holtz stash and ended up using my absolute favorite style that I have from him with the music notes and butterflies. I actually like to glue this down as one whole sheet. There is a little bit of an art to this- so be sure you watch the video if this is something you want to try with your own tissue paper art. My secret? The same as before. Use MORE matte medium. Underneath AND on top. In this case - more is better! Seriously... check out how much matte medium I'm glopping onto my art journal page right now for my BOTTOM layer! You want it to be SOAKING wet. 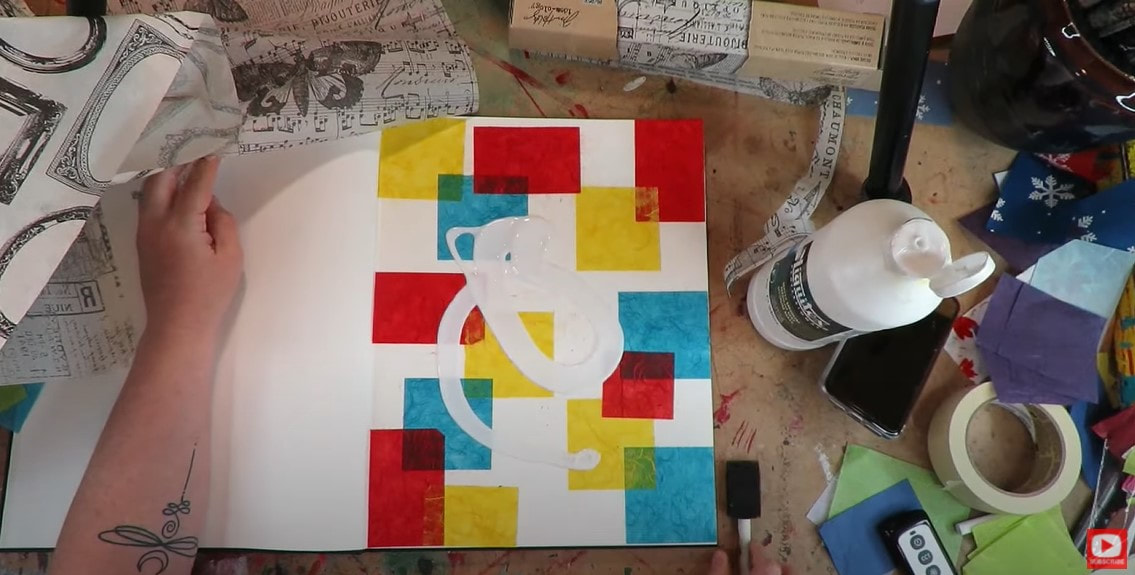 If you're getting wrinkles, and bubble especially - you're not using enough product. It's kind of like wallpaper. 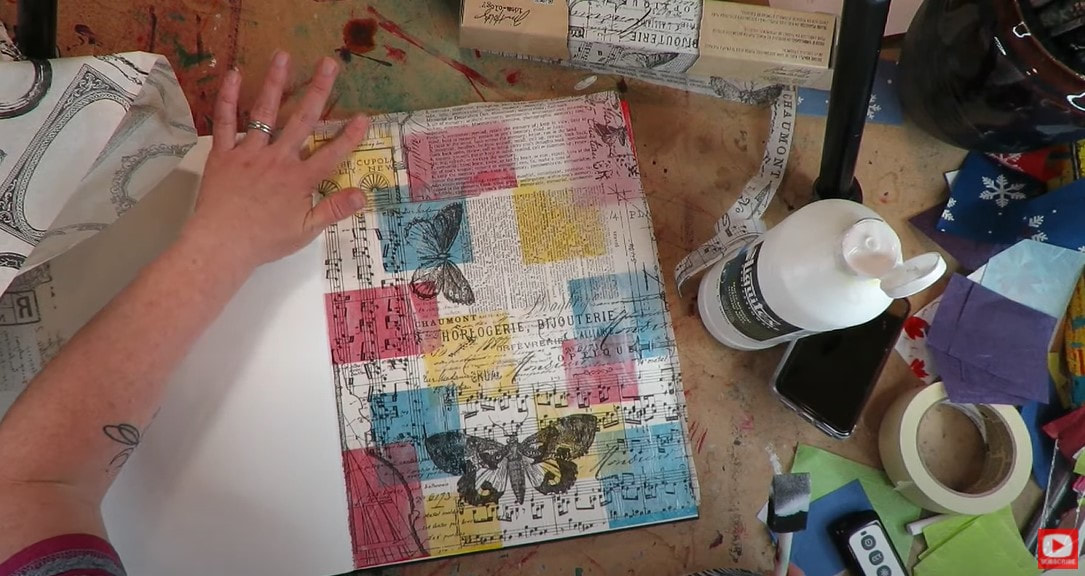 Once you work your sheet down, it's time for a massage. Work out the bubbles that appear from your bottom layer of matte medium, and become one with your art piece for a few minutes! Use your fingers to spread out each bubble - and work your way across the page until they're gone. I put SO much adhesive down that while I'm massaging my bubbles down, the glue is rising up through my paper. That's a good thing! 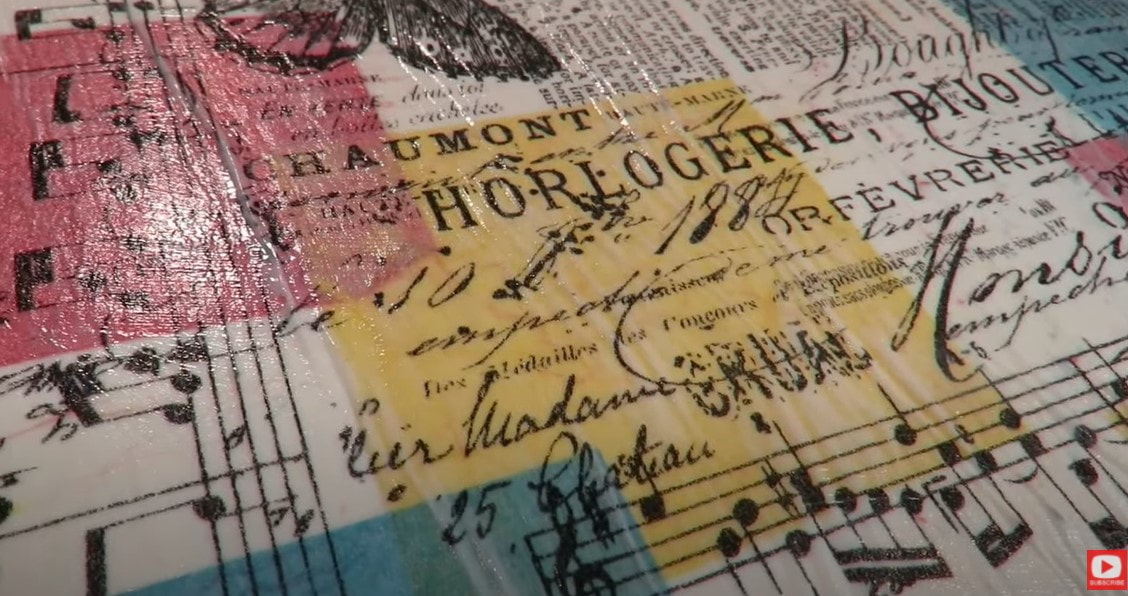 You have a little window of time to do the smoothing out. Once it's drying - you just can't move it anymore. It will rip. I had a student ask me the other day how long she needs to wait for her matte medium to dry before moving on to the next layer. My answer to that is - I never wait!! LOL. I just grab my hair dryer and let it blow until my collage feels dry when I touch it. I use a hair dryer instead of a heat gun because I feel like the air flow makes the drying process go faster. Sometimes heat from a heat gun can be too intense, and can even be damaging to certain products. So for me - I'm all about the hair dryer- it's fast, safe, and effective. 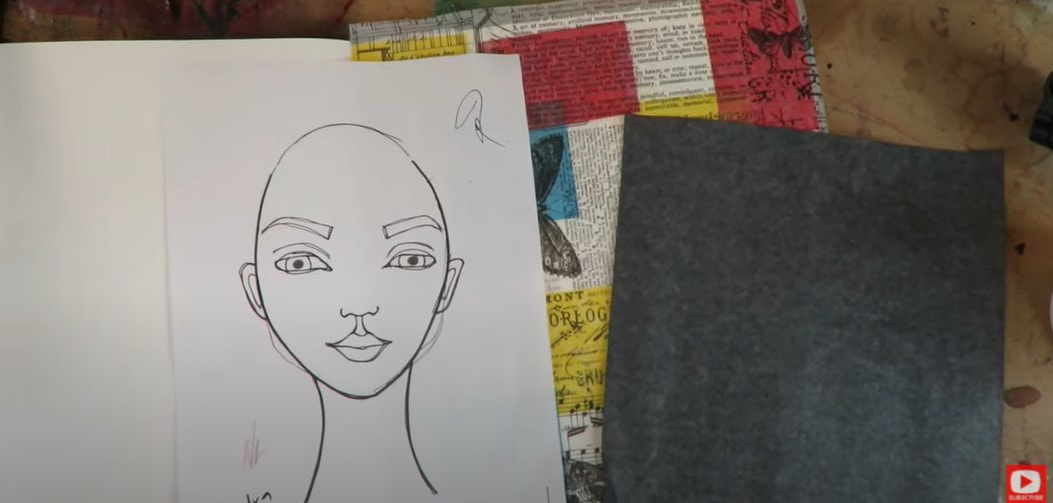 I decided to use my face template that I made ages ago to draw a face over my fun new background! The easiest way to use the template is to grab a sheet of graphite transfer paper, lay it dark side down, and put the face on top. Then just trace over my lines of the face I drew for you with your pencil. The drawing will show up on your collage background. Awesome right?! 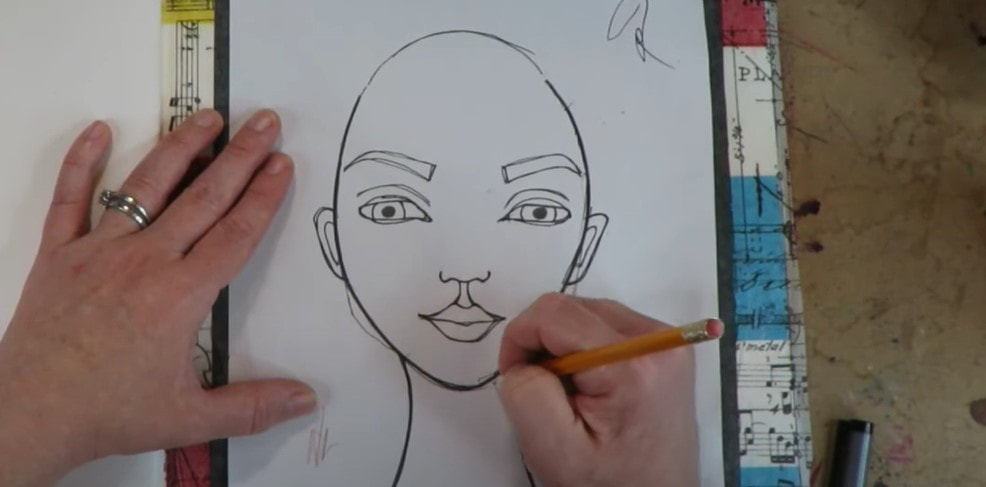 If you're new to drawing or don't love drawing faces, but want to try playing around with one in your own art journal? Please feel free to download my face shape template! 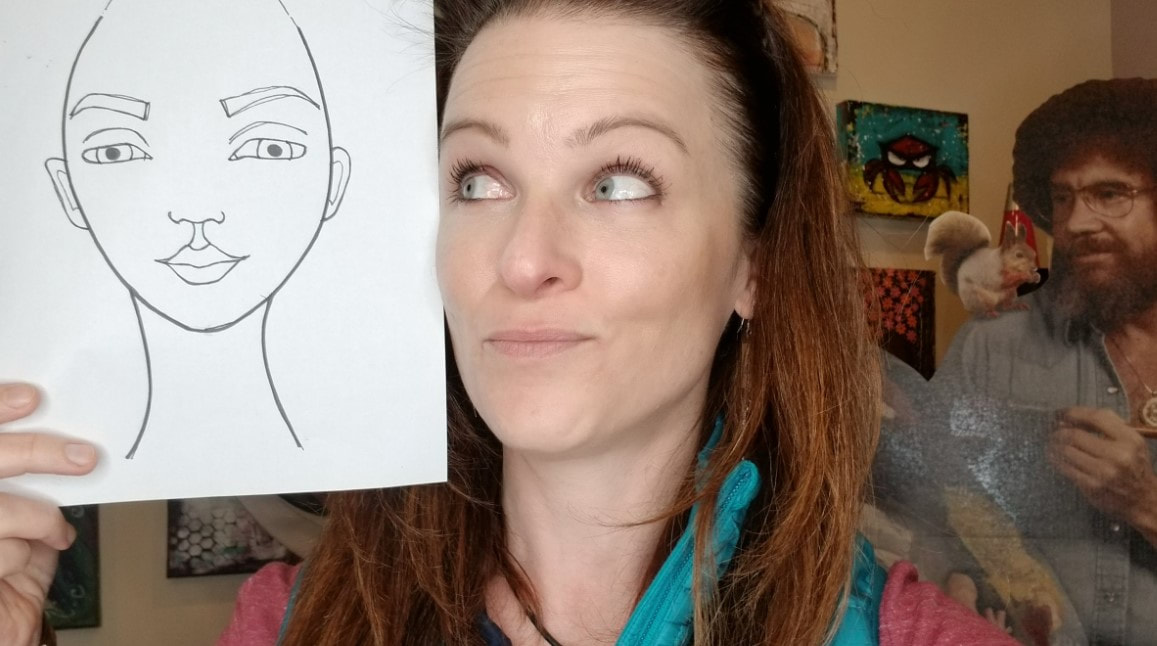 I decided to lay down a little gesso in the face shape area before doing the full transfer of the facial features in my template because I had a lot going on in my collage and it was too hard to see my transfer lines. I love using gesso INSTEAD of white acrylic paint for something like this because there is a level of transparency with gesso, and I will still be able to see the collage peeking through the face I create. 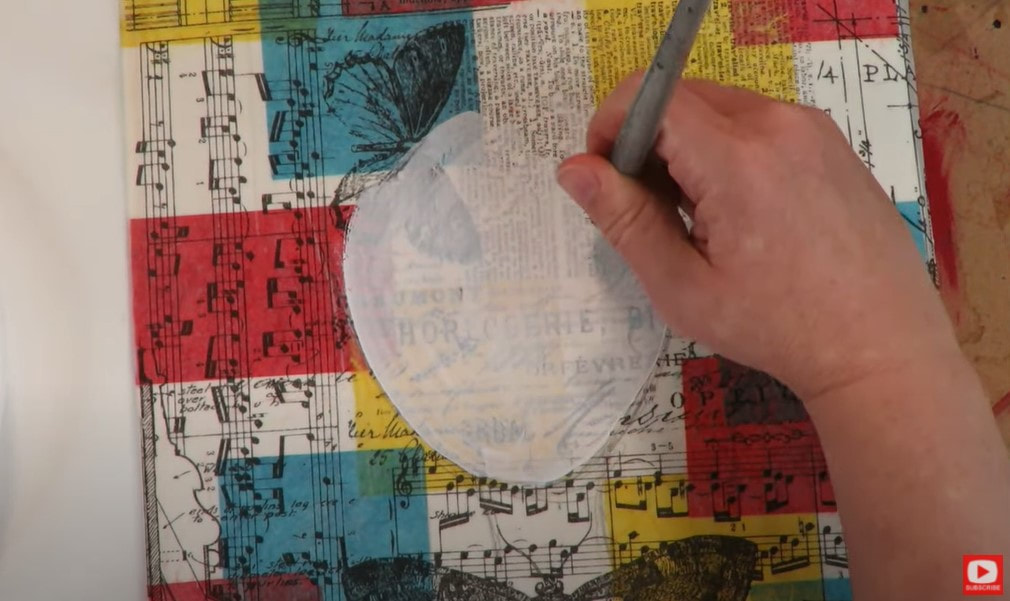 Once my gesso was dry, I grabbed my all time favorite -stabilo all pencil and started drawing! 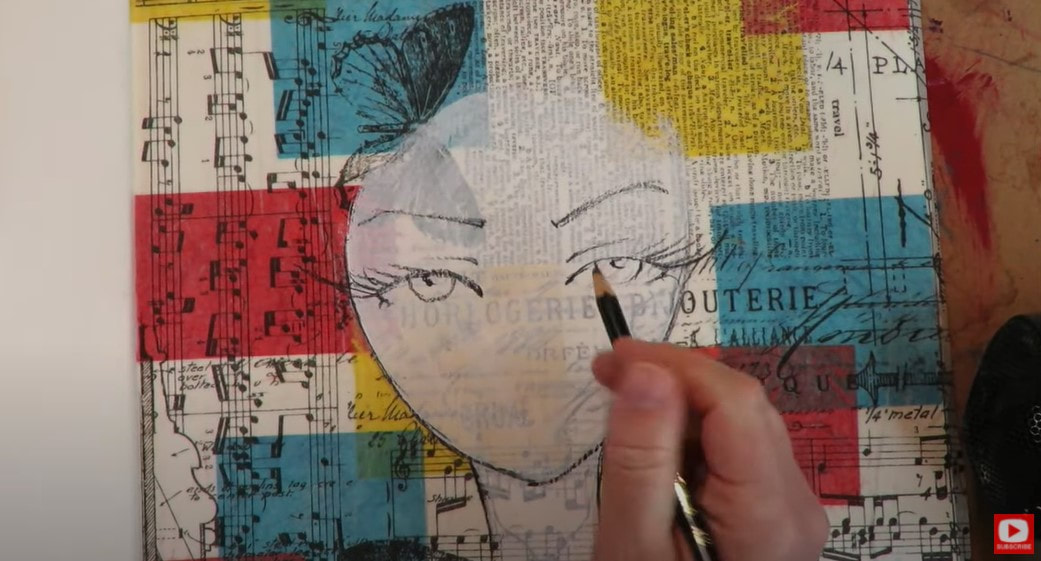 If you're new to using a stabilo - be forewarned that these are SUPER reactive! I love that effect, but it tends to freak out many of my students. It WILL react to water, gesso, matte medium, mod podge, paint- whatever you throw at it. Since I'm using matte medium to activate today- it actually "freezes" whatever I do here in place. 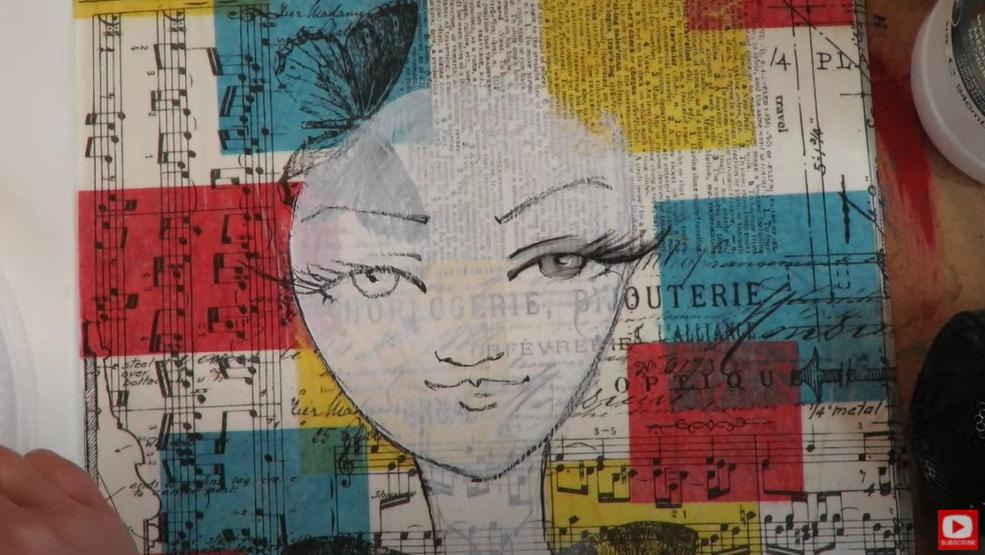 I drew in a quick bun and drug a little matte medium through this area, then worked some of the leftover gray on my paintbrush into the face as shading. 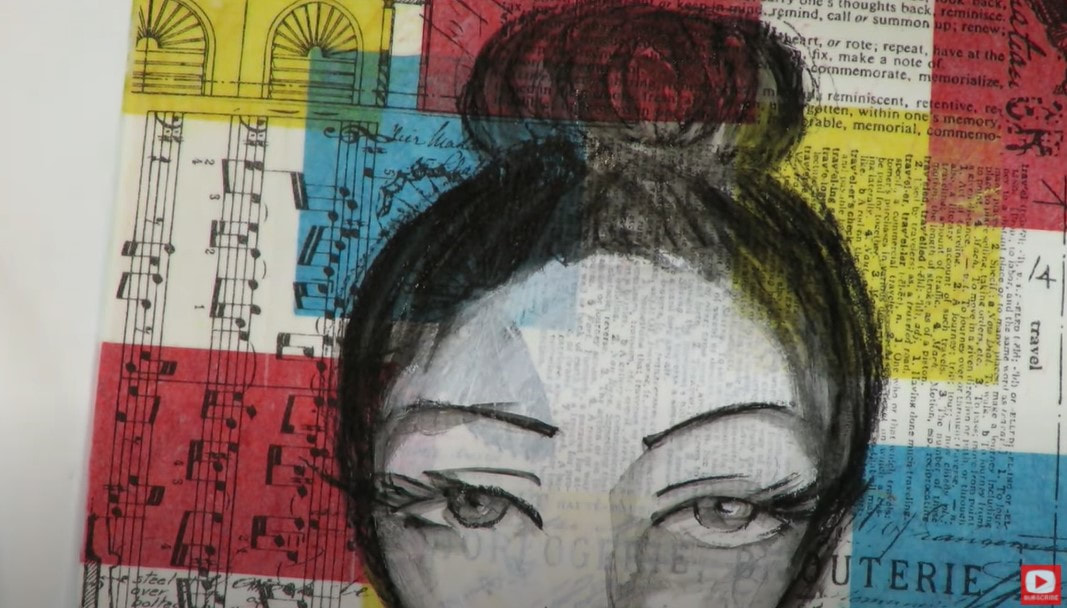 I thought about leaving her black and white, but decided to smudge some gelatos in to add a bit of color. 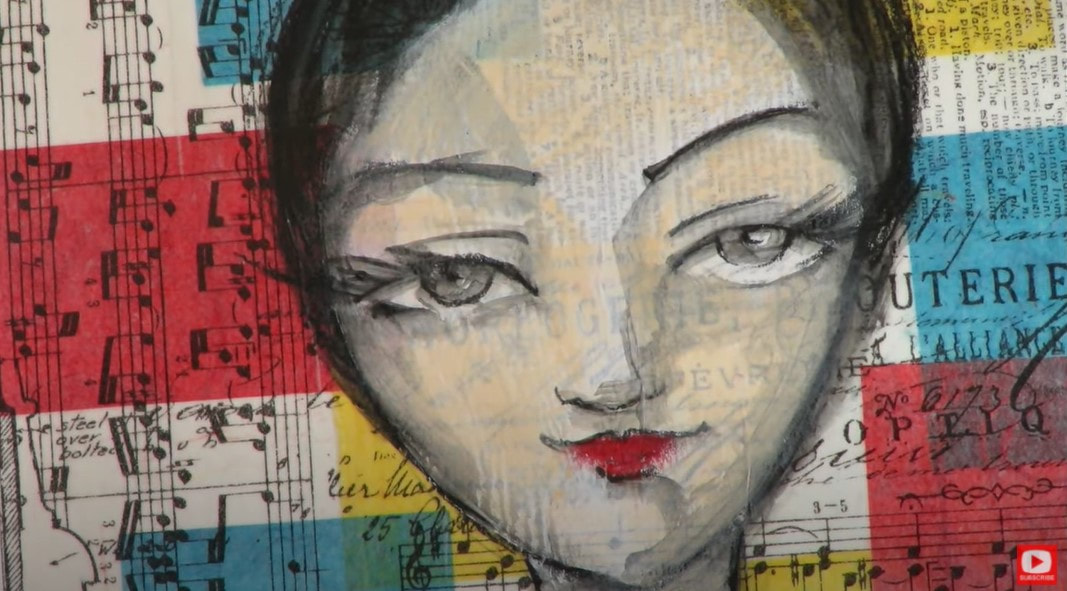 Remember each time you add a color - you want to repeat it somewhere. You should also always look to the colors in your background for inspiration. These become your color palette. Each time you repeat your background colors- you unify your piece. Take a look at how she pops when I add a touch of blue to her eyes... 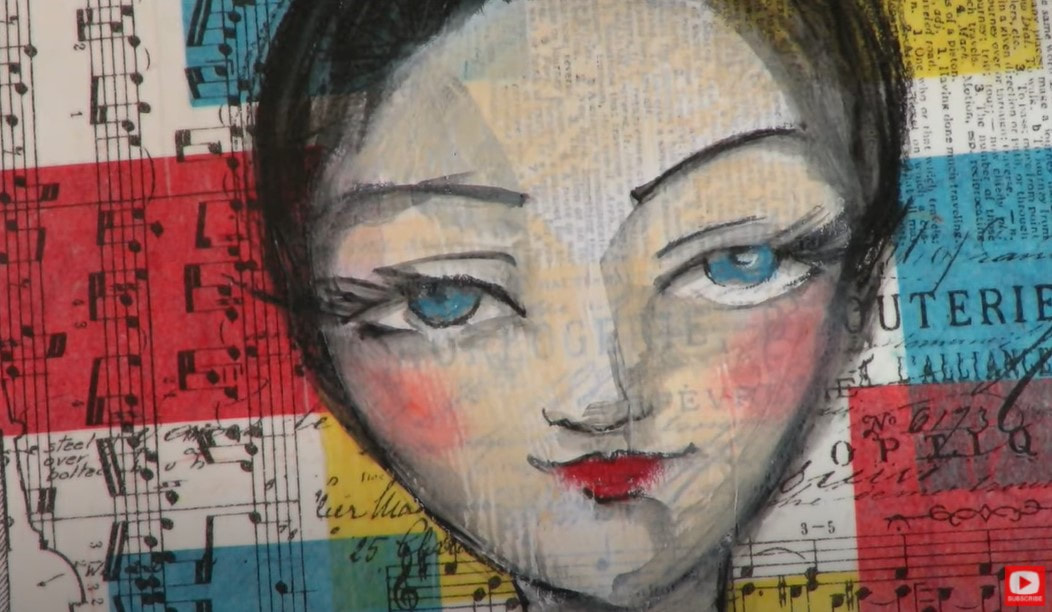 After I sealed this layer with more matte medium, I pulled out my pentel pocket brush to doodle some details like eyelashes, etc. Then I decided her lips needed to be redder, so pulled out some acrylics. I loved the way that looked so kept going - adding a touch of blue to her eyes, and a bit of yellow to the butterfly at her neck. 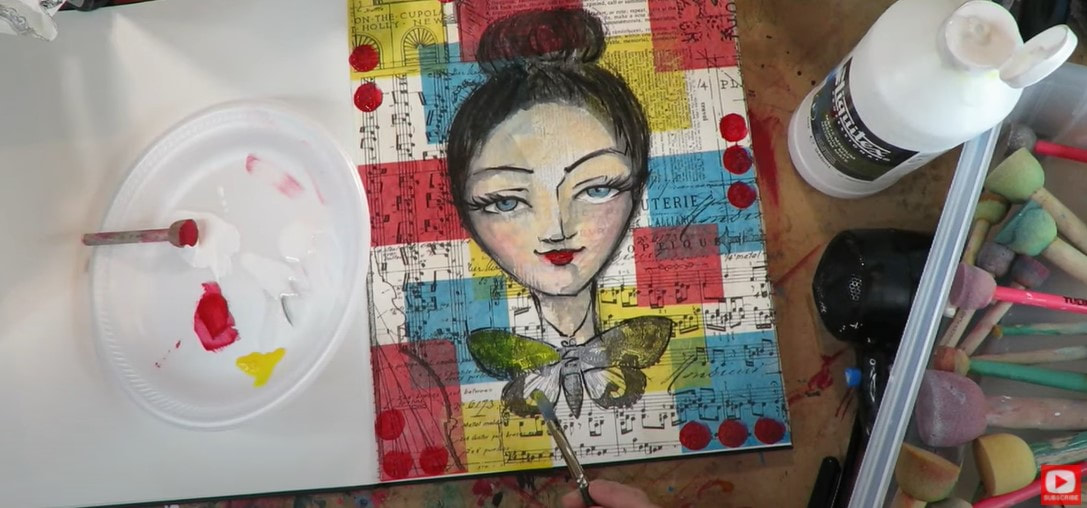 Cute, right?! I hope you enjoyed today's tutorial!! I sure did!! Super easy, and a FUN, artistic release!! See ya on Monday for the next Whimsical Women of the World drawing tutorial over on my Drawing Channel!! I've been drawing since FOREVER. But when I first started, it was SERIOUSLY hard to figure out where to put shadows and highlights on a face drawing to make it look 3 dimensional- like a more sophisticated drawing. I found this to be ESPECIALLY HARD whenever I would draw faces from different angles. Today's FULL LENGTH, real time drawing lesson on YouTube is going to help you skip of the hard parts of wondering where to drop in the shading or highlights on a profile face, so you can create some profile drawings you are SUPER PROUD of!!! 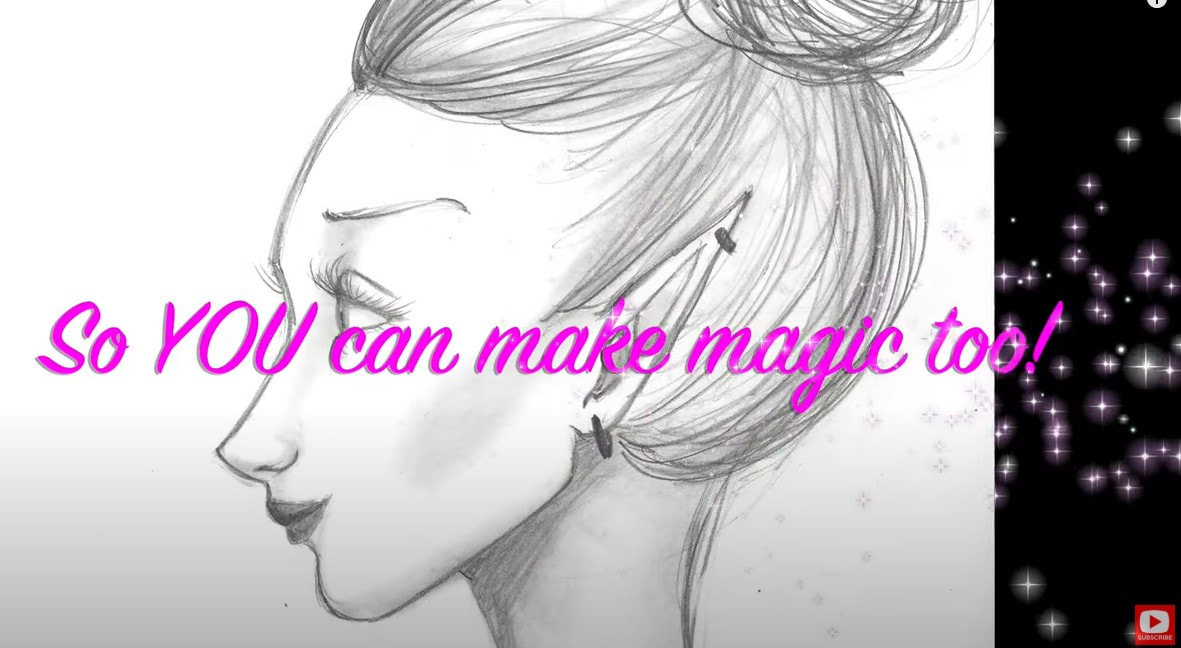 My first shading trick is to REALLY LOOK at the art you admire from other artists! Focus on the areas of that artwork that show light and dark in the face. Here's an example of a piece I LOVE and used as a REFERENCE to inform me where lights and darks could go in my own drawing. This is called reference drawing! It's a thing, and can definitely help you grow as an artist. Isn't this beautiful?? So dramatic!! 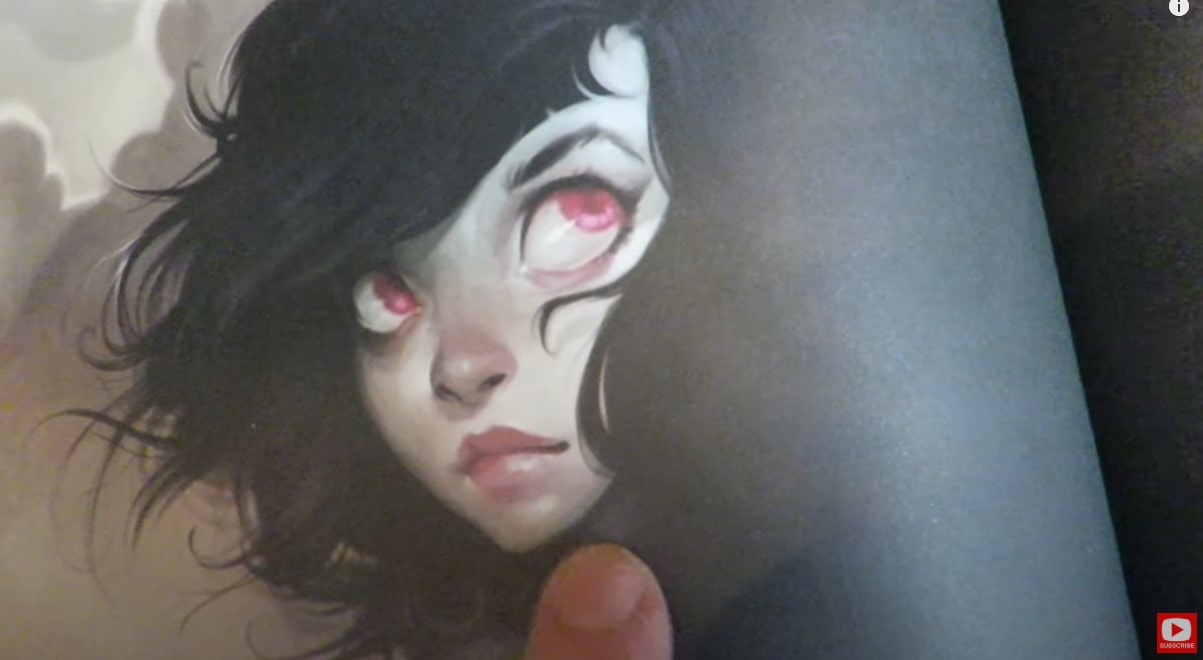 This piece was done by a Dutch digital artist I adore, Loish (Lois Van Baarle). I absolutely LOVE her work! If you look closely at the the piece below, you'll see that I tried to replicate the light source and technique Loish used around the eyes of her girl when I created my own... 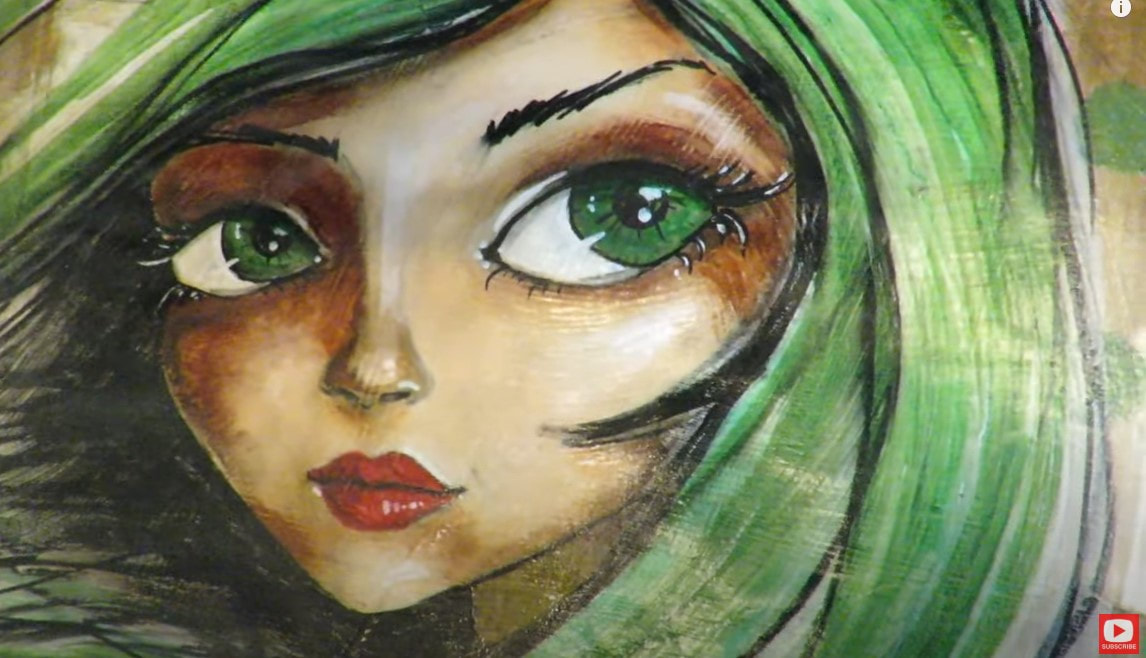 One of my favorite ways to demonstrate to students how light source affects the faces we draw, is using a foam head from the craft store and simply shining a flashlight on it. When you move the flashlight around, you can see exactly where the shadows and highlights are. This is exactly what you need to look for and imagine in your own drawings to add realistic shading to your face drawings - whatever angle you're drawing from! 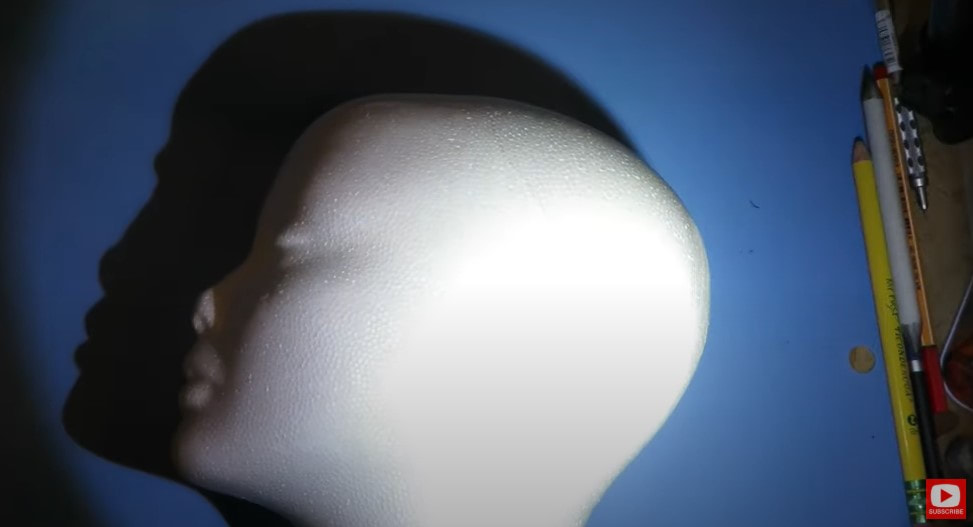 Sound confusing? CLICK HERE to watch my demo. Now- don't worry, I'm not telling you to go get a foam head in order to draw realistic shadows! If you're drawing a profile in pencil and want to add some shading, the EASIEST thing you can do is pull up a black and white profile photo on your phone. If you look closely, the photo will show you exactly where the lights and darks need to go for your drawing. That's it!!! It REALLY is THAT simple!!! Take a look at this image. REALLY look closely to see where the shadows are falling. If you need to- squint your eyes a bit! 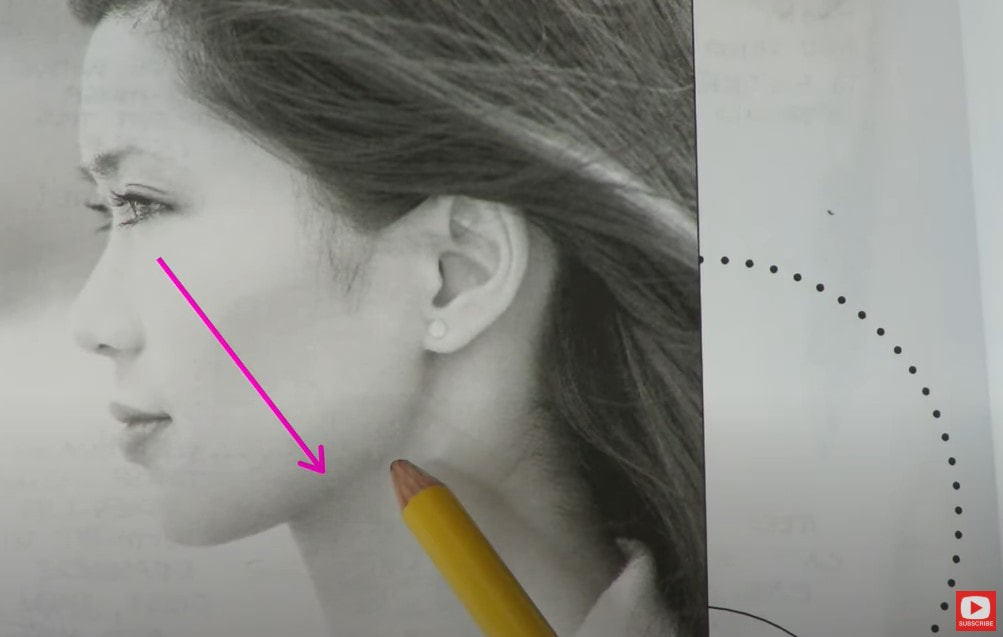 For this particular profile photo, the shadows are showing up primarily under the chin and neck- extending up to her earlobe. See what I mean? That wasn't too hard was it? You're totally gonna be looking at photos differently from now on, aren't you?! AWESOME!!! It's going to make you a better artist!!! OK!! On to today's project... we are shading the profile face we drew in last week's episode. If you missed that episode, CLICK HERE to draw the simple profile with me in real time. 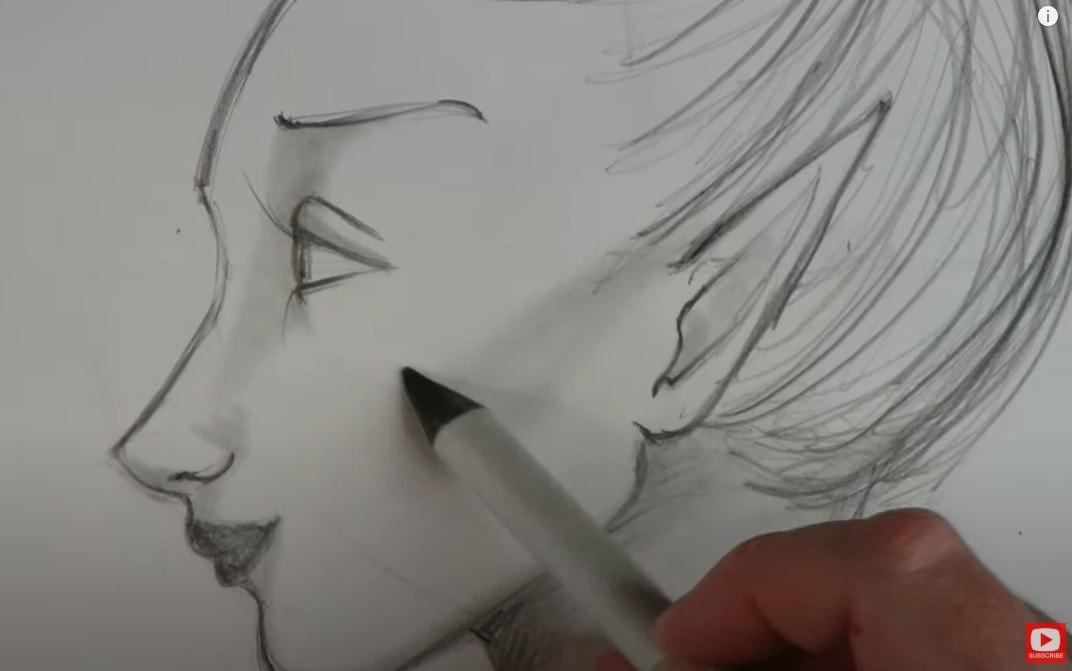 Shading a profile (or a face from any angle) is really much easier than you think! All you need to do is lay down a little graphite from your pencil and SMOOOOOSH it around with your blending stump (that's what I'm holding in the pic above!). If you don't have a blending stump- just use your finger, a cutip, or even a tissue to move graphite around on your paper.... Be as DRAMATIC as you want to with your shading!!! YOU are the CREATOR!!! 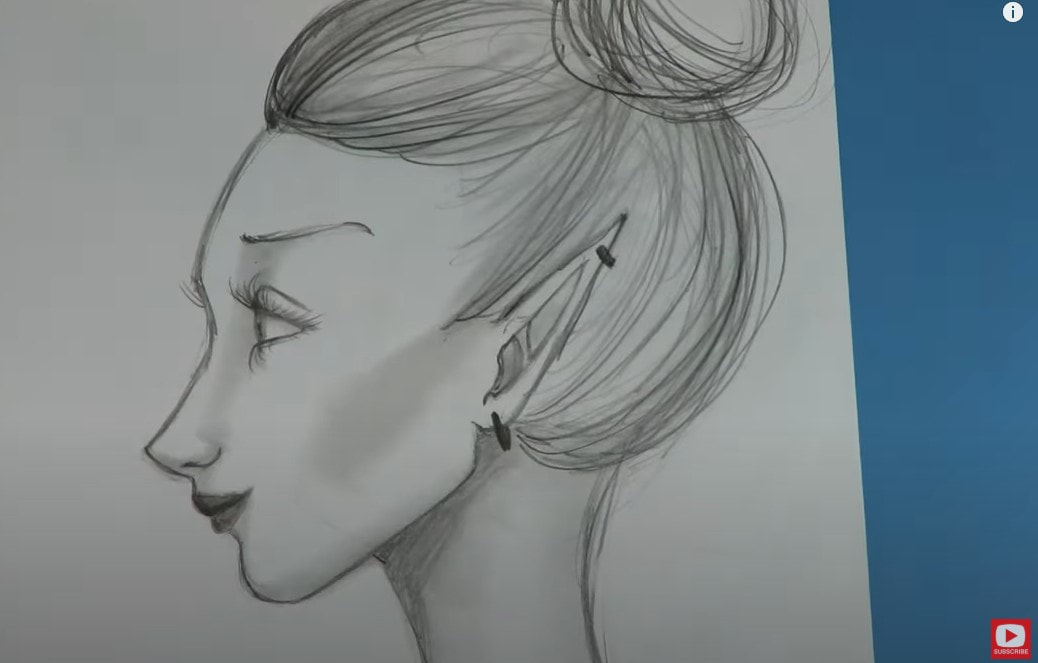 A little realistic shading on a whimsical face REALLY punches it up, and takes your art to the next level!! Personally, I LOVE me some DRAMA in my artwork, so of course you're gonna see super DARK shadows and bright white highlights in my work. That's part of what makes my work, mine- it's my style. YOU do YOU!!! Remember - a reference photo is just that- a reference. Don't feel like you have to match things exactly. AND you don't even have to use a reference photo EVER. This is just an example of one way to help you get started. Have SO much FUN with today's YouTube lesson!!! CLICK HERE or press the play button below to watch. See ya next week!!! I used to STRUGGLE with my profile face drawings because they ALL LOOKED LIKE ALIENS ...  OR...had FISH LIPS!!!  If you're ready to toss your sketchbook because you don't know how to draw a face that looks "right" as a side view drawing... You're in the right place! HELP IS HERE!!! As you may know, I'm a mixed media artist, but I REALLY value the skill of drawing because it makes my mixed media foregrounds look SO much more interesting and beautiful if they are based on accurate drawing proportions of the face.  It wasn't until I wrote my second book, How to Draw MORE Fun, Fab Faces, that I really held myself accountable to finally figure out how to draw 3/4 portraits and profiles in a CLEAR, step by step way! In today's drawing tutorial I'm pulling out ALL MY TIPS for face drawing, and I'm gonna walk you through profile drawing STEP BY STEP so it's easy for you to replicate on your own at home! ALL you need to do this project right along with me is a piece of paper and a pencil - ANY pencil with an eraser will do! 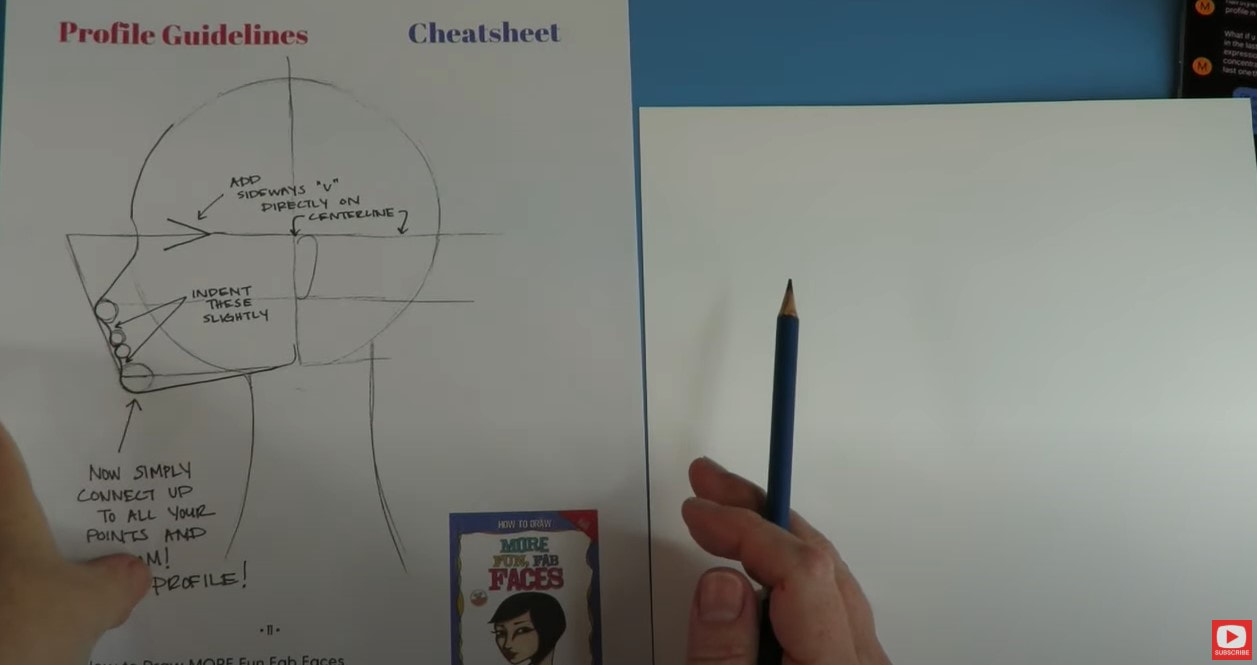 When you're working on a profile sketch, there are little tweaks you can make to help your faces look more realistic. Even if you're doing a a stylized whimsical drawing (like mine!), paying attention to angles of the face and the placement of facial features will give your drawing greater sophistication. Download a copy of my FREE Profile Face Drawing Guidelines here. After you grab your guidelines, let's get started. Don't worry- this is an EASY drawing for beginners!!! The first step is to simply draw a circle. Don't stress over it - just grab something near you that has a circular shape and trace around it. DONE! 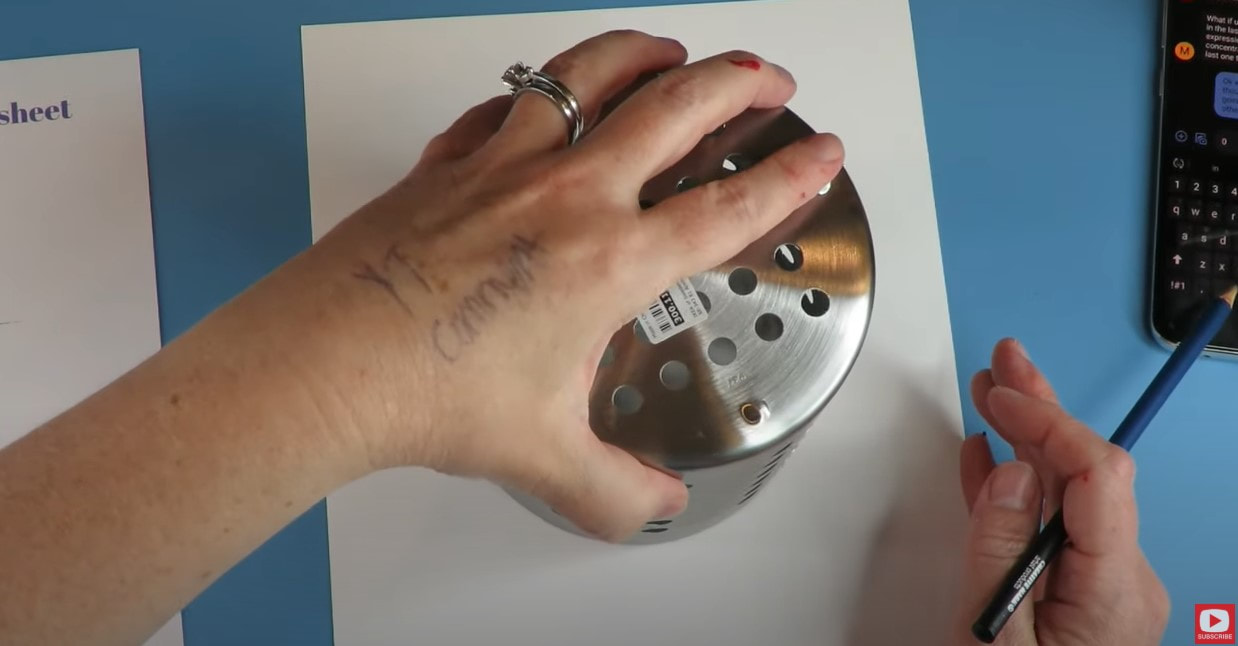 Before we sketch in your guidelines, there is something I need to show you. The angle from nose to chin varies a TON from face to face in real life. The pix below are from my book, How to Draw and Find Your Style. Look at that pink arrow focusing on the angle from nose to chin. See how it differs from the photo on the left? They are COMPLETELY different! 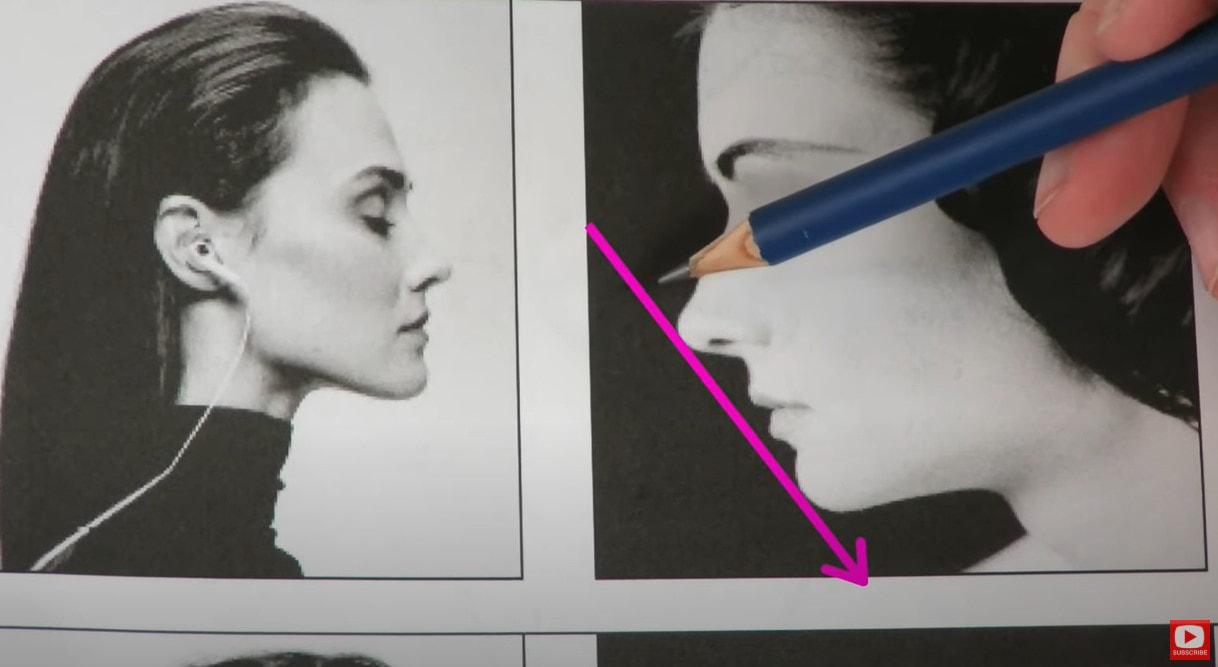 SUPER INTERESTING right?!! This is an example of one of the little nuances that trip us up as artists when we try to draw profiles! The angles are seriously tricky!!!! But we're NOT gonna let them get the better of us. How do we draw this in an easy way without having issues? CLICK HERE and I'll demonstrate for you step by step. When you sketch in these simple guidelines, it will help you focus on drawing proportions of the face- which is just a fancy way of saying YOUR girls won't look like aliens the way mine did ;) 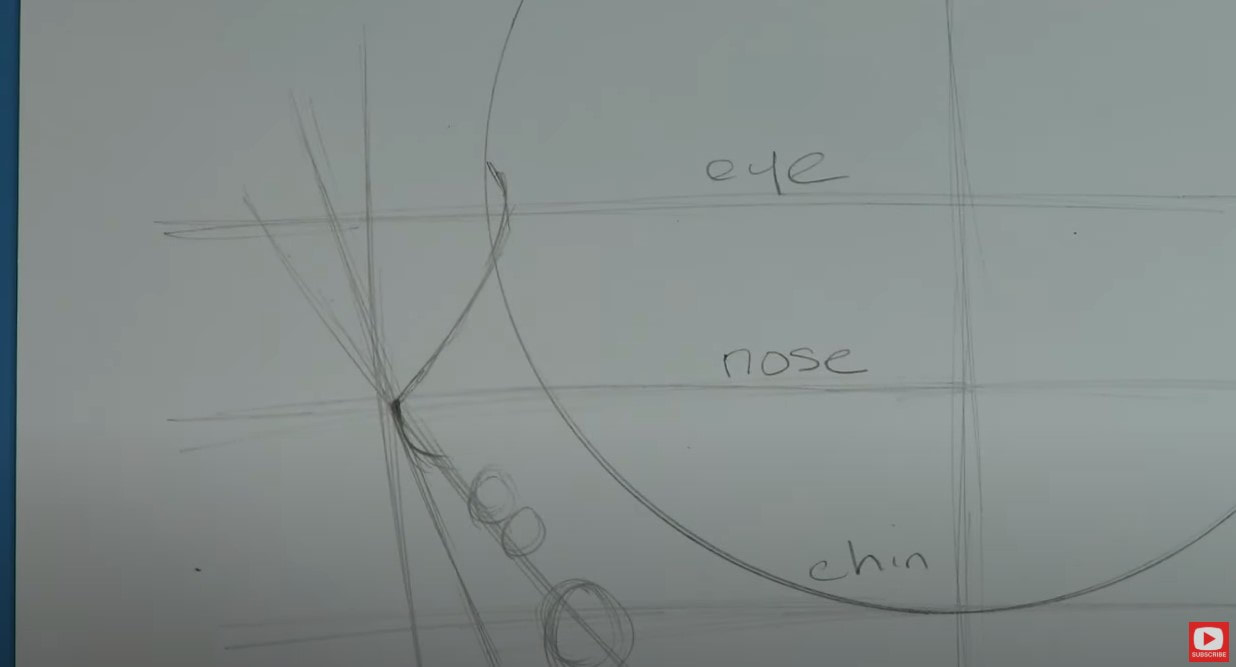 One of the biggest rules to remember about profiles is the lips should NEVER stick out beyond the nose. See how that first set of double circles (above) looks just under my rough nose sketch? Those will soon become lips ... see below! 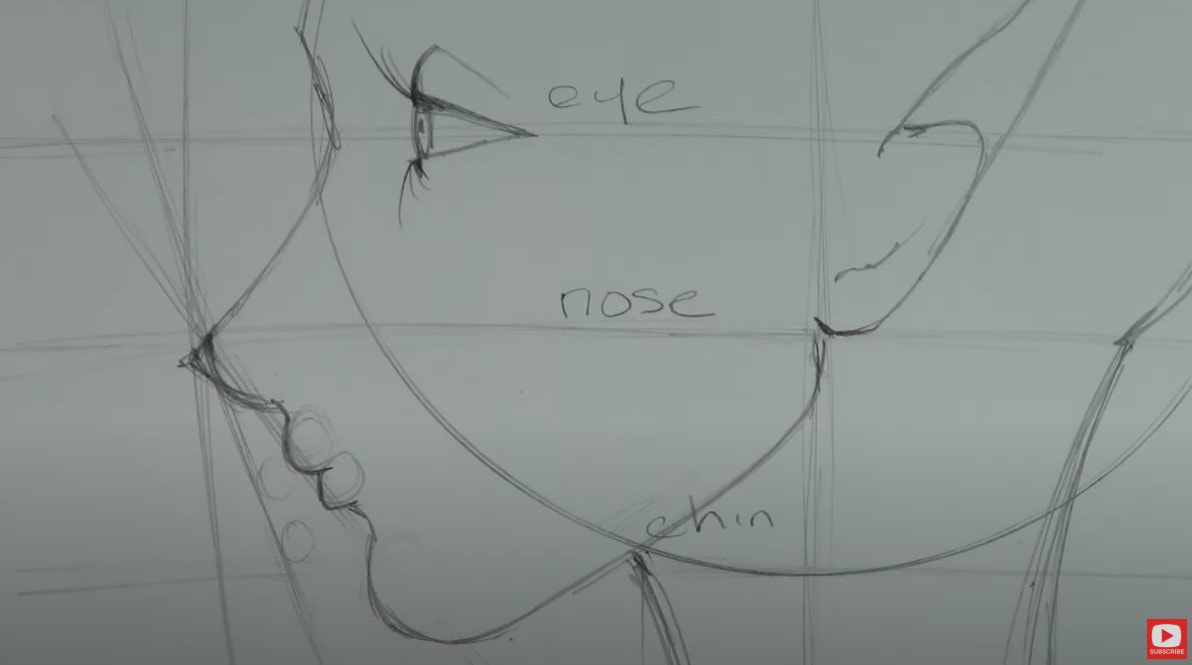 The more you work on your face drawing practice - the more these guidelines will become second nature to you. You’ll know how to draw facial proportions for your side view face sketches correctly & will have drawings in your sketchbook you can be SUPER PROUD OF!! I PROMISE!!! EVEN BETTER - it doesn't have to be hard anymore when you're armed with my Profile Face Guidelines Cheatsheet. I HOPE you have FUN with this video and find the guidelines helpful. Make sure you're drawing right along with me because that is how you will learn best- with practice!!! STAY TUNED for next week's video, because I'm gonna teach you HOW TO SHADE today's profile (see below!). And YES, of course I gave her elf ears / fairy ears because I LOVE (and DO BELIEVE in) fairies!!! 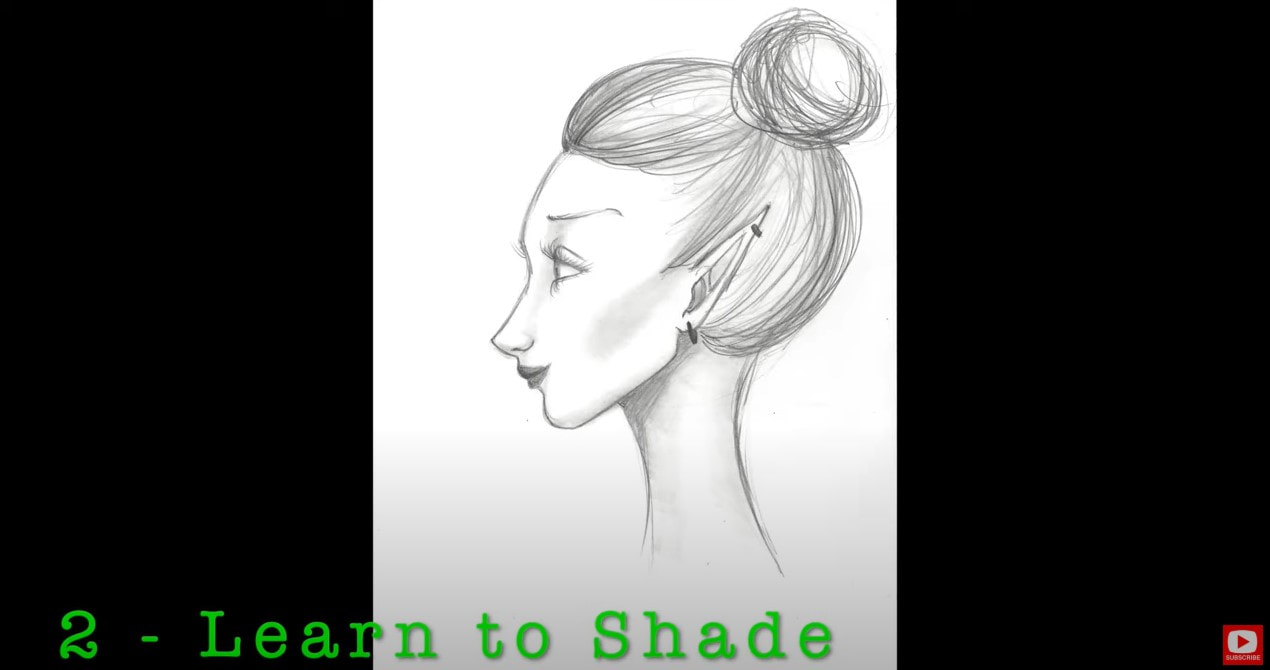 See ya over on YouTube!!! ❤️All product links are Affiliate. I may earn a small commission if you choose to order through these links but by law there is never any additional cost to the consumer for doing so. I thank you for your support! |
Karen CampbellFounder of Awesome Art School. Mixed Media Artist. Author of 19 Instructional Art Books! 
Whose work has appeared in...
   
 Archives
July 2024
Categories
All
|
 RSS Feed

"Karen is flipping hilarious and she's very real...I like the way she teaches in a way that really gives you confidence, whether you're a beginner or advanced there's always something new to learn!"
- Elizabeth W. |
What Fans Are SayingKaren, you are absolutely fabulous! You make me feel like I can draw anything. I have recently retired and finally have the time to do some of the art that I have loved since I was in school. I am really at the beginning of my art journey and I hope to learn as much as I can. Thank you for all you do. |
Contact ME |