
|
Recently, one of my super-talented students suggested a mixed media art idea I can't wait to try!!
I LOVE creating alcohol marker drawings of faces. Over the years I've discovered quick layers in alternating directions will help me avoid streaks, and colored pencil over alcohol markers can soften transitions between marker shades. My ROCKSTAR student shared an alternative alcohol marker blending technique: pan pastels over alcohol markers. I'm SO intrigued!! Join me in the studio as teacher becomes student, and I discover if THIS is the job my pan pastel set has been waiting for! 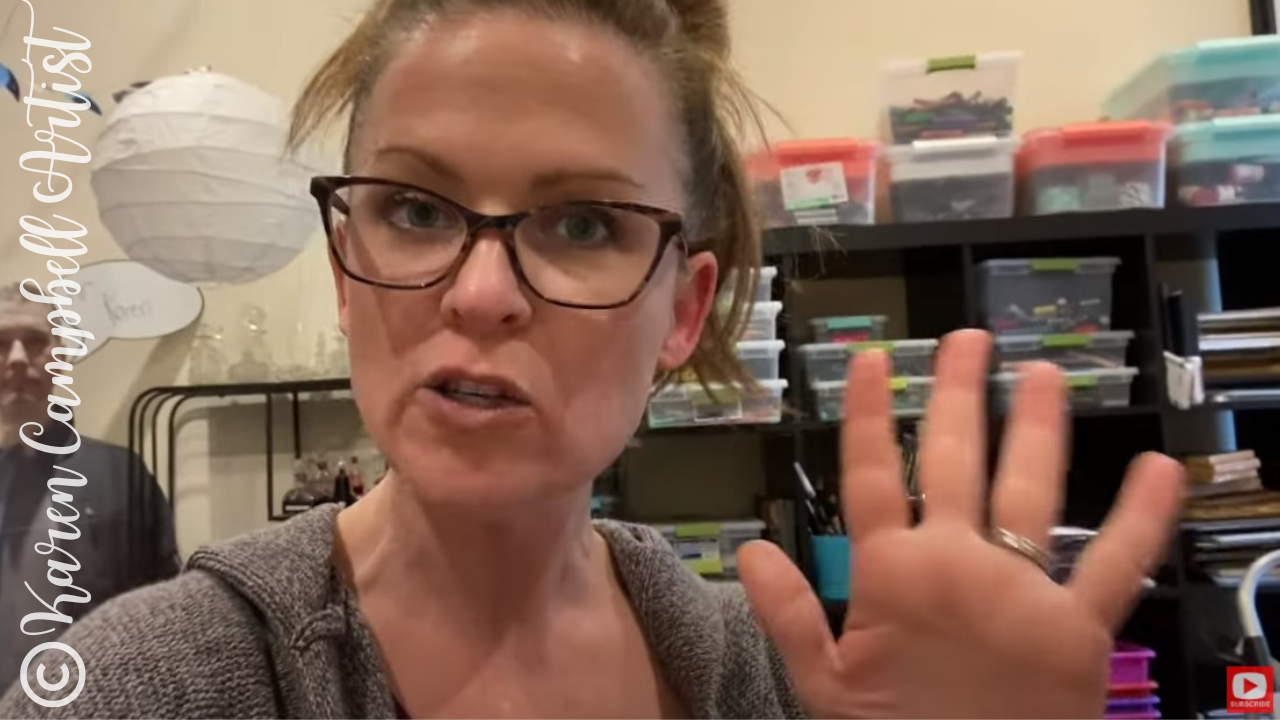
New to mixed media art, feeling intimidated to try it, or overwhelmed by the supplies? I've got 30 FUN Mixed Media Art Ideas with SIMPLE, tried, and true art supply combos like Pan Pastels over Alcohol Markers! Click the button below to download my FREE "Hot Dog Packet! "

Each mixed media example in The Hot Dog Packet reads like a recipe with ONLY 4 art supplies, so it's perfect for mixed media beginners and anyone on the lookout for NEW mixed media art ideas that won't make a hot mess!!

Before we continue, super quick announcement: All product links are Affiliate. I may earn a small commission if you choose to order through these links but by law there is never any additional cost to the consumer for doing so. I thank you for your support.
Today's AWESOME mixed media art technique comes straight from one of my AMAZING students over at Awesome Art School, Darlene Hanna.
Darlene has been a part of my world FOREVER, and I'm SO grateful for her ever-supportive presence in my Facebook Group. I LOVE it when she posts what she's working on because everything she does is sheer magic. Just take a look... 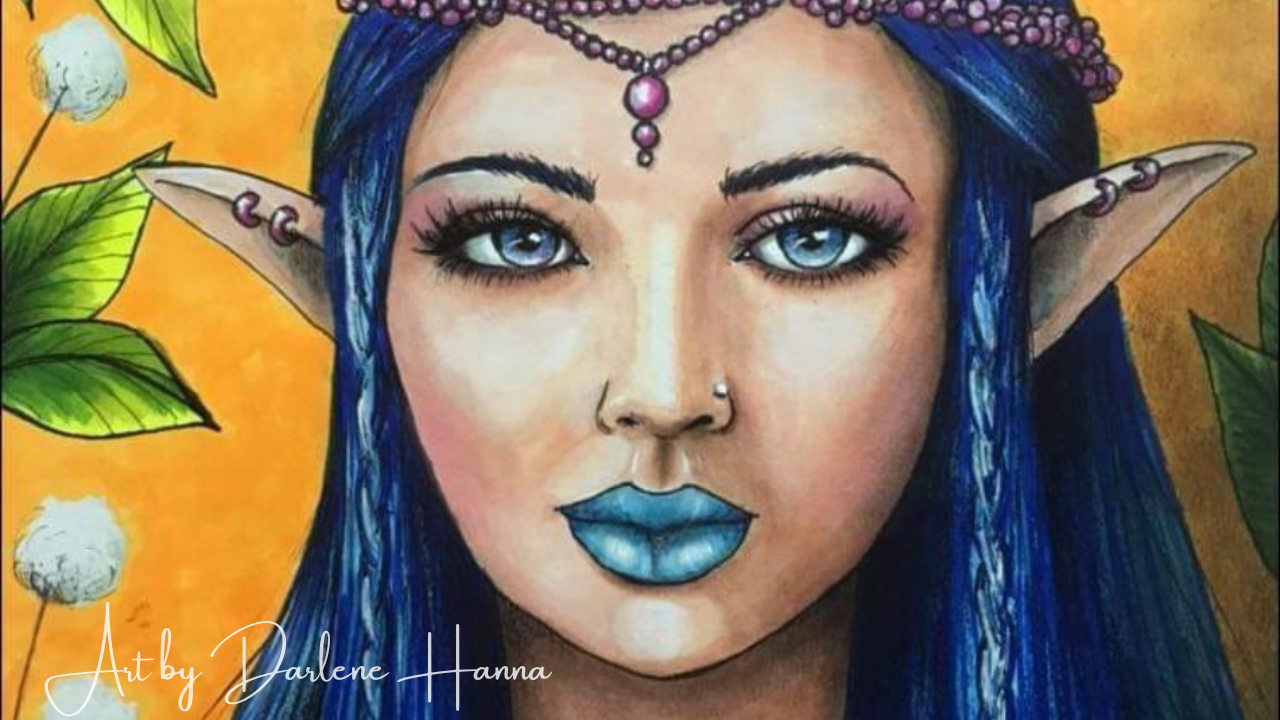
Out of this world, right?! There's nothing she can't do!!
Darlene recently shared an alcohol marker blending technique with me that I've never tried before using pan pastels. I really don't know much about pan pastels and have only used them a couple of times. I never dreamed of trying them on top of my alcohol marker drawings. 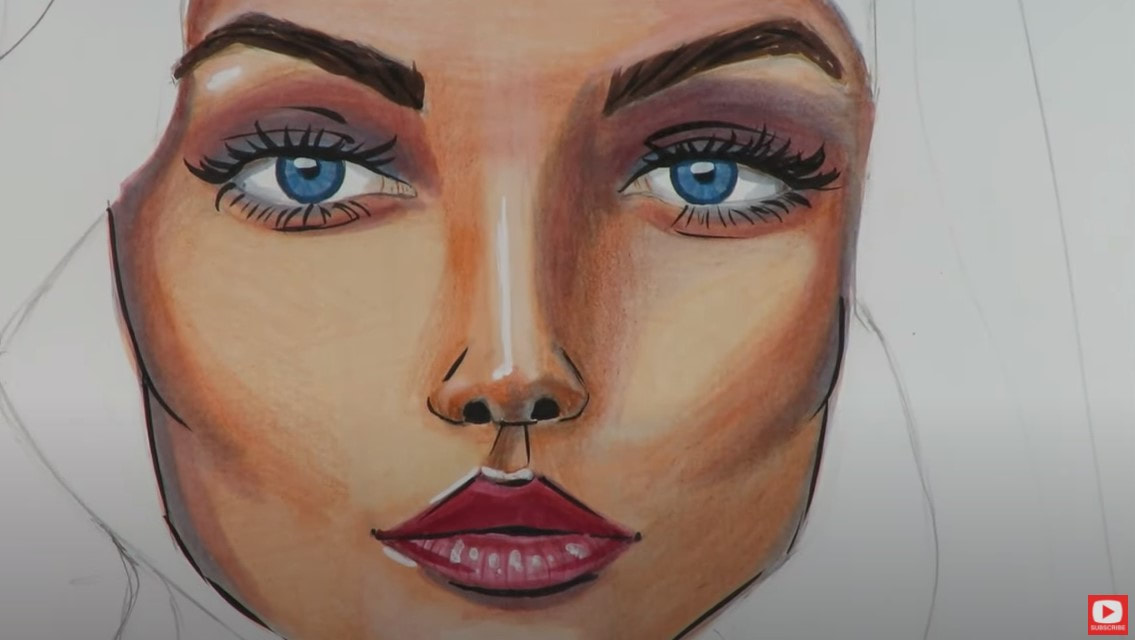
Typically I only use colored pencils over alcohol markers, as you can see above (along with my white poscas and pentel pocket brush pen). I'm excited to try Darlene's technique AND to finally have a purpose for my ginormous pan pastels set!!

Last week's face chart-inspired alcohol marker drawing is perfect for today's experiment. My only concern is the paper used for this drawing - it's a super smooth Bristol. I *think* panpastels need a little texture in the paper in order to stick? Fingers crossed this paper isn't too slick!!
If you look closely at my drawing above, you'll see there are definitely some transition areas that could benefit from a little more blending.
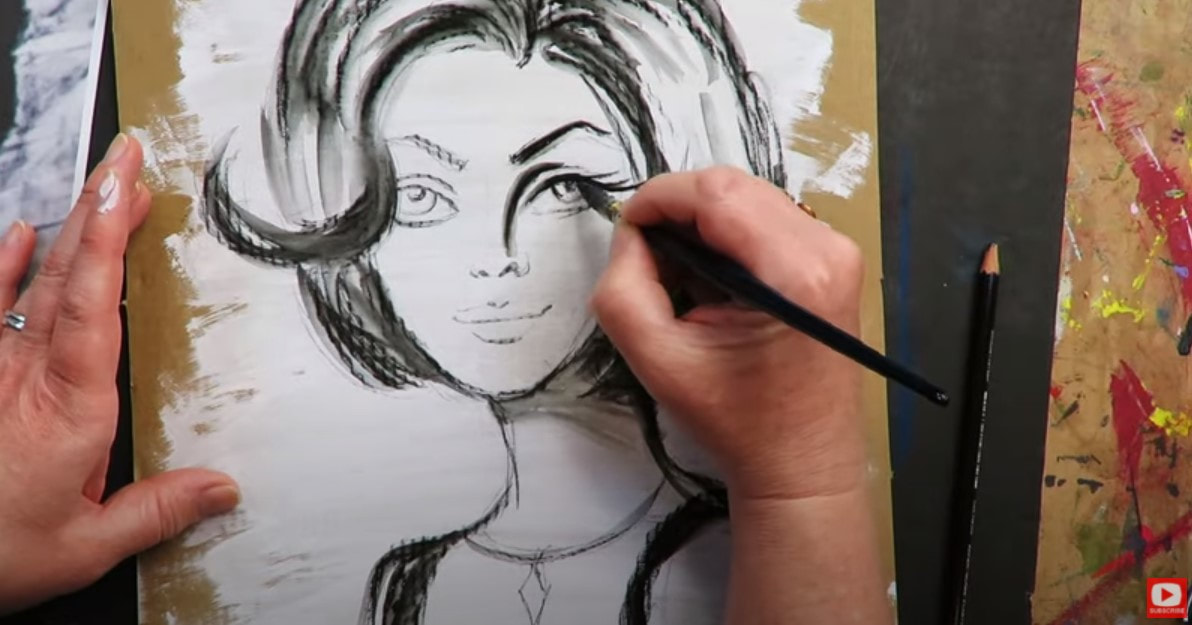
I looked back at my face chart reference photo from last week also to see what else I might want to adjust. I love super dramatic shading and makeup in the faces I draw, so I started out by dabbing a little orange pan pastel around the corners of each eye to kick the makeup in my drawing up a notch. 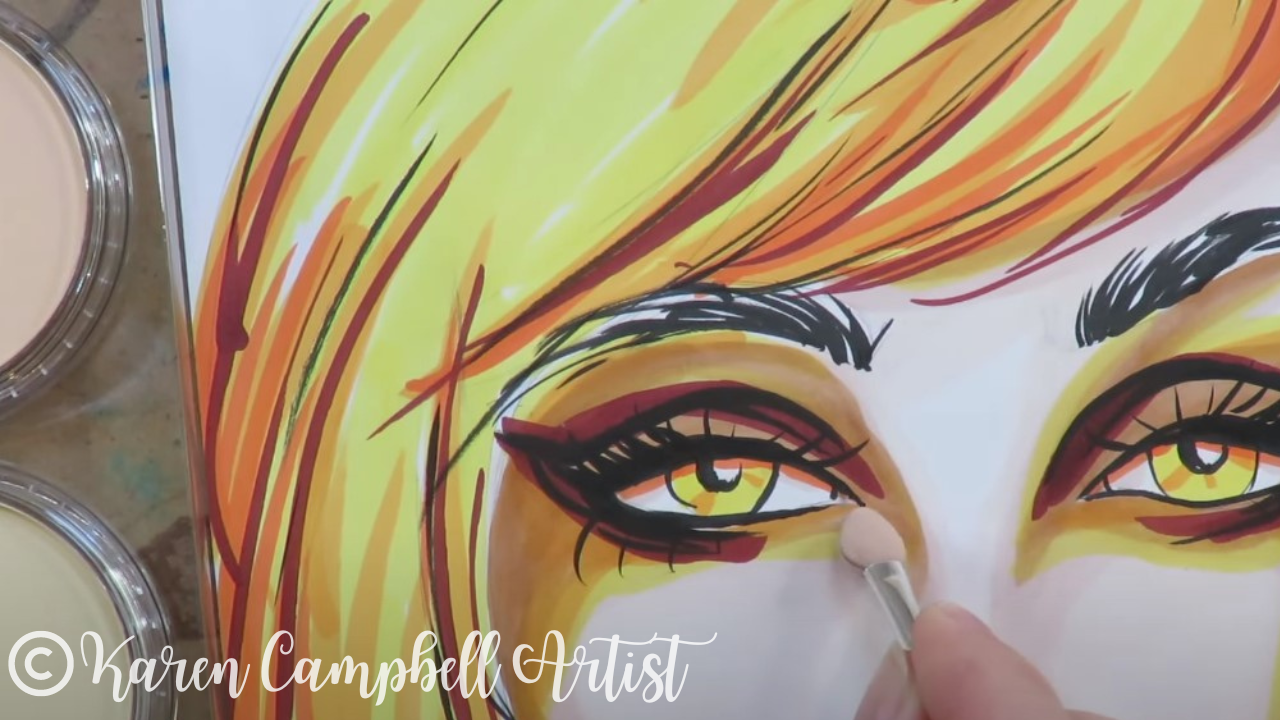
My first thought as my pan pastel applicator hits the paper is, "WHY HAVE I NOT BEEN DOING THIS MY WHOLE LIFE?!"
I'm thrilled with the results!! The orange panpastel deepens my shading AND softens the transitions around each eye as soon as I start to apply it. Excited by how this is going, I reach for another shade and move on to the lips! Just look at these results... 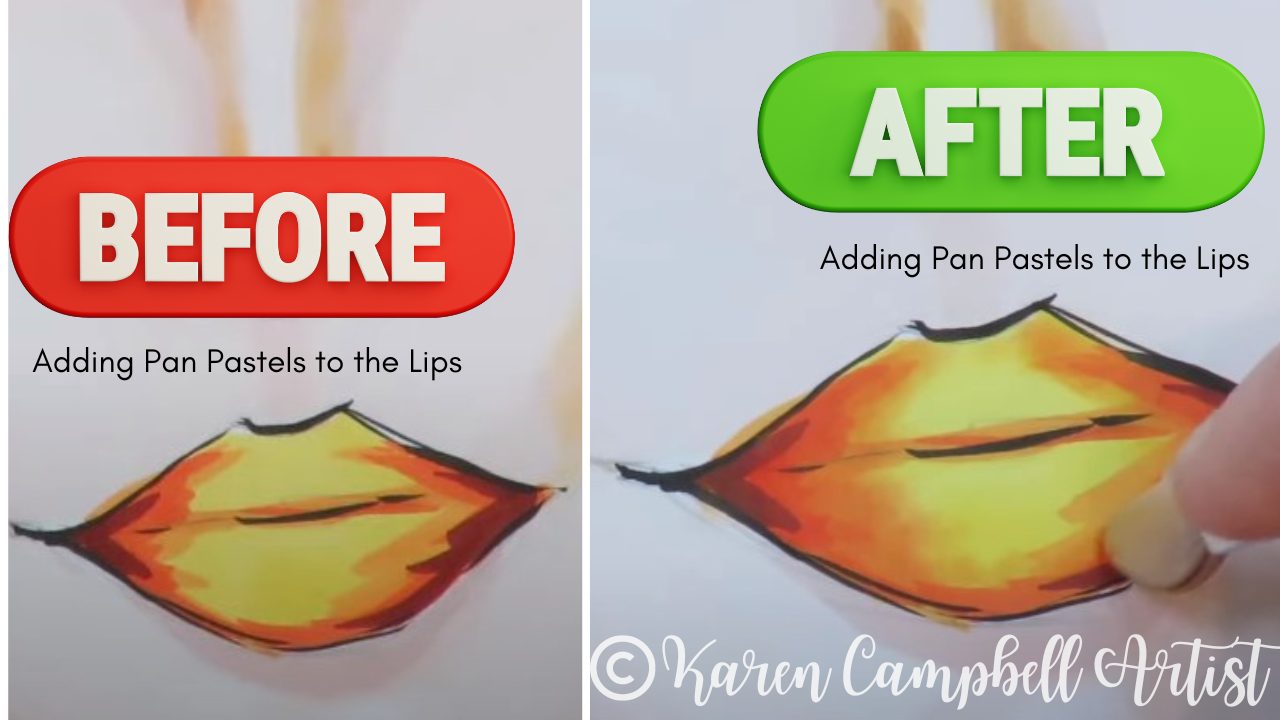
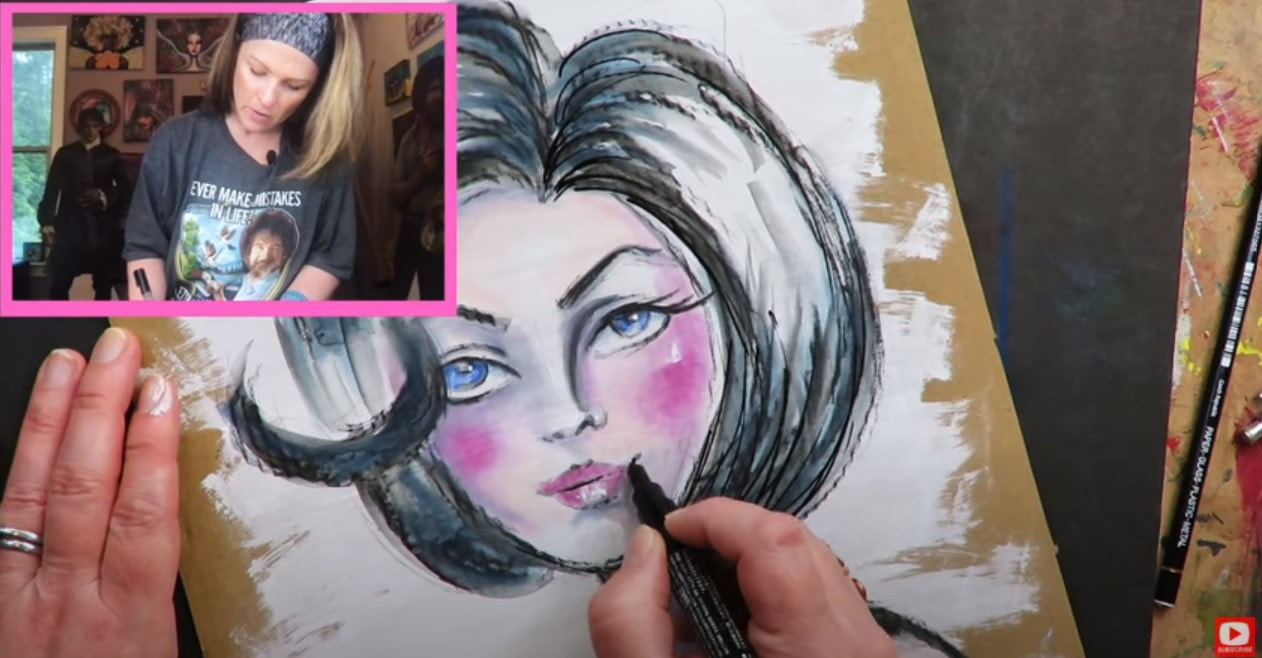
The pan pastels are totally like a "corrector method" for alcohol markers!! The next question is if I can use my white posca pens for highlights and my secret weapon for creating gorgeous eyelashes OVER the pan pastel layering?
Watch the video to meet me in the studio and find out!!
Make sure you grab my FREE Hot Dog Packet for more FUN & EASY mixed media project ideas like the one we tried today. If YOU discover another art supply combo YOU love, there are even blank sheets in the packet where you can jot them down!

Thanks for hanging out with me today! And another HUGE shout out to my ROCKSTAR student, Darlene Hanna, for sharing her life-changing alcohol marker blending technique ??
WANNA DRAW the face-chart inspired alcohol marker drawing featured in today's video? Here's the FREE drawing tutorial:
NEED the FACE DRAWING REFERENCE from last week's drawing tutorial? Grab it here! NEED MORE resources to get your creative juices flowing? ❤️ CHECK OUT ALL my art books on AMAZON ❤️ CHECK OUT ALL my online art classes @ Awesome Art School ❤️ MY FAVORITE ART SUPPLIES on AMAZON (affiliate links) ❤️ MY BELOVED FACEBOOK GROUP
0 Comments
QUICK & EASY! Mixed Media Portrait in Stabilo All Pencil, Pan Pastels & Paint Pens ["Hot Dog" Style]10/5/2022
Creating mixed media portraits is one of my FAVORITE things to do! When I don't have a ton of time to art, I'll use my quick Hot Dog System to layer just FOUR mixed media art supplies.
I asked 20 of my artsy friends about the simple mixed media art supply combos THEY love and have TONS of FUN ideas to share with you in a FREE 32-page PDF (you're welcome!). This packet contains our BEST, tried and true, 4 art supply combos- "HOT DOG" style. 
Click the button below to download this FREE 32-page stack of ideas just filled with Hot Dog System inspiration!

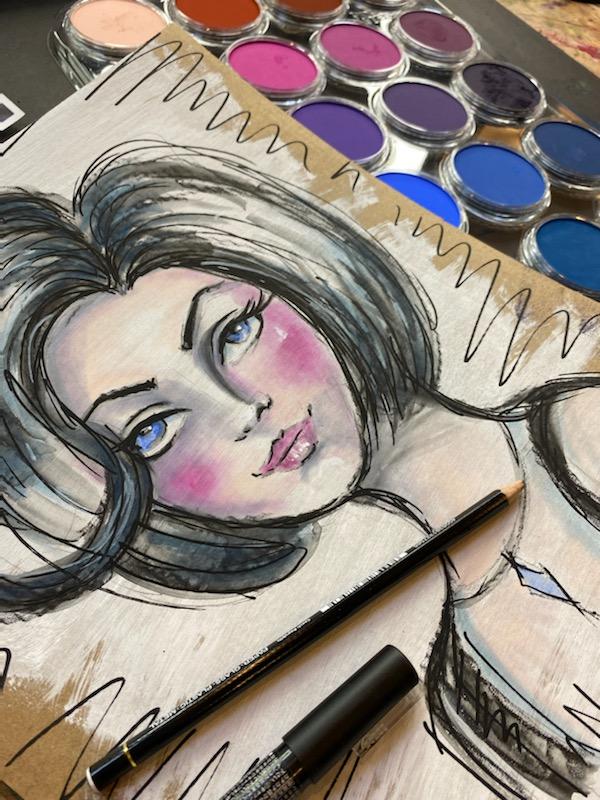
Today I'm testing a new-to-me mixed media art supply combo recommended by one of my artsy friends, Alexa. Straight outta the Hot Dog Packet on page 3 - we're combining my beloved stabilo all pencil with pan pastels and paint pens on cardboard. If you're a beginner in the world of mixed media art, or just curious about these tried and true art supply combos - today's video (and FREE 32-Page Packet ) are FOR YOU!!
Before we continue, super quick announcement: All product links are Affiliate. I may earn a small commission if you choose to order through these links but by law there is never any additional cost to the consumer for doing so. I thank you for your support.
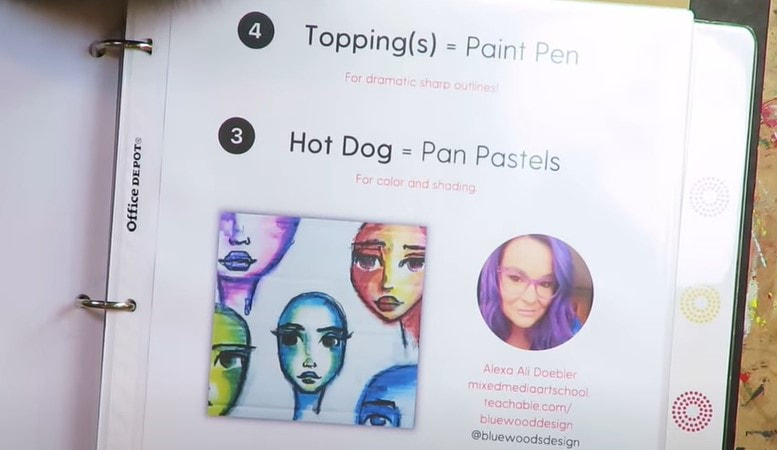
Today's combination of mixed media art supplies comes from page 3 of the Hot Dog Packet, and is a recommendation by artist, Alexa Ali Doebler.
She's suggested we create on cardboard. Feel free to use the back of a cereal box, an Amazon box, whatever. You can also just as easily do this project in an art journal (preferrably one filled with watercolor paper because we'll be activating a water soluble pencil with water). It's up to you! 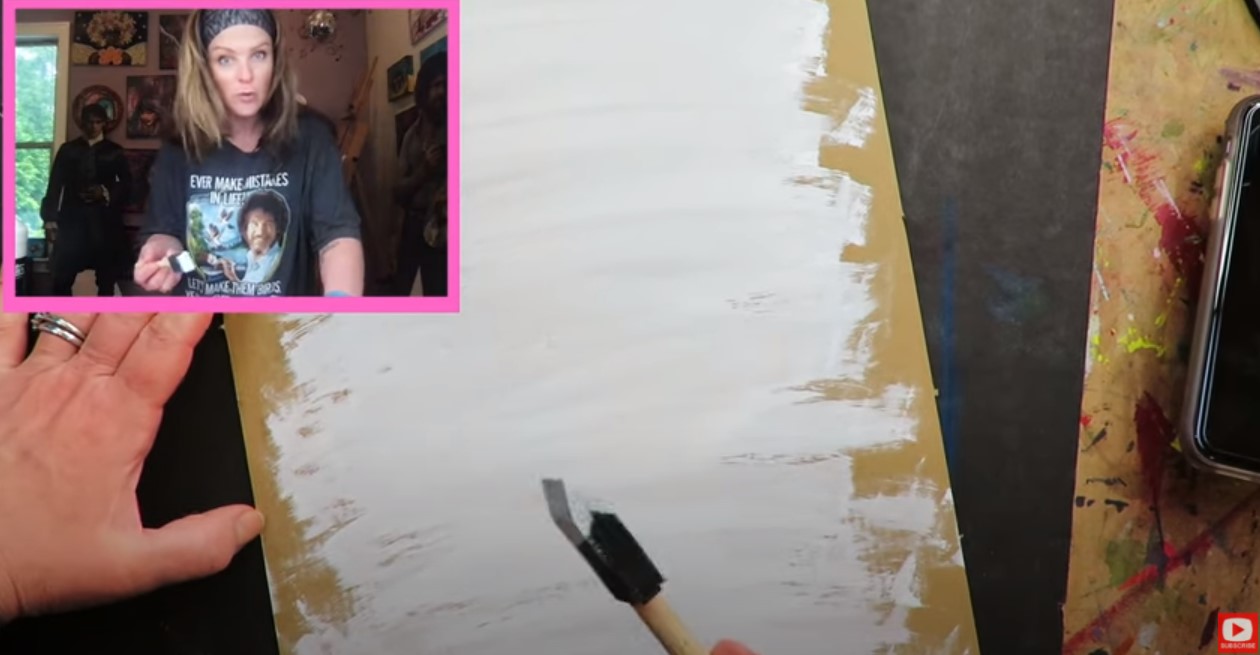
I'm using cardboard like Alexa suggested. To get this party started, I'm covering my cardboard "canvas" with some swaths of white gesso (skip this step if you're working in a watercolor sketchbook or journal).
As you'll see in the video, I'm using a cheap foam brush to apply it. These are amazing for SO many applications and can easily be washed out and reused for a long time. Typically gesso is used as a primer for acrylic paint, and absorbent ground is the primer for watercolor and water soluble products. However, because I know the Stabilo All Pencil in Black SO well as a product, I know it will perform beautifully when layered over white gesso. 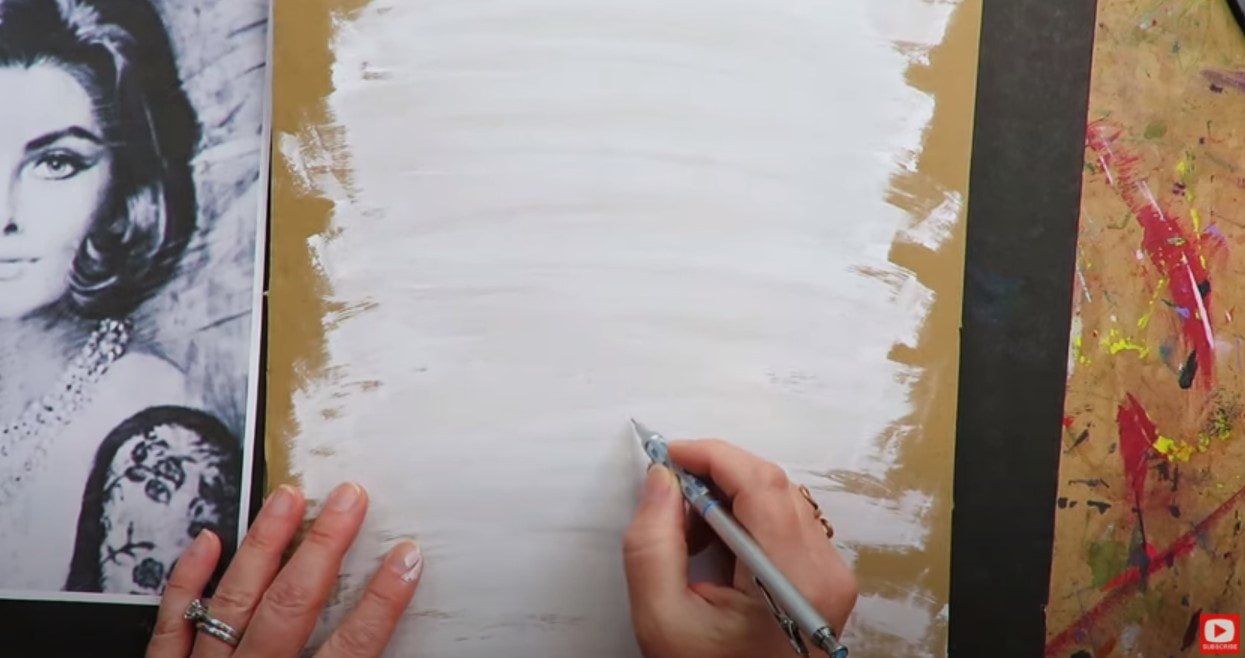
To draw in the face for today's mixed media portrait, I'm sketching her in with my mechanical pencil first. I find this super helpful because I can erase if I need to. If you don't have an eraser you love, this one is my favorite.
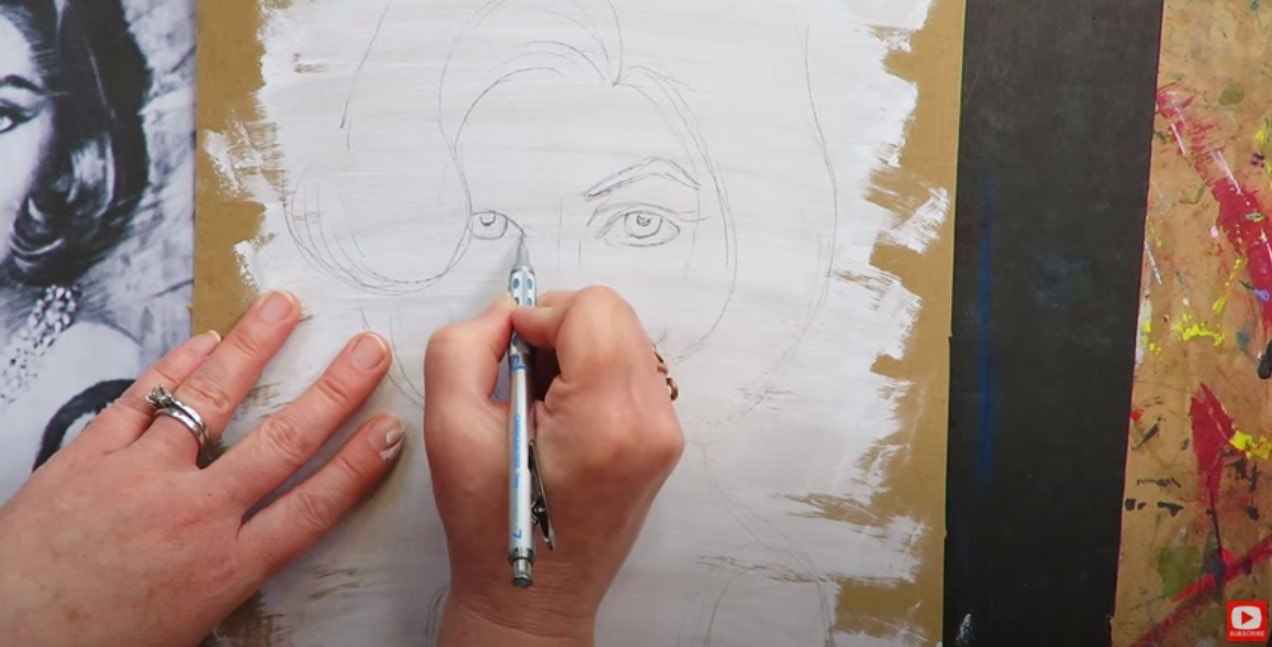
Today's sketch is quick and dirty because I'm more into trying out the art supply combo and seeing how the layers work together, than making the drawing my life's work!
I know her neck is totally wonky, but I'm just letting it be since I'm in a hurry. Try to ignore that for now, LOL. 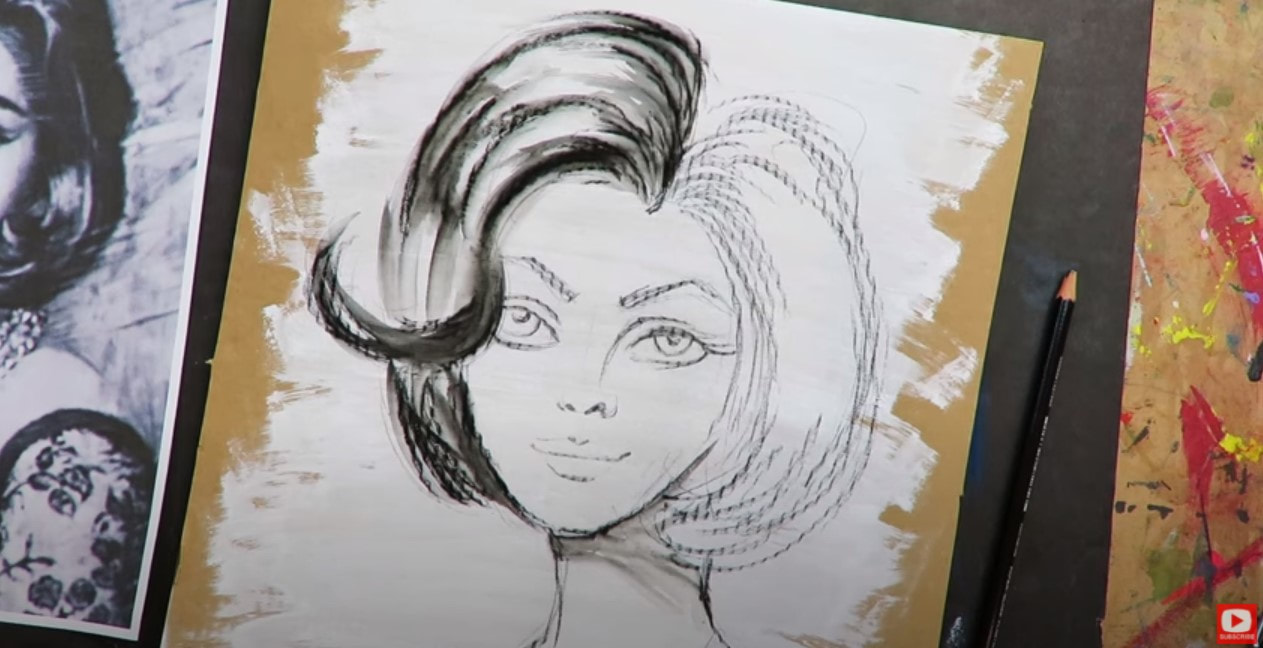
To activate the stabilo, I'm using my favorite watercolor brushes by Polina Bright (check out this video for a full product review of them!). If you'd like to get a set for yourself, Polina has extended a coupon code to my followers for 10% off if you enter my full name in caps (KARENCAMPBELL) at checkout on her website or in her Etsy shop.
Something to remember about the stabilo is that is WON'T stop activating. Some of my students LOVE this... and some HATE it. I love that feature, but I just want you to be prepared for how it will behave before you try working with it if it's a new art supply to you.

Now it's time for pan pastels. I'm still SUCH a newbie with these- but that's ok! I'm ready to learn!
There's a cute little pan pastels applicator that looks like it fell out of an eye shadow compact. This will help you dab color on wherever you want it, and do some blending. 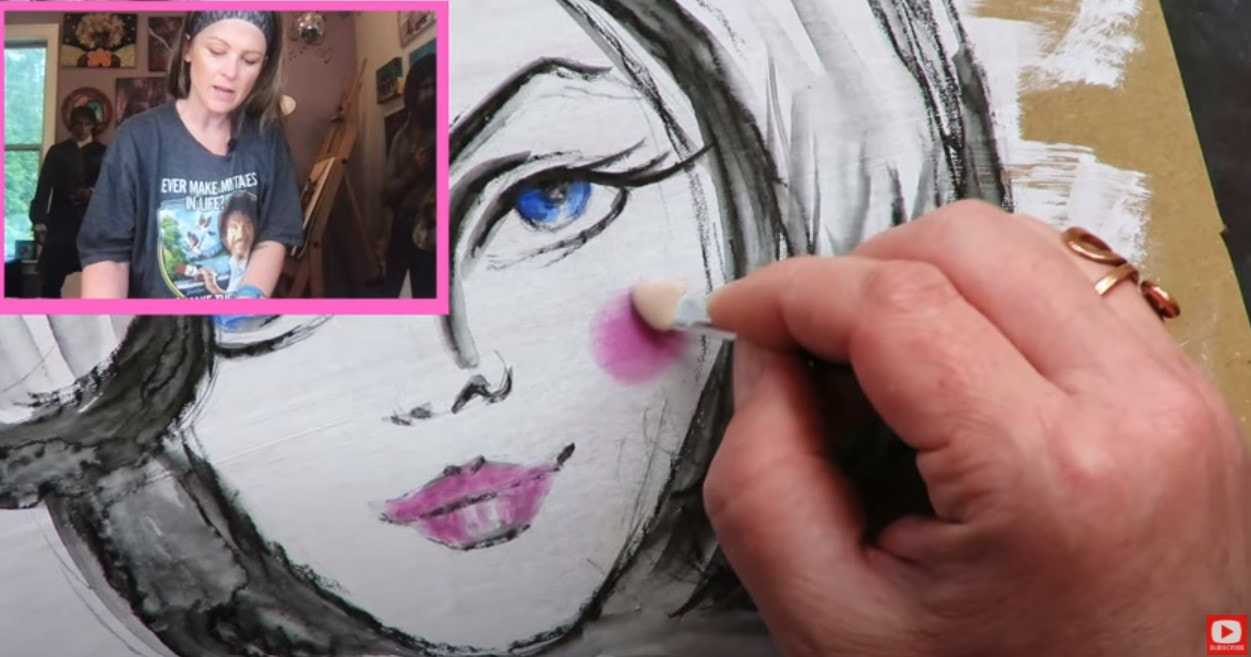
I spent a little time playing with the pastels - incorporating shading into the face and hair to add dimension. At this point in the project, I was also just experimenting with what the pan pastels were capable of and how they worked. They're actually really fun!
Then it was time to bust out the paint pens. I'm just using whatever is hanging out on my art table. I've got a white sharpie paint pen and dabbed on a few highlights with that, then added some outlining and scribbles with my black posca paint pen. Simple, fun and done!
I hope you enjoy this quick mixed media portrait tutorial! Have fun experimenting with your art supplies, and make sure you post your version in the Facebook Group if you do the project too!
Thanks for hanging out with me today! ❤️ CHECK OUT ALL my art books on AMAZON ❤️ MY FAVORITE ART SUPPLIES on AMAZON ❤️ MY BELOVED FACEBOOK GROUP ❤️ FOLLOW ME ON INSTAGRAM
Today's CREEPY skull watercolor project for Halloween was a special request from my students over at Awesome Art School! If you're not sure how to draw a skull, don't worry - I guide you through the skull drawing step by step. Then we'll bring it to life with one of my favorite art supplies that works JUST like watercolor - Noodler's Ink!
If you're curious how I paint with fountain pen ink, complete this project with so few art supplies, or if you're just in the mood for a spooky mixed media Halloween art project, hop over to YouTube because today's Halloween watercolor video is FOR YOU. 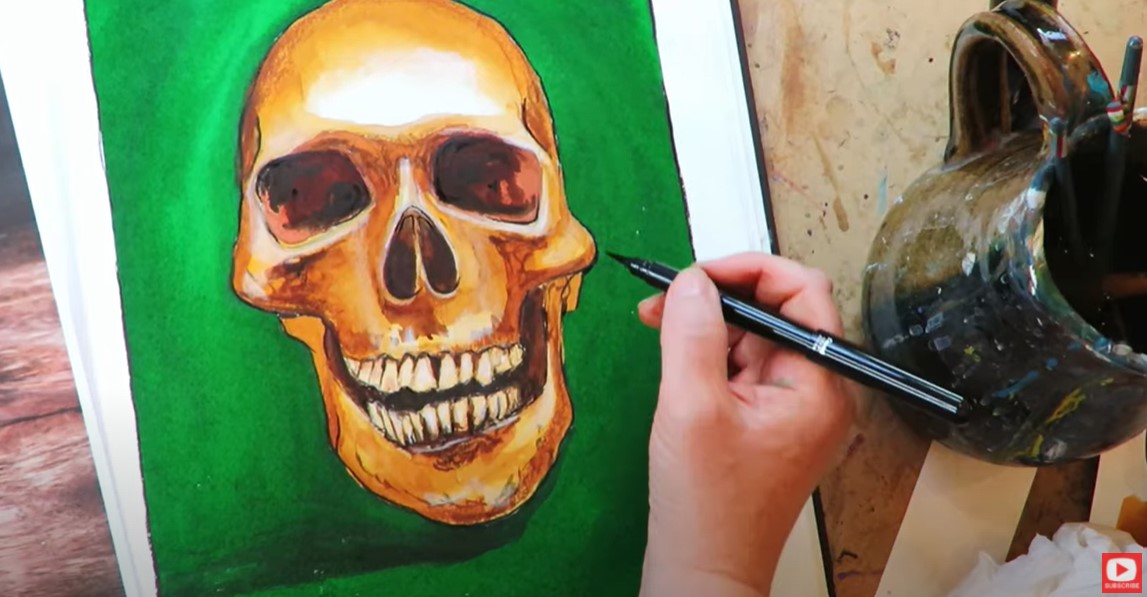
Before we continue, super quick announcement: All product links are Affiliate. I may earn a small commission if you choose to order through these links but by law there is never any additional cost to the consumer for doing so. I thank you for your support
I created today's tutorial project in my Strathmore Watercolor Journal. It's filled with cold press (textured), 140# paper. If you're new to art-ing with me - I LOVE using this watercolor journal for my mixed media work because the paper is so hearty. It can really take a beating from whatever layers and art supplies I want to throw at it, and has become one of my go-tos over the years.
If you're new to mixed media art, looking for mixed media examples, or clear instructions on how to layer your mixed media art supplies so you can make a masterpiece instead of a mess, look no further! I've been teaching my 7-step "Hamburger System" for almost 2 years now and it's been a game changer for SO many students. 
While the Hamburger System is my main mixed media layering process I use when creating full blown mixed media portraits (like the one above), sometimes I enjoy lightening up on the art supplies and layering.
I'm calling this condensed layering process "The Hot Dog System," and it's perfect for mixed media beginners!
There are just four simple layers in my Hot Dog System:
I've put together a ginormous 32-page PDF (you're welcome!), giving you examples of 4-art supply layer combos- HOT DOG STYLE- not just from me, but from TWENTY of my artsy friends to inspire you! Click the button below to download this FREE 32-page stack of cheatsheets just filled with Hot Dog System inspiration! 
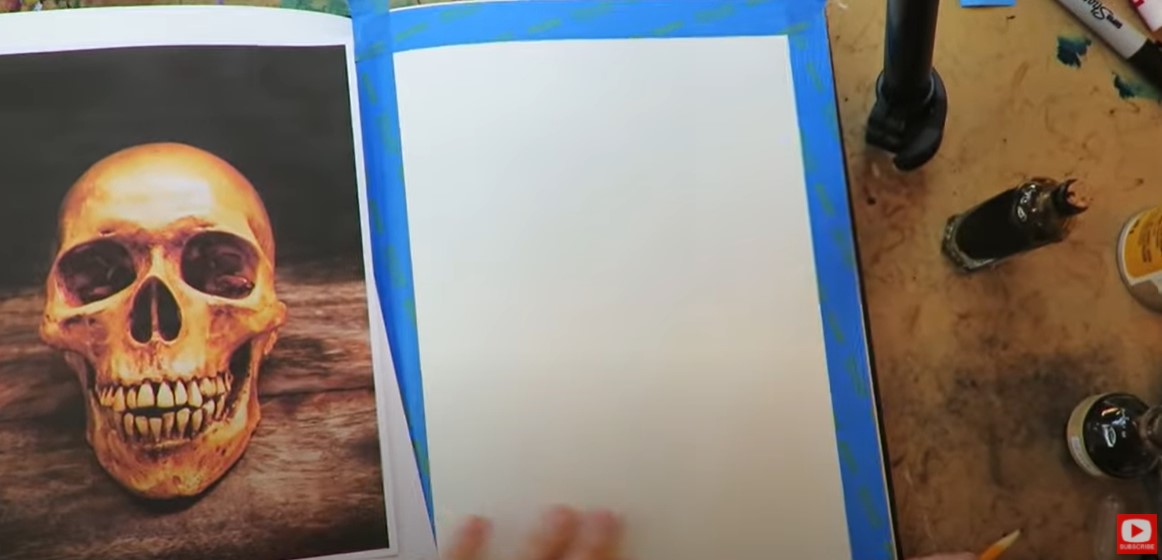
A copy of today's skull drawing reference is included in the above cheatsheet packet, so be sure to click that button and get a copy so you can create along with me!
If you're not sure how to draw a skull, don't worry- I take the skull drawing step by step in this tutorial. 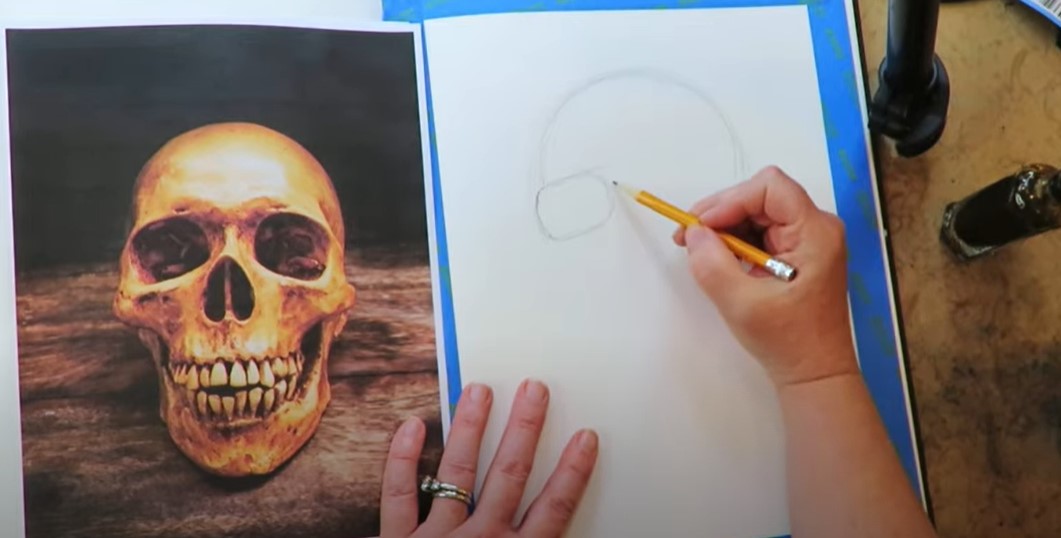
Drawing a skull is like drawing anything - we just break it down and take it shape by shape, starting from the top.
I saw a large circle at the top of the skull and basically decided to warm myself up by sketching a few light circles until I got the shape I wanted and saw in my reference image.
Once I got a bit further down the face of my skull drawing, I started cracking myself up, because my drawing looked like I'm actually drawing Darth Vader! LOL! I swear I'm NOT - he just looked this way before I started drawing the mouth.

When I sketched in the lower jaw and blocked off the area for the teeth, I was seriously reminded of the smiling Italian woman from my Whimsical Women of the World series on my drawing channel last year! She was another student request (how to draw a smiling mouth with teeth), that I created a lesson around just for my students (see below).
For me, drawing teeth is a laborious process (hence why MOST of my whimsical faces and mixed media portraits have closed mouths!).
In all seriousness though, I think the biggest mistake people make when drawing teeth is drawing them all straight, perfect and the SAME. Check out how each tooth below has an individual, unique (and wonktastic) shape. It might look crazy - but I'm just drawing in the shapes I see in my reference photo. 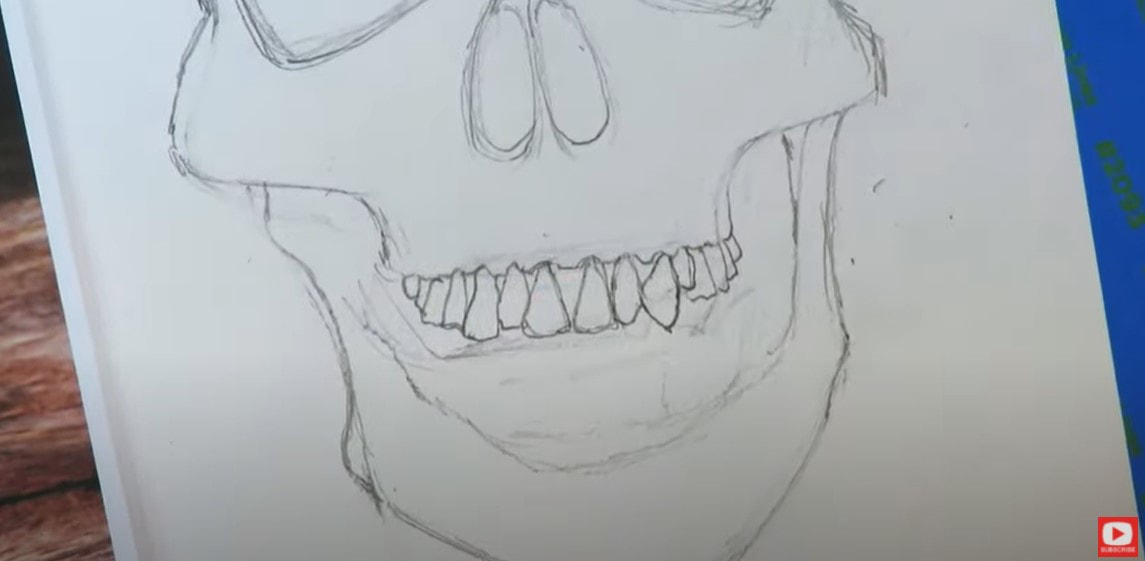
As soon as the upper teeth were sketched in, I headed into that bottom row to knock them out so we could move on with the drawing and get to my favorite part - shading!
In today's tutorial, I shaded with one of my favorite mixed media art supplies - fountain pen inks. Most people use these for writing or even drawing, but I use them exactly like I do my watercolors, and PAINT with them! If you're new to painting with fountain pen inks, check out this playlist. It's got your name all over it! If you love watercolor - this is definitely something you HAVE to try. 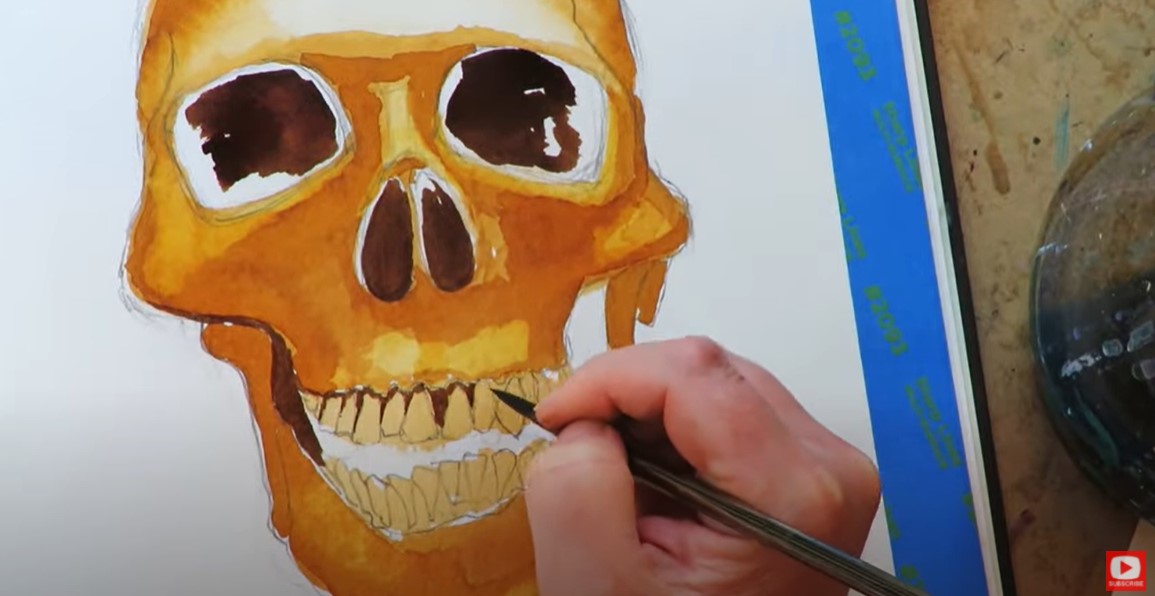
I layered a variety of ink shades (Hot Dog Layer #2: Noodler's Ink) carefully on top of the previous layer (once the previous layer was dry), and worked from light to dark to shade my drawing to look like the skull drawing reference image (Click here if you want to grab a download of the drawing reference and all my HOT DOG SYSTEM layering tips with inspo from 20 of my artsy friends!!).
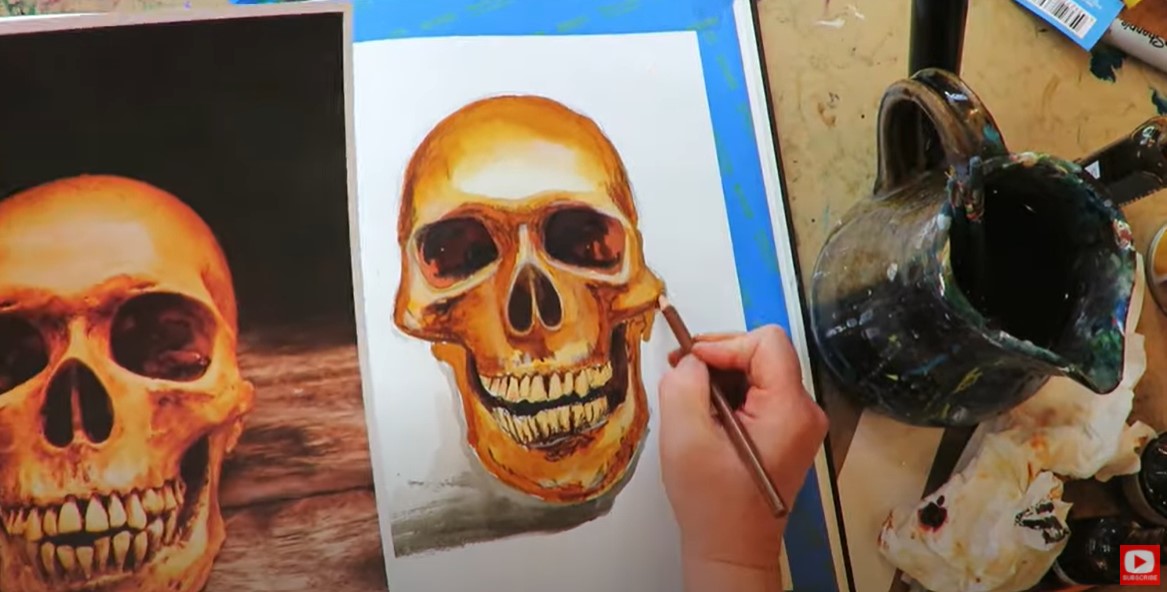
When I was happy with my "watercoloring," I moved on to incorporate colored pencils to smooth my transitions and work in some highlights (Hot Dog Layer #3).
Once those were in a good place, I pulled the tape off my journal page and started doodling in my 4th layer with my pentel pocket brush (Hot Dog Layer #4), and...DONE! I hope you enjoyed today's project and take some time to go through the helpful PDF I've put together for you!! I think you'll love seeing the mixed media inspiration from not only me, but from TWENTY of my artsy friends who also enjoy creating mixed media art journal pages and canvases with fewer supplies!! Thanks for hanging out with me today! ❤️ CHECK OUT ALL my art books on AMAZON ❤️ MY FAVORITE ART SUPPLIES on AMAZON ❤️ MY BELOVED FACEBOOK GROUP ❤️ FOLLOW ME ON INSTAGRAM |
Karen CampbellFounder of Awesome Art School. Mixed Media Artist. Author of 19 Instructional Art Books! 
Whose work has appeared in...
   
 Archives
July 2024
Categories
All
|
 RSS Feed

"Karen is flipping hilarious and she's very real...I like the way she teaches in a way that really gives you confidence, whether you're a beginner or advanced there's always something new to learn!"
- Elizabeth W. |
What Fans Are SayingKaren, you are absolutely fabulous! You make me feel like I can draw anything. I have recently retired and finally have the time to do some of the art that I have loved since I was in school. I am really at the beginning of my art journey and I hope to learn as much as I can. Thank you for all you do. |
Contact ME |