
|
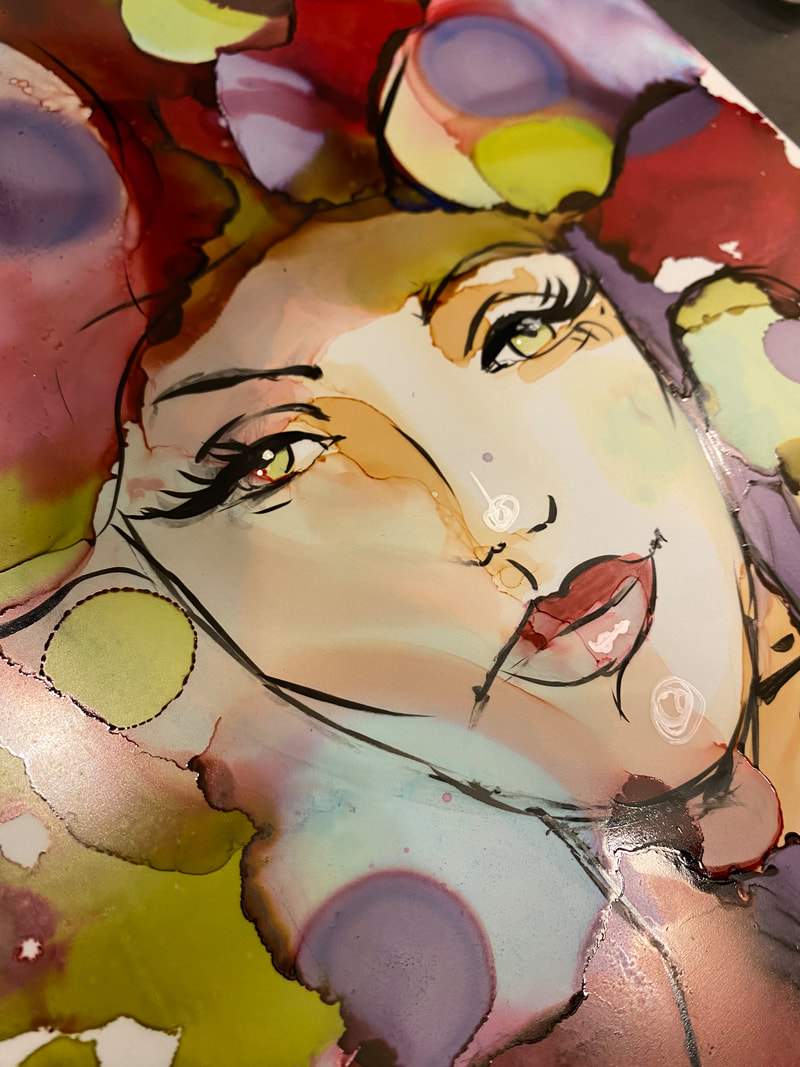
I've NEVER created a mixed media portrait by doing alcohol painting on yupo paper... until today!
In fact, everything about today's mixed media tutorial was kind of a science experiment- from trying this crazy alcohol ink paper to my trial and error mixed media painting techniques and my NEW 2 camera setup.
Love the eyelashes on this girlie? Me too! Lots of my students have shared that drawing eyelashes is hard for them, so if you're feeling the same, you're NOT alone. I created a FREE, super simple eyelashes cheatsheet for you with THREE things to remember each time you're drawing eyeashes.
Simply click the button below and I'll send it straight to your inbox! 
Real quick, before we continue- All product links are Affiliate. I may earn a small commission if you choose to order through these links, but by law, there is never any additional cost to the consumer for doing so. I thank you for your support!
Today's mixed media art book review is of Mixed Media Portraits with Pam Carriker. If you've been following me for a while, you know I'm OBSESSED with creating mixed media portraits.
Flipping through mixed media art book like Pam's gets me thinking outside of my own style, and can totally inspire me to try something new, outside my comfort zone... like alcohol ink painting! If you get this book too, today's project in Pam's book is called "Yippie for Yupo." Stay with me till the end of this video for a sneak peek at Pam's entire book! 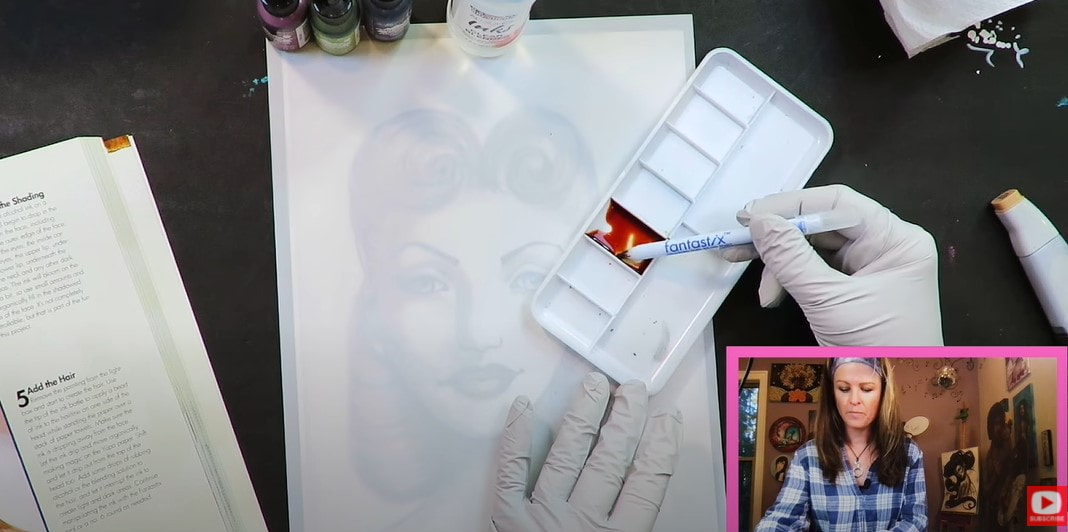
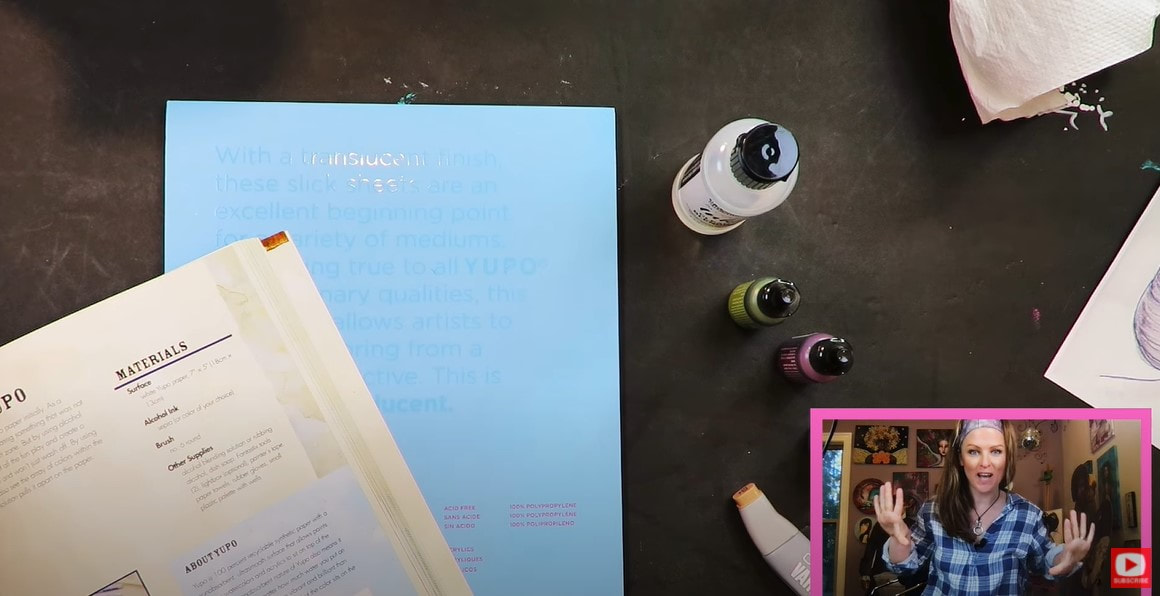
I don't know about you, but I've worked with yupo paper exactly ONCE before today's video. LOL! So I really have no idea what to expect, which is actually kinda FUN, right?! I get emails every day asking me how to do various techniques or if I've ever tried a particular combo of art supplies.
I almost always answer with the same response! I've learned SO much just from experimenting and trying new things. You never know how something will work until you try it. So my advice is ALWAYS live and learn. You might discover something amazing and fall in love with it! Some of the supplies needed for this project were totally new to me like these random sticks called Fantastix (below). 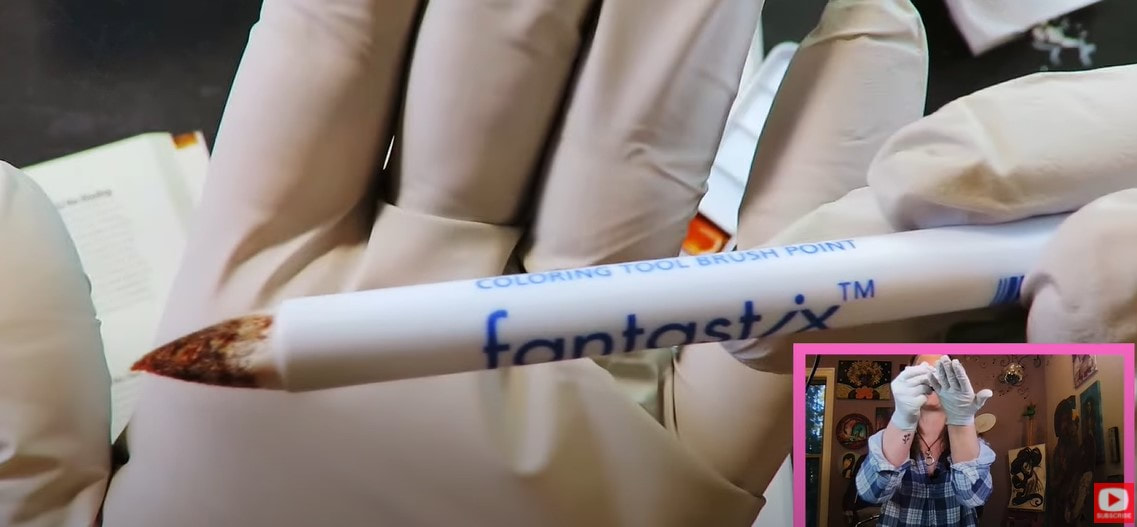
It didn't take me long to get what these little guys do. They feel a bit like styrofoam, and immediately soak up whatever you dip them into, just like a sponge. It was a little like I'd made my own alcohol marker here, but using it on paper felt similar to watercoloring.
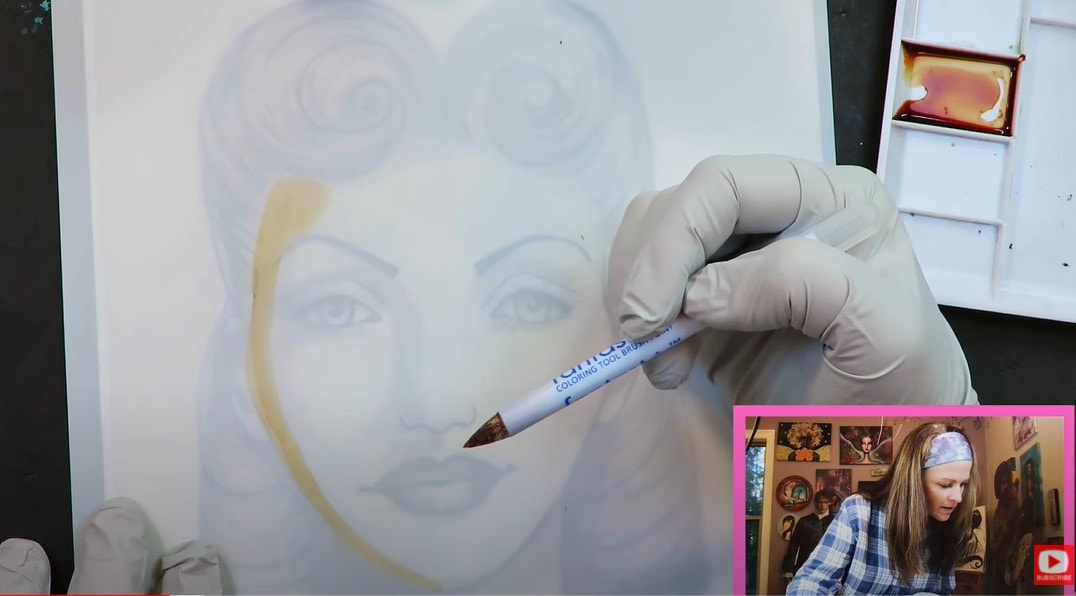
The first part of this project started with laying down the mid tones of the face shading (above). In the book, Pam suggests using a light table, but I was able to see just fine without, so just used my yupo paper like tracing paper on top of a recent graphite drawing I'd done.
If you like the look of this female face drawing in the video and want to learn how to draw her with me, I've got an online art class coming up called Art Retro Rendezvous. It starts on Valentine's Day (2022), and only costs $15 (only through this special link) if you sign up to party with me before that day. There will be 10 drawing lessons spread out over 5 days! 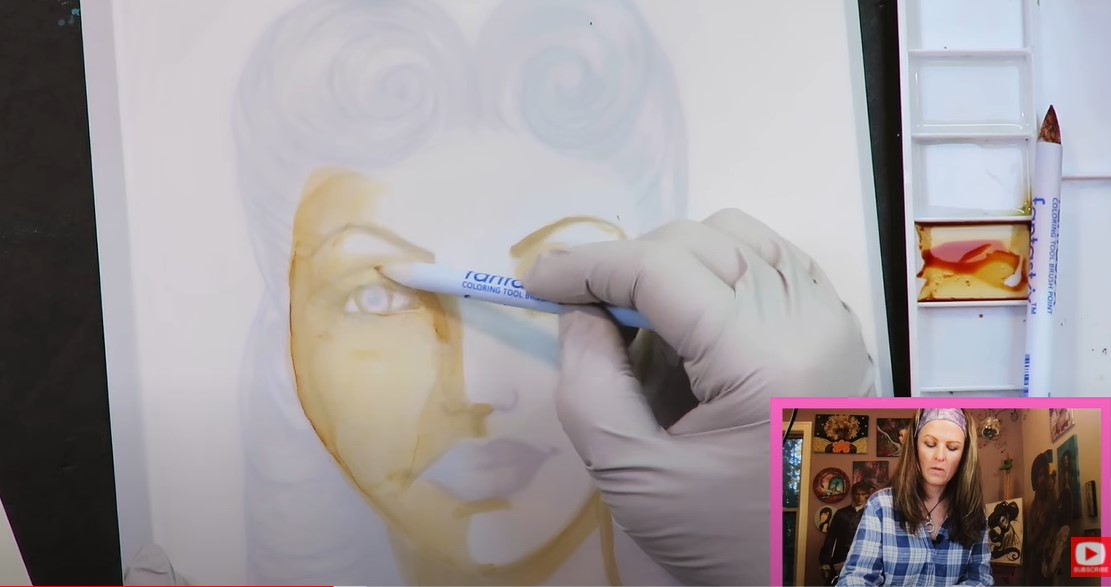
Back to today's project!
When I first started shading this face with the fantastix stick (I *think* that's what I should call it?!), I was almost wishing for the control of my copic markers, but I tried to let it go, and embrace this new way of creating. It's definitely a bit more abstract than I'm used to. When it was time to blend out the mid tones to create some lighter areas on the face, I dipped a fresh fantastix stick into alcohol blending solution and pulled some of the color from the left edge of the face over to the cheeks. This was a really neat experiment - again using art supplies that are totally new to me. 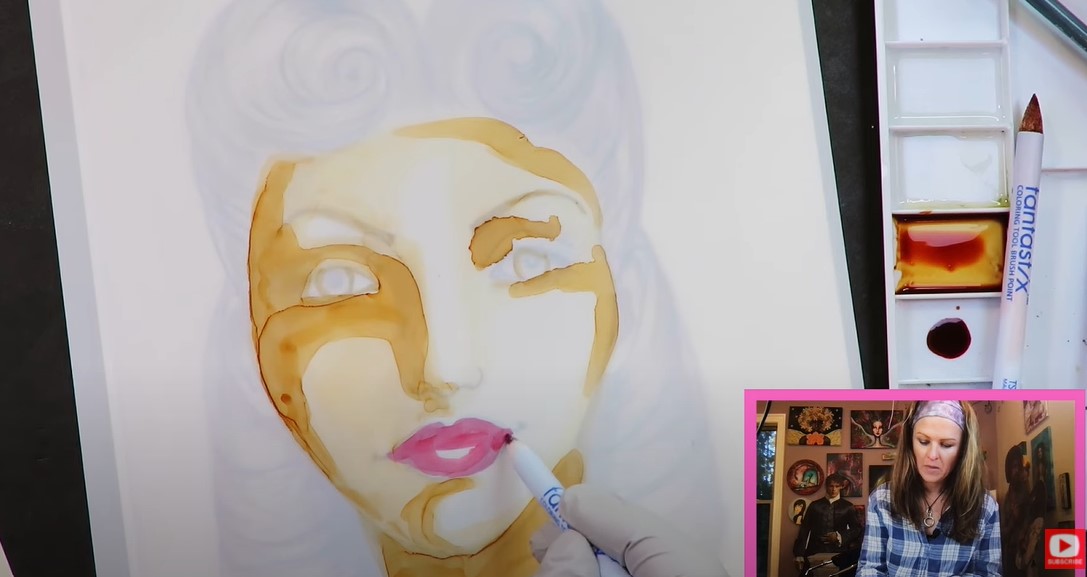
To put my own spin on the project, I decided to try using my pentel pocket brush to add some details on the face, since the rest of the project instruction appeared to be all about how to paint hair using alcohol inks. I didn't have the heart to leave my girl's face totally abstract, so I did a bit of doodling before moving on.
If you're not familiar with the pentel pocket brush, it's one of my favorite products to use for drawing eyelashes onto my drawings and mixed media portraits. If you'd like to learn more about it or how to draw eyelashes - I did a video about it on my mixed media channel, and another on my drawing channel. 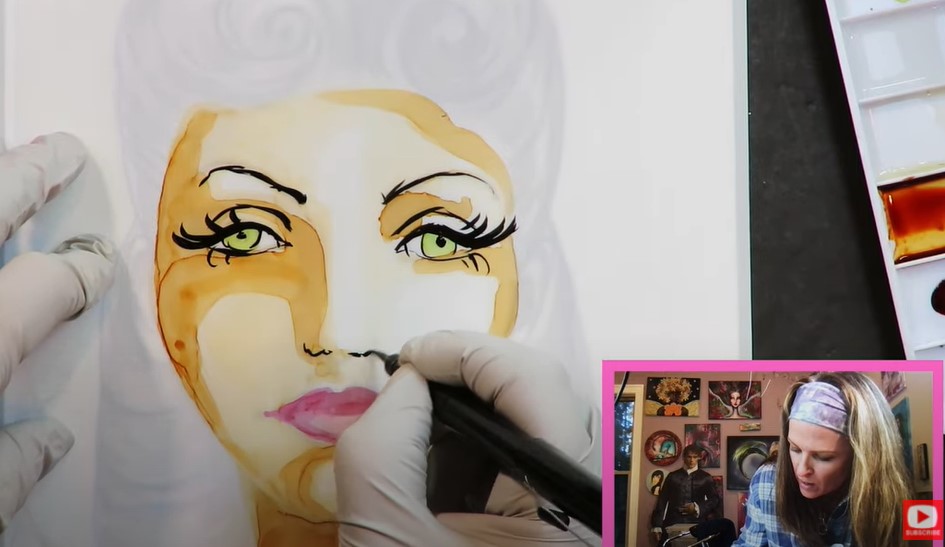
As soon as I started adding droplets of alcohol ink onto my paper, the project took an entirely FUN turn that I wasn't expecting. How gorgeous is that blooming purple ink for hair?!

I LOVE learning new mixed media techniques and this one is really turning out cool! The rest of the project is really all about experimenting with the inks - adding new drops of color, removing some color with the alcohol blending solution, and tipping my yupo paper around to see what effects I could get from letting the alcohol ink drip and run across the page.
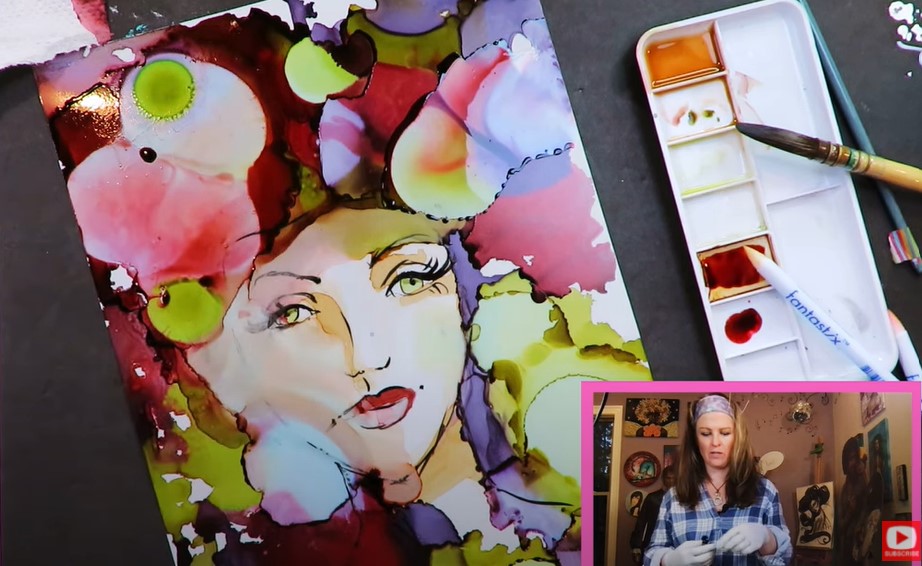
I kinda loved it! Although if I'm honest- it did bug me when the blooms of ink started to infringe a bit too much into the face.
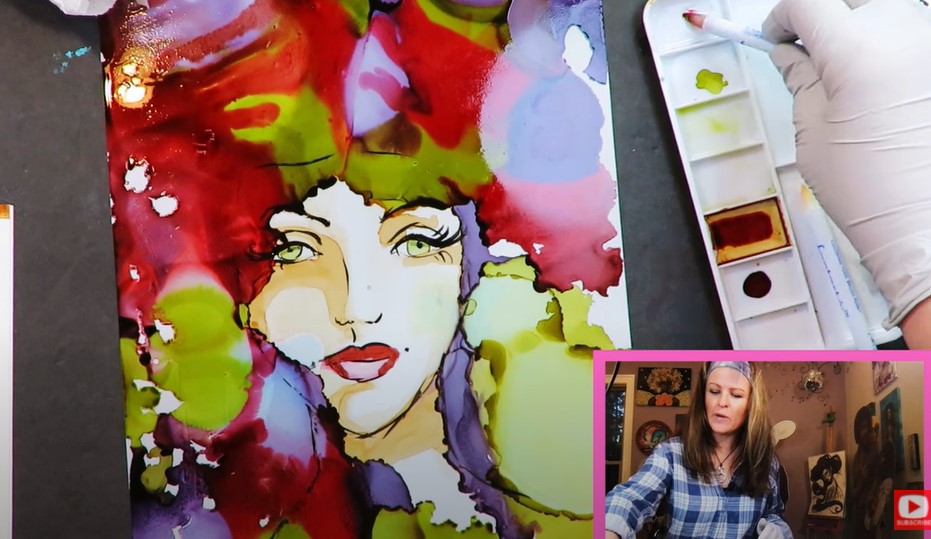
Make sure you click over to the video to see how this works in acton. Plus if you hang out with me for a few more minutes after the art project- I'm doing a quick flip through of Pam's book to show you even MORE fun mixed media ideas you can try at home!
Don't forget to SIGN UP FOR MY ART RETRO RENDEZVOUS with this special link for just $15. Beginners welcome (even if you've NEVER drawn a thing before!) 
Thanks for hanging out with me today! ❤️ CHECK OUT ALL MY ONLINE ART CLASSES & Art Clubs ❤️ CHECK OUT ALL my art books ❤️ MY FAVORITE ART SUPPLIES on AMAZON ❤️ MY BELOVED FACEBOOK GROUP
0 Comments
Need a FUN zentangle art project that's step by step and EASY enough to do even if you've never tried drawing before, or are just learning how to draw? You're in the right place!
In today's drawing video, you'll get a sneak peek at one of my favorite drawing books. It's jam packed with zentangle art ideas for beginners! You'll learn a little about my creative process (I LOVE flipping through art books for inspiration!), and why I'm drawn to certain zentangle art patterns over others.
Then you need to grab your favorite markers and fineliners so you can draw along with me in this CUTE and relaxing zentangle art tutorial- perfect for artists of all levels! 
If you're new to drawing and coloring with markers, make sure you grab my FREE Swatch Sheet so you can swatch your markers out before we get to the coloring portion of today's project. Simply click on the button below, and I'll send it straight to your email!

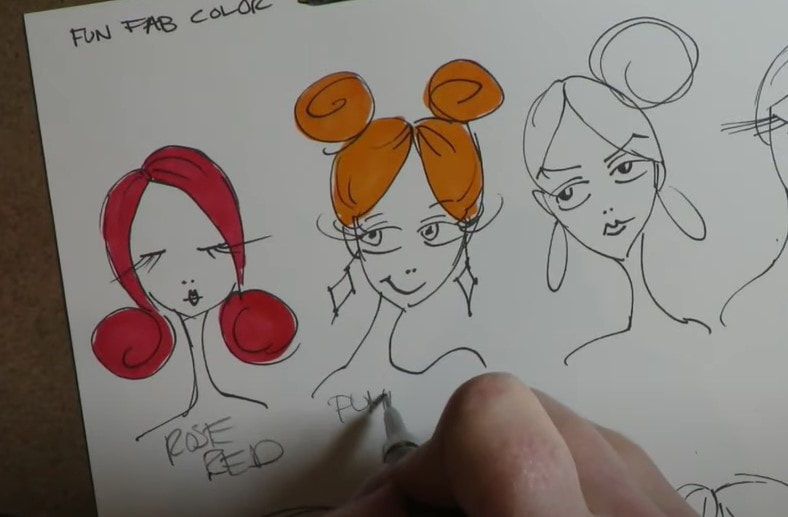
Whenever I get a new art supply with multiple colors - whether that's a new set of markers, watercolors, etc. - I ALWAYS swatch them out. That's because I learned the hard way that the color on the cap, tube or bottle often doesn't really look like what ends up on your paper. TRUST ME. Now my rule of thumb is to ALWAYS swatch. Here are a couple of the fun faces on my Swatch Sheet!
Before we continue, super quick announcement: All product links are Affiliate. I may earn a small commission if you choose to order through these links, but by law, there is never any additional cost to the consumer for doing so. I thank you for your support!
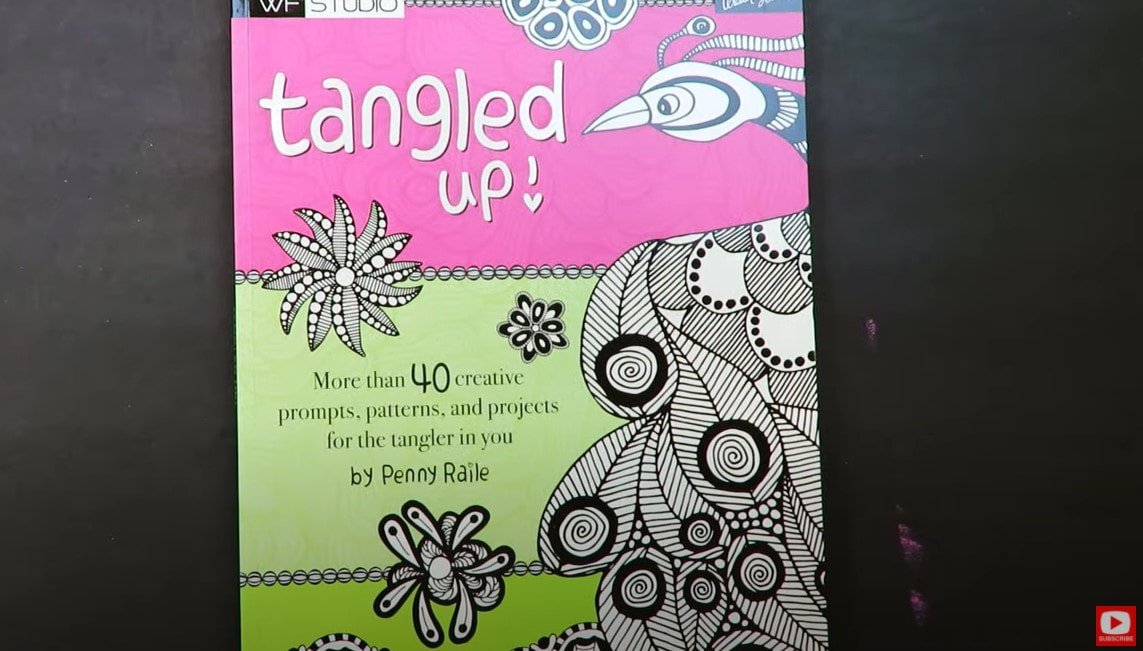
Today I'm reviewing a drawing book about zentangling from my personal art book collection called Tangled Up by Penny Raile. This Walter Foster Studio book is a great example of inspiration, paired with practical how-to instruction.
If you're new to zentangle art, zentangling is basically a form of line art that plays with repeating patterns and line weights (how thick or thin a line is). It's a super chill and mindless activity to do if you're feeling stressed, need an escape, or want to get creative but not spend forever working on a project.
Zentangling is also EXCELLENT for people interested in learning how to draw. In fact, it's one of the first lessons I teach to beginners in my Fun Fab Drawing Club because it's a simple way to warm you up for learning line variation (how thick or thin a line is), which segues beautifully into learning how to shade. 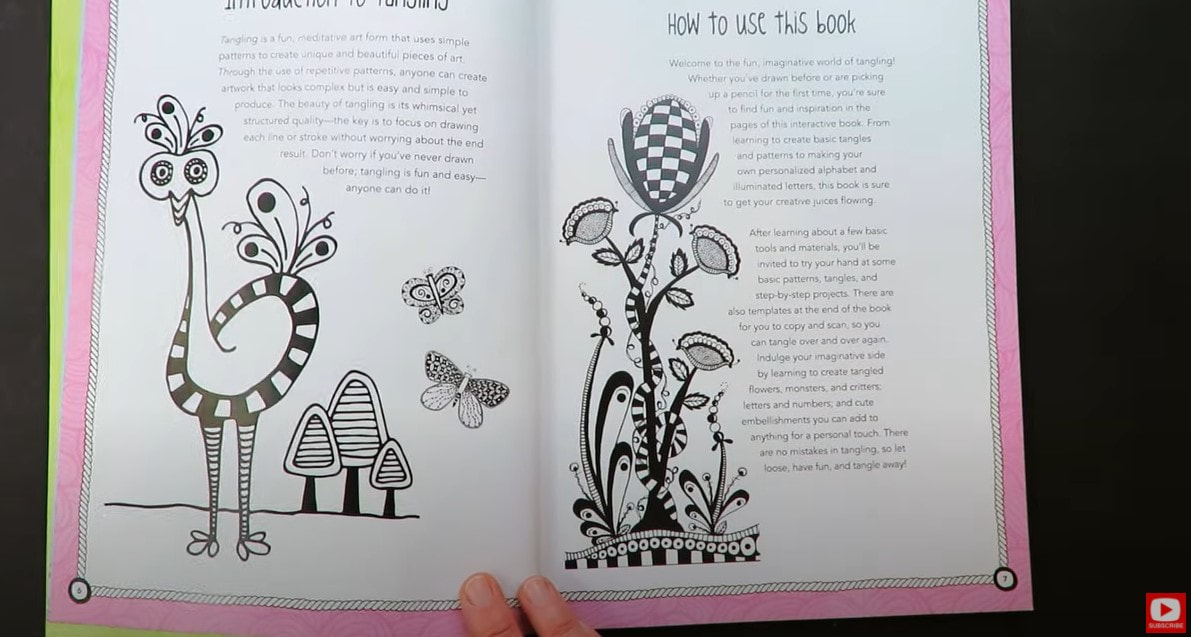
If you know me, and my work - I can be impatient and don't love spending a ton of time on details. ? That's the only part of zentangling that can feel a little annoying to me (teeny, intricate patterns)!
As soon as you open Tangled Up, you'll see LARGER zentangle pattern ideas, plus a lot of really simple patterns to try, which I totally appreciate! 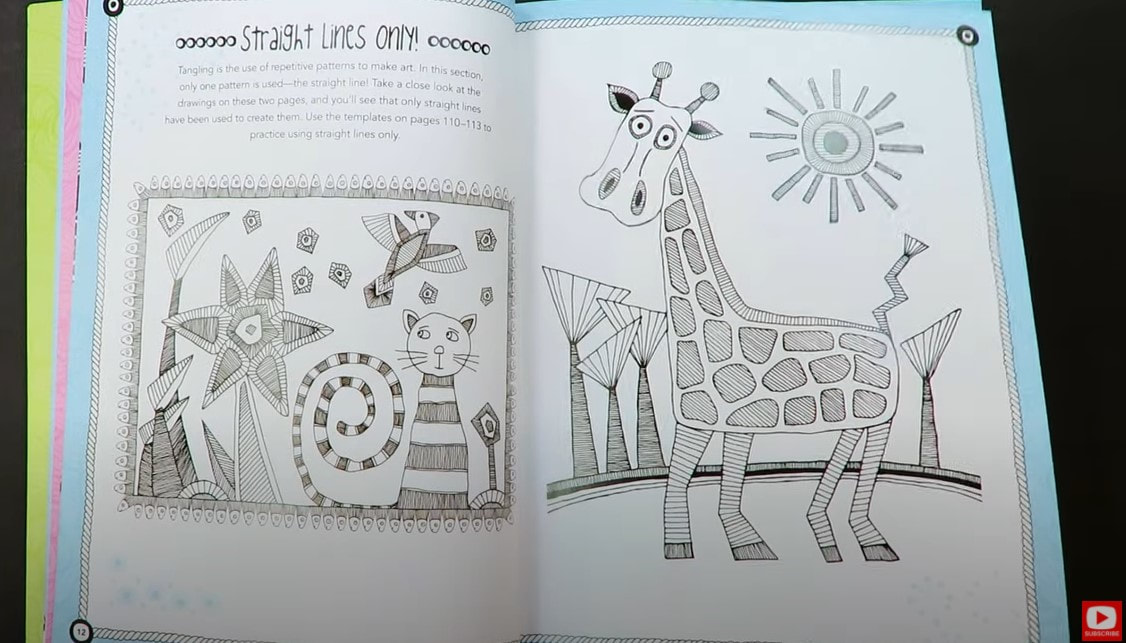
The first zentangle drawing project in chapter one ONLY uses a pattern of straight lines (above). I love that! Not complicated, not too fussy- it's perfect for beginners just learning how to draw (even kids), or anyone looking for a fun warmup drawing excercise!
The idea below is another great one to try with kids- simply use a cookie cutter as the project's stencil. 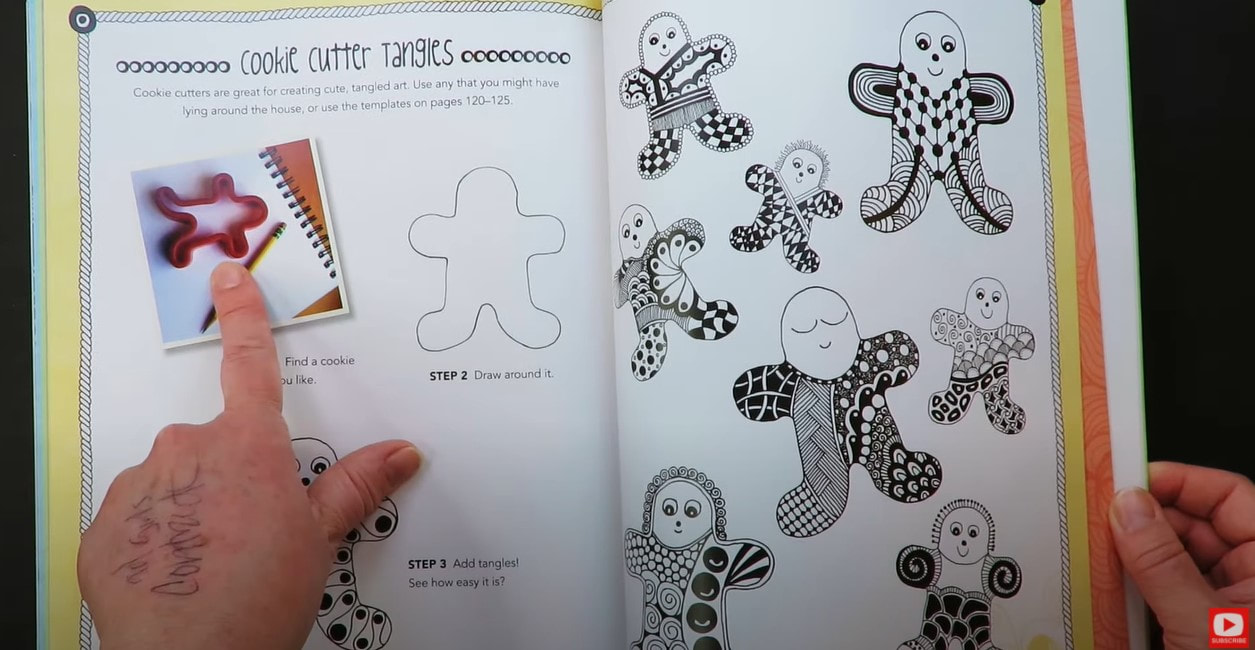
Tangled Up features some adorable zentangle pattern ideas throughout that would make fun borders around a drawing (below). There are also lots of examples with multi-line weights (line variation - showing lines in a variety of thicknesses. This is a really important introductory skill for drawing beginners.
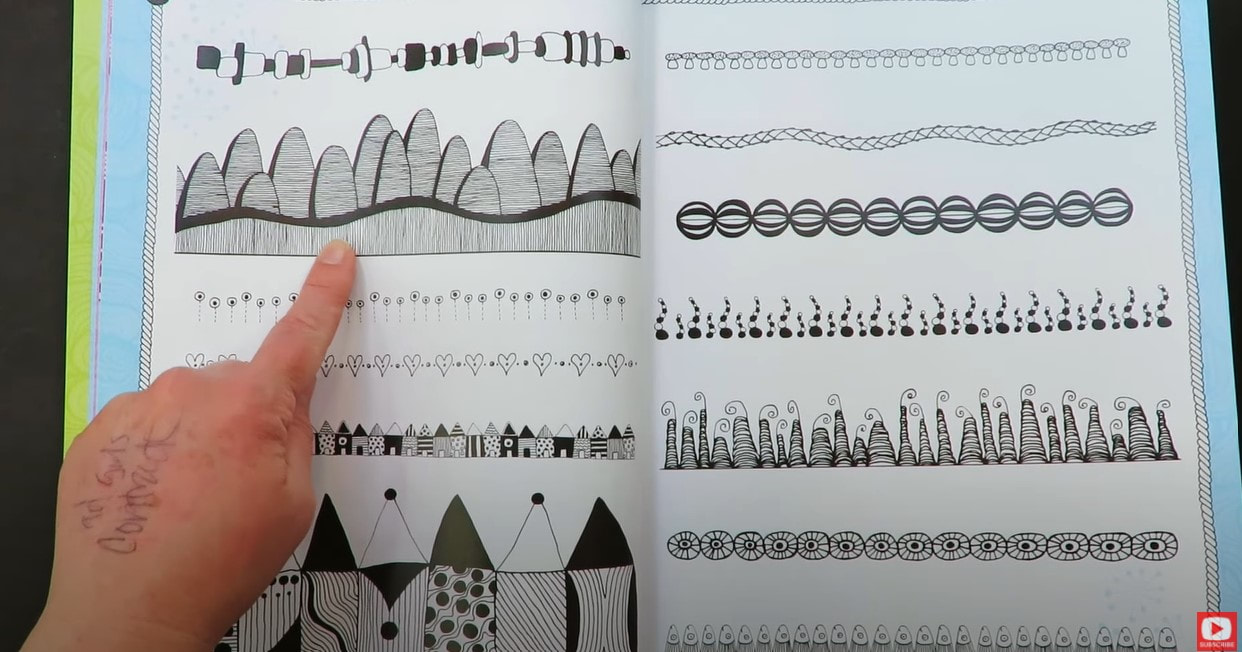
This book also shows you step by step how to draw fun shapes from arrows to ribbons, that you can fill with zentangles! I love this- nothing is rushed here in the instruction. It's all very simple to follow, so if you're a beginner, you're in great hands.
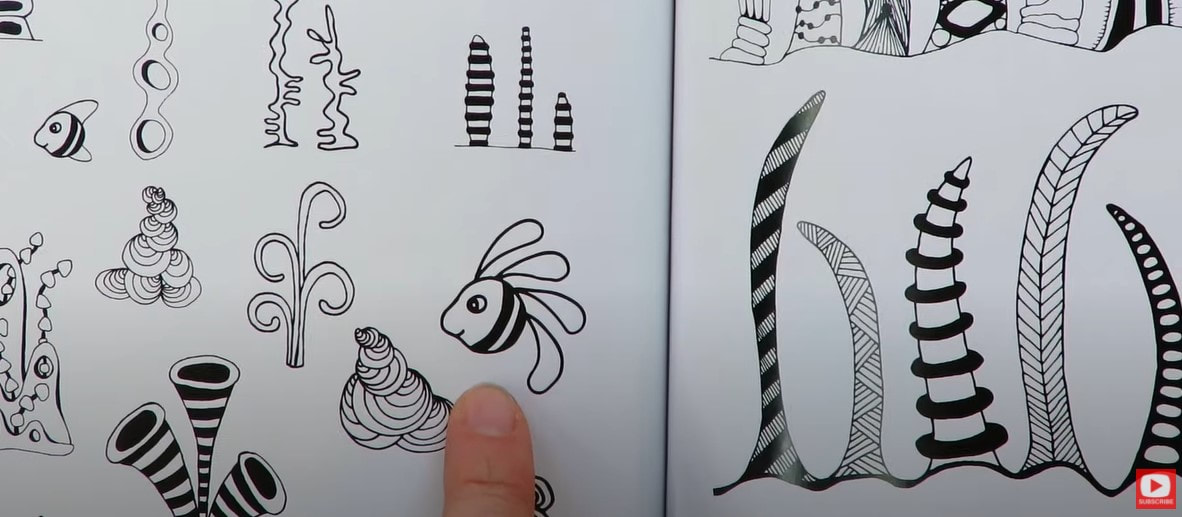
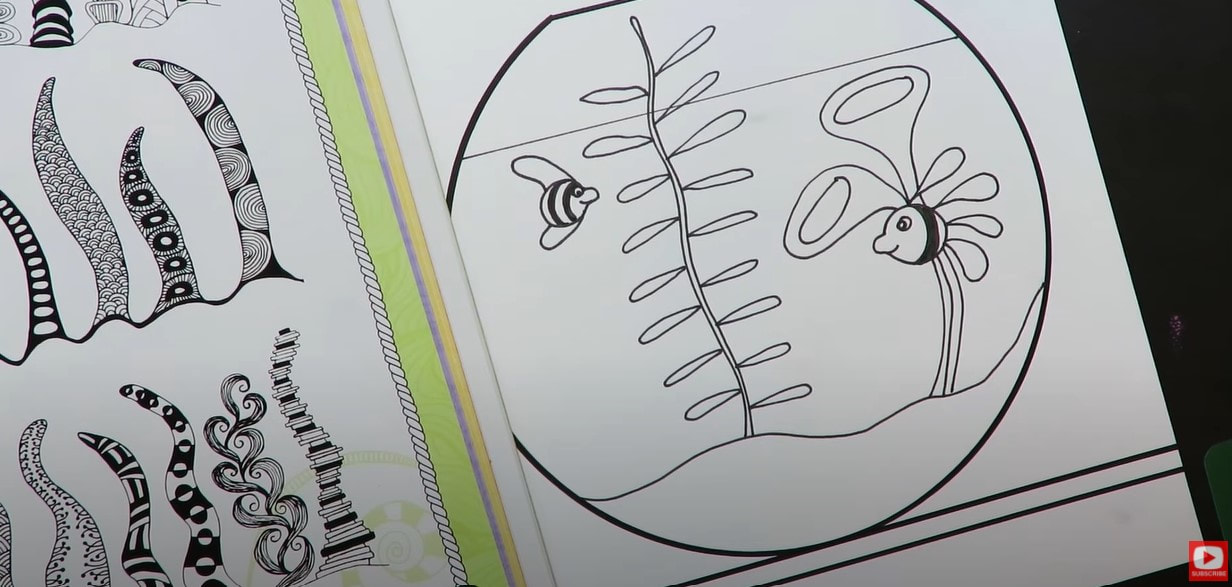
Today, I was totally inspired by the adorable little fish above! I decided it would be fun to put him center stage inside a fish bowl with some plants or coral.
Zentangling is an amazing activity to do when you're sad, stressed, or need some kind of escape and don't want to fuss with a complicated project. It can take your mind off of whatever is bothering you, and you can choose to make the project last for a short or long time based on your mood.
Get intricate with your patterns if you want the project to last longer, or keep your zentangle patterns large and simple to finish quicker (like me!). 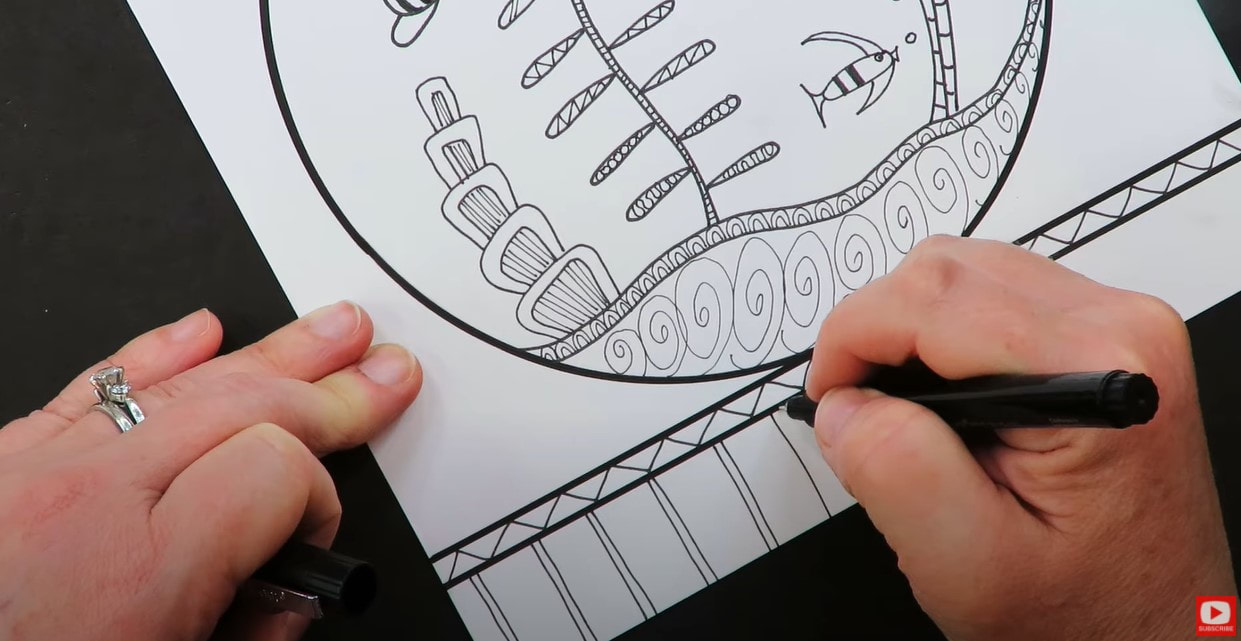
When you're ready to color your drawing, make sure you swatch your markers off to the side and label each shade before you dive into coloring so you don't get any surprises.
If you didn't do it already, download my FREE Swatch Sheet of faces and print as many copies as you need. 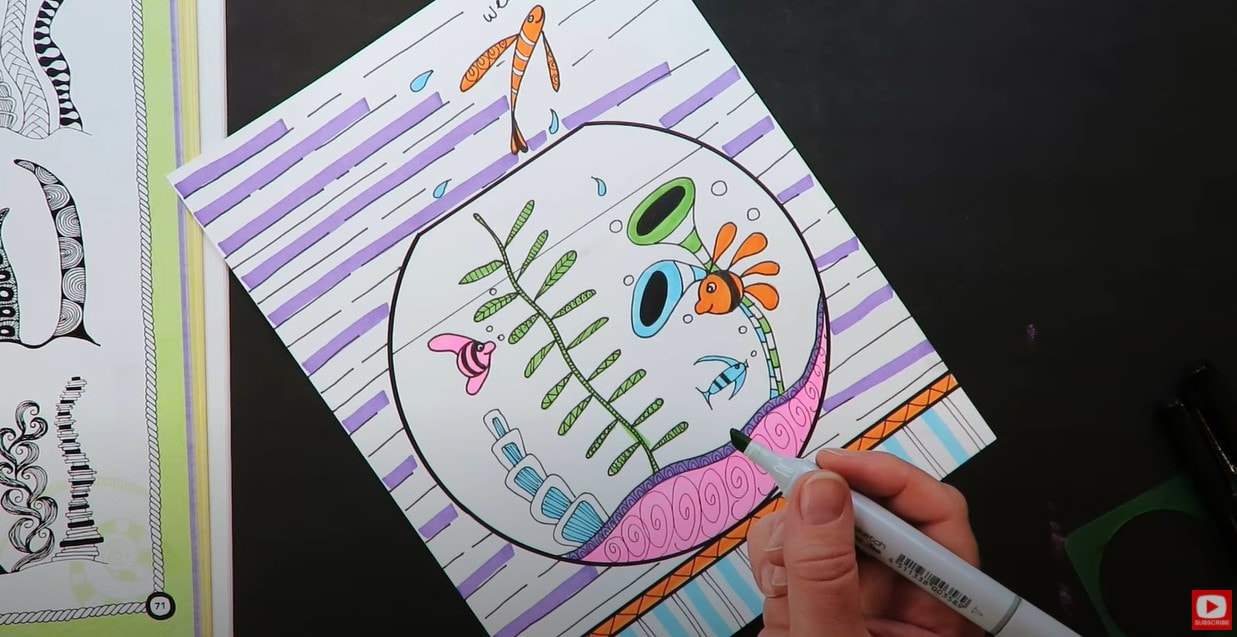
I used copic markers for my coloring today because I love them, and that's what I had on hand. Use whatever you've got on hand.
The art supplies don't matter, what matters is that you just draw... and have FUN while you're doing it. I hope you enjoy today's zentangle art project and completely LOVE Tangled Up if you decide to get it. Oh, and just a word of warning... zentangling is a little addictive. Once you start, it's kinda hard to stop! Thanks for hanging out with me today! ❤️ CHECK OUT ALL MY ONLINE ART CLASSES & Art Clubs ❤️ CHECK OUT ALL my art books ❤️ MY FAVORITE ART SUPPLIES on AMAZON ❤️ MY BELOVED FACEBOOK GROUP 8 CHEAP & EASY Mixed Media Art Ideas I Haven't Tried Yet! [Stenciling & Stamping Techniques]11/1/2022
Need NEW mixed media art ideas? Whether you're a mixed media beginner, or a seasoned mixed media artist like me, flipping through a gorgeous art book is one of THE BEST THINGS you can do for creative inspiration.
In today's art video you'll get a sneak peek at one of my favorite mixed media art books, followed by a demo of the 8 CHEAP & EASY stamping & stenciling techniques this book inspired me to try for the first time in my own mixed media sketchbook!
If you're new to the world of mixed media art, and not sure how to layer your supplies for success - you're in the right place! Beginners are my specialty.
Make sure you download my FREE cheatsheet outlining my signature mixed media layering process calledThe Hamburger System. It tells you exactly HOW to layer your mixed media art supplies so you can make a masterpiece, instead of a hot mess! Simply click the button below and I'll send it straight to your inbox!
When you're done with today's video, I've got an awesome YouTube series to go with this cheatsheet, so look for that link at the bottom :)
Real quick, before we continue- All product links are Affiliate. I may earn a small commission if you choose to order through these links, but by law, there is never any additional cost to the consumer for doing so. I thank you for your support! 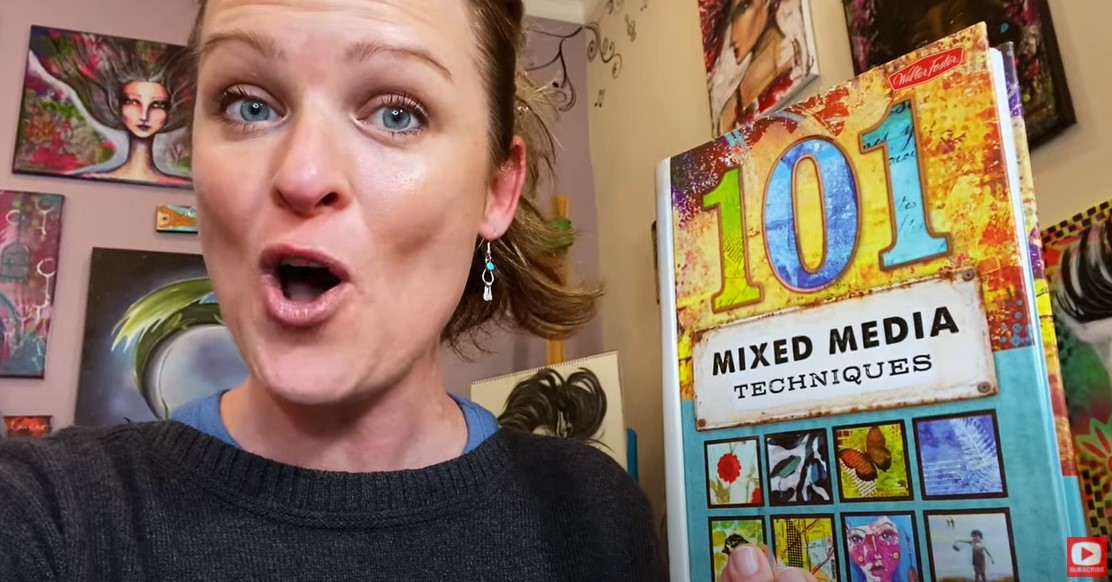
Today's mixed media art book review is of 101 Mixed Media Techniques, by Walter Foster.
This book is jam packed with 128 pages of mixed media art techniques. It's an excellent addition to any art book collection and will definitely get your creative juices flowing.
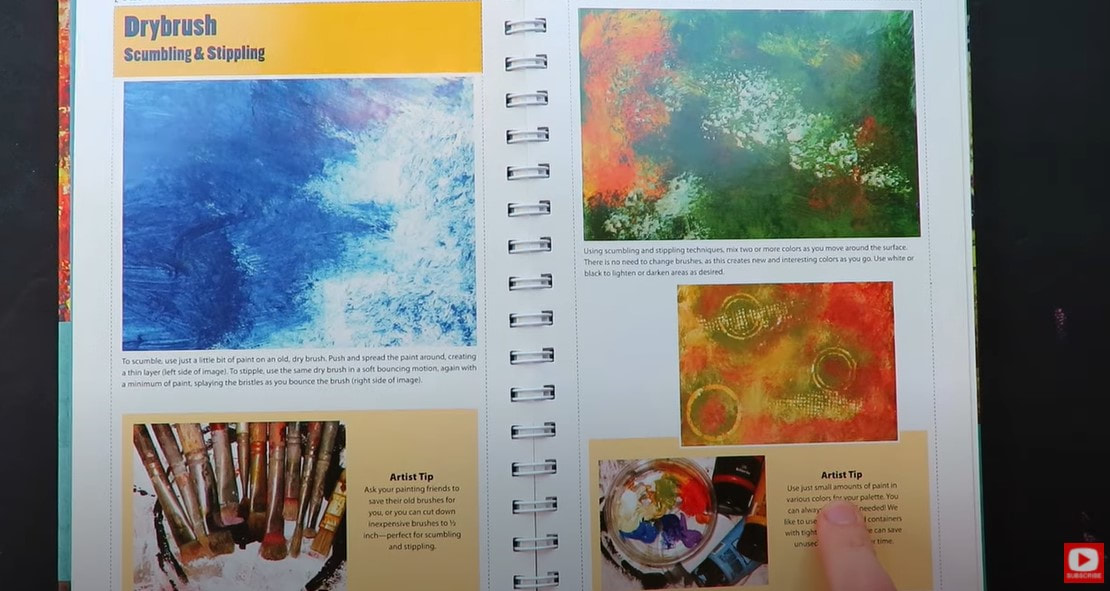
What I really love in this book are the "Artist Tip" boxes that you'll find scattered throughout. I actually think these little pointers are better than most of the book content!
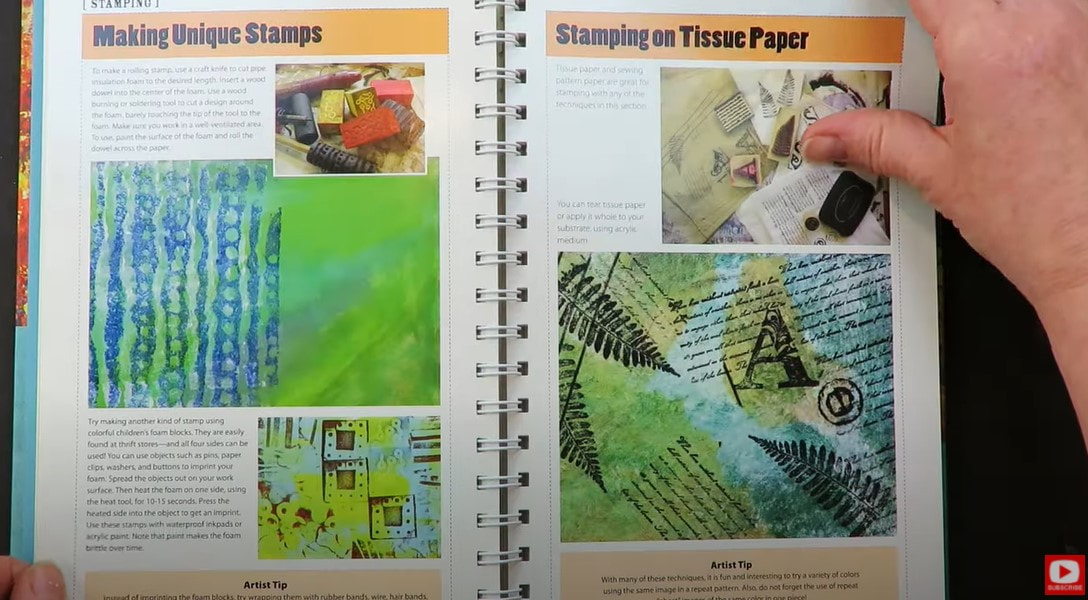
Each chapter of 101 Mixed Media Techniques is written by a different artist so you can really get some unique perspectives. The tip below came from a section in the book about stenciling and stamping techniques. It got me thinking out of the box, motivated me to take a little field trip around my house looking for new mixed media ideas to try, and inspired today's entire video!

I easily found eight random objects lying around my house just waiting for me to experiment with in my mixed media sketchbook.
The first item I decided to test out is actually the inside squeaker of a dog toy that was headed for the trash! How funny is that?!
Check out the whimsical polka dots I created when I ran this ball through some acrylic paint and upcycled it into a stamp! 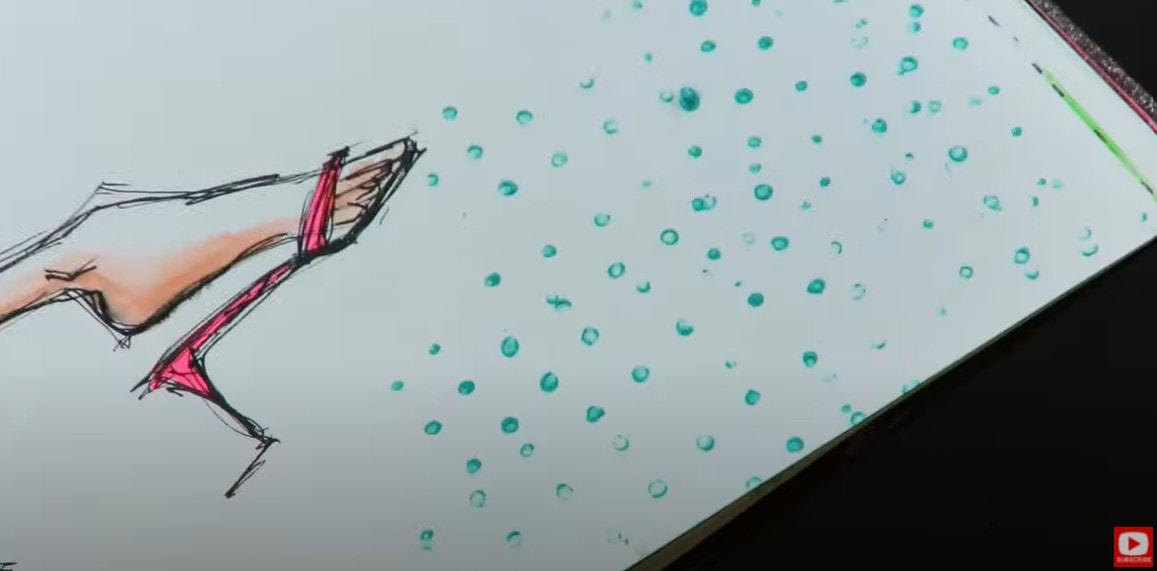
The next item I decided to try as a stamp was a shot glass!
Lots of mixed media artists have done videos using empty toilet paper rolls or paper towel rolls to stamp circles onto their canvases or art journal pages. What I don't love about these empty rolls is they can bend, and don't make perfect cirlces. I decided to try stamping circles onto my art journal page with a shot glass. Look how great that turned out!! 
Simply grab a glass from your kitchen that you don't care about, or pick one up at a thrift shop, and turn it into a mixed media stamp for yourself!
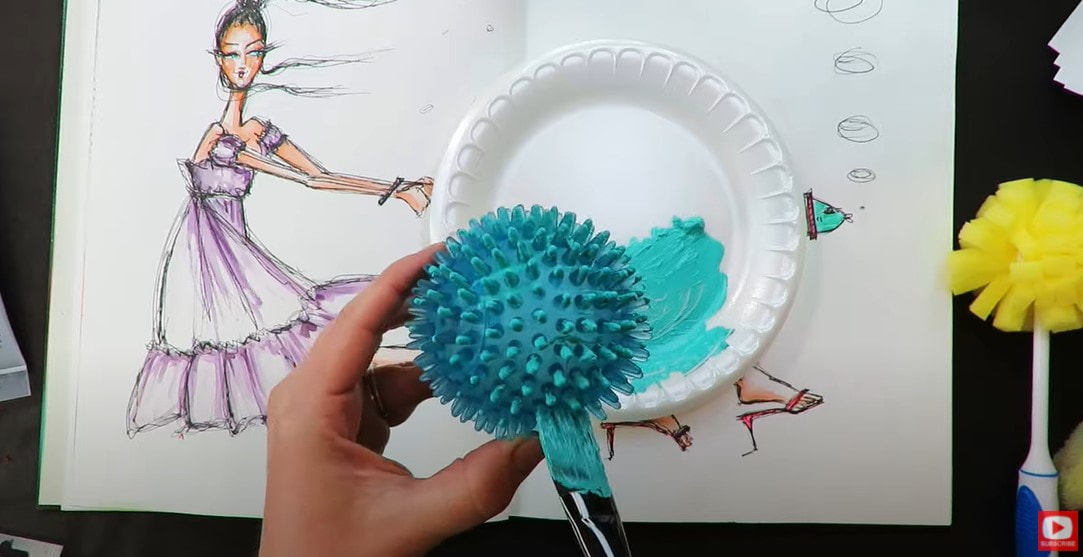
Ages ago, I bought a spongey toilet scrubber from the dollar store and set it aside to try as a paintbrush or stamp. Today was the perfect day to bust it out! 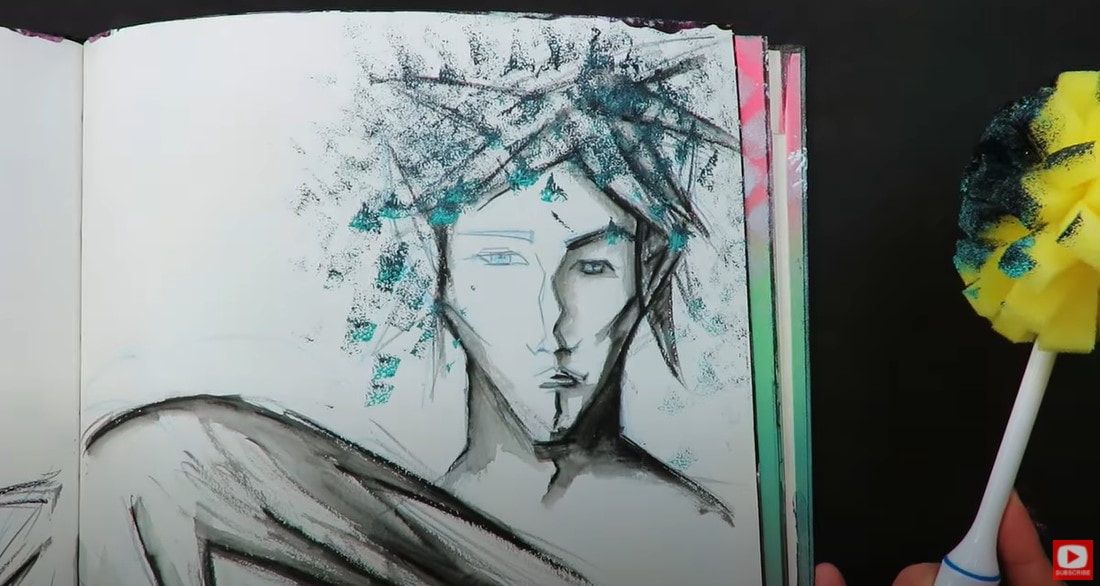
I dabbed the scrubber into 2 colors of acrylic paint and stamped it as hair around an old face doodle in my art journal. Look at how amazing THIS looks!! Total win!!
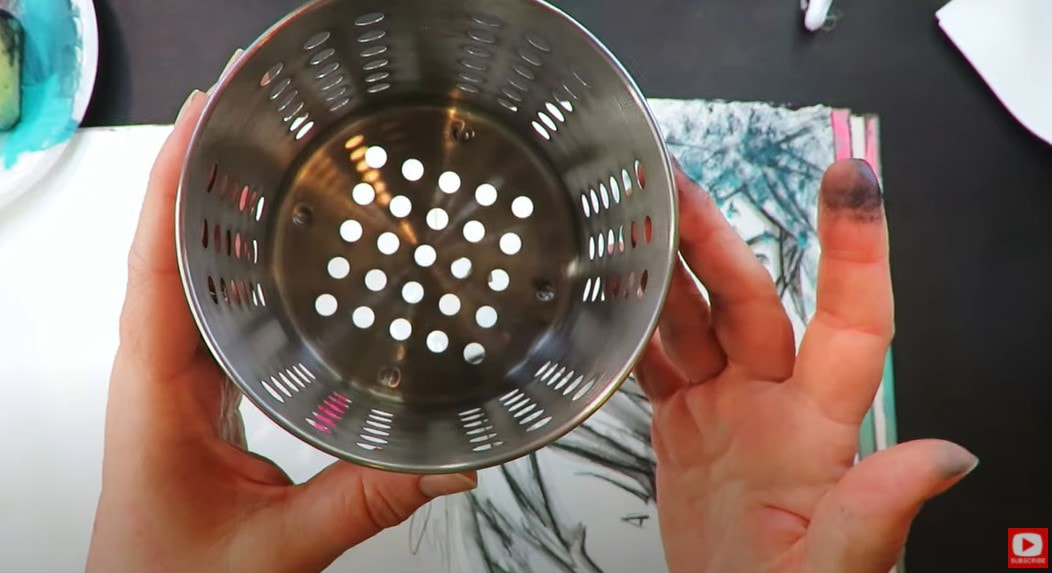
This next object I decided to try was a slotted spoon. I tested out a couple of ways to turn this into an upcycled mixed media stencil, and love the effect I got when swiping over the negative space with a sponge covered in acrylic paint. 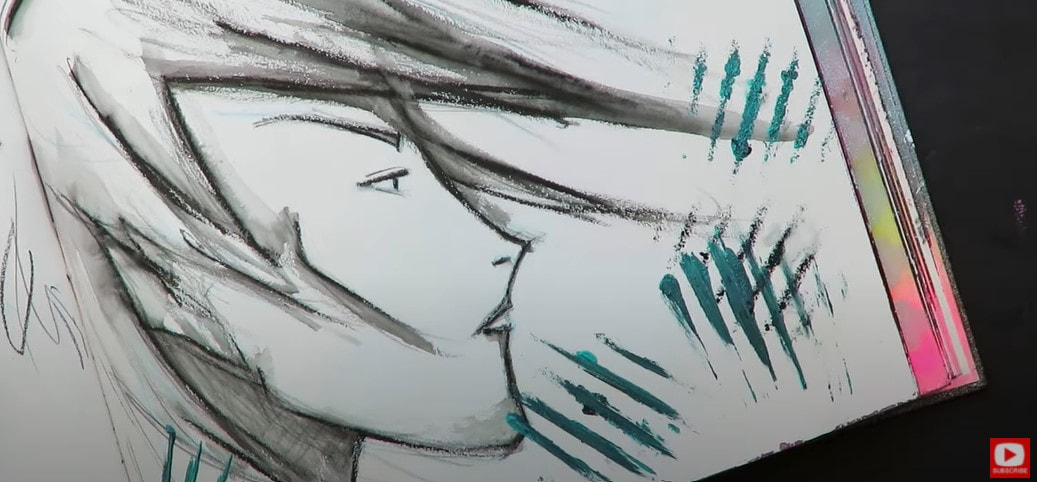
As I mentioned, I LOVE creating the look of polka dots and circles. I have a zillion of these utencil holders from Ikea (below), and the bottom of each just happens to have the perfect pattern to try as a stencil.
I like how that worked, but still might love bubble wrap even more! I'll show you that technique at the end of this demo.
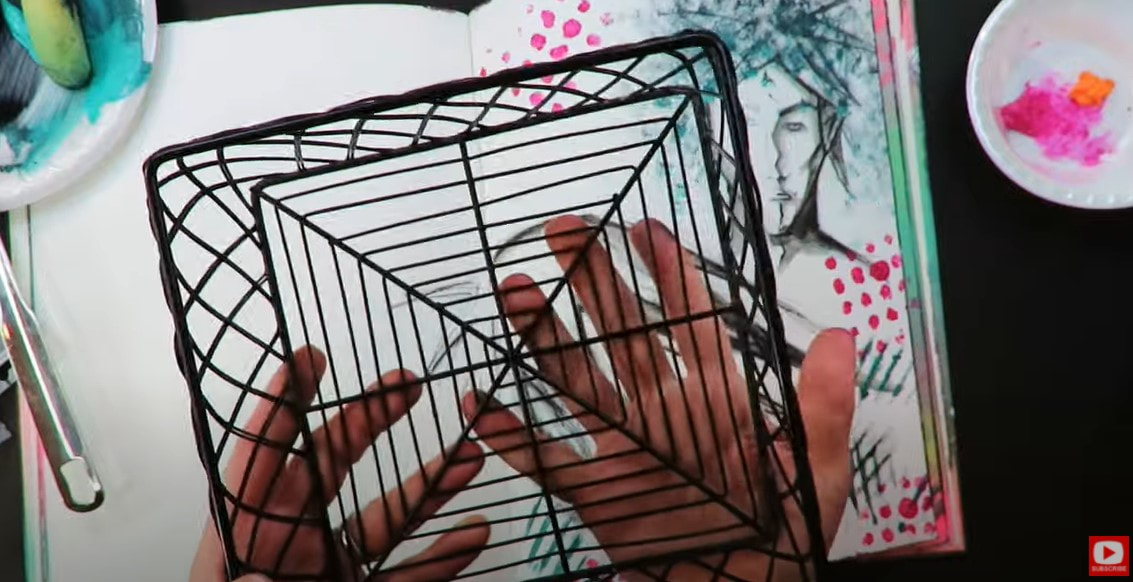
While I was in my kitchen, I noticed my napkin holder could be a two for one win as a stencil, with the unique patterns on the bottom and the sides!
Check out how amazing this looks (bottom right corner) when I added two colors of acrylic paint to a sponge, and swiped that sponge through the side of my napkin holder! 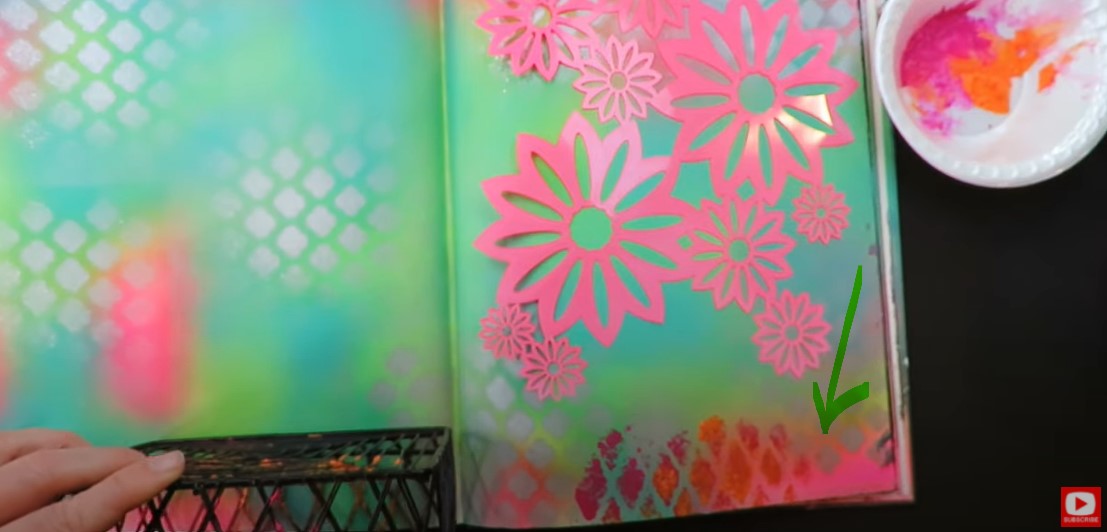
Another object I tried using was a fragment of the pouch my clementines came in. I tried it this material as both a stamp and stencil, and found I really loved the subtle effect it created as a stamp the most.
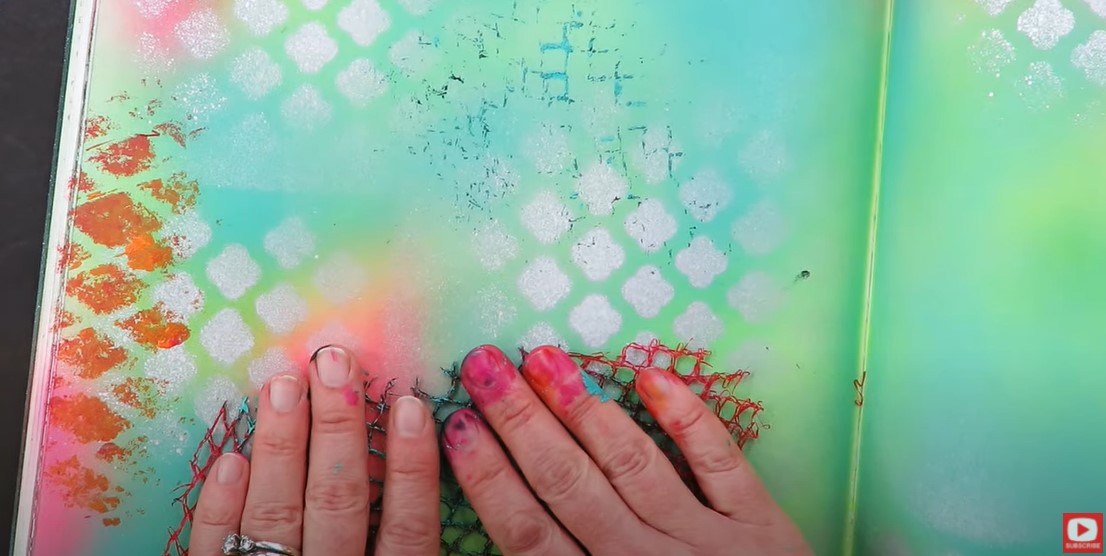
HOT TIP: Whatever you do - do it everywhere so it looks intentional.
My last stamping technique wasn't necessarily inspired from today's video because I've been doing it for years, but in case you haven't tried this before - you've GOT to save the next sheet of bubble wrap that comes through your door!
You can get the most gorgeous pattern from applying acrylic paint to the corner of some bubble wrap, and turning it into a mixed media stamp. Click over to the video to see my favorite places to stamp with bubble wrap! Thanks for hanging out with me today! Don't forget to grab my FREE HAMBURGER SYSTEM CHEATSHEET. Once you print it out, join me on YouTube for my Hamburger System Series, and I'll explain everything you need to know about mixed media art supplies, and my simple mixed media layering process! ❤️ CHECK OUT ALL MY ONLINE ART CLASSES & Art Clubs ❤️ CHECK OUT ALL my art books ❤️ MY FAVORITE ART SUPPLIES on AMAZON ❤️ MY BELOVED FACEBOOK GROUP
This mixed media portrait tutorial was filmed BEFORE I'd even identified the steps in my signature mixed media layering process, let alone named it "The Hamburger System!"
When I watch this full-length tutorial now, I can see many of the Hamburger steps I was using, even then. This fun his and hers art journal spread was painted into an altered book art journal I upcycled from my local thrift shop. To this day that art journal is STILL one of my favorites.
If you're new to mixed media, or struggling with how to layer your art supplies so you create a MASTERPIECE instead of a mess - you need to download my FREE Cheatsheet outlining my signature mixed media layering process, called the Hamburger System.
Simply click the button below, and I'll send it straight to your inbox!
In many of my mixed media canvas and art journal pages, I often love to start with a collage layer, as I explain in my FREE YouTube series breaking down each layer of the Hamburger System. After this - the cheatsheet I HOPE you just downloaded, will make complete sense!!
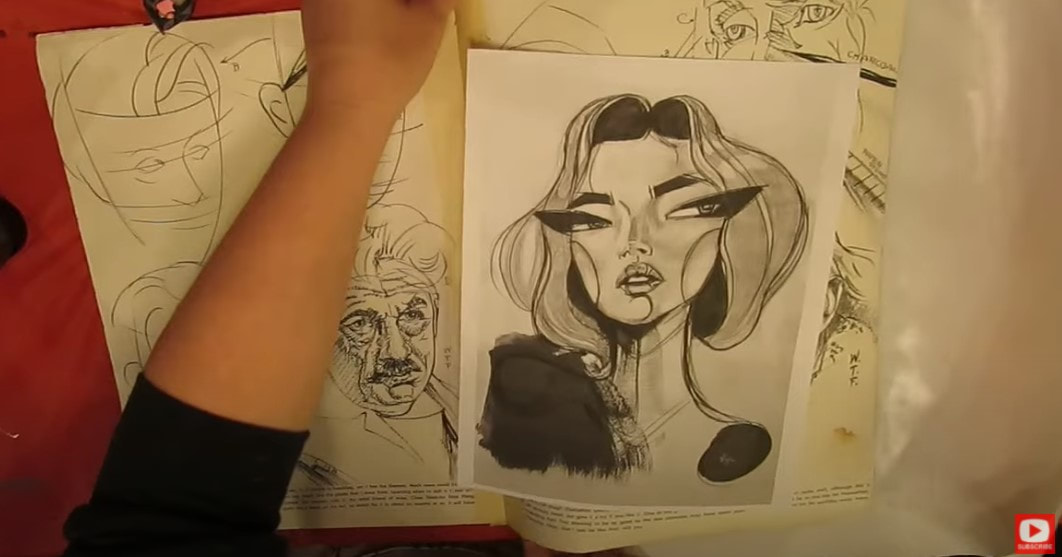
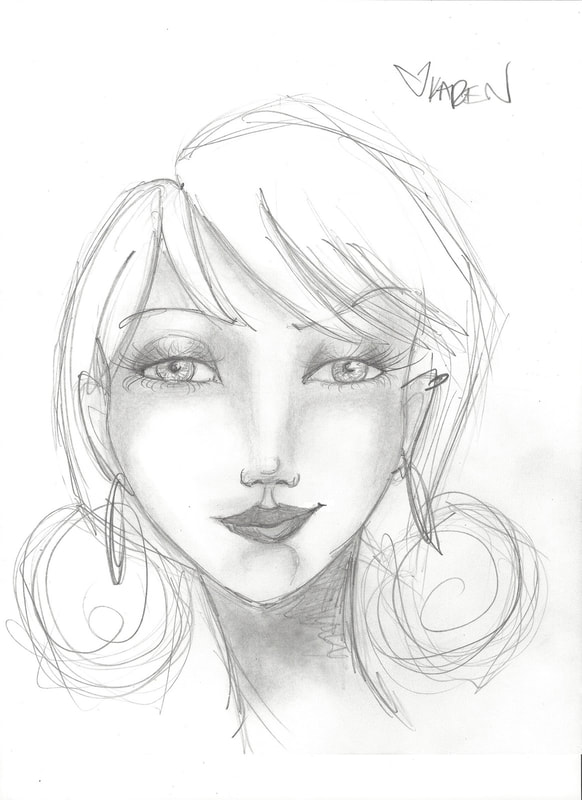
With today's mixed media project, I felt the need to start with face drawings, instead of collage. I think I was just too excited to dig into this face drawing reference image (below), that I'd found on Pinterest.
I wish I could credit the artist here, but I couldn't find one for this image.
I felt the need to use a dramatic color scheme, so I selected teal, red, yellow and black.
Since I'm working in my altered book, I need to prep my pages with a thin coat of gesso. This will knock back the opacity of the book's original illustrations and make it so I can paint or draw over them more easily. Once the gesso is dry, I started this face drawing as I do ALL of them - by sketching in my face drawing guidelines. Even if I'm doing stylized, whimsical drawing (not realism), it's still important to sketch in guidelines so the facial features look more proportional. 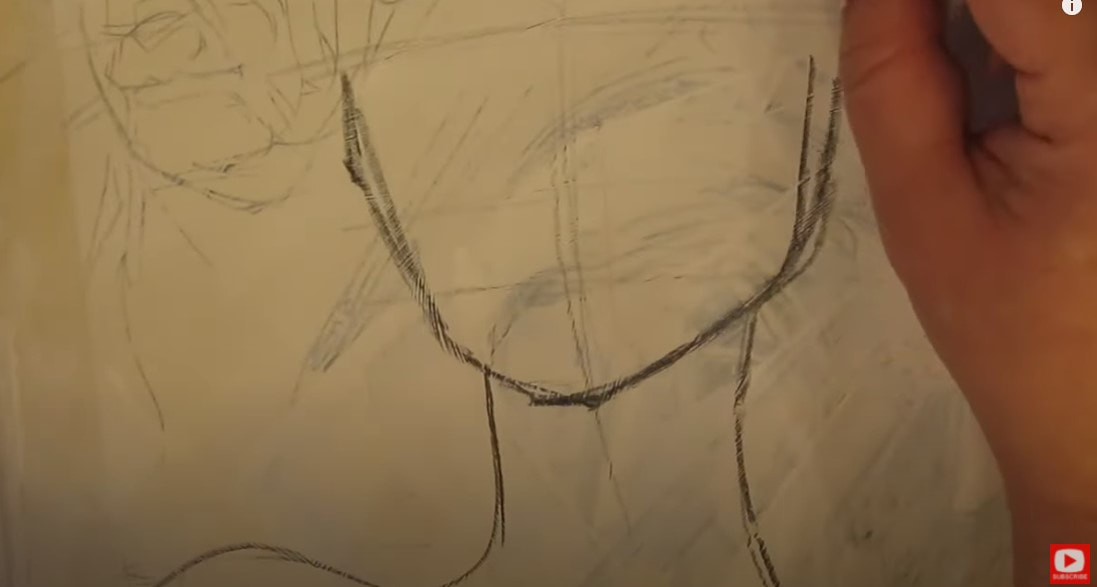
Do you love drawing and shading faces too? Or maybe you're just learning how to draw faces? CLICK HERE to download my FREE whimsical face drawing guidelines. They're super easy to follow, and will help you draw a simple and proportional forward facing face.
If you're a total beginner with face drawing, you might want to check out this playlist over on my YouTube Drawing channel to practice your face drawing guidelines with me step by step before trying out today's project. The face drawing tutorials in this series are are short, sweet, and perfect for beginners. Here's one of the faces you'll learn how to draw...
Real quick, before we continue - super quick announcement: All product links are Affiliate. I may earn a small commission if you choose to order through these links but by law there is never any additional cost to the consumer for doing so. I thank you for your support.
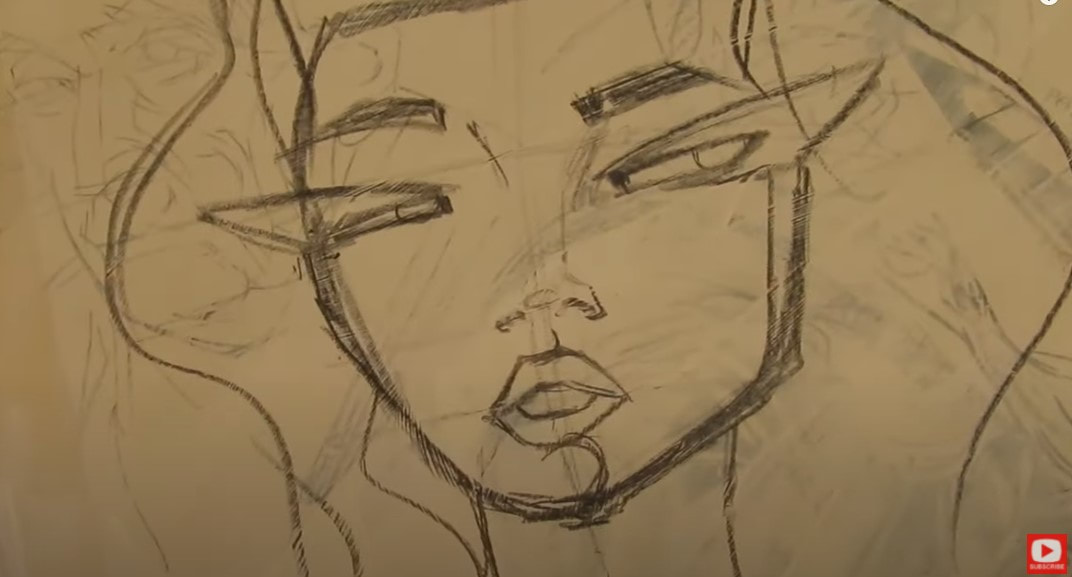
After my initial sketch for today's project is done, I pull an old flat paint brush out and add a little more gesso along the outer cheekbones and jawline to correct my proportions since I'm working with a pencil that doesn't erase.
Gesso is a bit magical like that in the world of mixed media art! It can give you a fresh start and work like an eraser to hide any little mistake you want. Be sure whenever you use gesso that you're using an old paint brush because it will totally destroy your brush. I have one that I've designated for myself to use only for gesso. I highly recommend you do the same. 
In this particular project, I added an additional thin layer of gesso over my subject's cheeks, nose, forehead and neck to knock back some of the background that was still peeking through from the book's original illustrations.
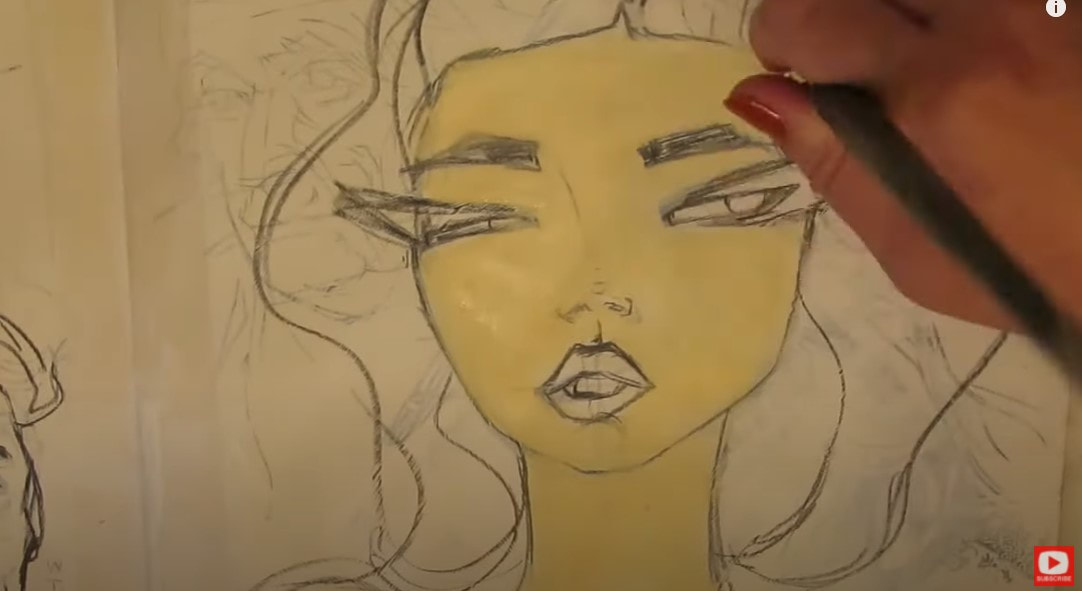
Next, I applied some acrylic craft paint in ivory as a base skin tone layer all over her face and neck. Since this piece is purely for my own enjoyment in my own personal art journal, and I'm not selling it, etc. - craft grade acrylics are fine for this application.
When I started adding red acrylic paint into the background behind my face drawings, I decided to scrape some onto my journal page for an edgier look using an old credit card! This is a really fast way to cover a lot of ground with your acrylics. 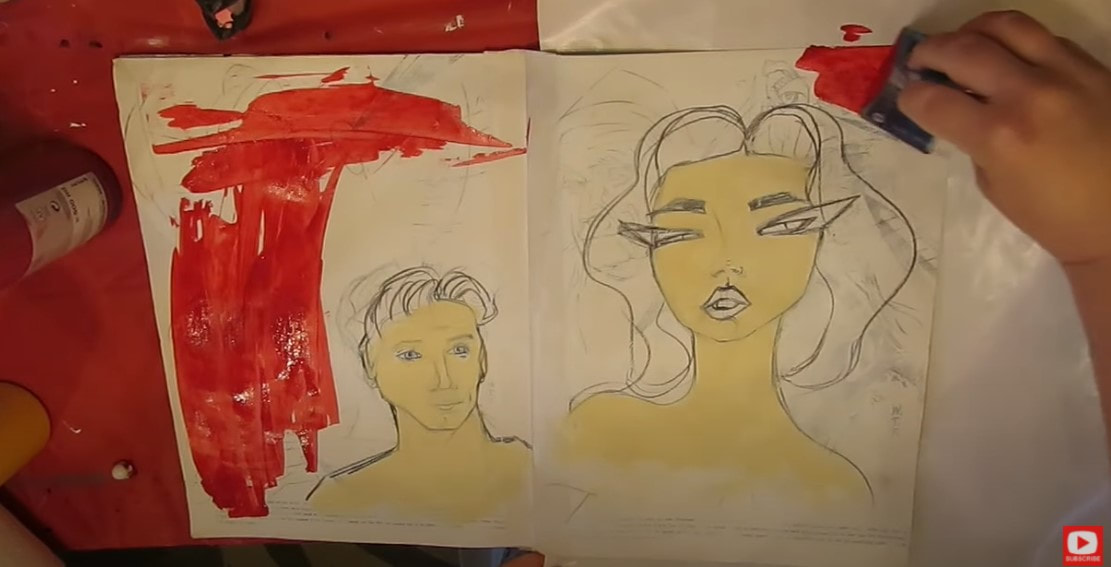
At the time this project was created, I'd just published my How to Draw Fun Fab Fellas book, so you'll also see me working on a guy's face in this mixed media tutorial.
If you're interested in drawing male faces, one of the things you need to watch out for is to go easy on the lips. If you're not careful, these can turn feminine real quick! You also want to be sure to keep the lines in male faces very angular, except for the eyeballs- these are really the only true curves you should see in a male face drawing. 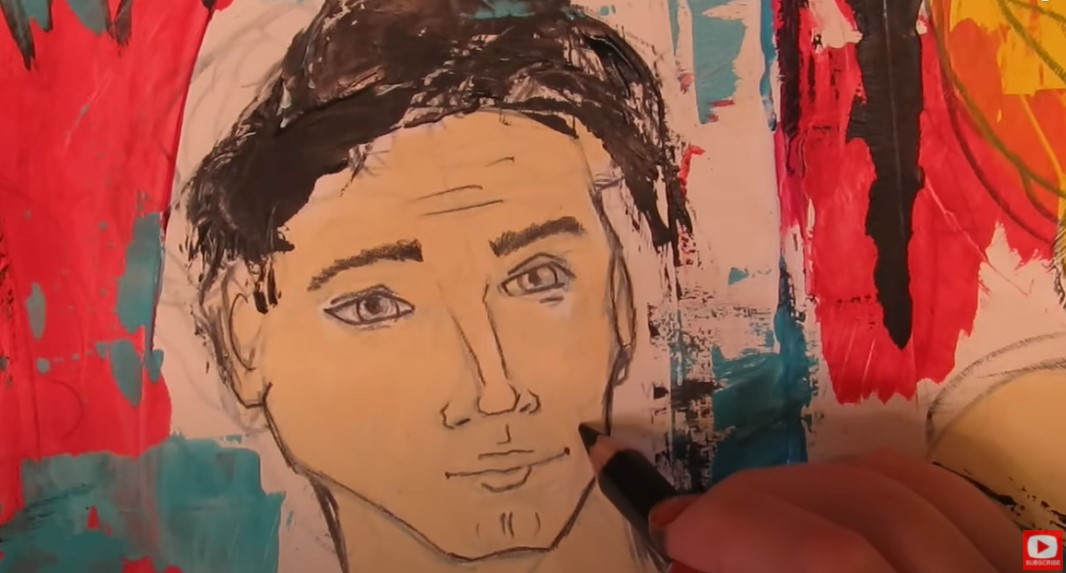
Next, I decided to add some detail work in with my black stabilo all pencil, before I sealed both pages with clear, matte mod podge.
Usually I LOVE how water soluble the black stabilo all pencil is (even though I know it totally freaks some of my students out!!), but today, it muddied the skin tone of my female portrait because I had doodled in stabilo on top of the eyebrows. This was just too dark and dissolved everywhere once the mod podge hit it. 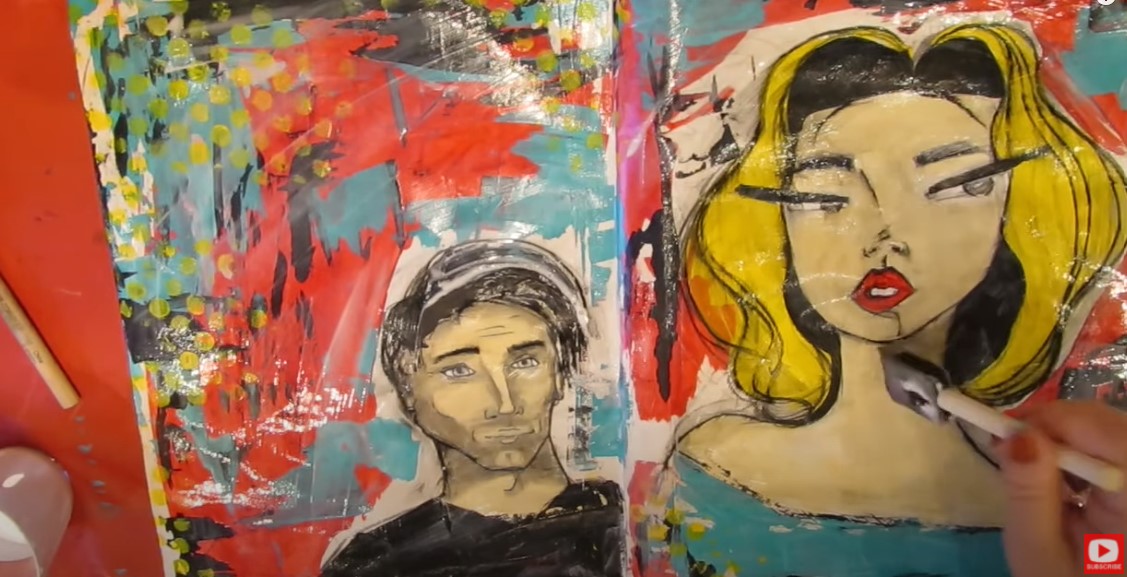
If you're new to my world, you'll quickly learn how relaxed I am about "mixed media mistakes." I think everything is fixable, and encourage my students to ALWAYS keep pushing through on a project.
I ended up adding gesso, more acrylic craft paint (ceramacoat) to save her face, and blending some gelato skin tones on top to do some face shading, and tying things together with my pitt pens and posca pens- "Hamburger" style. 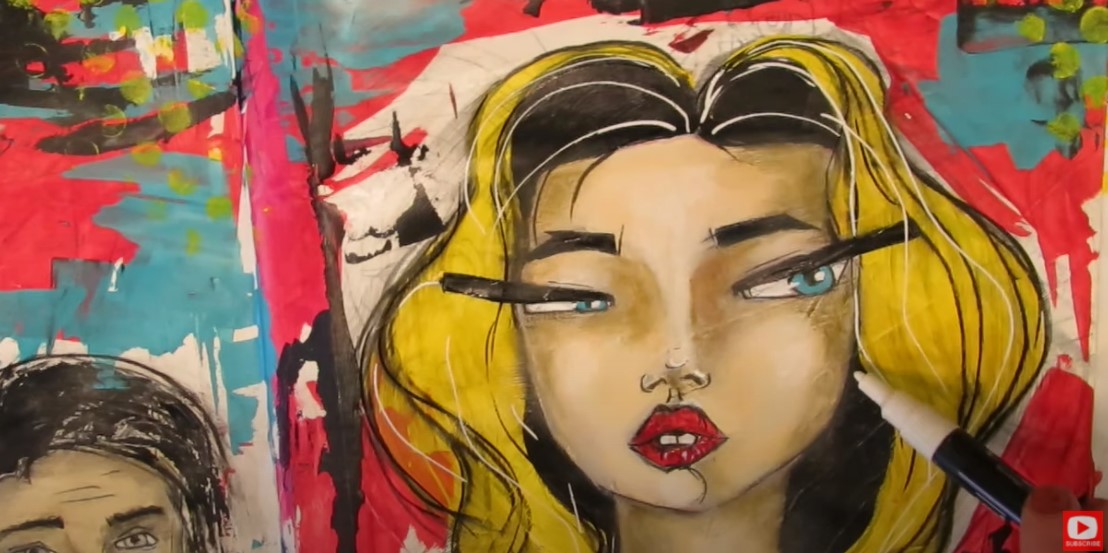
If you've never used creamy gelatos to help you "paint" a variety of skin tones into your face shading, they're amazing and something you've got to try.
This chick totally gave me a run for my money, but I had a blast and am happy with the end result. Be sure you click over to the video to see her unfold in real time. Thanks for hanging out with me today! Don't forget to grab my FREE HAMBURGER SYSTEM CHEATSHEET. Once you print it out, join me on YouTube for my Hamburger System Series, and I'll explain everything you need to know about mixed media art supplies, and my simple mixed media layering process! ❤️ CHECK OUT ALL MY ONLINE ART CLASSES & Art Clubs ❤️ CHECK OUT ALL my art books ❤️ MY FAVORITE ART SUPPLIES on AMAZON ❤️ MY BELOVED FACEBOOK GROUP
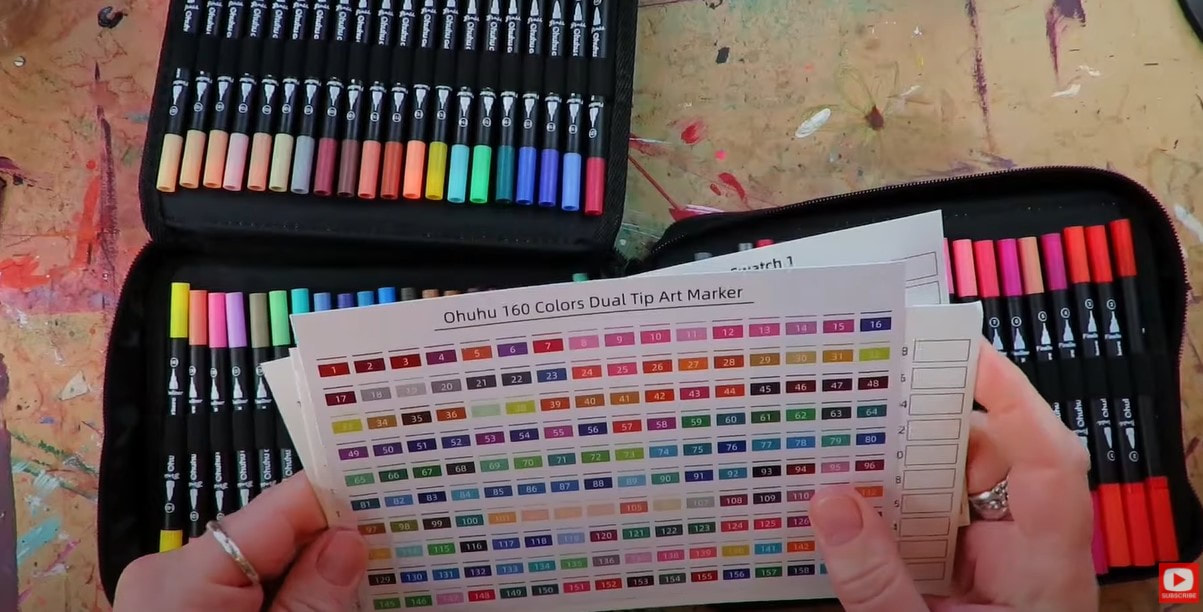
Today's water soluble markers showdown puts Ohuhu water based markers to the test! How do they compare to SEVEN other water soluble brush pens and fineliners in price, color selection and quality?
Out of the box, my Ohuhu marker set of 160 provides a gorgeous array of colors, and the price per marker can't be beat! But will they provide the watercolor painting effect I NEED from a water based marker?
Whenever I get a new art supply with multiple colors - whether that's a new set of markers, watercolors, etc. - I ALWAYS swatch them out. That's because I learned the hard way that the color on the cap, tube or bottle often doesn't really look like what ends up on your paper. TRUST ME. Now my rule of thumb is to ALWAYS swatch.
I actually made a cute FREE swatch sheet for you to download to make your swatching a bit more fun!! Simply click the button below to grab your FREE swatchsheet and I'll send it right over.
I had so much fun making this swatch sheet, I actually turned it into a BOOK with my Facebook group!! I know!! We had a blast doing this together. Each page was created by another Awesome Artist. Here's a link to buy the finished book on Amazon if you're interested.
Before we continue, super quick announcement: All product links are Affiliate. I may earn a small commission if you choose to order through these links, but by law, there is never any additional cost to the consumer for doing so. I thank you for your support!
Let's take a look at some of the water soluble products I've laid out for us as a comparison to see how my new water based Ohuhu markers stack up.
I'm comparing the Ohuhus to SEVEN other water soluble markers & fineliners:
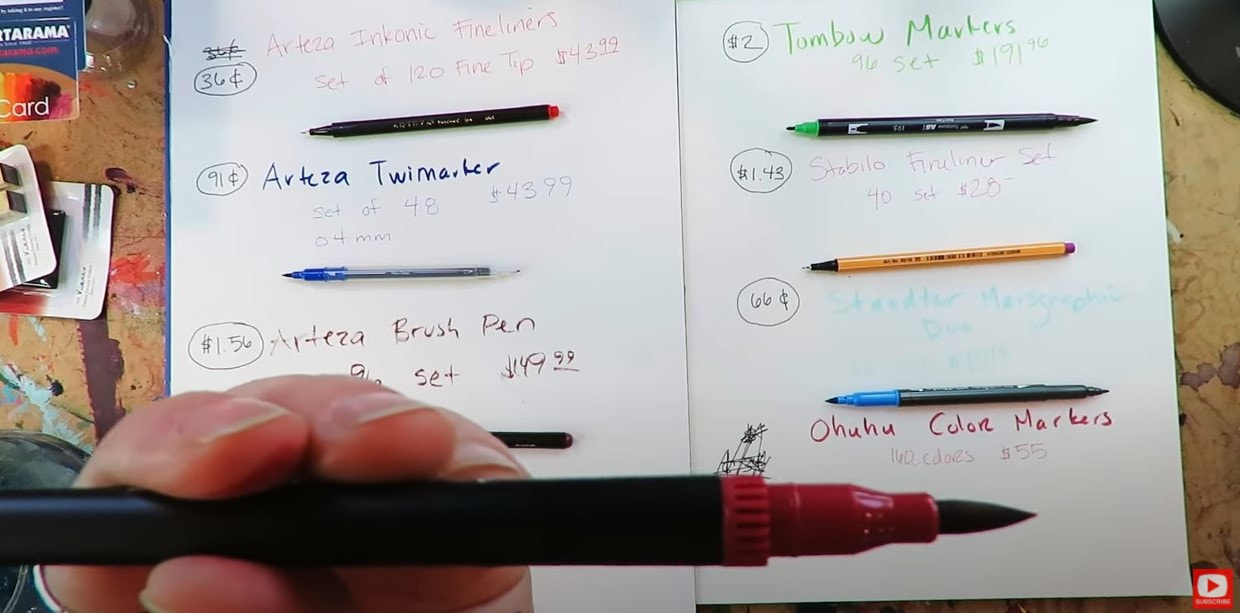
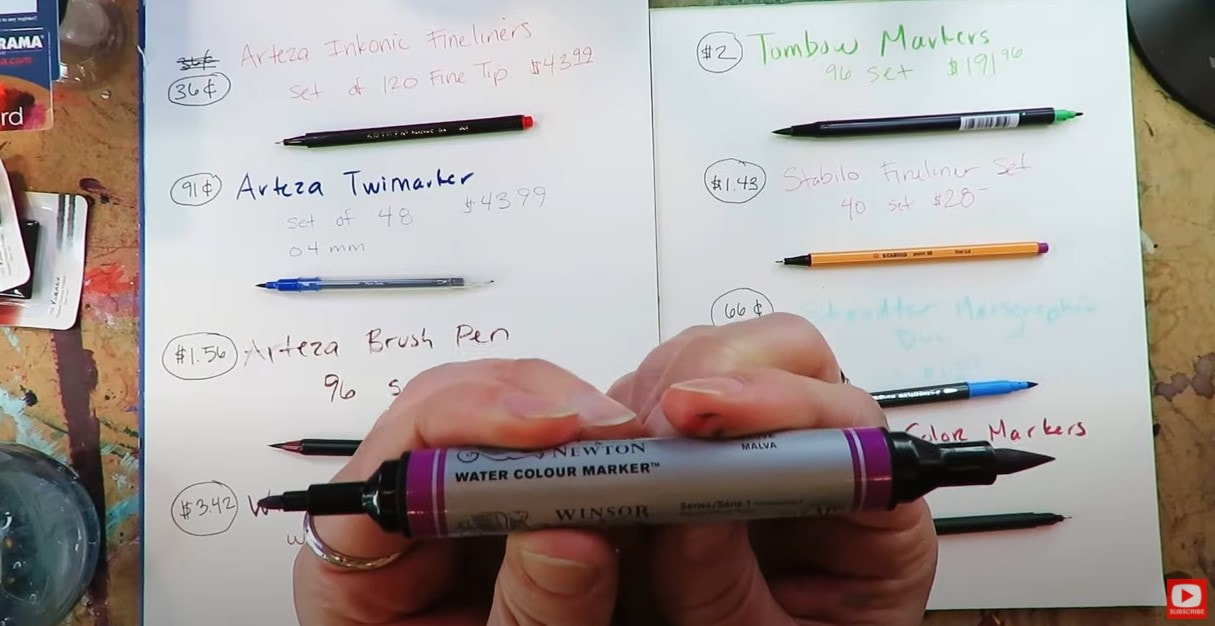
The water soluble ohuhu markers are dual nib. On one side you'll find the brush nib (above). On the opposite side, you'll find a fineliner. They come in a set of 160 for just $55, making each marker a steal, at just 34 cents each. I couldn't find my set of 160 for you on Amazon, so here is the Ohuhu Water Based Marker set of 100 for $34.
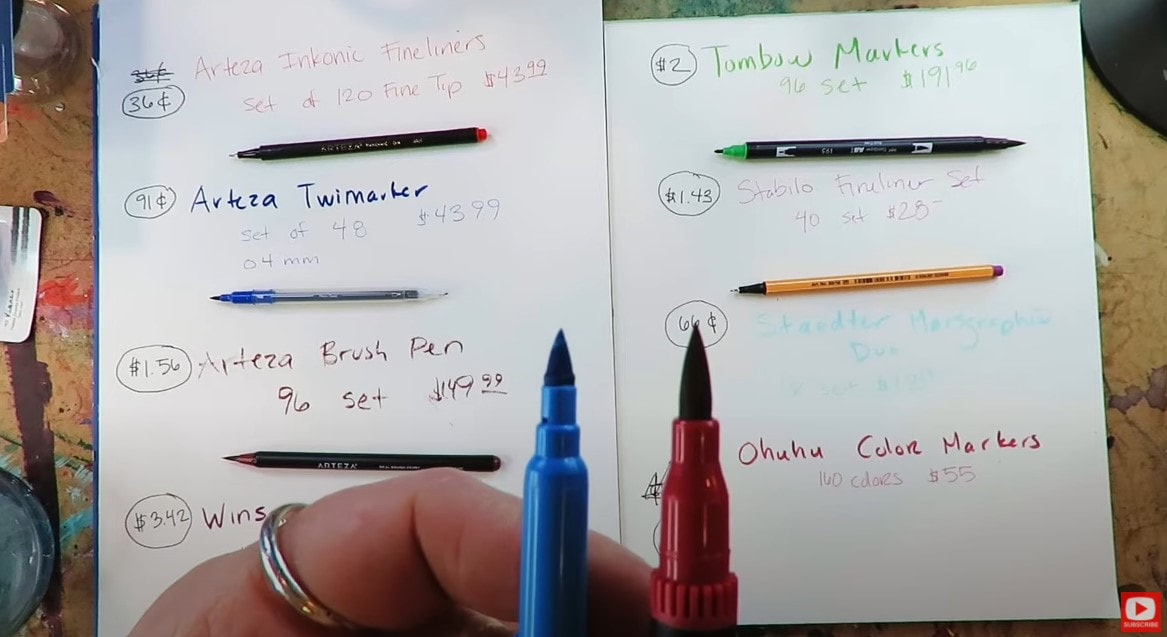
The Staedtler Marsgraphic Duo (above left), has a brush nib as well, but it's not nearly as sexy as the one from Ohuhu. This marker also has a bullet nib on the opposite end. Their largest set contains 18 markers, and only costs $12. This low cost set makes it feel like an amazing deal, but when you look at the cost per marker, the Staedtlers are actually more expensive than the Ohuhus at 66 cents each.
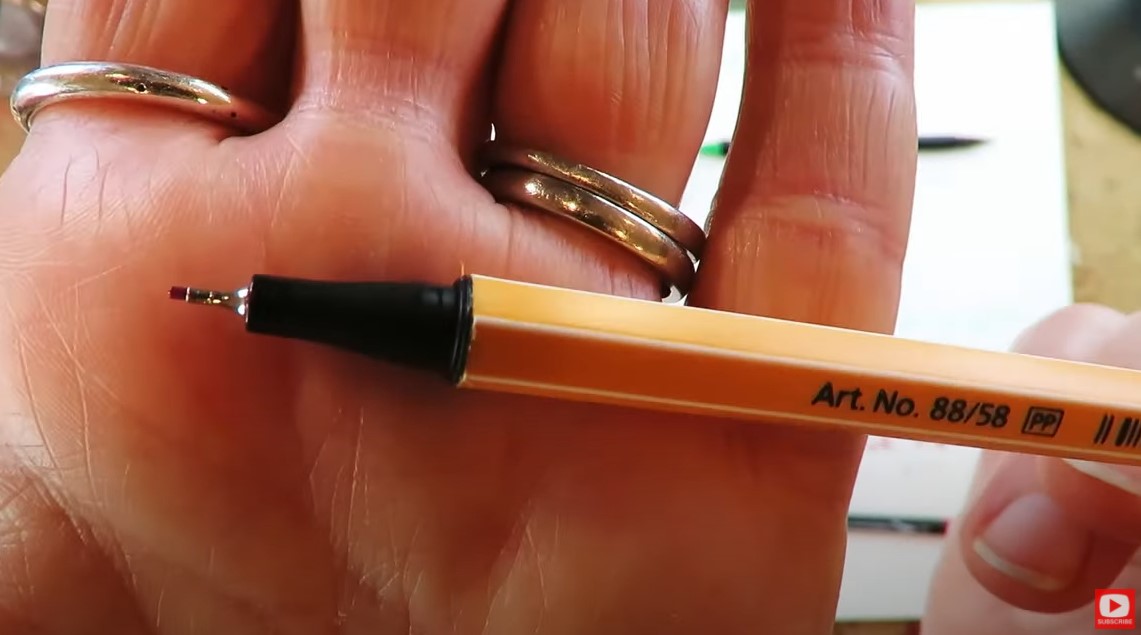
Lots of artists enjoy using Stabilo fineliners (above) because they are great for coloring books and getting into teeny weeny spots. You can get a set of 40 for just $28, making each marker $1.43/each.
I LOVE stabilo as a brand, and if you know me, you know one of my absolute FAVORITE art supplies is my black stabilo all pencil. But when I did this water soluble marker comparison, I was a little disappointed to see how expensive the Stabilo fineliners actually are when compared to the others. 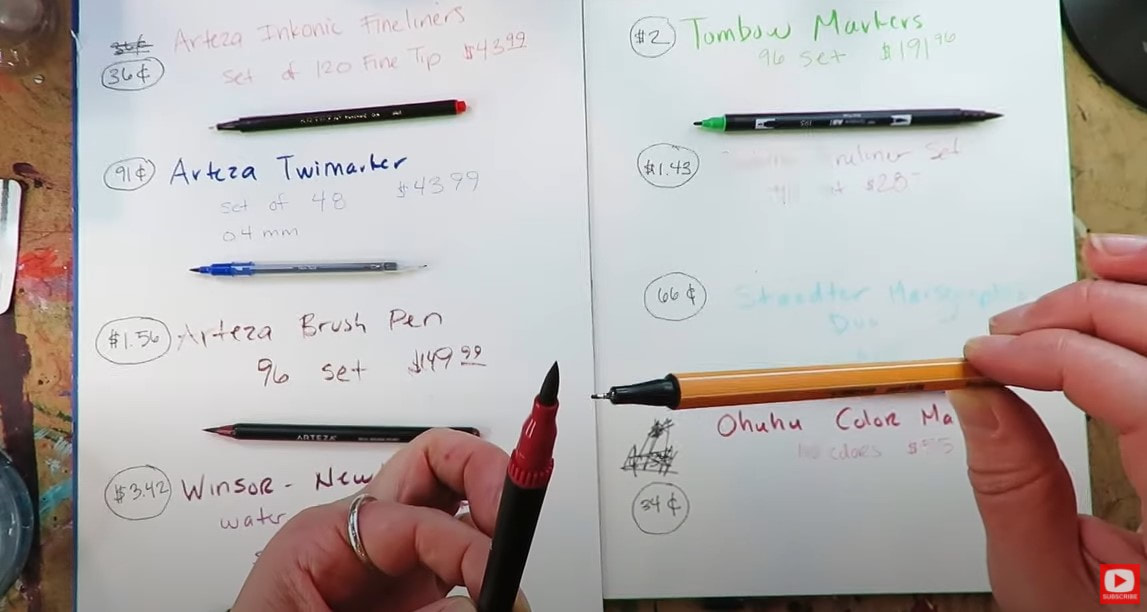
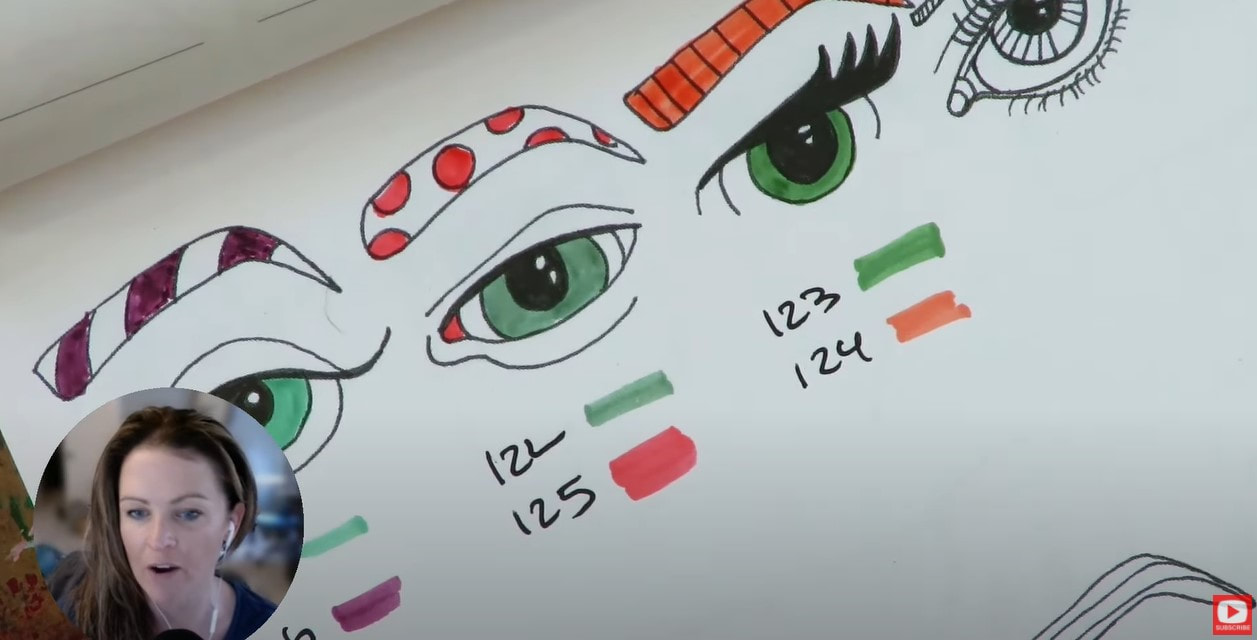
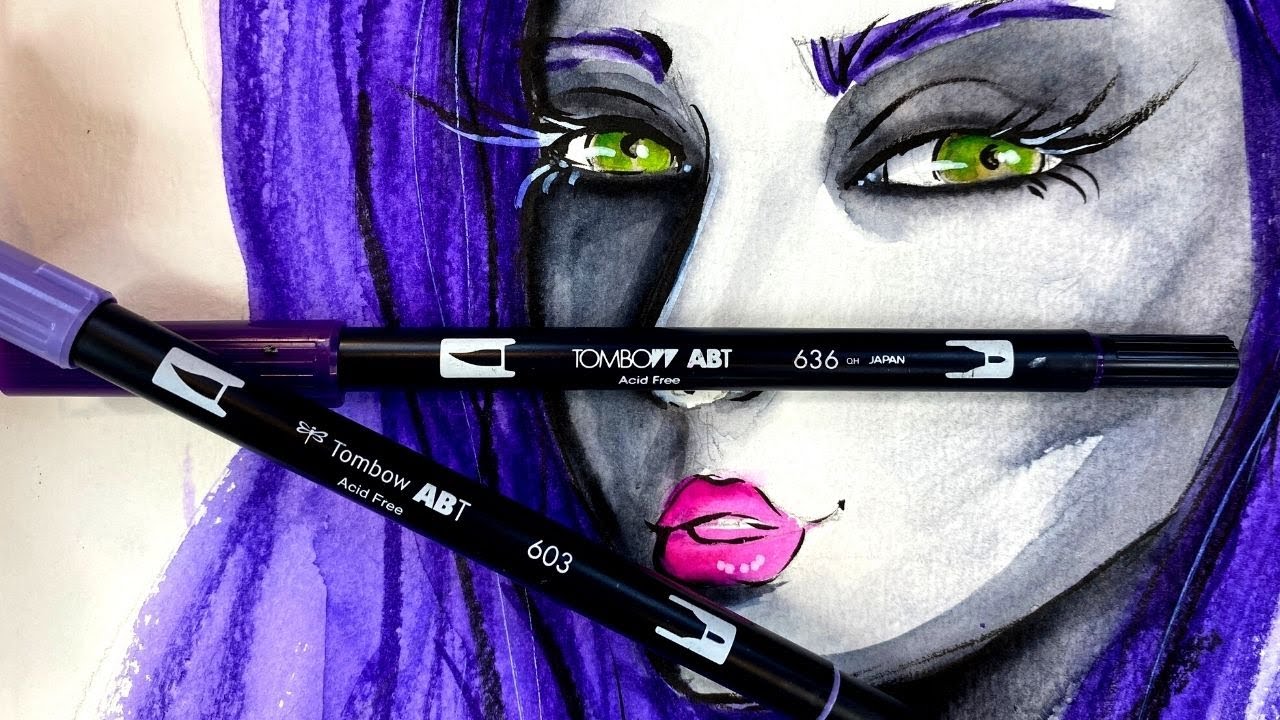
Tombow is another brand I totally love! I take my Tombow dual brush pens everywhere, and have completely fallen for the watercolor painting effect I can achieve with them (below). Isn't that fun?!
I was a little disappointed to realize just how much my beloved Tombows cost per brush pen. My set of 96 cost just under $200, making each marker about $2 per piece. (Sadly this set is currently listed on Amazon for $279, but there are three smaller sets for less, saved in my store for you).
Next on my list to test today is Winsor Newton Water Colour Markers. These are the only product in today's comparison that contain a fine art product inside the tube. They're lightfast and gorgeous.
The biggest set you can buy is only a set of 12, and it's about $40. That makes each marker an expensive $3.42 each. They're not cheap, because they are a fine art product. There really is no comparison when I look at the other products on the table today. In a way that's not really fair, because this is the only product from the rest that isn't a dye based craft product. But I use these all the time, so added them to the test. Here are the current Winsor Newton watercolor marker sets I could find for you on Amazon: Sky, Landscape, and Basic (don't be deterred from the "basic" set - the colors are FAR from basic!).
The Arteza Brush Pens really don't do anything for me (so no link to buy). As you can see in the above photo, the ink doesn't even really flow the way it should just to write the simple product name on my paper. These are not nearly as juicy as I think they should be for the price. And, there's nothing you can do to get the ink flowing better.
Their nib is actually bristles like a paint brush instead of a foam tip shaped like a paint brush tip. You would think this is a benefit, but I think it actually makes them harder to work with. 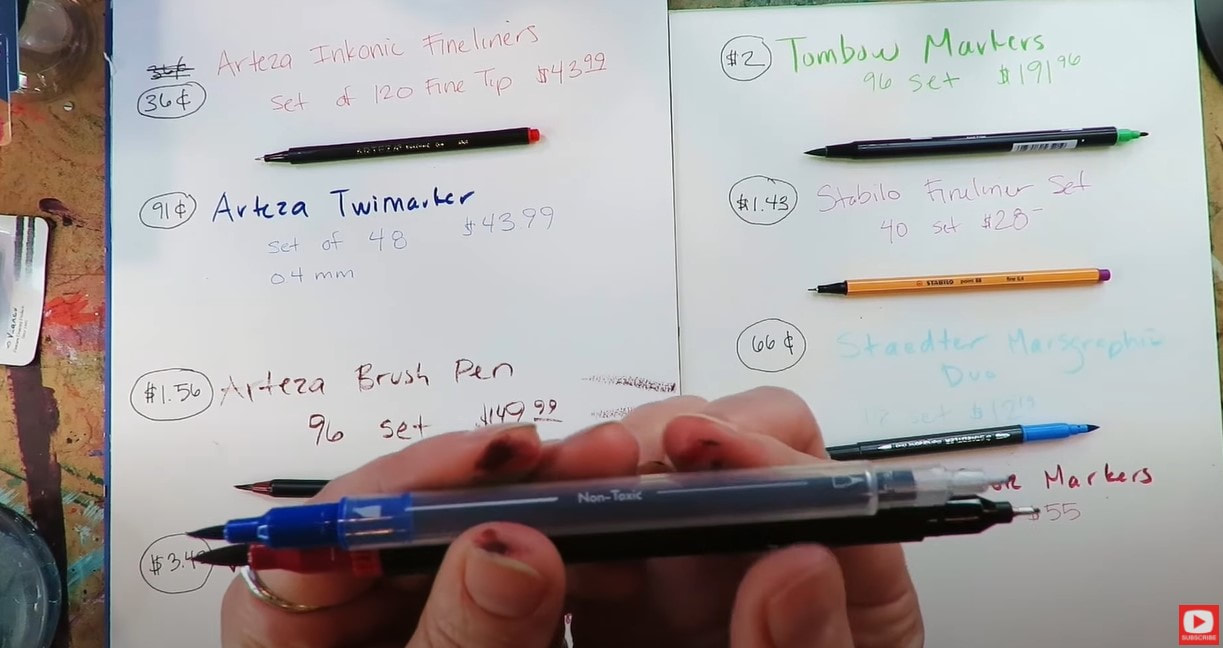
On the other hand, Arteza Twimarkers are a much better value and compare more appropriately with the Ohuhu color markers (shown above). These have both a brush nib and fineliner nib in one. However, you may have seen there are a lot of negative reviews out there on the Twimarkers, because the bullet nib frays easily. It's not encased in metal like the Ohuhu marker, so this creates a problem.
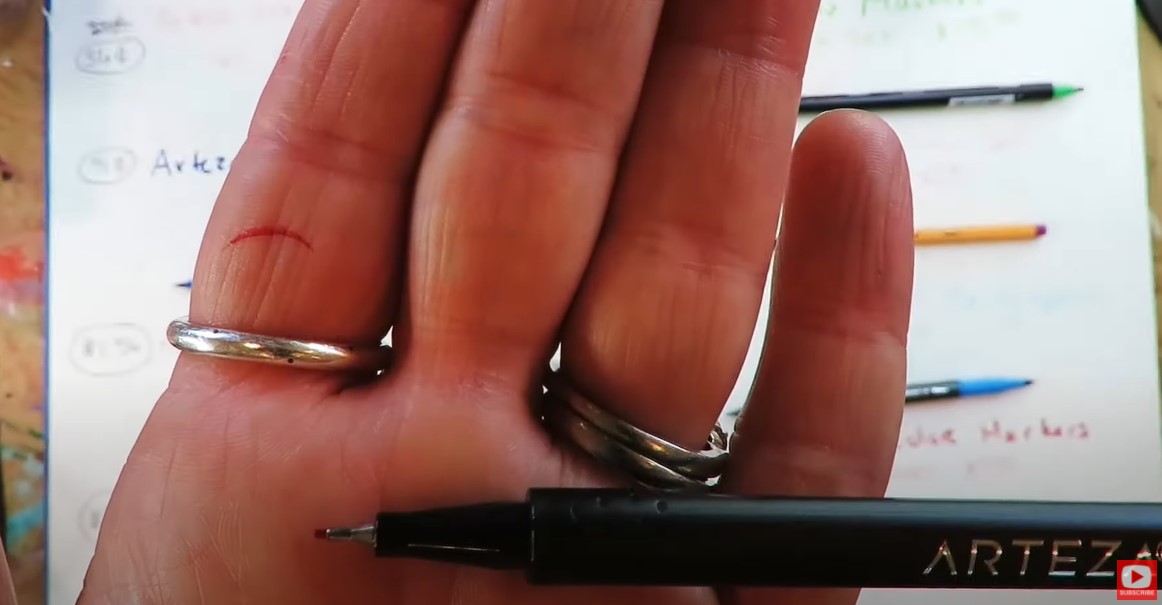
The Arteza Inkonic fineliners are just a classic fineliner. They come in a beautiful set of 120, but the Ohuhus come with a brush nib too, plus 40 additional colors and are 2 cents/marker CHEAPER! I was really surprised to see this when I did the math. The Ohuhus are killing it so far in value.
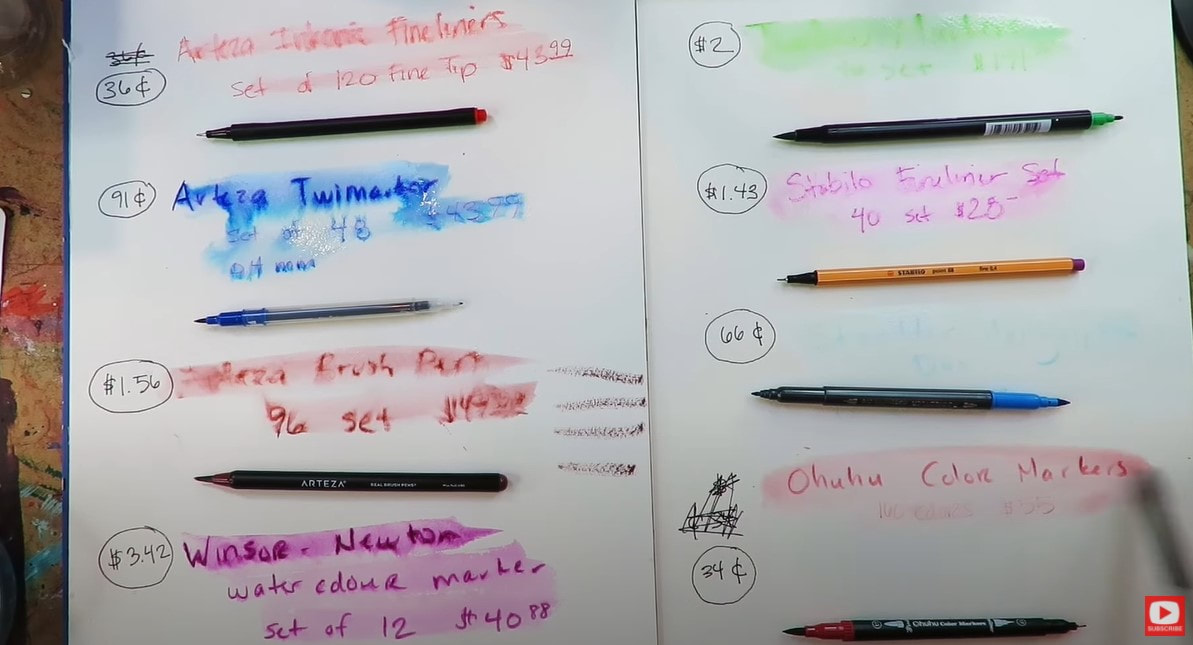
After I run my watercolor brush (with plain water) over each sample, you can see how water soluble each product is. The Tombows disolve the most. If watersolubility is important to you- you might want to keep that in mind when buying a set of these markers - the Ohuhus seem to disolve too, but not nearly to the extent of the Tombows.
To get started with this particular project, I decided to flip through the reference photos for drawing I compiled in my book called The Celtic Collection. 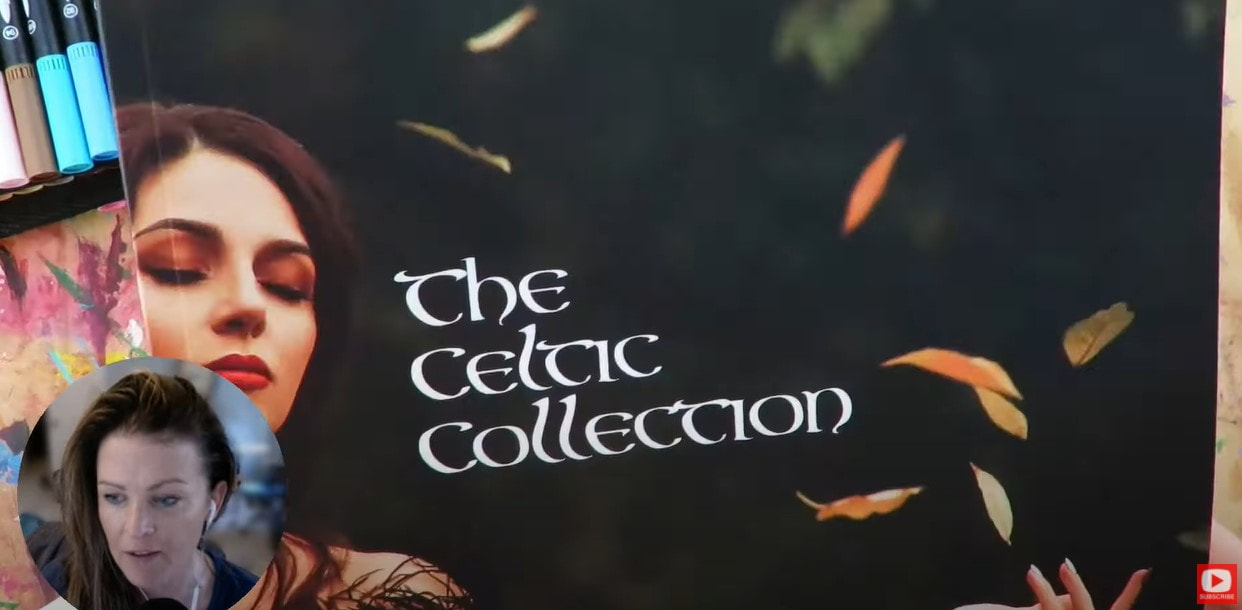
This is a fun book of copyright free fantasy art reference images I compiled for one of my art clubs called The Celtic Collective, that I run with one of my art besties, Lucy Brydon. If you love fairies and fantasy art, click here to learn more about The Celtic Collective.
Press play on today's video to see if I was able to achieve the watercolor painting effect I love from the water based Ohuhus. Thanks for hanging out with me today! ❤️ CHECK OUT ALL MY ONLINE ART CLASSES & Art Clubs ❤️ CHECK OUT ALL my art books ❤️ MY FAVORITE ART SUPPLIES on AMAZON ❤️ MY BELOVED FACEBOOK GROUP |
Karen CampbellFounder of Awesome Art School. Mixed Media Artist. Author of 19 Instructional Art Books! 
Whose work has appeared in...
   
 Archives
July 2024
Categories
All
|
 RSS Feed

"Karen is flipping hilarious and she's very real...I like the way she teaches in a way that really gives you confidence, whether you're a beginner or advanced there's always something new to learn!"
- Elizabeth W. |
What Fans Are SayingKaren, you are absolutely fabulous! You make me feel like I can draw anything. I have recently retired and finally have the time to do some of the art that I have loved since I was in school. I am really at the beginning of my art journey and I hope to learn as much as I can. Thank you for all you do. |
Contact ME |