
|
I have been IN LOVE with my black stabilo for YEARS!! After last week's review of water soluble pencils in color, I decided I should probably put my black stabilo all pencil to the test to make sure it still deserves to be my go-to for mixed media drawing!! Join me over on YouTube to see what I found out!! 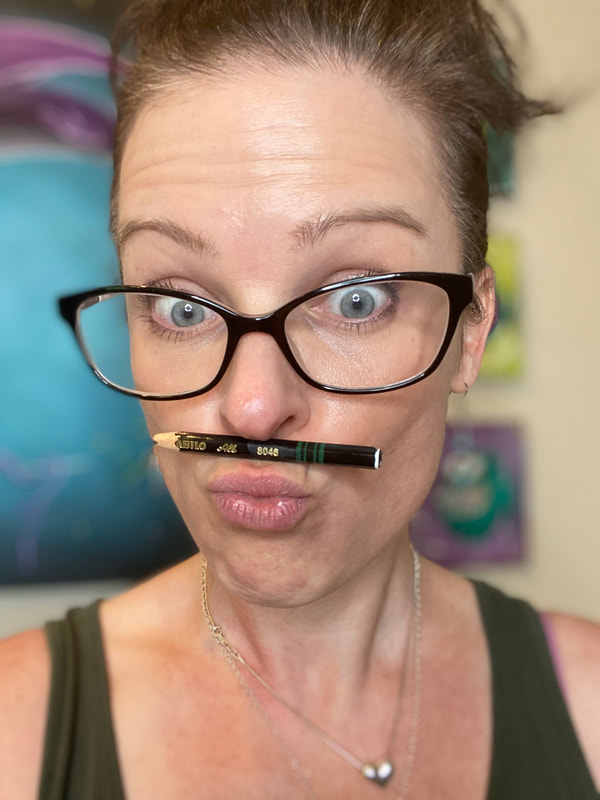 Before we continue, super quick announcement! All product links noted below are Affiliate. I may earn a small commission if you choose to order through these links, but by law there is never any additional cost to the consumer for doing so. I only reccommend products I actually use and love. Thank you for your support! It's NO secret that I love my black stabilo all pencil (waaaay cheaper by the dozen, by the way). I've been using this water soluble pencil FOREVER. I tested it against other water soluble pencils years ago and have been using it faithfully ever since. The girl on the right (below) is one of my countless stabilo girls! 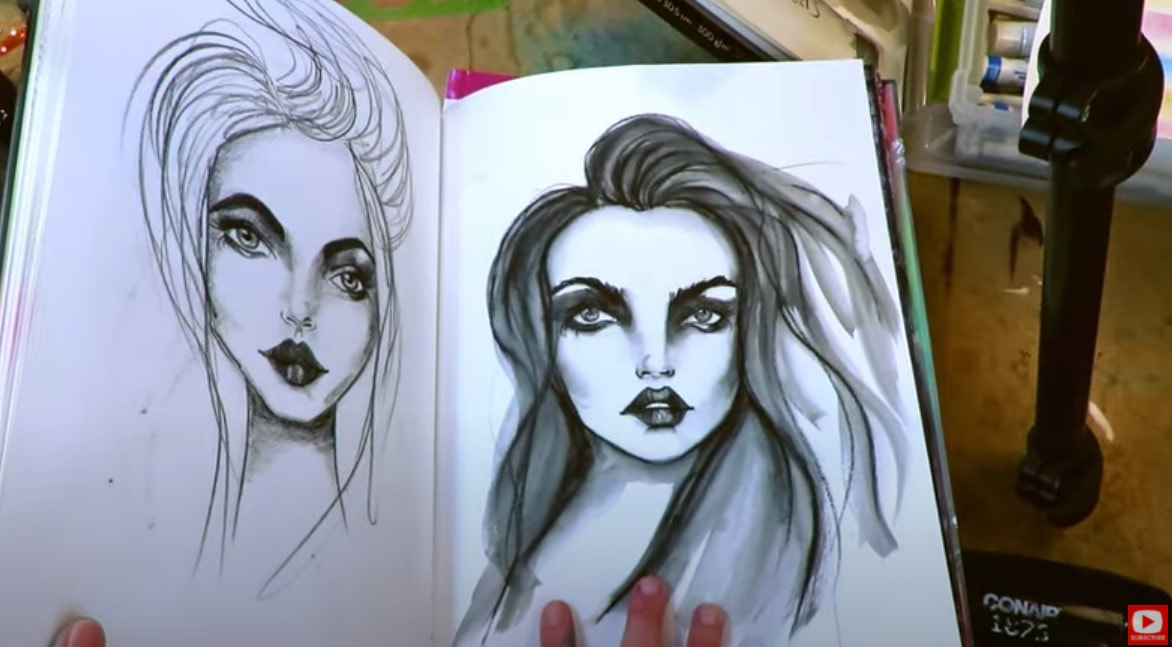 I loved the chick on the right SO much that I put her on the cover of my How to Draw & Find Your Style Book! 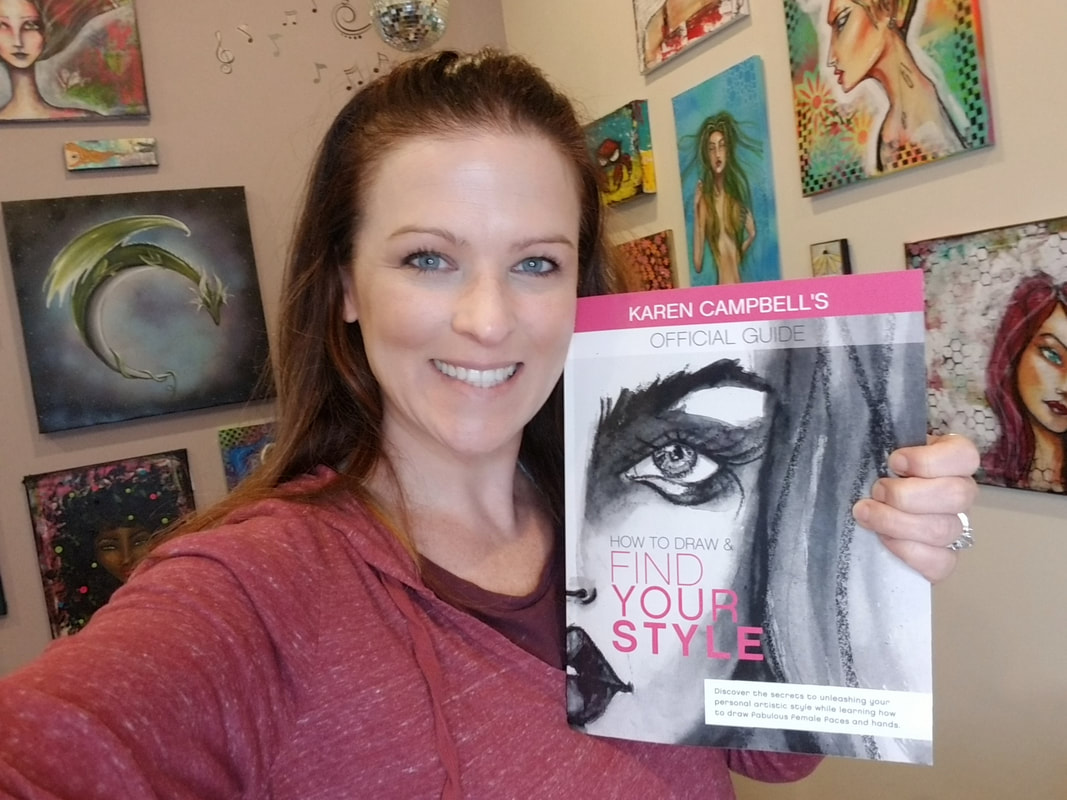 Just to be sure I'm not missing out on anything from another brand, let's put my stabilo to the test. 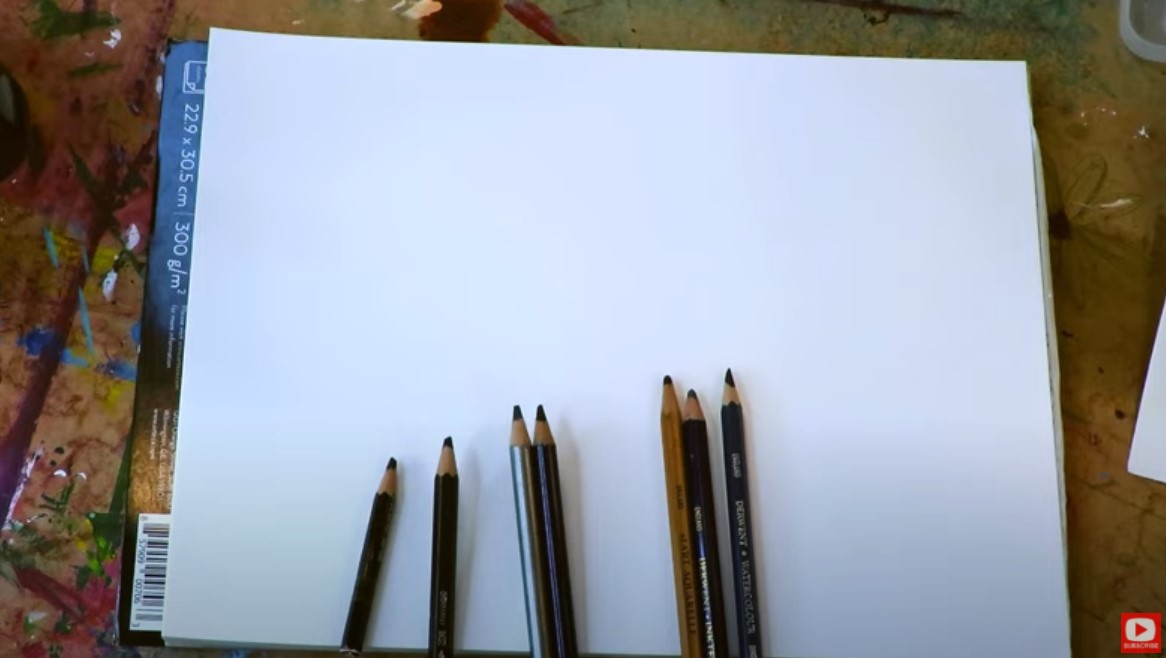 I gathered 7 water soluble pencils and am looking not only for water solubility, but for richness in pigment- something magical I LOVE about my stabilo all.  Products I'm testing today in black include:
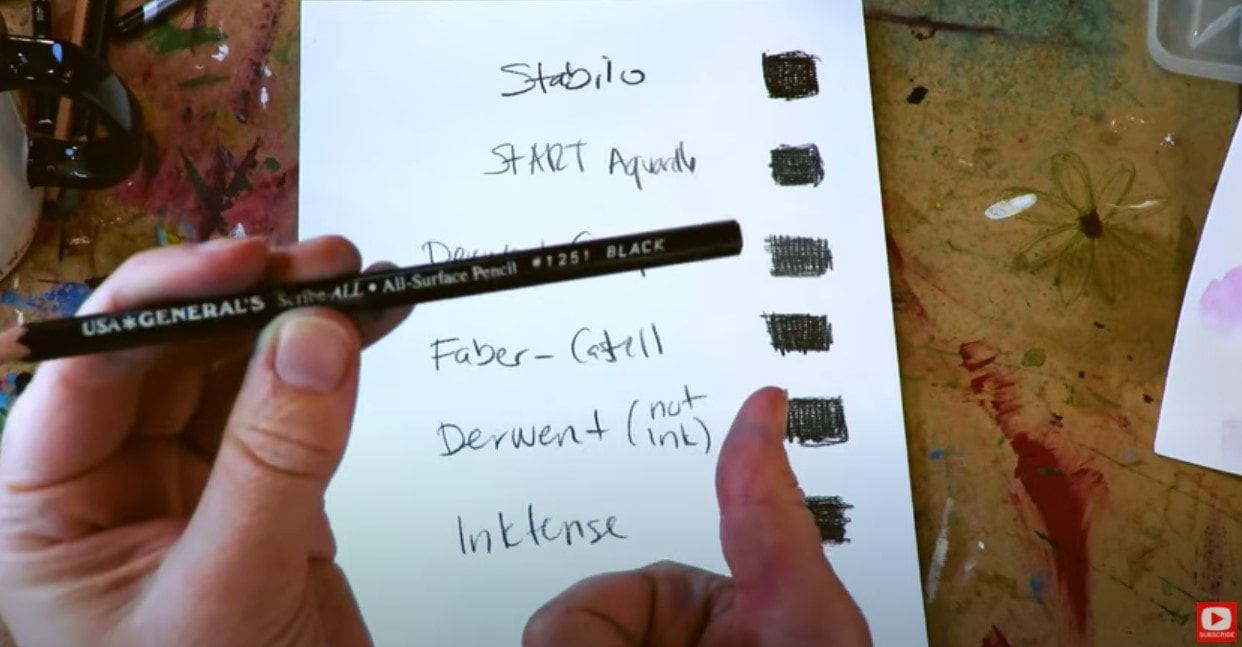 After I write down the name of each product and scribble a little square off to the side, I activate each line with some clean water and a watercolor brush. Be sure to click over to the video to see this in action! 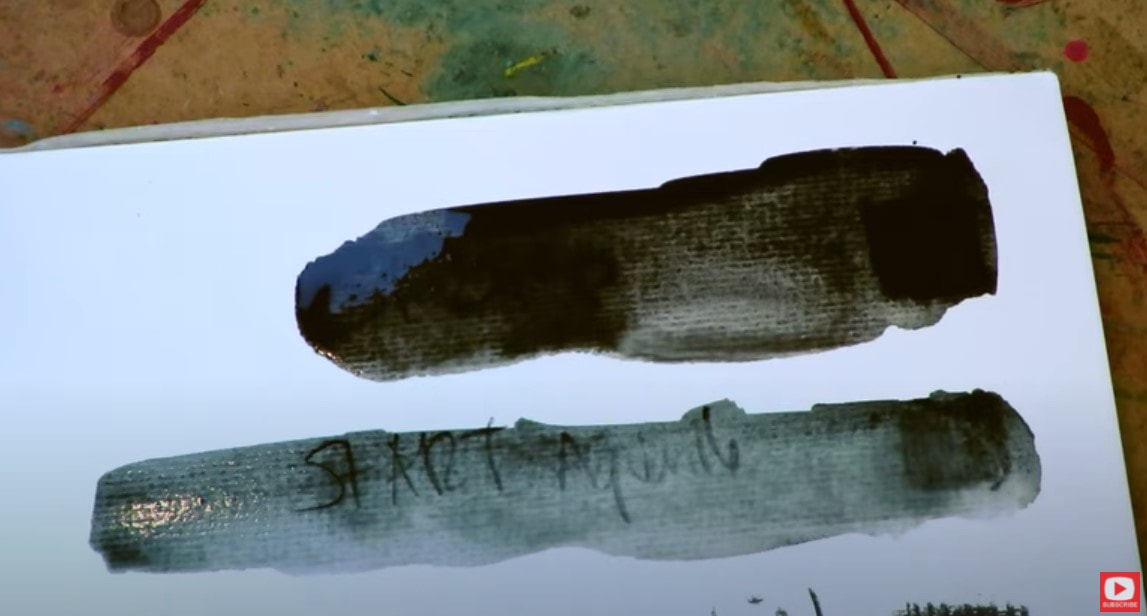 Look at that first line - stabilo NEVER lets me down! You can barely see my writing because there is so much black pigment pooling. YES!! 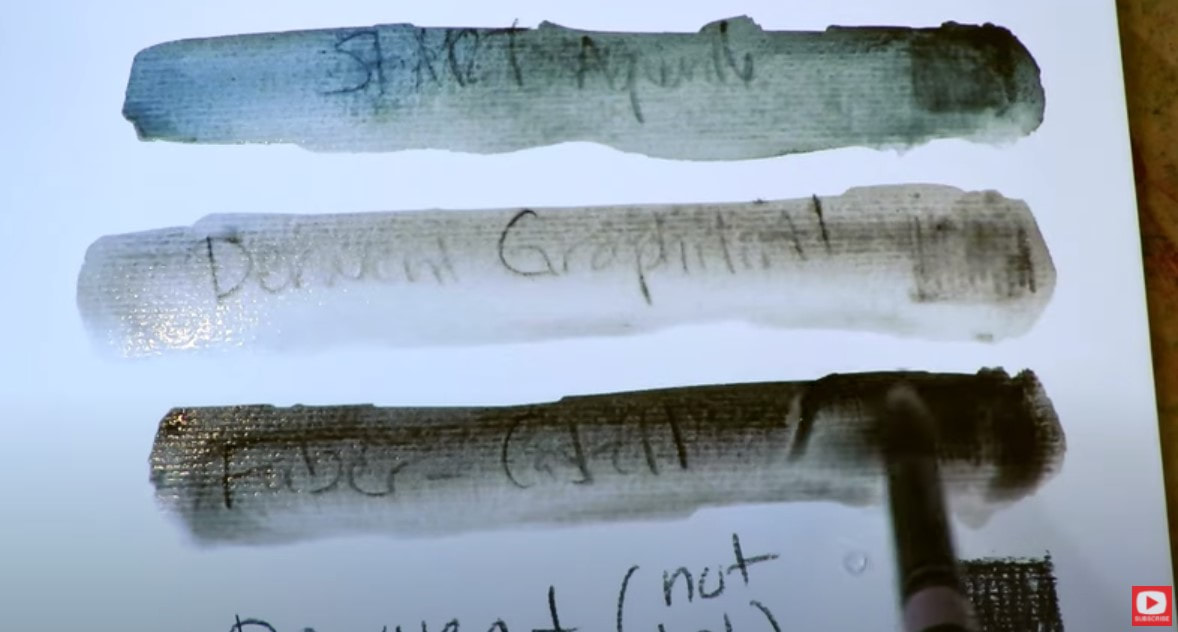 I'm also loving the results of the Faber Castell Albrecht Durer as well. Look at this rich, yummy goodness (third line above). As I do this test, I'm reminded of something I noticed when I did this years ago. Some of these brands seem to have a touch of color in them, or don't feel like they're jet black once activated with water. I'm seeing some faint green in the Aquarell (first line below) and a little blue in my black Derwent watercolor pencil (fourth line below). 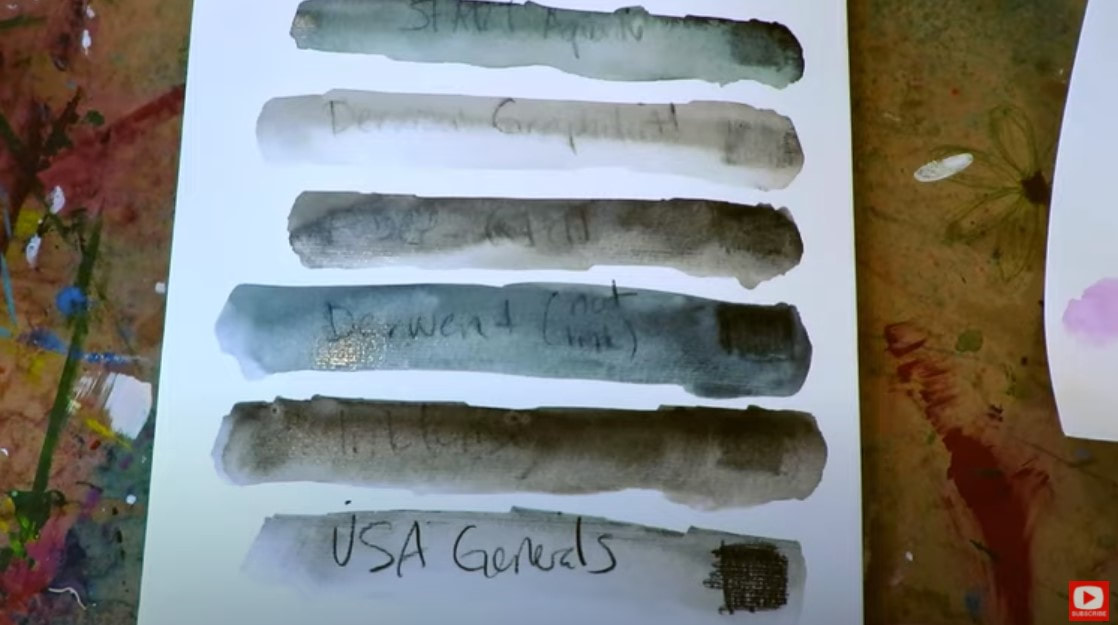 After I dry my paper with the hairdryer, I attempt to reactivate each line to see what happens... and which products I want to recommend for projects using my "Hamburger System." 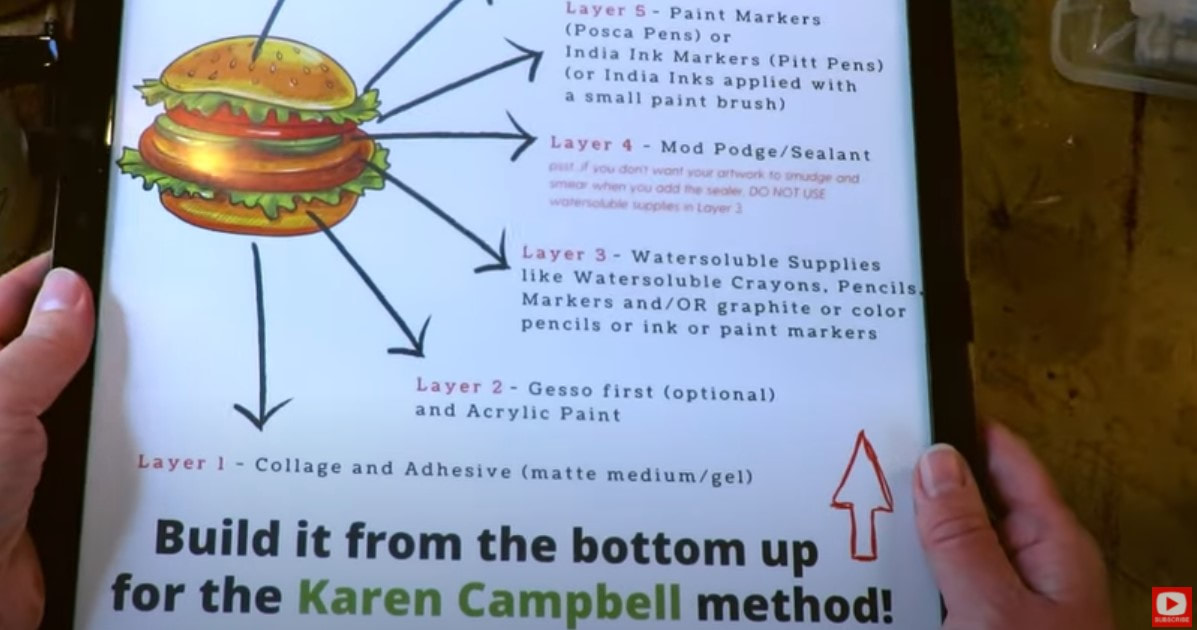 If you're not sure what I'm talking about, the art supply layering system I often use for my mixed media art projects is something I lovingly refer to as my mixed media "Hamburger System." I compare layering my supplies to the way you layer toppings for the perfect burger! I've actually got an entire FUN YouTube series of tutorials, cheatsheets, and even wrote a mixed media art BOOK about it!! Download the FREE, one-page cheatsheet that explains it all by clicking the button below.  I'll send it straight to your inbox so you can print it and keep it at your art table for reference to help you with your own mixed media layering. Check out today's video to find out which of these water soluble pencils I recommend using and WHY!! Thanks for hanging out with me today!! ❤️Want FREE, immediate access to my Fun Fab Drawing Club and/or Mixed Media Society plus discounts on all my art books, sneak peek at YouTube videos and new book content, behind-the-scenes fun and MORE? Join me over on Patreon today and get HUGE PERKS in return for a small monthly donation. ❤️ CHECK OUT ALL my art books on AMAZON (available in both Kindle and Paperback) ❤️ SIGNED COPIES of my art books on ETSY ❤️ MY FAVORITE ART SUPPLIES on AMAZON ❤️ MY BELOVED FACEBOOK GROUP ❤️ FOLLOW ME ON INSTAGRAM ❤️ FOLLOW ME ON FACEBOOK
1 Comment
Drawing eyelashes is something SO many people struggle with!! In today's real time eyelash drawing tutorial, I'm sharing 3 QUICK TIPS to make eyelash drawing easier, and will demo how to draw eyelashes using a mechanical pencil, an 8B pencil, two kinds of sharpies, & my super SECRET weapon for lashes drawing across all mediums!! Let's get to it!!  I love to use drawing references to inspire me as I create because I feel it helps inform my decisions when I'm drawing, and my work will look more realistic- even if I'm doing a whimsical face drawing!! Using a face drawing reference is SO much easier than trying to dream up ideas in my own head for the faces I want to create in my art journals and canvases. I've got two eyelash drawing references in my EYELASH DRAWING CHEATSHEET for you, along with 3 QUICK TIPS on how to make drawing eyelashes easier :) Click the button below and I'll email it right over! I hope you find this helpful!! Once you've got your eyelashes cheatsheet printed, let's pull out a piece of paper or your sketchbook and get started.  The easiest way to draw an eye is to start with a squished oval, then do some fine tuning. If you need help with drawing eyes (or drawing ANY facial feature!) - please download my 5 in 5 Practice Packet and be sure to watch the video series because it will really help you zero in on the nuances for how to draw eyes and ALL of the facial features. For today's purposes- I'm not adding any detail there- we're headed straight for the lashes.  As you'll see in today's video - eyelashes have a definited DIRECTIONALITY to them on every human eyeball. I like to think of them as parentheses. You will switch the direction of your parentheses at the mid point of whatever eyeball you're drawing. Watch the video and you'll see exactly what I'm talking about!! 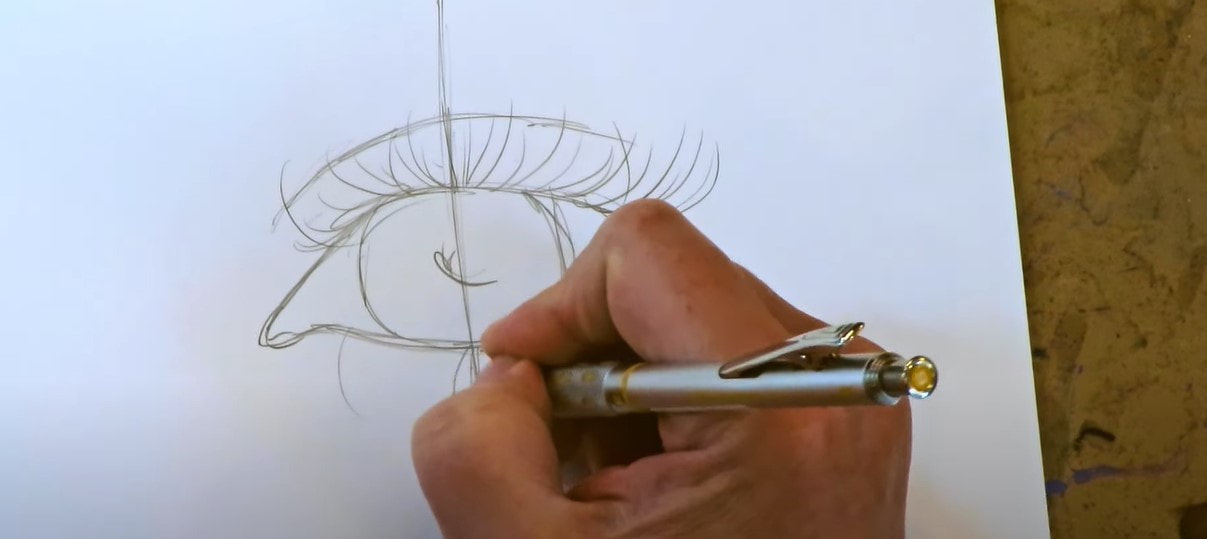 Lots of time I will see students drawing stick straight lashes like in the pic below at the right. 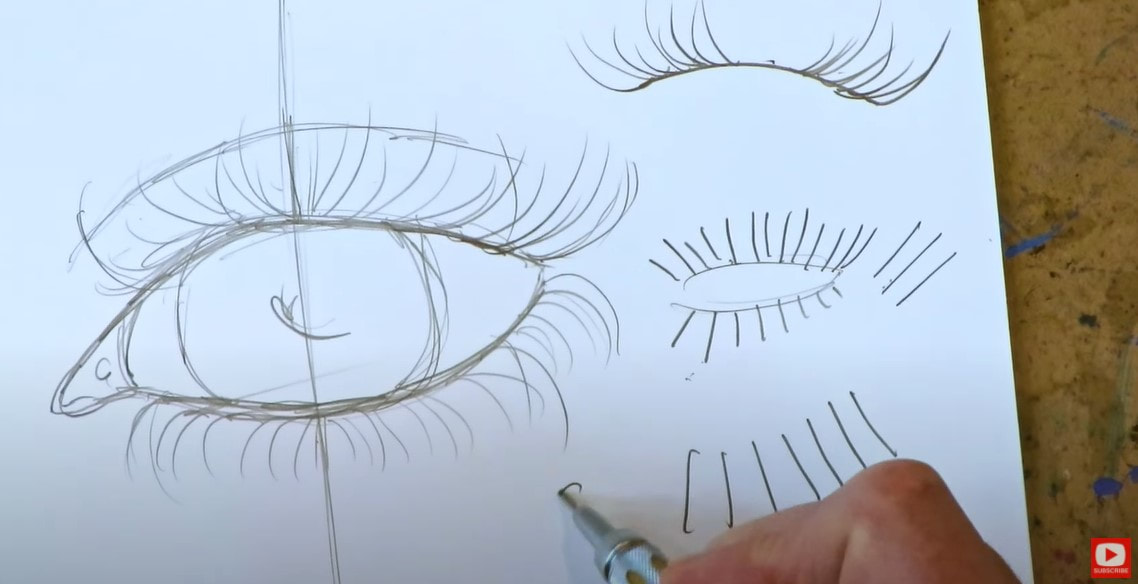 These tend to end up looking more like SPIDER legs than eyelashes, so make sure you ALWAYS keep in mind my second quick tip for drawing eyelashes - PRESSURE. 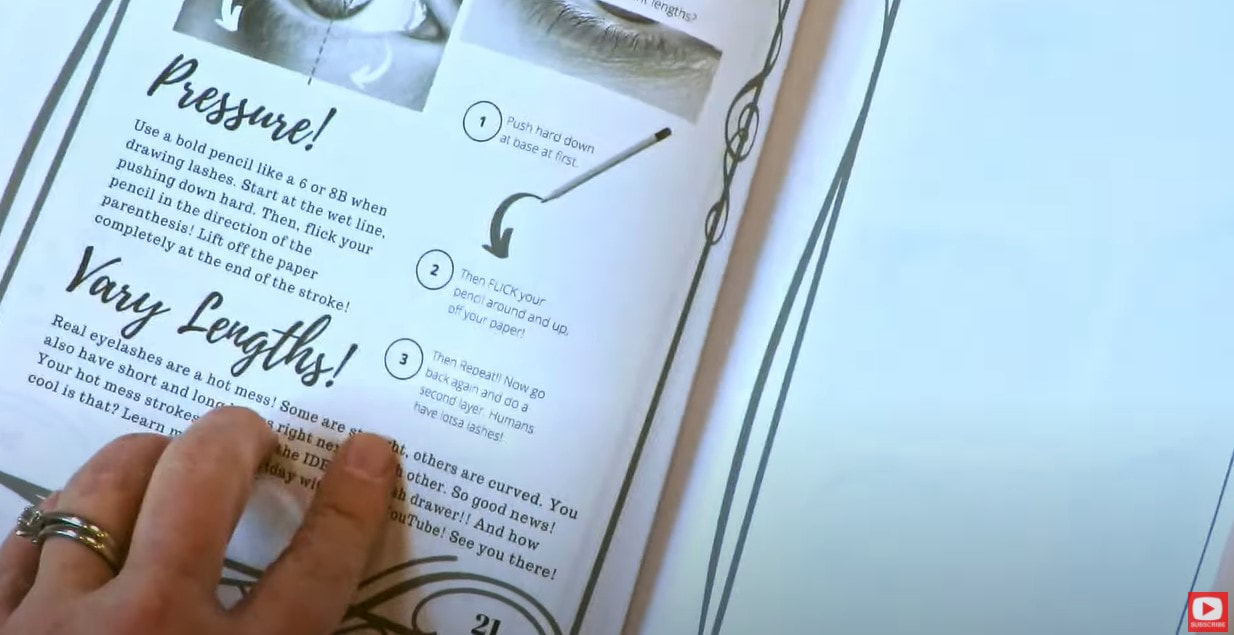 There is a flicking motion I use when I'm drawing eyelashes- no matter what medium I'm drawing in. Be sure you check out the video to see what I'm talking about. It's WAY easier to understand if you SEE it. 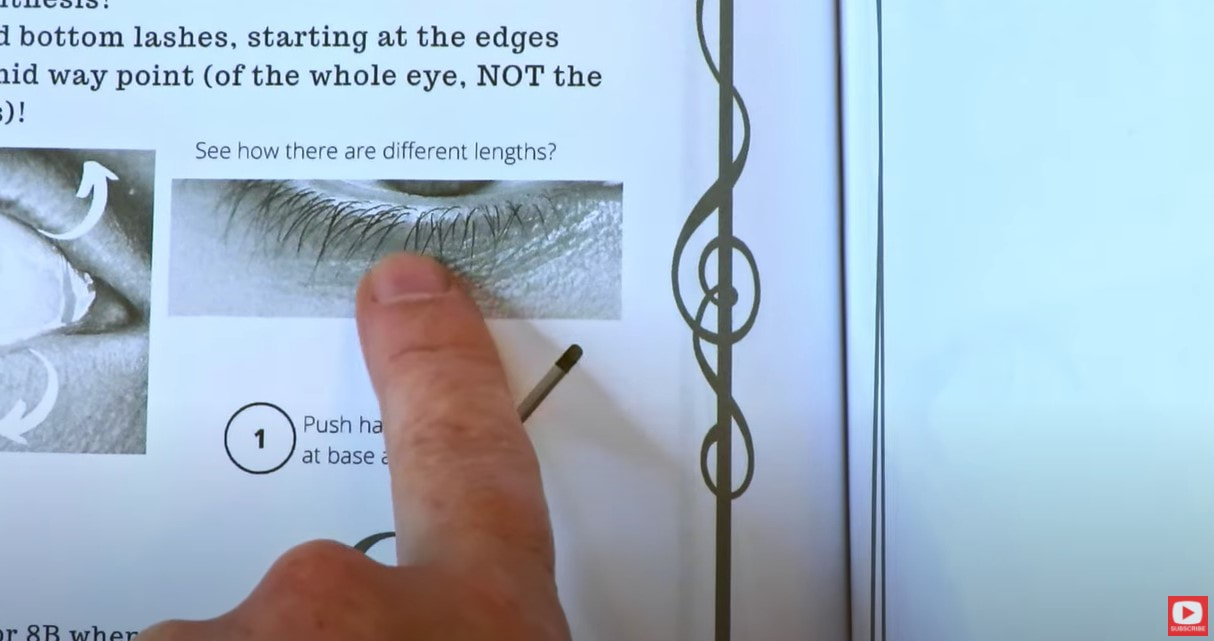 Tons of people have trouble with how to draw bottom eyelashes. I have a super weird analogy that helps me with this! I think of eyelashes kinda like shark teeth! When you think about shark teeth - they have multiple rows, right? We have the SAME thing going on with eyelashes! Take a look at my cheatsheet's eyelash drawing reference pictured above. When I zoom in on that (or if you print it at home), you'll see there are actually multiple rows of teensy hairs! Taking point #3 into account, let's put this into practice... 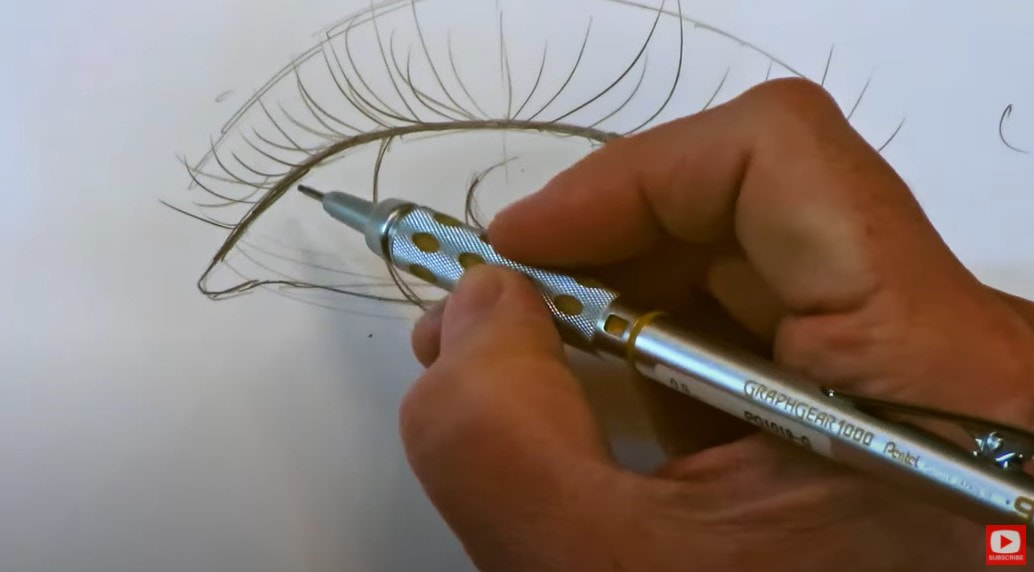 As you can see from the photo above, these lashes aren't finished. That's because I don't have ENOUGH eyelash LAYERS layers going on in my top row. This is a mistake I see happen all the time. There's an easy trick to it though! Just add MORE!!! You can also make some of your lashes THICKER at the root. If you're drawing a large scale eye (like the above pic), as I'm doing in today's video - the lashes look like they're missing something, don't they? They're missing volume! See how it changes when I add a little more thickness below? It's starting to look better, right? 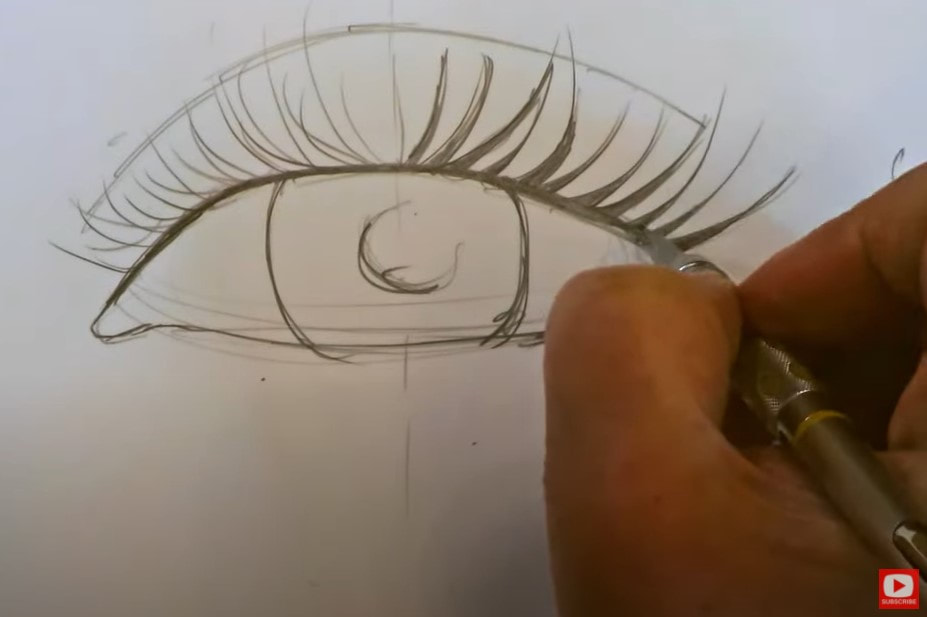 All of this was done using my mechanical pencil. It can take FOREVER to draw eyelashes with a mechanical pencil, even though you can get some beautiful effects!! 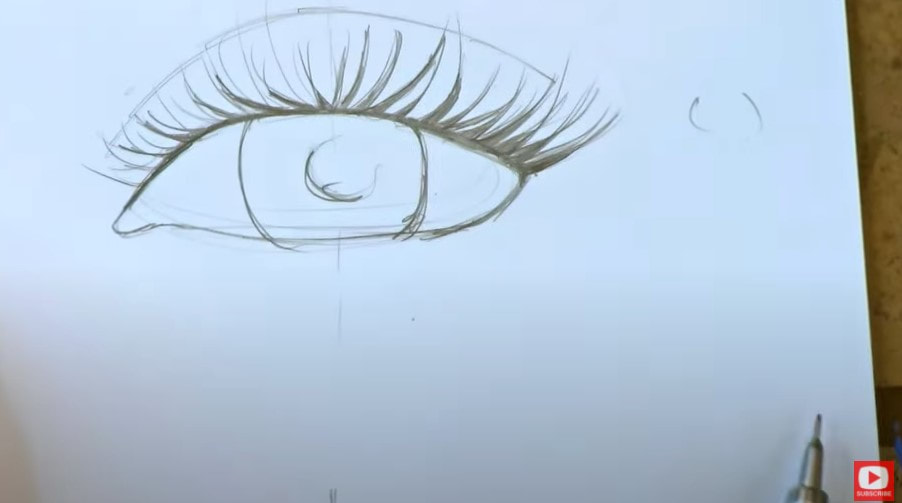 If you're a little less patient (like me!!), using a really soft pencil (like an 8B), can be very helpful to vary your lines more quickly. 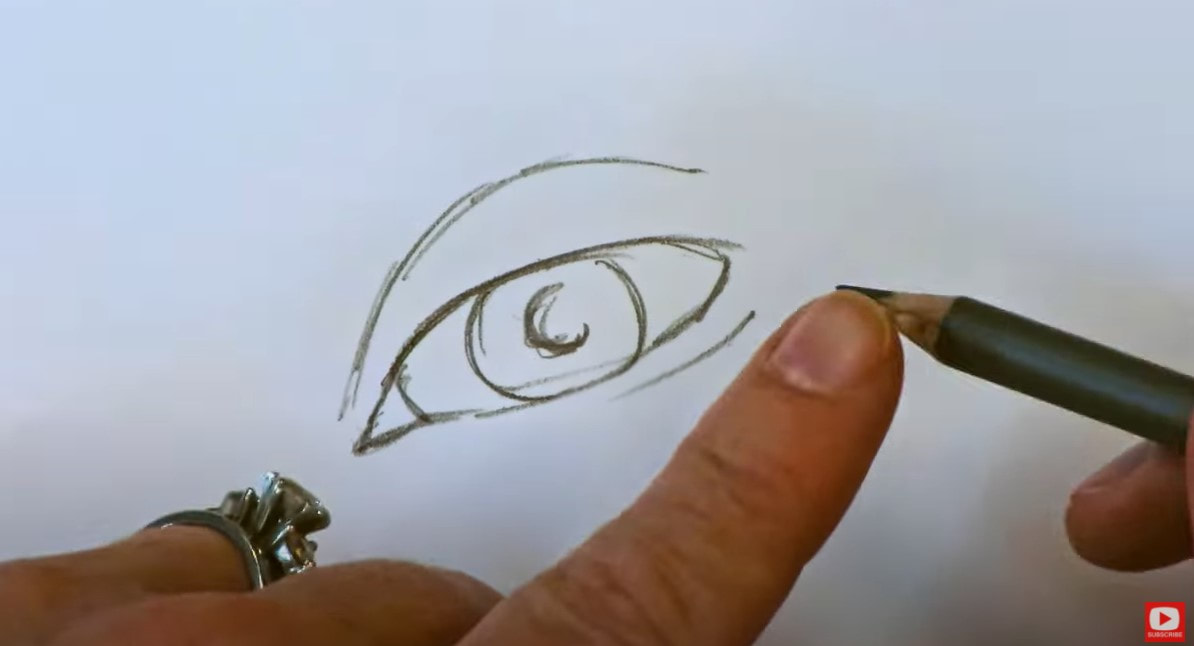 Then take into consideration, my 3 QUICK TIPS of Directionality, Pressure, and Varying Lengths. When you watch the video, you'll see how quickly I was able to knock all three out using my 8B pencil. 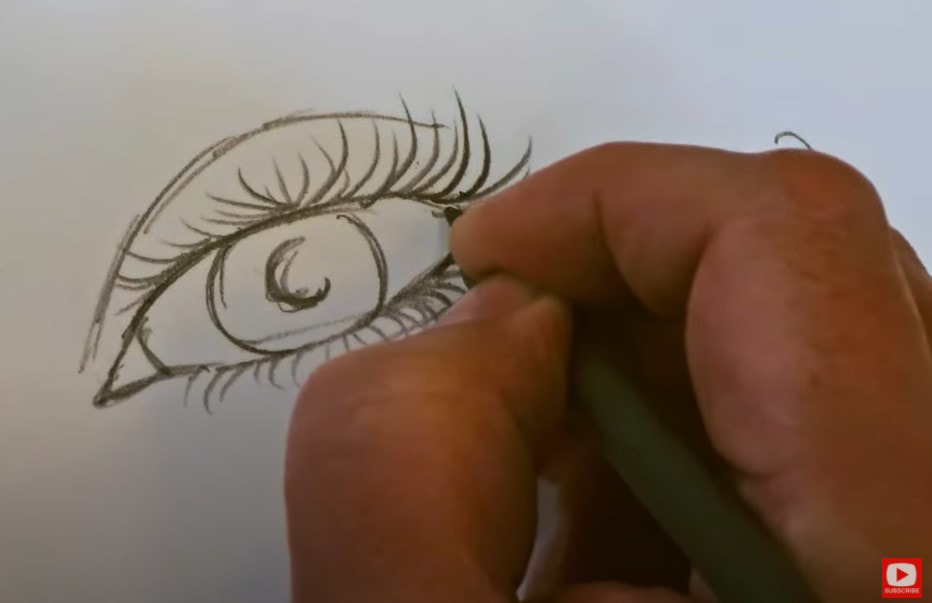 Add in a blending stump, and you'll achieve even more QUICK results! 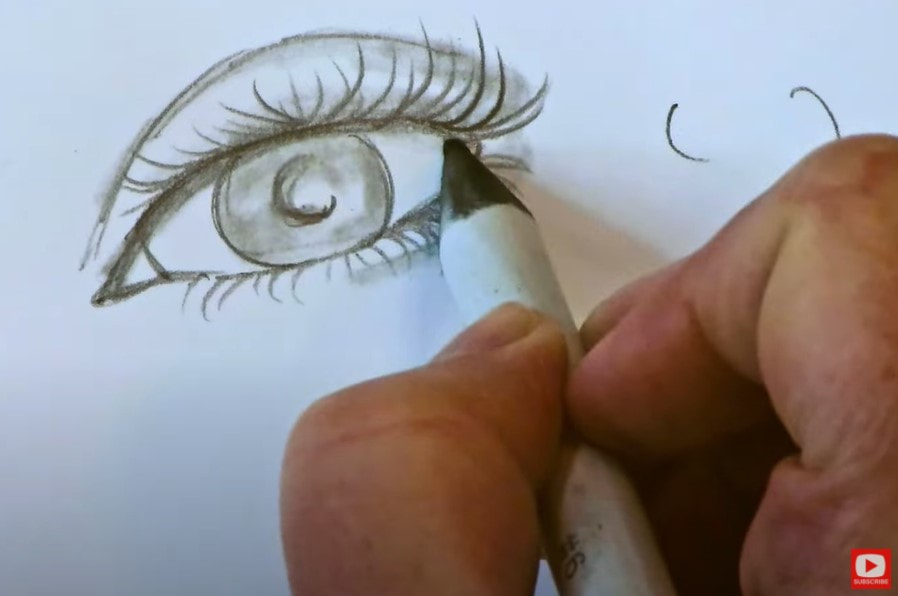 If you decide to draw eyelashes with a thin sharpie, you'll find this is very similar to working with a mechanical pencil. It can be a little difficult to vary your thickness in the strokes, but can also be very precise if that's what you're going for. 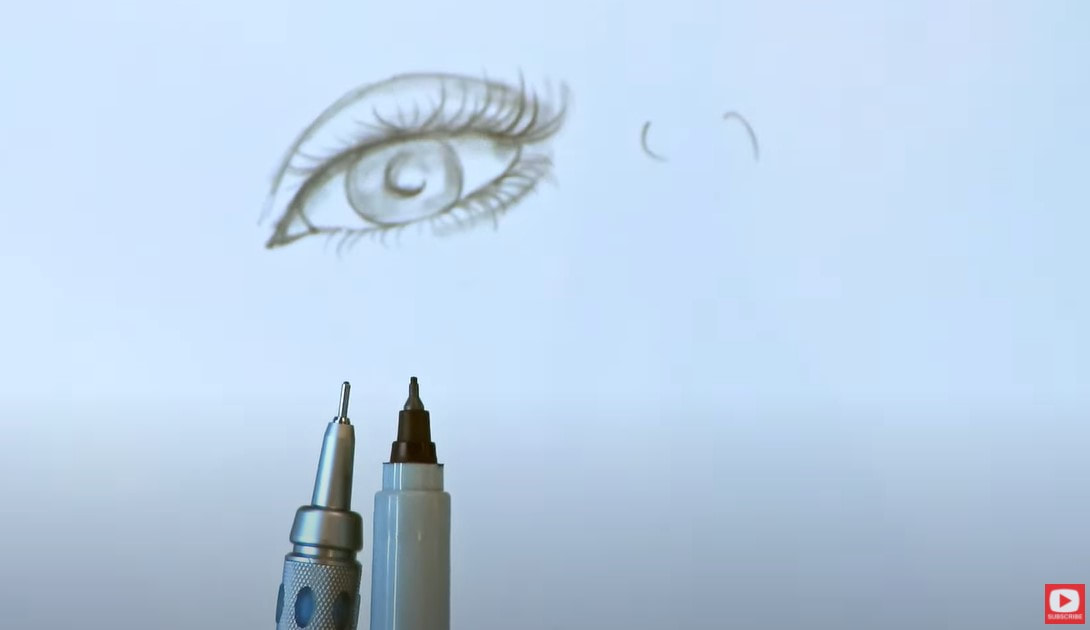 It helps to use a DOUBLE LINE when working with a thinner lead or marker nib like this. 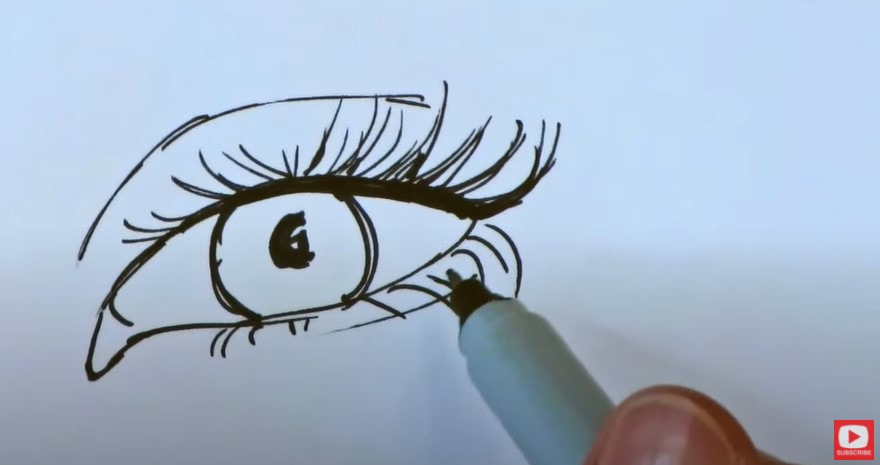 Another trick I use if I feel like my eyelashes are looking a little wonky or if I want to make it look like the girl I'm drawing is wearing eyeliner, is to thicken that lid line. Then that line takes a bit more center stage and people might not notice the wonky eyelashes as much :) 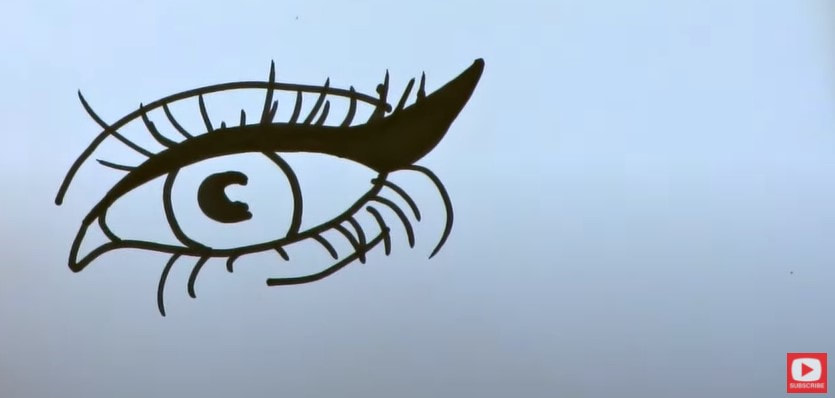 When I'm doing my mixed media faces, eyelashes are typically the LAST thing I add to my girls! Sometimes if I'm having issues with how the lashes are coming out, a great cheat is to turn whatever you've done into cat eye makeup! Then you can cover up whatever mistakes you've made and make it look intentional, like this was the look you meant to do all along!! 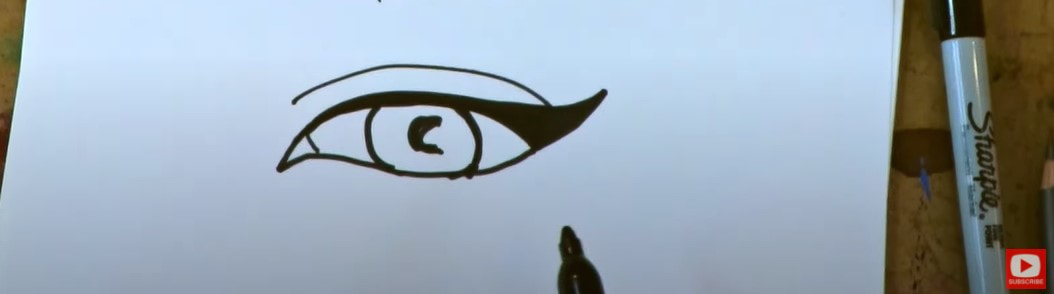 Another trick that works AMAZINGLY for mixed media faces is to just simplify the lash line completely and turn it into cat eye makeup without additional lashes on the top or bottom. It looks really cool, is super fast and you're done!! Pretty fail safe!! You can always add in a few thinner lashes if you feel like you want to - but you totally don't have to. 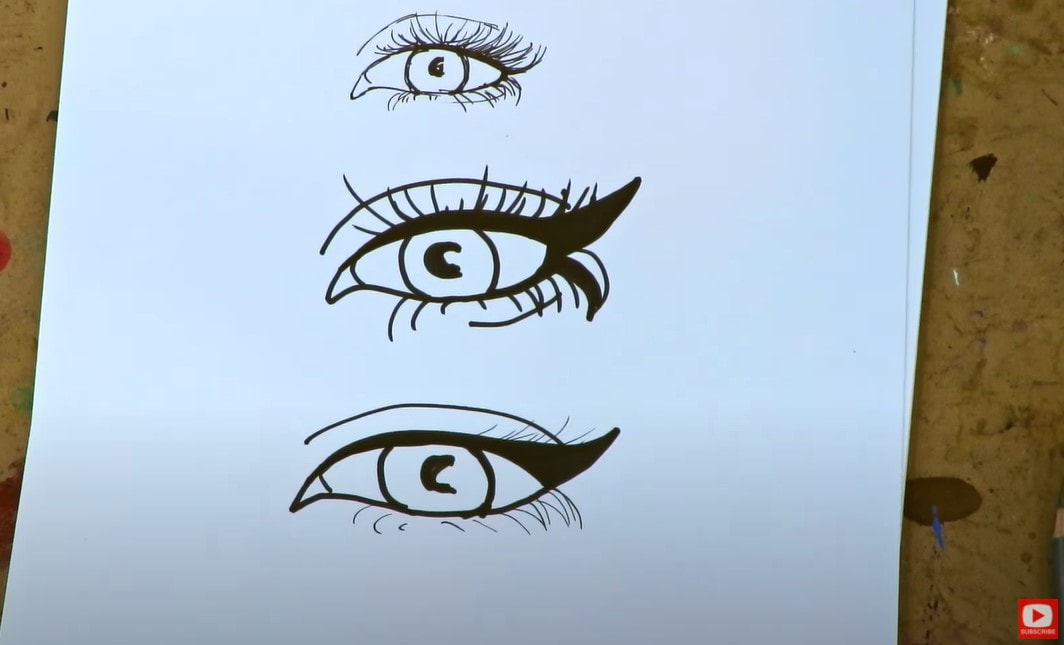 Using a brush pen is another AWESOME way for drawing eyelashes! It doesn't matter which medium - I've felt my pental pocket brush pen is amazing for drawing eyelashes because it has such a sensitive nib. It takes no effort to vary the pressure, and I feel like the eyelashes I draw here look SO much more realistic because of the varying pressure. I use this pen across both mixed media and drawing. It does take a bit of practice- so if you just dive in with this product at the end of a project that you're in love with - you have to be careful. I highly recommend practicing with it off to the side until you get the feel of how it works and what kind of pressure you need to use to get the line weights you're looking for. Be sure to watch the video to see how the various effects and line variation you can achieve from this amazing tool!! 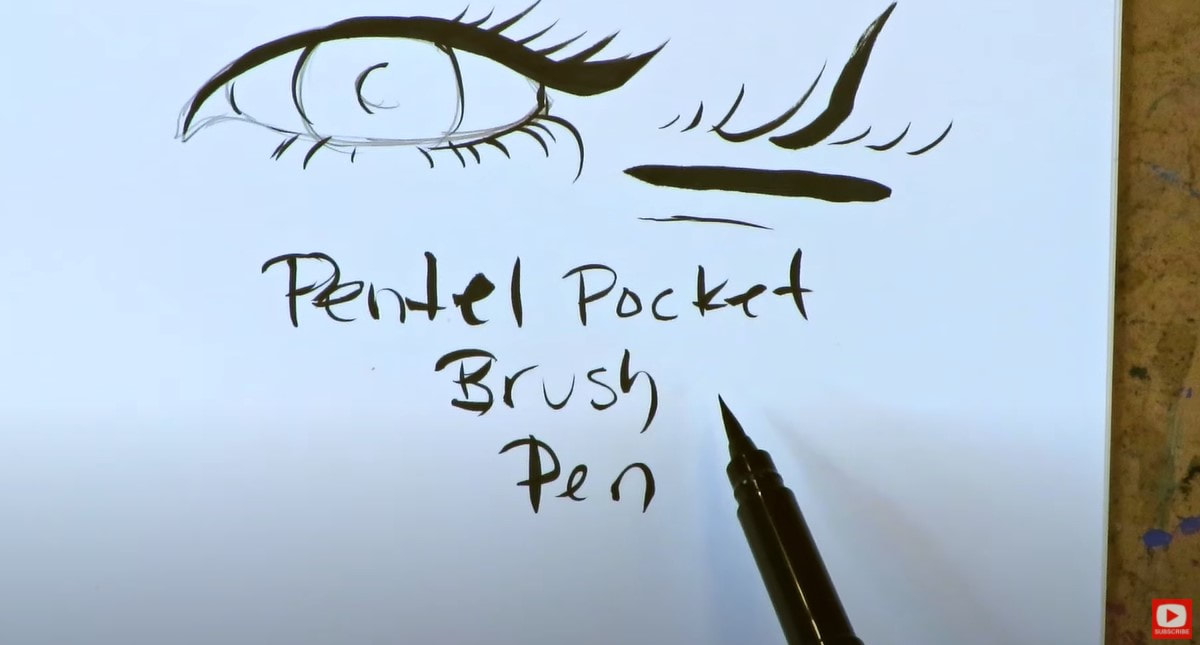 I hope you found this video helpful!! Thanks SO much for hanging out with me today!! I'll see you back here NEXT Monday!! Have a wonderful week!!!
❤️ Want FREE, immediate access to my Fun Fab Drawing Club and/or Mixed Media Society plus discounts on all my art books, sneak peek at YouTube videos and new book content, behind-the-scenes fun and MORE? Join me over on Patreon today and get HUGE PERKS in return for a small monthly donation. ❤️ CHECK OUT ALL my art books on AMAZON (available in both Kindle and Paperback) ❤️ SIGNED COPIES of my art books on ETSY ❤️ MY FAVORITE ART SUPPLIES on AMAZON ❤️ MY BELOVED FACEBOOK GROUP ❤️ FOLLOW ME ON INSTAGRAM ❤️ FOLLOW ME ON FACEBOOK Derwent Inktense Pencils are water soluble pencils that ALSO claim to be PERMANENT once dry. I've actually never tried inktense pencils in my Hamburger system and decided to test this permanent claim out first to see if it's true. Get ready for a SHOCKER in today's mixed media art supply demo!! 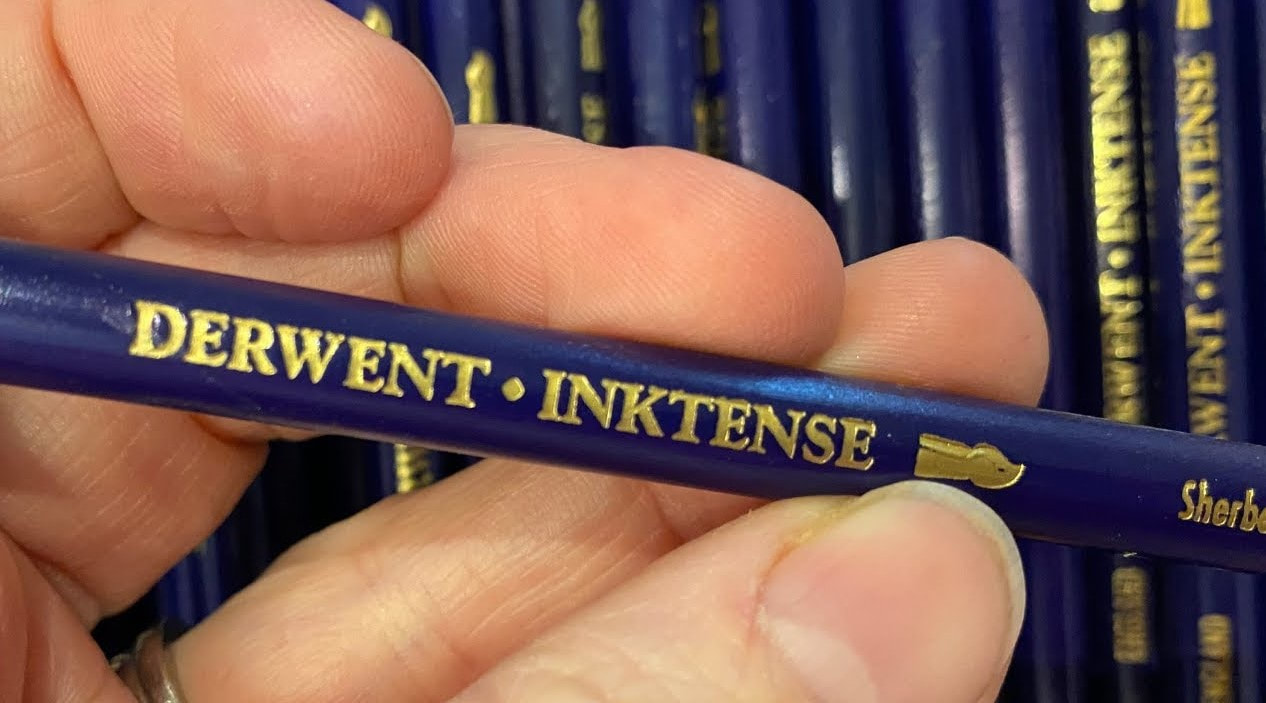 Inktense water soluble pencils are filled with a "magical" ink - that's why they're called "inktense" instead of watercolor pencils. Confession: I never work with Derwent inktense pencils other than to occasionally use them like I would use a watercolor pencil! I decided today's test was the perfect opportunity to try a variety of water soluble pencils vs watercolor pencils to see which ones move the most when I attempt to reativate them all a second time!  If you've got a copy of my hamburger system cheatsheet, water soluble supplies can be used in layer three, OVER your collage and paint layers. Not sure what my Hamburger System is? It's my signature mixed media layering process! I compare layering my supplies to the way you layer toppings for the perfect burger! I've got an entire FUN YouTube series of tutorials, cheatsheets, and even wrote a mixed media art BOOK about it!! Download the FREE, one-page cheatsheet that explains it all by clicking the button below.  I'll send it straight to your inbox so you can print it and keep it at your art table for reference to help you with your own mixed media layering.  I've collected a ton of watercolor pencils and watersoluble pencils over the years because these are one of my favorite ways to draw something cute, and add a little quick shading with watercolor effects. I've lined up 10 watercolor and watersoluble pencils for today's Derwent Inktense review. 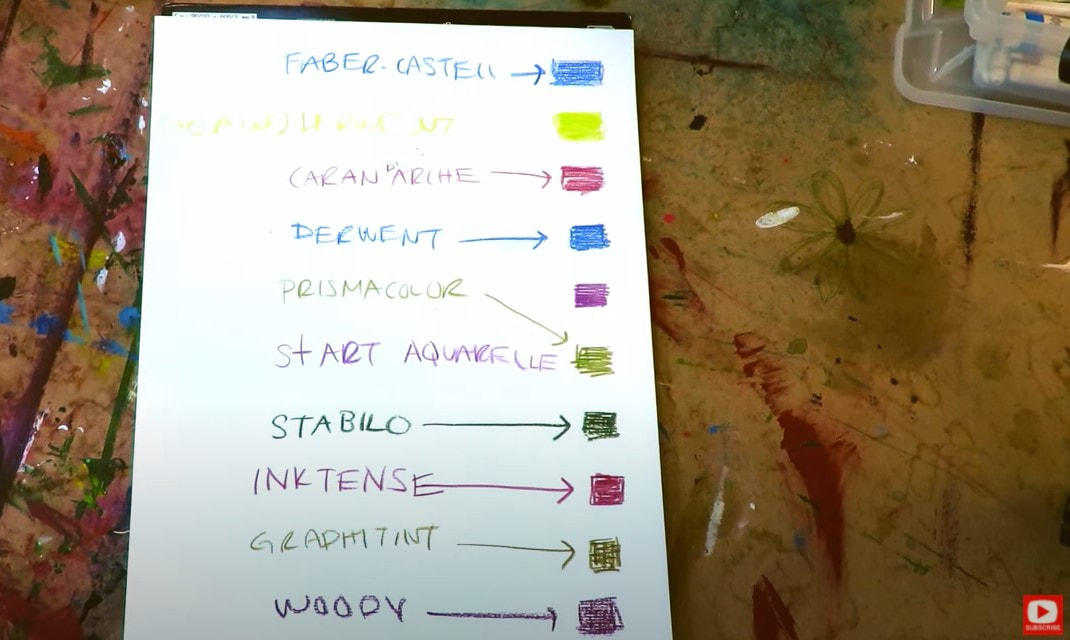 So far I'm loving how the Aquatones (also by Derwent) are activating. Sadly, this product is becoming hard to find though. There's a rumor it was discontinued, so if you go hunting for them, you might have a hard time. 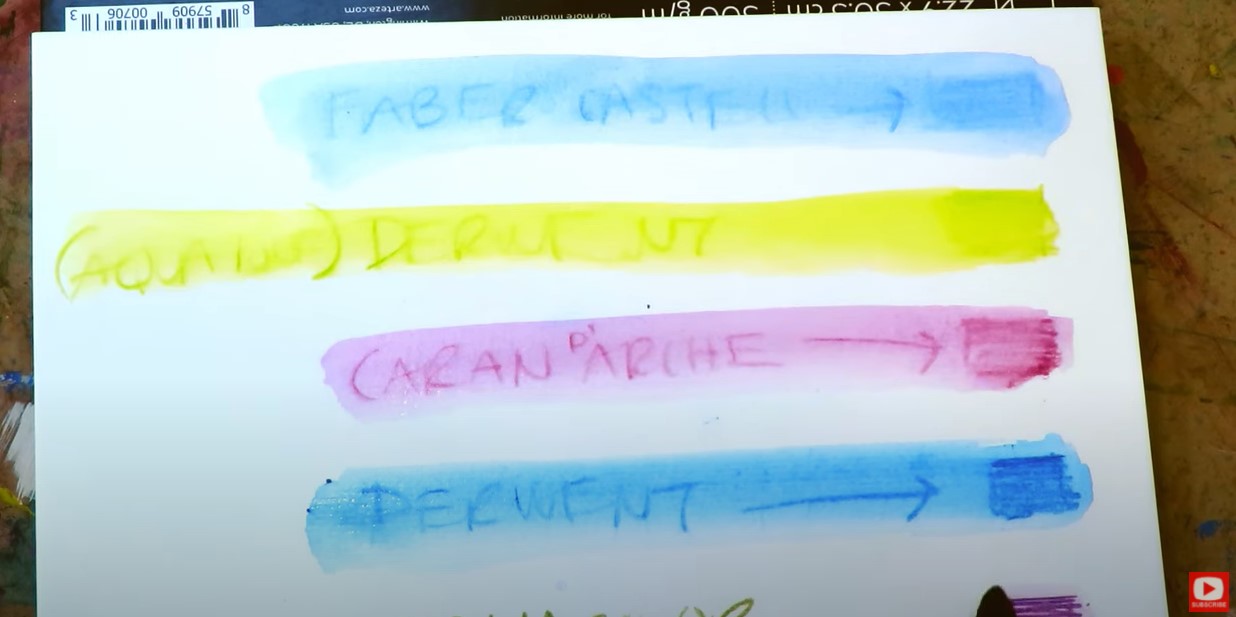 As you can see in today's mixed media art supply demo, even after I activate all the products, you can still see the pencil line from each one (except for the aquatones - which really seem to melt as soon as the water hits them). 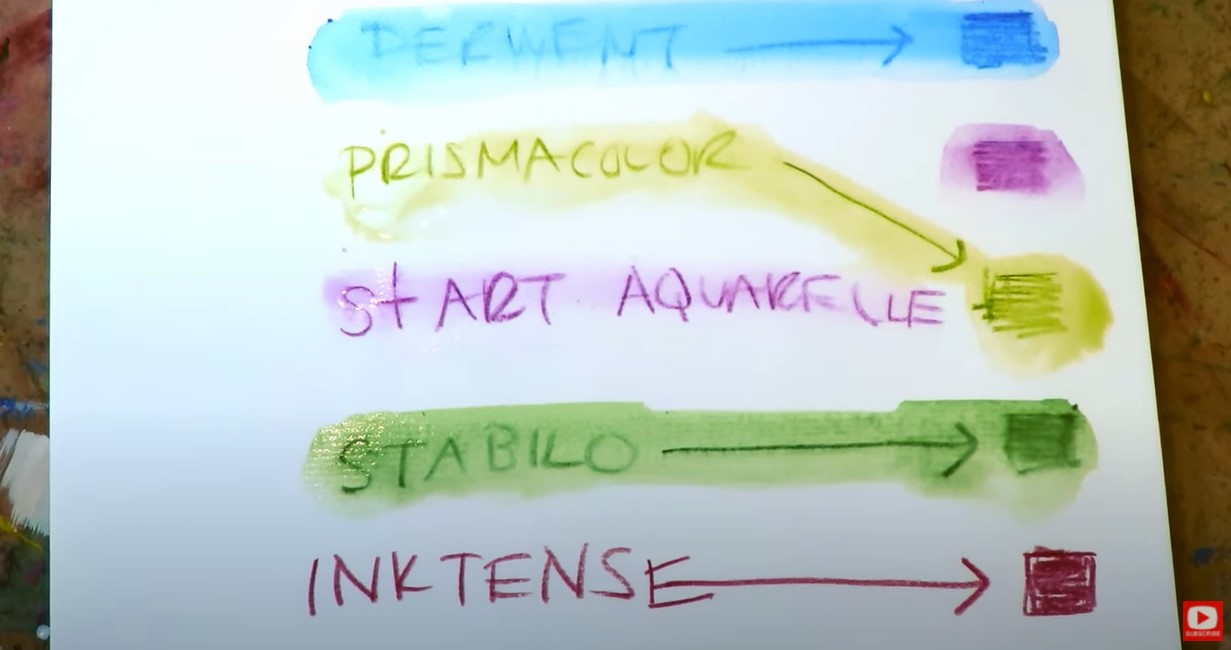 This is a super cool effect if you like the look of mixed media drawing and still want pencil lines to be visible in your work. If you don't - you may prefer to reach for a watercolor marker, because that pigment will totally dissolve for you. After I activated each product, I hit the page with my hairdryer to make sure each one is fully dry. 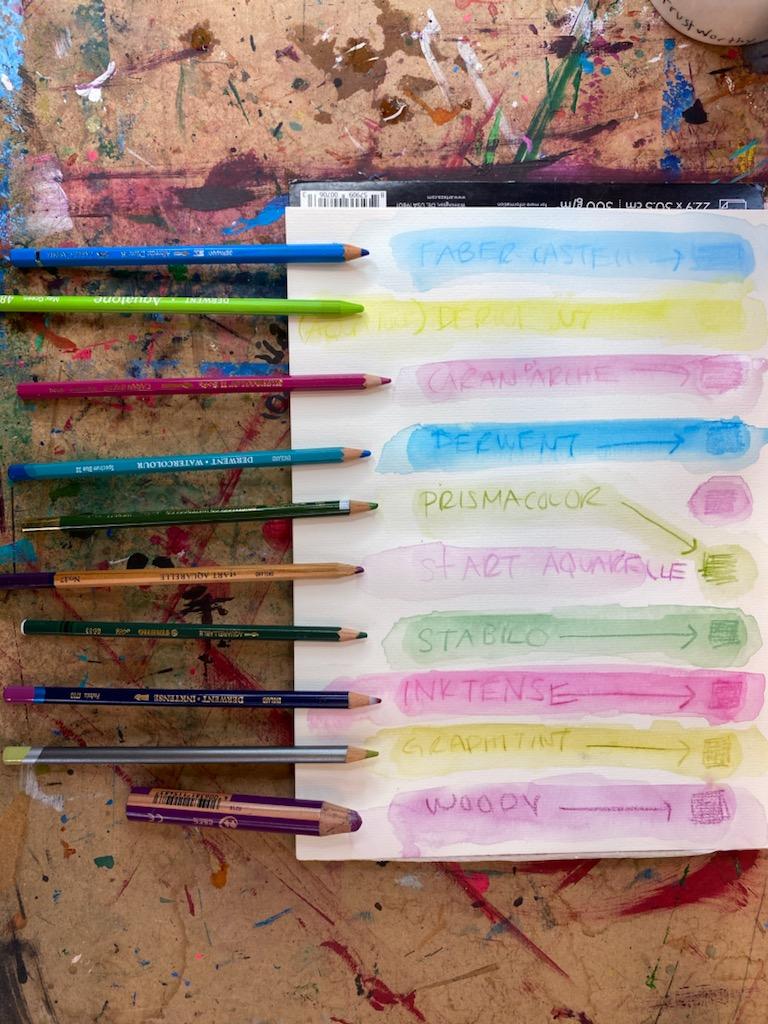 Once I dried everything and came back to rewet, the Derwent Aquatones (woodless pencil), Watercolor and Derwent Graphitint are the MOST watersoluble. I tested the inktense pencils last! CLICK OVER to watch the video and find out if they live up to their marketing claim ... is the ink permanent, or will it move? Thanks for hanging out with me today! I hope you have a fab week!!
❤️Want FREE, immediate access to my Fun Fab Drawing Club and/or Mixed Media Society plus discounts on all my art books, sneak peek at YouTube videos and new book content, behind-the-scenes fun and MORE? Join me over on Patreon today and get HUGE PERKS in return for a small monthly donation. ❤️ CHECK OUT ALL my art books on AMAZON (available in both Kindle and Paperback) ❤️ SIGNED COPIES of my art books on ETSY ❤️ MY FAVORITE ART SUPPLIES on AMAZON ❤️ MY BELOVED FACEBOOK GROUP ❤️ FOLLOW ME ON INSTAGRAM ❤️ FOLLOW ME ON FACEBOOK Only have 5 minutes? Today's face shape drawing lesson is for YOU! In today's quick, step by step tutorial, we're going to be studying reference photos for drawing 5 face shapes in real time. If you've always wanted to learn how to draw a face, have been struggling with how to work drawing practice into your daily life, if the faces you draw ALL LOOK THE SAME, or ... if you need to add MORE FUN into your art practice, THIS SERIES IS FOR YOU!!l  We're in week six of the 5 in 5 Drawing Facial Features series on my YouTube Drawing Channel, and this week is focused on how to draw a face shape step by step!! If you're just discovering this series, we are working on drawing facial features and only spending about 5 minutes with each face drawing reference I've provided. This whole series on my YouTube drawing channel is a FUN way to help us establish a daily art practice that doesn't take forever, and will help increase your drawing skills as an artist - EVEN if you're a beginner, who just wants to finally learn how to draw a face!!! 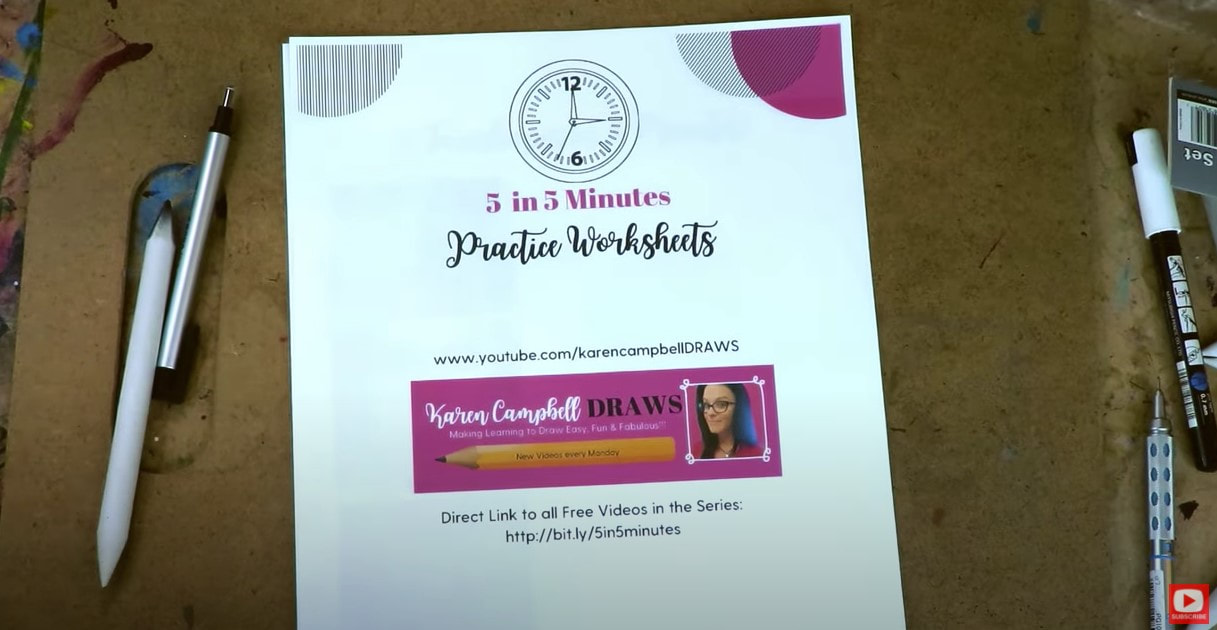 If you don't have my 20 -page, 5 in 5 Practice Packet - you'll want to download that now. This has all the face drawing references you need for the entire series, and you can work directly on each practice worksheet. Best of all, it's yours, FREE. Simply click the button below, and I'll send it straight to your inbox!  Even though I'm on week six of the series, don't feel like you're behind if you are just discovering this. This drawing practice is for YOU to do on your own time, at your own pace. There is no schedule, just FUN!! All you need to do the drawing exercises is my 5 in 5 Practice Packet is basically a good eraser and a pencil. You totally don't have to get fancy. Before we continue, super quick announcement! All product links noted below are Affiliate. I may earn a small commission if you choose to order through these links, but by law there is never any additional cost to the consumer for doing so. I only reccommend products I actually use and love. Thank you for your support!  If you are interested in some fancier drawing tools - I'm using two of my favorites today: a Blackwing pencil, and my vanish eraser. Since today we're just going to draw face shape, there isn't any shading, so, no need for a blending stump. In fact, if all you have is a regular #2 school pencil- that's perfect! You never need fancy supplies when you're hanging out with me. Let's get started!! 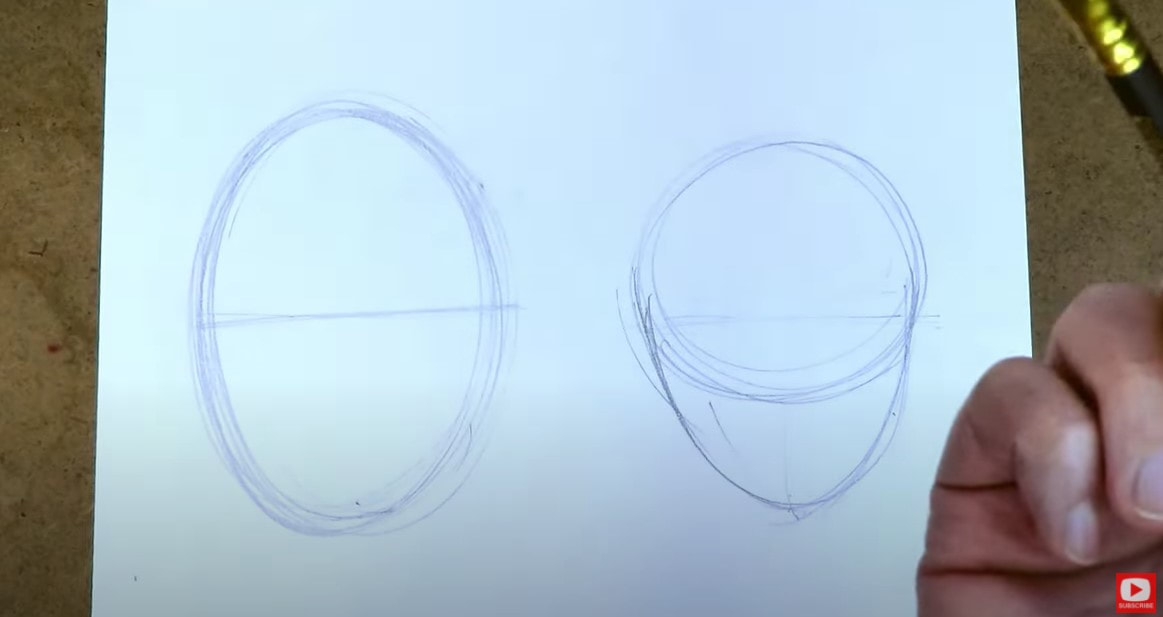 Face shape drawing may not seem like it's all that important, but I feel like it's something that's typically overlooked, because it's so subtle. It's SUPER easy for artists who love whimsical face drawing to discover a "way" they like to draw face shape (mine is by drawing a zillion ovals, on the left above!!). Then before you know it, suddenly we find ourselves with a portfolio of faces that all look the same - even if they're beautiful!! One of the ways you can avoid what we call "same face syndrome" in art - is to use a face drawing references when you're drawing, because these images will inspire you to try new angles, facial feature positions, etc. Hop over to the video so I can SHOW YOU exactly what I mean ;) 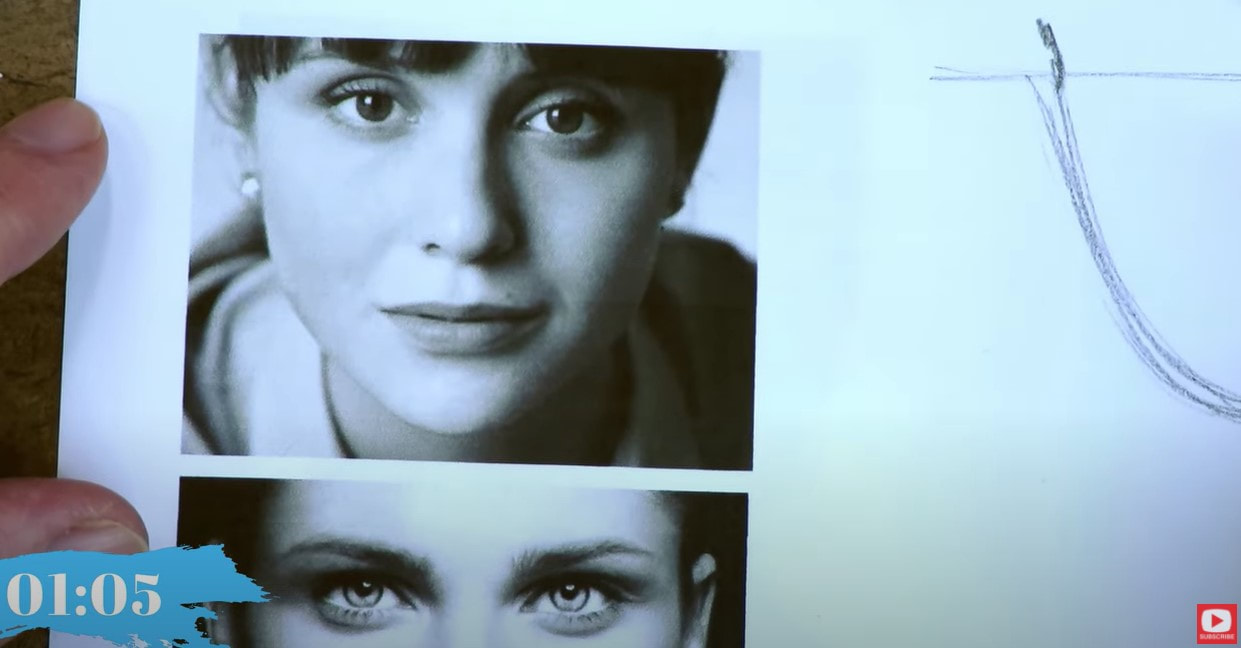 When I'm trying to vary face shape, I pay close attention to bends and angles in the jaw, because this varies so much from human to human. As you'll see in the video, I can't even start this face without drawing a million ovals, LOL! That's just my thing!! From there, I note my face drawing guidelines, and start to refine, based on what I see in my reference photo. If you're not sure what I mean when I say "face drawing guidelines," you DEFINITELY need my cheatsheet to help you understand where the facial features should rest on every face you draw. Guidelines are THE KEY to making your face drawings proportional! Simply click the button below, and I'll send you my one-page Whimsical Face Drawing Guidelines. I printed and laminated this cheatsheet for myself because these guidelines are SO important. They will make every face you draw look proportional, no matter what ethnicity you're drawing. In general - we're surprisingly ALL the same as humans in this regard, even though we're all so unique! If you check out my Whimsical Women of the World face drawing series on YouTube, you'll see exactly what I mean!! 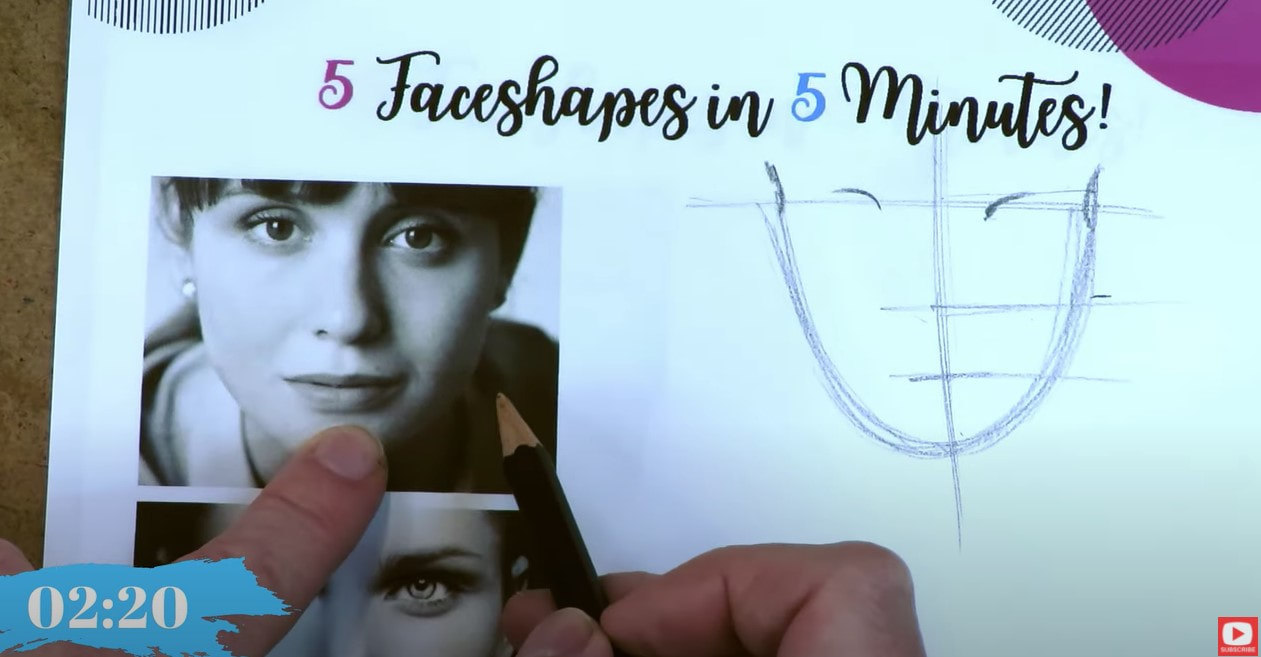 Sketching in my face drawing guidelines helps me zero in on each little section of the face, one at a time. This helps me pay closer attention to the angles and curves I need to replicate in my drawing, and helps the WHOLE face not feel so overwhelming. Remember I'm doing all of this in real time over on YouTube, so be sure to join me so I can teach you HOW to draw a face shape step by step!! 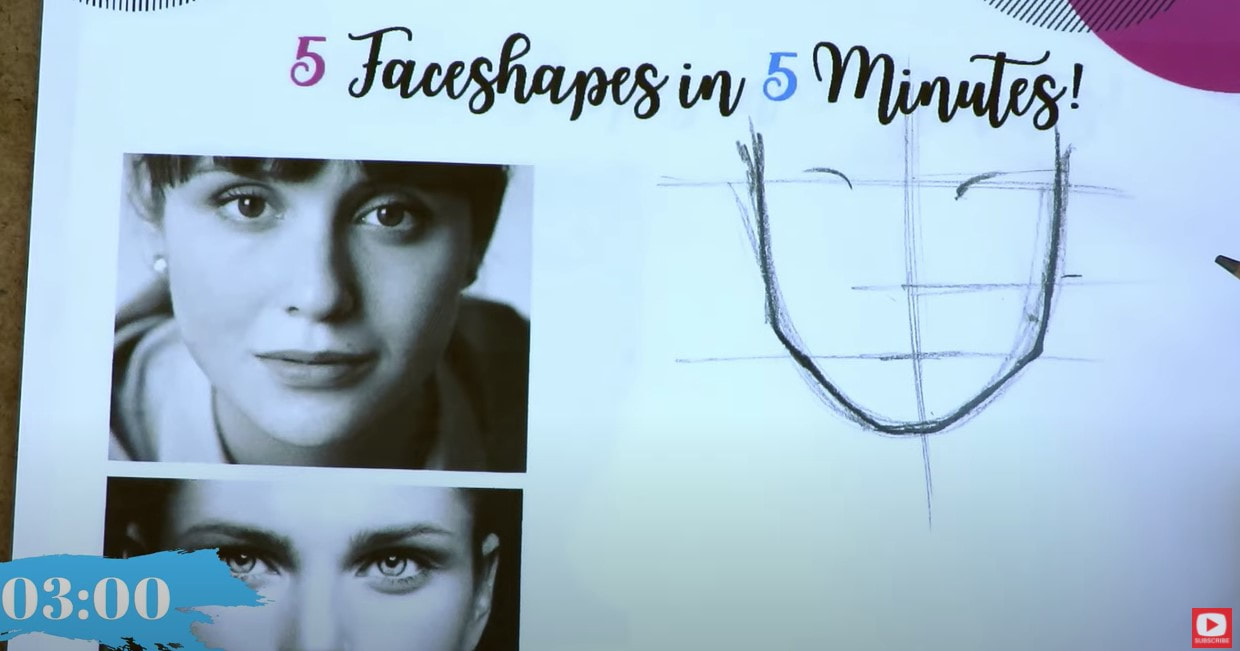 I spend the bulk of my time for each of these face drawing references observing, and trying to replicate what I see. There's no shading or extra detail to layer in like we had in previous weeks, so you will likely breeze through these exercises! Just because you might get through them quickly doesn't mean they're not worthwhile!! You're definitely sharpening your observational and drawing skills as you draw face shapes. 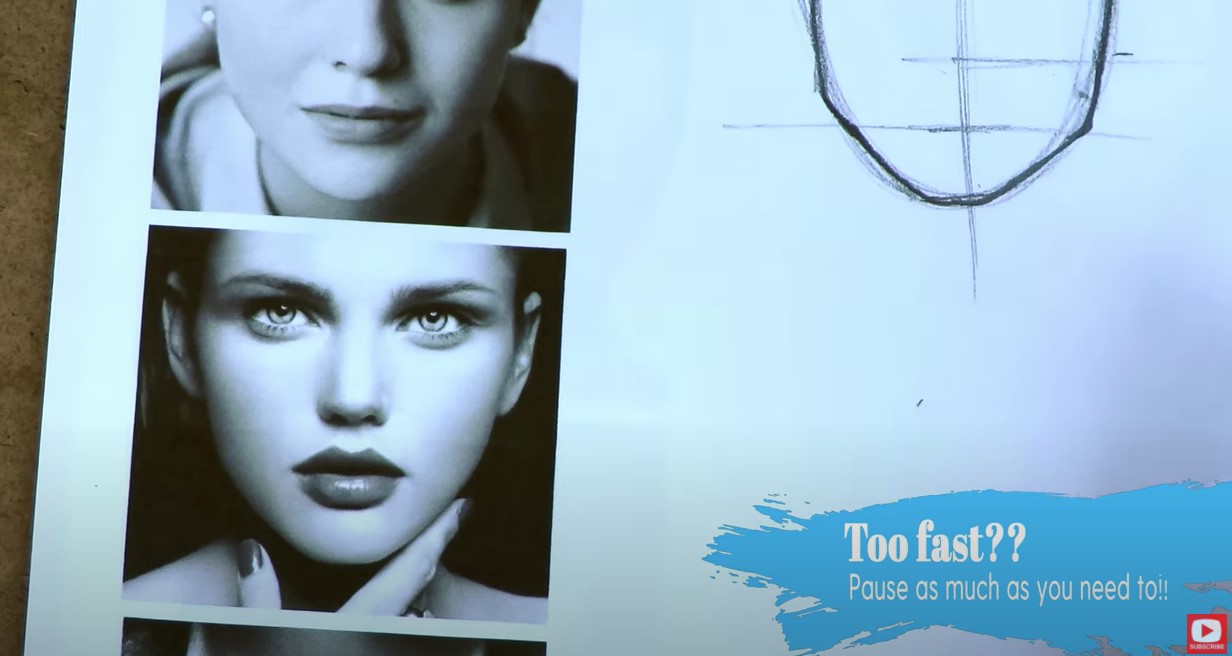 Our second reference image has more curves happening in her face shape. Again, it helps me to first sketch out an oval, mark my face drawing guidelines, and focus on drawing one small section at a time. 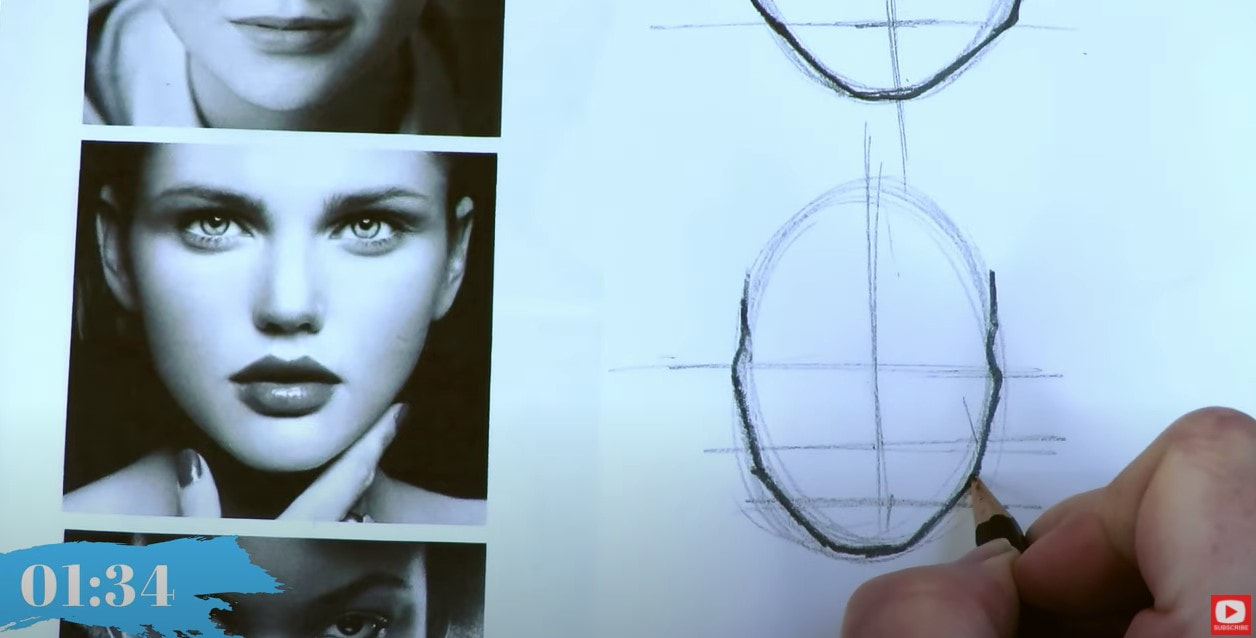 As I get to reference image 3, I notice she has a very different chin from the others. Looking at this makes me go back and take a second look at the previous chins to see if I caught the nuances there, or if I need to make adjustments. Remember, you can ALWAYS go back and do the same when something new like this catches your eye. 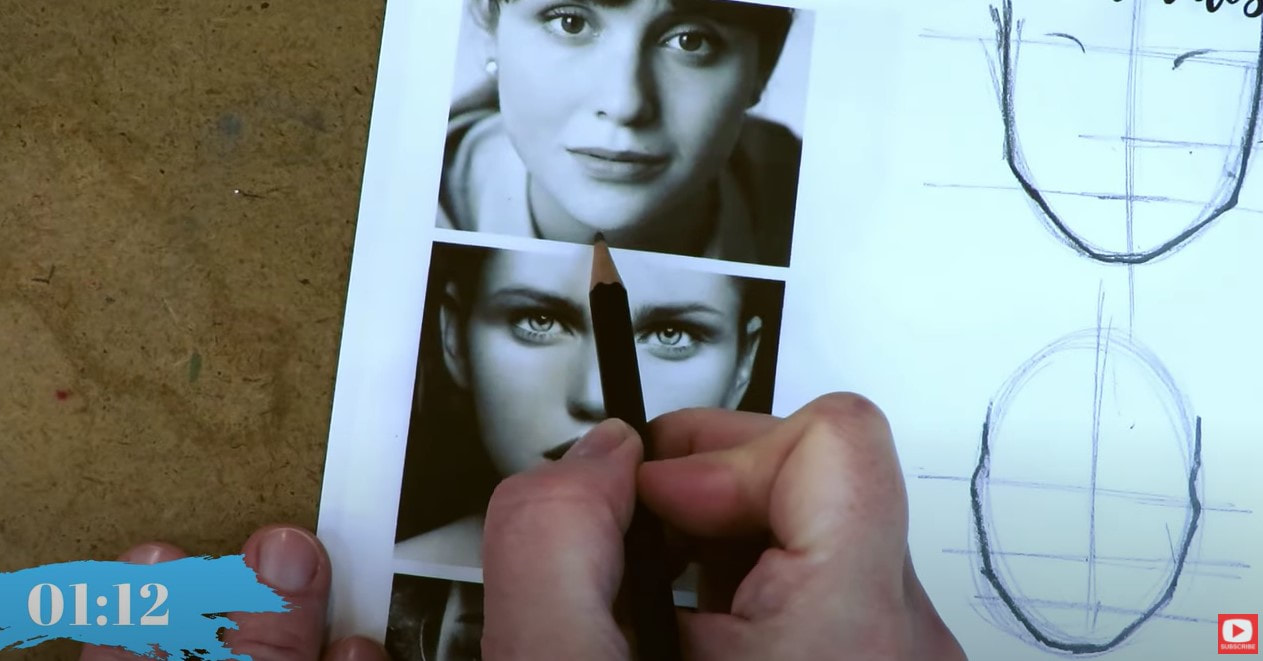 I specifically chose each of these face shape drawing references on purpose because I felt they were all so unique, and wanted to give you some good practice at drawing different face shapes! The one below felt like really great practice for round face shape drawing. 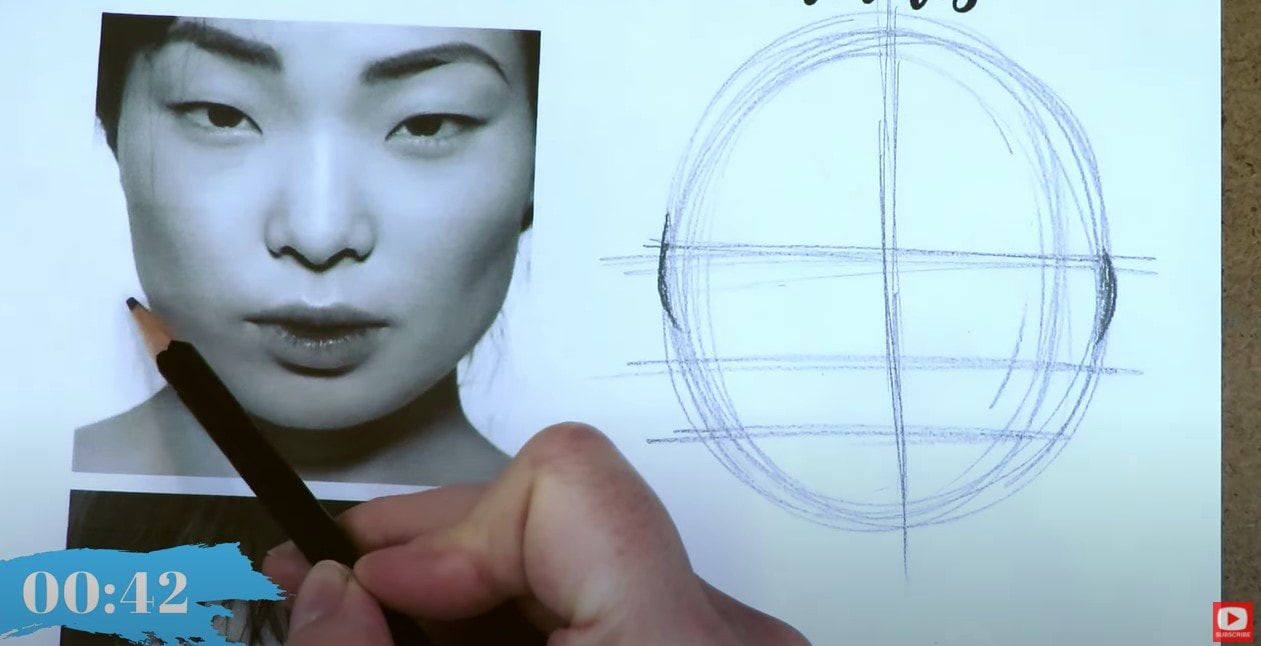 Her angles and curves are SO interesting, right?! 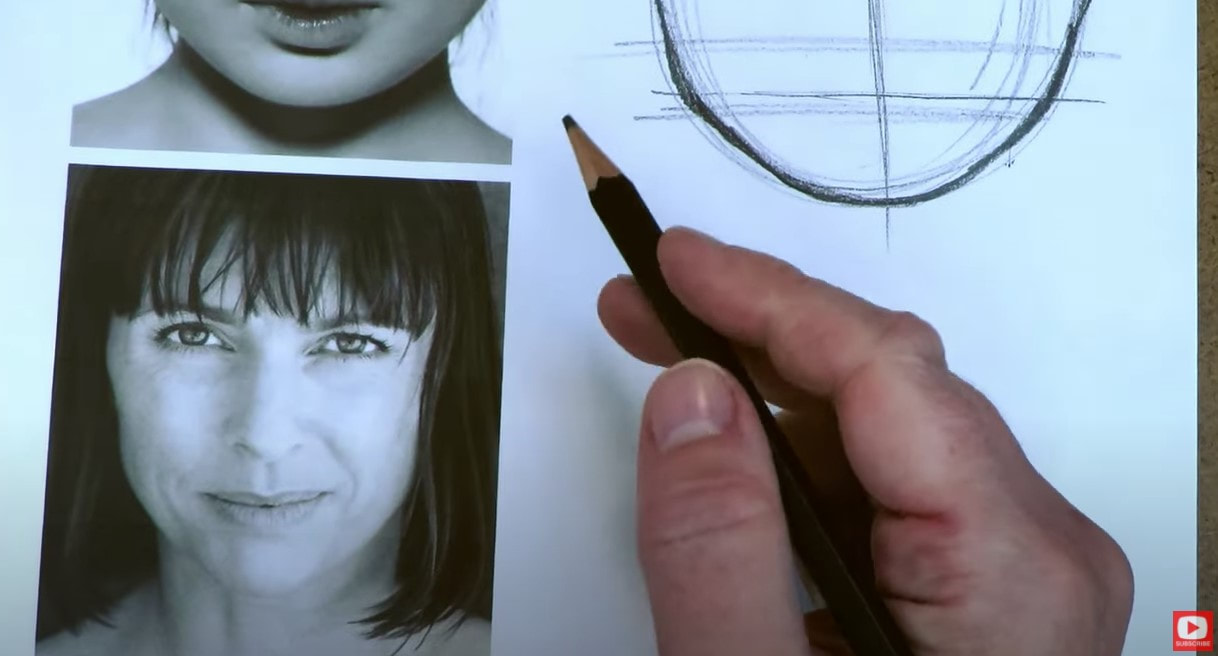 As you focus on basic face shape drawing with me today (and I HOPE you're doing this with me!!!), you'll notice that you don't need to make huge variations from face to face for each drawing to take on a life of its own! 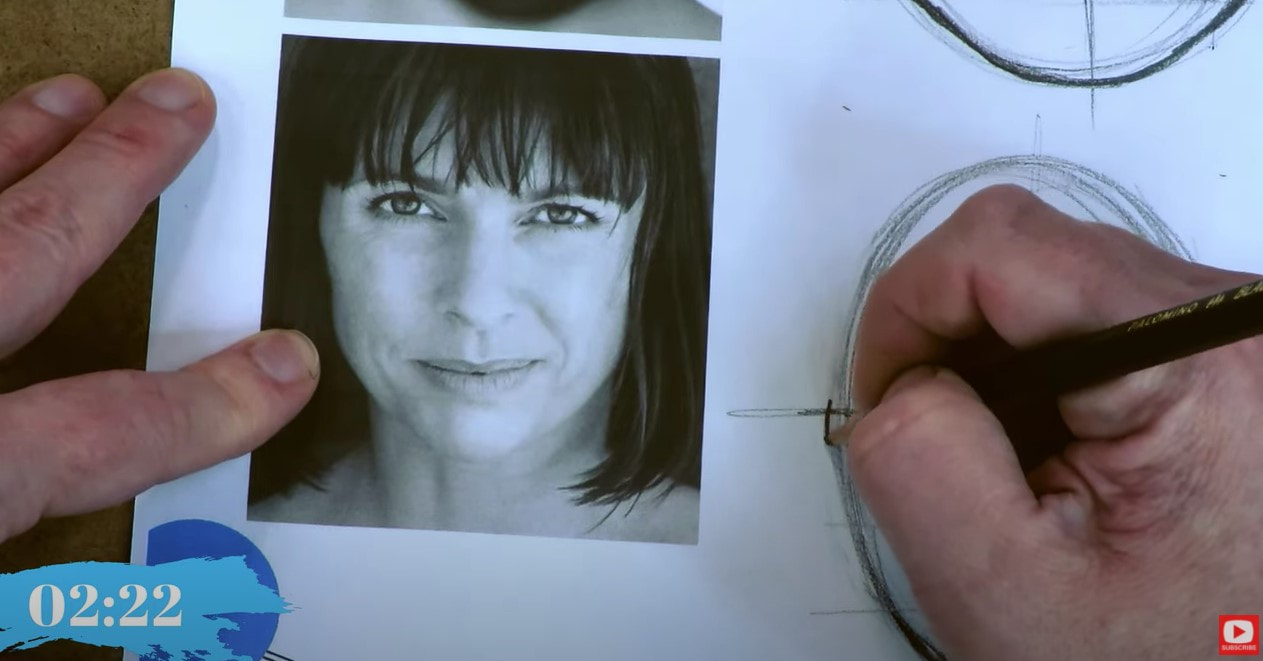 If you haven't been using drawing reference images for your art in the past, I think they will help you sharpen your observational skills and make your drawings look SO much more sophisticated. Even if you want to draw in more of a whimsical or cartoon style vs realistic - taking characteristics from real life people will add more depth to your work. 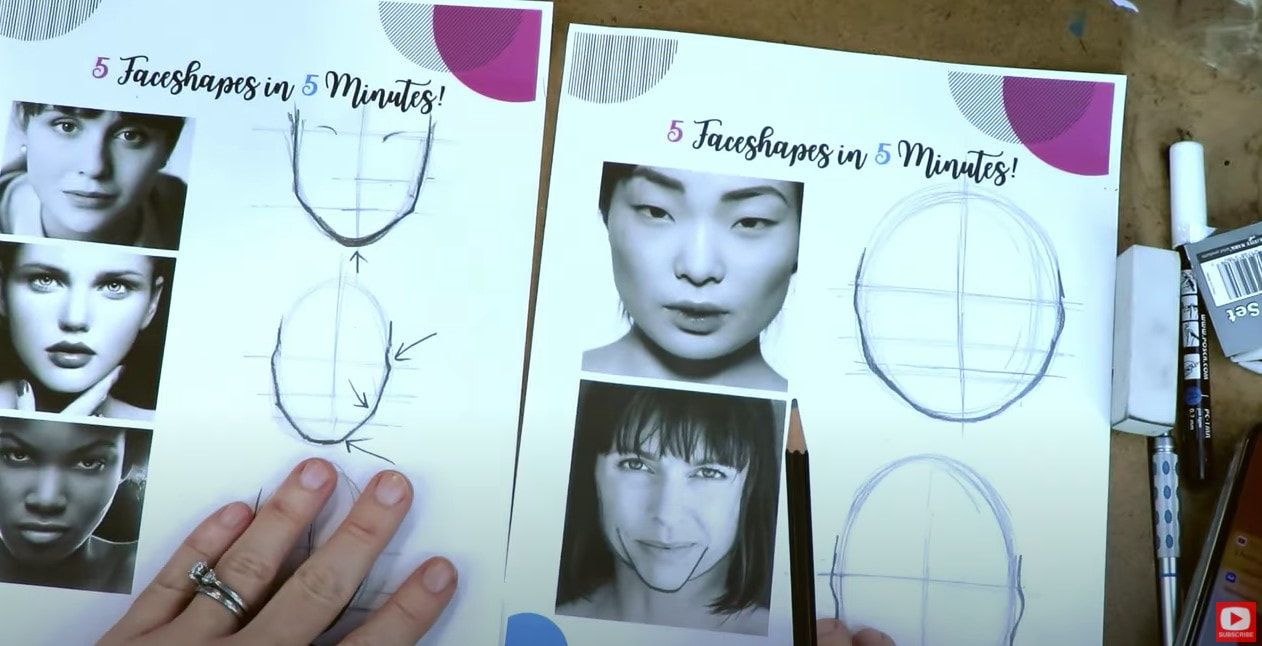 I hope you enjoyed today's face shape drawing tutorial, and the whole 5 in 5 Drawing Series!
❤️Want FREE, immediate access to my Fun Fab Drawing Club and/or Mixed Media Society plus discounts on all my art books, sneak peek at YouTube videos and new book content, behind-the-scenes fun and MORE? Join me over on Patreon today and get HUGE PERKS in return for a small monthly donation. ❤️ CHECK OUT ALL my art books on AMAZON (available in both Kindle and Paperback) ❤️ SIGNED COPIES of my art books on ETSY ❤️ MY FAVORITE ART SUPPLIES on AMAZON ❤️ MY BELOVED FACEBOOK GROUP ❤️ FOLLOW ME ON INSTAGRAM ❤️ FOLLOW ME ON FACEBOOK You are going to LOVE THIS 3 MINUTE mixed media canvas background technique!! It is by far THE FASTEST way to knock out a vibrant background for my mixed media portraits! I typically start with collage, but sometimes I'm in the mood for something a little different. Evidentally, today it was punk, and I'm LOVING how she turned out!! 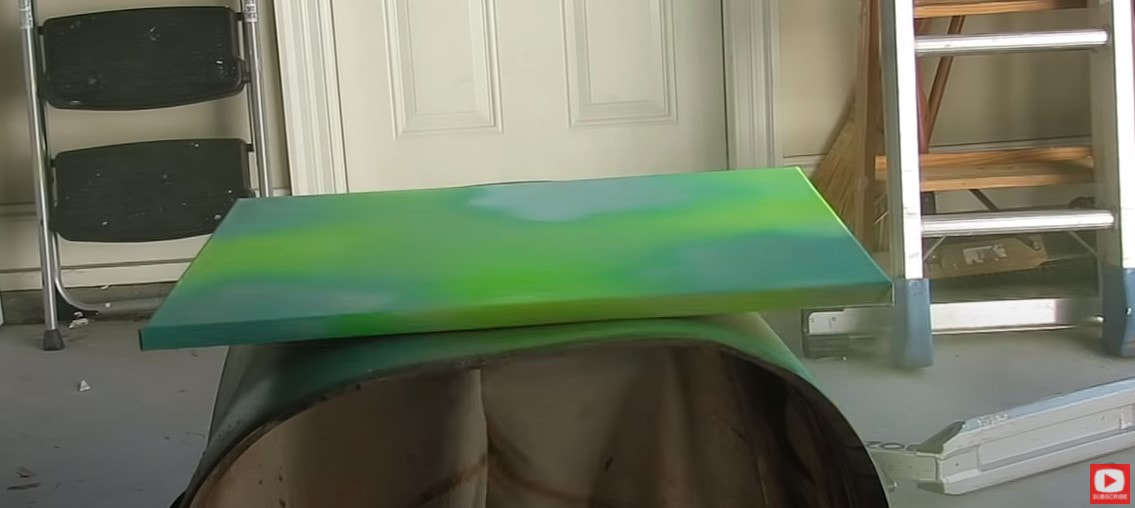 To get started, select 3-4 spray paint colors you like together, a few stencils, and head outside with your canvas. Begin by adding a few shots of color here and there, in two different shades. Then drop a stencil on top and use your third color of spray paint to start working in some fun patterns. 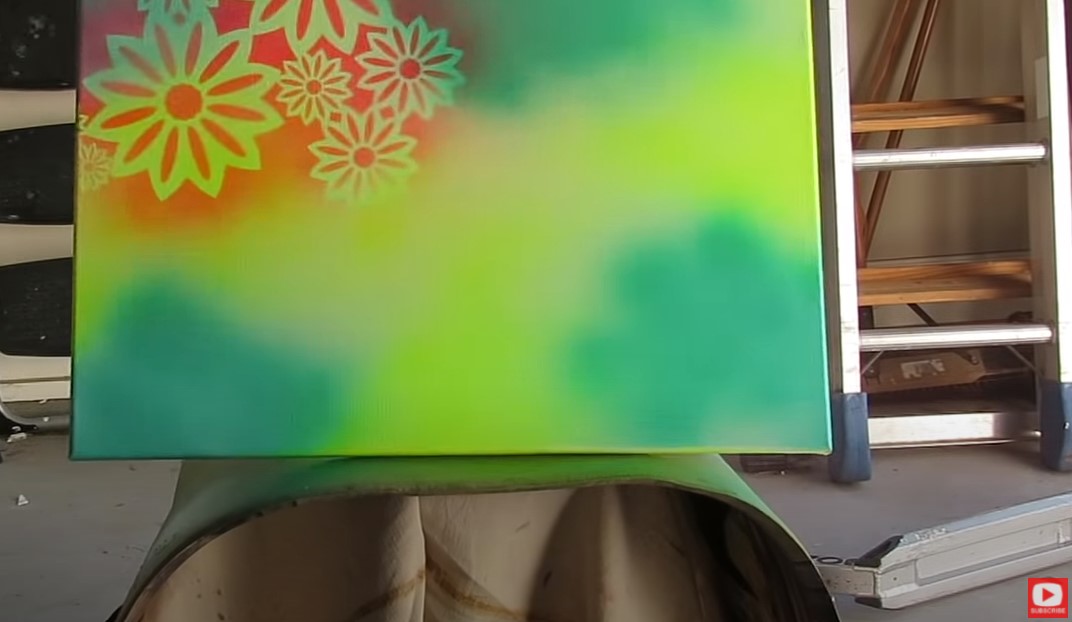 Cool, right?! There are SO many directions you can take a mixed media canvas background like this. I worked in some black with mine because I wanted it to feel edgy since I knew where the portrait for this piece was headed. This background seriously took me ALL OF THREE MINUTES. That's it. I think that might be a record, even for me!! 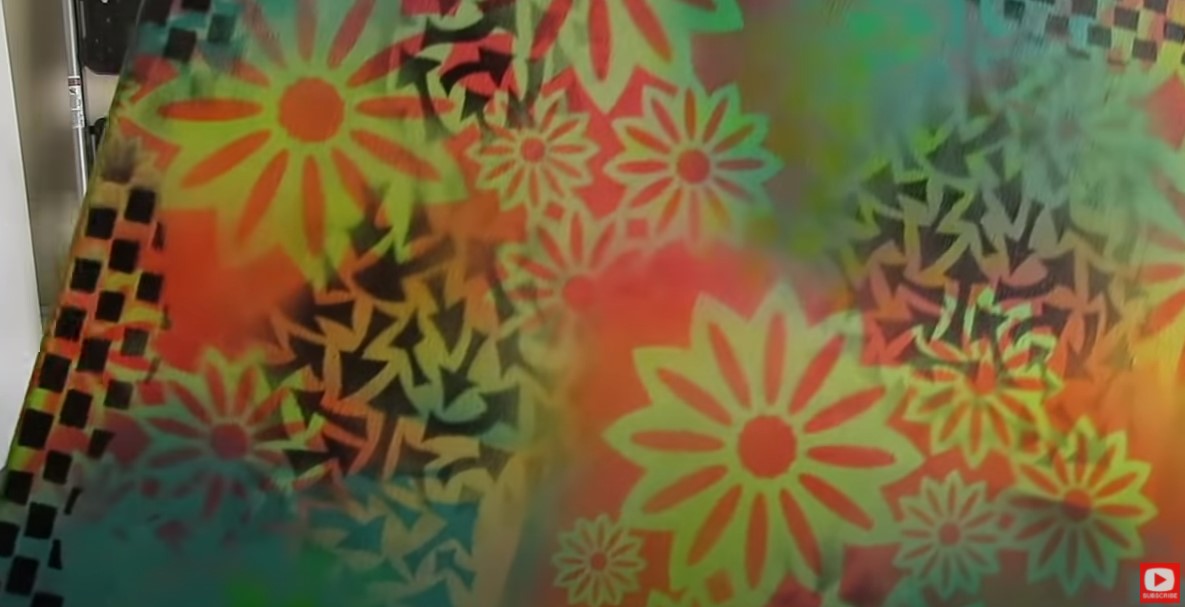 Once my canvas was dry, I pulled out my GINORMOUS magnum sharpie back in the studio, and got to work on a side profile drawing prompt from an artist friend of mine, Jenny Manno. Before we continue, super quick announcement! All product links noted below are Affiliate. I may earn a small commission if you choose to order through these links, but by law there is never any additional cost to the consumer for doing so. I only reccommend products I actually use and love. Thank you for your support! 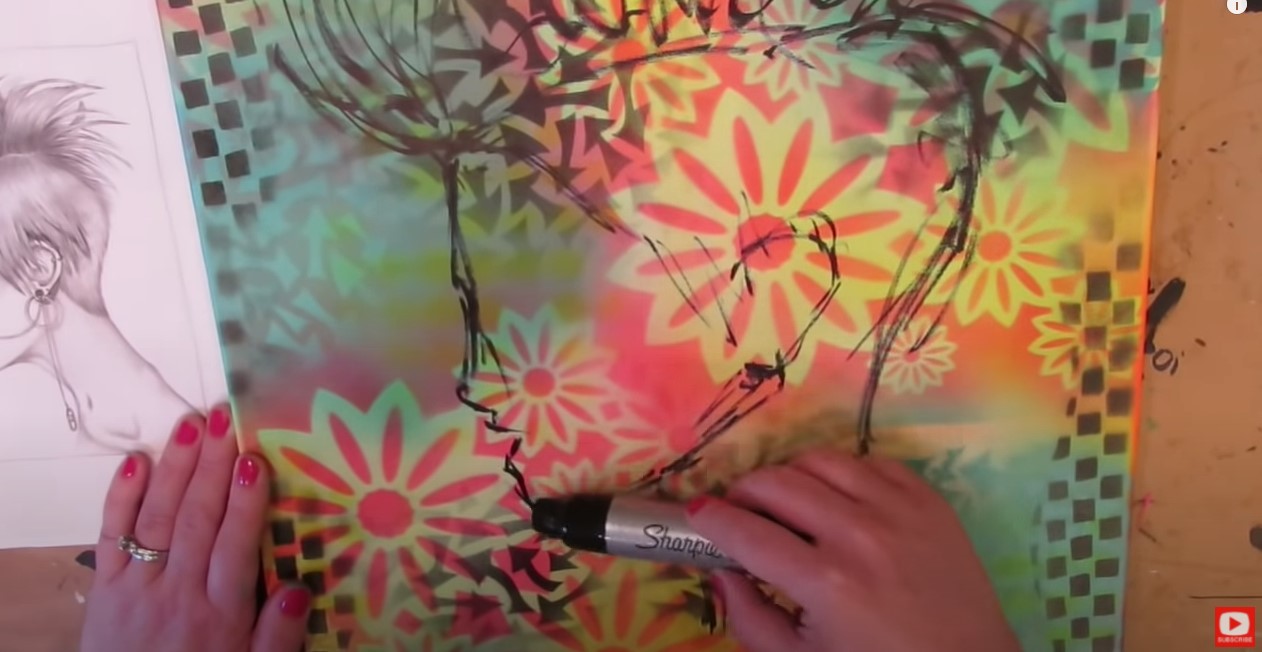 Just a word of caution... if you're not used to doing profile drawings, I definitely DON'T recommend using a sharpie!! Especially one this big!! In all seriousness, if you're new to side profile drawing, it's NOT as hard as you think it is. You probably just need someone to break it down for you so it doesn't feel so overwhelming. Then you just need a little practice. I have TONS of resources to help you with profiles! Feel free to check out this playlist on my YouTube Drawing channel for beginners. You'll learn how to do side profile drawing step by step in pencil. You can also check out my book, How to Draw MORE Fun Fab Faces, over on Amazon. This is PERFECT for beginners who want to learn how to draw profiles step by step (even kids!!).  Once I finished my initial drawing, I got my gesso going inside the face and just around the outer edge of her face shape to knock the background back just a bit. Then I painted a thin layer of flesh colored craft paint on the face. If you've been watching me for a while - you know I'm NOT super patient, LOL! Layering with gesso and acrylic paints really can take forever, and I don't usually have the patience for that. Because I have the neeeeeed for speed, I developed this cool technique to add color to my mixed media portraits QUICKLY, using my gelatos by Faber Castell! See the light pink in the face below, where it looks like blush has been applied to her cheek? That's from my gelatos! I blended it with my finger and it literally took me TWO seconds. 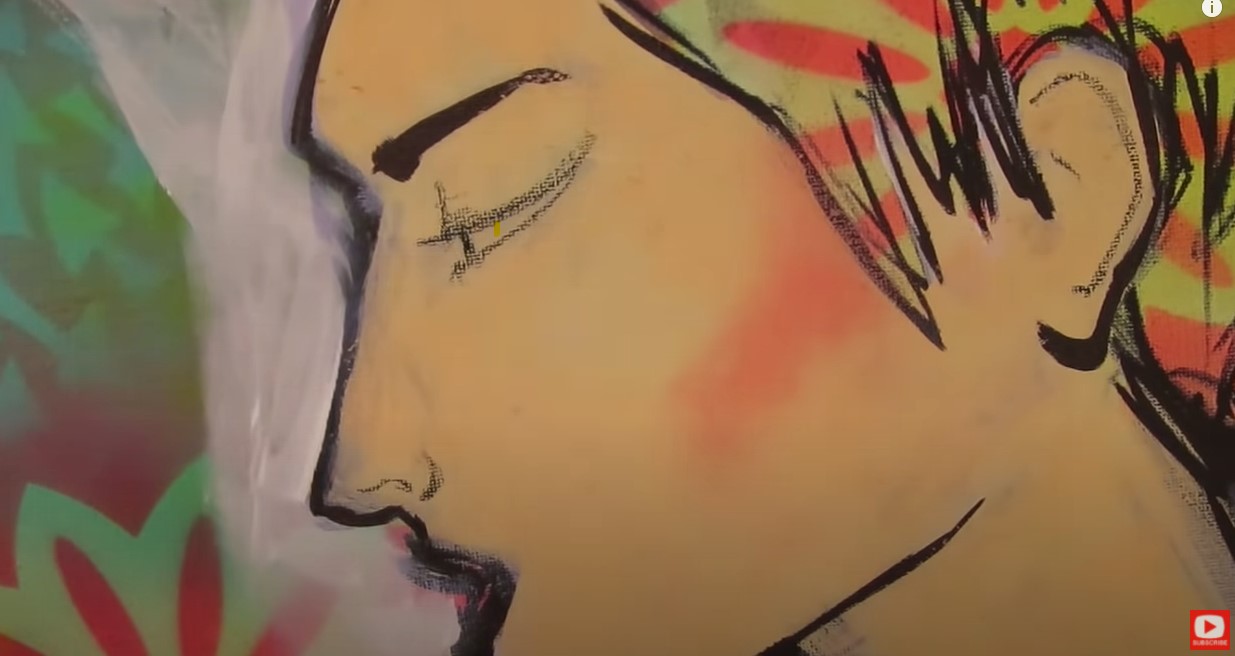 If you want to see this gelatos technique slowed down in REAL TIME, I just did a product demo with my Faber Castell Gelatos, so you definitely need to check that out! If you haven't tried them before on your own, this is my favorite set. FYI, beware of the metallic version if you want to follow me with this technique, because sadly they don't work!  If you're watching this project unfold (and I HOPE you do!!), I actually struggled a little with the skin tone and decided I wanted a clean slate to work with, so pulled out my gesso and started again with my fun gelatos technique. In the pic above, you can see it's looking SO much better, so that ended up being a great move! Keep that in mind- if something doesn't go quite right- there are a MILLION ways to fix something, so DON'T give up. Keep pushing through!! In the world of mixed media art, gesso is your friend in more ways than one!! 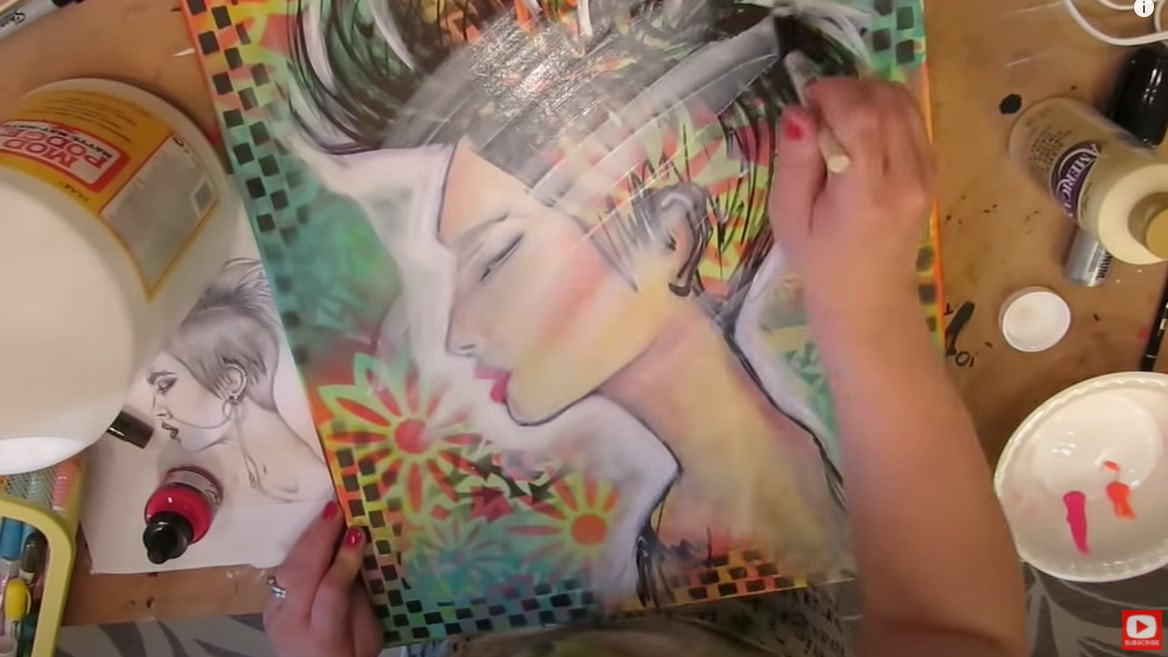 When I'm switching gears from mixed media painting to mixed media DRAWING... I seal my whole canvas with one of my favorite mixed media art supplies - mod podge! I buy this stuff by the gallon!! When the mod podge has dried, my canvas is slippery and has been prepped beautifully for playing with pitt pens. I love using my pitt pens to help me when shading a face (mixed media style). I use them in a similar way to my gelatos. I layer some color and blend with my fingertip. 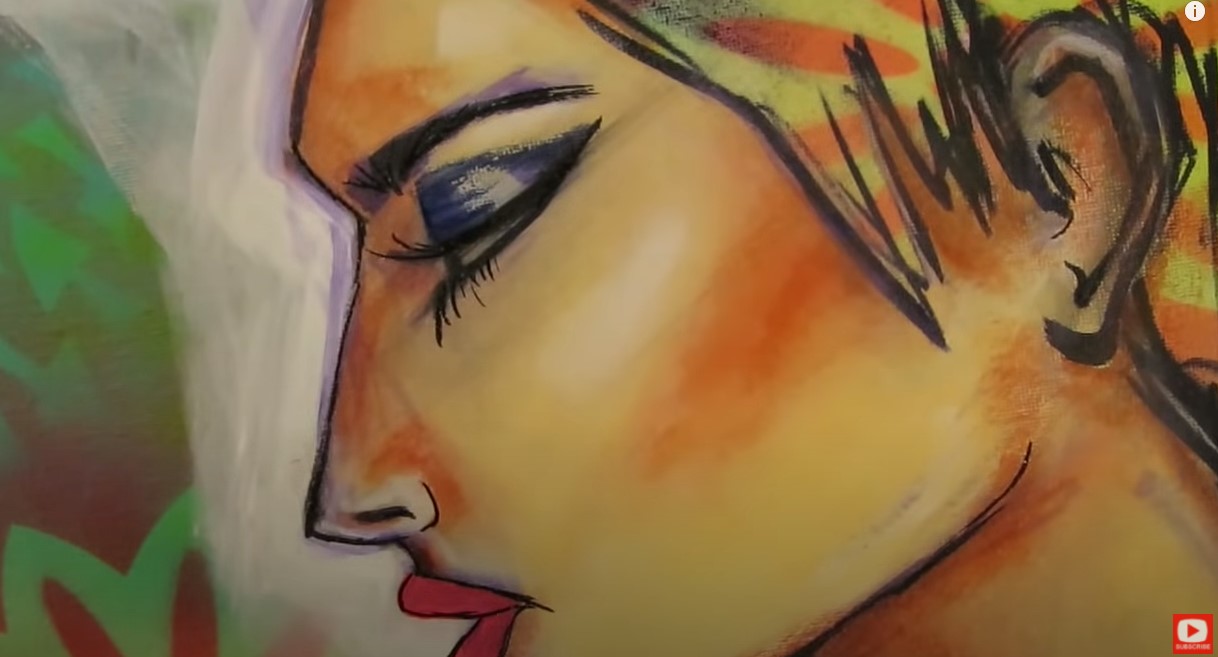 What's REALLY cool about working with pitt pens over mod podge, is you can ERASE things you don't like with a simple baby wipe! Amazing, right?! The art supply layering system I'm using in today's project is something I lovingly refer to as my mixed media "Hamburger System." I compare layering my supplies to the way you layer toppings for the perfect burger! I've actually got an entire FUN YouTube series of tutorials, cheatsheets, and even wrote a mixed media art BOOK about it!! Download the FREE, one-page cheatsheet that explains it all by clicking the button below. I'll send it straight to your inbox so you can print it and keep it at your art table for reference to help you with your own mixed media layering. 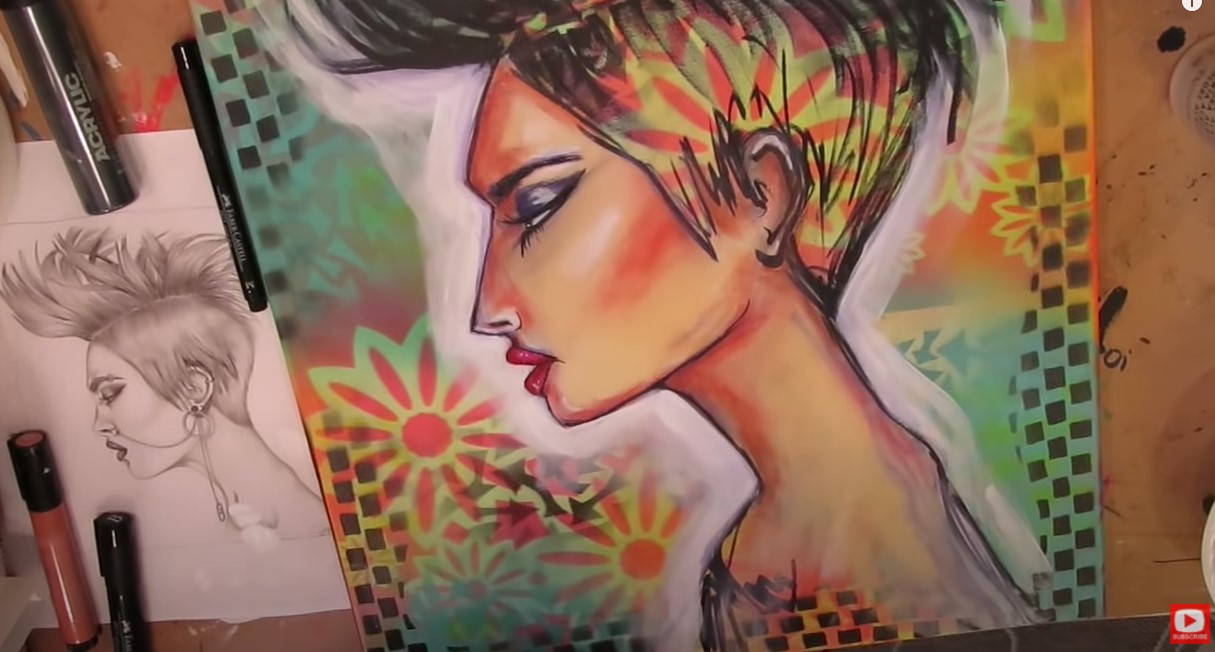 When I'm using my hamburger system for layering and am happy with something I've done, I seal my work with another layer of mod podge to ensure it won't move, then hit it with my hair dryer so I can do a bit more doodling. 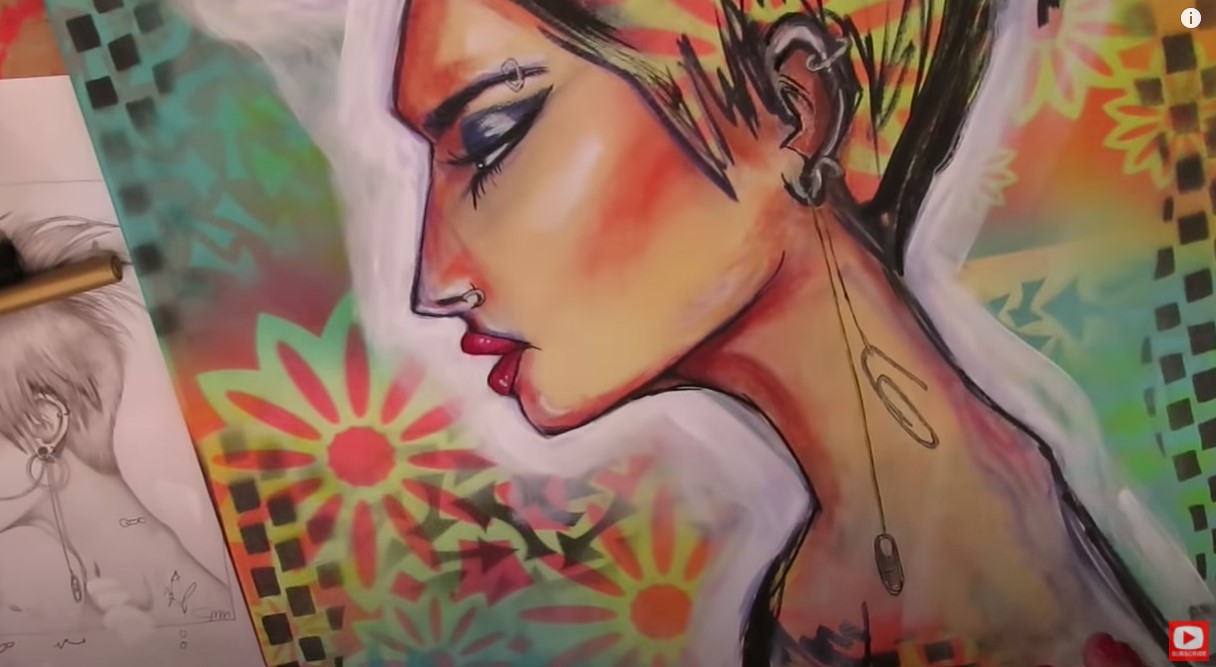 My last step is always grabbing a white sharpie or posca pen to add highlights throughout. I LOVE the drama this adds to my mixed media portraits. 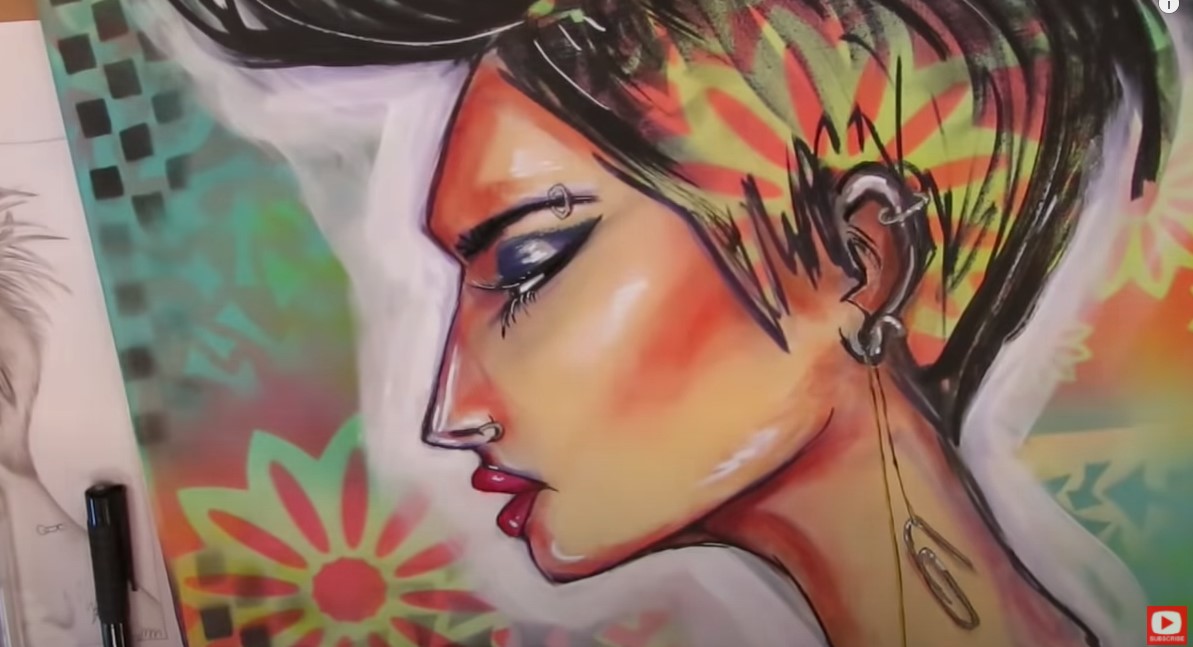 I hope you enjoy watching this video!! I had a blast doing this project!!
❤️Want FREE, immediate access to my Fun Fab Drawing Club and/or Mixed Media Society plus discounts on all my art books, sneak peek at YouTube videos and new book content, behind-the-scenes fun and MORE? Join me over on Patreon today and get HUGE PERKS in return for a small monthly donation. ❤️ CHECK OUT ALL my art books on AMAZON (available in both Kindle and Paperback) ❤️ SIGNED COPIES of my art books on ETSY ❤️ MY FAVORITE ART SUPPLIES on AMAZON ❤️ MY BELOVED FACEBOOK GROUP ❤️ FOLLOW ME ON INSTAGRAM ❤️ FOLLOW ME ON FACEBOOK Faber Castell Gelatos are one of my all time FAVORITE art supplies. Lots of mixed media artists aren't quite sure how to use them, or only associate gelatos with background work. In today's art supply demo, I'll show you why they're a MUST HAVE in my studio + the QUICK & EASY way I use them to create MAGICAL mixed media portraits. If you're a beginner in the world of mixed media art, or just curious about what gelatos can do for you - today's video is a MUST SEE!!  Before we continue, super quick announcement! All product links noted below are Affiliate. I may earn a small commission if you choose to order through these links, but by law there is never any additional cost to the consumer for doing so. I only reccommend products I actually use and love. Thank you for your support! 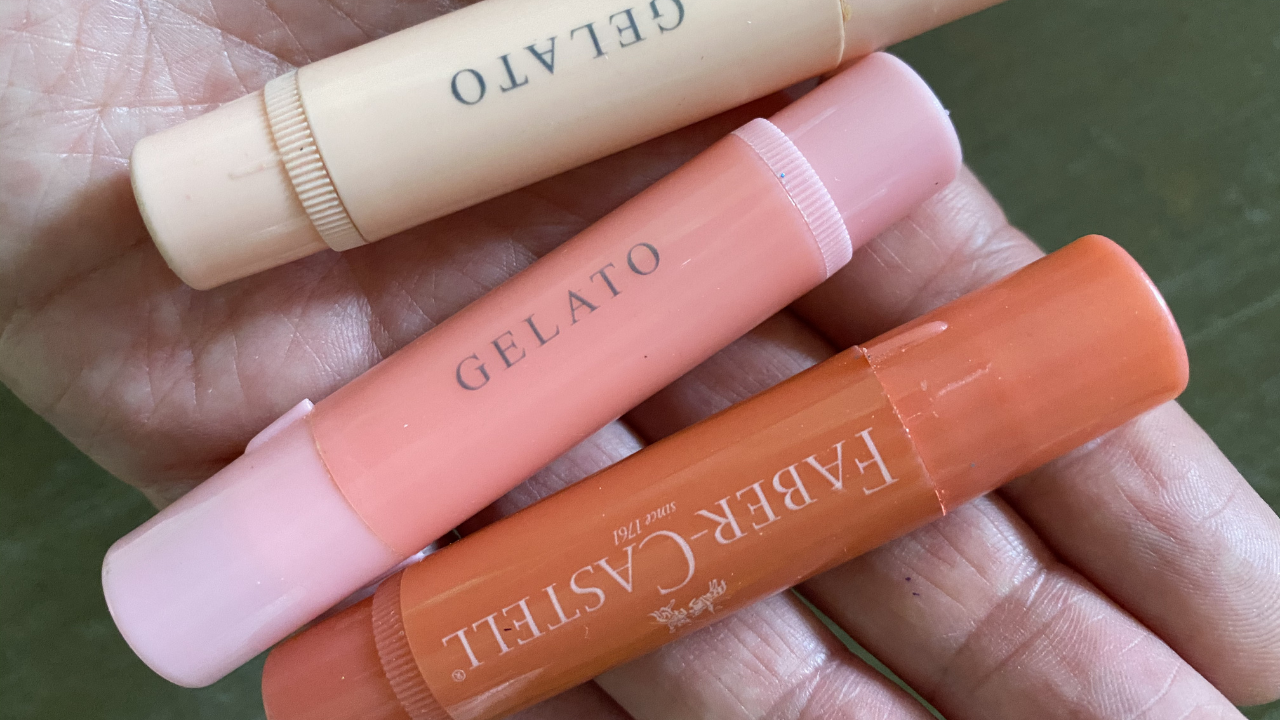 When students first start working with me, they often ask, what are gelatos? Gelatos are a fun art supply made by a fine art supplies company called Faber Castell! Gelatos are supposed to be a fine art product, but I think a lot of artists would probably put them into the "craft" category because they are not light fast. If you haven't seen these before, they kinda look like a tube of chapstick with a blunt tip. 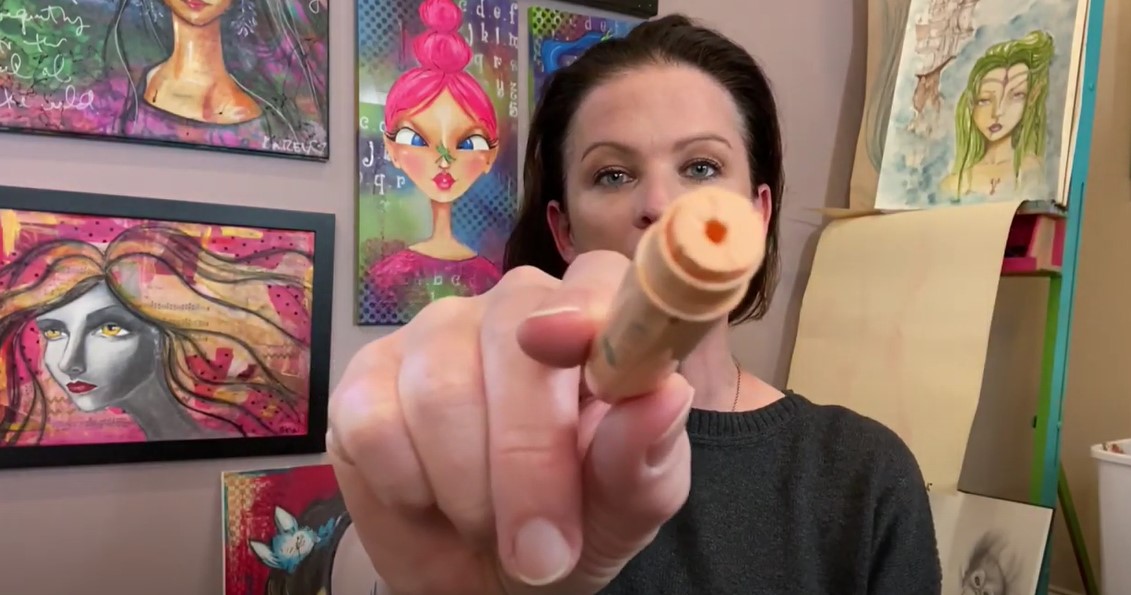 Gelatos come in a wide range of colors. They even have a metallic line. I do want to caution you if you're drawn to metallics. If you follow me and have picked up the Faber castell gelatos metallic set, hoping to use them like I do in my Mixed Media "Hamburger" projects, unfortunately they DON'T work. So just be forewarned, if you want to play along with me- the metallic version has been tested, and sadly failed. Pick up the flat/matte set and you'll be good to go! In fact, here is my favorite. It's got all the skin tones I love, and I think you'll REALLY enjoy yourself!! Not sure what my Hamburger System is? It's my signature mixed media layering process! Lots of people struggle with understanding their mixed media art supplies and how they work best together. It's really not that hard once someone shows you how! I compare layering my supplies to the way you layer toppings for the perfect burger! I've got an entire FUN YouTube series of tutorials, cheatsheets, and even wrote a mixed media art BOOK about it!! Download the FREE, one-page cheatsheet that explains it all by clicking the button below. I'll send it straight to your inbox so you can print it and keep it at your art table for reference to help you with your own mixed media layering.  If you haven't worked with them before, gelatos are a watersoluble product. That means if you put them down on a piece of paper and add water to them - they WILL melt and move around on you. There are a lot of other products on the market that work just like gelatos- including Marabu art crayons (they can really smear on you) and Distress crayons (not lightfast at all, so I quit using them).  What I LOVE about gelatos is they're not AS watersoluble as these other brands. The way that I like to use them is for accentuating the shading and tones on top of my acrylics. They blend out just perfectly, and I'll show you in today's video. I think they're AMAZING for adding skin tone shading, or adding any shading on any subject you're featuring in your mixed media projects! 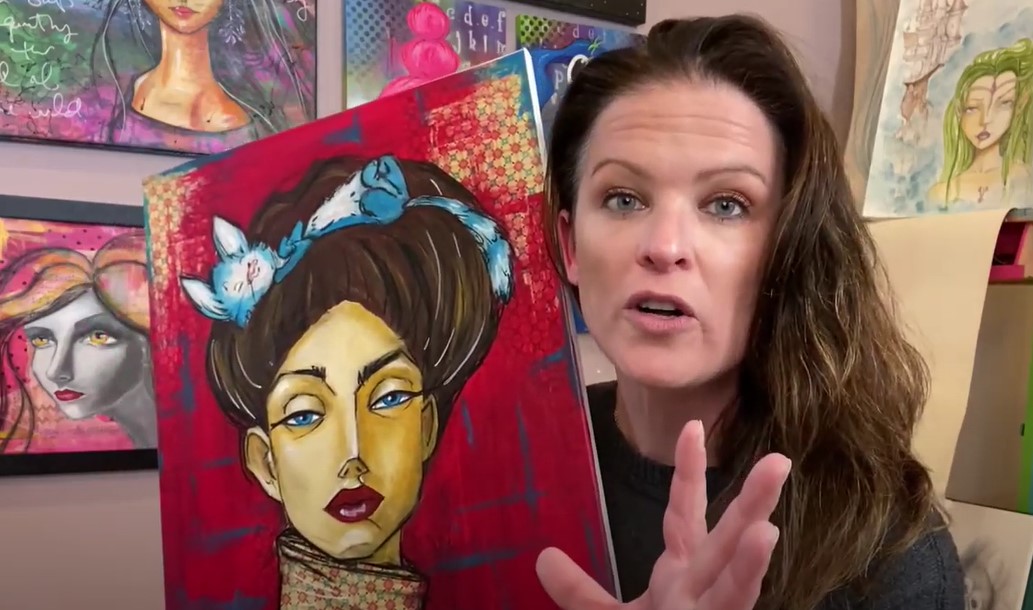 Personally I love mixed media projects to be fast and FUN!! And I want to see an instant success. For me, Faber-Castell gelatos DO just that. I don't have to spend TONS of time blending my acrylic paints, I can just work some gelatos on top of my acryilcs, it's super easy, and BOOM. Gorgeous shading, every time! Watch the video to see where I've used gelatos specifically in this cute mixed media face and in the one above. 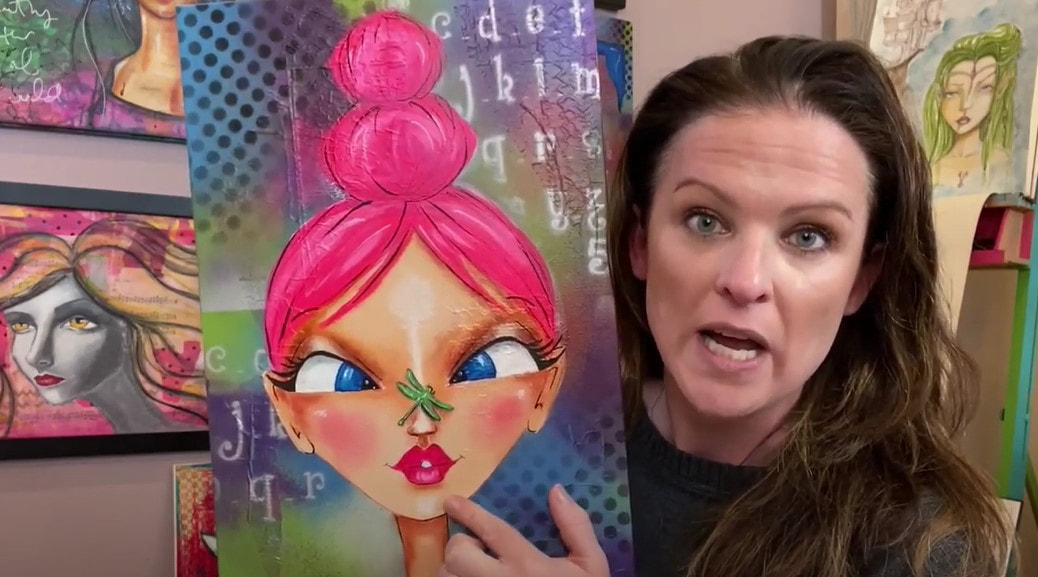 Now, let's move on to the product demo! CLICK over to the video so you can see exactly what I'm talking about ;) To get the demo started, I painted an acrylic head shape in four different skin tone shades using craft paints. Using craft paint is totally normal for me when I'm doing skin tones because I love how the paint that comes out of the bottle in the prefect skin tone I'm looking for in a base coat. I don't have to mix a thing! Then I add 2-3 shades of gelatos on top for shading, and they look amazing! 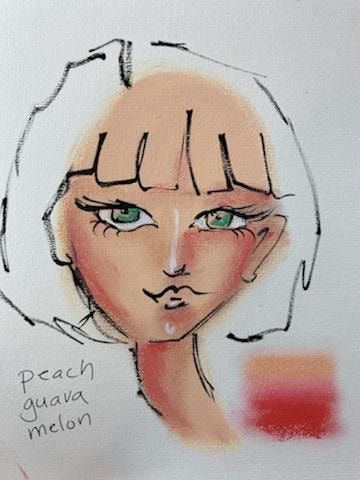 I noted the gelato shades I used in the above girl off to the side, and showed you just how EASY it is to blend with these on the right. They totally melt right into each other. And this is without adding anything to them. 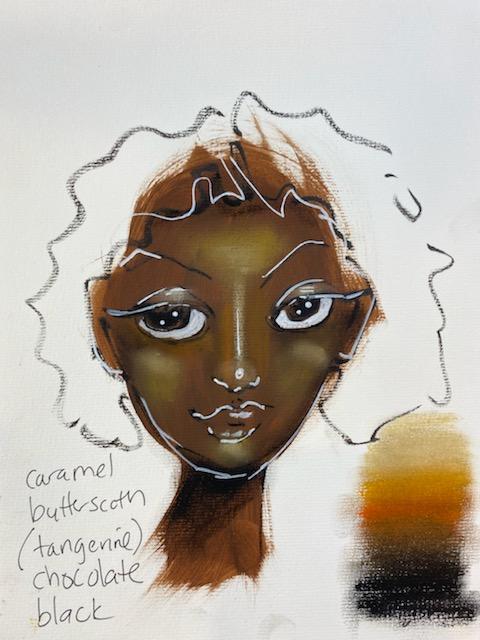 In this one I used five shades of gelatos instead of three because I just couldn't stop! LOL! I love these things. Isn't that the most beautiful blend off colors off to the right? I told you these things were magical for mixed media work!! 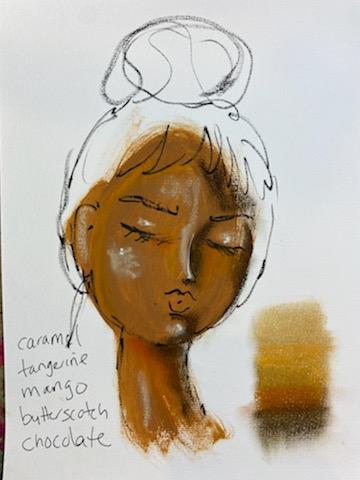 So fun!! I love how these shades blend together for a rich medium skin tone. You really can add such a rich layer of color to your faces and I'm not kidding... it only takes a couple of strokes and a little blending with your finger and you're done. SO much faster than doing countless layers of blending with your acrylics!! The highlights throughout this face (above) were done in the color caramel. Using white would've been too strong here. Make sure you try incorporating tangerine if you're playing with darker skin tones because it REALLY adds a beautiful effect. 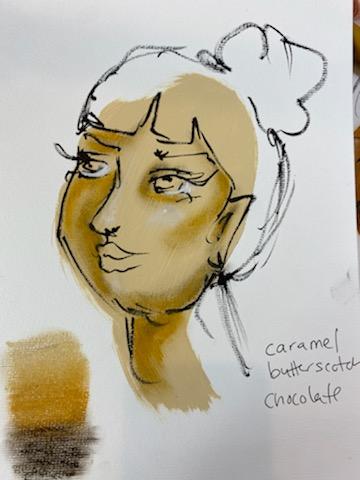 And here is the last one! Just a different direction from the first pale skinned girl. This one goes more into the yellow color family and butterscotch. If you look closely, you'll see a few white highlights I added with my white gelato. This has a very soft effect. And again, SUPER easy and fast. Especially if you're only using three shades! 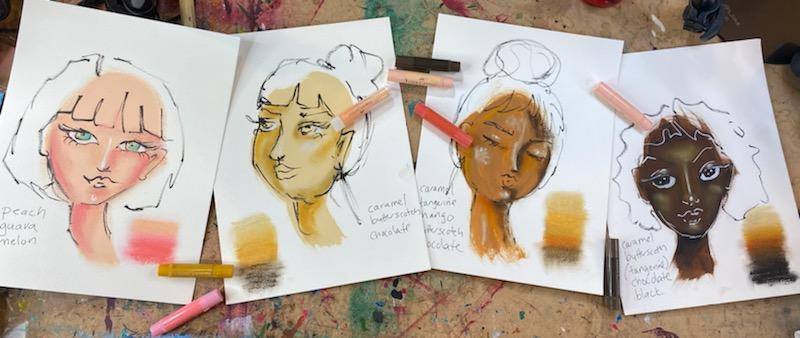 Now! If this was a "real" mixed media project for me (not just a value scale demo showing you how I love to use gelatos)... there are a lot more steps I take to tie a project together. Be sure you click over to the video to see a quick demo of what comes next. I know tons of people have questions about how to SEAL faber castell gelatos! I have found they do fantastic with a layer of mod podge on top! Check this out...  but this STILL isn't the end... There's even MORE!! If you want to see what comes next, click over to watch my Hamburger System playlist after today's video, and I'll take you layer by layer through the entire SUPER FUN process!! Thanks for hanging out with me today! I hope you have a fab week!!
❤️Want FREE, immediate access to my Fun Fab Drawing Club and/or Mixed Media Society plus discounts on all my art books, sneak peek at YouTube videos and new book content, behind-the-scenes fun and MORE? Join me over on Patreon today and get HUGE PERKS in return for a small monthly donation. ❤️ CHECK OUT ALL my art books on AMAZON (available in both Kindle and Paperback) ❤️ SIGNED COPIES of my art books on ETSY ❤️ MY FAVORITE ART SUPPLIES on AMAZON ❤️ MY BELOVED FACEBOOK GROUP ❤️ FOLLOW ME ON INSTAGRAM ❤️ FOLLOW ME ON FACEBOOK DRAWING FEMALE HAIRSTYLES in Just 5 MINUTES! (#DrawingFacialFeatures with Karen Campbell)1/3/2021 Ready to learn about drawing female hairstyles in just FIVE minutes?! In today's step by step lesson, we're going to be drawing 5 hairstyles in real time. If you've always wanted to learn how to draw a face, have been struggling with how to work drawing practice into your daily life, or need to add MORE FUN into your art practice, THIS SERIES IS FOR YOU!!  We're in week five of the 5 in 5 Drawing Facial Features series on my YouTube Drawing Channel, and this week is focused on girl hairstyles drawing! 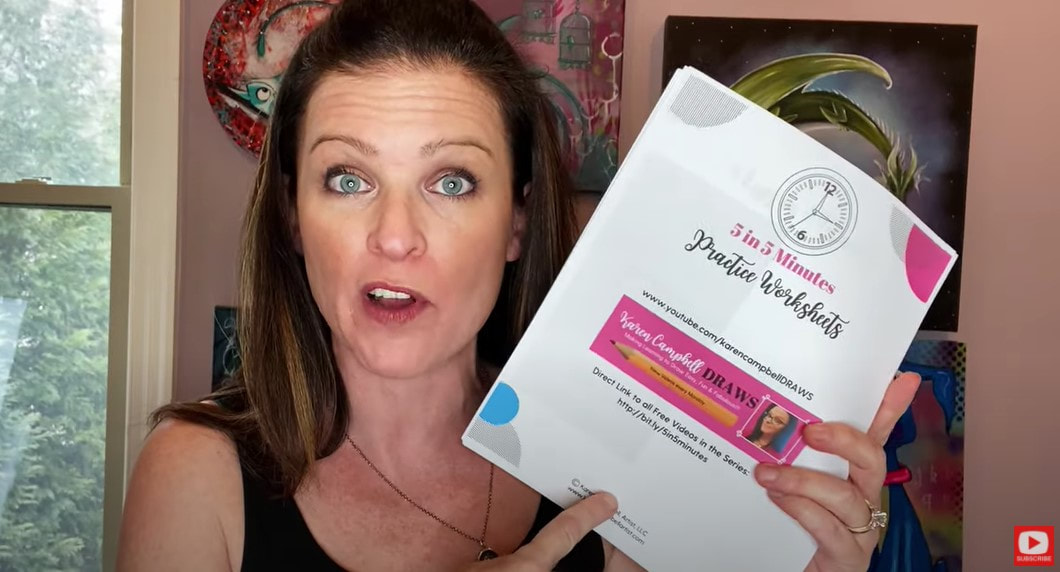 Make sure you download my 20-page drawing practice packet so you can draw right along with me. It's got all the hair drawing reference (female) images for this week, and all the drawing reference photos for every other week in the series. Best of all, it's yours, FREE. Simply click the button below, and I'll send it straight to your inbox! Even though I'm on week five of the series, don't feel like you're behind if you are just discovering this. These drawing exercises are for YOU to do on your own time, at your own pace. There is no schedule, just FUN!! All you need to do the drawing exercises in my 5 in 5 Practice Packet is basically a good eraser and a pencil. You totally don't have to get fancy. Before we continue, super quick announcement! All product links noted below are Affiliate. I may earn a small commission if you choose to order through these links, but by law there is never any additional cost to the consumer for doing so. I only reccommend products I actually use and love. Thank you for your support! 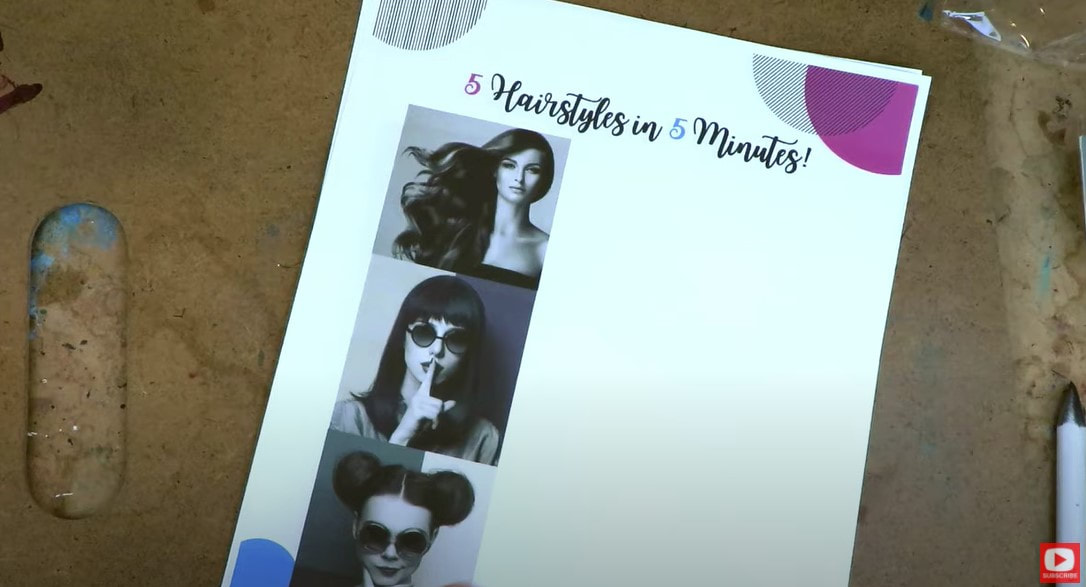 If you are interested in some fancier drawing tools - I'm using three of my favorites: a Blackwing pencil, vanish eraser, and my Tombow Mono Eraser (that's the one that looks like a mechanical pencil, but is an eraser!). This thing is AMAZING for carving out teensy highlights!!! If you have a blending stump - get your dirtiest one ready! If you don't have one - just use your finger or a q-tip to help you with blending. 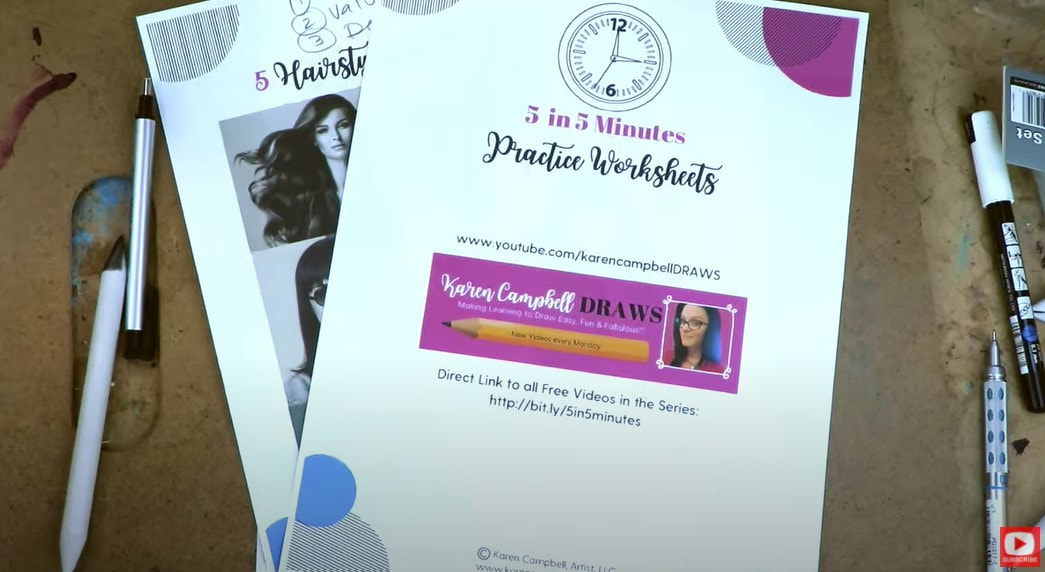 If you're just finding this series, I'm trying not to spend more than 5 minutes on each drawing prompt. It's not because I'm trying to "hurry" myself, but because I'm specifically trying NOT to get bogged down with details. This keeps our drawing practice light-hearted and more FUN. And- if we're having fun - drawing practice is something we'll want to do again, which will naturally make us better artists! As I have done with each of the videos in this series, I'm asking you to focus on three things with each drawing prompt:
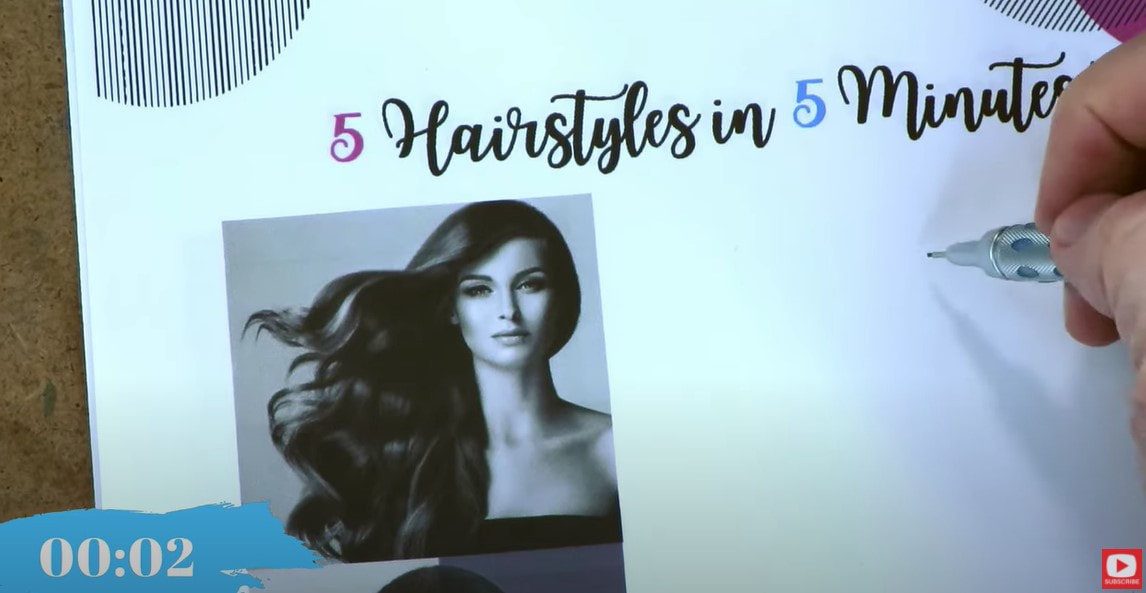 If you like to paint and are familiar with my Mixed Media channel on YouTube, you may recognize the first reference image as one of my favorite hairstyles! I LOVE painting variations of this one, and am excited to teach you how to draw hair blowing in the wind! To get started, draw an oval for the face. I'm not drawing in any of the facial features today because this lesson is focused on simple hairstyles drawing only. If you missed any of the previous episodes, click here for LIPS, here for NOSES, here for EYES, and here for EARS. When your oval is ready, go ahead and sketch in a horizontal line across the approximate middle of your oval. This is our imaginary "eye line." Next, check your reference to see which way her part is going. Draw a mark on your oval to note that location. Then take another look at the reference to see which direction the hair is going out of that part. When you're working with a photographic reference it makes drawing super easy because the "answers" are right in front of you. Your brain can kinda relax and just record what you're seeing in the reference on your drawing paper! 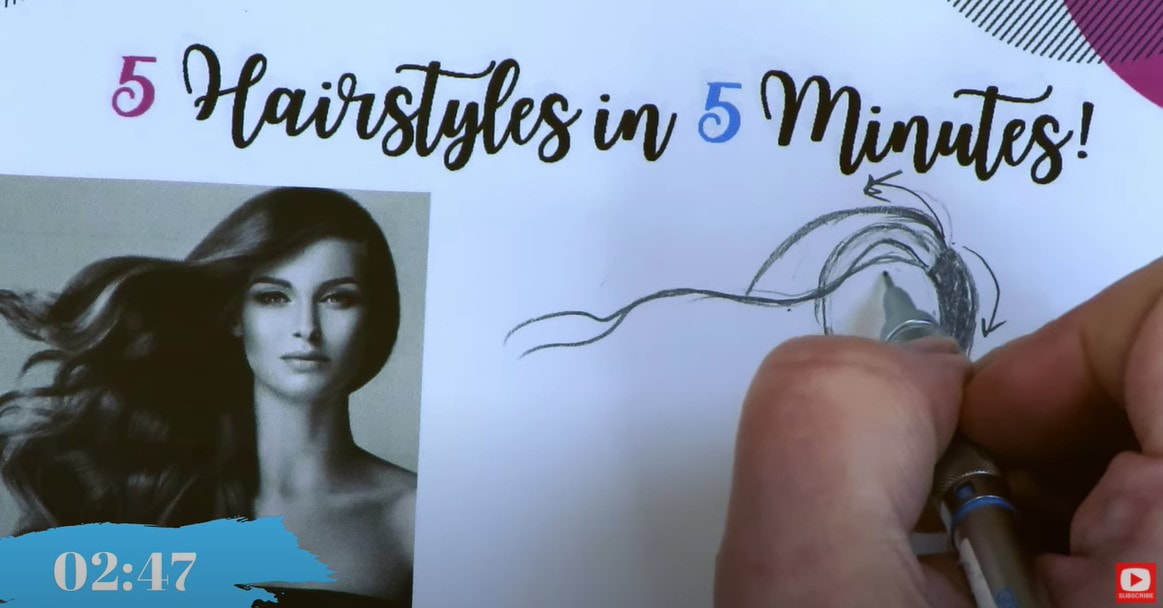 One of the most important things to remember about hair is that is has VOLUME to it. That means it always extends UP and OVER the face shape you've drawn. It also will typically fall into the face shape as well in some way. I usually just sketch in a general outline for the hair shape I see in my reference, then add shading and detail. 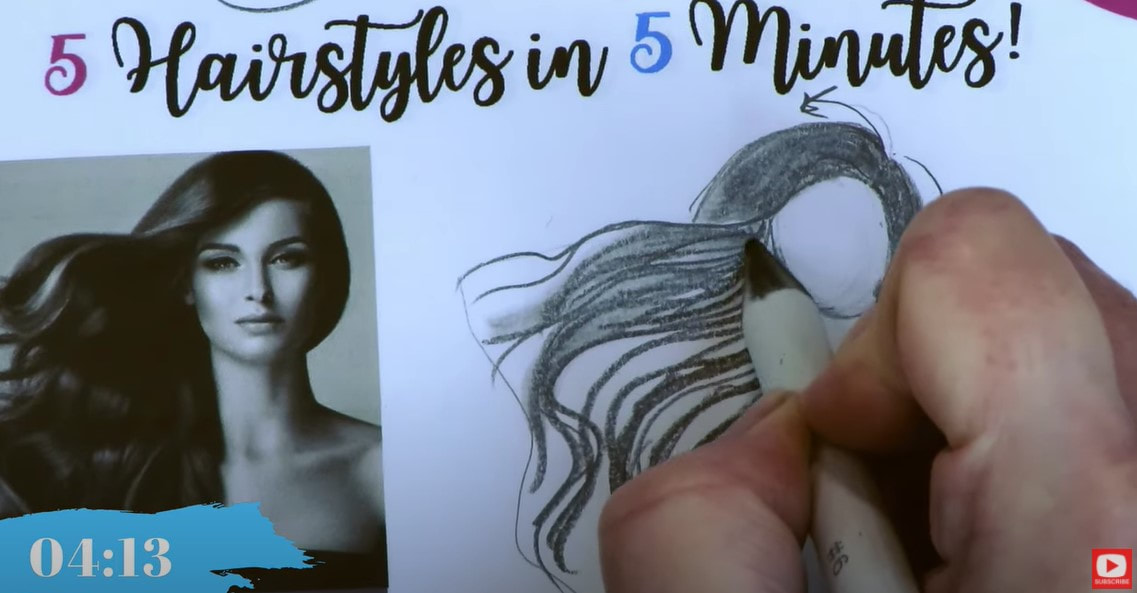 To make this a quick drawing and shading practice, simply scribble in the areas that are super dark with your pencil. Then we'll drag that graphite around with a blending stump, and chisel some highlights out with an eraser at the end. 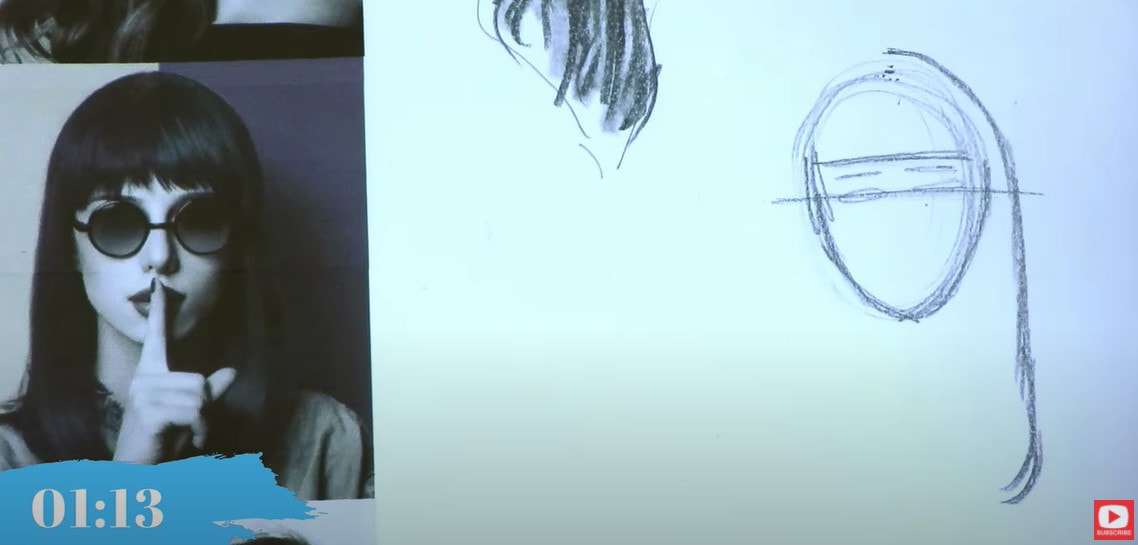 It's a bit tricky to see the part on reference #2, but since her hair is perfectly symmetrical, we can assume her part is down the middle. Mark your page in the middle of your oval for her part. Then go ahead and sketch out the general outline of her hair, including the bangs. Remember to sketch her hair shape UP and OVER the oval of her face to indicate volume. For hair this dark, you don't have to draw every line, and we've got a blending stump to help us as our time saver "cheat" today. Feel free to add in some loose strands if you want to with the same pencil or a mechanical pencil to vary the line weight.  If you'd like to learn MORE about drawing different hairstyles, the hair section of my How to Draw & Find Your Style Book has some great hair drawing tips, including an "Action Plan" for highlights. Be sure to watch the video so I can explain these options to you so they make sense.  For the third and fourth hair drawing references today, we're focusing on bun hairstyles drawing. Our third image is a set of super cute, double buns! Follow the same method we did for the other prompts. Look for the part, then draw an outline of the hair shape that extends UP and OVER the oval head. Even though this girl's hairstyle is pulled back, she still has volume extending outside of her "oval," if you look closely. Making observations like this will help your whimsical drawings look more realistic. 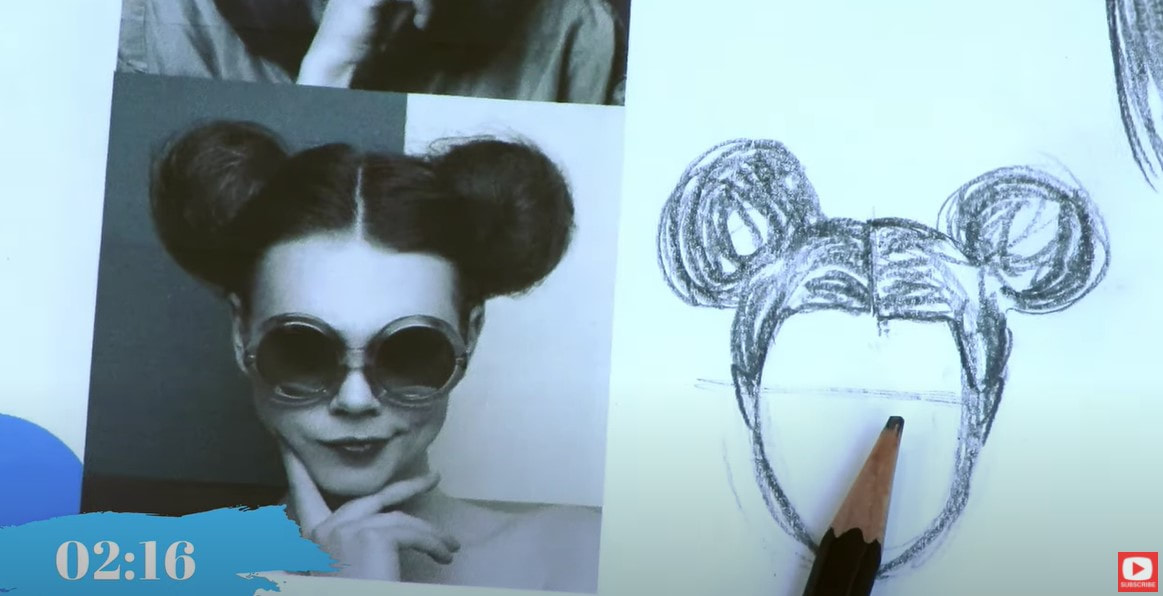 After our double buns, I'll show you how to draw hair in a bun on top of a girl's head. I LOVE this cute top knot! She is gorgeous, and I'm already excited to add her glossy highlights in! 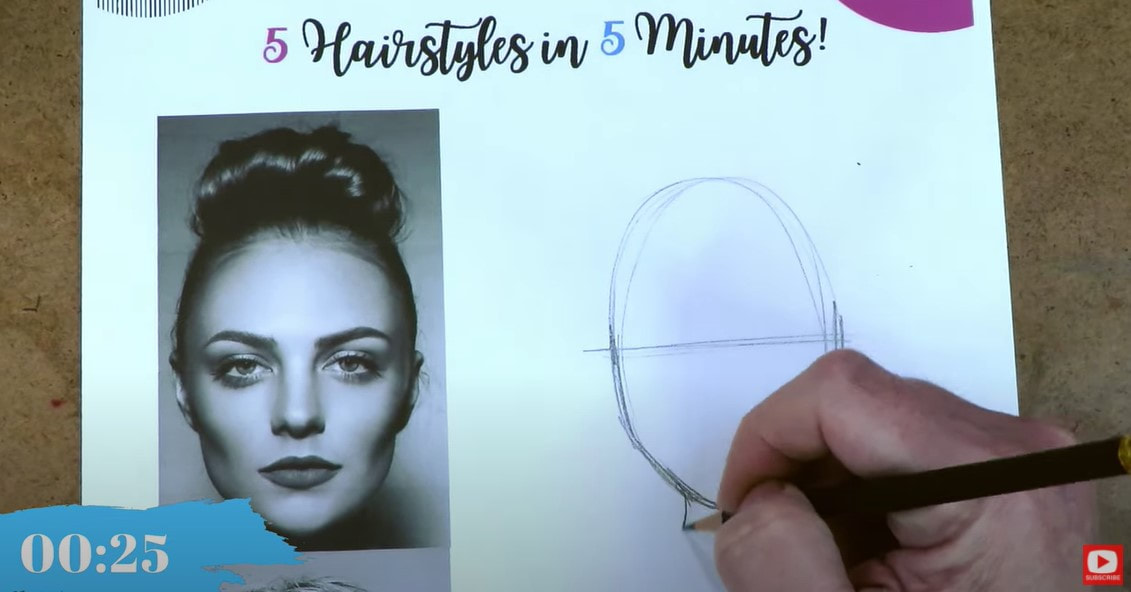 Like prompt #2, this one doesn't show a visible part. When that happens, we again can simply assume it's in the middle - especially if you see a hair bun or ponytail in the middle of her head. 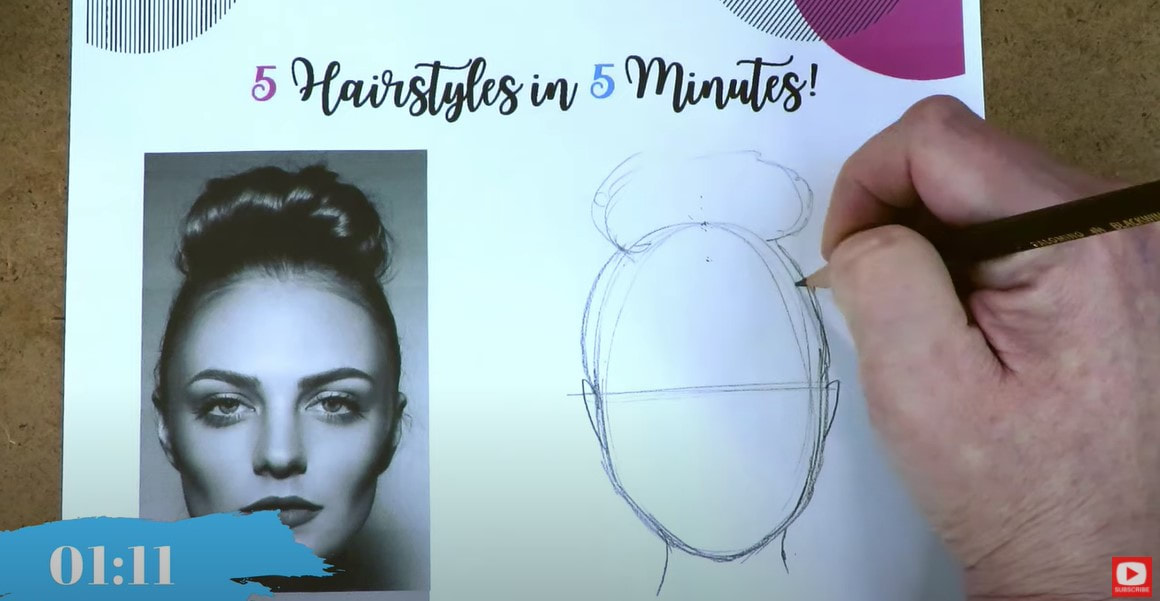 After we note a spot for the part and sketch in an outline of the hair, I draw individual lines and pay special attention to the directionality so what I'm drawing resembles my hairstyle drawing reference. 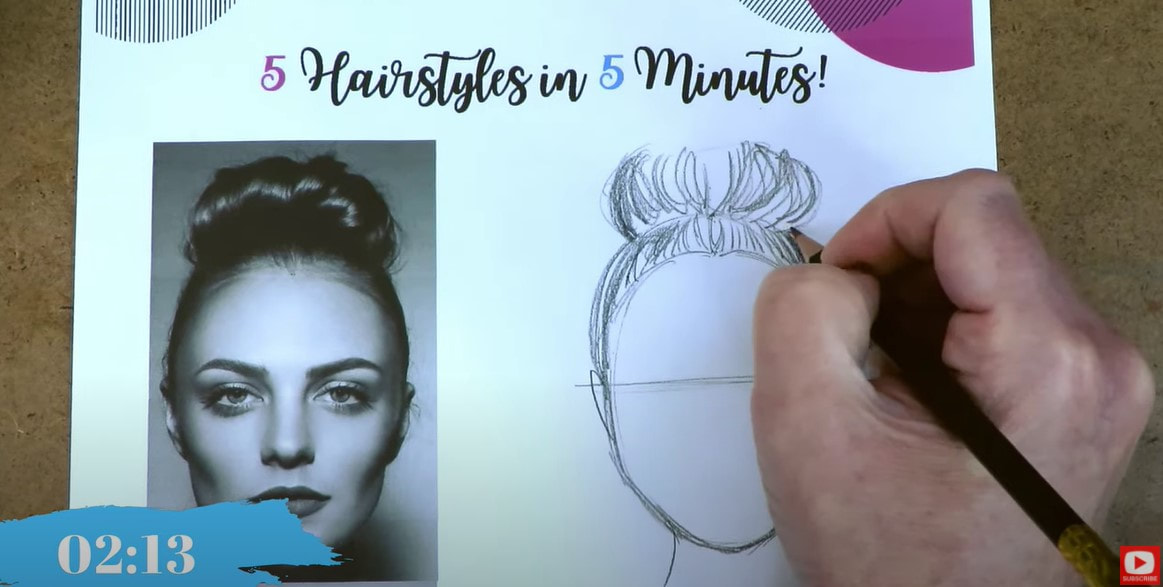 Once I've blended the graphite, I'll show you how to draw hair highlights. These highlights remind me of some of the glossy higlights we had in our Realistic Lips drawing video. I find it super easy to carve a few highlights out with my mono eraser in cases like this. Just replicate the shapes you feel the highlights are making on the bun as your eye moves across it. 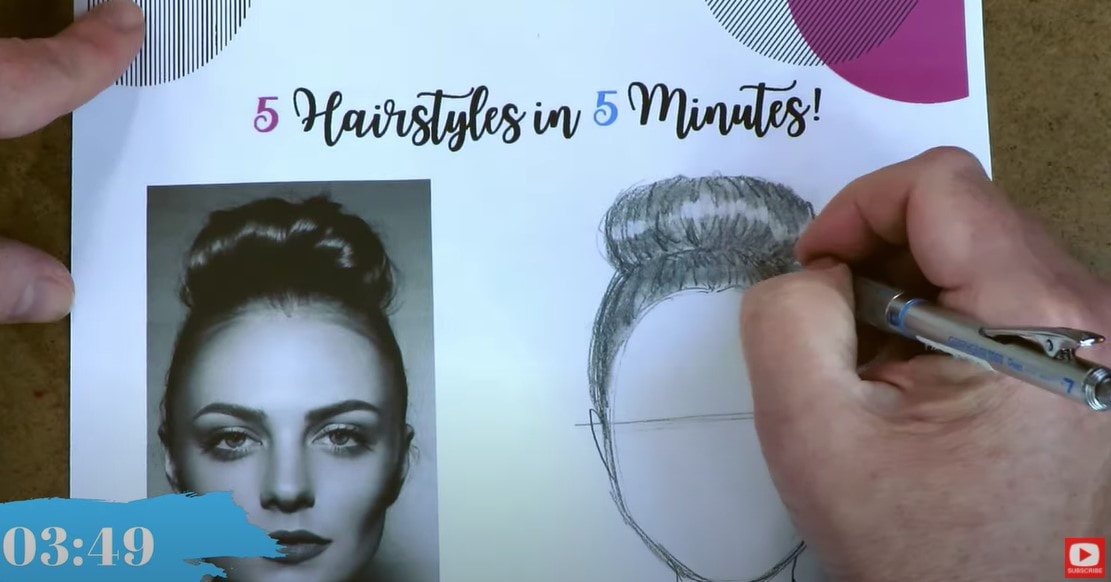 Since I spent so much time on long hairstyle drawing, I thought we DEFINITELY had to do a little SHORT hairstyle drawing as well, so for our last drawing prompt today, I'm going to show you how to draw a pixie cut! 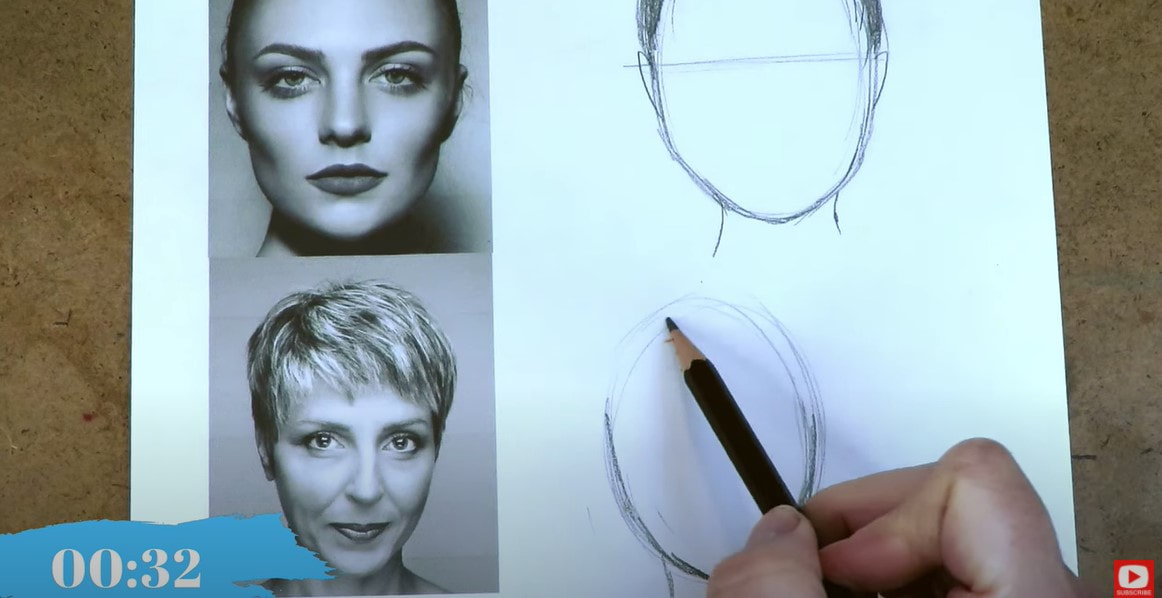 After you get your head shape drawn, sketch in the eyeline (half-way down the oval). Then pencil in some approximate eyebrows, note the part location, and start sketching in where the bangs fall. Even when you're drawing short hair, there is volume, so be sure your hair outline indicates that. If you're not sure how to draw short hair, make sure you're watching the video here because everything is in real time, and will help you SO much!! Before you start penciling in the strokes of individual hair strands, make sure you really look at your short hair drawing reference to consider the directionality of her hair. Which way does it extend from the part? 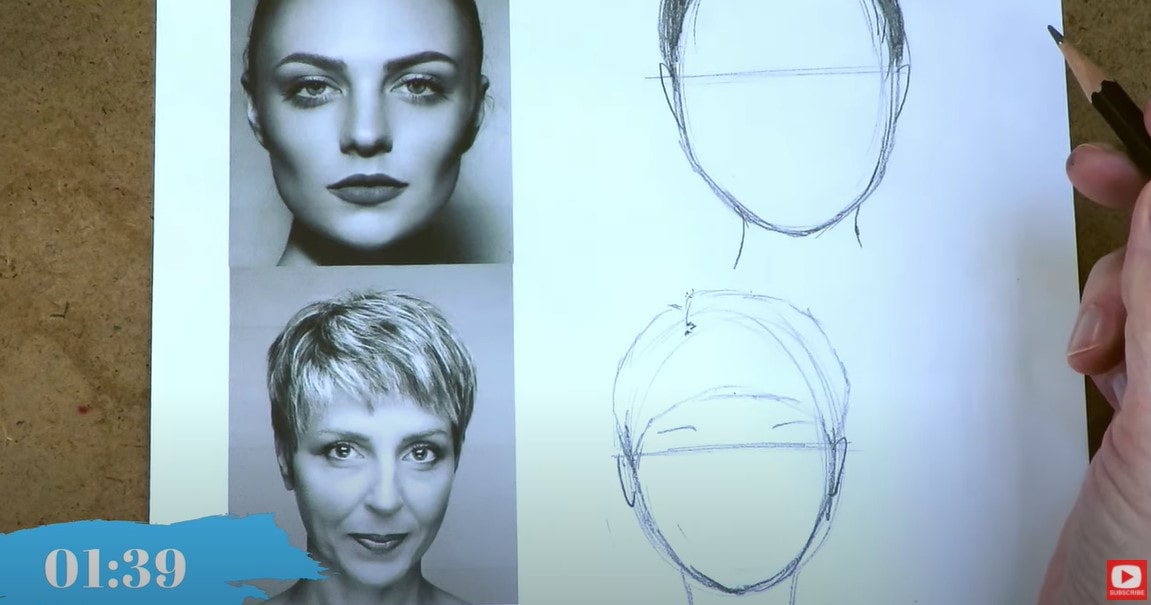 I hope you found this video on drawing female hairstyles super helpful!! I'll see you back here NEXT Monday for our next facial feature...
Have a wonderful week!!! Want to learn how to draw a simple whimsical face in pencil? Want to work on shading a face? ❤️Want FREE, immediate access to my Fun Fab Drawing Club and/or Mixed Media Society plus discounts on all my art books, sneak peek at YouTube videos and new book content, behind-the-scenes fun and MORE? Join me over on Patreon today and get HUGE PERKS in return for a small monthly donation. ❤️ CHECK OUT ALL my art books on AMAZON (available in both Kindle and Paperback) ❤️ SIGNED COPIES of my art books on ETSY ❤️ MY FAVORITE ART SUPPLIES on AMAZON ❤️ MY BELOVED FACEBOOK GROUP ❤️ FOLLOW ME ON INSTAGRAM ❤️ FOLLOW ME ON FACEBOOK |
Karen CampbellFounder of Awesome Art School. Mixed Media Artist. Author of 19 Instructional Art Books! 
Whose work has appeared in...
   
 Archives
July 2024
Categories
All
|
 RSS Feed

"Karen is flipping hilarious and she's very real...I like the way she teaches in a way that really gives you confidence, whether you're a beginner or advanced there's always something new to learn!"
- Elizabeth W. |
What Fans Are SayingKaren, you are absolutely fabulous! You make me feel like I can draw anything. I have recently retired and finally have the time to do some of the art that I have loved since I was in school. I am really at the beginning of my art journey and I hope to learn as much as I can. Thank you for all you do. |
Contact ME |