
How to Draw ELF EARS in PROFILE on a HOT Male Elf Warrior (#50FunFabFairies Drawing Challenge)8/8/2022
Wanna learn how to draw elf ears in a side profile drawing of a HOT male elf warrior? Heck yeah, ya do! In lesson seven of the #50FunFabFairies drawing challenge, you'll learn how to draw a male face in profile and just how EASY it is to turn him into an elf warrior.
Make sure you bring a blending stump to today's drawing tutorial. I've got TONS of pencil shading and blending tricks up my sleeve to help you shade pencil drawings more quickly & create COOL male fantasy art hair for your own characters! Let's get this party started... 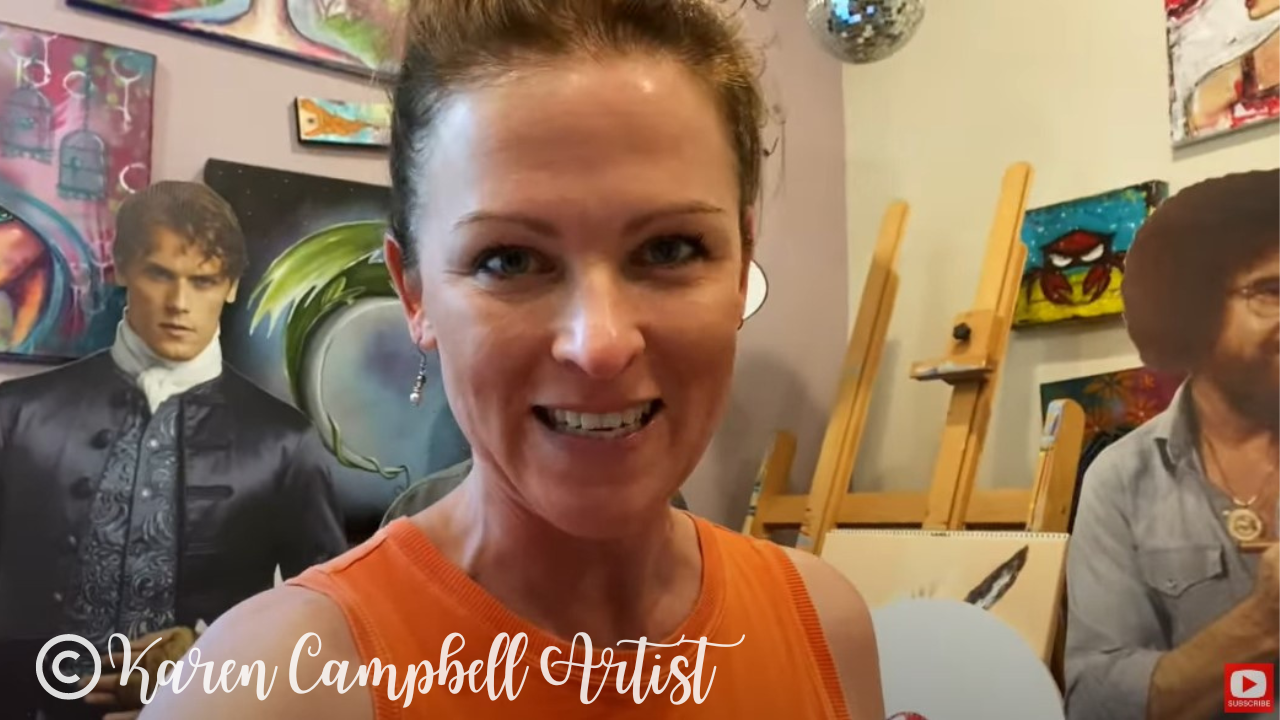
Want easy access to today's lesson and even MORE fairy drawing ideas? Join my FREE #50FunFabFairies drawing challenge over at Awesome Art School!
Simply click the button below to receive instant access to ALL the fairy reference images for each drawing prompt (including today's elf ears drawing reference!), plus info on supplies, cheatsheets, and more! 
Wanna become a better artist? Do today's lesson (and every lesson of the challenge) five times, making a few creative alterations of your choice, and watch your skills soar as you practice fairy eyes drawing, fairy and elf ears drawing AND fairy hair drawing 50 different ways!
Before we continue, super quick announcement: All product links are Affiliate. I may earn a small commission if you choose to order through these links but by law there is never any additional cost to the consumer for doing so. I thank you for your support.
For today's drawing tutorial I'm working in my favorite 11x14" watercolor sketchbook by Strathmore. The cold press paper has a gorgeous texture to it. Cold press paper is perfect for watercolor and wet mixed media art projects. The texture is also excellent to draw on because it makes shading super easy!
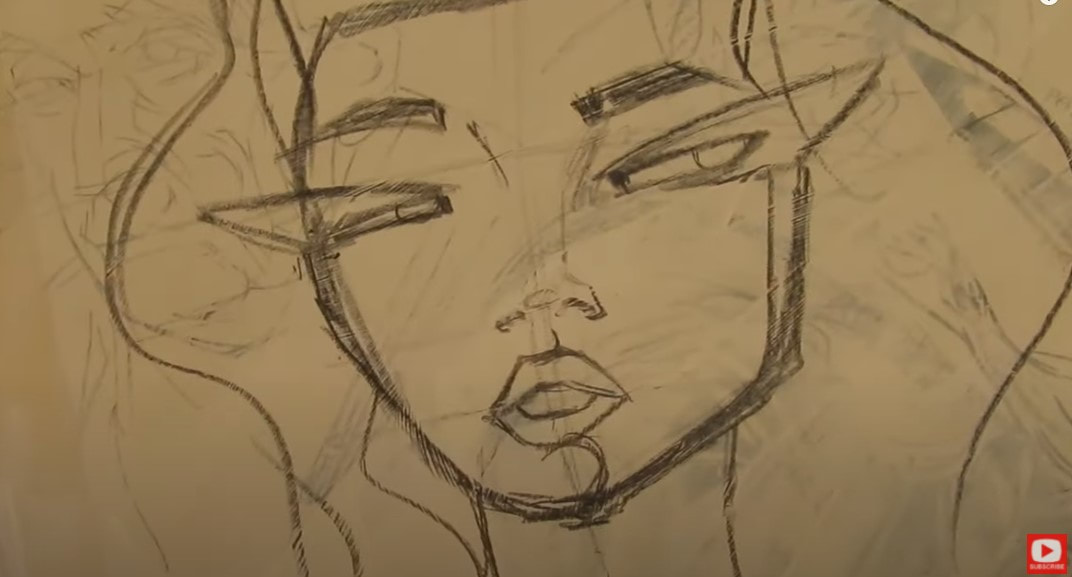
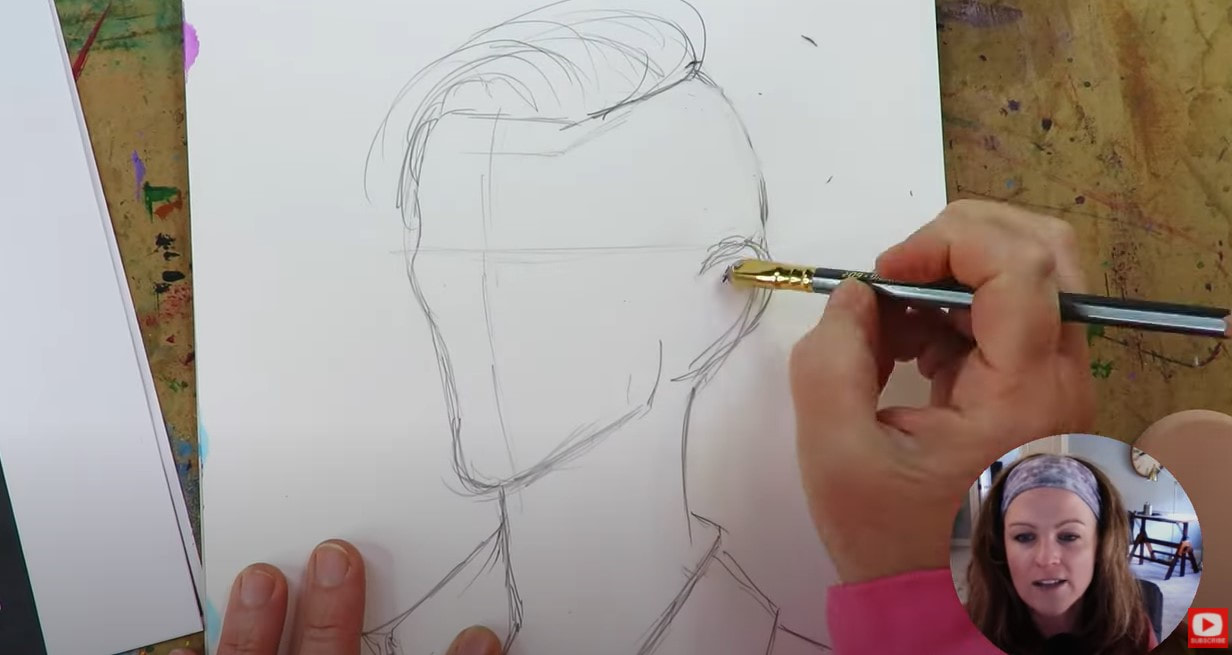
To get us started on our male elf warrior drawing, we first need to sketch in our profile face drawing guidelines. If you know me- you know I'm a stickler for drawing in my guidelines EVERY time I draw a face. Guidelines aren't just for drawing realistic faces. Your whimsical drawings will have a more sophisticated look to them too, because the facial features will be more proportional. 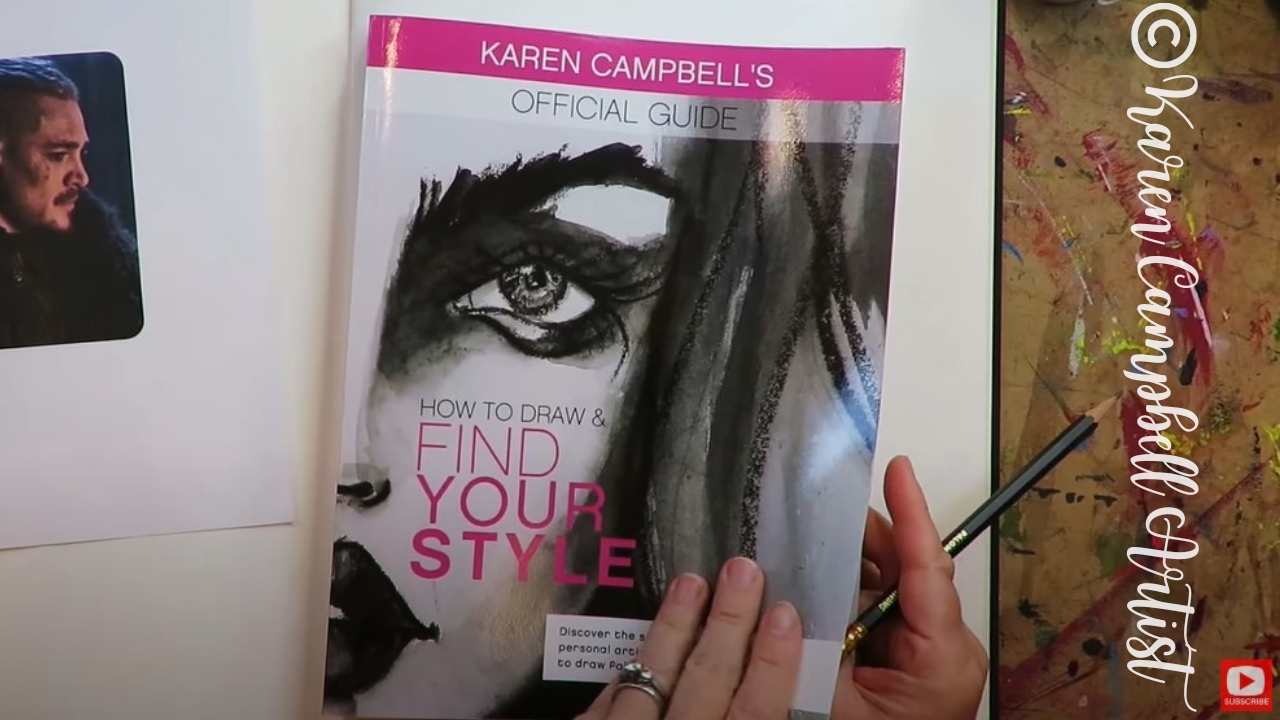
If you're not sure how to do a side profile drawing, you can grab those face drawing guidelines from two of my books (How to Draw MORE Fun Fab Faces and How to Draw & Find Your Style). The book above was on my art table, so I'm using that one in today's lesson. If you've already got this book at home, turn to page 179 to follow along.
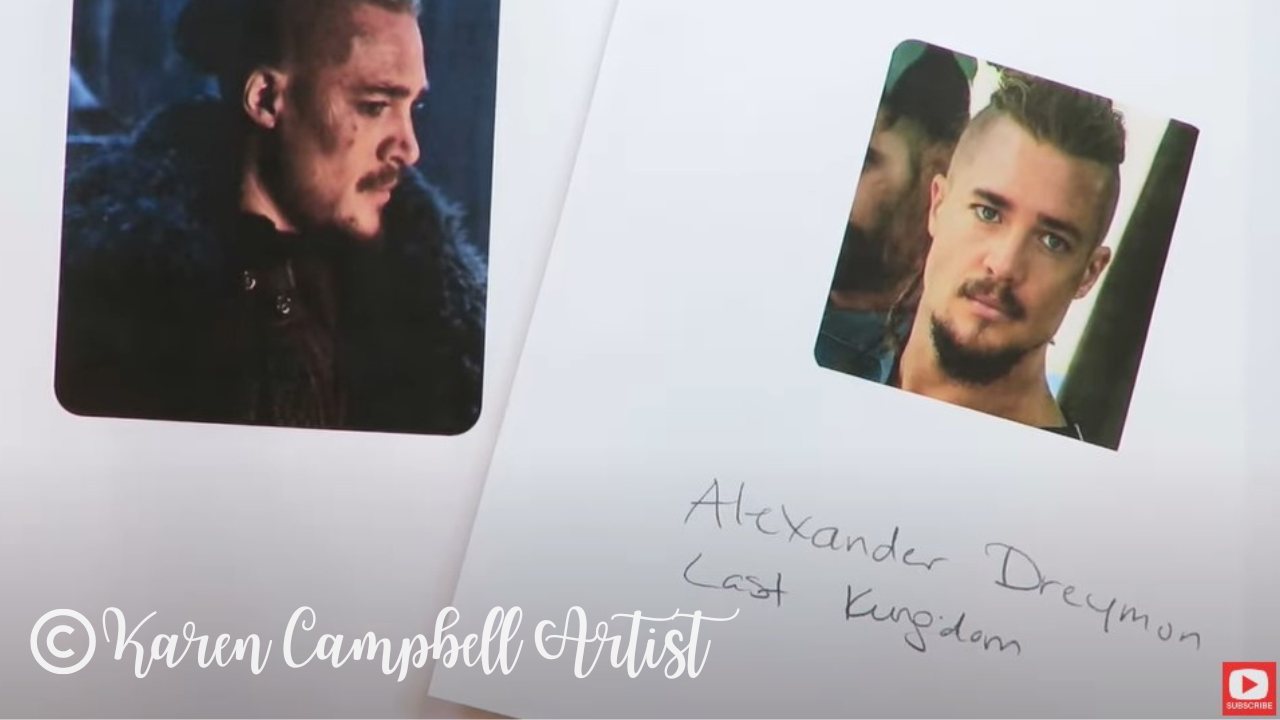
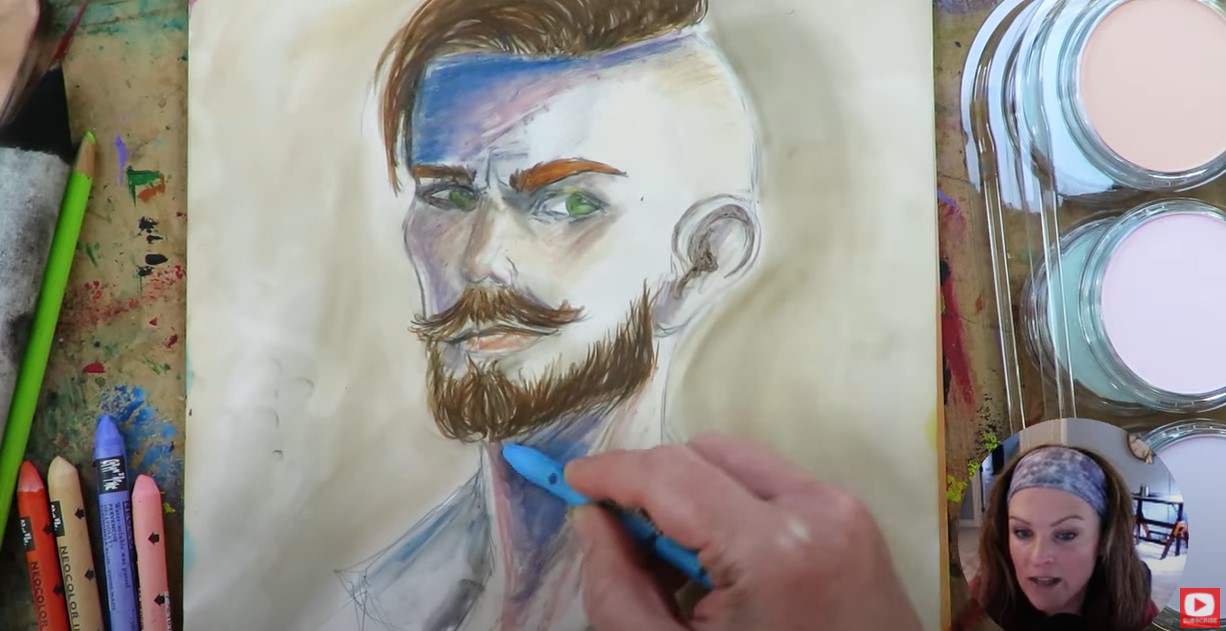
We're using a face drawing reference of Uhtred of Bebannburg (Alexander Dreymon) from The Last Kingdom because I love him and this show. Both the reference image (on the left) and my side profile drawing guidelines are in the FREE #50FunFabFairies Drawing Challenge classroom waiting for you over at Awesome Art School so you can draw along with me.
I love to start my side profile face drawings off by tracing a circle. Some people prefer to freehand this, but I figure why bother wasting time trying to recreate the perfect circle? Trace something and move on already. Am I right?!
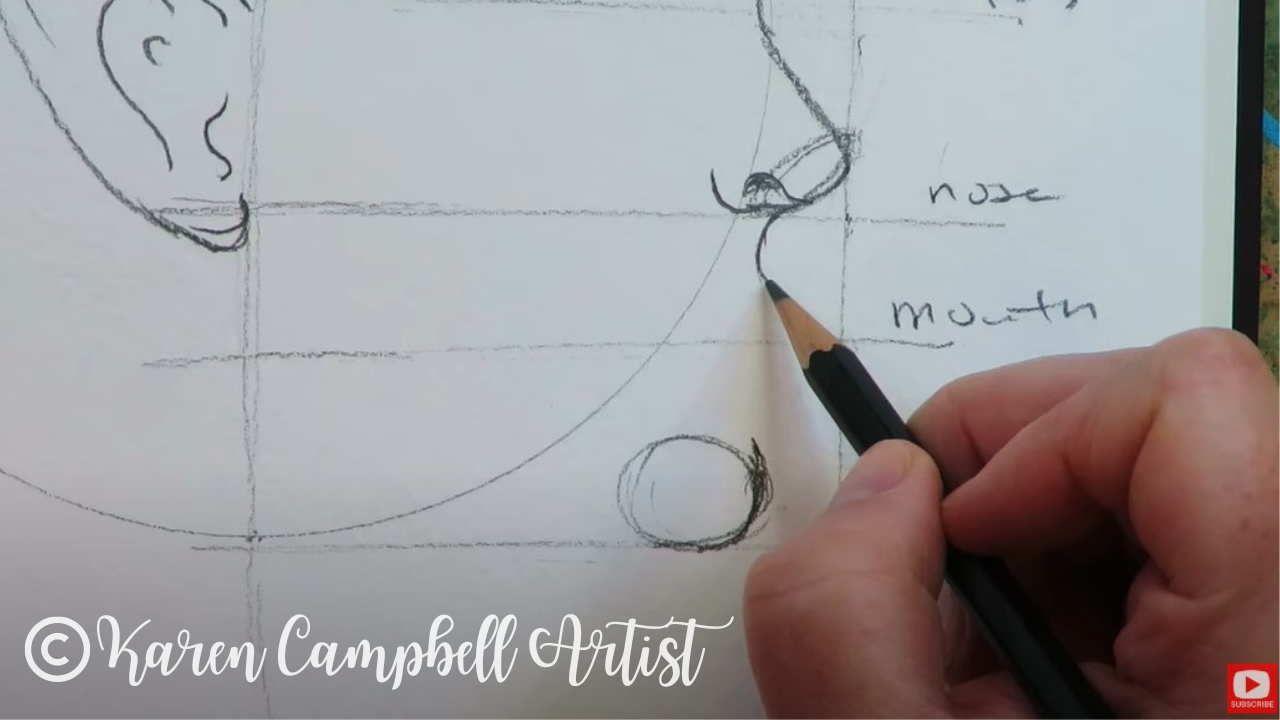
After your circle is sketched in, it's time to mark where your eyes, nose, and mouth will sit. Make sure you click over to watch this while I do it because the placement of these lines is super important.
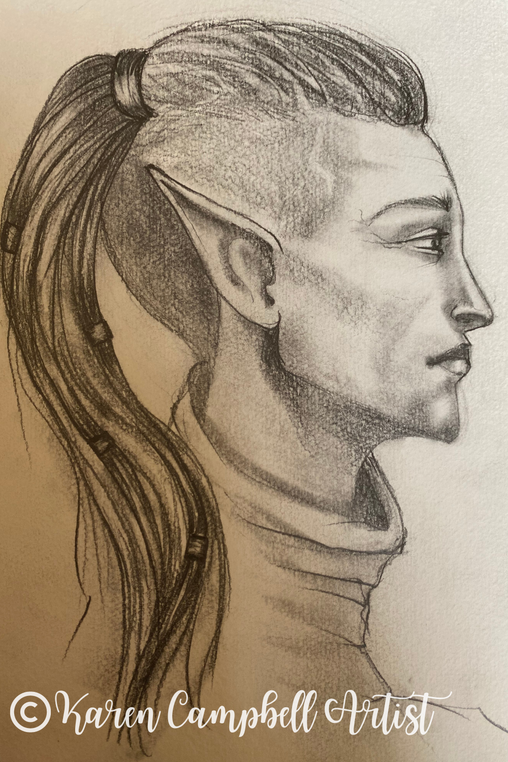
Not sure how to draw elf ears? Check out how EASY it is in today's step-by-step drawing tutorial. I promise you can totally do this!
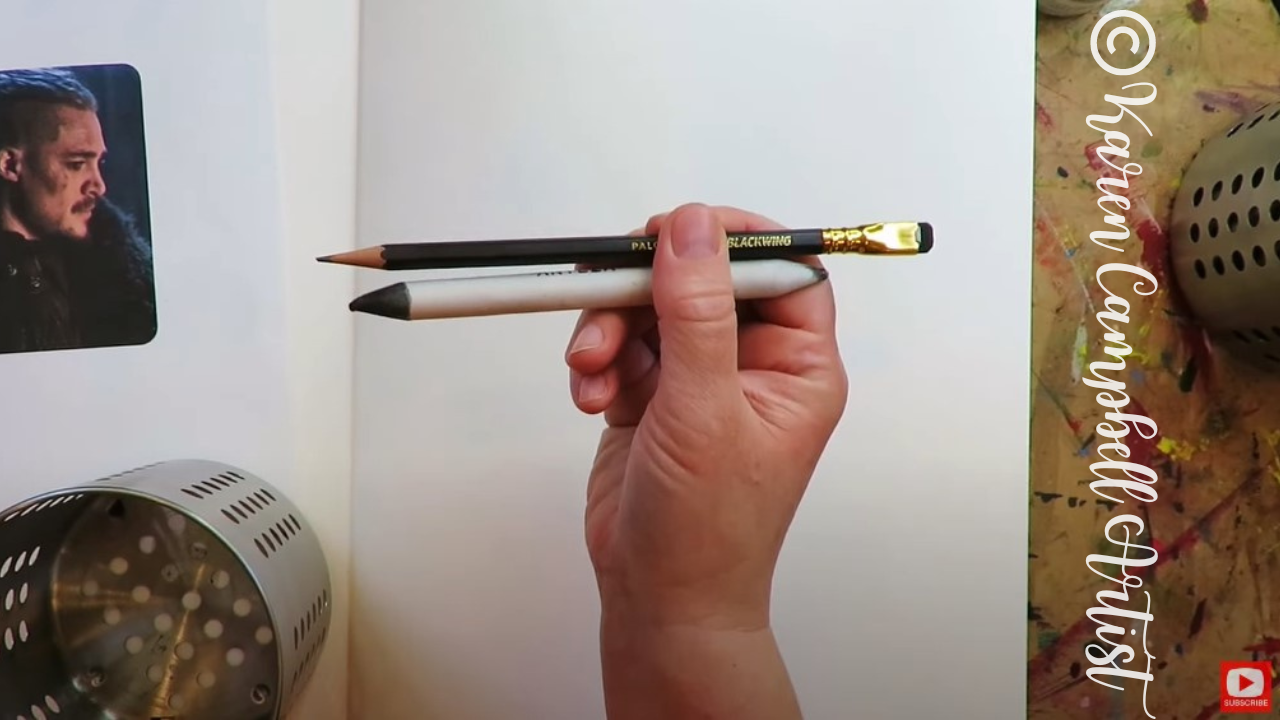
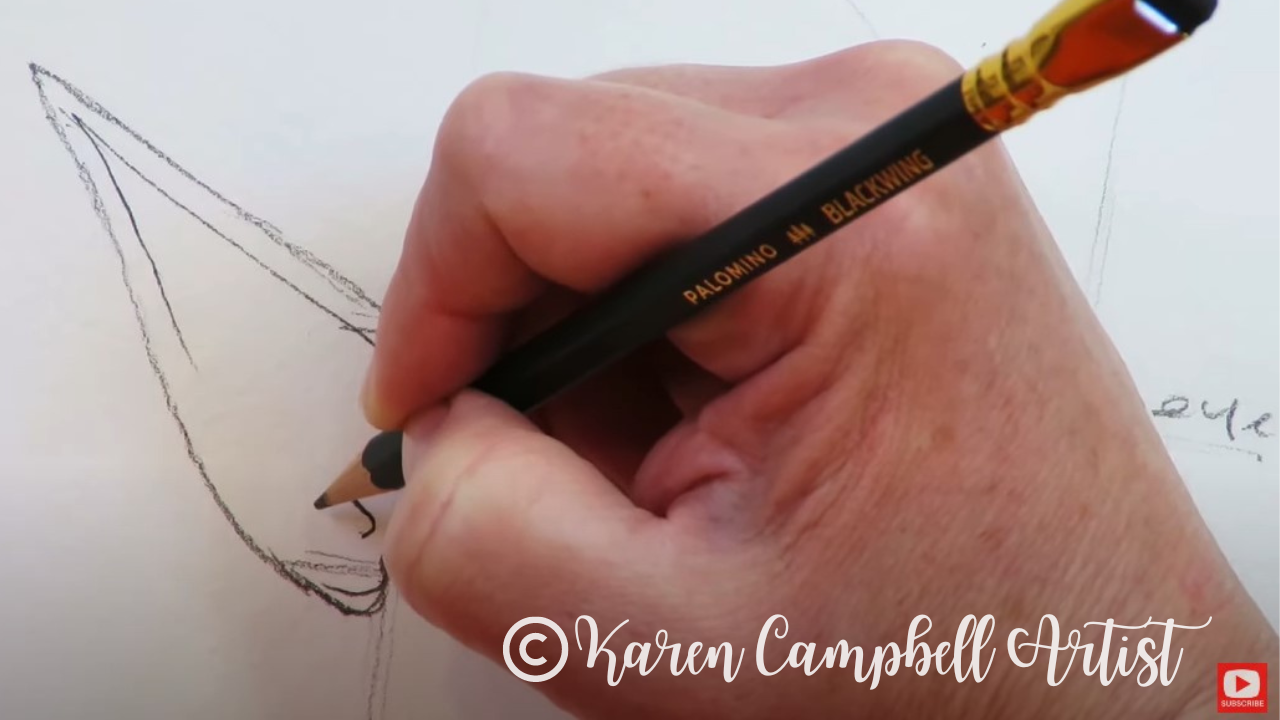
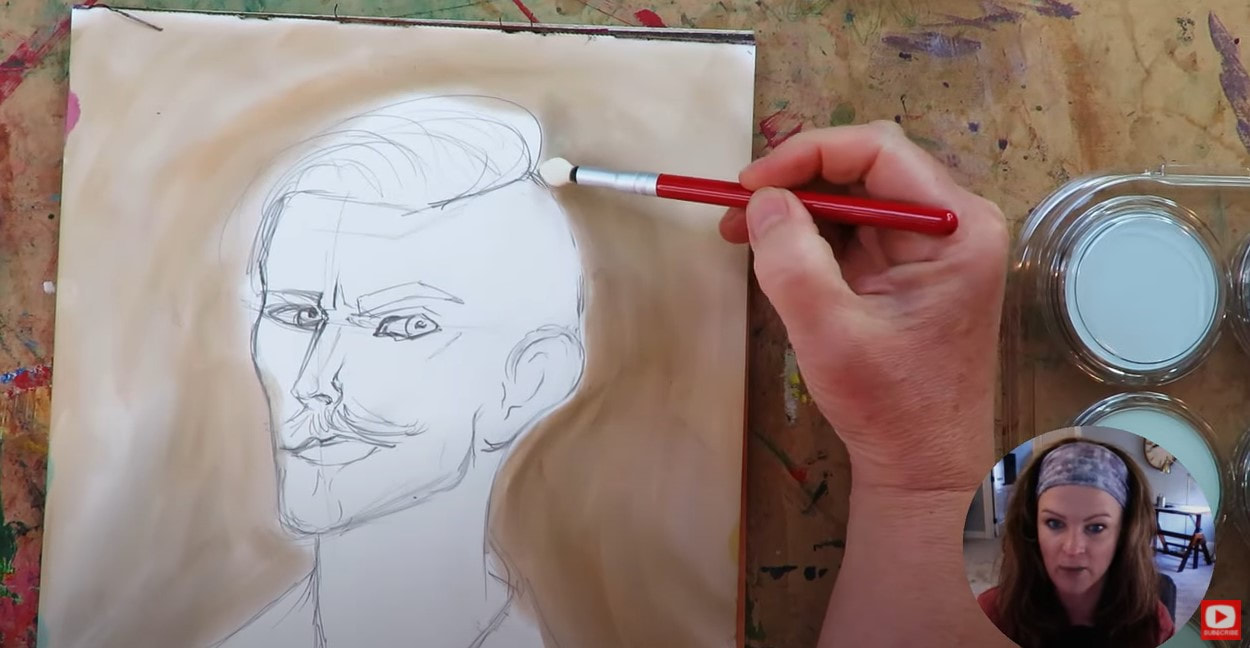
As you can see in the pic above, I'm drawing with my favorite pencil. The graphite is super soft and feels similar to a 6B to work with. One Blackwing pencil will replace an entire pencil set because you can get so many different values from it while you're shading faces just by changing the pressure of your pencil as you draw. 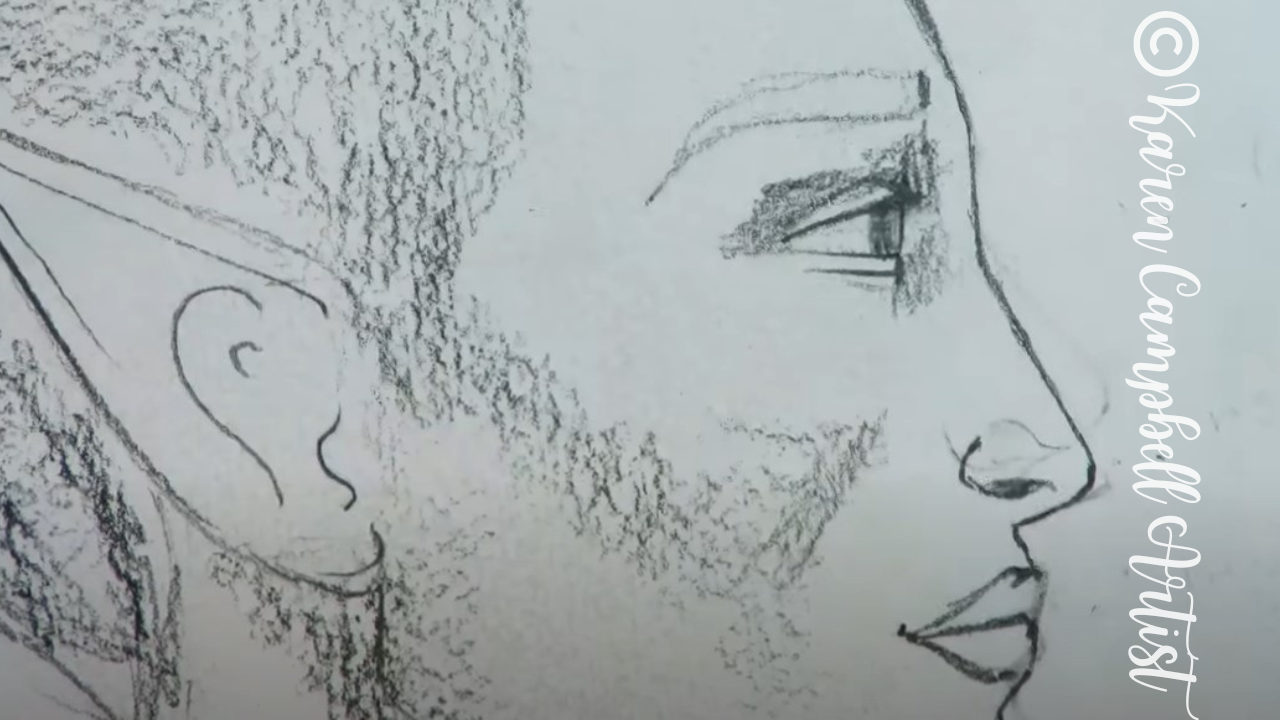
Now before you judge my quick and dirty shading above, I already know if looks like a scribble scrabble mess at this point, but I promise you - when I start using my blending stump- it's gonna get magical.
Tons of students ask me how, or if I clean my blending stumps. The answer is I DON'T clean them ever, because "the dirtier, the better" is my rule as far as blending stumps go. However, if you start blending and feel like you're kinda losing control or your drawing is getting too dark- you can absolutely switch to a cleaner blending stump to lighten things up. You can also knock some of the graphite back using an eraser. I love using my vanish eraser for this, but you can also use a kneaded eraser. 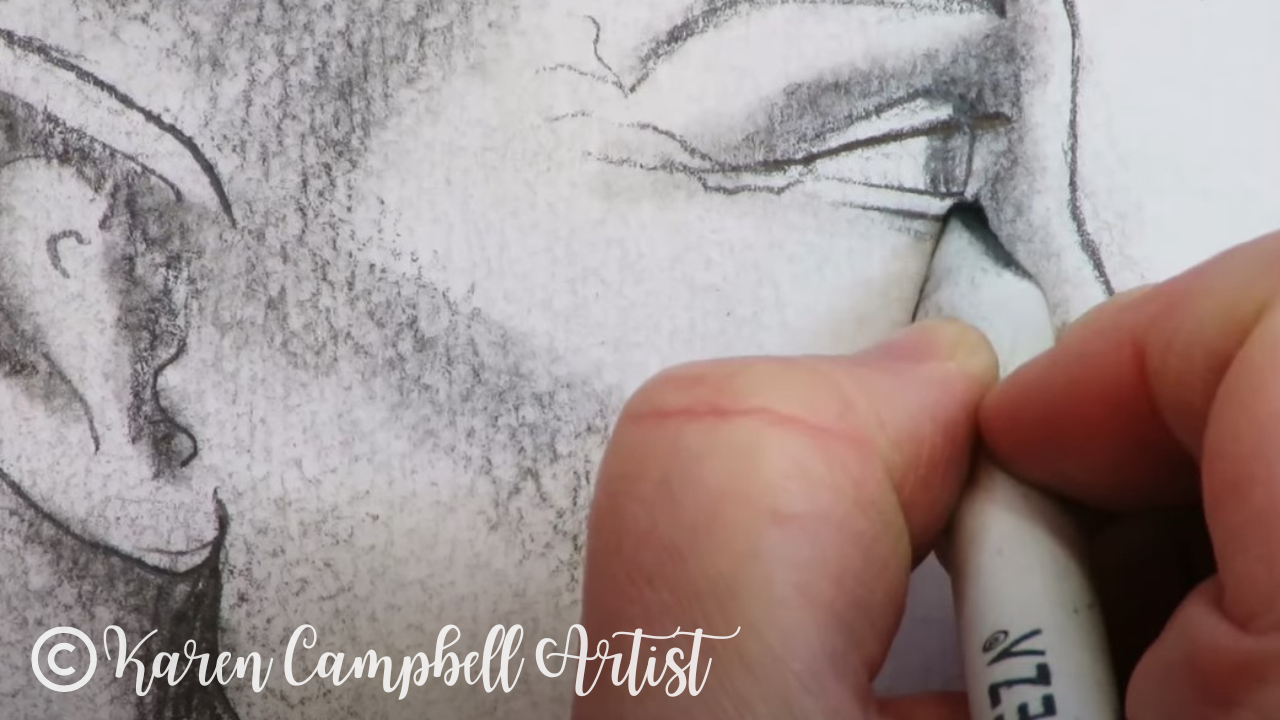
After I've blended in the first layer of shading throughout, I press my pencil down firmly to add some contrast wherever I see dramatic shadows and details in my face drawing reference image featuring the lovely Mr. Dreymon.
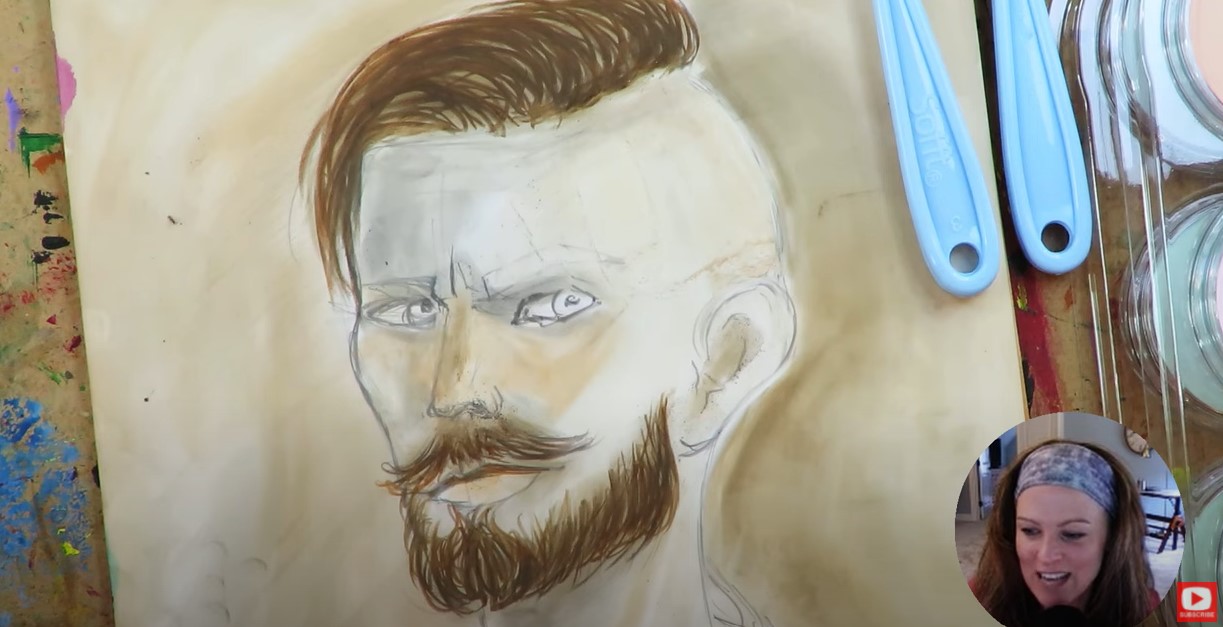
When you're ready to work on the hair, make sure you click over to watch this in action because I've got a lot of really cool tips to help you if you don't know how to draw male hair. 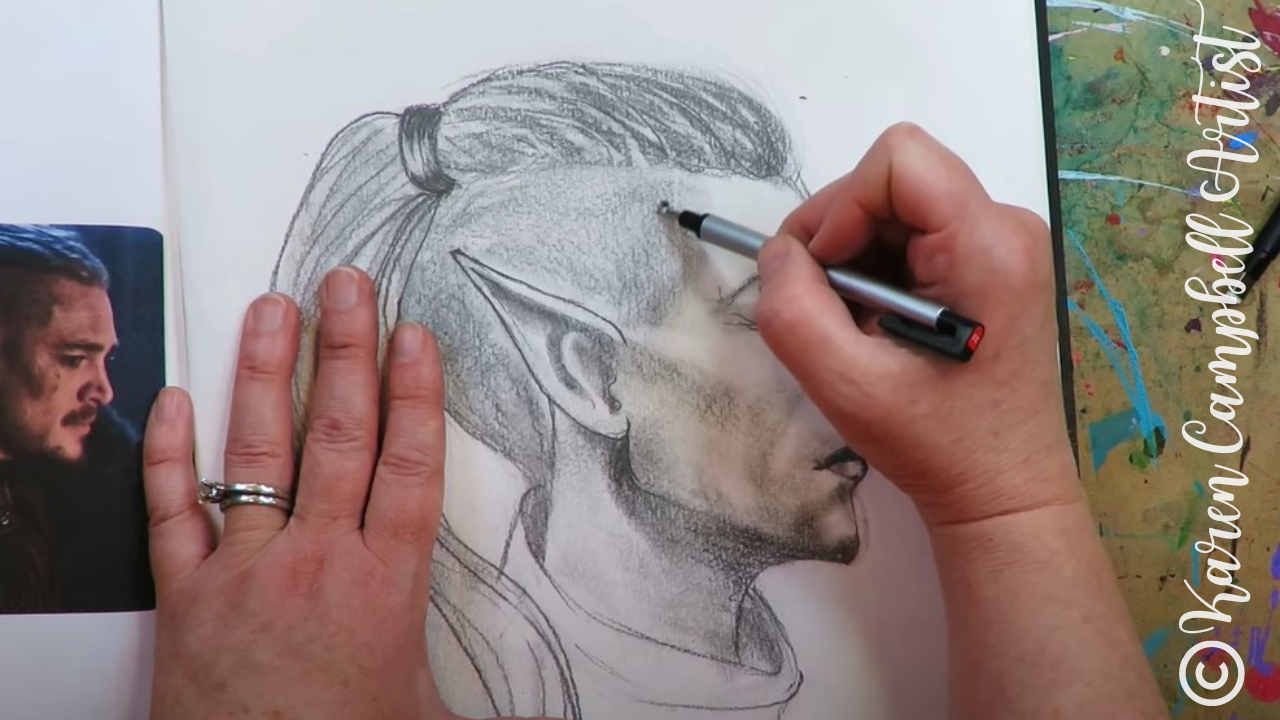
A great tool to try when you're drawing hairstyles is the Tombow Mono Zero eraser (pictured above). It's basically like a mechanical pencil, in eraser form. It's awesome for carving out highlights when you're shading faces too.
I hope you enjoyed today's free drawing tutorial on YouTube. If you're drawing along with me in this series, make sure you share a pic of your work in my Facebook Group with the hashtag #50FunFabFairies for a chance to win giveaway prizes on the 1st of the month :) I can't wait to see what YOU create!
If you're OBSESSED with fairies and fantasy art like me, you might just LOVE the Celtic Collective over at Awesome Art School that I run with my Scottish bestie, Lucy Brydon. Add your name to the waitlist to be notified when it's open for enrollment.
You might ALSO enjoy our podcast 1Scot,1 Not. We talk about everything under the sun to do with Scotland - whether it's historical, fantasy, whatever. Just a quick warning - we have a blast and are totally ourselves on the podcast, which means there is some drinking and swearing. ❤️ CHECK OUT ALL my art books on AMAZON ❤️ MY FAVORITE ART SUPPLIES on AMAZON ❤️ MY BELOVED FACEBOOK GROUP ❤️ FOLLOW ME ON INSTAGRAM
0 Comments
Don't ya just love a funky watercolor portrait with attitude?! Today I'm trying a new-to-me mixed media technique using FOUR simple supplies: Noodler's ink, watercolor and colored pencils with a layer of wax pastels on top!
If you've never tried Caran D'Ache Neocolor Is (basically wax crayons for artists), grab a set to create along with me, and I'll talk you through the project step by step. Or, sit back and relax as I create this "Hot Dog Style" project in my mixed media sketchbook in real time. 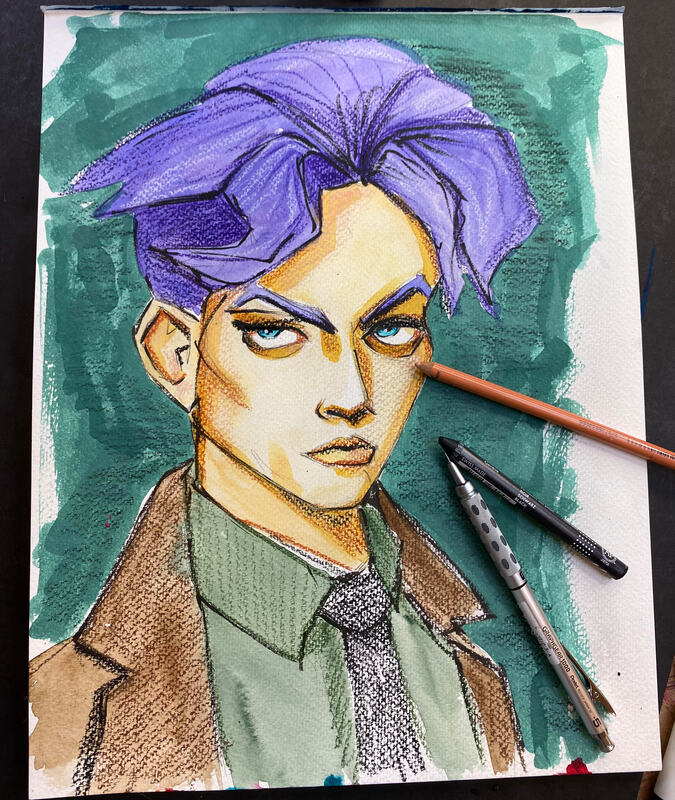
I've been teaching my signature mixed media technique for layering, "The Hamburger System," for almost 2 years now, and it's been a game changer for SO many students!
Sometimes, mixed media beginners can feel a bit overwhelmed by all the new supplies. I recently created a condensed approach using just 4 supplies, called the "Hot Dog System." I also made a ginormous 32-page PDF (you're welcome!) to go with it, giving you examples of 4-art supply layer combos- HOT DOG STYLE- not just from me, but from TWENTY of my artsy friends to inspire you!
Click the button below to download this FREE 32-page stack of cheatsheets just filled with mixed media "Hot Dog System" inspiration!

Before we continue, super quick announcement: All product links are Affiliate. I may earn a small commission if you choose to order through these links but by law there is never any additional cost to the consumer for doing so. I thank you for your support.

Today I'm doing a mixed media project in the style presented by my friend Tara, on page two of my hot dog packet. The four supplies she's using are watercolor and colored pencils, Noodler's Ink, and what is basically a fine art crayon, made by Caran D'Ache. I didn't even have those, so needed to take a quick field trip to my FAVORITE art supply store in town - Jerry's Artarama!

After a quick Jerry's stop, I gathered the rest of my supplies for today's project. Then I did a little Pinterest search through my face drawing references.
If you're new to my world, you may not know that I have a fascination with digital art. I use digital portraits and characters all the time as faces for drawing reference to inspire my own work. These images are perfect to guide you where you need to add shading, especially if you don't know how to shade faces yet. I also love to challenge myself to recreate digital faces using traditional materials. Take a look at this guy! 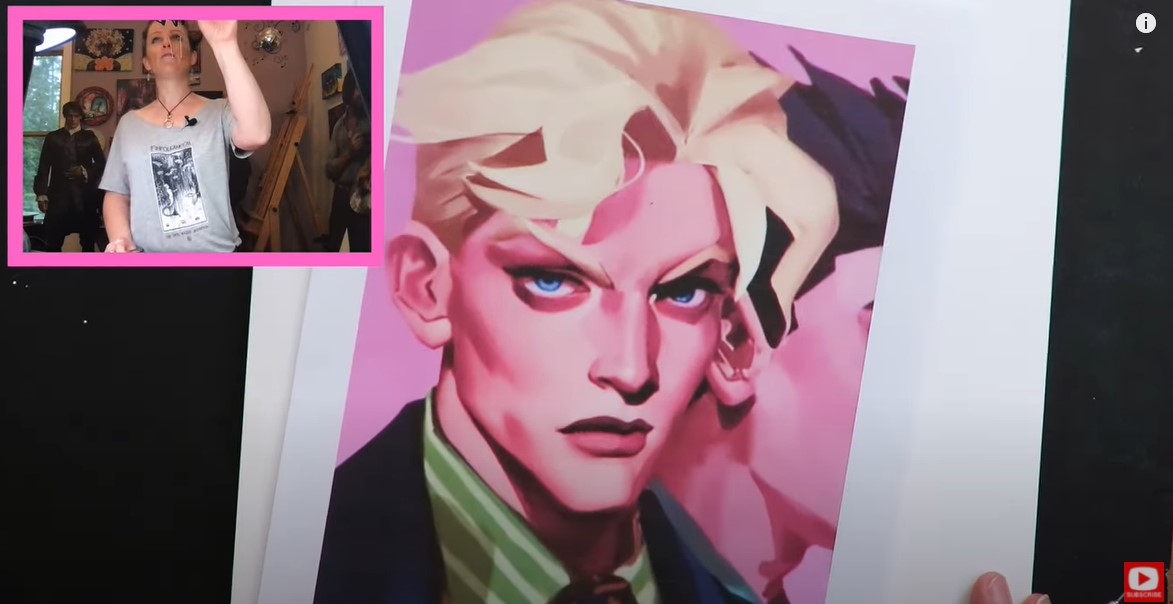
I love his deep eyes and dramatic facial features. They're kinda magnificent - like they've been sculpted out of clay or something.
Since the purpose of today's project is to try a new combination of 4 art supplies, I'm not gonna bother with making my drawing perfect. I'm just blocking in what I see from my reference photo with my mechanical pencil . If you don't have one, these are my favorites! 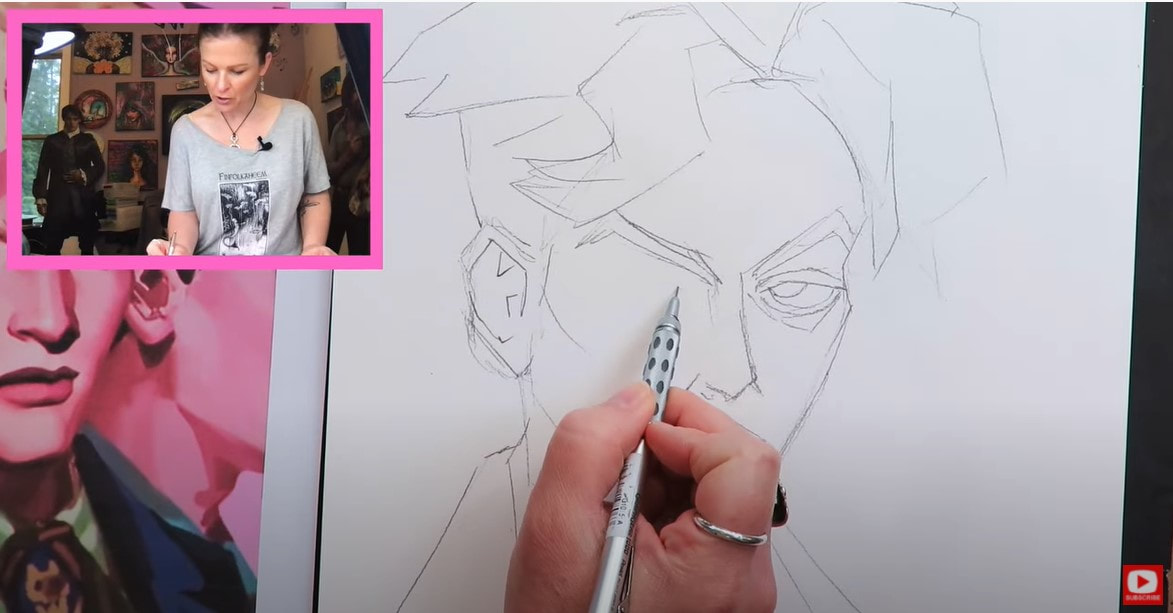
Since the watercolor is my base layer, I'm going to keep it fairly simple, so we can add depth later with our colored pencils and wax crayons.
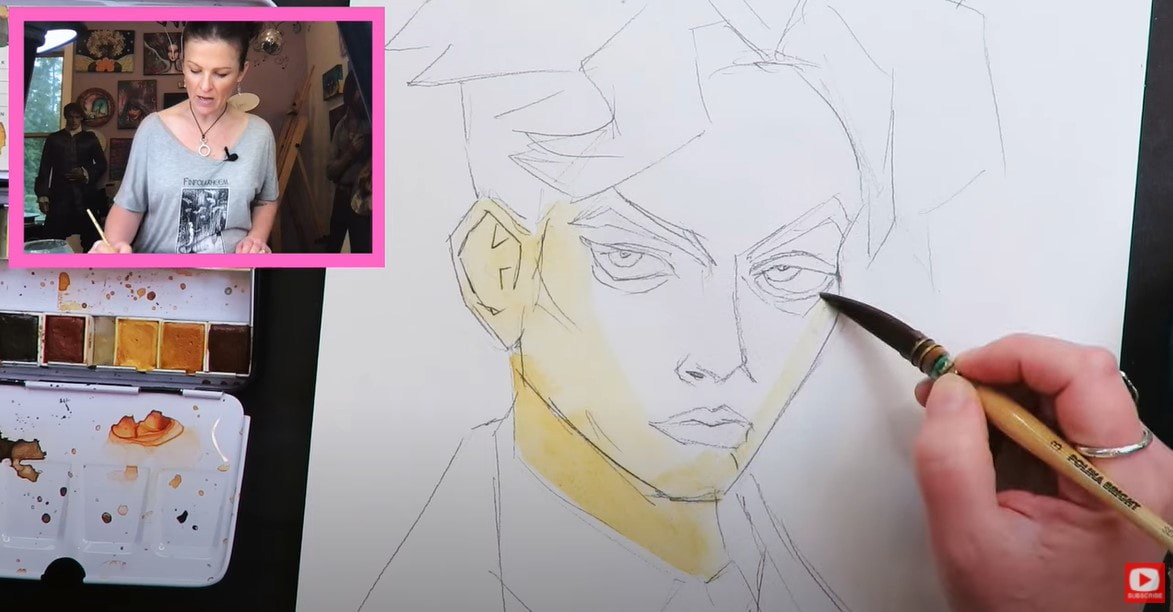
A lot of my students ask me about my favorite paint brushes. Right now I'm seriously in love with the ones by artist, Polina Bright (shown above). They take a while to ship because they're from Australia, but they are SO worth it!
Polina made a coupon code JUST FOR MY FOLLOWERS, so you can save 10% off your order. Simply enter my name in all caps (KARENCAMPBELL) at checkout on her website. To see how her watercolor brushes compare to two of my other favorite brands, check out this video. As far as skin tone watercolor shades go, I tend to be kinda lazy about mixing colors to come up with my own color. I prefer to use shades someone else created, right outta the box or tube because it's faster! For a couple of years, the Complexion Watercolor Set by Prima has been my go to. It's got some beautiful light, medium and dark skin tones you can play with straight from the palette (or mix if that's fun for you). If you'd like to learn more about it,I did a video on this skin tone watercolor set not too long ago that will answer ALL your questions :) 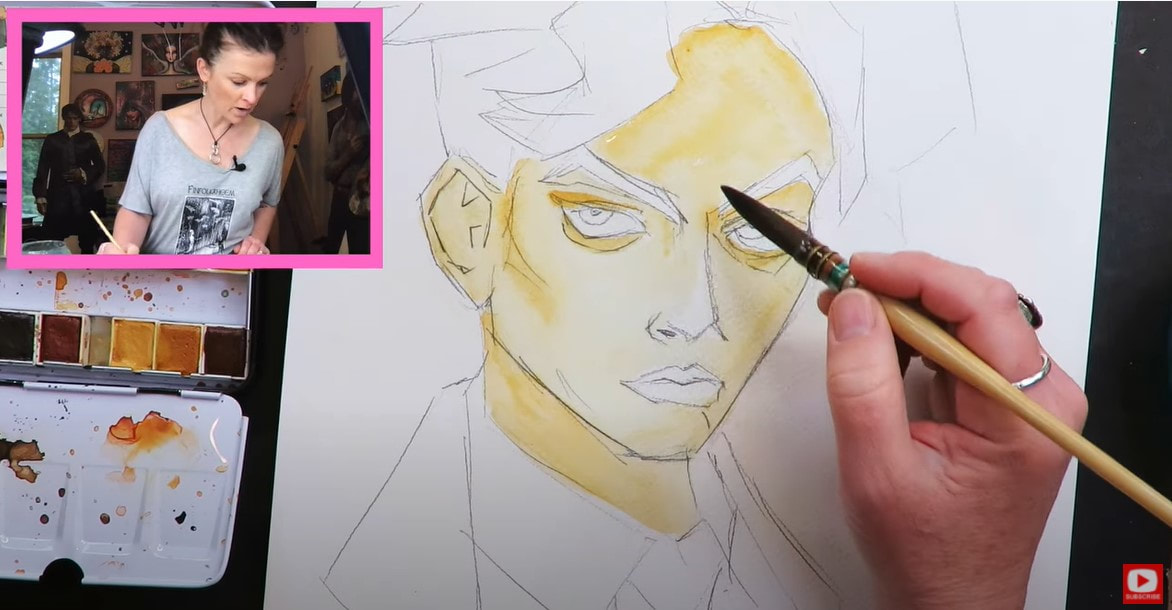
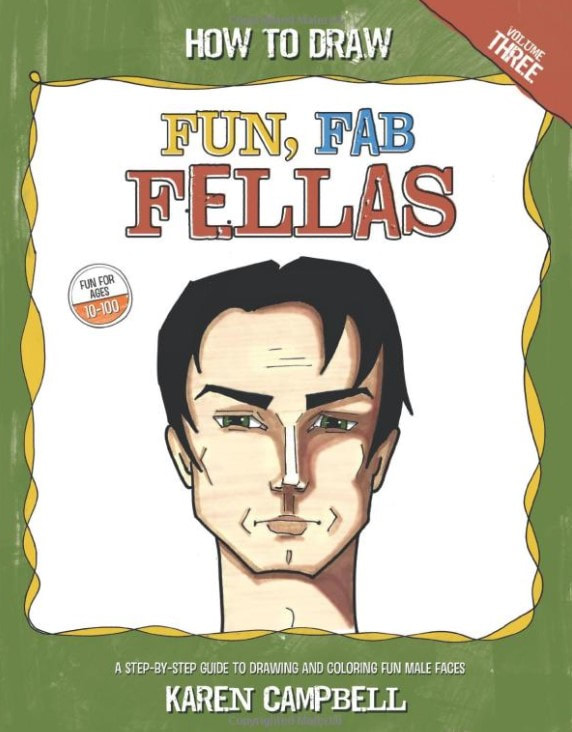
I don't often draw guys, but sometimes I just love to do something a little different. If you're interested in learning how to draw a male face for beginners, I published a book a couple of years ago called How to Draw Fun, Fab Fellas.
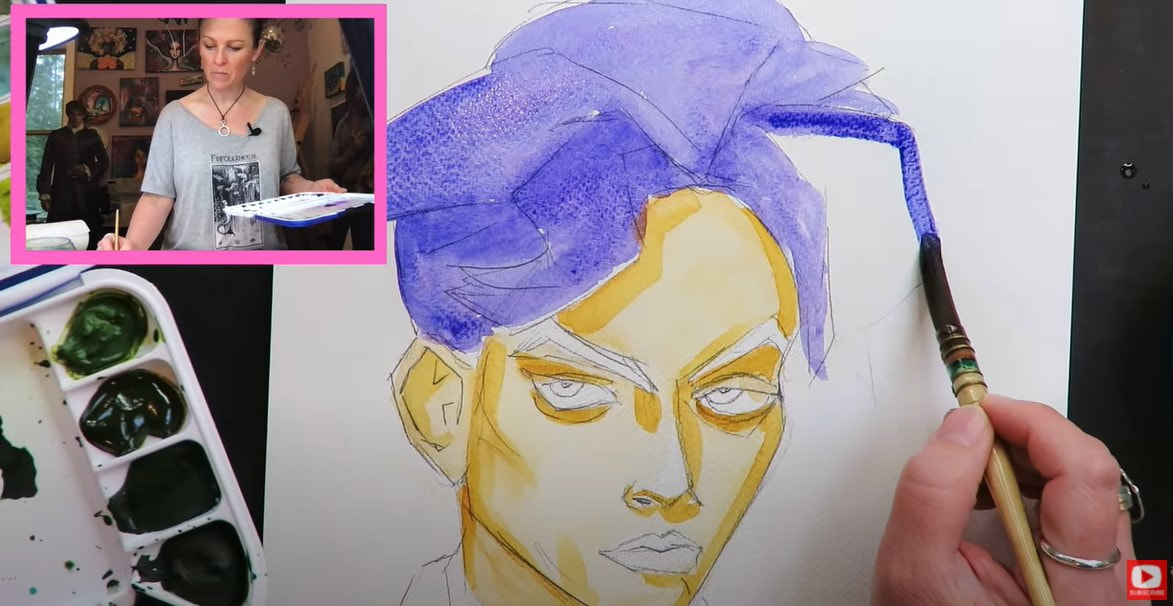
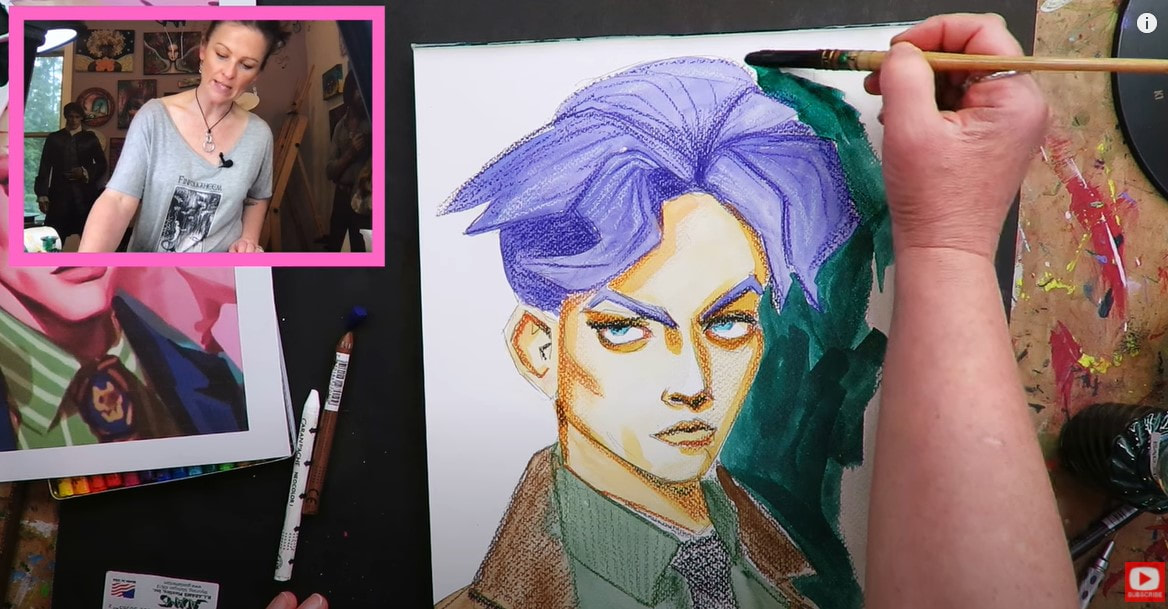
After I get the face shading done for today's dude, it's time to move on to his hair. Cobalt blue violet by Daniel Smith was calling my name. If you're new to watercolor, or thinking about starting a Daniel Smith watercolor collection, be sure to watch this video.
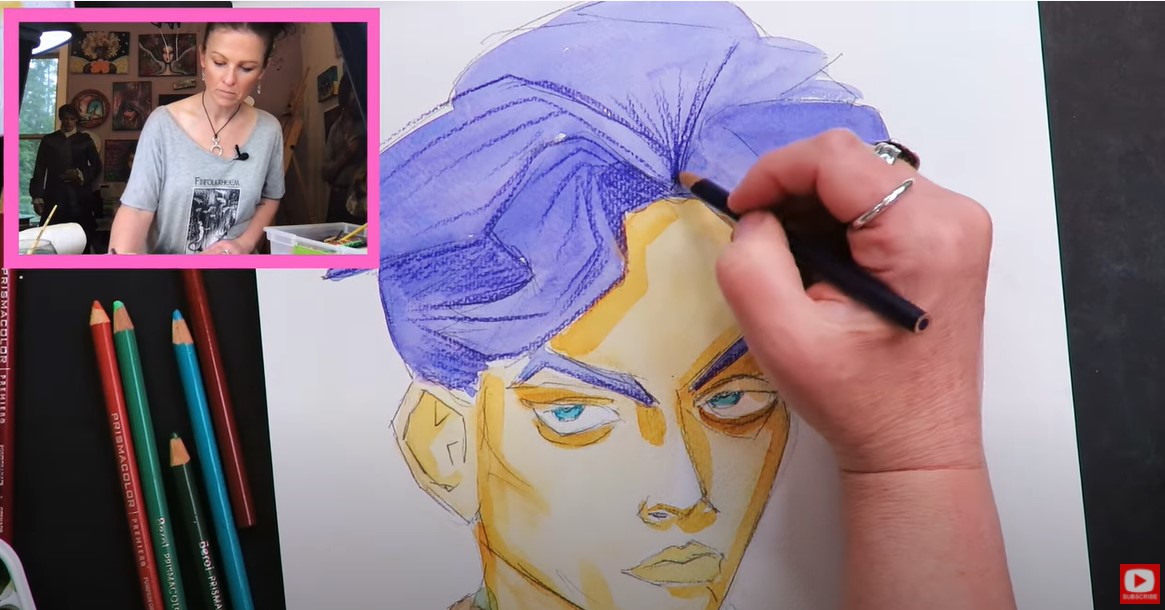
Typically I would shade the larger areas first, and finish off with colored pencil for detail because I tend to work biggest to smallest, but Tara has suggested doing the opposite, so I'm giving that a shot. Out come my prismacolors!
It cracks me up that he looks SO MAD. LOL!
Look at how the colored pencils are really bringing out the texture of my cold pressed watercolor paper. Beautiful! I love that effect. 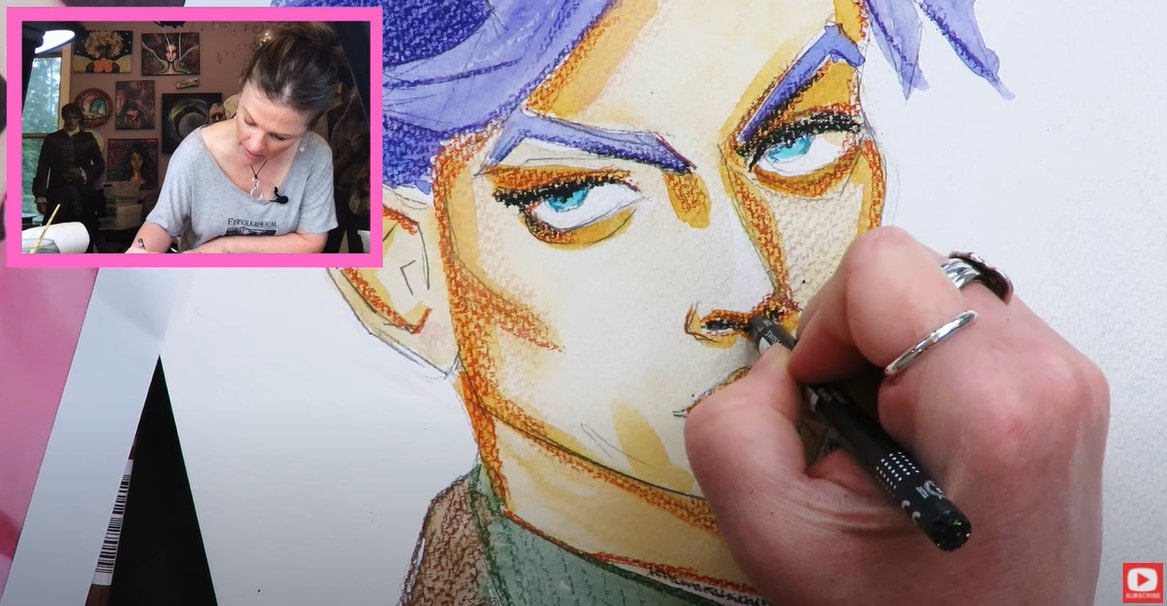
After the colored pencil layer, it was time for the Caran D'Ache Neocolor Ones to come out and play. These really felt like working with crayons from childhood, except that they're a high quality fine art product. I kinda loved them! The white was super opaque too, which really made me happy. I'd love to play with them on hot pressed paper too because I wonder how they would look over a smooth surface without texture.
Whenever I need a super bold, amazing background, I pull out my Noodler's fountain pen ink. It's seriously juicy and so vibrant. This color is called Bad Green Gator. I think it's a perfect backdrop for his crazy hair, don't you?
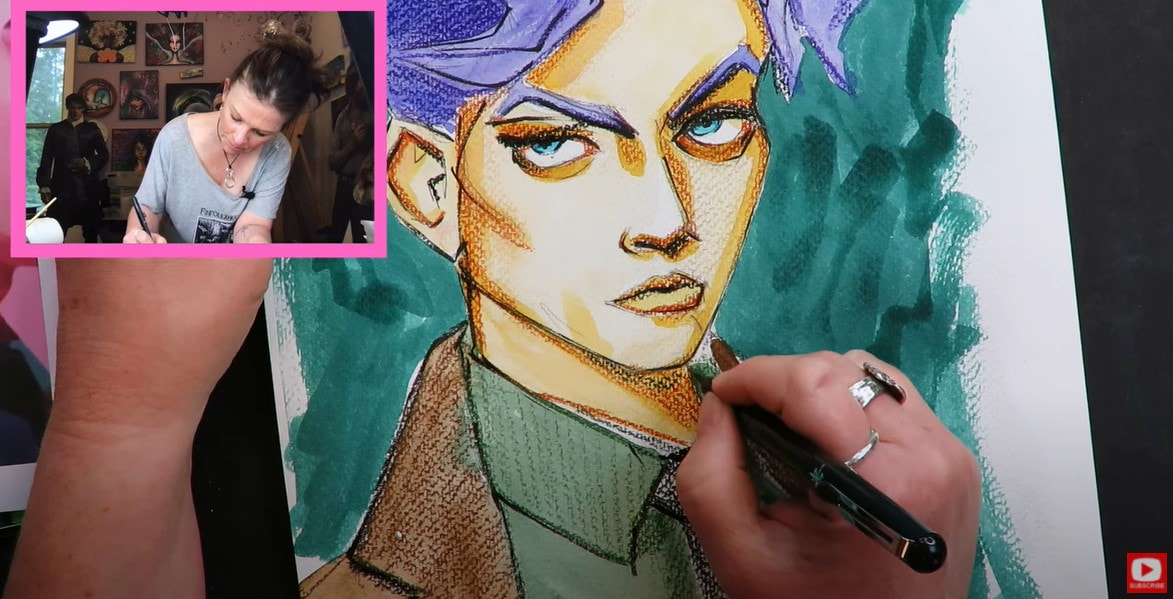
And as all my students know, the way that I love to finish, 99% of my projects is with my pentel pocket brush. It's perfect for outlining and detail work. It's also amazing for drawing eyelashes on my female mixed media portraits!
I hope you enjoyed today's project and learned something new! Not familiar with my "Hamburger System"? It's a simple order of operations for collage, acrylic paint, mod podge and ALL my favorite mixed media art supplies. I'm sure you'll love it! Check out my Hamburger System playlist for FREE on YouTube to see the entire process step by step, in action. Here's the FREE cheatsheet to go along with it! ❤️ CHECK OUT ALL MY ONLINE ART CLASSES & Art Clubs ❤️ CHECK OUT ALL my art books ❤️ MY FAVORITE ART SUPPLIES on AMAZON ❤️ MY BELOVED FACEBOOK GROUP
This mixed media portrait tutorial was filmed BEFORE I'd even identified the steps in my signature mixed media layering process, let alone named it "The Hamburger System!"
When I watch this full-length tutorial now, I can see many of the Hamburger steps I was using, even then. This fun his and hers art journal spread was painted into an altered book art journal I upcycled from my local thrift shop. To this day that art journal is STILL one of my favorites.
If you're new to mixed media, or struggling with how to layer your art supplies so you create a MASTERPIECE instead of a mess - you need to download my FREE Cheatsheet outlining my signature mixed media layering process, called the Hamburger System.
Simply click the button below, and I'll send it straight to your inbox! 
In many of my mixed media canvas and art journal pages, I often love to start with a collage layer, as I explain in my FREE YouTube series breaking down each layer of the Hamburger System. After this - the cheatsheet I HOPE you just downloaded, will make complete sense!!
With today's mixed media project, I felt the need to start with face drawings, instead of collage. I think I was just too excited to dig into this face drawing reference image (below), that I'd found on Pinterest.
I wish I could credit the artist here, but I couldn't find one for this image.
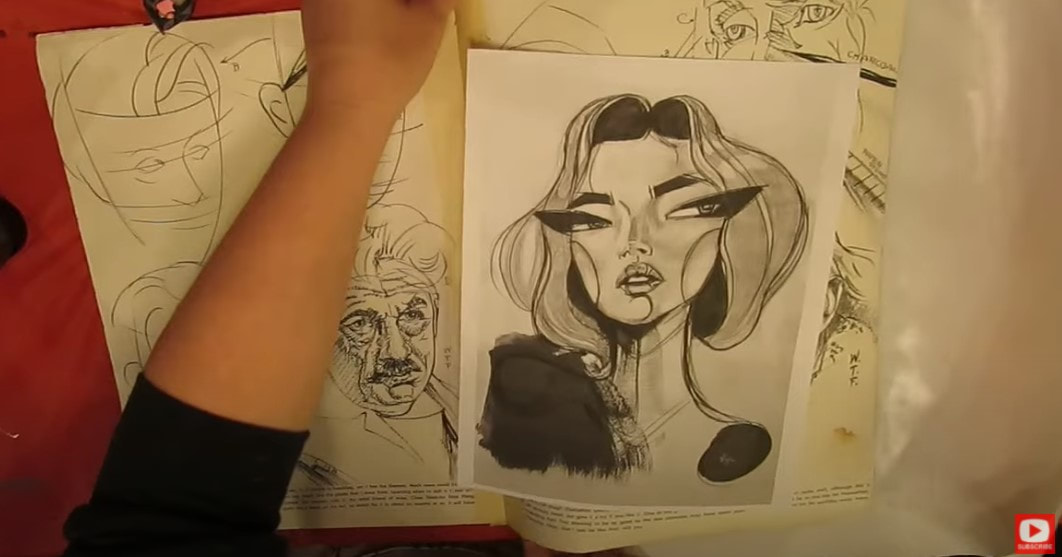
I felt the need to use a dramatic color scheme, so I selected teal, red, yellow and black.
Since I'm working in my altered book, I need to prep my pages with a thin coat of gesso. This will knock back the opacity of the book's original illustrations and make it so I can paint or draw over them more easily. Once the gesso is dry, I started this face drawing as I do ALL of them - by sketching in my face drawing guidelines. Even if I'm doing stylized, whimsical drawing (not realism), it's still important to sketch in guidelines so the facial features look more proportional. 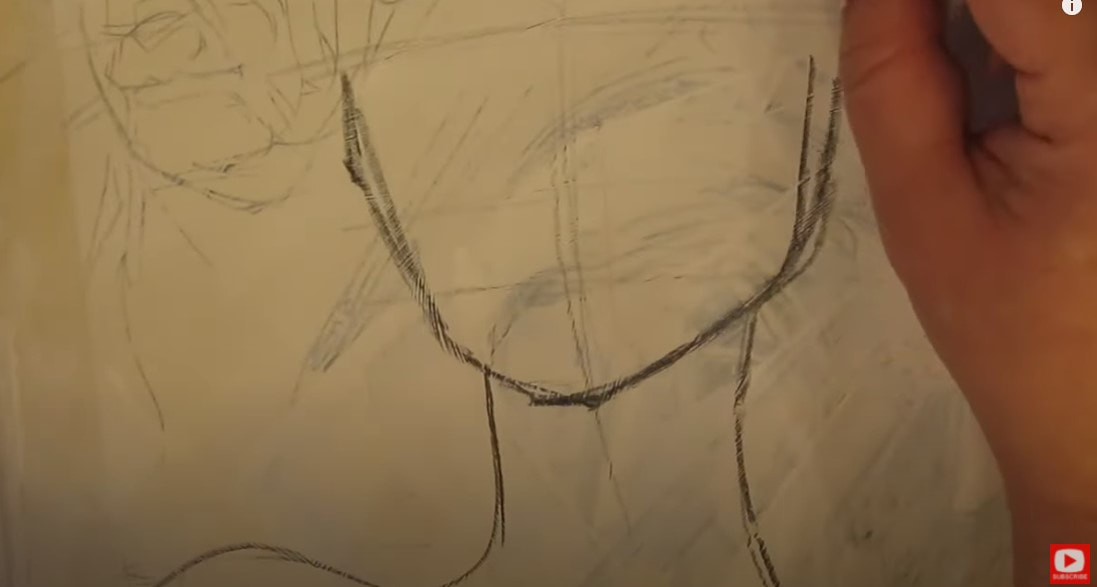
Do you love drawing and shading faces too? Or maybe you're just learning how to draw faces? CLICK HERE to download my FREE whimsical face drawing guidelines. They're super easy to follow, and will help you draw a simple and proportional forward facing face.
If you're a total beginner with face drawing, you might want to check out this playlist over on my YouTube Drawing channel to practice your face drawing guidelines with me step by step before trying out today's project. The face drawing tutorials in this series are are short, sweet, and perfect for beginners. Here's one of the faces you'll learn how to draw...
Real quick, before we continue - super quick announcement: All product links are Affiliate. I may earn a small commission if you choose to order through these links but by law there is never any additional cost to the consumer for doing so. I thank you for your support.
After my initial sketch for today's project is done, I pull an old flat paint brush out and add a little more gesso along the outer cheekbones and jawline to correct my proportions since I'm working with a pencil that doesn't erase.
Gesso is a bit magical like that in the world of mixed media art! It can give you a fresh start and work like an eraser to hide any little mistake you want. Be sure whenever you use gesso that you're using an old paint brush because it will totally destroy your brush. I have one that I've designated for myself to use only for gesso. I highly recommend you do the same. 
In this particular project, I added an additional thin layer of gesso over my subject's cheeks, nose, forehead and neck to knock back some of the background that was still peeking through from the book's original illustrations.
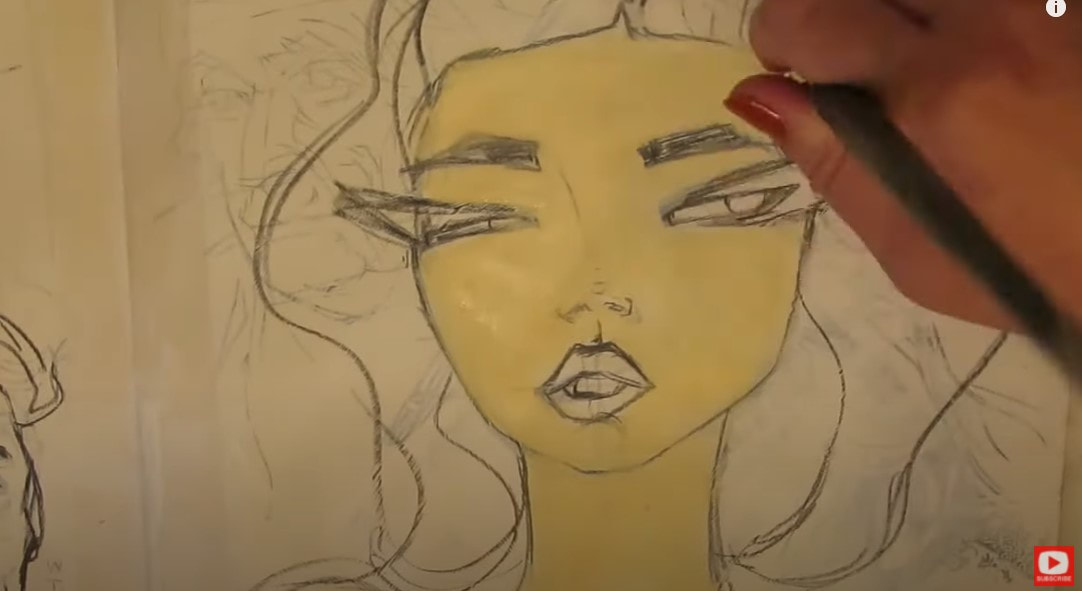
Next, I applied some acrylic craft paint in ivory as a base skin tone layer all over her face and neck. Since this piece is purely for my own enjoyment in my own personal art journal, and I'm not selling it, etc. - craft grade acrylics are fine for this application.
When I started adding red acrylic paint into the background behind my face drawings, I decided to scrape some onto my journal page for an edgier look using an old credit card! This is a really fast way to cover a lot of ground with your acrylics. 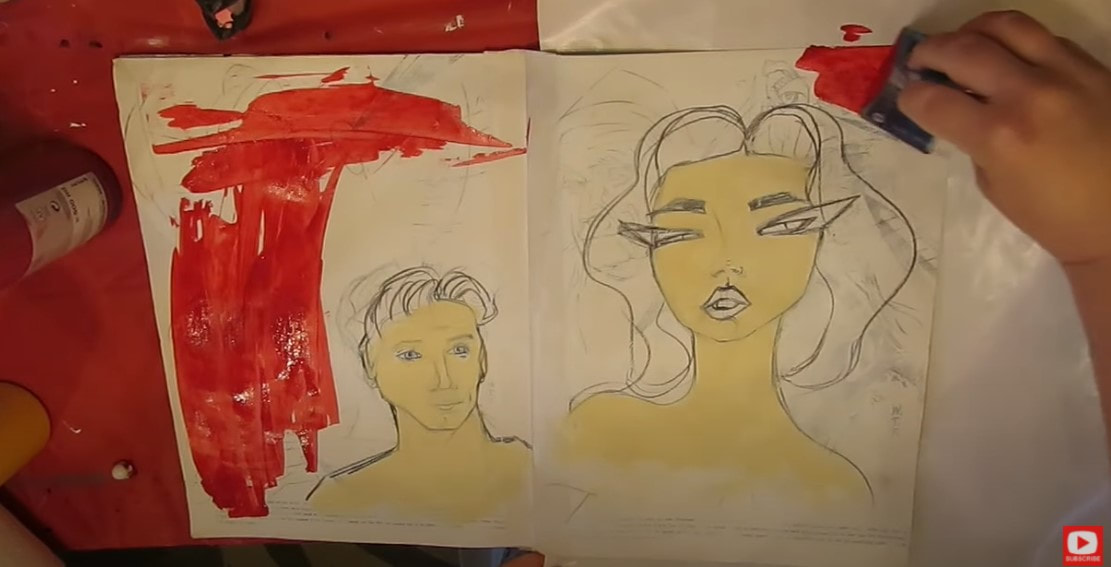
At the time this project was created, I'd just published my How to Draw Fun Fab Fellas book, so you'll also see me working on a guy's face in this mixed media tutorial.
If you're interested in drawing male faces, one of the things you need to watch out for is to go easy on the lips. If you're not careful, these can turn feminine real quick! You also want to be sure to keep the lines in male faces very angular, except for the eyeballs- these are really the only true curves you should see in a male face drawing. 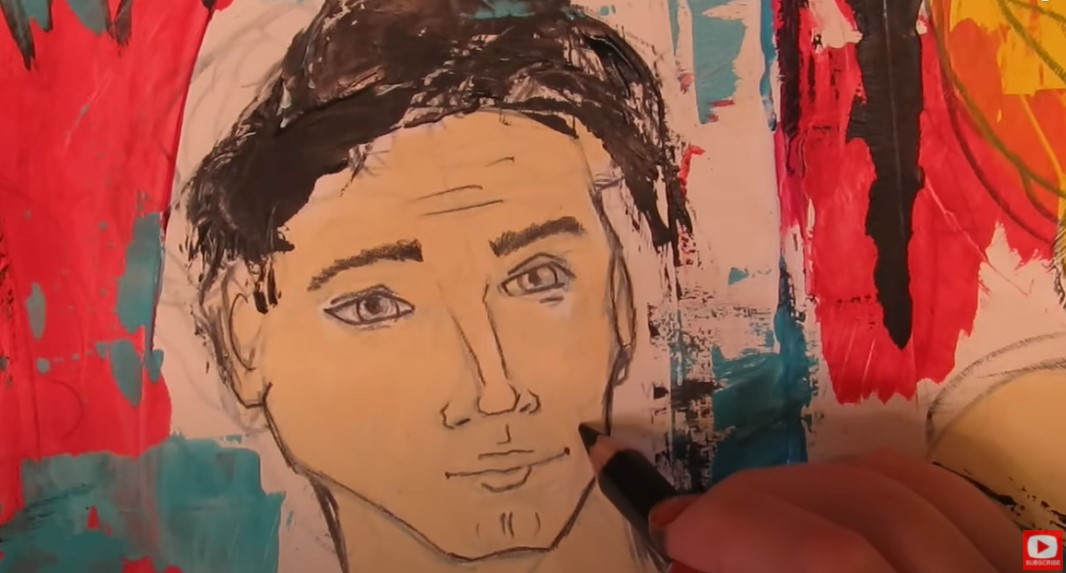
Next, I decided to add some detail work in with my black stabilo all pencil, before I sealed both pages with clear, matte mod podge.
Usually I LOVE how water soluble the black stabilo all pencil is (even though I know it totally freaks some of my students out!!), but today, it muddied the skin tone of my female portrait because I had doodled in stabilo on top of the eyebrows. This was just too dark and dissolved everywhere once the mod podge hit it. 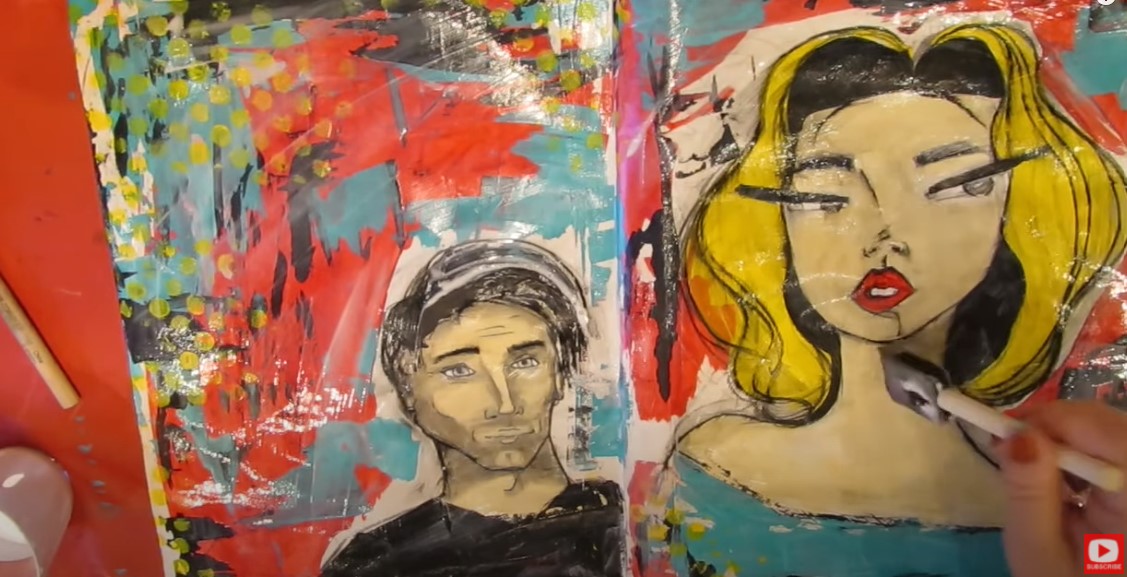
If you're new to my world, you'll quickly learn how relaxed I am about "mixed media mistakes." I think everything is fixable, and encourage my students to ALWAYS keep pushing through on a project.
I ended up adding gesso, more acrylic craft paint (ceramacoat) to save her face, and blending some gelato skin tones on top to do some face shading, and tying things together with my pitt pens and posca pens- "Hamburger" style. 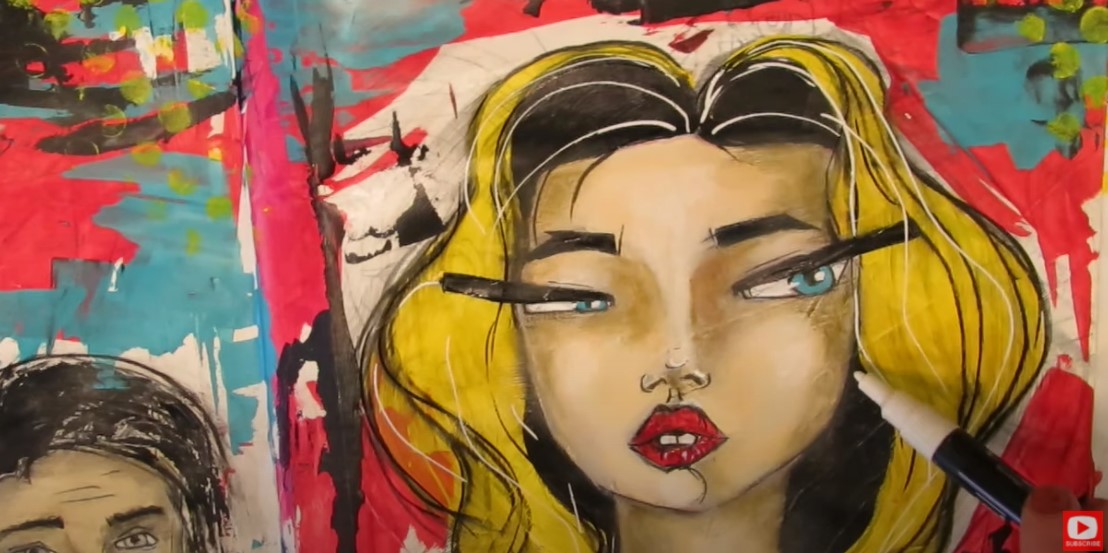
If you've never used creamy gelatos to help you "paint" a variety of skin tones into your face shading, they're amazing and something you've got to try.
This chick totally gave me a run for my money, but I had a blast and am happy with the end result. Be sure you click over to the video to see her unfold in real time. Thanks for hanging out with me today! Don't forget to grab my FREE HAMBURGER SYSTEM CHEATSHEET. Once you print it out, join me on YouTube for my Hamburger System Series, and I'll explain everything you need to know about mixed media art supplies, and my simple mixed media layering process! ❤️ CHECK OUT ALL MY ONLINE ART CLASSES & Art Clubs ❤️ CHECK OUT ALL my art books ❤️ MY FAVORITE ART SUPPLIES on AMAZON ❤️ MY BELOVED FACEBOOK GROUP
Using photos of faces for drawing reference WILL make you a better artist. There's no question in my mind! Recently an awesome reference photo was shared in my Facebook group. Seeing this post got me thinking about how GORGEOUS the reference image was, for so many different reasons.
My teacher brain spiraled about all the things I needed to tell you! Hence... the LIVE. This video is a MUST SEE for you if ...
Here's the post that inspired today's LIVE... 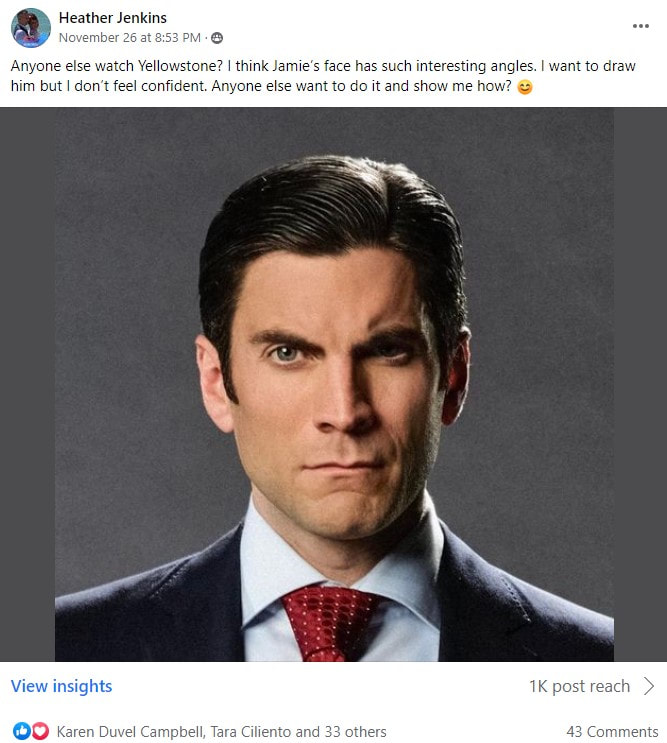
I know, right?!
I'm not watching Yellowstone right now, but clearly I should be ;)
Before we get into how amazing this image is and WHY, you need to download my FREE 4-page cheatsheet packet called the Face Drawing Cheatsheet Bundle. This will help you SO much if you're just learning how to draw a face, or if you want to improve your face drawing skills. The info inside works beautifully whether your'e drawing a man or a woman.
The bundle includes my Face Drawing Guidelines, Shading Guide, my How to Draw Eyelashes Guide, and a Face Base / Face Drawing Template if you feel like you don't want to fuss with drawing proportions and would rather cut something out that can be traced directly into your art journal or sketchbook. Simply click on the button below and I'll send the packet right over. 
After you get your packet downloaded and are ready to practice, you can join me in this live stream video, or feel free to check out this playlist of How to Draw & Shade a Face in 5 Minutes if you feel like this LIVE is a little too advanced for you.
When you're ready, join me back on the live stream because I have some really cool face shading tips to share with you - whether you're drawing faces for beginners, or a more advanced artist!! 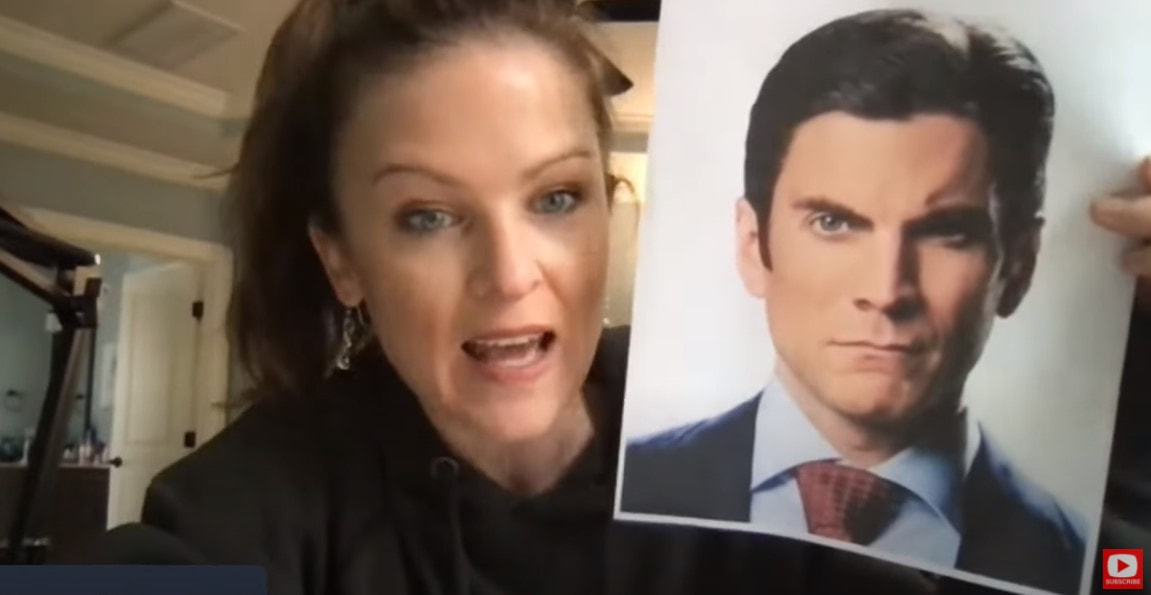
Reference photo drawing is super helpful for both whimsical drawing (semi-realistic drawing) and realistic drawing. References make a HUGE impact on your work.
They actually make your job as an artist EASIER because they give your brain a little break (you don't have to think up a zillion details to include in your drawing), and they give you ALL the "answers" your brain needs to observe in order to create something amazing. To get you started on finding faces for drawing reference, you need to find an image you love! Here is a page right out of my How to Draw & Find Your Style book that talks ALL about reference photo drawing. 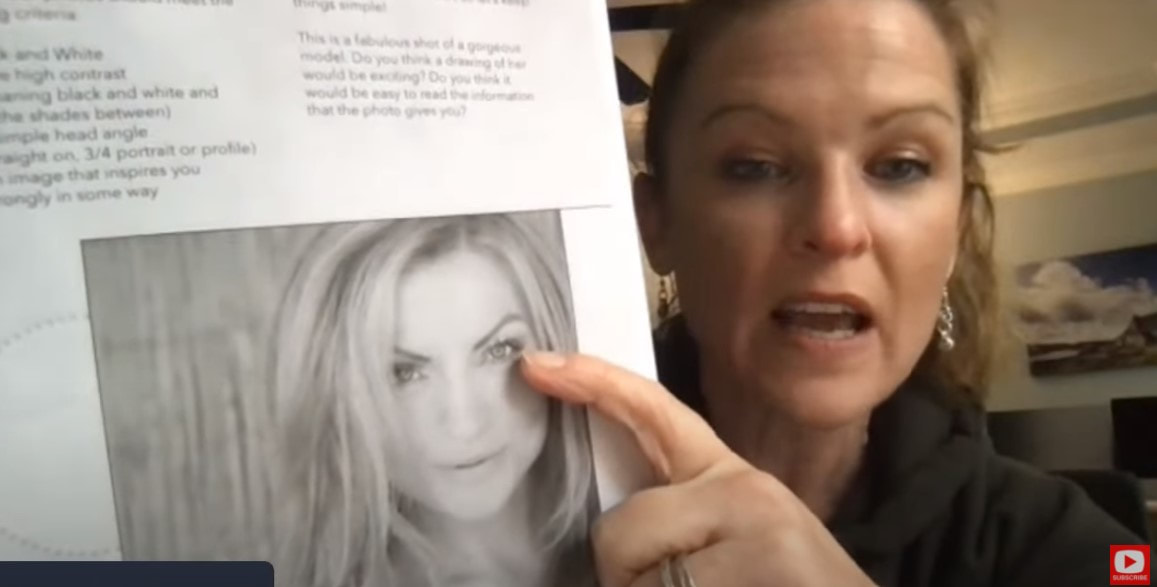
While this model is gorgeous, and I totally want to draw her too - if you look closely at all the gray tones in this photo- you'll see they're all basically THE SAME! That means this image really isn't the best choice to use as a face drawing reference.
It's better to choose an image that has ALL the values in the value scale represented from the lightest light, to the darkest dark. Why? It will make the drawing easier for you to draw, and your drawing will look fantastic because you're using every shade of gray in the value scale. If you're new to value scale drawing, today's video will help you out. You can also check out this one to learn how to create your own value scale using pencils. This is also an exercise members of the Fun Fab Drawing Club and Mixed Media Society do right from the beginning. I highly encourage you to create one for yourself! 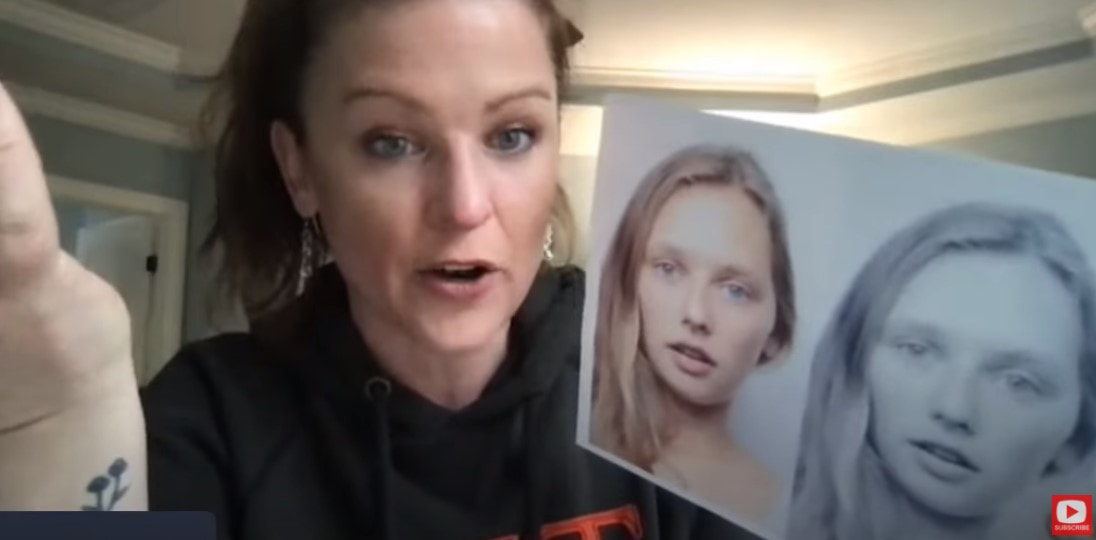
If you're not sure if a face drawing reference image you've selected will be great for drawing, just print it in black and white with your printer. This is a super easy way to convert a color image to black and white, and it's actually better to draw with anyway! This is especially helpful if you're drawing in graphite, because it's tough to replicate what you see in color using grayscale pencils.
Sometimes, I use reference photos PURELY for the shading information. Today, I'm going to show you how you can even use the face shading information from one photo to create a totally different drawing! It's really kinda magical, and why my face shading guide in this cheatsheet packet is SO VALUABLE! Make sure you grab that download if you haven't yet :) Then click over to the video to watch how I "steal" the face shading inspiration from Yellowstone dude's photo to guide how I shade the face of a completely different drawing of a woman. 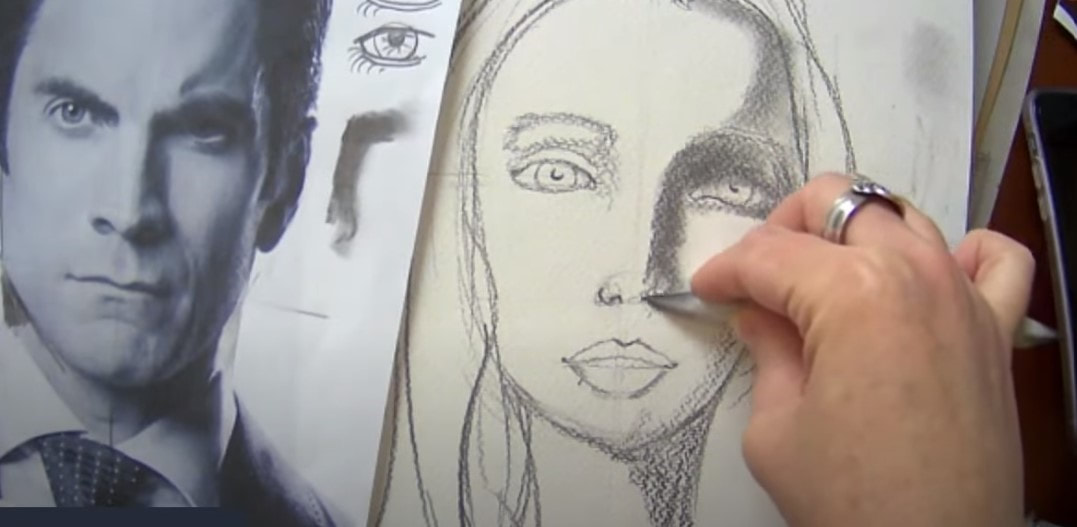
Pretty Cool, right?!!
Thanks for hanging out with me today!! And in case you're wondering if I did actually draw Jamie from Yellowstone- I totally did, and shared him in our Facebook Group for Awesome Art School ;) 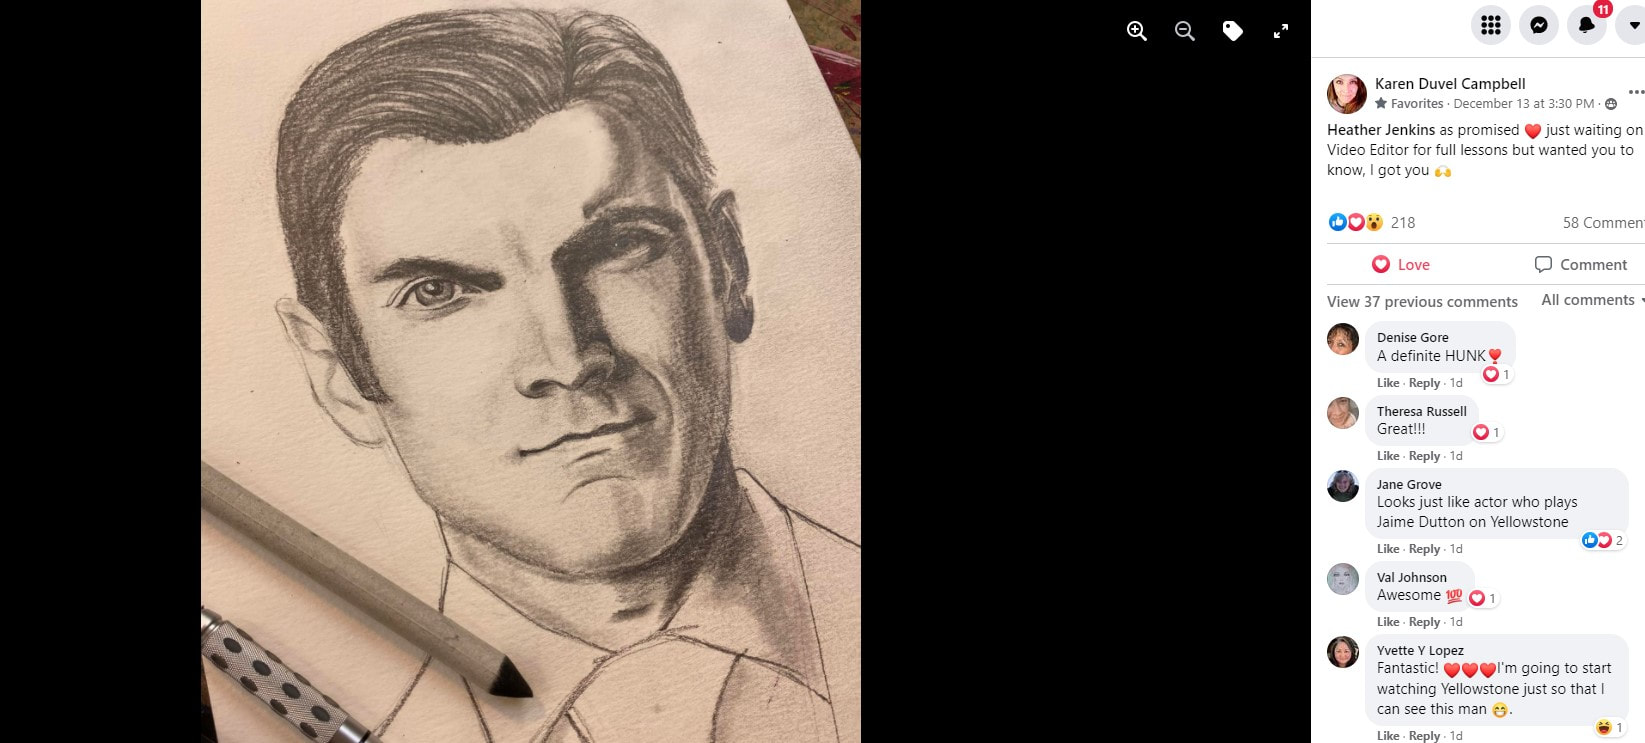
I also turned this into a real time drawing lesson and dropped it into The Fun Fab Drawing Club "Dudes" classroom for my beloved club members like Heather!
❤️ CHECK OUT ALL my art books on AMAZON ❤️ MY FAVORITE ART SUPPLIES on AMAZON ❤️ MY BELOVED FACEBOOK GROUP ❤️ FOLLOW ME ON INSTAGRAM
How have I NEVER tried pan pastels before in any of my mixed media portraits?! I KNOW!! I just purchased a pan pastel set of 80, and am super excited to PLAY with them for the FIRST TIME. Will my pan pastels portrait fail on yupo paper? Is layering pan pastels easy or hard? What art supplies "play nicely" with them? NO CLUE!
Today's mixed media art supply demo is all about letting go & discovering the answers on my own as I play. It is in this space of experimentation where we can truly be FREE as artists! If you're new to pan pastel art like me, need a little push to TRY something new, or curious if you should add some pan pastel colors to your own art supply stash - THIS VIDEO is FOR YOU! 
I don't about you, but I like to dive in "blind" whenever I experiment with a new art supply! I think it's fun to not know how things are gonna work, how they'll react together, and figure it all out by myself first!
Then I love to dive into research LATER if things went wrong, because for me - my experience helps me to craft my knowledge. My hope for you with today's video is that you feel empowered to try anything and everything you want to all by yourself. You can learn SO much by doing this!! Before we continue, super quick announcement: All product links are Affiliate. I may earn a small commission if you choose to order through these links but by law there is never any additional cost to the consumer for doing so. I thank you for your support. 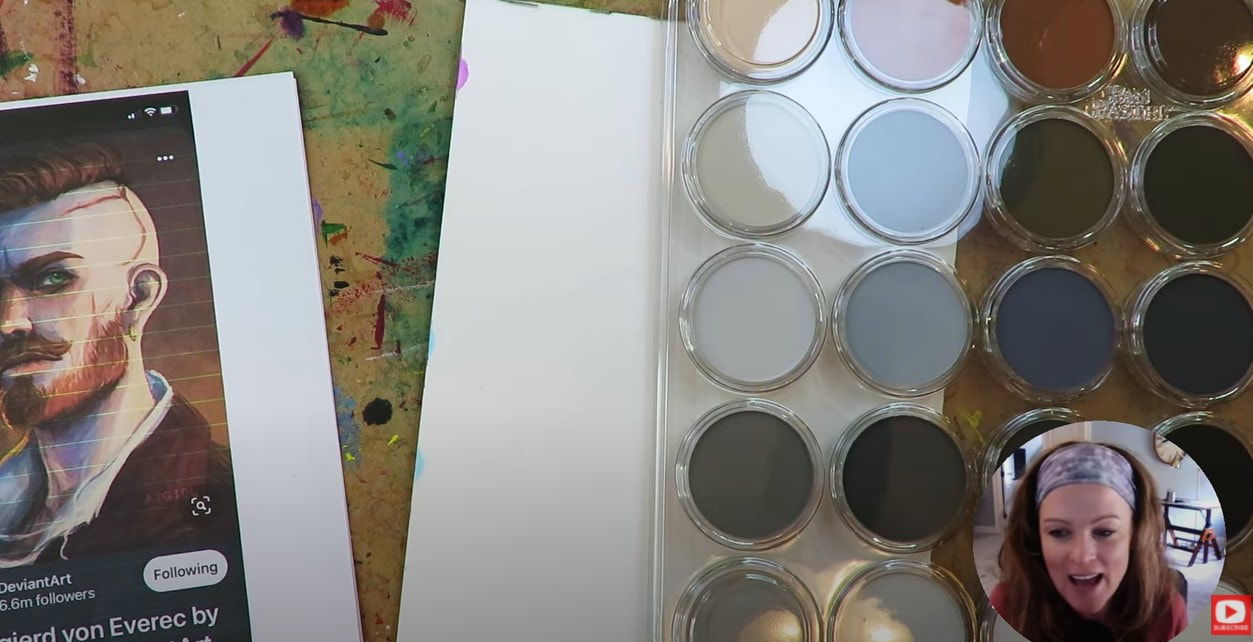
I found an awesome face shading reference photo on DeviantArt that inspired today's project. He's a side profile drawing in 3/4 view.
If you'd like to try drawing a 3/4 portrait, and need a little help, click the button below to download my FREE 3/4 view Face Drawing Guidelines! I'll email them right over to you.
The paper I'm using today is called Yupo paper. It's 100% non-pourous, and basically plastic! When you draw on it - you'll experience a really slippery sensation, like 80x slippier than bristol!
As you'll see in the video- it doesn't matter how many times I've drawn a face, I ALWAYS go back to basics and sketch in my face drawing guidelines first. This helps me ensure the face I'm drawing will come out with facical features that are proportionate. If you need help getting the proportions of the 3/4 portrait correct, CLICK HERE to download my free cheatsheet. 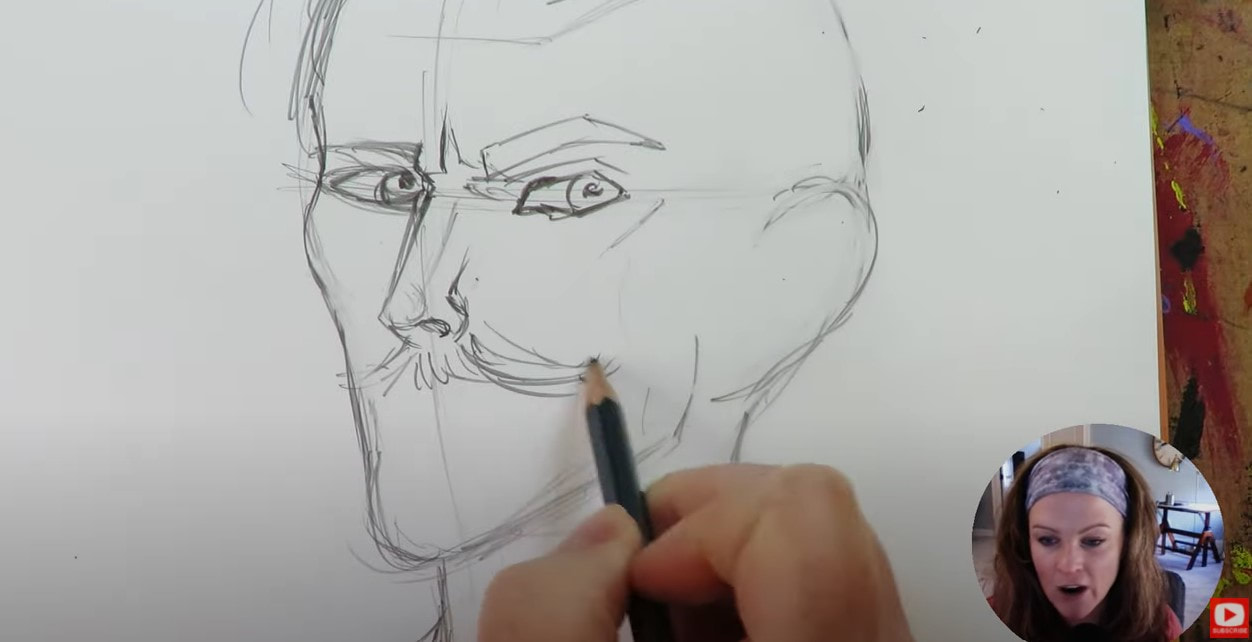
If you're interested in learning more about how to draw male faces check out my book - How to Draw Fun Fab Fellas. I don't draw guys nearly enough, honestly! And they're really fun because the angles in their faces are SO different from women.
As I was drawing this particular guy, I really felt like he was turning into a young Van Gough!
Since I'm totally doing this project from the perspective of a pan pastels beginner... and also new to working on Yupo paper- I have no idea how my first layer of pan pastels is going to stick to the paper, because it literally has zero texture and feels like a skating rink.
If you don't have any pan pastel sets yet, I recommend trying the set of 20, or the skin tones set of 7. I used one of the pan pastel Sofft tools (they came with my pan pastels set of 80), to apply some color to the background, and it was seriously done in under a minute. If you need some applicators, try this little set of 12 mini sponges, and/or this set Craft Ink Blending Brushes. 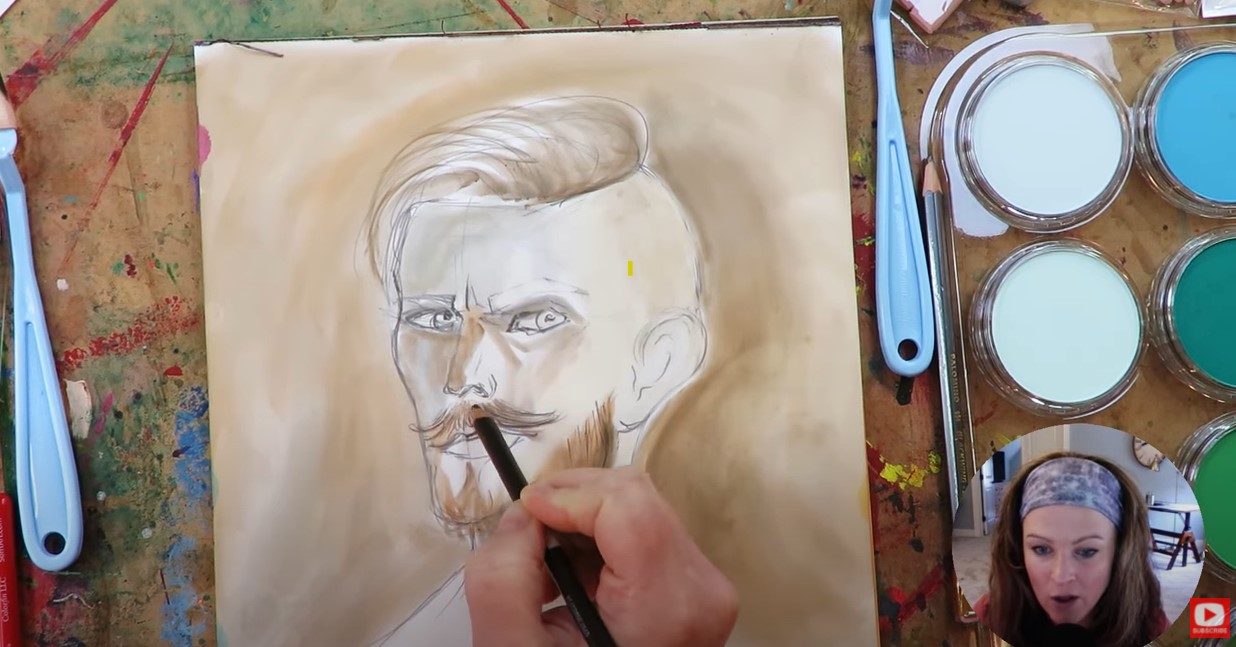
I experimented with trying combining my pan pastels and Prismacolor colored pencils, but wasn't patient enough to work with that for a long period of time. It was great for adding some detail in the beard (above), but I needed something bolder and faster to work with.
I discovered using my Neocolor IIs by Caran d'Ache really worked well and helped me to achieve the depth I was struggling to get out of the pan pastels alone.
I had heard pan pastels are eraseable, but they didn't erase well with my beloved vanish eraser. I also tried using the eraser on my Blackwing pencil, and had much better luck. I love chiseling highlights out of the face shading I do, so enjoyed playing with this fun pan pastels technique!
If you know me and my work at all, you know I'm a HUGE FAN of outlining. And you may know that as soon as I pull out my pentel pocket brush, the project is basically over! LOL. I hope you have fun with this demo, and enjoy working with pan pastels on your own as much as I did! HOW to DRAW & SHADE a Whimsical MALE Face with Asian Eyes in Copic Markers (Whimsical woMAN #12)3/1/2021 Today I want to show you how to draw a whimsical MALE face just to mix things up a bit with the whimsical face drawing tutorials in this series- especially because I often get requests to draw guys, and I'm a boy mom of 3- so here ya go!! In today's face drawing lesson, I'll also cover how to draw Asian eyes (forward facing), and have an awesome new Skin Tone Marker cheatsheet just waiting FOR YOU if you didn't grab that last week!  To draw this cutie, we start with an oval like always, then we're gonna MAN-ify the facial features! 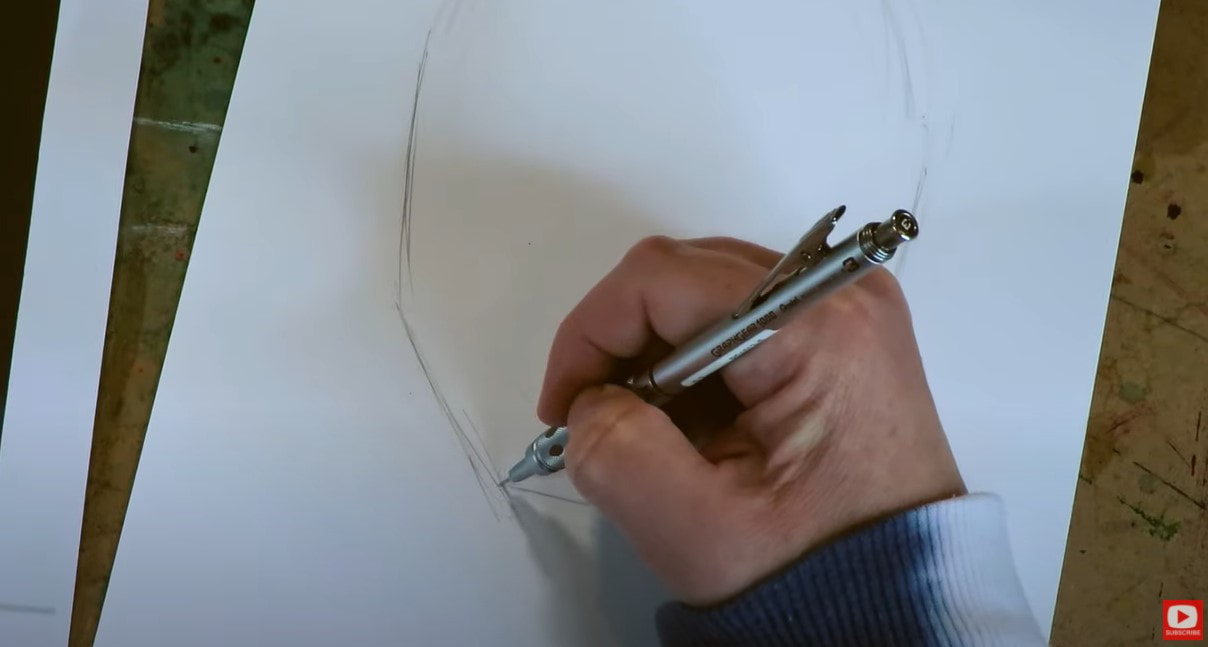 In general, keep in mind that men have more STRAIGHT lines when it comes to drawing. When you're ready to darken the face shape for this dude, start by straightening the lines on the sides of his face (like shown above). Then, as you work your way down toward a chin area, you can imagine we're attaching a triangle to the bottom of his face - just cutting off the pointy part and leaving a straight line. It's probably easier to see this in action, so check out the tutorial over on my YouTube drawing channel. The next main difference when drawing male faces (even whimsically), is to change the width of the neck. The male neck is MUCH wider than a female's. 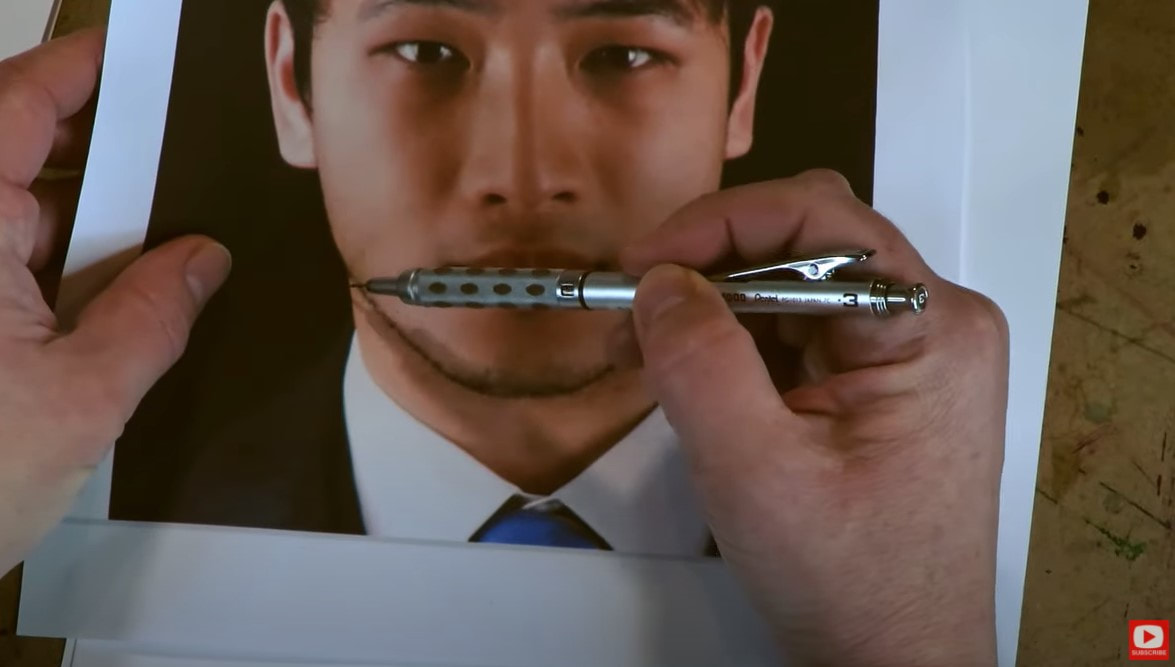 Now it's time to sketch in our face drawing guidelines! I find this fact kind of amazing ... the face drawing guidelines for drawing men and women are identical! Crazy, right? No matter WHAT our ethnicity or gender are - we all start out with the same basical human face shape, and our faces naturally follow the same basic face drawing guidelines to make us look proportionally correct! If you're not sure what I'm talking about, you HAVE to download my FREE Face Drawing Guidelines Cheatsheet to help you out! I printed and laminated mine because drawing proportions of the face are SO important. It's a reference I've ALWAYS got on my art table. Click the button below and I'll send it straight to your email ;)  Back to our drawing!! The biggest difference when you're drawing asian eyes vs. any other ethnicity, is often the absense of a dramatic upper eyelid. That's it! Pretty simple adjustment, right? Watch the video to see how this looks in real time, step by step.  Male hair, like hair for women -also has volume that extends above and outside the face shape oval we've drawn in, so make sure you block in the general shape you see for hair. This will make it much easier later when it's time to shade. 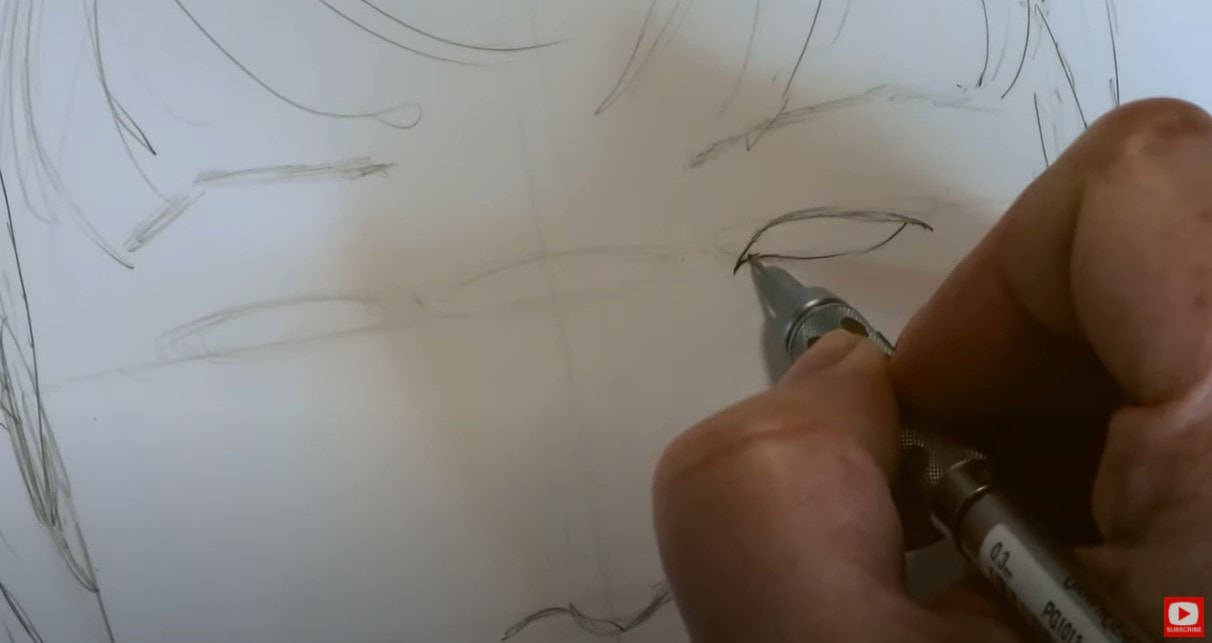 If you're drawing along with me (and I HOPE you are, because you'll learn SO much MORE by doing this than just watching me!!), I think you'll find that drawing eyes on a male face is actually QUITE easier, because there is no makeup to worry about! If you'd like a copy of this reference, or any reference from this series, I've popped them into TWO convenient locations for you over at Awesome Art School! The stand alone, Whimsical Women of the World classroom - where everything (even the color shading part of each lesson) is in real time, step by step has references, as well as my YouTube Cheatsheet & Video Library. If you're a member of the Fun Fab Drawing Club or Mixed Media Society- you've already been given free access to the Whimsical Women of the World classroom. 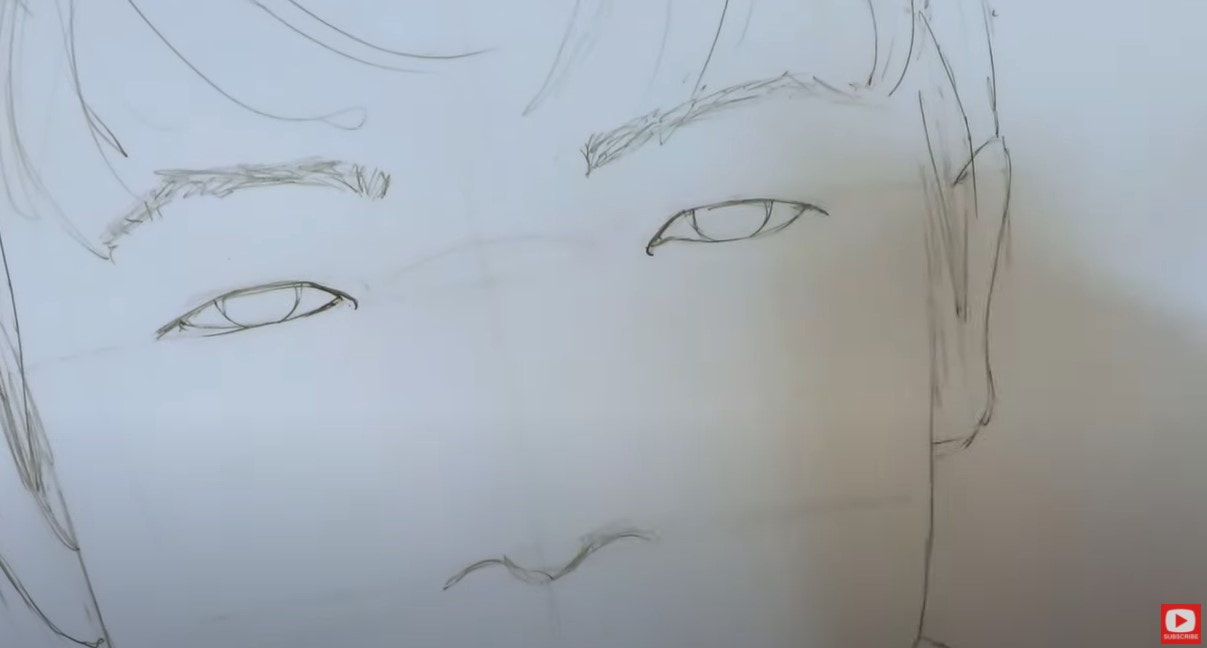 As you'll see in today's whimsical portrait drawing tutorial, when you get to the lips, you have to be careful about not letting them get girly. Watch the shapes carefully here. Even if your model has very full lips, you don't want to draw the lines in super dark, because the more you define them and darken these lines, the girlier your dude will start to look! If you get to a point in this drawing (or ANY drawing!), and you feel like something looks a little off and needs to move - don't be too precious about what you've already drawn in. Go ahead and erase whatever is bugging you and draw it again! You drew it once, you can TOTALLY draw it again. And that adjustement might make your drawing look SO much better! I drew this guy's left eye THREE times before I was happy. Then when I pulled my markers out, I drew BOTH of them over again - I think TWICE!! Don't worry about it. Just do what feels right to YOU. 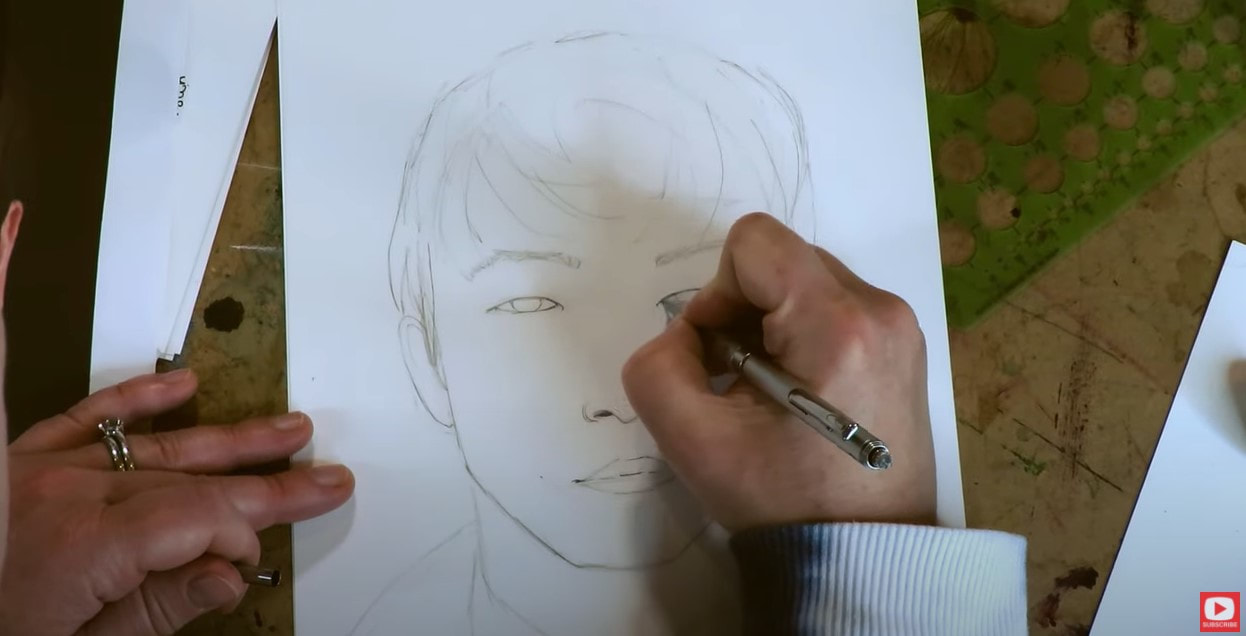 The lighting effect is the main reason I selected this particular image for today's free drawing lesson. I think you're gonna enjoy it when you're ready to shade because it's unique. You'll see the nose bridge is actually in SHADOW today (instead of highlighted as it typically is), because there are TWO light sources for this particular photo. One on either side of his face! Check out the video to see how I show this to you in action. It's super interesting, and if you've been drawing any of the projects from my Whimsical Women series, it's honestly the opposite from what we normally see in terms of light source. I've been using alcohol markers to do all the shading for my Whimsical Women of the World face drawing projects, but PLEASE use whatever art supply YOU LOVE best!! If you are using alcohol markers too - please don't worry if you don't have copic markers. I know they are SO expensive, and I've been collecting them over a long period of time. I totally love the Ohuhu brand as well and they are way cheaper. Arteza also has some good markers for even less. If you're new to shading with alcohol markers, or need some tips on which skin tone markers go nicely together for a variety of ethnicities, I recently created a FREE 12-Page cheatsheet ALL about this to help ya out!! I organized it by color family for skin tones that are light, medium, or dark, and have marker swatches from each brand (Copic, Ohuhu, Arteza) that will work well. This should REALLY save you some swatching and trial/error time! Click the button below and I'll send it straight to your inbox. 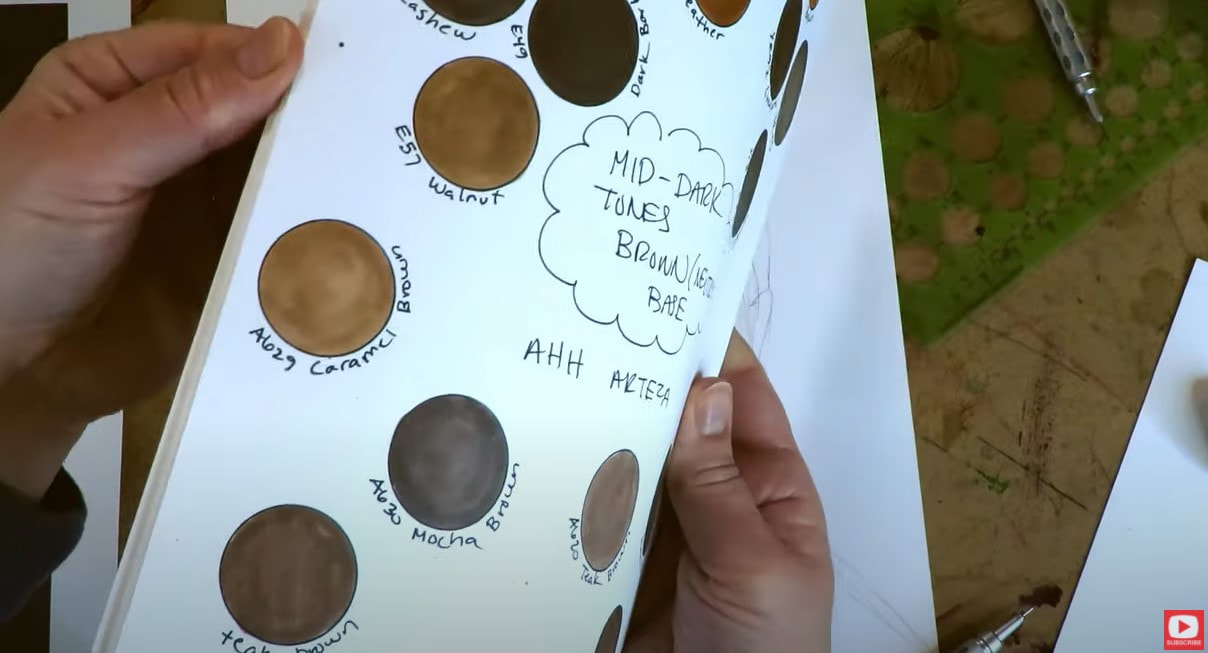 This was actually the first time I used my Skin Tone Marker Guide to help me shade a face in this series and I was thrilled with how easy it made things go! Usually I am swatching like a mad woman off to the side and fly by the seat of my pants, but this really organized my thoughts and totally saved me some time. I really hope it does the same for YOU!  Before we continue, super quick announcement: All prouct links are Affiliate. I may earn a small commission if you choose to order through these links, but by law, there is never any additional cost to the consumer for doing so. I thank you for your support! 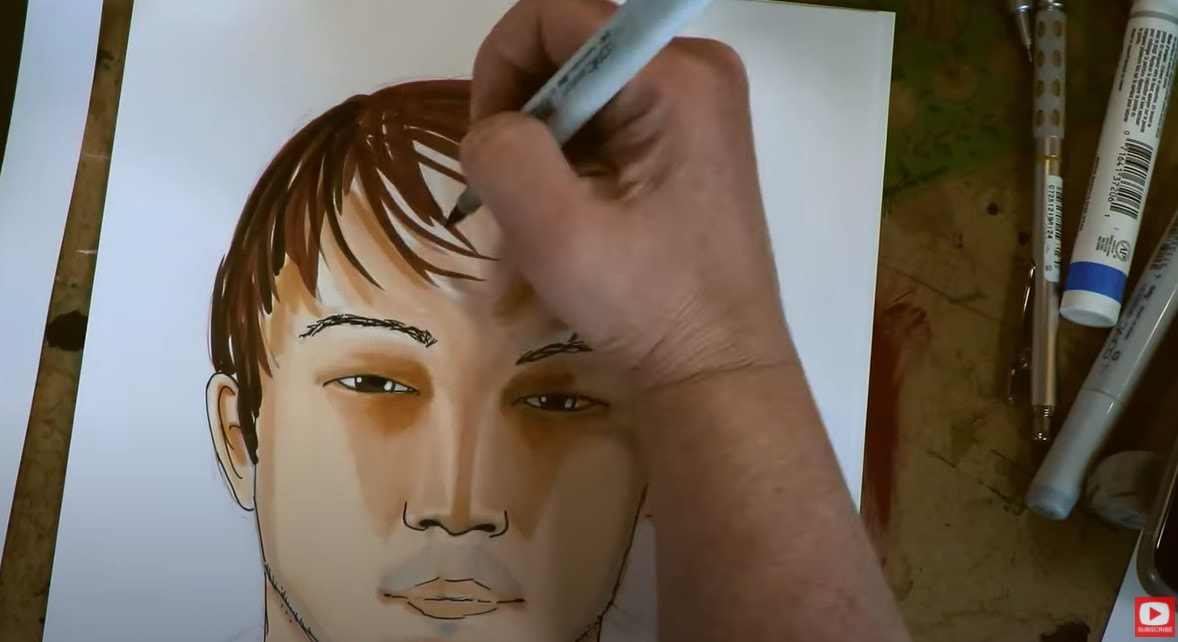 If you're interested in how to draw a male face, and are new to me and my channel, you'll find a few here and there, but I know my audience is most interested in drawing female faces, so that is primarily what you'll see. I do, however, have a book dedicated to drawing guys in a whimsical style called How to Draw Fun Fab Fellas that I created for my own boys when they were younger. It's available on Amazon if you're interested! It covers how to draw a male face from all the main angles- forward facing, profile and 3/4 view. 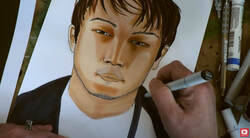 Full transparency here - I'm not in love with the way this project turned out - just being totally honest. I think the model is SUPER CUTE, but sometimes this just happens, and you've got to be honest with yourself. I want to make sure you know how I feel about my own work, so you can own your feelings, and not obsess over them for too long if something you were excited to do, didn't turn out how you'd envisioned. It's ok, and happens to ALL of us! Art is supposed to be FUN. If something doesn't go as planned, change what you can. If the project is done- move on and do something else! It's as SIMPLE as that. I've got 3 more whimsical face drawing projects coming up for you in this series, including a more mature woman with wrinkles and an up-turned face, so keep your eyes peeled for those!! I hope you have fun with this project if you choose to draw along with me!! See ya back here next Monday for more!! |
Karen CampbellFounder of Awesome Art School. Mixed Media Artist. Author of 19 Instructional Art Books! 
Whose work has appeared in...
   
 Archives
July 2024
Categories
All
|
 RSS Feed

"Karen is flipping hilarious and she's very real...I like the way she teaches in a way that really gives you confidence, whether you're a beginner or advanced there's always something new to learn!"
- Elizabeth W. |
What Fans Are SayingKaren, you are absolutely fabulous! You make me feel like I can draw anything. I have recently retired and finally have the time to do some of the art that I have loved since I was in school. I am really at the beginning of my art journey and I hope to learn as much as I can. Thank you for all you do. |
Contact ME |