
|
Looking at mixed media art examples from other artists is a GREAT way to get inspired if you're ever feeling creatively stuck. As you'll see, my mixed media art journal is a place where I love to swatch, experiment, paint, collage, plan or teach online art lessons for Awesome Art School & SO much more!
Do you have an art journal, or have you always wanted to try it but didn't know how? Download my Kick-in-the-Pants Guide to Starting an Art Journal with inspiring quotes from one of my favorite people, Bob Ross. Simply click the button below and I'll send it straight to your inbox!

Once you've printed out your guide, meet me here to watch the series that goes along with it, or check out today's art journal flip-through first.
Before we continue, super quick announcement: All product links are Affiliate. I may earn a small commission if you choose to order through these links but by law there is never any additional cost to the consumer for doing so. I thank you for your support.
For me, art journaling is a place where I can swatch new art supplies, experiment, play, plan or teach the lessons I create for Awesome Art School.
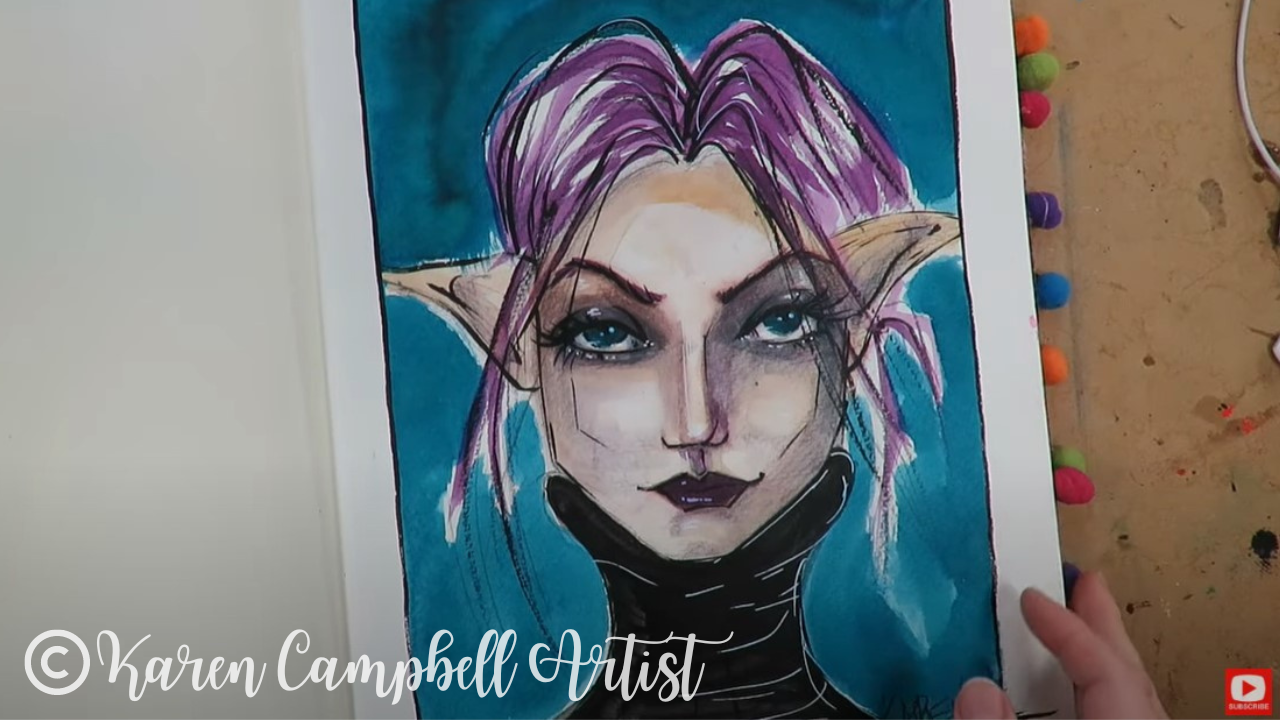
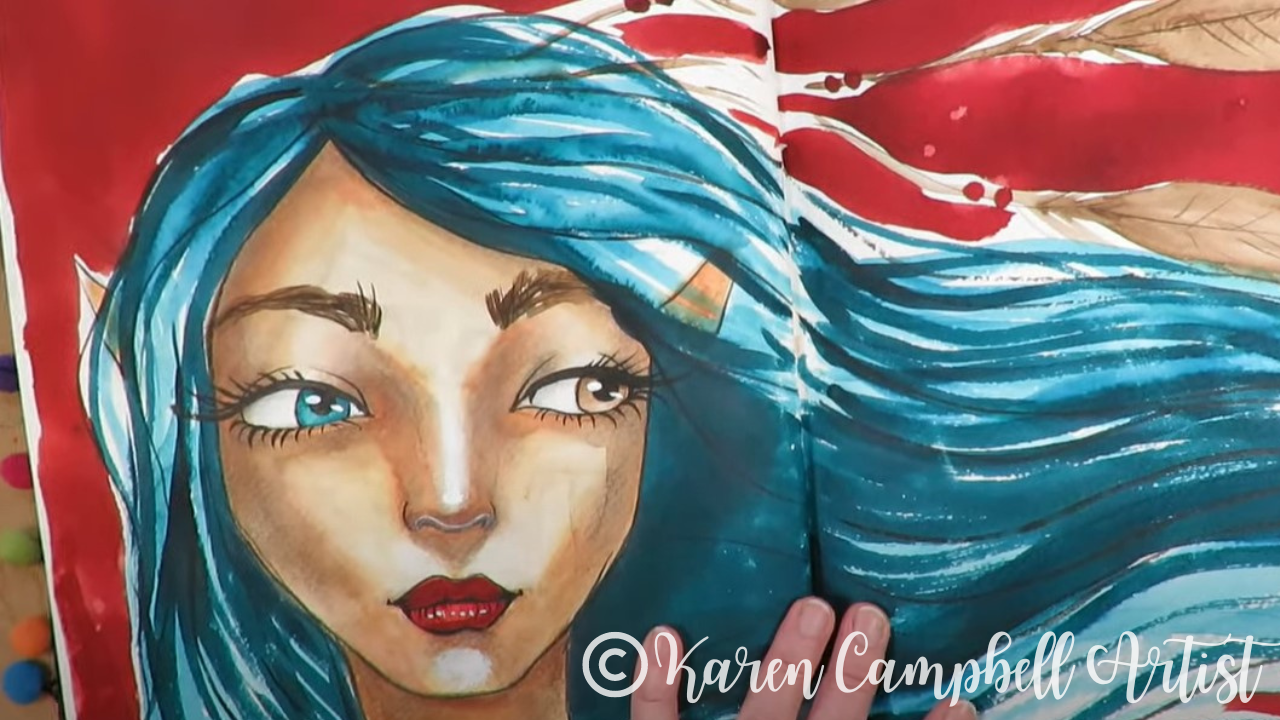
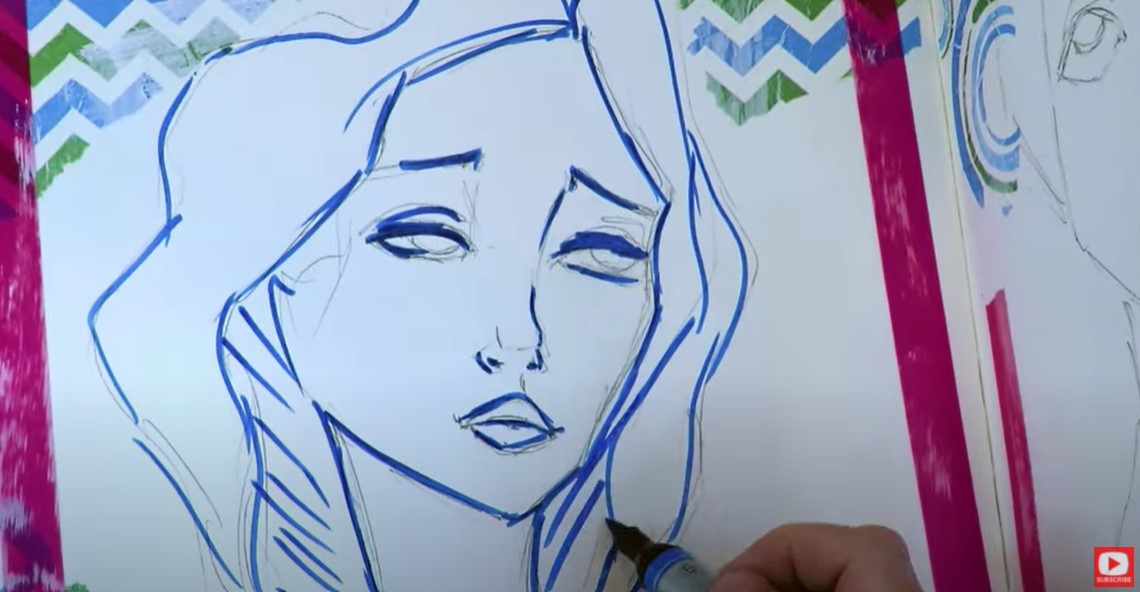
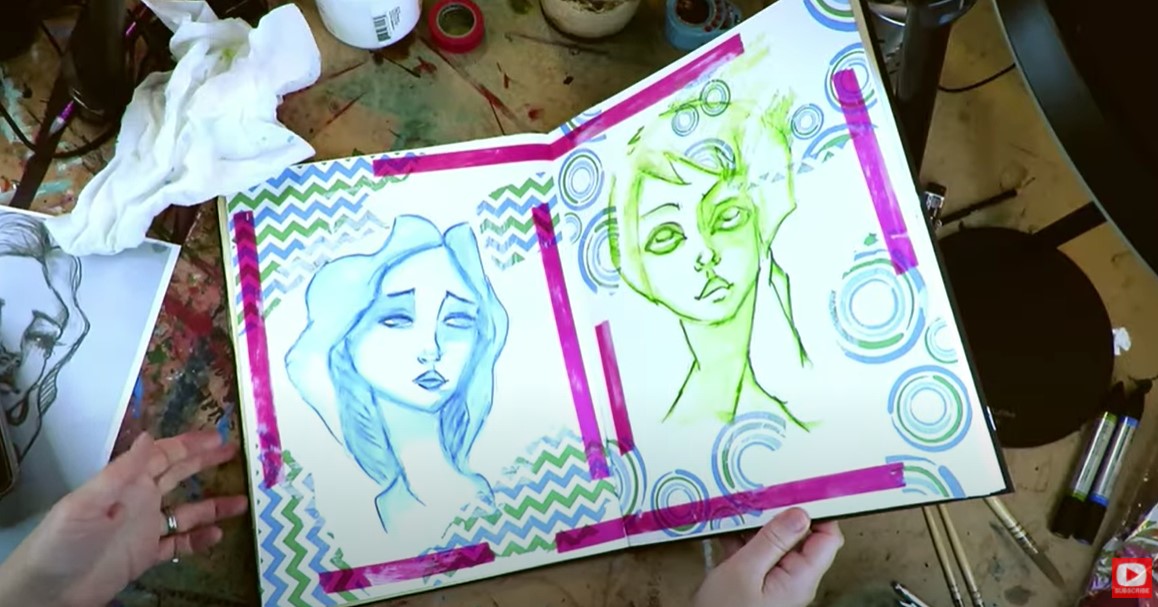
This particular art journal is filled with fountain pen ink paintings like the one above, because I started experimenting with fountain pen ink right around the same time as I bought this journal. 
I love to work big, so I always buy the 11x14 size, but there are some smaller ones available too. This watercolor sketchbook is filled with 140 lb. cold press (textured) paper and can honestly take ANYTHING I throw at it from watercolor pencils to full-blown, multi-layer "Hamburger Style" projects with collage, acrylics and mod podge.
If you've never done a mixed media art journal before, or aren't sure what kind to buy, I'm in LOVE with this hardcover watercolor sketchbook by Strathmore. It's the journal featured in today's video and countless others.
If you're going to work with any type of wet medium, and want to work in an art journal, you always want to be working on watercolor paper because it's the sturdiest and will hold up to whatever you're using.
How gorgeous is that red fountain pen ink in these paintings? It's called Widow Maker by Noodlers. It is SO vibrant and fun to work with.
As I mentioned, an art journal can be a great place to experiment with art supplies and learn which ones work well together. Look closely at the painting below on the left.
Do you see a sheen to it? I tested adding pan pastels to my fountain pen ink painting and wanted to see if it would hold up to a sealer (in this case just mod podge). It TOTALLY did, and I think the mod podge layer made this piece even more vibrant than it already was. 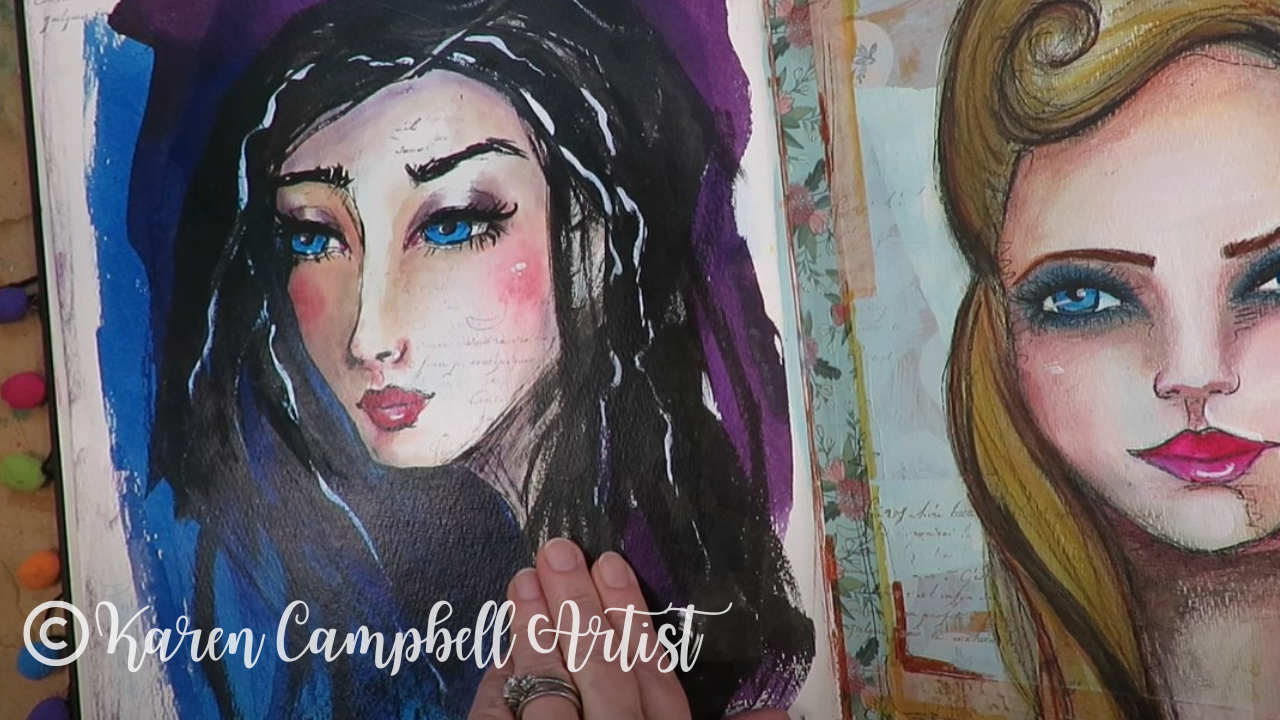
I mentioned how sometimes I will plan out a potential project in my art journals too. This one is of a cute interior from Wardhill Castle, the turret bathroom.
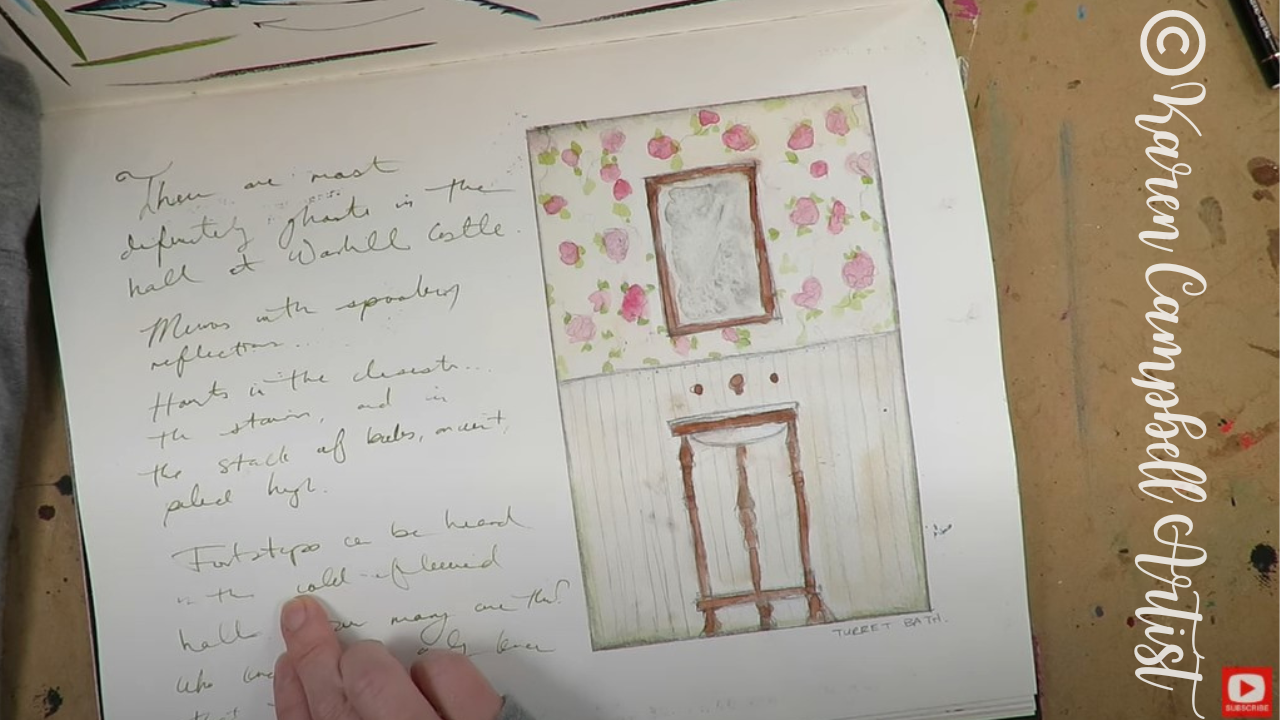
How cute is that?! I scribbled some musings about the castle and my curiosity as to whether or not it's legit haunted off to the side :)
Make sure you click over to watch the full video because there are lots of other pieces in this journal that I didn't feature on the blog today. I hope today's flip-through is giving you tons of mixed media ideas to try in your own art journal. And seriously, if you've always wondered about starting an art journal, but don't know how, or feel intimidated... you've gotta check out this series. It's a gentle "Kick-in-the-Pants" from me with quotes from Bob Ross to get you creating!
Need more resources to get your creative juices flowing?
❤️ CHECK OUT ALL my art books on AMAZON ❤️ CHECK OUT ALL my online art classes @ Awesome Art School ❤️ MY FAVORITE ART SUPPLIES on AMAZON (affiliate links) ❤️ MY BELOVED FACEBOOK GROUP
2 Comments
FUN & EASY Mixed Media Project for Beginners with Derwent Graphitint Watercolor OVER Pencil20/9/2022
Today's mixed media project is PERFECT for mixed media beginners, watercolor beginners, and anyone curious about the Derwent Graphitint Paint Pan Pocket Set.
Adding watercolor over pencil drawings is a super FUN and EASY technique that can really make your drawings look more sophisticated. Grab your watercolors and your fairy drawing to create along with me as I lead you step-by-step through simple face shading, creating magical hair, and an easy background in watercolor! 
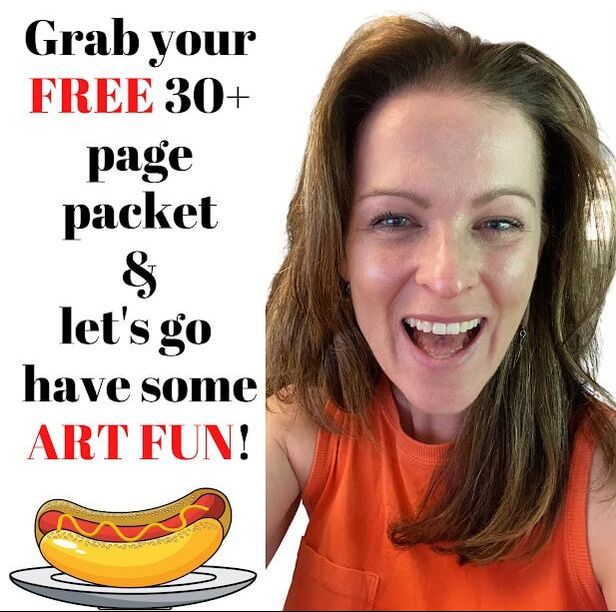
WANT 30 FUN Mixed Media Project Ideas with SIMPLE, tried, and true art supply combos like Watercolor over Pencil? Click the button below to download my FREE Hot Dog Packet!

Each mixed media idea in The Hot Dog Packet reads like a recipe with ONLY 4 art supplies, so it's perfect for mixed media beginners! Click the button above, and I'll send it straight to your email.
Before we continue, super quick announcement: All product links are Affiliate. I may earn a small commission if you choose to order through these links but by law there is never any additional cost to the consumer for doing so. I thank you for your support.
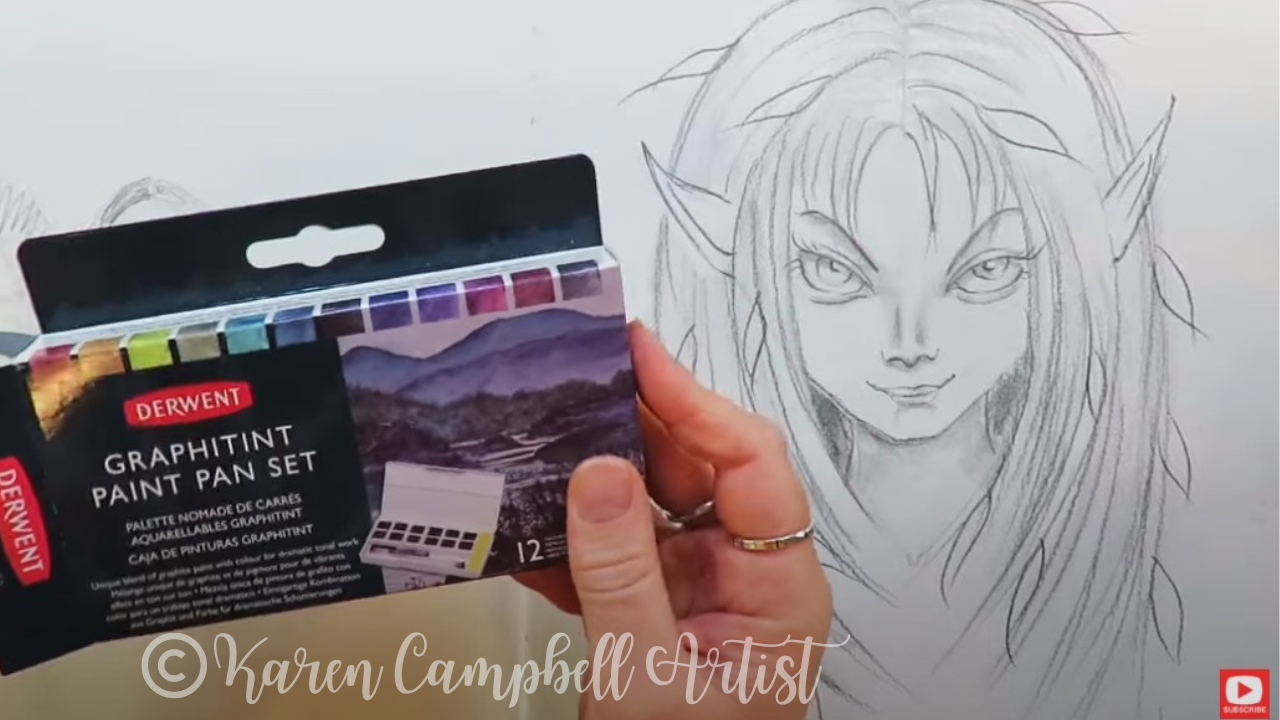
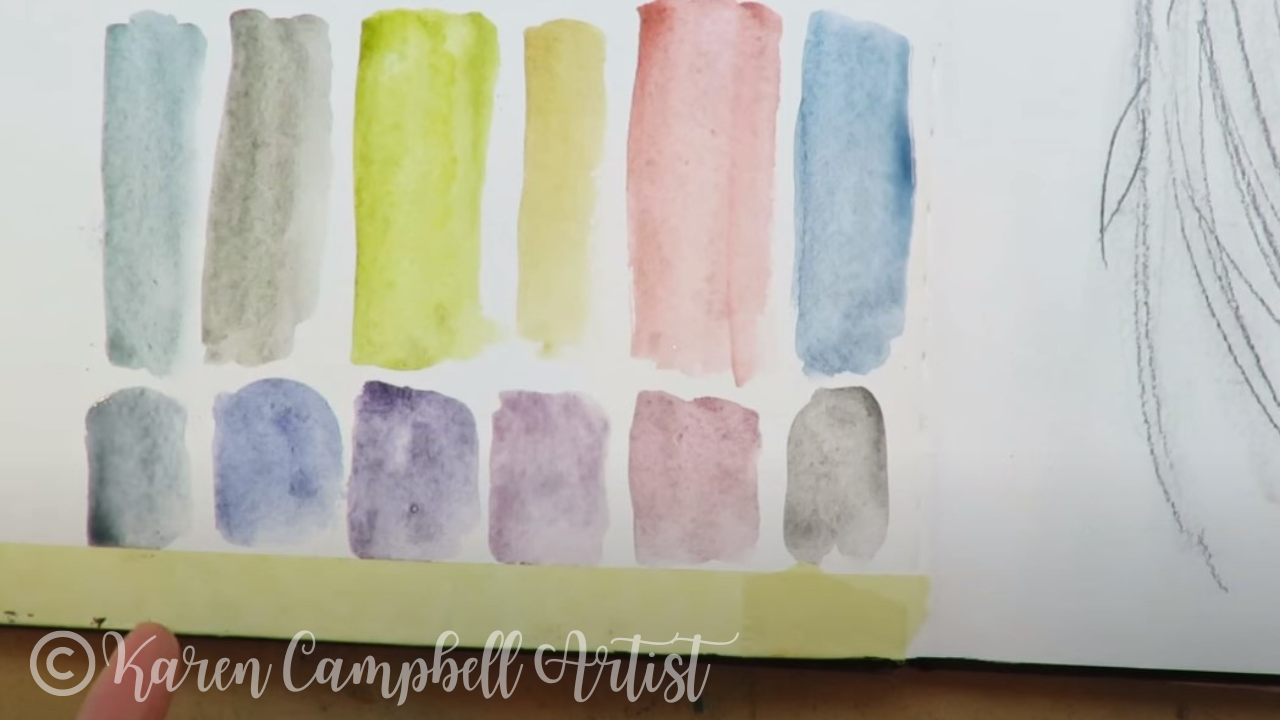
Use whatever watercolor set you have on hand to paint along with me. Today I'm trying a new set - Derwent's Graphitint Paint Pan Pocket Set.
If you've never heard of Graphitint before, it's a "unique blend of graphite paint with color for dramatic tonal work," according to the package. To me- this set feels like muted nature tones, which is perfect for today's mixed media project. 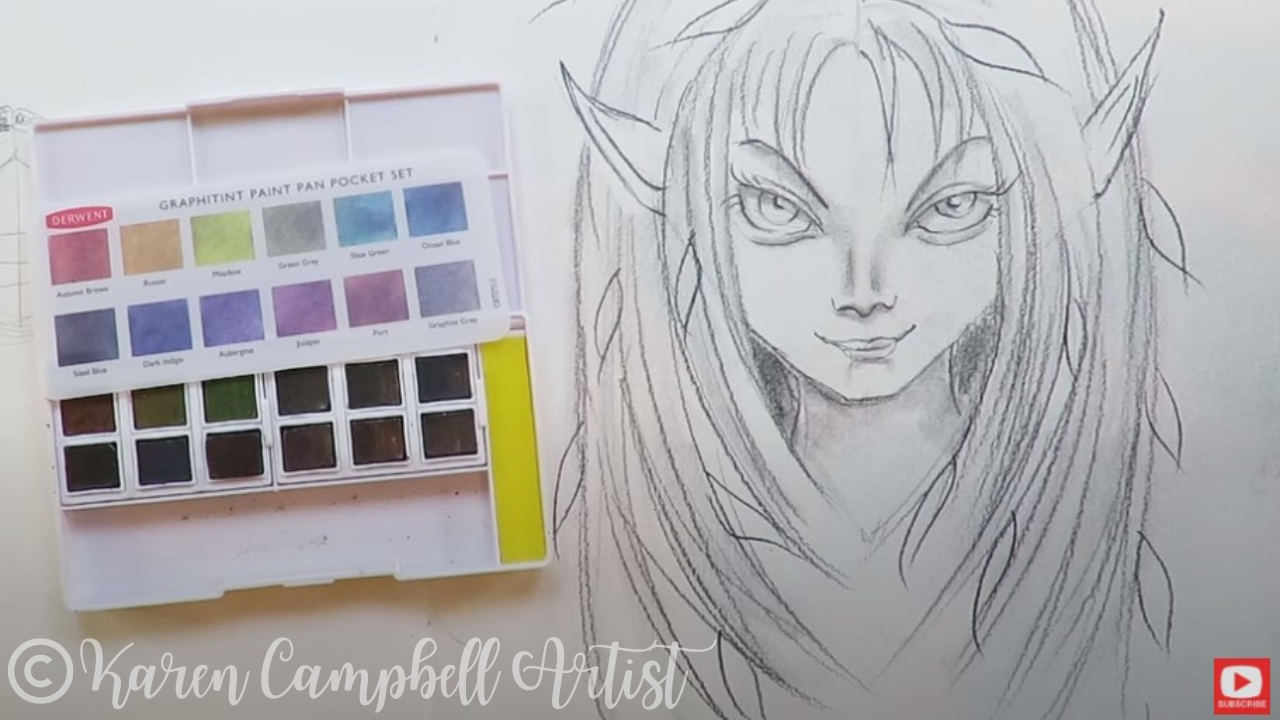
As soon as I start to swatch these watercolors, they remind me of my granulating watercolors by Daniel Smith. They also look kinda dirty, which isn't a bad thing - you can just tell they have gray graphite in there for sure.
There isn't a skin tone in this set, but I feel like the shade called Russet will work. Watch as I add a light wash of this onto my fairy face drawing. (Wanna draw this fairy? Watch this first.)
I'm using my Polina Bright watercolor brushes (get 10% off Polina's watercolor brushes here) for this project. They're the only thing I use now! Find out why here. 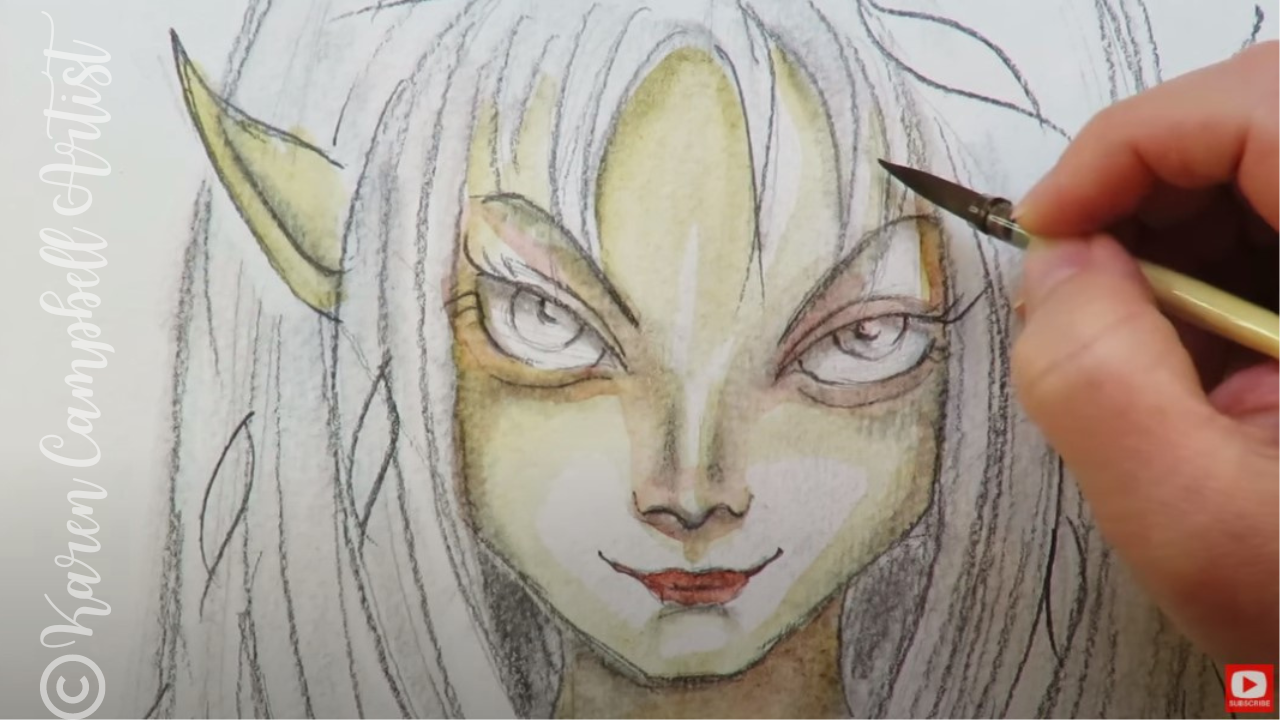
Next I added a little Autumn Brown to accentuate the nose and creases of the eyes to add dimension. I love this technique of adding watercolor to an already shaded drawing. It's got this messy, grungey feel.
It's so freeing because you don't have to be "precious" about your work - just get in there, drop a light wash where you want some color, and call it a day. 
I switched to a larger Polina Bright watercolor brush to do the hair in meadow green. If you struggle with how to paint hair (or draw it), I add color from root to tip, leave some white space, and add more color from tip to root.
Make sure you click over to the video to see this in action. It's such a cool effect, and SO easy to do - even if you're a beginner. 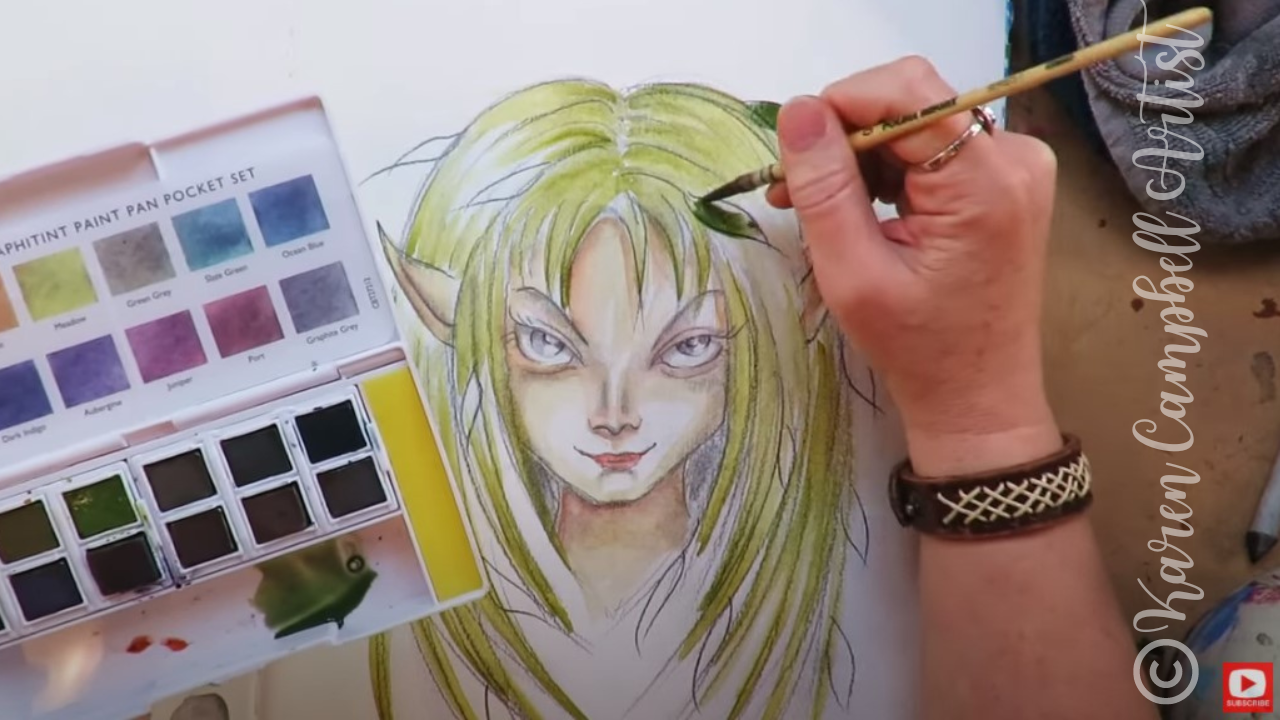
If you've been following me for a while, you know I HATE to mix watercolors. I know - it's ridiculous. I'm the only professional artist who won't do this. LOL.
I'm just lazy like that - I love to work straight from the pan, tube or whatever. It's faster and there's no guesswork about what color I'm gonna get! I feel like this Derwent set could've used a nice dark forest green. Since it doesn't have one, I went out of my way (LOL) to mix one for the leaves in my fairy's hair. 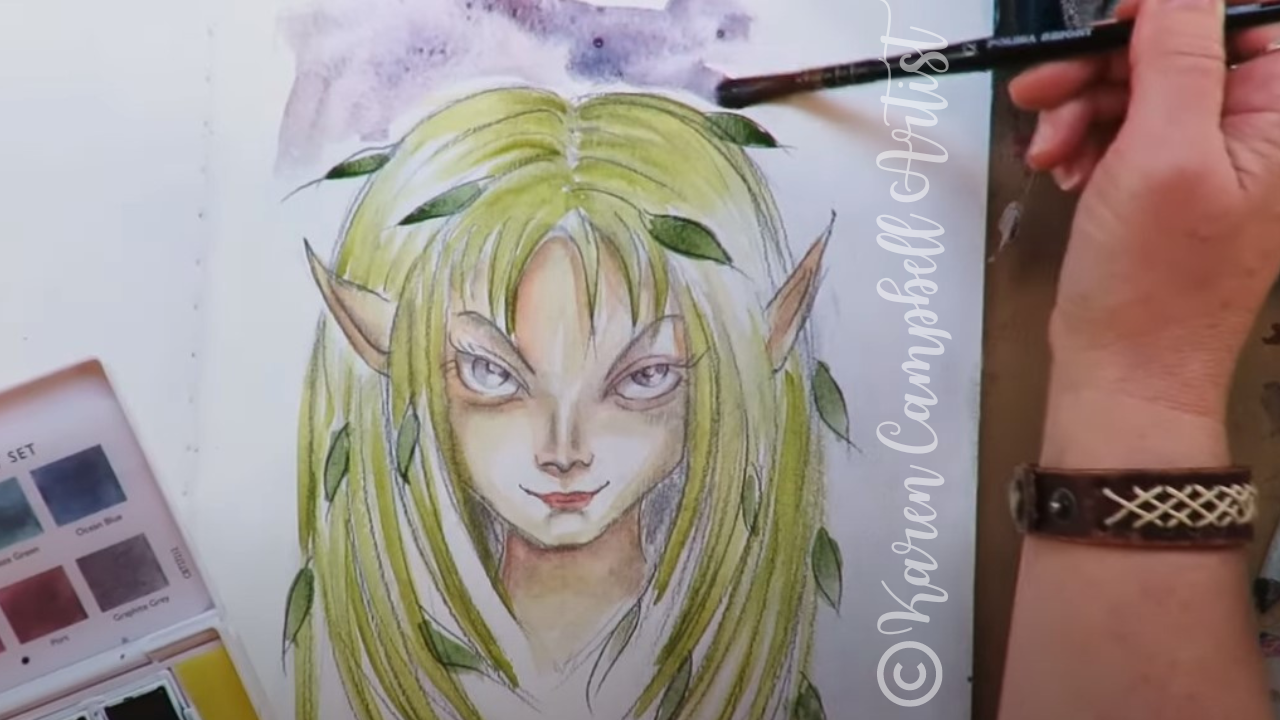
I'm kinda loving my new Derwent Graphitint Paint Pan Set! It's perfect for doing projects like this - just adding some color to a graphite drawing.
If you've been following me for a while or are a student in one of my art clubs, you know I'm obsessed with my pentel pocket brush for drawing eyelashes and outlining. I know many of my students are intimidated by it because it can be unpredictable and take some getting used to. 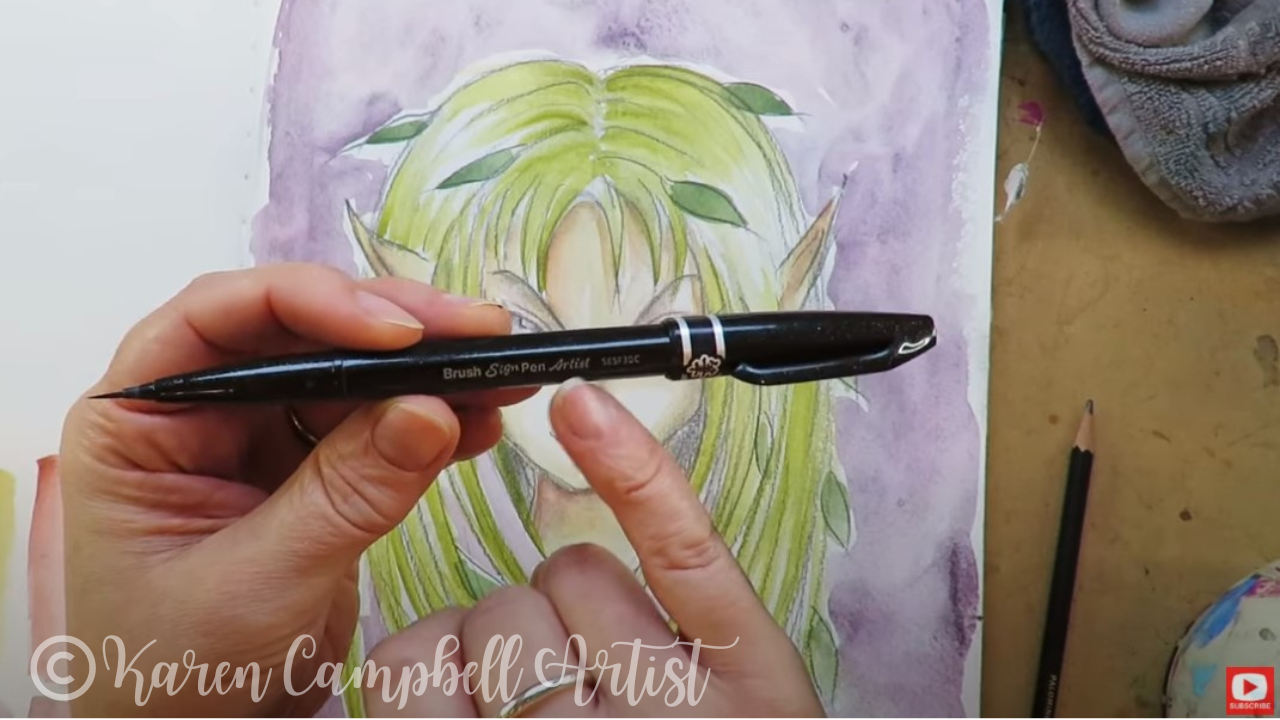
Recently I discovered a little sister product, the Pentel Arts Sign Pen with Micro Brush Tip. This is perfect for adding some finishing touches to today's piece.
I think it will also help those students intimidated by the Pentel Pocket Brush. This one has a much thinner bristle tip and is way easier to control to create daintier lines. I hope you enjoyed today's full-length mixed media tutorial! Remember, if you want to draw this fairy- watch this video first: When you've finished your drawing, watch this one to watercolor her: Thanks for hanging out with me today! If you enjoyed this lesson, you might just LOVE my entire #50FunFabFairies drawing challenge. Here's the playlist in case you wanna check that out. ❤️ CHECK OUT ALL my art books on AMAZON ❤️ MY FAVORITE ART SUPPLIES on AMAZON ❤️ MY BELOVED FACEBOOK GROUP ❤️ FOLLOW ME ON INSTAGRAM
Gesso vs Absorbent ground? Which one would you reach for if you're in the mood to do a little watercoloring in your mixed media art journal and feel the need to prep the surface first? Today I'm doing a little experiment in my own art journal so you don't have to! We'll compare how watercolor on gesso looks on an art journal page vs. how watercolor looks on a page prepped with golden absorbent ground!

If you've never started an art journal on your own before (GASP!!!) You're missing out on SO MUCH FUN!!
SO many people think about trying something like art journaling and never follow through with it. A lot of them get intimidated by that big empty white page, or ALL the empty white pages in a journal. If you're one of these people - this is so common. I can help you to get over that hurdle so you can start having FUN with art!! Click the button below to get my FREE pdf to give you the KICK IN THE PANTS you need to start art journaling ;) It's filled with tons of tips and advice from not only me, but one of my artsy idols - Bob Ross! We'll have you "breaking the blank page" and creating in no time!!! 
Before we continue, super quick announcement: If you're in the market for new art supplies, or curious what I'm using, supply links are included below. All product links are Affiliate. I may earn a small commission if you choose to order through these links but by law there is never any additional cost to the consumer for doing so. I thank you for your support!

I love Liquitex gesso for my mixed media work, so that is what I'll be using for today's little experiment. Because gesso is specifically MADE for acrylic paints, it preps any surface you want to work on for acrylic paints. I also love to use white gesso as a replacement for white acrylic paint when I'm creating my mixed media portraits because it's more transparent than your typical white acrylic paint, and I love the way that looks when I'm doing mixed media art - especially if there is a collage in the background! For the purpose of today's demo, I'm testing how gesso works with watercolor so you don't have to!! I've decided to start these art journal pages off with a bit of simple collage in the background. Colorful, patterned napkins are one of my go-tos for collage art. I find they're easier to work with if you pull the layers apart so you're only working with one ply. If you're curious about how to do wrinkle free mixed media collage backgrounds with paper napkins, I recently did a YouTube tutorial on that- so be sure to check it out if you missed it and simply hate those wrinkles!! 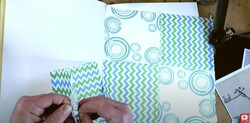
I almost always use matte medium as my collage adhesive whether I'm working in my mixed media art journal or on canvas. If you'd like to know more about WHY matte medium is typically what I reach for, check out this mixed media art tutorial on my YouTube channel for the side by side comparison of matte medium vs mod podge.
Today I'm working in one of my Strathmore watercolor art journal because I absolutely LOVE this for mixed media art journaling. I also love to work big, so I buy the 11" x 14" version. It's filled with 140 pound cold press (cold press paper has texture to it - it's not smooth) watercolor paper. If you're art-ing along with me (and I hope you do!!!)- be sure to take care when selecting your paper, journals, or whatever substrate you choose to work on. It's EQUALLY important as the art supplies you are using. 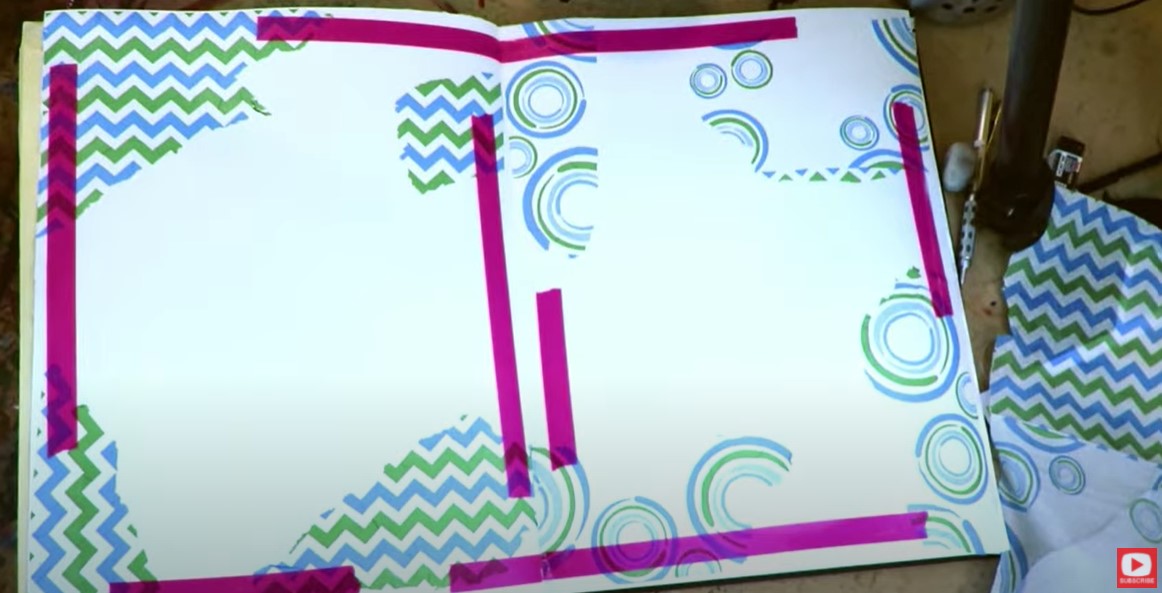
I felt like these collage pages needed some bright color so added some hot pink washi tape then got right to it - covering the middle of my left side journal page with gesso, and the right side with absorbent ground.
I feel like a lot of mixed media artists skip over absorbent ground all together, so I want to make sure you know what it does and how to use it if you enjoy watersoluble art supplies. 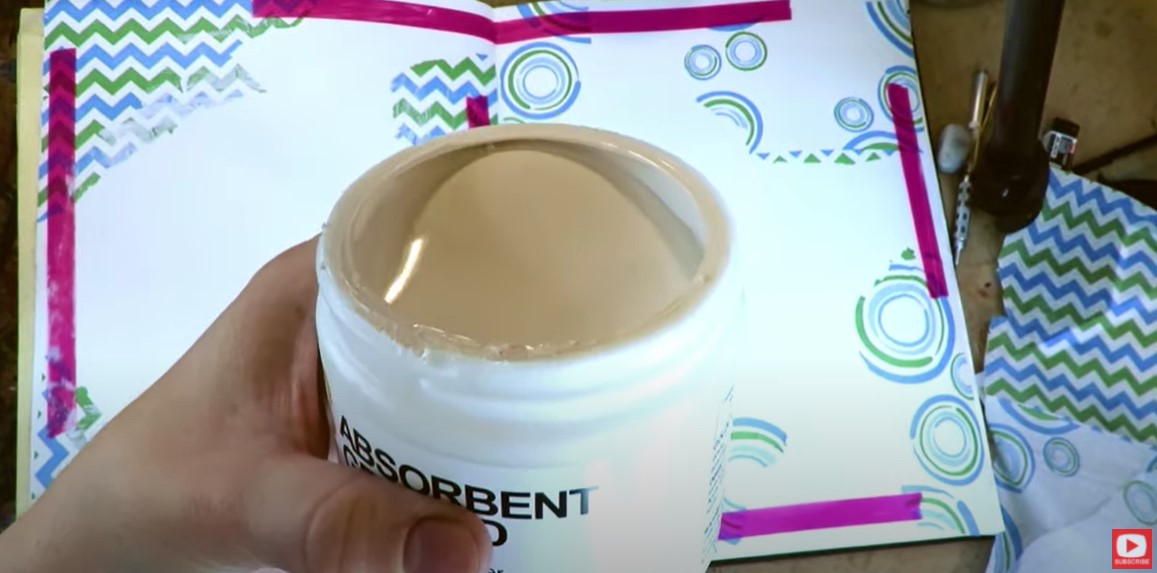
Golden's absorbent ground has basically the same consistency as Liquitex Gesso, and has the same level of transparency to it - which I love, because I enjoy a little collage art peaking through the face of whatever mixed media girl I'm painting into the foreground of my art journal pages!
Just so you know, absorbent ground can be added to basically ANY surface that normally wouldn't "play nicely" with watersoluble supplies (even wood!). It's especially awesome if you like to upcycle old books into altered book art journals and enjoy watercoloring! Typically I will do two coats of absorbent ground to keep the coverage fairly light and transparent. When I'm using gesso, I typically do one coat for the same reason. Acrylic paint dries itself into a plastic so it doesn't need heavy priming. Watercolors need a little more baby-ing. I hit both pages with my hair dryer to dry them. Once dry, I can feel right away with my hands how much smoother the right side page of my paper is because of the Absorbent Ground. The gesso on the left side really kind of preserves the original texture of my cold press paper, while the absorbent ground minimizes the texture and makes it feel more like hot press watercolor paper. 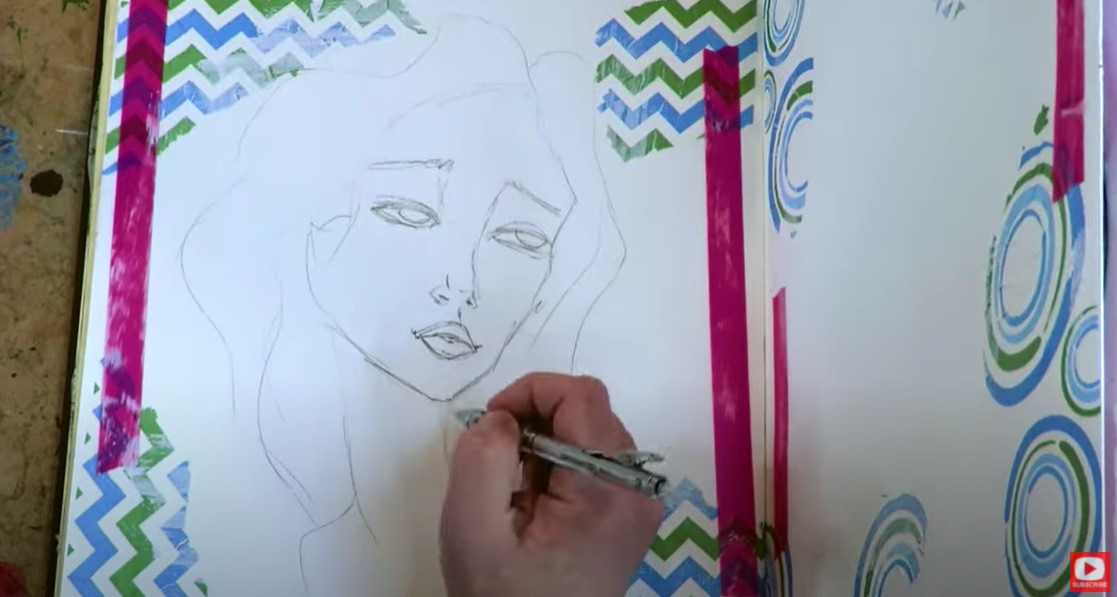
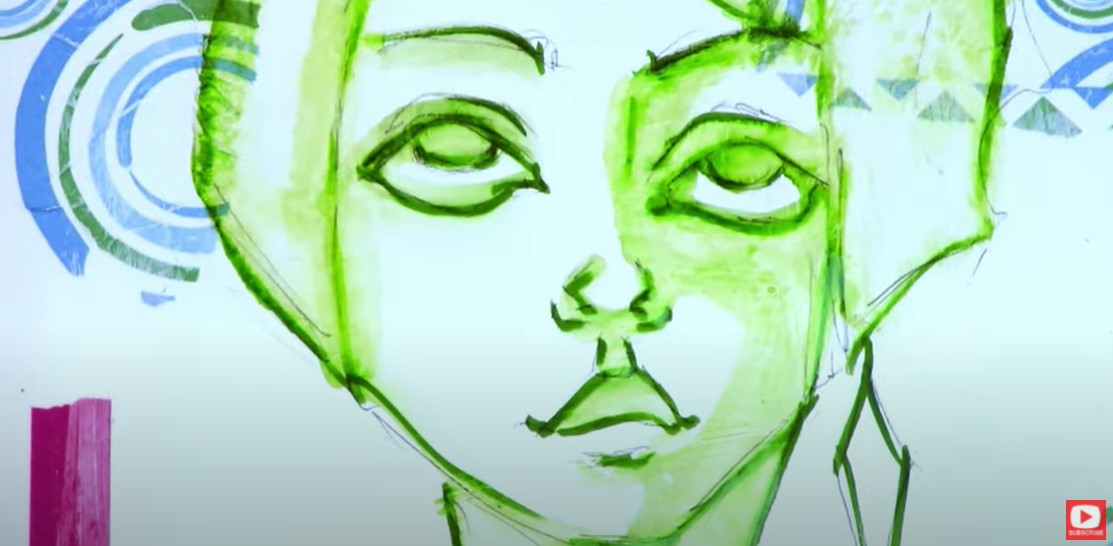
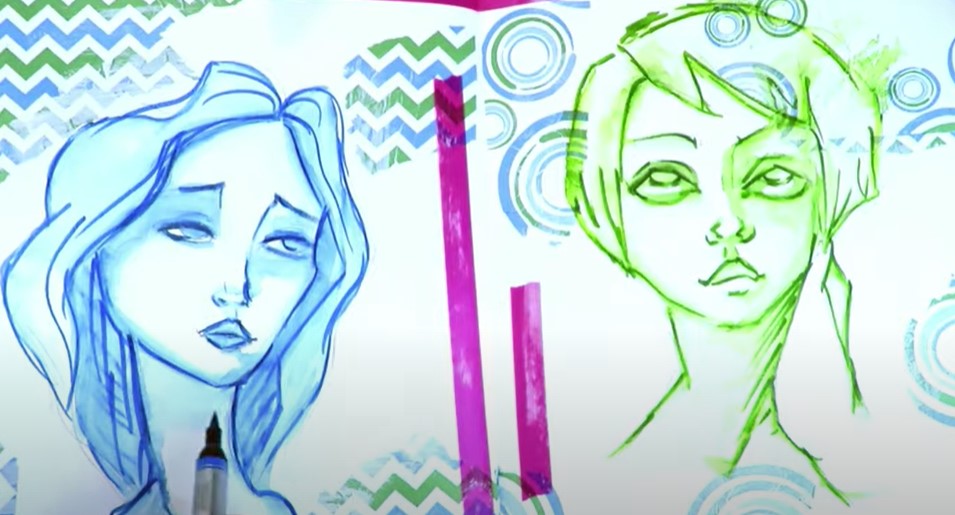
I sketched a simple face on both pages in pencil, and doodled on top of that with my watercolor markers.
When I start brushing some water onto the gesso side of my paper to activate the watercolor marker lines (see below - it's the side in blue), I can still see some of the texture from the paper poking through underneath it. Both the paint and any water I add stay very much on the surface due to the gesso. It blocks the paper from absorbing the color or the water, so the paint just pools on top. My brush can move the pools around, but the paper can't absorb it, which isn't a desirable effect to me.
It's not "wrong" in any way- it's just not how I prefer to work with these supplies, so let's test out the absorbent ground page to see how things go over there... 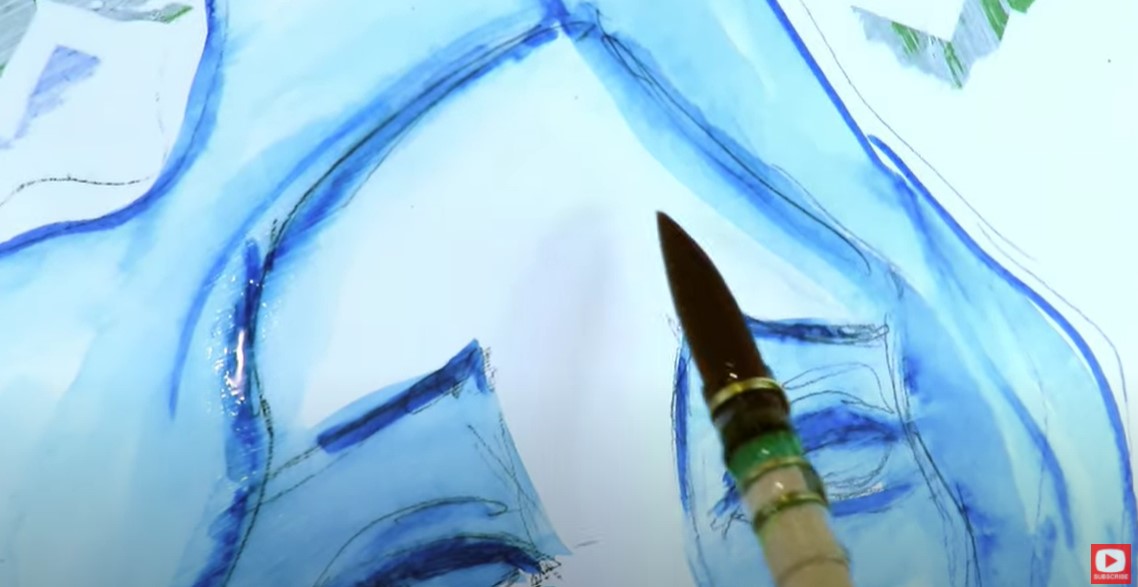
On the absorbent ground side (in green, below), when I activate my lines with water, there is definitely less pooling of paint and water. You can see this for sure when I attempt to soften a "hard edge" by reactivating a line that had started to dry. The surface feels a bit more predictable to work on with watercolor and is much easier to blend on - both of which, I really like and prefer.
These effects may not matter to you, but if you are someone who likes to go back in and blend lines out, touch things up, etc., absorbent ground is really gonna be your friend. It allows watersoluble mediums (any art supply you can activate with water) to really behave as they typically would on watercolor paper.
It's funny - I posted a sneak peek of this project early over on Instagram and a ton of followers - even my professional artist friends - actually asked me about the markers I was using! In case you're interested too - they're watercolor markers by Faber Castell, and I just love them! They are a bit more expensive because they are a fine art product, but they're worth it in my book, and they won't fade over time because they're light fast.
These two are in what I lovingly refer to as "the ugly phase" (above!), which means they're about half way done, and not looking nearly as beautiful as they will if I keep on layering my supplies and pushing through till the end!
After a few more layers with the watercolor markers, I decide to go in and doodle on top of my girls with pen because I LOVE the way pen looks on top of watercolor! 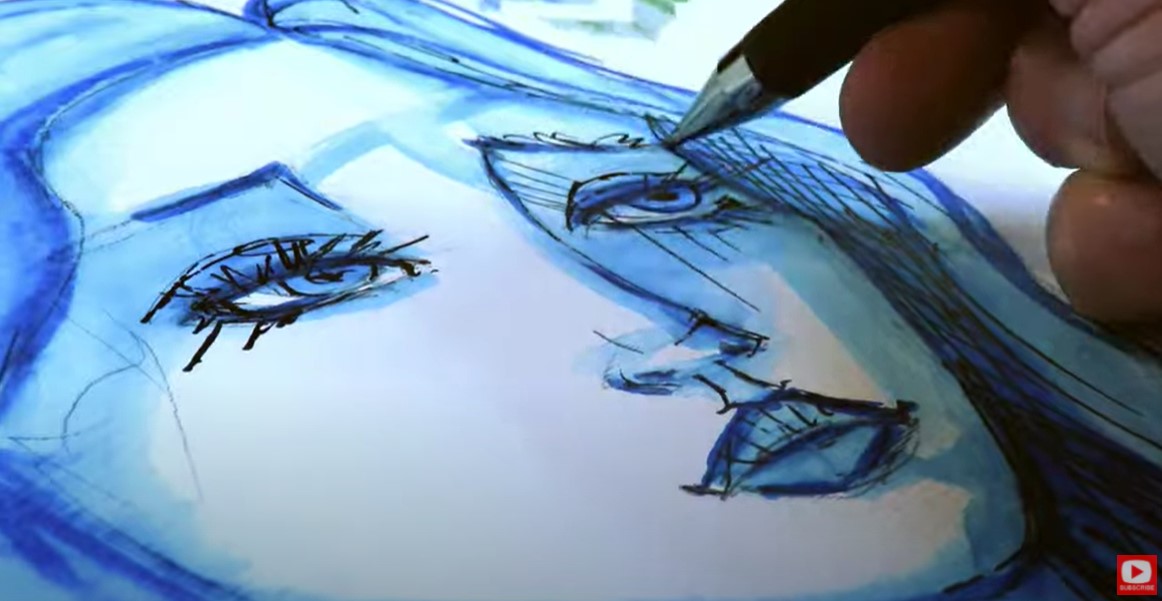
Make sure you actually watch the video for today's demo to see for yourself what I experienced. I'm a big fan of learning about how an art supply behaves and using it in that way so I don't just make a mess!
LOVE MIXED MEDIA & ART JOURNALING? Learn more about the Mixed Media Society and join the waitlist to get notified when I'm open for enrollment! ❤️ CHECK OUT ALL my art books on AMAZON ❤️ MY FAVORITE ART SUPPLIES on AMAZON ❤️ MY BELOVED FACEBOOK GROUP ❤️ FOLLOW ME ON INSTAGRAM The thrift shop is AMAZING if you need mixed media art journaling ideas! Join me on a little field trip to one of my favorite shops in Durham called The Scrap Exchange. I'll show you EXACTLY what I look for when I'm on the hunt for old books to upcycle into mixed media art journals and altered book art journals! It's SO much fun, and you won't believe HOW CHEAP!! I might have spent a whopping 8 bucks!! And, yes... before you EVEN THINK IT... this is pre-covid, hence the NO MASK routine- when things were "normal." Sigh...  Before we even walk into the store, here are the TOP 3 THINGS I'm always looking for when I'm on the hunt for an old book to upcycle into an altered book art journal for my mixed media masterpieces!! 1. Matte pages that are super flat - not glossy 2. Threaded binding 3. Thin books (12 - 30 pages usually feels good to me because I like to FILL my art journals completely!!) QUICK THRIFT TRIP TIPS: Head to the children's section & sheet music book section and you're sure to score!!  Grabbing an old book like the one pictured above is AWESOME to keep around when you're in the mood for collage! I love these types of books because the pages are usually really thin and distressed looking already (another LOVE IT for me). Additionally the pages are usually very pourous and soak up whatever adhesives and primers I throw at them from matte medium to gesso! Lots of people have asked if I feel bad taking these old books home to use for art. I'll tell ya what- I don't. Not one bit!! That's because I specifically look for the books that are super beat up and completely on their last legs anyway- with missing pages, no cover, etc. I take the ones that no one else wants. THESE are my treasures!  I also REALLY love picking up books that have a variety of font sizes and typefaces in them. It just makes things more interesting to look at if you mix these elements up in your collage art. 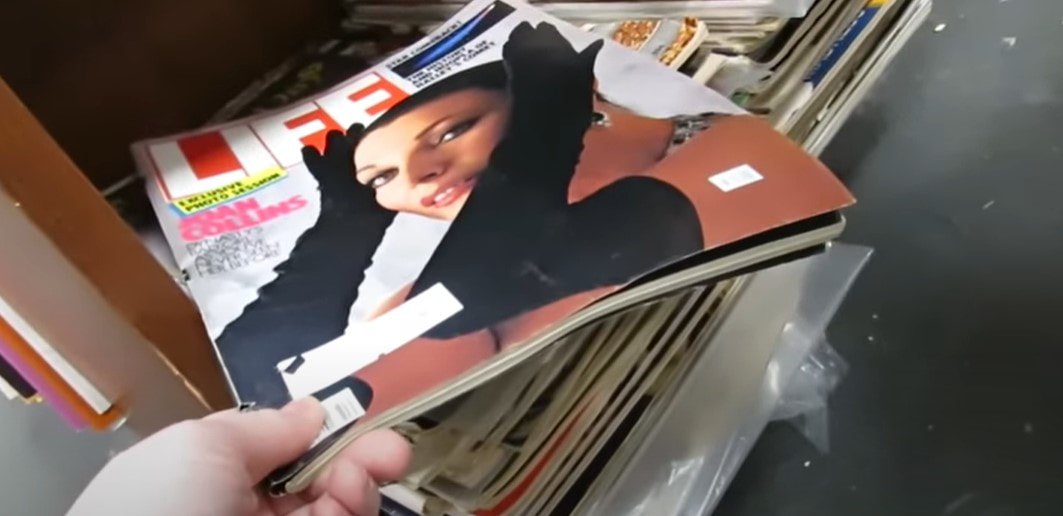 Magazines like the one above are GORGEOUS, but I really shy away from them because they are typically super glossy, and I know working on a matte surface is going to yield better results, so as much as this glamour shot is calling my name - back she goes onto the shelf for someone else.  The pages of the children's encyclopedia above are PERFECT and exactly what I'm looking for, but there are SO many pages in this book, it's a little overwhelming. If I can't find something, I may come back to this one, because it's possible to systematically score and remove pages to thin the book out without compromising it's integrity if it has threaded binding (see below). I don't know if I'm in the mood for that much effort though, and with SO many options in this thrift shop - I keep digging! 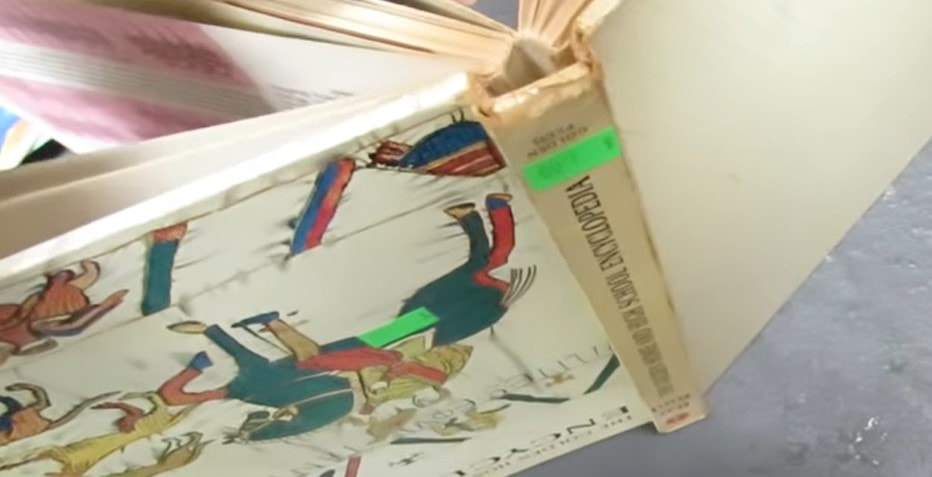 As you'll see in the video, we ended up with quite a few awesome finds! I found an old fashioned giant coloring book of "Alice in Wonderland" that felt just perfect to me. Mandi grabbed an old book of paper dolls, some sheet music, and a board book. Board books like the one she found (below) can be great as altered books! They're super sturdy and this one has a particularly fun shape! Just a word of warning - board books often have a sheen or gloss to them, which can make art-ing on top of them tricky. A great work around is to literally spray them with paint primer, or to sand the gloss right off the page! 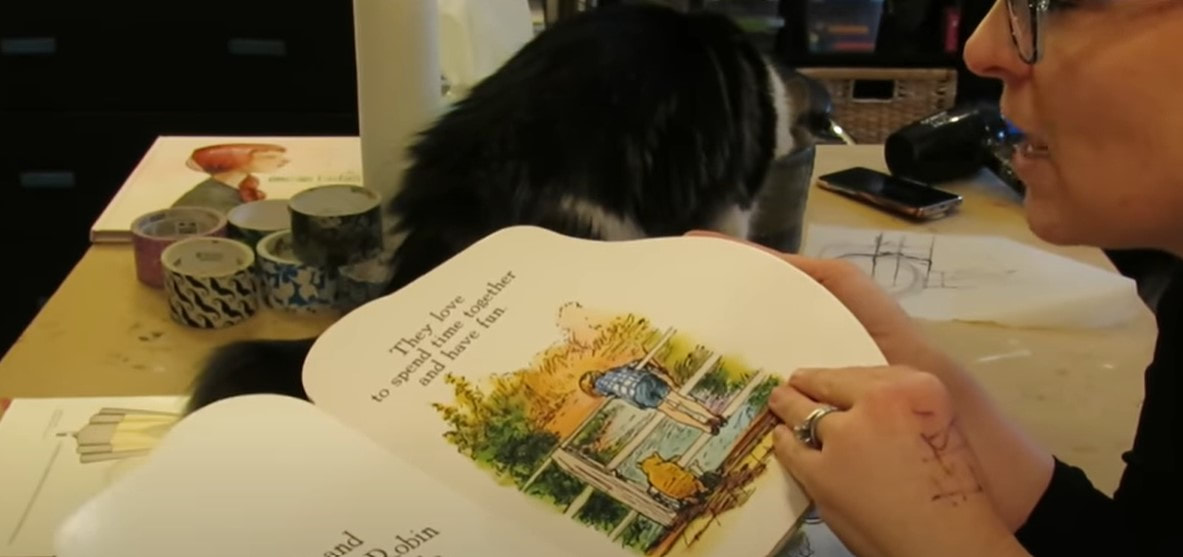 Once you've decided which book you want to turn into an art journal, it's super easy to get started. I often begin with shoring up the pages using some pretty duct tape down the center to reinforce the binding. This typically sets the stage for my entire color scheme for a piece! If getting started feels hard (TRUST ME, YOU'RE NOT ALONE!!), I've got a Bob Ross inspired "Kick in the Pants" PDF for you to help you start art journaling so you can get over the fear of the blank page, and just start HAVING FUN already!! CLICK the button below and I'll send that fun art journaling cheatsheet straight to your inbox!!   After you grab your art journaling cheatsheet, be sure to binge this entire series on YouTube about art journaling. I promise it will help you get OVER the HURDLE and just start creating. Here is one of the funny, no stress projects we do! Aren't these emus hilarious?! 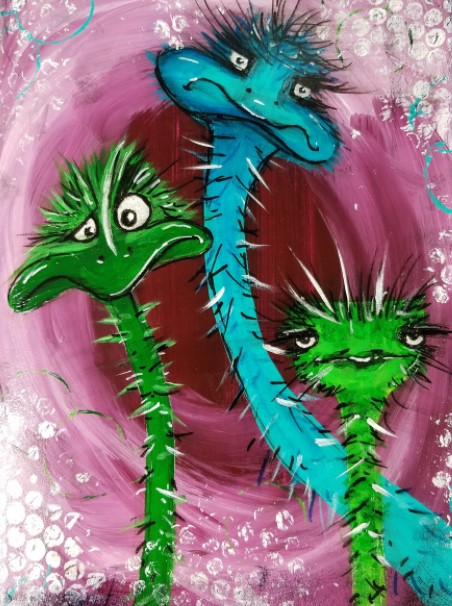 If you're in the mood to try addding human faces to your art journal, but kinda hate drawing or feel intimidated by it - I've got an entire NO DRAW series of art journaling prompts to help you try this as well. It's SO much fun!! You can download my FREE face shape template, and I teach you EXACTLY how to use her so you can play around with adding gorgeous faces in your art journal - without the stress of having to learn how to draw! 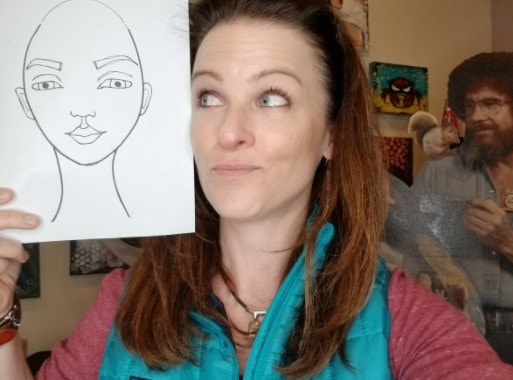 The children's book I bought on this thrift shop field trip turned out to be so much fun to work in. Here's one of my favorite pieces I created inside. She's actually a mixed media art tutorial as well. That tear wasn't meant to be there, believe it or not. Find out HOW it came to be by clicking HERE. 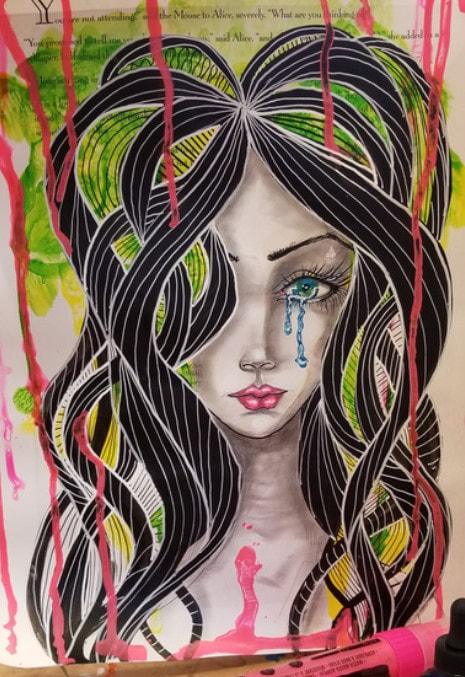 If hope you have just as much fun on your own thrift shop adventure and creating your own mixed media art journal as I did!! See ya back here next week!! Who doesn't love SASSY Pinup Girl Art?! Seriously!! Why have I not shown you how to draw a pinup girl before?! I had such a blast with this art journal page and can't wait for you to try it! Today’s video is a FULL LENGTH mixed media art project, so if you love vintage collage, pinup girl drawings, art journaling, my hamburger system OR mixed media tutorials - this is for YOU!  Not sure what I'm talking about when I say "Hamburger System?" NO PROBLEM!! I've got you!! My Hamburger System is a simple mixed media layering system I've developed over time after TONS of trial and error from playing with ALL the art supplies I could get my hands on!! I used to get asked all the time (and still do!) about my mixed media process, and what order I layer my mixed media art supplies in. I've broken it down for you layer by layer and created a fun step by step video series on YouTube, created a FREE cheatsheet you can download, and EVEN ending up pouring it all into a book because I think it's that helpful to have as a reference on your art table. 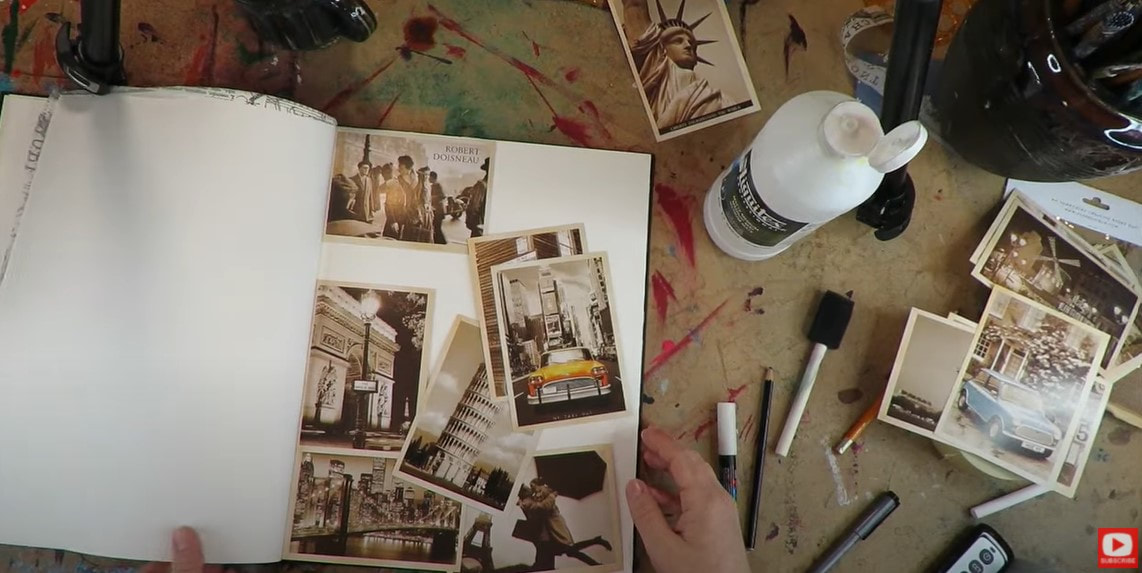 I love collaging art journal backgrounds with new materials and trying out new art journal ideas, so was thrilled to try doing a postcard collage! I was not sure how this was gonna work because I've never done much with postcard art, or collaging materials with a glossy sheen, but I was in the mood to BREAK a FEW RULES!! Grab your art journal, some vintage postcards, your acrylics, gelatos, pitt pens and ALL your mixed media hamburger supplies because it's TIME TO PLAY!!! 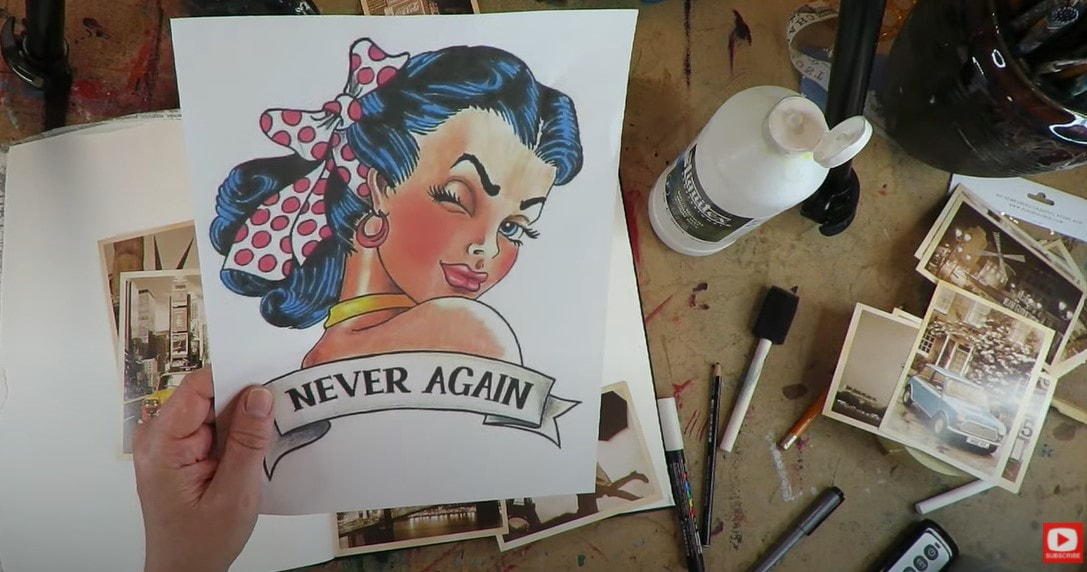 How ADORABLE is this retro pinup girl I found to use as our reference image for todays' project??!! I'm SO excited to paint her into the foreground!! Before we go any further, super quick announcement: All product links are Affiliate. I may earn a small commission if you choose to order through these links, but by law there is never any additional cost to the consumer for doing so. I thank you for your support!! 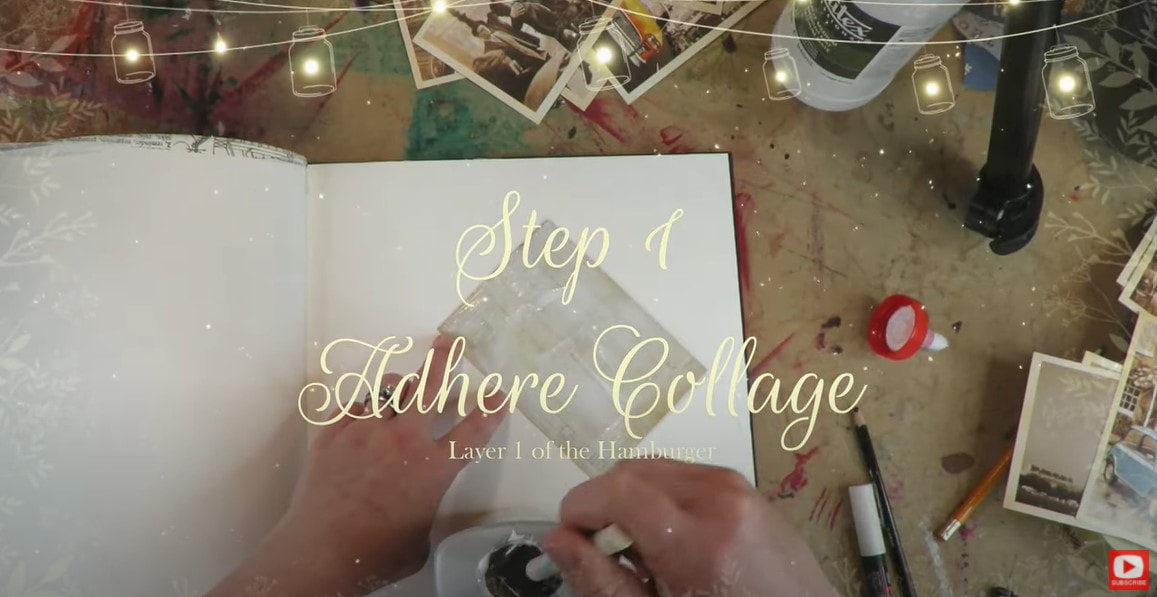 If you follow me, you know I'm a super fan of liquitex matte medium for my collage layer, but since I've already started this project in a rebel mood- I'm gonna go ahead and continue that streak! These postcards are pretty substantial, so I grabbed my good old fashioned Weldbond adhesive because I don't want them buckling or separating. I want them to be locked down and rock solid. 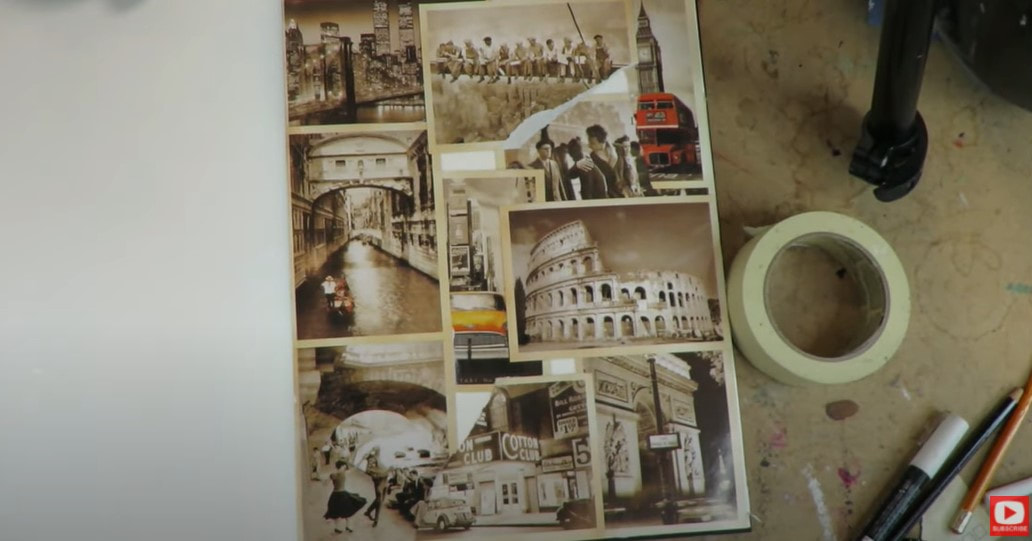 Initially I hadn't planned to use masking tape for this project, but it was sitting next to my art journal, and I've used masking tape tons in the past on my collage layer, so decided to frame my page around the edges. Not only will this add some additional texture to my collage background, it will help to strengthen the edges of my page. Before we get TOO FAR into the project- we need to talk about background vs. foreground. While I totally love each and every one of these postcards individually AND the composition they've magically created together in my background - I'm not gonna let myself get attached. I KNOW it's hard, but you need to do this to if you intend to paint or draw something into the foreground of your piece. A background is simply that- a background. Of course we want it to be awesome, but we can't be precious about it. To help me with that, I've added a few scrappy pieces of masking tape in the center of my page, and my stamps! 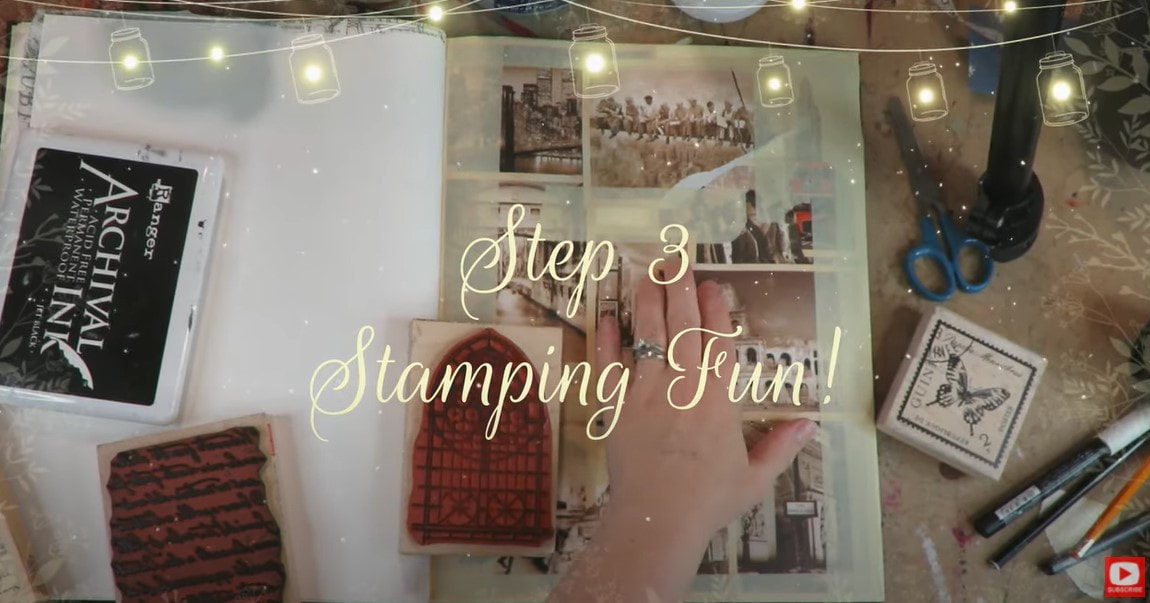 Next, I added some gesso with my brayer to kick the background back even more, so I have some space to draw. Don't let this hurt, ok? Background is background! We're prepping the space for someone fun to appear in the foreground, so we need this to head backstage. The rough application with my brayer helps the background take on a bit of a grungy look - which I LOVE. To bring that out a bit more- I added some brown acrylics around the edges. 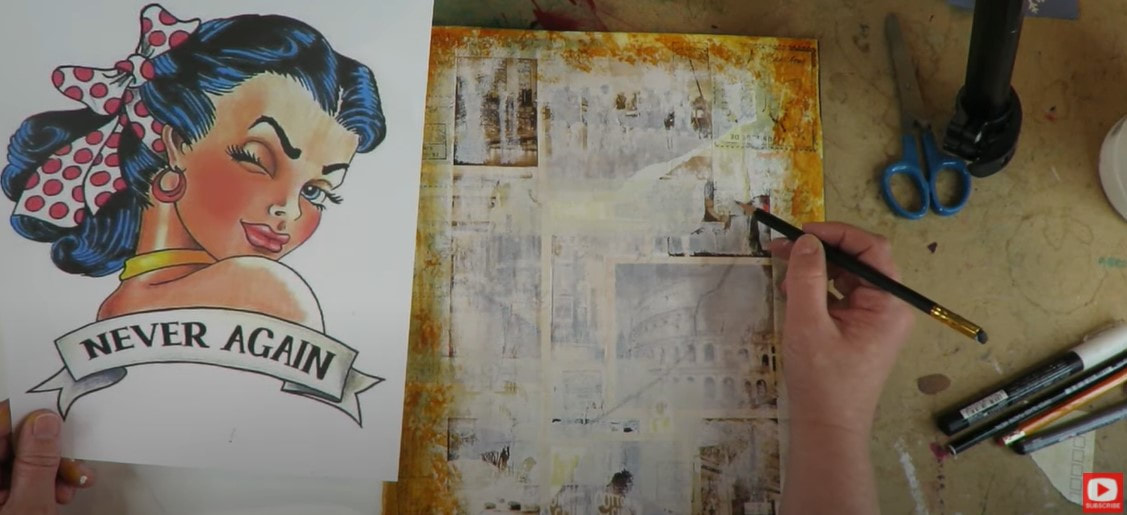 I know some mixed media art fans kinda hate drawing, but I love it, so a lot of my work ends up as mixed media portraits (because I LOVE drawing faces and teaching people how to draw a whimsical face!). If you love drawing faces, you HAVE to join me over on my YouTube Drawing channel for my Whimsical Women of the Women of the World series. We're having a blast and you can do this on your own time, any time you want!  If you're totally new to drawing faces, check this series out on my YouTube Drawing Channel to get you started!! You'll learn how to draw a whimsical face in pencil. It's super easy and relaxed. Then I show you how to add a little bit of shading, and we build on those skills when you're ready for more! 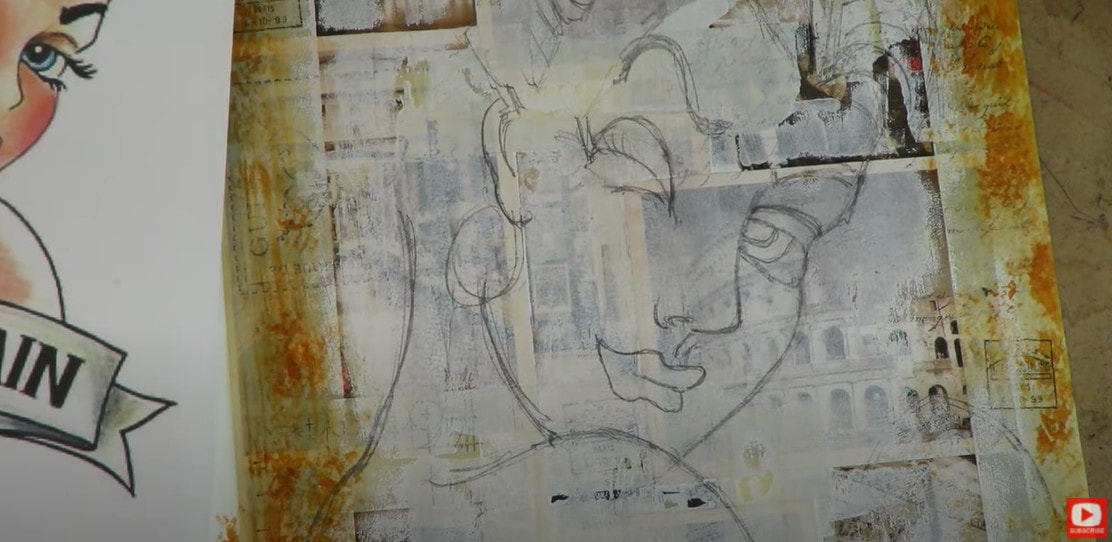 I get a ton of questions about how to draw so many random things, and I really encourage using a reference photo because everything you need to know to create a beautiful drawing is already in the photo. All you do have to do is draw what you see! A reference makes things SO much easier. And if you choose to draw in a whimsical style like I typically do - it's way more forgiving than realism. AND more fun (I think!!). 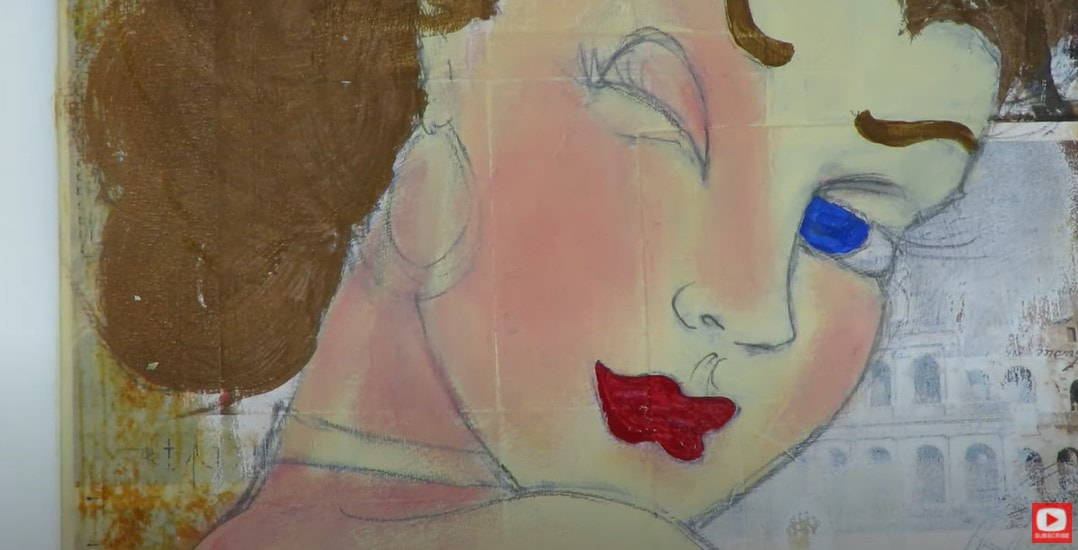 After your pinup girl drawing is all sketched in - it's time to kick things up a notch and add some color!!! Have FUN layering in your acrylics and gelatos. Just keep on moving up the hamburger layering system from the bottom up! If you have questions about your supplies and where or when they go, just use your cheatsheet! If you didn't grab that yet, click the button below to have it sent straight to your email!  When I'm happy with my gelatos and acrylic layers, I'm ready to seal it - which is layer number 4. At this point, nothing should move when I add mod podge except for my gelatos. They will melt a little bit, so be prepared for that. If you don't want anything to move (this totally freaks some people out, and that's ok!) - you can just choose to work only with materials that are nonwatersoluble, and permanent - like acrylics! Tons of students ask me if watercolors are ok to use in the Hamburger System and where to put them. I honestly don't use them AT ALL in the Hamburger system because they are SO reactive, and just their own animal! I save up my watercolor love for other projects. Watercolors play nicely with colored pencils, paint pens, fountain pen ink, pens, etc. - and I totally love them, just not for my "Hamburger" projects. 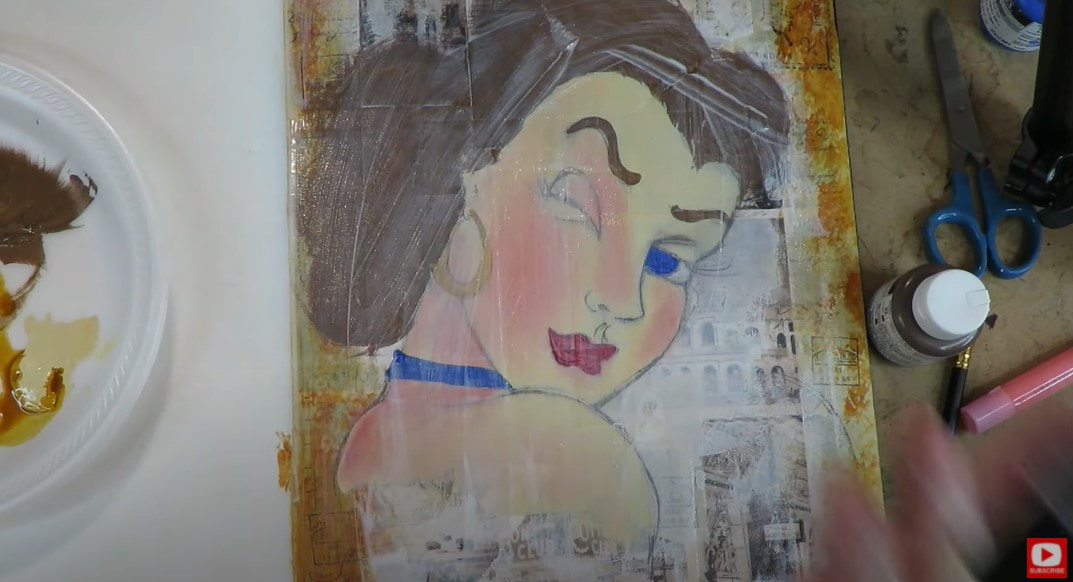 Remember - my Hamburger System is not the only way to go with mixed media- it's just a fun pattern I've developed for layering over time that I love and find to be pretty fail safe. It always gives me gorgeous results, and because I want YOUR art to be AWESOME - I've shared this with you so you have NO questions about what supplies play nicely together and you can just have FUN, which is the most important part of art-ing, am I right?! 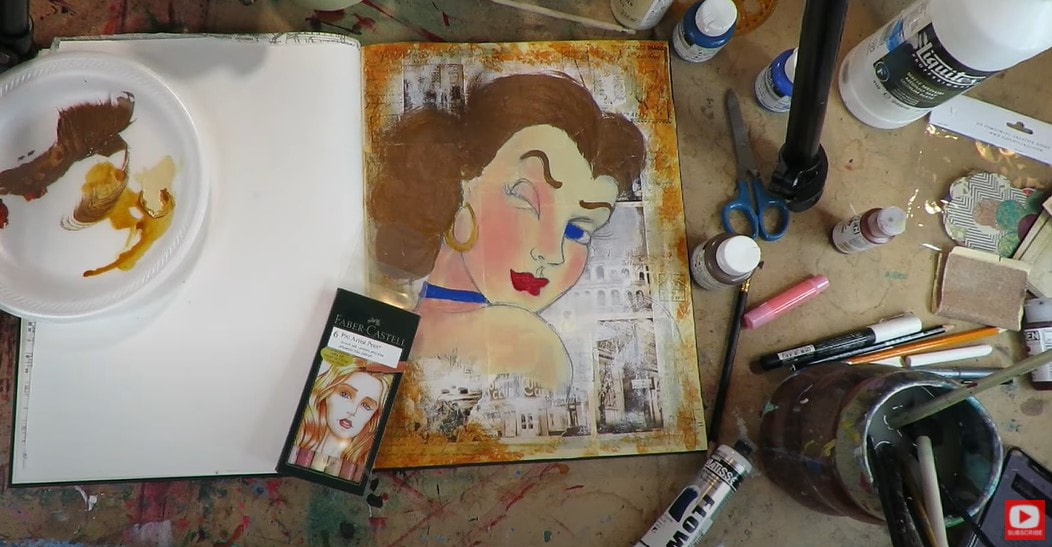 Once my mod podge layer dries, it's time to have some fun with my pitt pens! They're made by Faber Castell and filled with India Ink, and I LOVE using them to "paint" more details on the mixed media faces and mixed media animals I love creating. They actually make an awesome skin tone pack that you might want to check out if you don't have any pitt pens and are interested in trying them out. So fun!! Make sure you do a test swatch of these before you put them on your project because the caps can totally can trick you here and there! 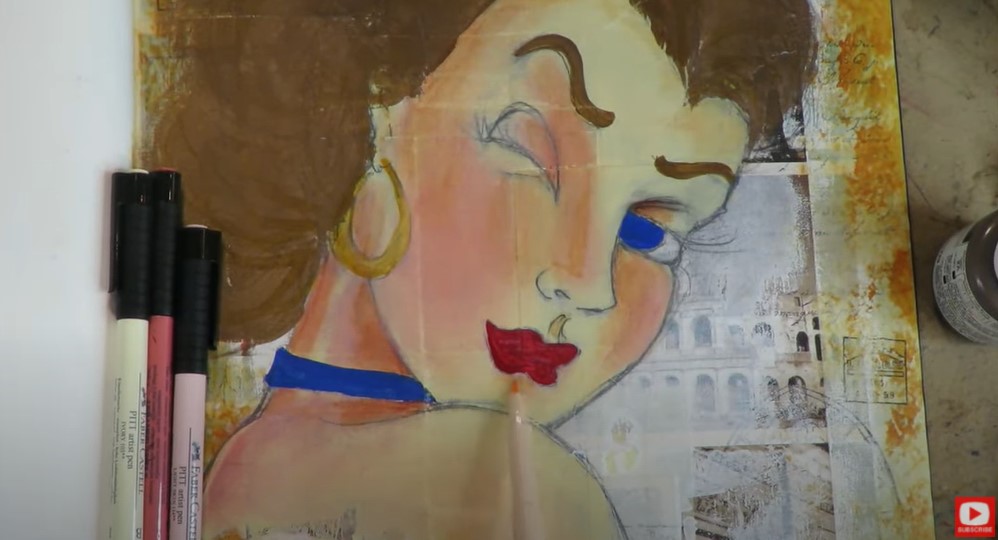 At this point, I just have a blast shading and doodling all over the place with my pitt pens to add detail and depth on my slippery mod podge surface. I use my finger to blend for shading in the face. The amazing thing about this layer and playing with pitt pens, is they can be erased with a baby wipe if something happens that you don't like!! If you're following along with my cheatsheet for the Hamburger System, you can feel free to seal this layer with mod podge, and then go back to add even MORE doodles! 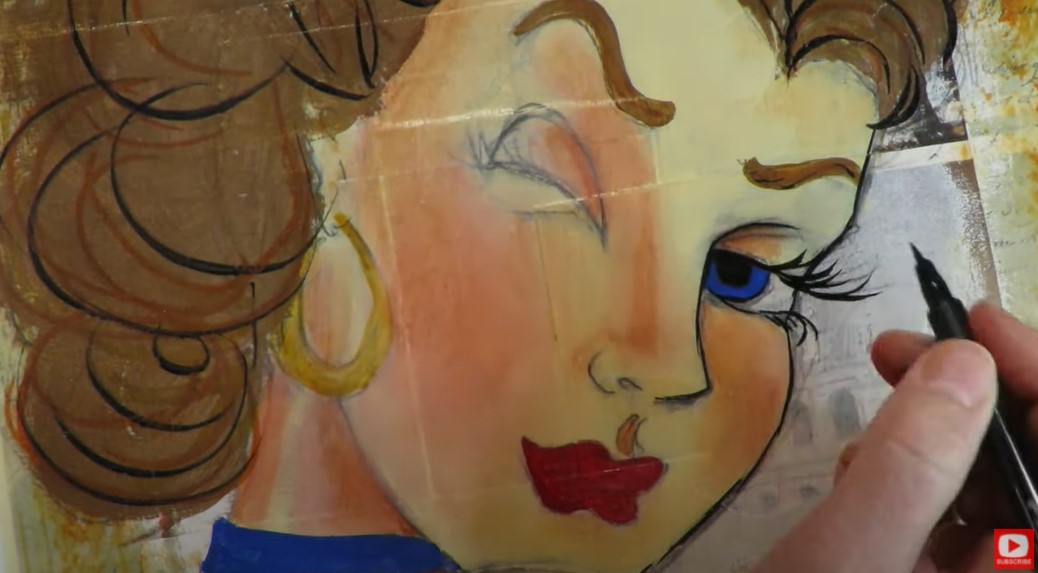 If you do get any smears with your mod podge here - like I did (because my black pitt pen marks weren't quite dry in one spot before I added my mod podge), that's ok! Everything is fixable- we can figure it out. Just take a breath and redirect the smear!  I always finish up with a white sharpie pen or posca pen / paint marker to add some highlights that pop - they make SUCH a huge difference in your art! Watch the video to see exactly where I love to jazz my girls up, and make them glow!! 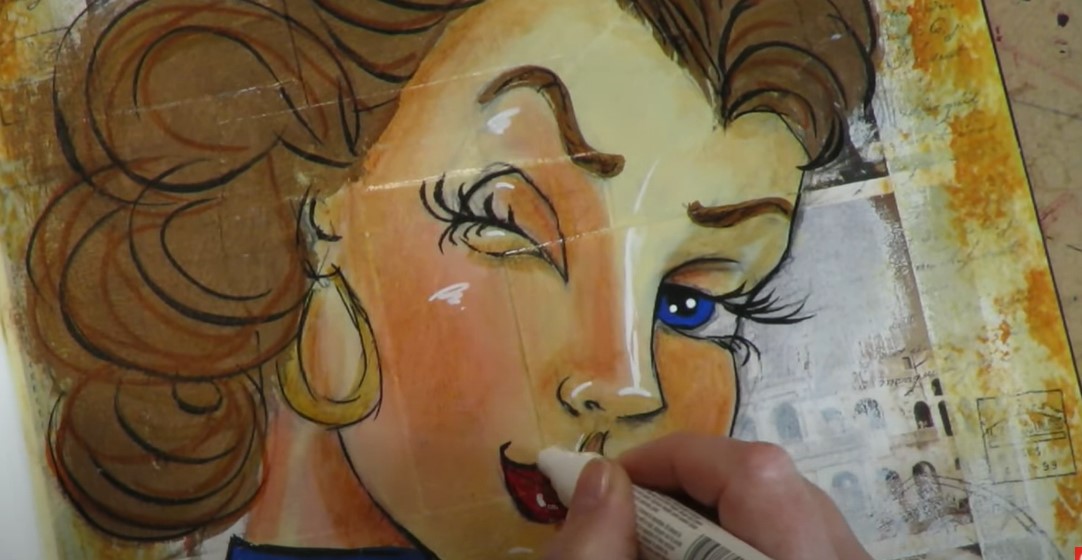 Once I'm good to go with my highlights and have finished adding some distress marks to the edges of my art journal page, it's time to seal her up so she doesn't move and so my art journal pages will not stick together. This is one the HUGEST questions I get from students- "How to keep art journal pages from sticking together?!" So here ya go - my answer is at the end of today's video. Be sure to stay with me till the end for that tidbit!! Thank you so much for hanging out with me today! I hope you LOVED this project and will see ya back here next Friday!! Have a fab weekend!! Today's SUPER FUN Mixed Media tutorial is a cute piece of art inspired by a book by Julie Nutting called Collage Couture Techniques for Creating Fashionable Art. I'm a HUGE fan of Julie's and have loved this book since it came out in 2011. In fact- I used to do a variation of some of her cute projects with my students when I used to teach art classes in person! 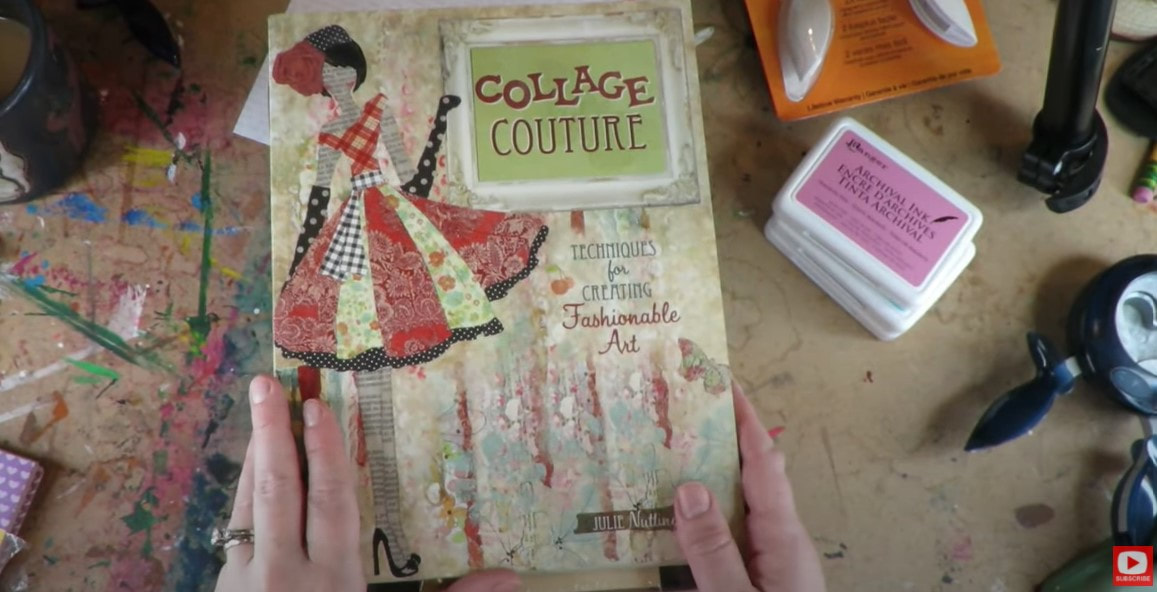 For today's project I've got a FREE download for you in case you'd love to SKIP OVER the DRAWING part and get straight into the mixed media goodness! Here are the supplies you need for today's project:
Once you have your body template cut out, trace her onto the back of a piece of scrapbooking paper. Quick tip here - choose a contrasting pattern for the body vs. clothes. For example- if you pick a tiny/subtle pattern for the body/skin - select a bolder pattern for the clothes (or try the reverse!). 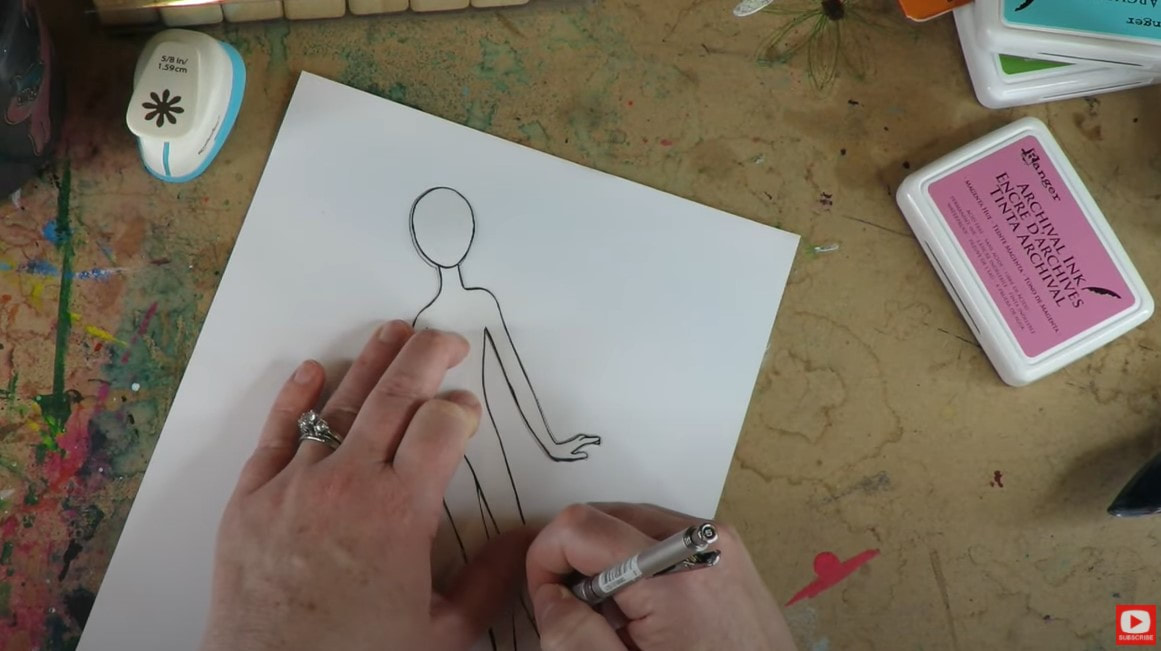 Next we're gonna design some clothes! We need a mini pattern first, so lay a sheet of trace paper right over your cutout and let your imagination run wild! Today, I drew in a 3/4 sleeve shirt, skirt, and some cute boots for my girlie!! 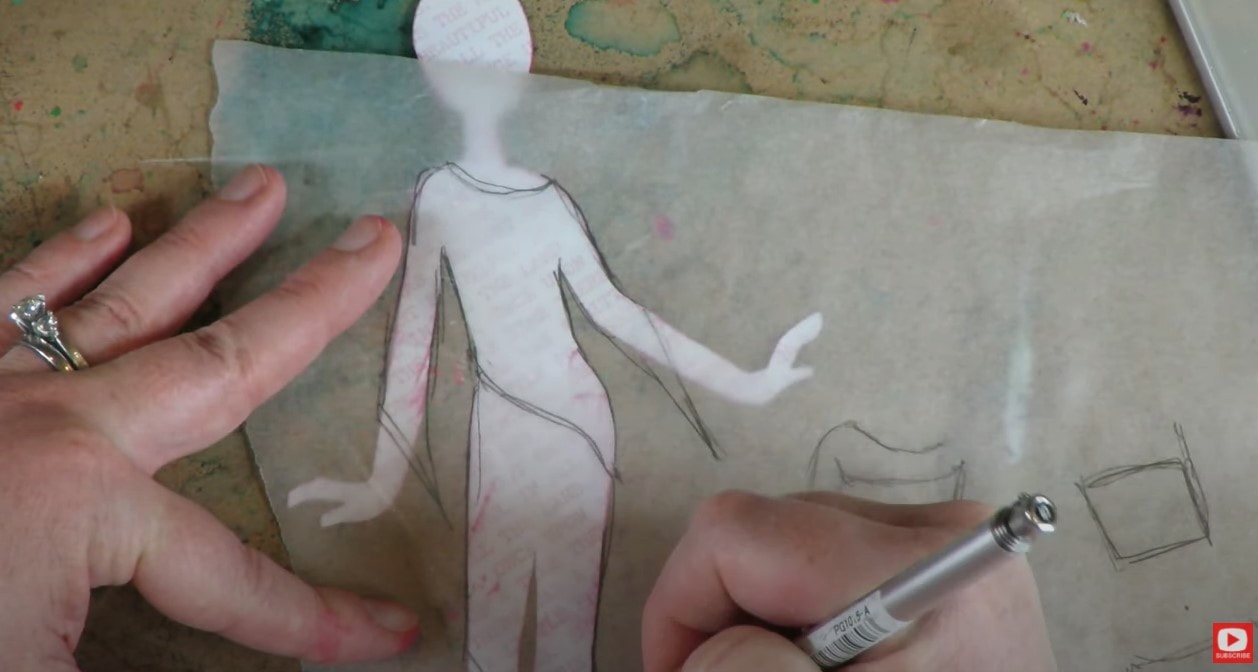 Next, choose 2-3 sheets of scrapbook paper that go together to be her clothes. Lay one sheet of scrapbook paper face down on your art table. Then lay one sheet of transfer paper face down (dark side down) on top of your scrapbook paper. Finally, lay your trace paper with the clothes patterns you just created on top of that. Sound confusing? CLICK HERE to watch the video. I promise it's SO EASY! I used different sheets of scrapbooking paper for the top and the skirt for my girl. Look how cute she is looking already!!! 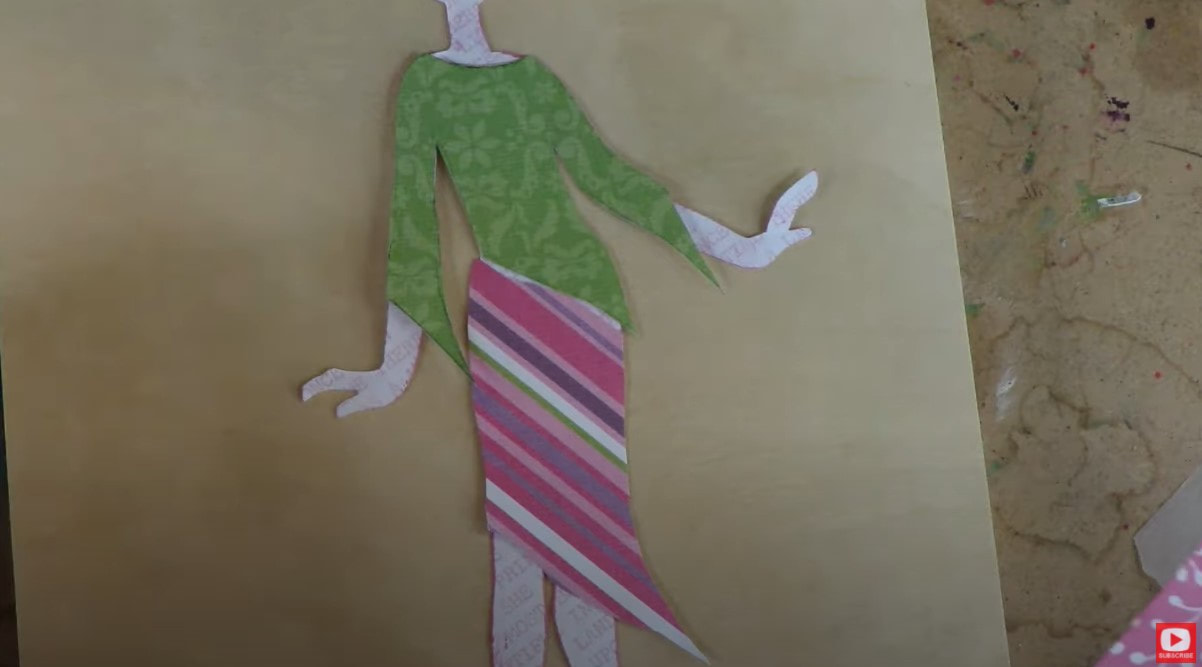 Since I'm working on a wood panel (and I LOVE the look of wood), I'm leaving the background somewhat naked for now. If I had chosen to work on canvas or a canvas board, I totally would've painted a background of some kind before gluing my girl down. GRAB YOUR MOD PODGE to glue your collage pieces to the board. I used matte medium and I actually wish I hadn't!! Mod Podge will make your collage pieces slippery and creates a beautiful surface to doodle on top of. So go for that look if you can!! Once your girlie is glued down, just HAVE FUN with her! I have a ton of cute punches and am a cat mama of 3 - so my cat punch came out to play for this piece, along with some flower punches in different sizes. I used a paint pen to add hair, and then stamped a quote to make me smile ;)  I continued doodling on the flowers and cat to carry over that look from the outlines on her clothes and tie it all together. Lastly, I added buttons to my large flower punches, and DONE! Isn't she SO CUTE?!!! 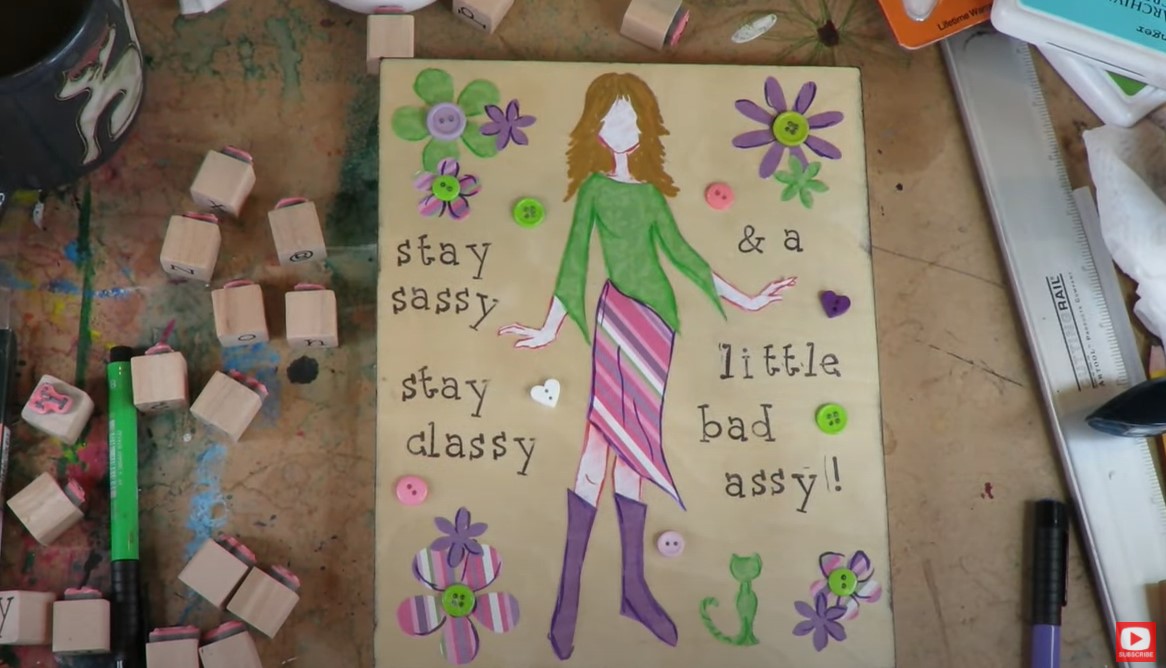 Once I had everything all glued down, I applied a huge layer of mod podge over the entire thing. That allowed me to doodle in a bit more dimension with my pitt pens because this is something I LOVE to do. You can leave bold pen strokes, smudge your strokes to add shading, or do a combo. It's what I do ALL the TIME with my hamburger style girls!!! I love the way it turns out...  I hope you ENJOY this super fun project!! Remember to DOWNLOAD your free, no-draw BODY TEMPLATE here. Then come back and press play for the full length, mixed media tutorial!! See ya next week ;) Scrapbook paper backgrounds are my GO TO for the mixed media art I create on canvas or in my art journal! Before I get into WHY - I want to show you some of the effects you can achieve with various types of collage material - in case you're new to the world of collage or creating mixed media backgrounds! In the pic below you'll see a closeup view of one of my favorite mixed media collage projects from my book, Mixed Media Magic. See the wrinkly, raised bumps of texture? That happens when you collage with NAPKINS in your bottom layer! 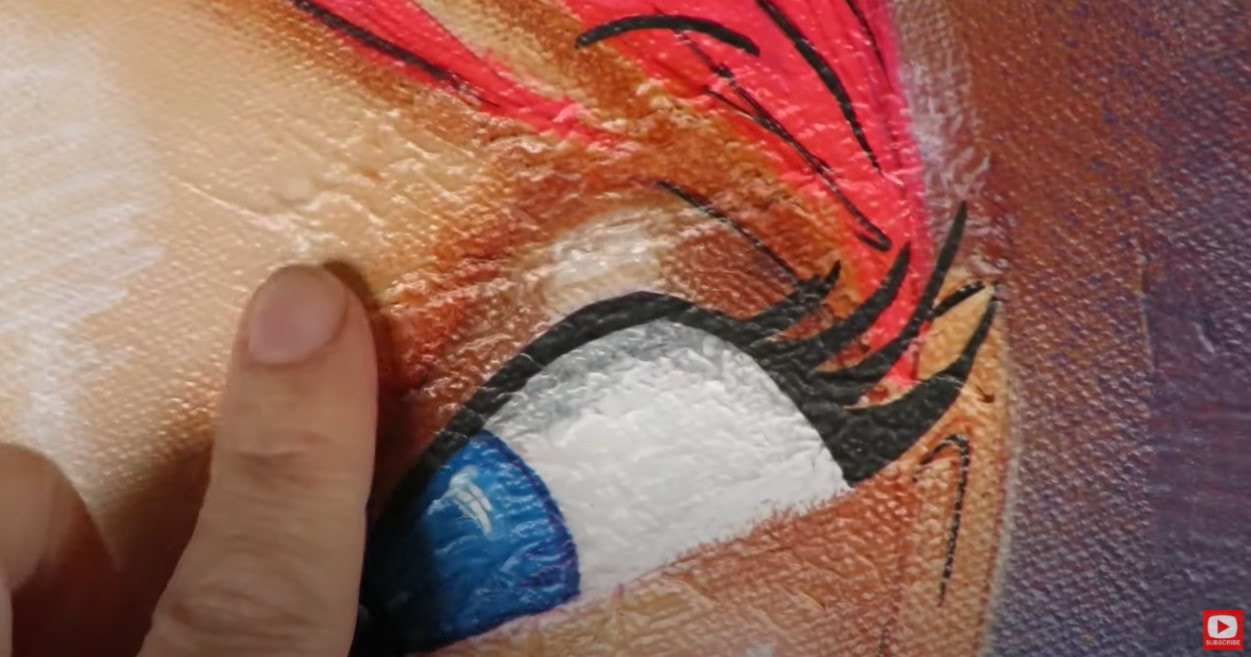 Some people LOVE this kind of texture in their art (I'm one of them!!). From a distance, the texture in the background is very prominent. You can see the wrinkles and bumps from my napkin pieces. This is a look I was going for on purpose in this particular painting.  Some people aren't into this bumpy goodness, and that's ok! YOU do YOU!!!! In case you're one of them... here's what collaging with TISSUE PAPER can do in your mixed media art backgrounds!!  See the typewriter words smack dab in the middle of her face? That is a ripped piece of tissue paper! Tissue paper will give you a transparent effect in your collage, which I also LOVE!!! You can definitely see there are some bumps and wrinkles up close, but it's more chill than using napkins like I did in the previous piece. From a distance, the tissue paper texture is VERY understated...  The next example I'm going to show you is a piece I started with a collage layer of torn scrapbook paper pieces!  Look closely at the background of this mixed media girl painting. You'll see there are 3-4 sheets of scrapbooking paper that were collaged into my first layer of this canvas. I like to rip palm sized chunks from papers that have the same color scheme going on. It's SO easy to find matching colors with an assortment of patterns because ALL the craft stores sell these giant books of gorgeous sheets with repeating color schemes that are totally designed to be used together! 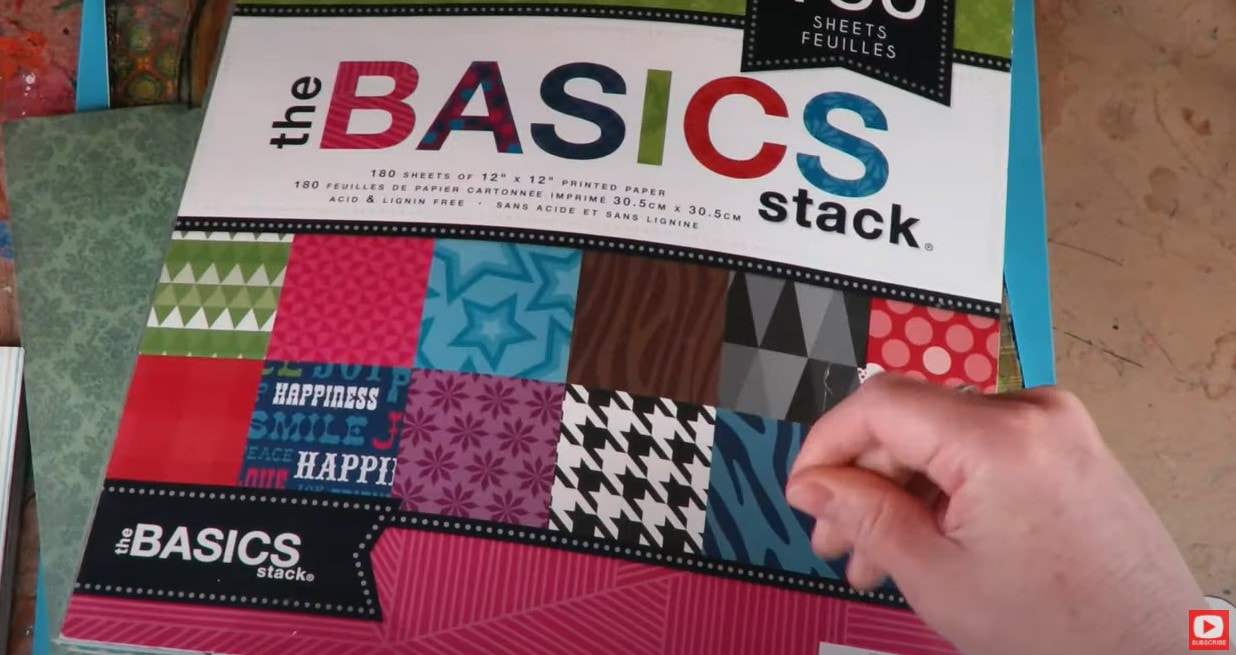 Personally, this is my FAVORITE collage material because you really DON'T get any wrinkles at all! This type of collage creates a smooth surface that is PERFECT to paint on. That doesn't mean it will create a "boring," or texture-less background. Take a look at this painting close-up! As you can see below... there are pretty subtle, raised edges from each chunk of scrapbook paper I used. And I have to say, I'm OBSESSED with this look!! I really feel like it adds a layer of sophistication to my art. You can achieve some VERY rich, complex backgrounds that really pull your eye around the piece as a whole, and make it interesting to look at- both from a distance, and up close!! 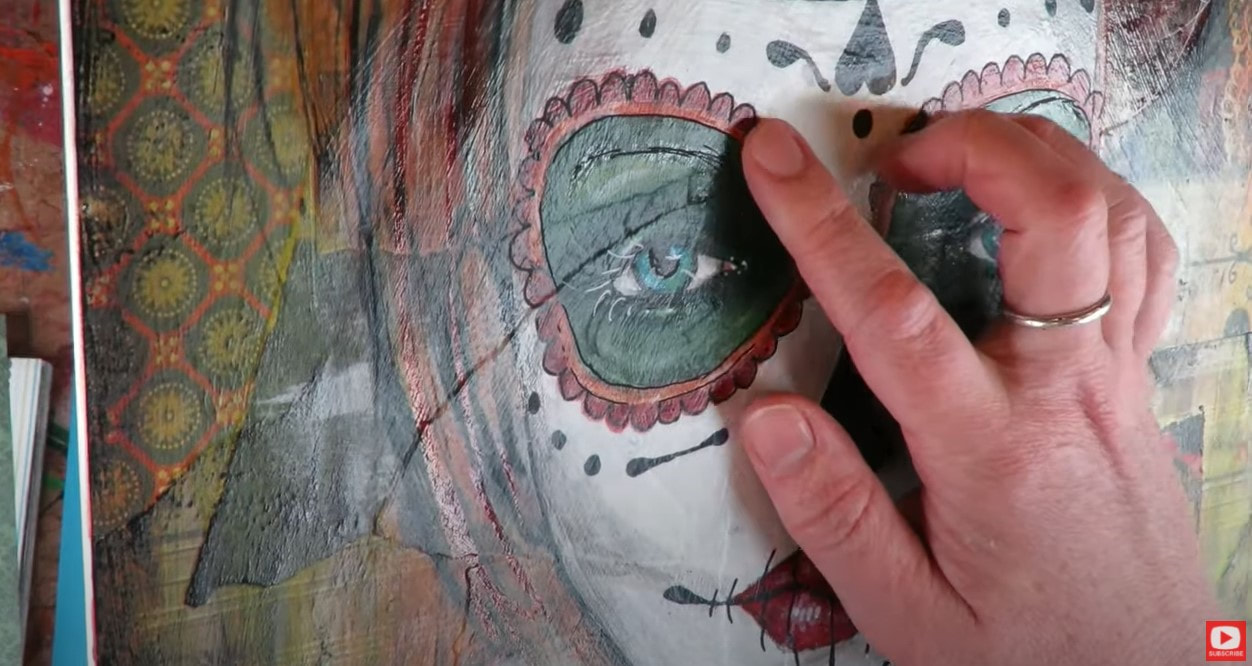 In today's mixed media tutorial, I've got a FULL-LENGTH, FREE art lesson for you!! I'm showing you my EXACT mixed media collage process using scrapbook paper so you can play right along with me at home. I find this process works amazing on canvas boards, wood panels, or as an art journal page or spread. It's a little harder to do on pre-stretched canvas because the middle of a pre-stretched canvas isn't super sturdy, so you have to be a bit more gentle. When you do collage work, you add a lot of pressure to whatever surface you're working on, and I don't want to be precious about anything- so I reach for something like a canvas panel, because it's more substantial (AND they are super cheap!!). Here is your supply list for today's project:
Go grab your supplies and meet me over on YouTube to get crafting with me!!!! CLICK HERE or press the play button below when you're ready to start!! 💜Product Links listed may be affiliate. I only link to products that I have personally used and tested and love! I may receive a few pennies if you purchase through these links, but no worries, there is never any cost to the consumer for doing so! If you've been paying attention to my recent uploads on YouTube you'll know how obsessed I've been with these Fountian Pen inks!! My vintage bottle collection hasn't slowed down either (sorry wallet!!). But I love "shopping" for my favorite color on my ink shelves!!! Check out this fancy new bottle I discovered on Etsy! 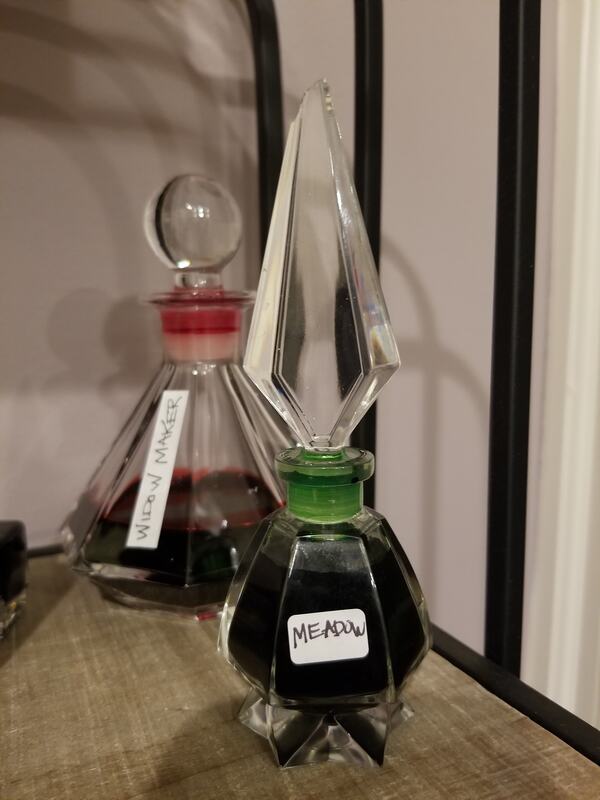 In today's video I am seeing if PanPastels can work over Fountain Pen ink to make a mixed media portrait! I used my beloved Noodler's ink in my favorite strathmore watercolor sketchbook and was pleasantly surprised by my experience! Today is Friday which means NEW FREE YouTube lesson!! This project was particularly satisfying for sooooo many reasons! Well, I'll just list them off so you know what they are! First all, I got to paint with my fountain pen inks. They are soooooo vibrant and juicy and satisfying (due to their vibrancy and juiciness) that I cannot even compare them to any other medium I love them so much! This is the one I use for skin color. It's DIVINE!  I can now draw hands after publishing a book on them! I can finally dive into any project that involves them and has truly opened up a whole new world of faces and characters now that I'm no longer afraid to tackle any drawing!  I spill 3 oz. of permanent ink all over my studio floor. There's nothing quite like an explosion of ink to liven things up in the old art room! 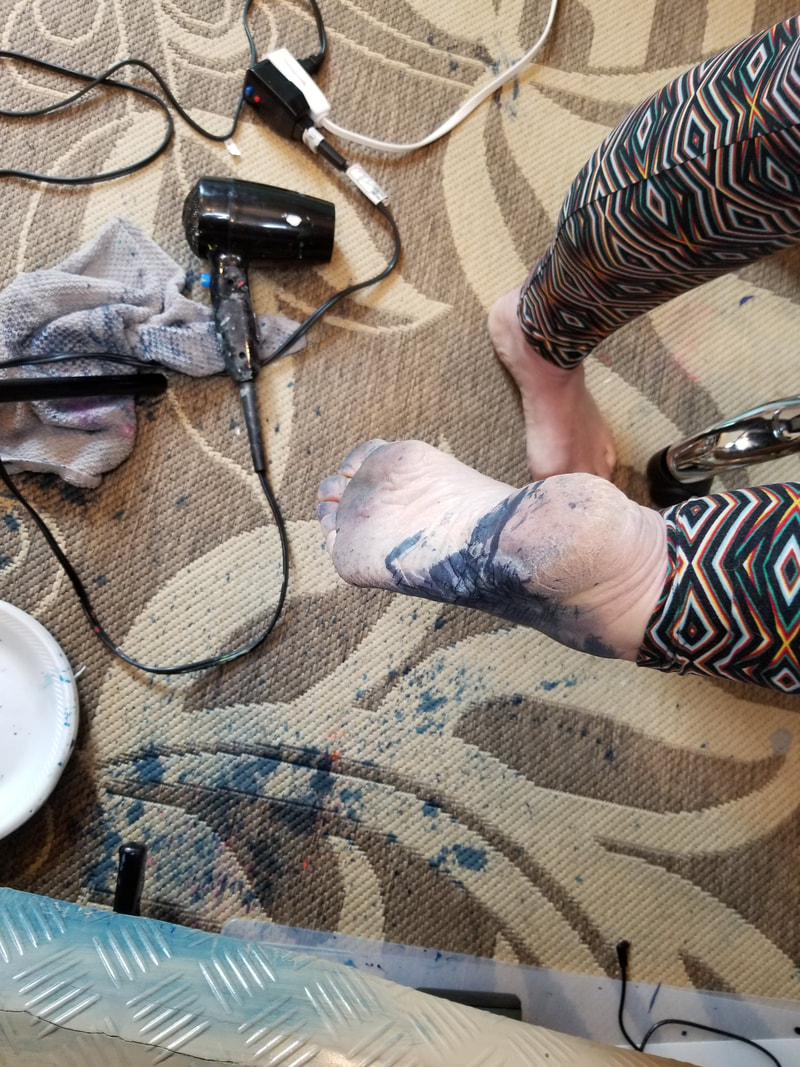 Glasses. Having the guts and courage to draw OVER and ON TOP OF a completely painted girl, is, well, TERRIFYING! But then the level of proud you feel when you actually pull it off is the BEST FEELING EVER!! So while it's scary, it's worth it!!! So my advice to you is to simply GO FOR IT. 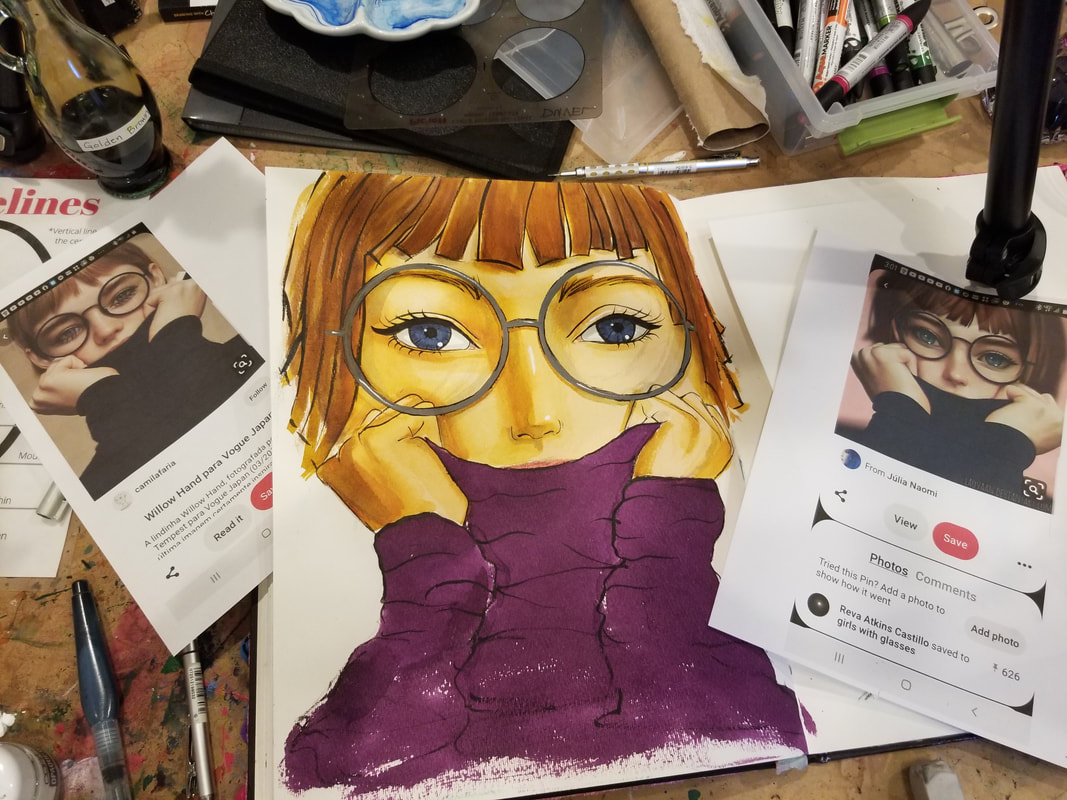 The references I used today are so super cute!! The original reference photo was taken from Vogue Japan and I just fell in love with it when I saw it!!! Another reason today's project was so fun was because of my little feline side-kick!! Oh Tippie!!! So after the spill and the cat play and the juicy brushes filled with ink I was just delighted at the final outcome. Click on the video here to watch how YOU can learn how to paint glasses on YOUR mixed media girls!! I hope you're staying safe indoors and have found some activities to keep your mind, heart and soul occupied and happy. I personally find the best way to keep my heart and mind happy is to keep my body busy!! I've gone on A LOT of walks. But I'm also keeping busy with painting and drawing!!! You may remember from last week's email that we painted our son Max's room? Well yesterday I painted his favorite video game character in there too. Lifesize. 'Cause, really, why not if it keeps me busy and him DELIGHTED! Seemed like a double win so we went for it! 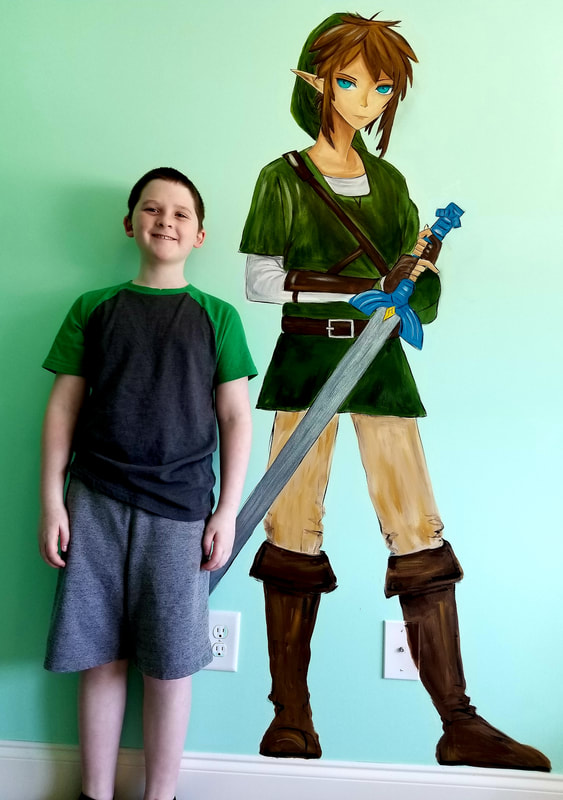 Sadly it only took me 2 hours so I still had to keep busy for the rest of the day but it definitely helped me take my mind off of things for an afternoon. Since being creative is working so well for ME these days, I thought maybe it would work well for you too! So today I'm bringing you a fun demonstration tutorial about how to use colored pencils to help you shade your mixed media drawn faces. The funny thing is that I REALLY DO HATE COLORED PENCILS. You can see so (and learn why) in the video!! lol! But then you can also see how I use them to really pack a shading PUNCH to my best art journal faces. Here's a peek! 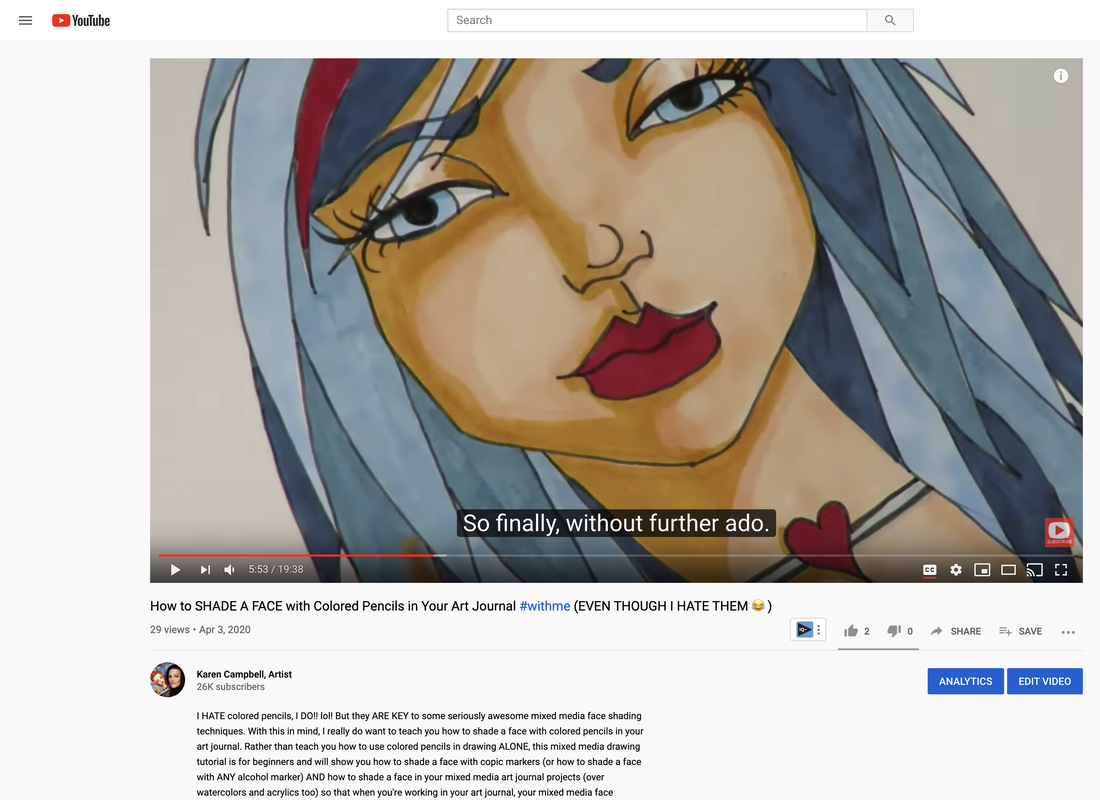 Ready to learn and see? Grab some pencils and meet me at your art table. Then press play and let's gooooo! |
Karen CampbellFounder of Awesome Art School. Mixed Media Artist. Author of 19 Instructional Art Books! 
Whose work has appeared in...
   
 Archives
July 2024
Categories
All
|
 RSS Feed

"Karen is flipping hilarious and she's very real...I like the way she teaches in a way that really gives you confidence, whether you're a beginner or advanced there's always something new to learn!"
- Elizabeth W. |
What Fans Are SayingKaren, you are absolutely fabulous! You make me feel like I can draw anything. I have recently retired and finally have the time to do some of the art that I have loved since I was in school. I am really at the beginning of my art journey and I hope to learn as much as I can. Thank you for all you do. |
Contact ME |