
|
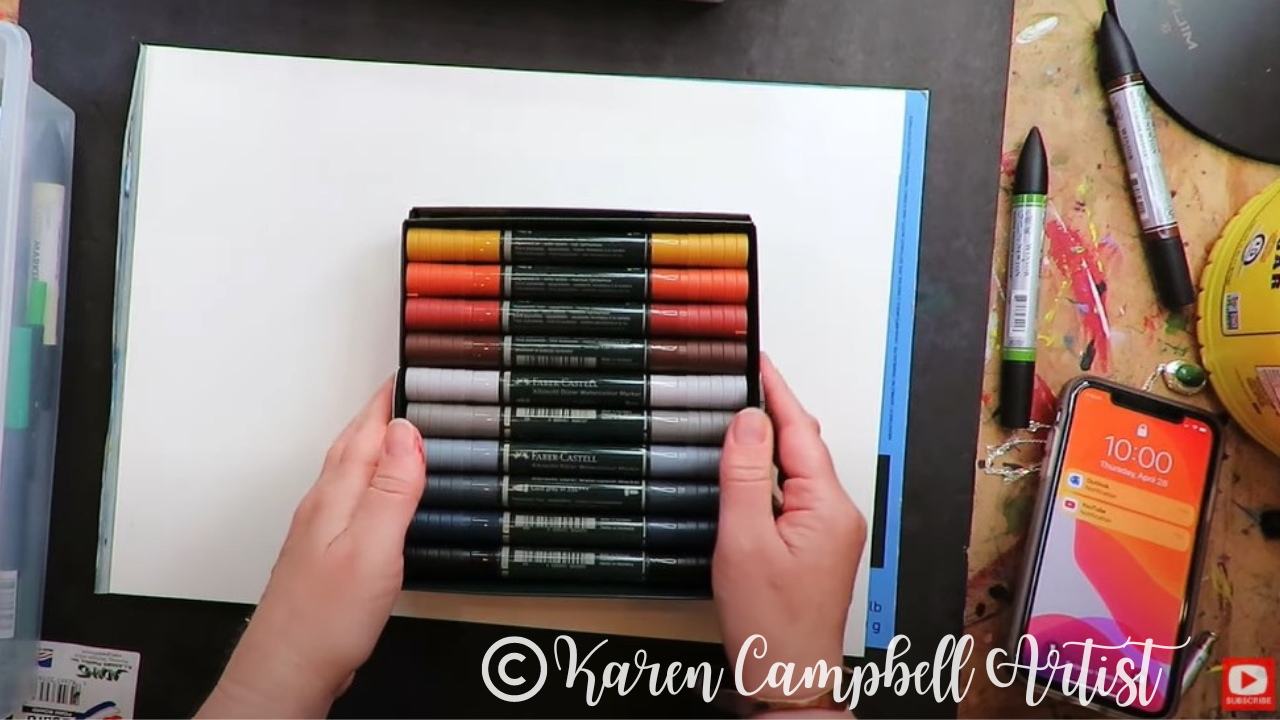
Today I'm unboxing a brand new set of Faber Castell watercolor markers! I've been in love with watercolor markers for my mixed media art projects for years, but only recently discovered Faber Castell makes a GIANT watercolor markers set filled with 30 colors!
Join me in my studio for a full Faber Castell watercolor markers review. We'll test these beauties against my favorite Winsor Newton watercolor markers, and compare their performance against mixed media artist brand favorites made by Ecoline and Tombow. 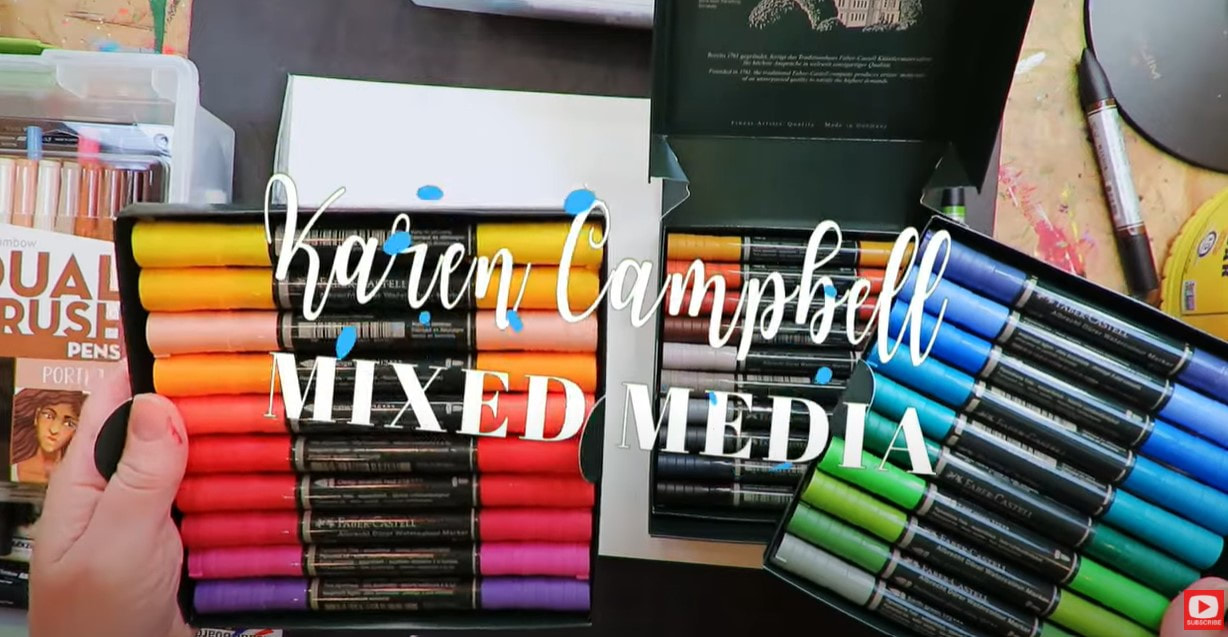
Got a new set of watercolor markers, colored pencils, pens or watercolors? It's SO important to SWATCH your new colors so you know what to expect when each color hits your page!
I've tried to make this process MORE FUN for you by creating a FREE Swatchsheet! Simply click the button below, and I'll send it straight to your inbox. 
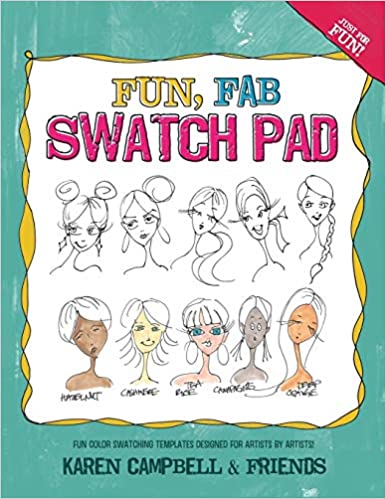
LOVE swatching, and can't get enough?! Check out the book I created with my Facebook Group called The Fun Fab Swatch Pad. This playful book will keep you swatching for days!
Before we continue, super quick announcement: All product links are Affiliate. I may earn a small commission if you choose to order through these links but by law there is never any additional cost to the consumer for doing so. I thank you for your support.
So WHY use watercolor markers in the first place? Control. It's a simple as that! Applying watercolors with a brush and water is a lot looser and can feel a bit dicier and unpredictable for tons of artists. Having the precision of a marker combined with the beautiful effects of watercolor is seriously magical!
I've been in LOVE with my Winsor Newton watercolor markers for years. They're a fine art product, so MUCH juicier, and more pigmented compared to other watersoluble markers on the market. They're also lightfast, which means the pigment is museum quality and the color in your mixed media art projects will stay beautiful FOREVER.
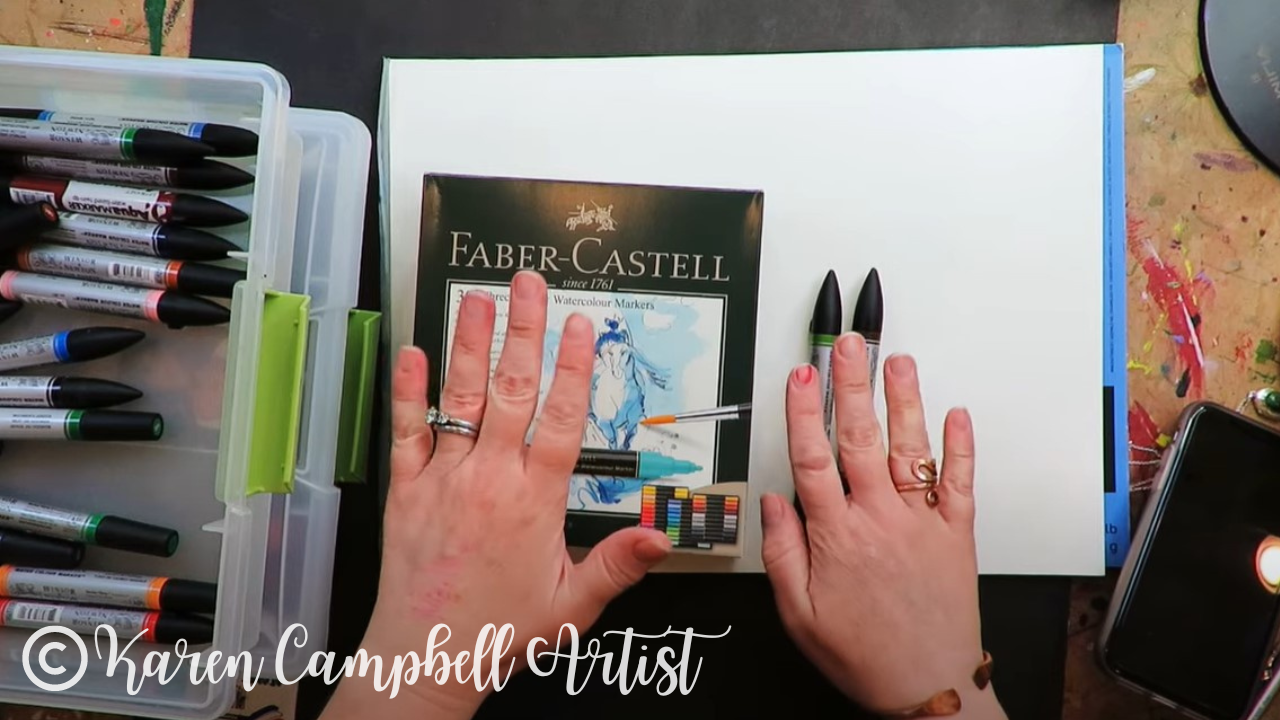
When I discovered this giant box of watercolor markers by Faber Castell, I immediately wondered how they would compare with my Winsor Newtons.
Because I've got mixed media beginners all the way to advanced students working with me over at Awesome Art School, I'm also going to test the Faber Castells against Ecoline Brush Pens and Tombow Dual Brush Pens as well because they're a little more budget friendly. Plus, LOTS of my students have at least a few watersoluble markers by one or both of these brands. 
As far as a cost comparison for Faber Castell Watercolor Markers vs Winsor Newton Watercolor Markers, the Winsor Newtons are definitely more expensive, at around $6/marker - if you buy them individually. They do offer a few sets of 12 (check out my Amazon shop), but costs can vary up to $90/set!
The Faber Castell Watercolor Marker Set of 30 isn't cheap by any means, but you get 30 colors for less than $100 (current Amazon price is $94) - so you're getting a bigger bang for your buck!
As soon as I opened the Faber Castells, right away I noticed a skin tone watercolor marker! This got me SUPER excited, because I don't have one of these in my Winsor Newton Watercolor collection. I can't wait to play with that one for one of my mixed media faces!!
I also noticed I've got five gorgeous blues, five beautiful greens , and an awesome set of six grayscale shades to play with. I LOVE my Grayscale Tombow Dual Brush Pens set, so the Faber Castell version will be really fun to try out too.
The first thing I like to do when I'm comparing mixed media art supplies in any category is to see how juicy and vibrant the pigment is. How the colors look on my paper, and how much coverage I can get QUICKLY are both really important features to me.
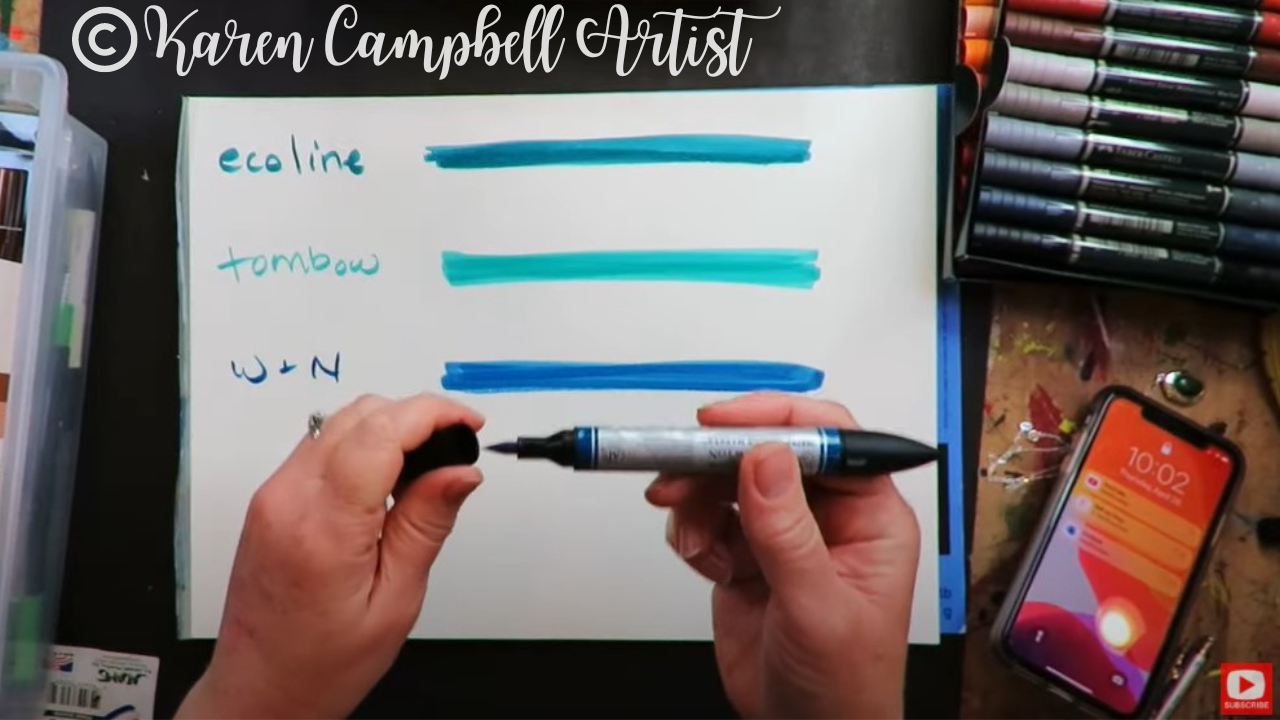
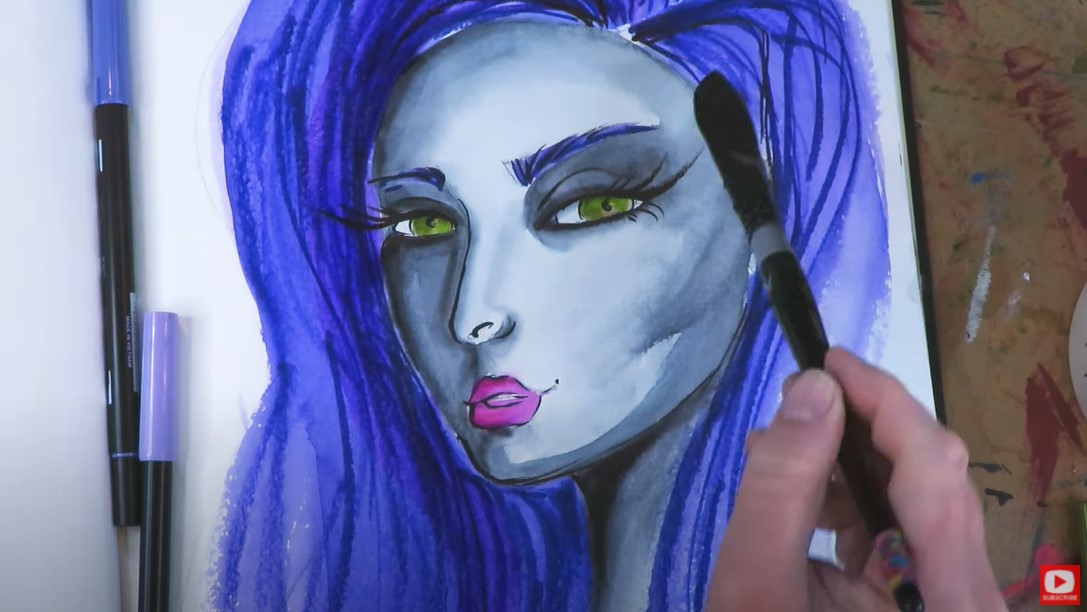
All of them have decent coverage and the shades of blue I'm testing are all beautiful. But as soon as my Winsor Newton watercolor marker hits the page, I can immediately tell a difference. I felt a similar juiciness from the Faber Castell watercolor marker as well. Both beat out the Ecoline and Tombow brands here, hands down.
Before I tested the watersolubility factor on each of these brands, I decided to dry the page completely with my hair dryer to see how each brand activated with water when dry.
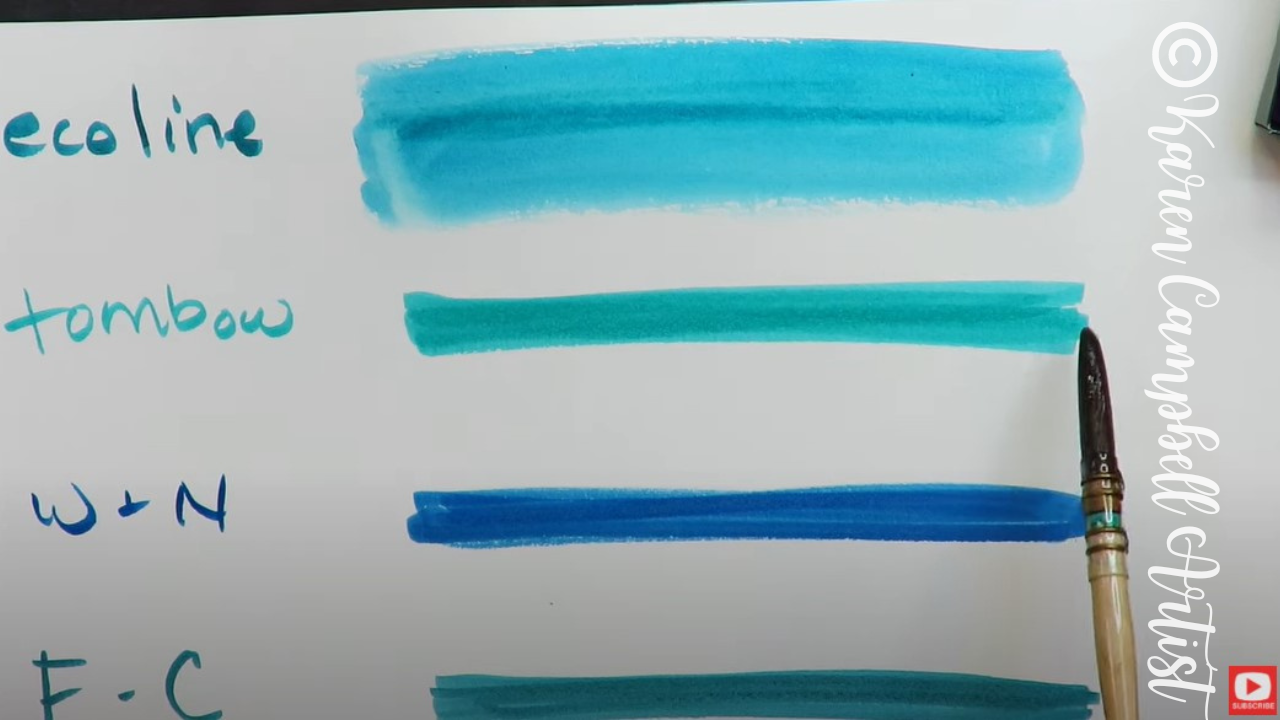
I used one of my favorite Polina Bright watercolor brushes to activate each line with water.
If you're new to Polina's watercolor brushes, you're in for a treat. They hold SO much water and are amazing. They are now the only watercolor brush I use. If you're interested in learning more about these, here is a recent product demo video and full Polina Bright watercolor brushes review. 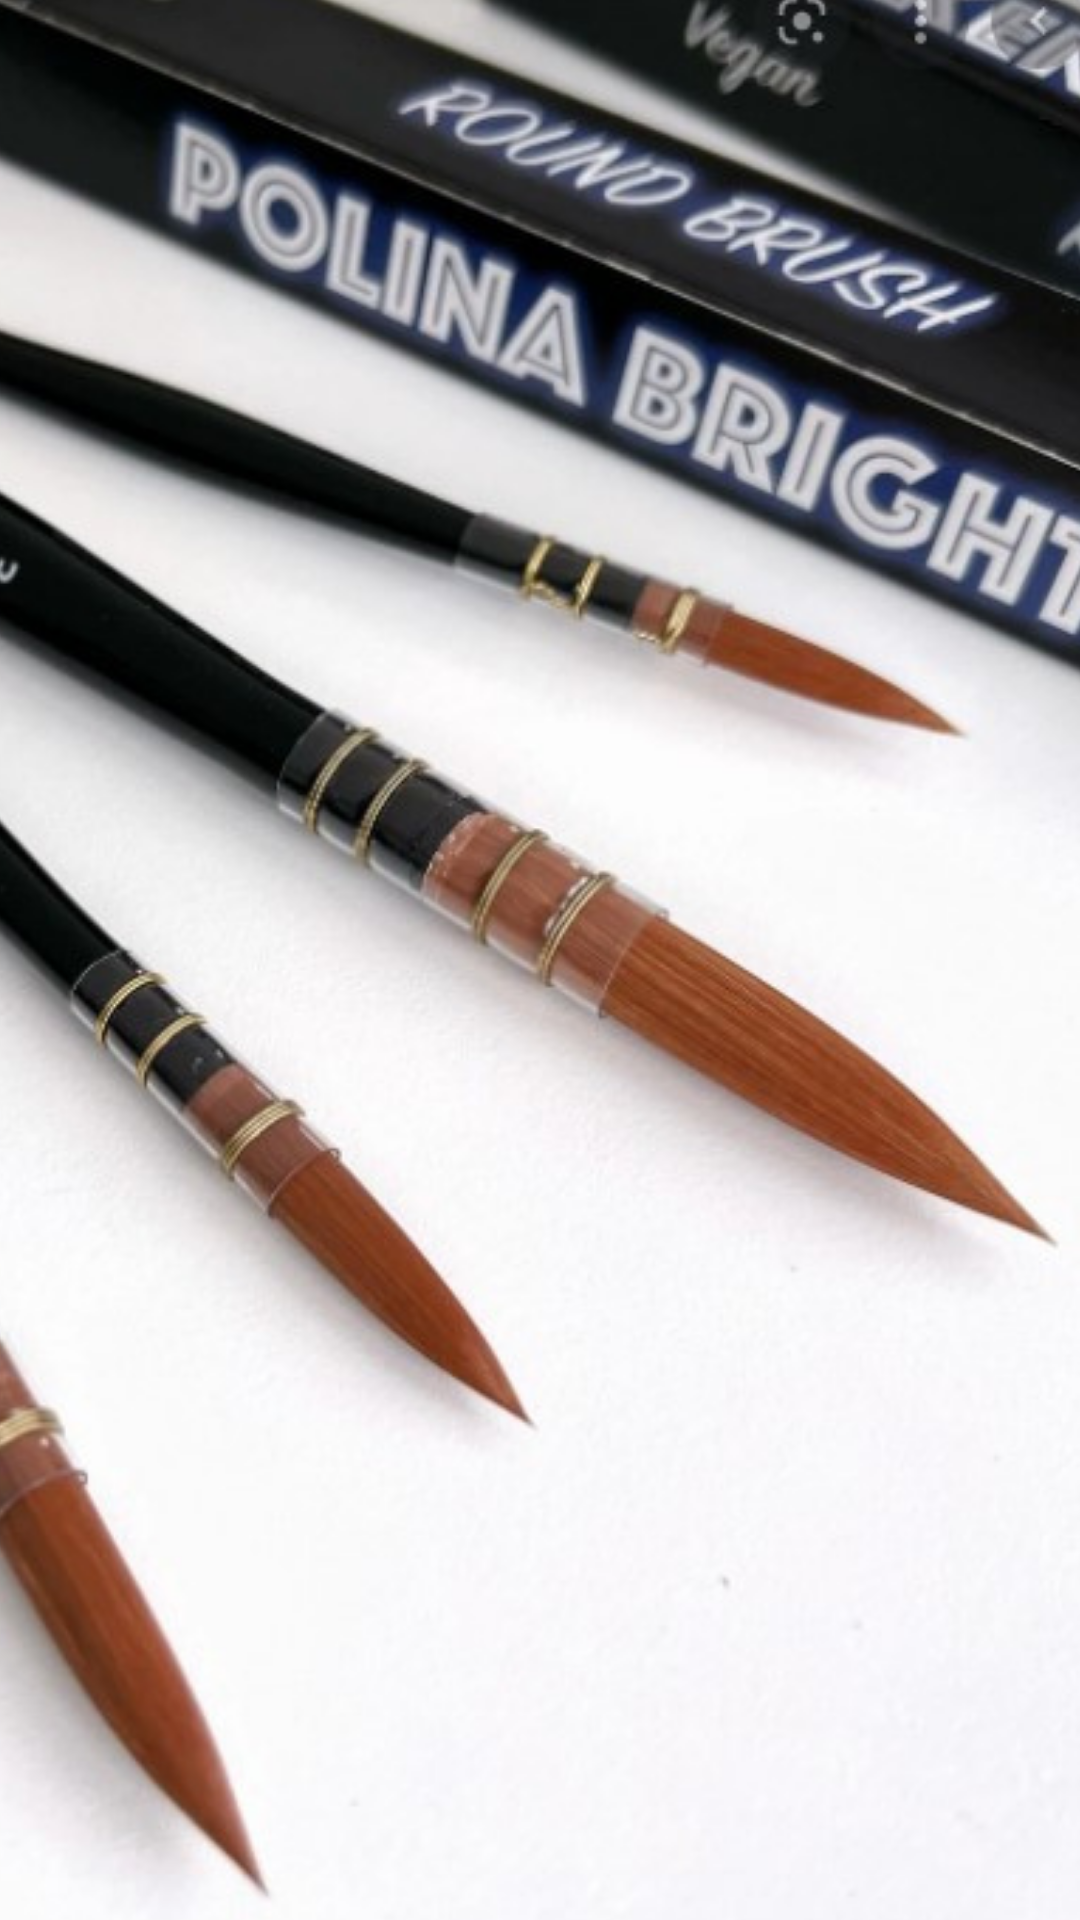
If you'd like to pick up your own Polina Bright watercolor brush or set, Polina has offered a 10% discount to my followers, so be sure to use this link when you shop! If you do order anything here- just a quick fyi, Polina is located in Australia so shipping may take a bit more time, but I promise, it's well worth the wait!
If you're new to Polina Bright - her art is simply fantastic, so be sure to look her up to see the gorgeous faces she creates as well. 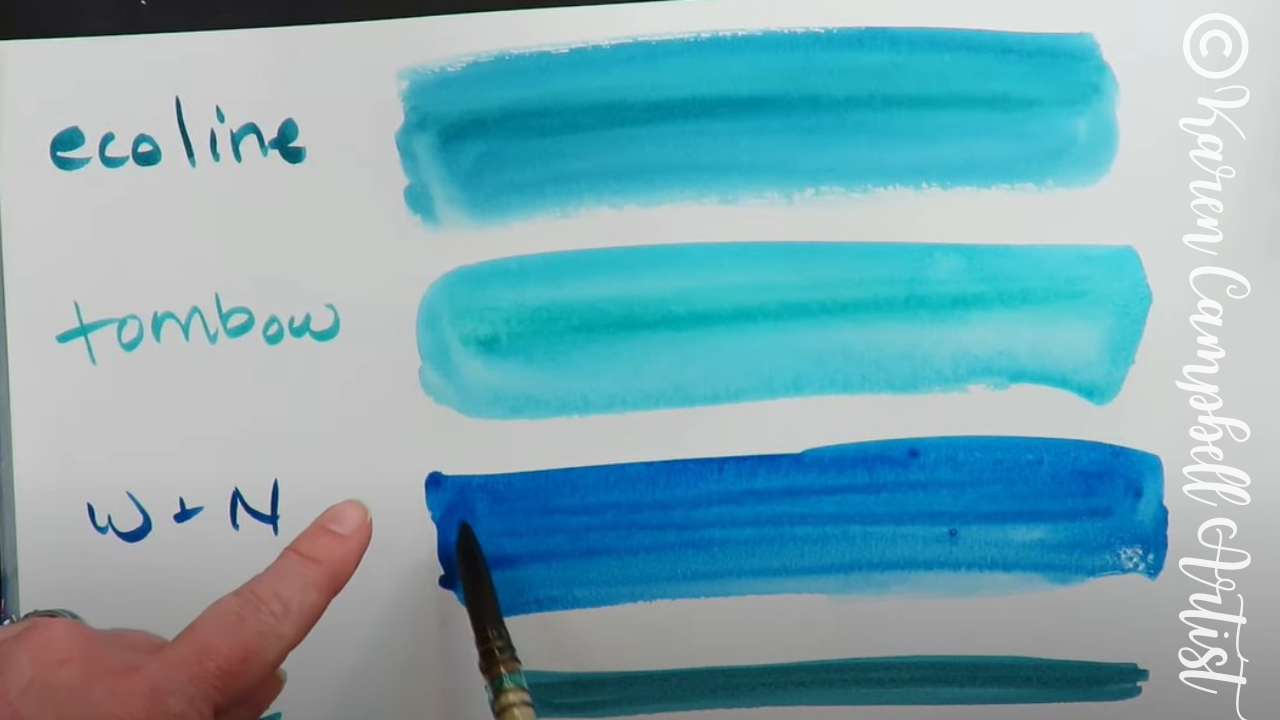
As you'll see in today's video, when I activated the Winsor Newton lines on my paper, I got such a rich effect. Plus, you'll notice I was able to fully disolve my original lines once I added water.
Both the Ecoline and Tombow activated beautifully too, but their original lines did NOT disolve as much as the Winsor & Newton and Faber-Castell lines. If this is a feature that's important to you, you might want to skip Ecolines and Tombows. 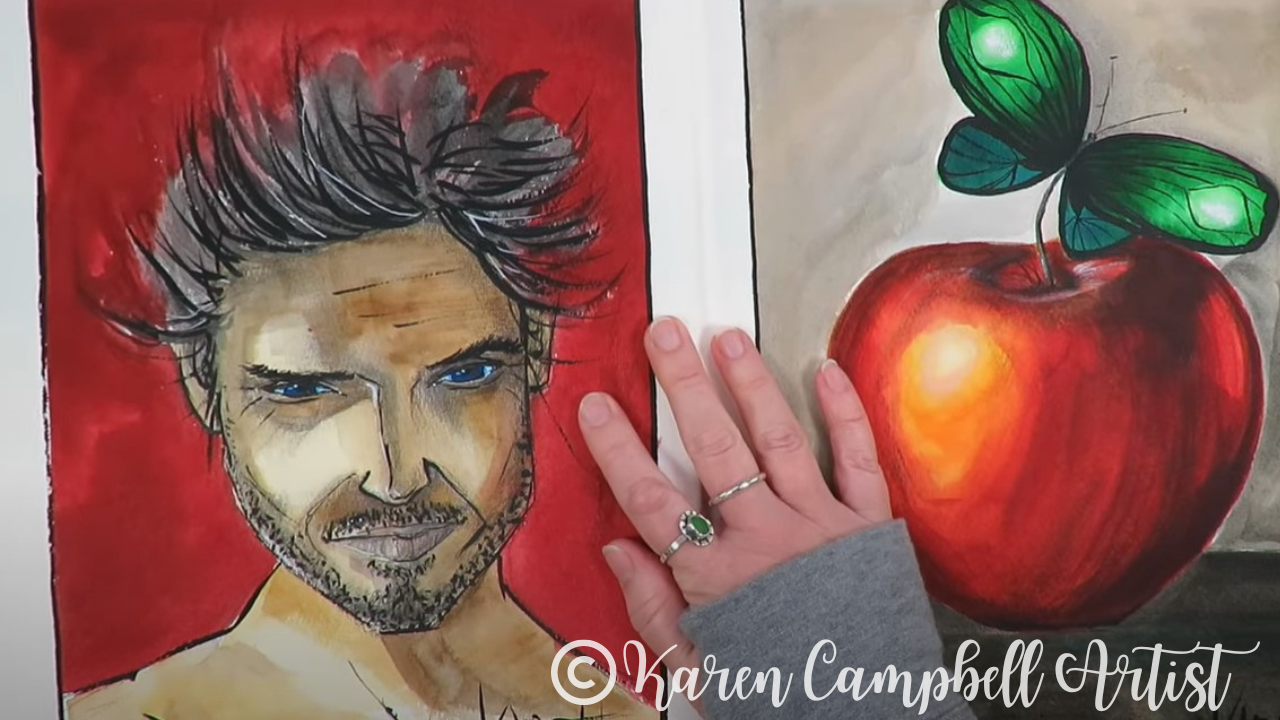
I also noticed a bit of granulation in the Faber Castells as well. Granulation is super common with watercolors becuase the pigment is typically made from minerals. This effect is something you won't see in a synthetic, dye based watercolor marker like Tombows or Ecoliners, and is something I LOVE about watercolors in general.
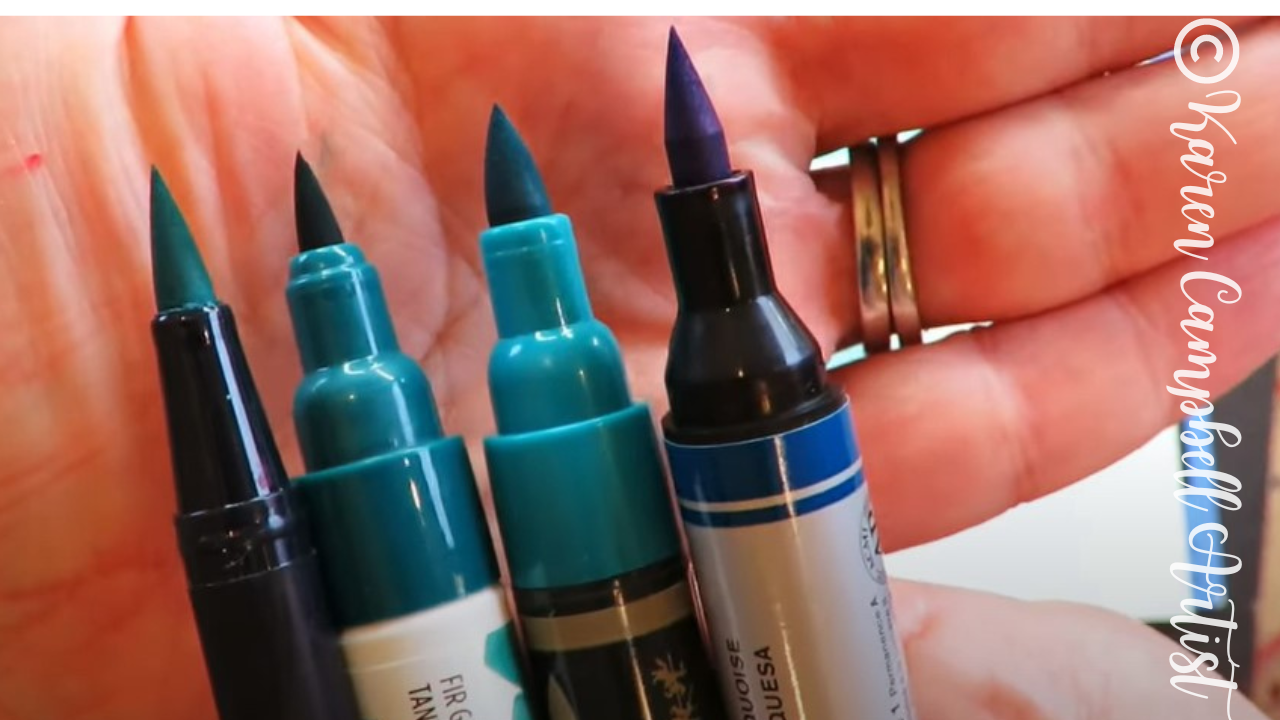
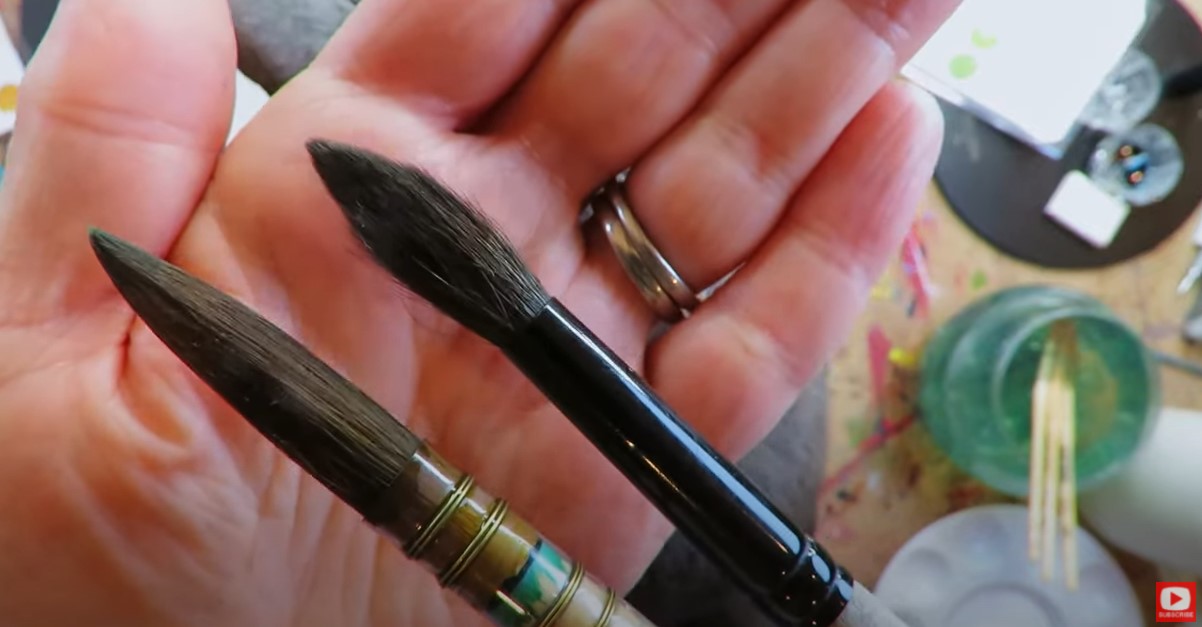
Here's what the brush nibs of each marker tested today look like side by side (above). I have to say they're all pretty comparable. Faber Castell has the widest nib (third from the left), while Winsor Newton's (far right) is both wide and long.
I felt the Winsor Newton nib was most flexible, and therefore felt most like a paint brush. The Faber Castell nib felt more like a felt tip or typical marker, and had zero flexibility.
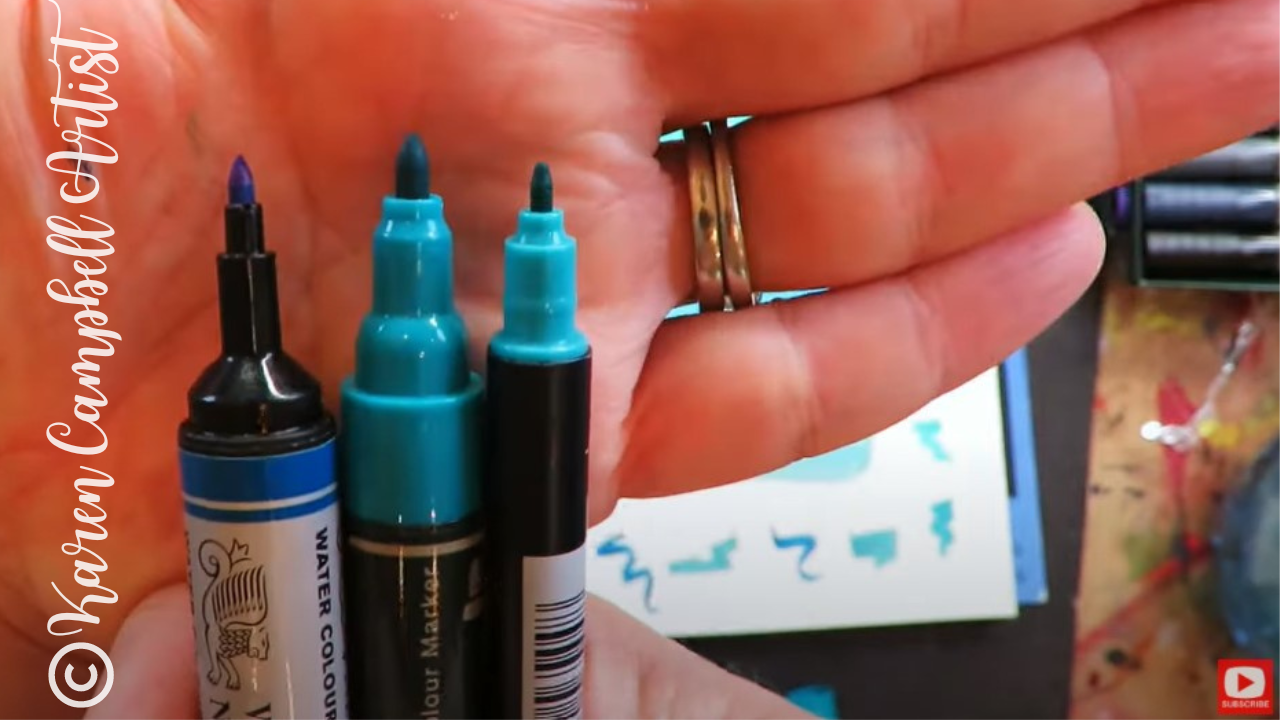
When comparing the bullet nibs from each of the markers tested today, they're also quite comparable (below). I rarely use this side of my dual brush pens or markers, but if this is something you're curious about, here's what they look like (excluding the Ecoliner, because it doesn't come with a bullet nib).
I hope you found this info helpful. Make sure you click over to the video to see everything in action!
See ya back here next week with lesson six of my FREE #50FunFabFairies drawing challenge!
Thanks for hanging out with me today!
❤️ CHECK OUT ALL my art books on AMAZON ❤️ MY FAVORITE ART SUPPLIES on AMAZON ❤️ MY BELOVED FACEBOOK GROUP ❤️ FOLLOW ME ON INSTAGRAM
0 Comments
WHAT IS GOUACHE?! How to Use it in Mixed Media Art + Gouache Alternatives for Matte Finish Lovers!8/6/2022
What is GOUACHE anyway?! I get asked about the meaning of gouache all the time by my mixed media beginners. In today's mixed media art supply demo, I'll show you WHAT gouache is, explain WHY mixed media artists might want to use it, plus give you a demo of my favorite brands and gouache alternatives for EVERY budget.
If you've been searching for a gouache definition, info on gouache vs acrylic, gouache vs watercolor, or simply want to know about ALL the supplies - today's video is FOR YOU!
Are you new to mixed media art, or just wanna learn more about mixed media art supplies so you can create mixed media masterpieces instead of a hot mess?! You're in the RIGHT PLACE!
Simply click the button below to grab my FREE Supplies Guide! 
Need a video of me explaining the Supplies Guide in Action, after you print it out? I've got you!!

Before we continue, super quick announcement: All product links are Affiliate. I may earn a small commission if you choose to order through these links but by law there is never any additional cost to the consumer for doing so. I thank you for your support.
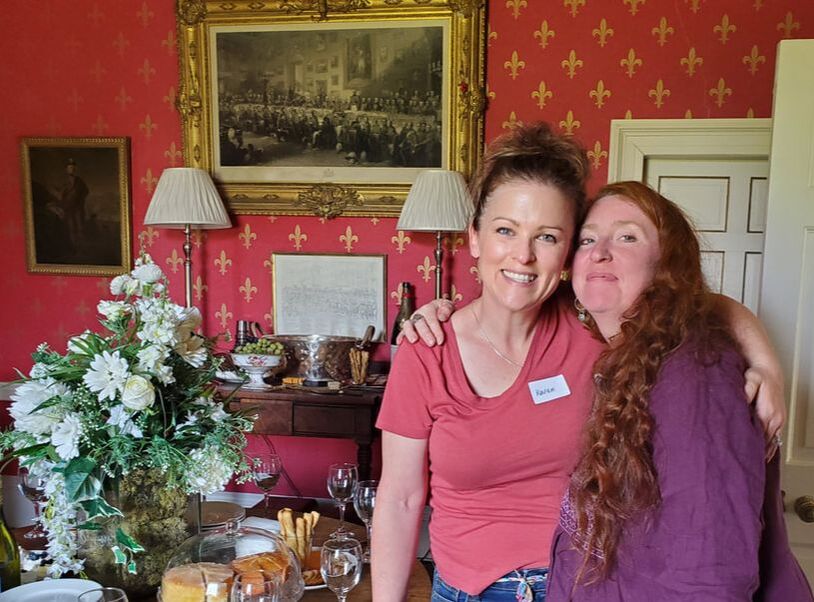
Everything I know about gouache, I've learned from my Scottish bestie, artist, Lucy Brydon (top right - that's us just a few short weeks ago, moments before we opened the doors to Wardhill Castle for our 2022 Castle Art Retreat!).
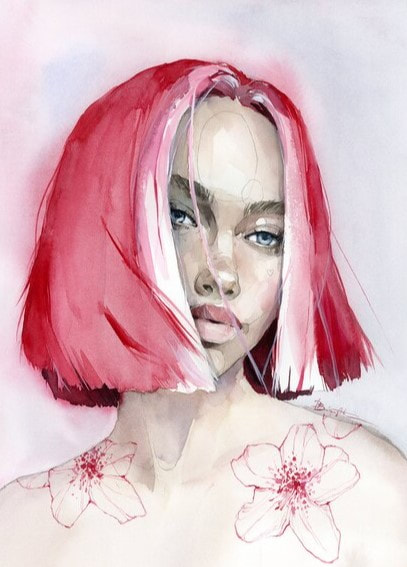
Lucy is truly a gouache artist! She loves painting portraits, animals and doing goache flower painting in the backgrounds of her work. Take a look at this recent piece she did of her dog, Miso! Isn't this gorgeous?! 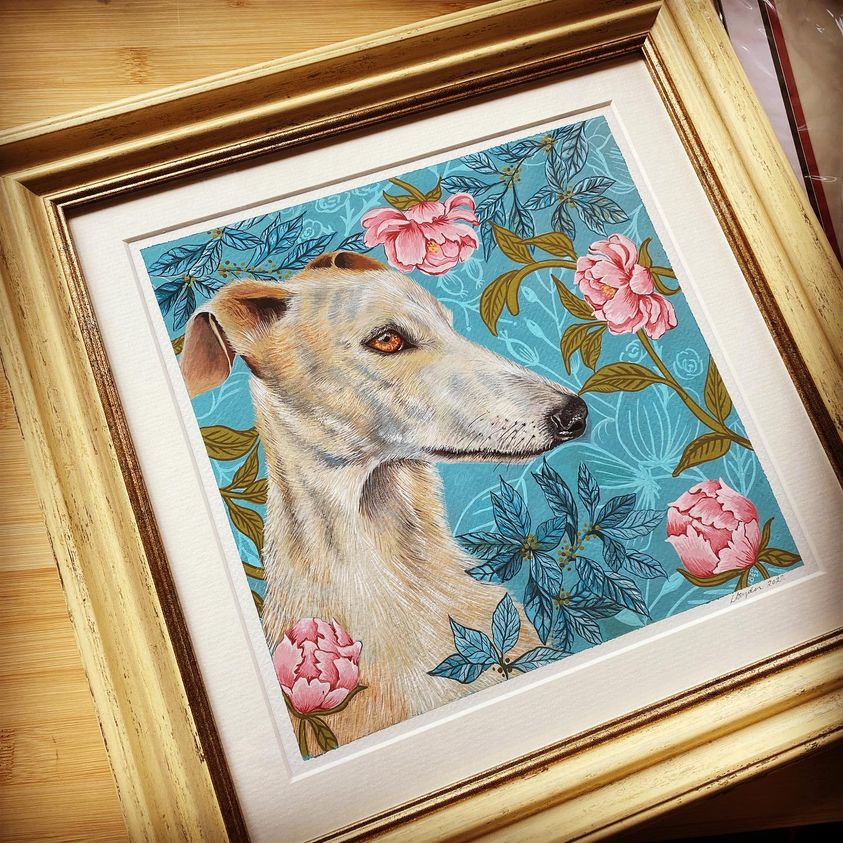
If you look closely at Lucy's piece above, you'll notice there's no sheen to her paint, and it's very opaque. You might even guess that the painting was done in acrylics, but it wasn't, it's gouache.
Time for a quick gouache definition... Gouache is a watercolor that is totally opaque, and very, very matte. Take a closer look at the red background on my gouache portrait painting on the left, or the blue hair and skin tones in my girl on the right. This is the look gouache can help you achieve in your mixed media art projects. 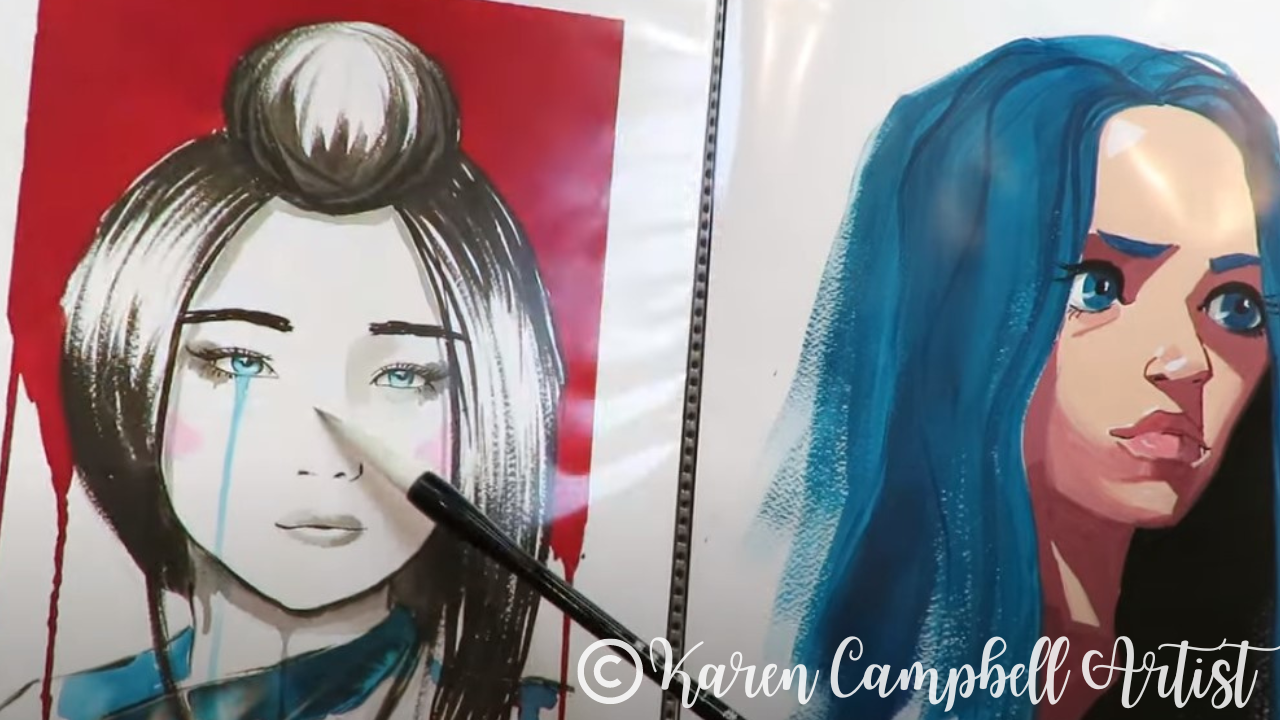
Lots of students wonder about gouache vs acrylic paint. If you like a matte look, and that's really all you're after, why not just paint with acrylics?
Gouache doesn't behave like acrylics. Because it's actually watercolor, it's highly water reactive, it will keep reacting when water is added. This is really important to understand, because if you're working in layers, whenever you add a new layer of gouache on top of a previous layer, you can easily reactivate your bottom layer. Lots of artists love playing with these effects, but in case that's not YOU, stay with me, because I've got gouache alternatives to share with you today! 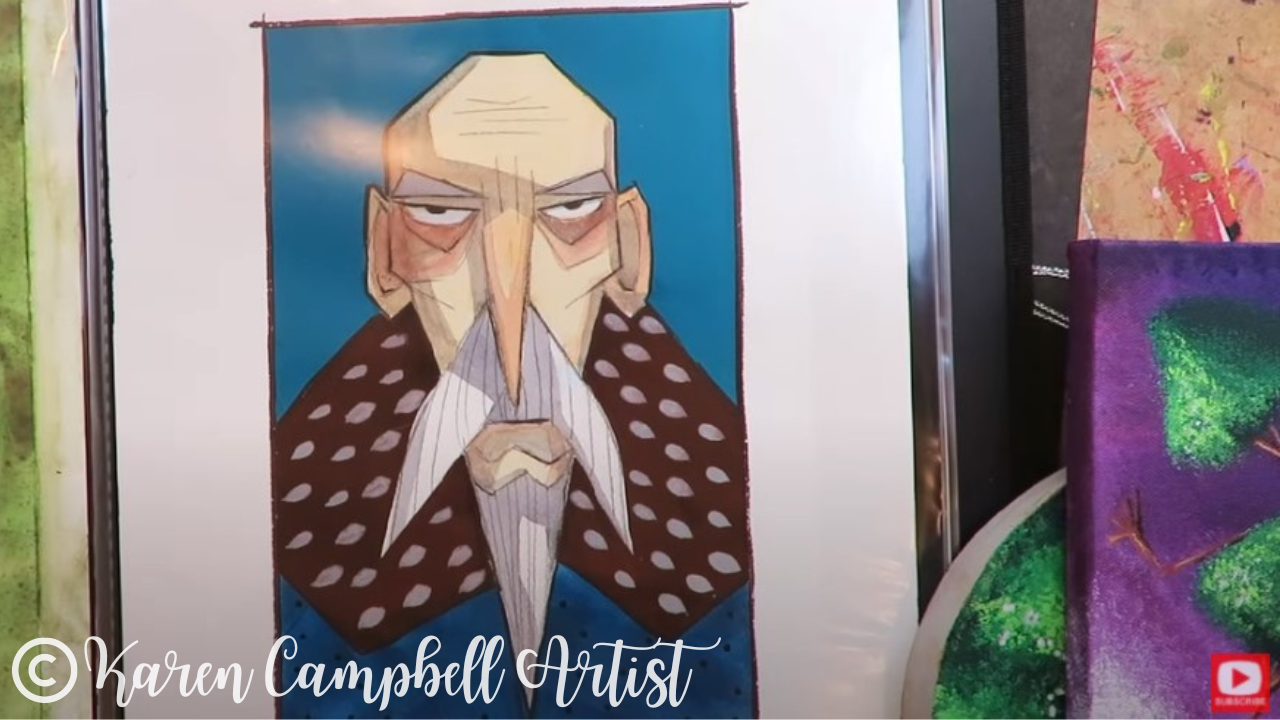
Before I get to today's demo, there are two other things you need to know about gouache...
1. Gouache works beautifully on ANY surface from cheap watercolor paper to wood or canvas (yup, I've tried them all!) 2. You DON'T need a a special gouache brush to work with this medium. In fact, I use my cheapies, because gouache texture is a thicker consistency than watercolor, but not quite as thick as acrylics. Choose a brush that is kind of inbetween a soft watercolor brush and a stiff acrylic paint brush. I recently found this brush set on Amazon for $7, and they're perfect for gouache! 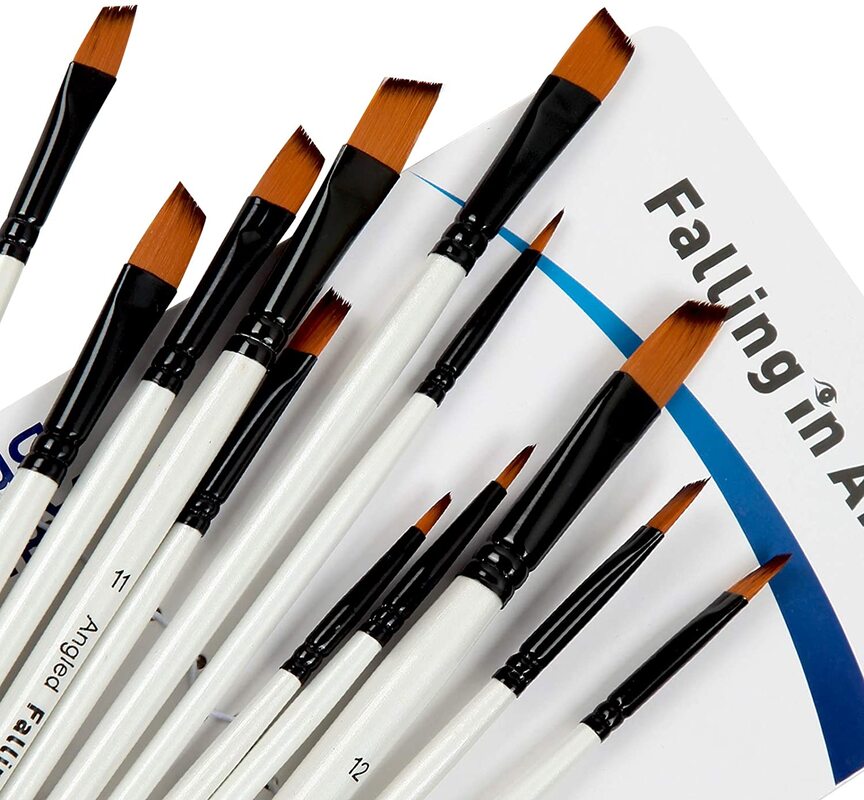
Let's get to the demo. First I'm swatching a square of of red guache by Turner Design. I found this brand at my local Jerry's Artarama for about $15/tube.
In general gouache can get expensive, so if you're chasing that gorgeous matte look, stay with me to see how you can achieve that from a number of cheaper gouache alternatives. 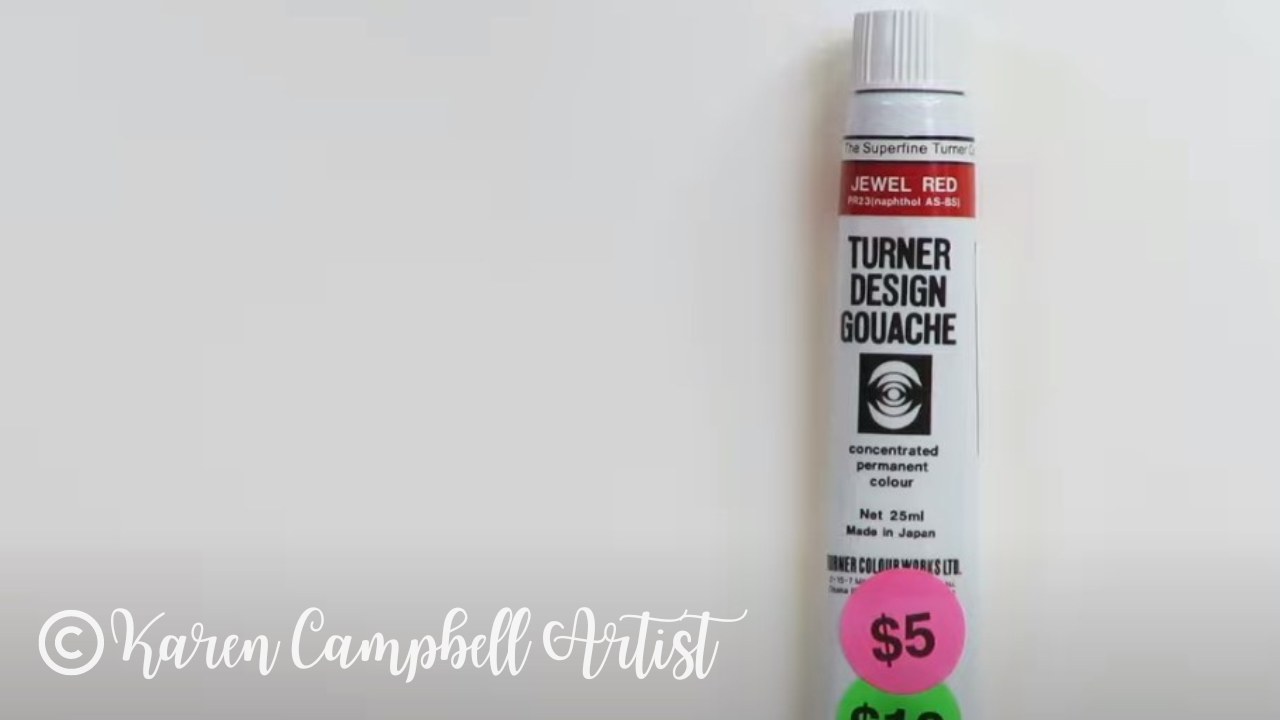
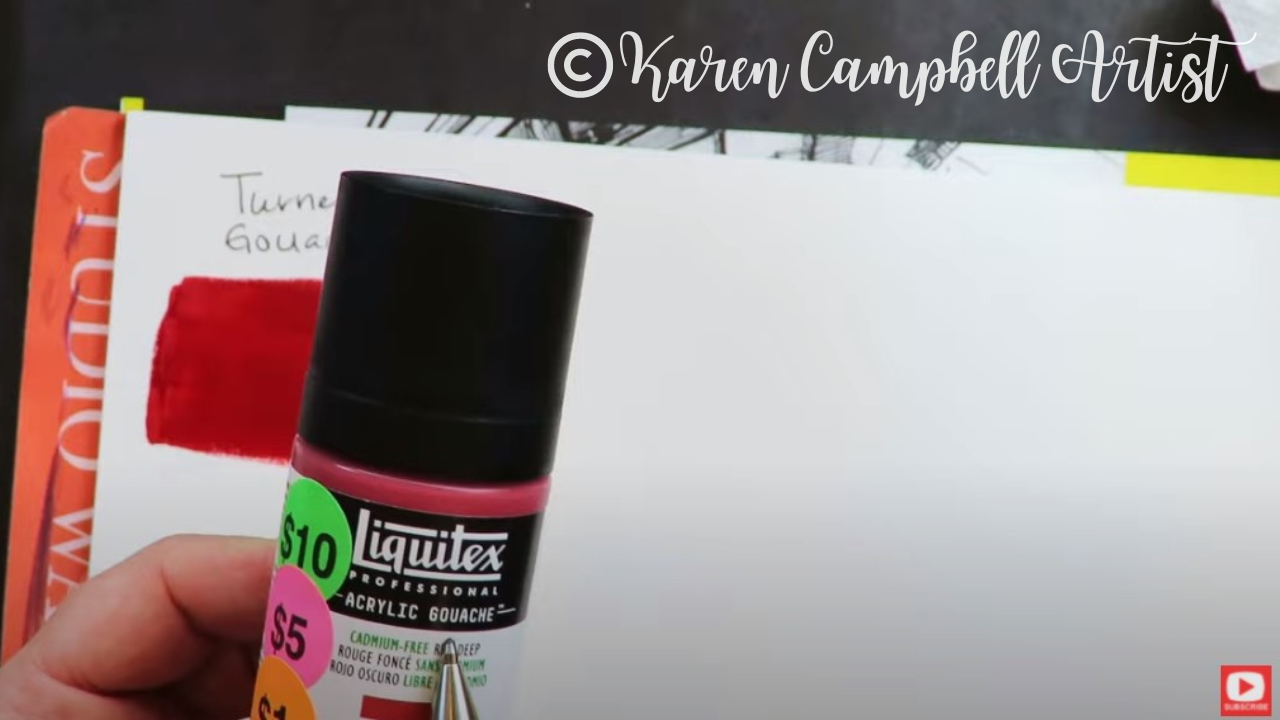
The next product I'm testing today is an acrylic gouache by Liquitex. Since this is an acrylic paint, it's NOT water reactive, which some artists prefer. If this is you, you might want to consider trying a bottle (also around $15/color).
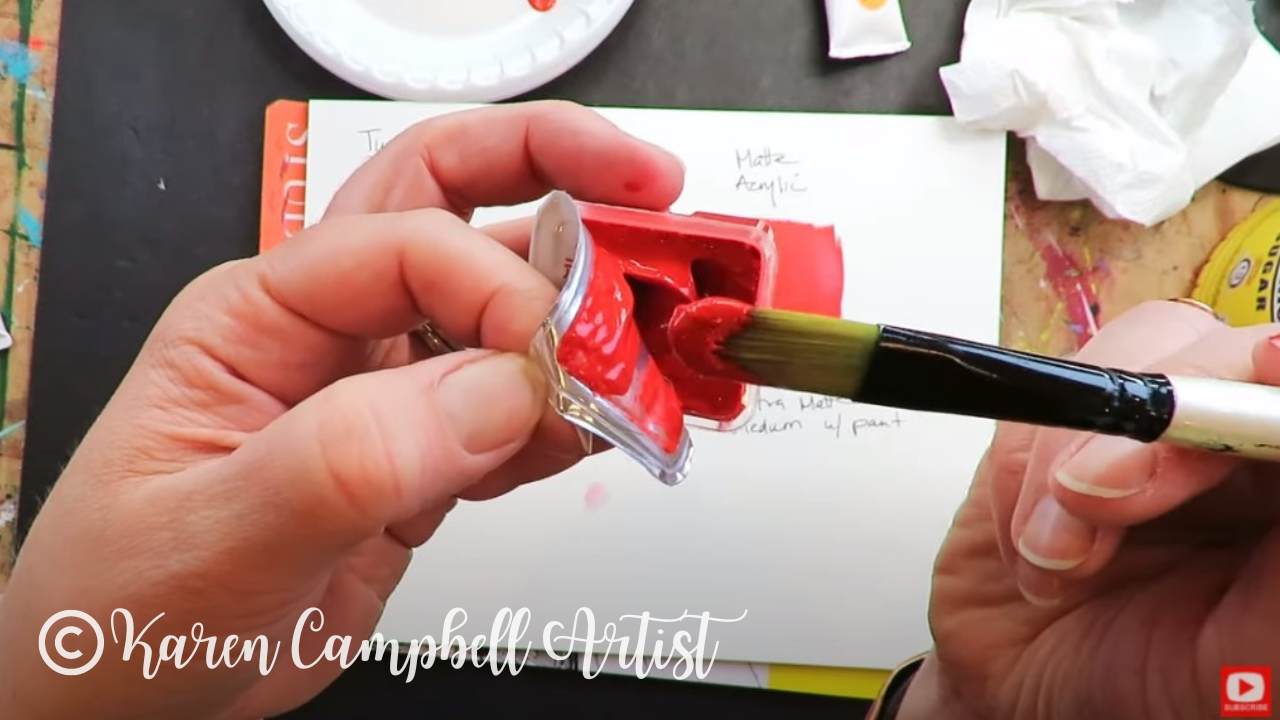
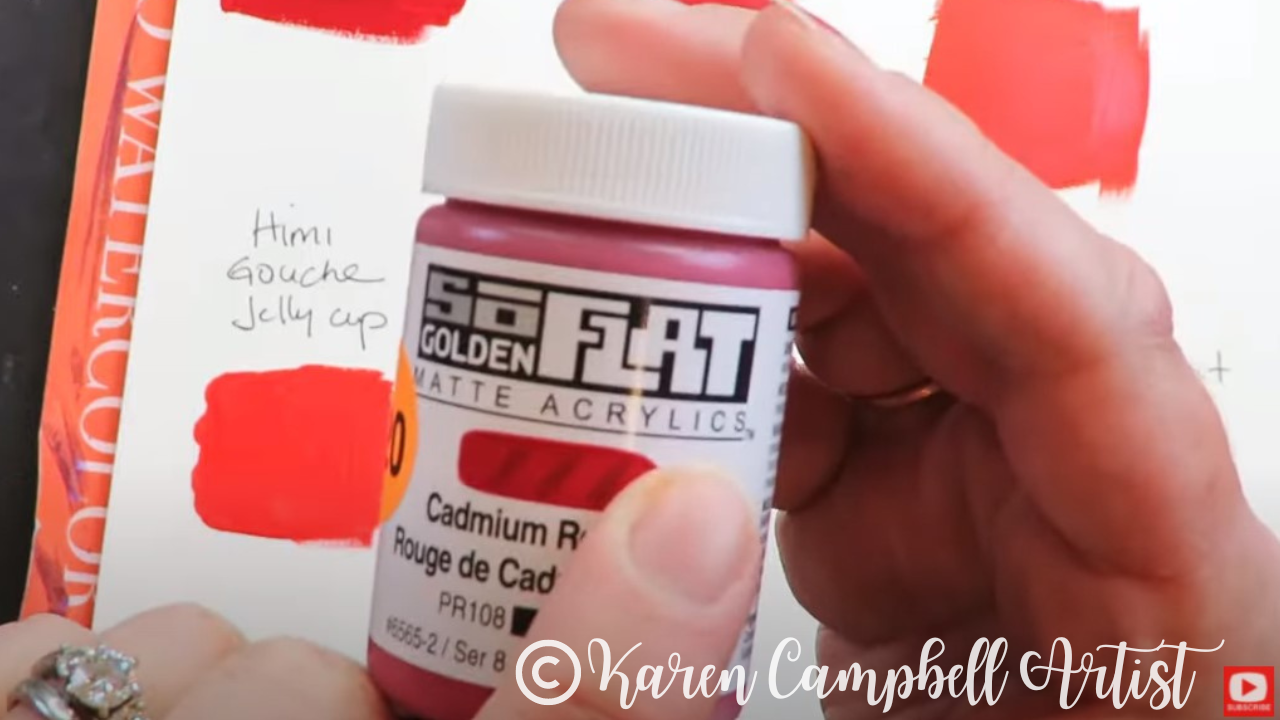
If you're in the mood to play with a watercolor gouache and don't want to spend a ton of money, check out Himi gouache. These are super interesting gouache "jelly cups." I purchased a set of 50 shades, for about $50. This type of gouache is very thick in consistency.
In case you DON'T want water solubility, Golden just came out with a line of "flat" acrylics. They're pretty pricey at $20 for a tiny jar, but if you compare it to the other brands of gouache and gouache alternatives I tested today, it's amazing quality for a matte finish, and I can't see any of my brush strokes like I can in the rest of today's swatches.
Another great "cheat" you can try if you're after that look of a super matte finish, is mixing your acrylic paint with matte medium. Now, if you're in my world, you know I use matte medium ALL THE TIME in my mixed media art projects as a type of glue for my collage because it's got great adhesive properties and is made to work with acrylic paint (which I typically use OVER my collage layers).
I recently discovered this "ultra matte" version of matte medium by Liquitex, and decided to test this out today mixed with a little acrylic paint to see how it compares to our other options. 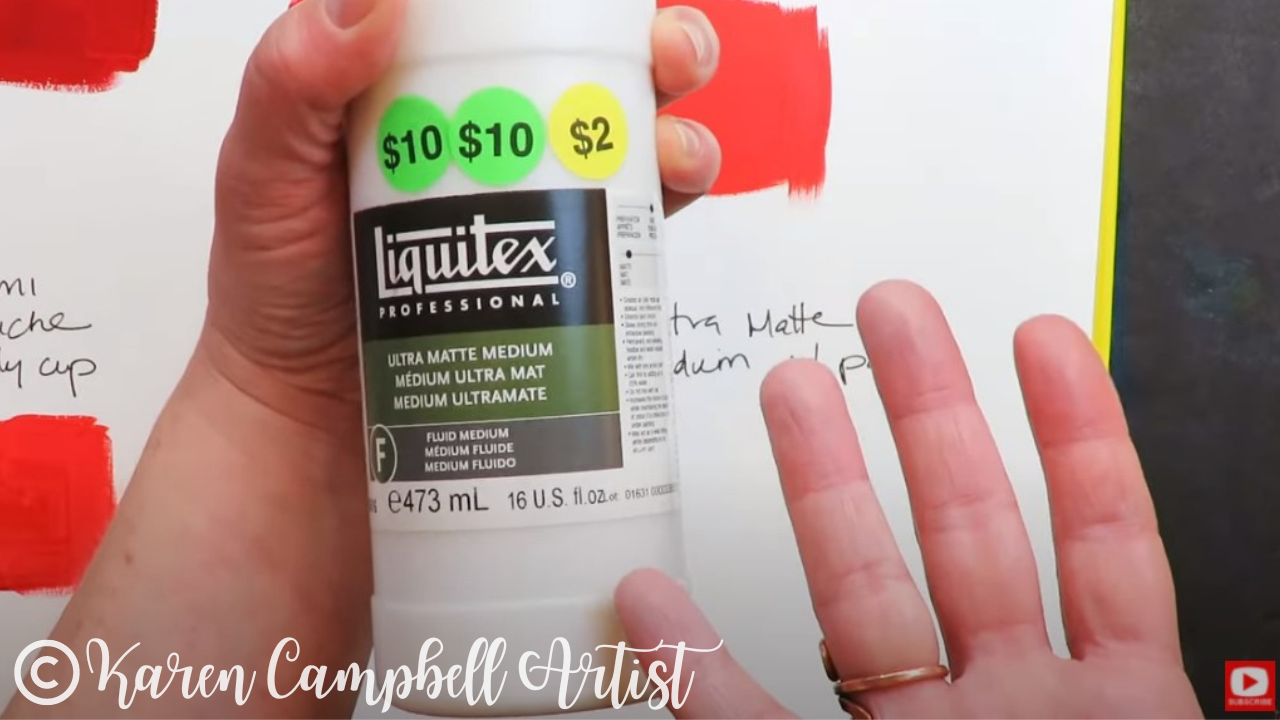
In terms of opacity for the variations I tested today, Golden's So Flat line is definitely a notch above the rest. I can't see a single brush stroke line, so if this is the look you're after, and you can pay around $20/tube for it- I highly suggest choosing this one.
The Mattise Matte Acrylic is a runner up for me in terms of opacity, but still fairly expensive at $15 - 20 /tube. 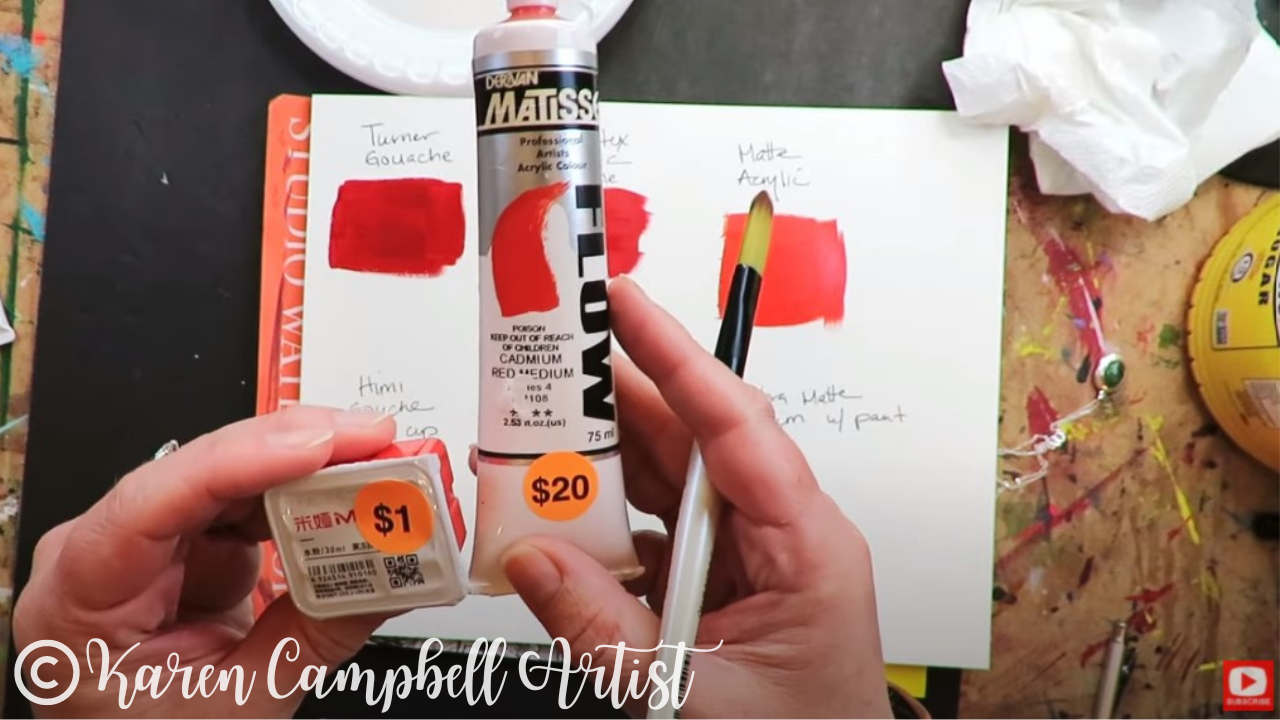
The least opaque variation I tested today were the Himi gouache cups. These are also the cheapest option, and we all know you kinda get what you pay for. However, if you just want to experiment with gouache and love lots of color options for $1-2 / color - gouache jelly paint is your best bet.
If you're looking for a higher quality gouache, pretty much all the higher fine art brands carry them.I love this one (not tested today, but I often use this Winsor Newton Permanent White Gouache to add highlights on top of my watercolor pieces). 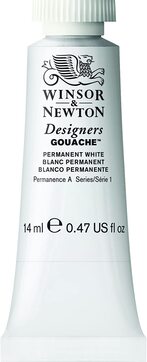
If opacity is what you're after, and you don't care about activating your matte layer with water, I highly suggest you consider one of the gouache alternatives I tested today - either the Liquitex acrylic gouache or Matisse Matte acylic. I think you'll be super happy with those!
Or, for even LESS of an investment, you can pick up a bottle of Liquitex Ultra Matte Medium for around $22. It will last you forever, and you can experiment with adding it any shade of acrylic paint or craft paint you already have on hand! Make sure you click over to the video to see each of these gouache and acrylic alternative options side by side to see which one YOU might love most! Do you LOVE fairies and fantasy art? I'm currently running a FREE drawing challenge called #50FunFabFairies over on my YouTube drawing channel. Literally thousands of other artists - from beginners to advanced, are playing along. I set up a FREE classroom for the participants over at Awesome Art School. Come join in the fun!!
I've been using Polina Bright brushes in ALL my watercolor and fountain pen ink paintings for the past TWO YEARS!
I know I've told you I'm obsessed with both Polina's art AND her watercolor brushes, but I just got her latest watercolor brushes set & thought you'd love to see the unboxing! If you've been on the hunt for the best synthetic watercolor brushes, or an excellent watercolor brush set for beginners that you can GROW with - today's video is a MUST SEE!! 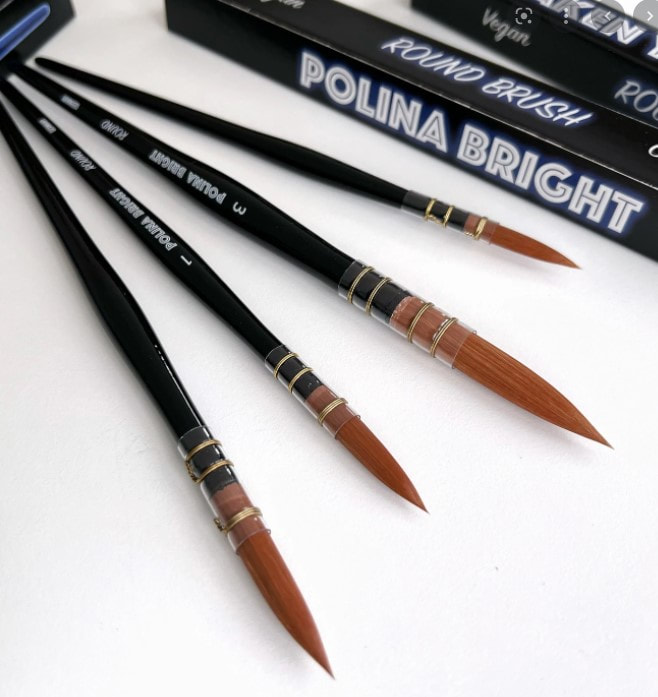
If you're new to watercolor, or have a brand new watercolor palette, make sure you grab my FREE Swatch Sheet so you can swatch your watercolors out before you do your next painting. Simply click on the button below, and I'll send it straight to your email!
Before we continue, super quick announcement: All product links are Affiliate. I may earn a small commission if you choose to order through these links but by law there is never any additional cost to the consumer for doing so. I thank you for your support.
I first purchased Polina Bright's watercolor brushes a couple of years ago just because I love her work (example below), and wanted to support her. I had no idea I would fall so in love with her brushes, or that they would become my absolute favorites for watercoloring and mixed media painting with fountain pen ink, water soluble pencils, pens, markers- you name it!
If you're interested in buying any of these watercolor brushes to try out yourself, Polina created a coupon code for all of my followers. You can SAVE 10% when you purchase brushes on her website. Simply enter the coupon code of my name in all caps, KARENCAMPBELL at checkout.
I used to only be a fan of watercolor brushes with natural bristles (like those found in Black Velvet brushes - at right below), because of their ability to hold MORE water than synthetic brushes.
Whatever synthetic material Polina uses to create these brushes, holds water extremely well. I think their ability to absorb so much water also has something to do with the shape of her bristles and their length.
The body of the bristles are about twice as long as those of the Silver Black Velvet brushes (above left).
Having a synthetic bristled brush that has the same absorbency as a natural bristled brush hasn't really been a thing in the world of commercial watercolor brushes, until now. 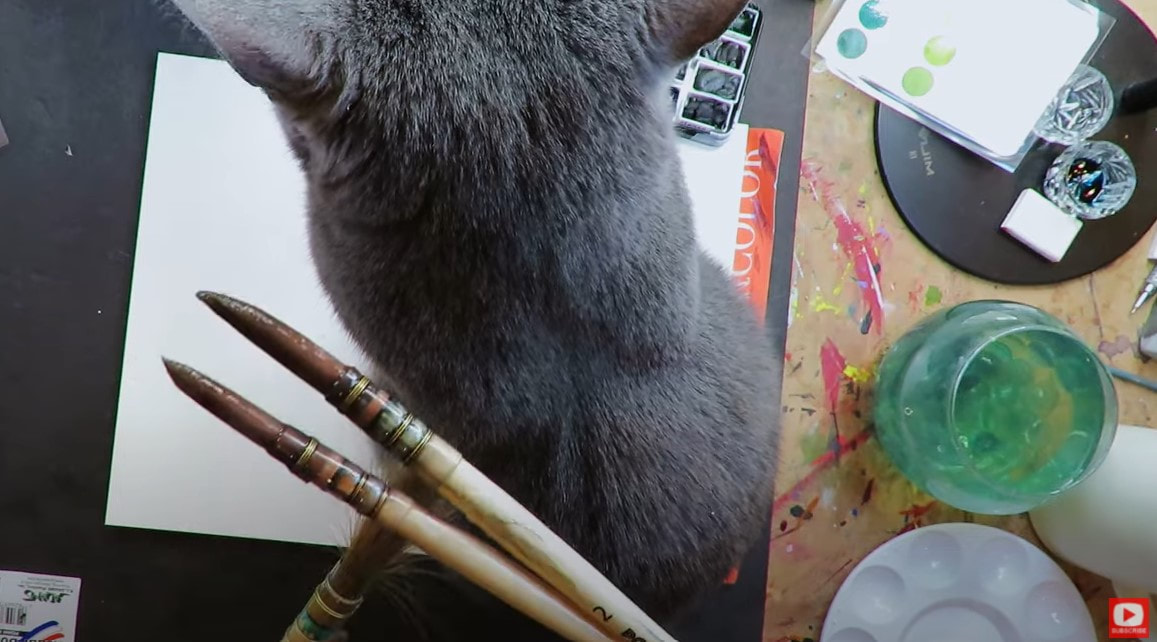
As an animal lover, I REALLY love the fact that the bristles on Polina's brushes are vegan and cruelty free.
I also love things that are simple to identify. Polina's numbering system for her brushes just go from 0-3. Plus there is a "mop brush" (for laying down large swaths of color), and a "rigger brush" (for detail work). Easy! 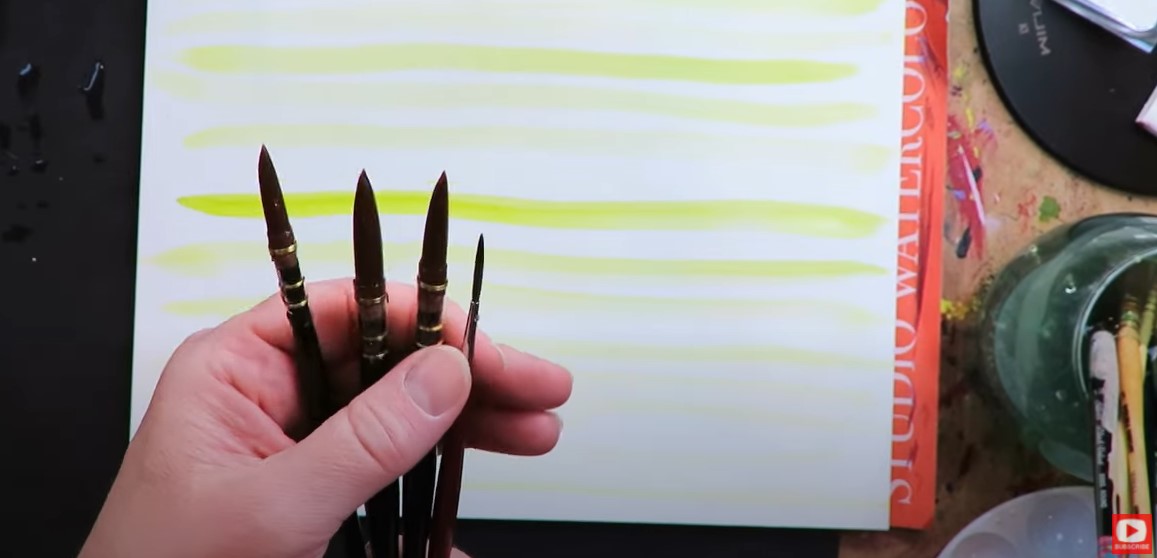
Hop over to the video to see these beauties in action! I demo a quick comparison against a Silver Black Velvet watercolor brush.
Then, if you're in the market for a new watercolor brush set -make sure you take the coupon code of my name in all caps (KARENCAMPBELL) either to Polina's website to get 10% off! Thanks for hanging out with me today! ❤️ CHECK OUT ALL my art books on AMAZON ❤️ MY FAVORITE ART SUPPLIES on AMAZON ❤️ MY BELOVED FACEBOOK GROUP ❤️ FOLLOW ME ON INSTAGRAM
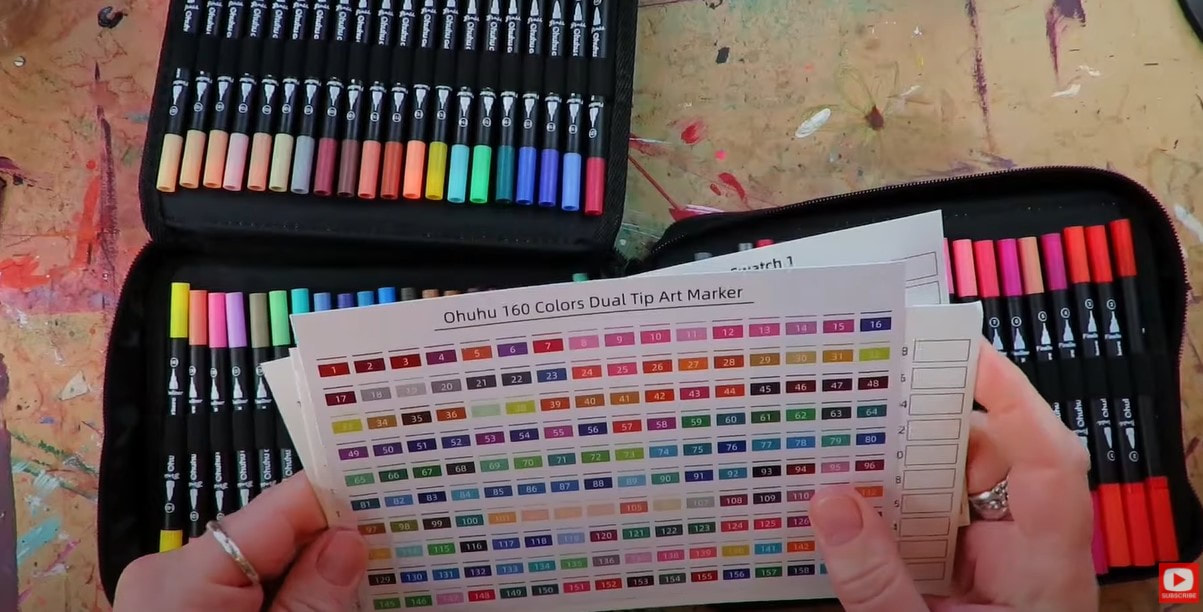
Today's water soluble markers showdown puts Ohuhu water based markers to the test! How do they compare to SEVEN other water soluble brush pens and fineliners in price, color selection and quality?
Out of the box, my Ohuhu marker set of 160 provides a gorgeous array of colors, and the price per marker can't be beat! But will they provide the watercolor painting effect I NEED from a water based marker?
Whenever I get a new art supply with multiple colors - whether that's a new set of markers, watercolors, etc. - I ALWAYS swatch them out. That's because I learned the hard way that the color on the cap, tube or bottle often doesn't really look like what ends up on your paper. TRUST ME. Now my rule of thumb is to ALWAYS swatch.
I actually made a cute FREE swatch sheet for you to download to make your swatching a bit more fun!! Simply click the button below to grab your FREE swatchsheet and I'll send it right over.
I had so much fun making this swatch sheet, I actually turned it into a BOOK with my Facebook group!! I know!! We had a blast doing this together. Each page was created by another Awesome Artist. Here's a link to buy the finished book on Amazon if you're interested.
Before we continue, super quick announcement: All product links are Affiliate. I may earn a small commission if you choose to order through these links, but by law, there is never any additional cost to the consumer for doing so. I thank you for your support!
Let's take a look at some of the water soluble products I've laid out for us as a comparison to see how my new water based Ohuhu markers stack up.
I'm comparing the Ohuhus to SEVEN other water soluble markers & fineliners:
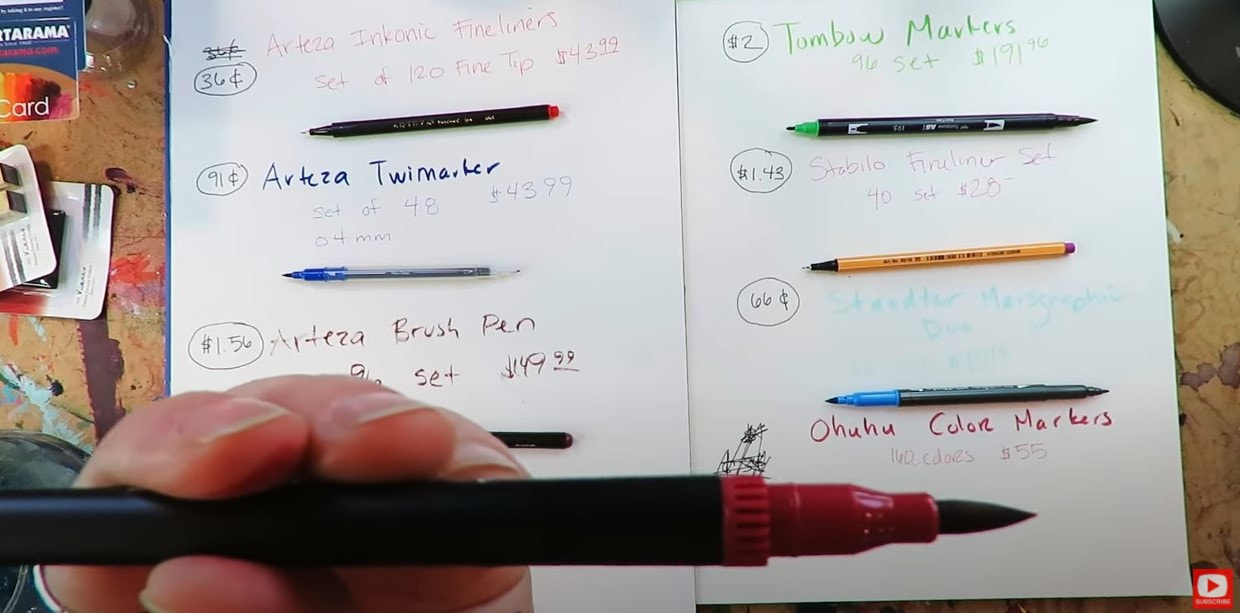
The water soluble ohuhu markers are dual nib. On one side you'll find the brush nib (above). On the opposite side, you'll find a fineliner. They come in a set of 160 for just $55, making each marker a steal, at just 34 cents each. I couldn't find my set of 160 for you on Amazon, so here is the Ohuhu Water Based Marker set of 100 for $34.
The Staedtler Marsgraphic Duo (above left), has a brush nib as well, but it's not nearly as sexy as the one from Ohuhu. This marker also has a bullet nib on the opposite end. Their largest set contains 18 markers, and only costs $12. This low cost set makes it feel like an amazing deal, but when you look at the cost per marker, the Staedtlers are actually more expensive than the Ohuhus at 66 cents each.
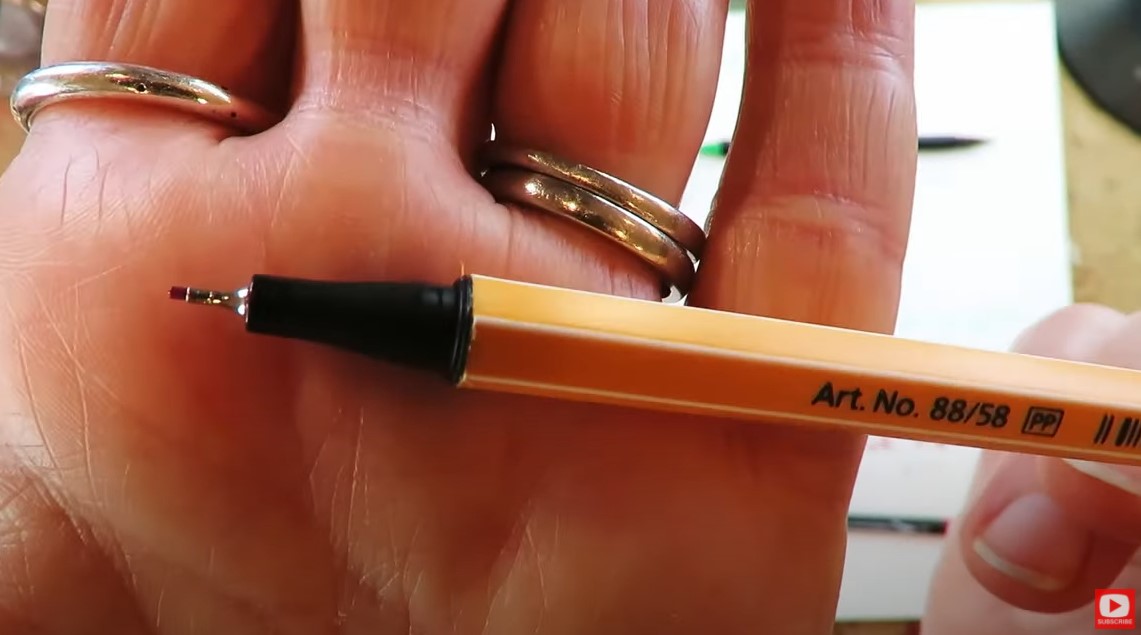
Lots of artists enjoy using Stabilo fineliners (above) because they are great for coloring books and getting into teeny weeny spots. You can get a set of 40 for just $28, making each marker $1.43/each.
I LOVE stabilo as a brand, and if you know me, you know one of my absolute FAVORITE art supplies is my black stabilo all pencil. But when I did this water soluble marker comparison, I was a little disappointed to see how expensive the Stabilo fineliners actually are when compared to the others. 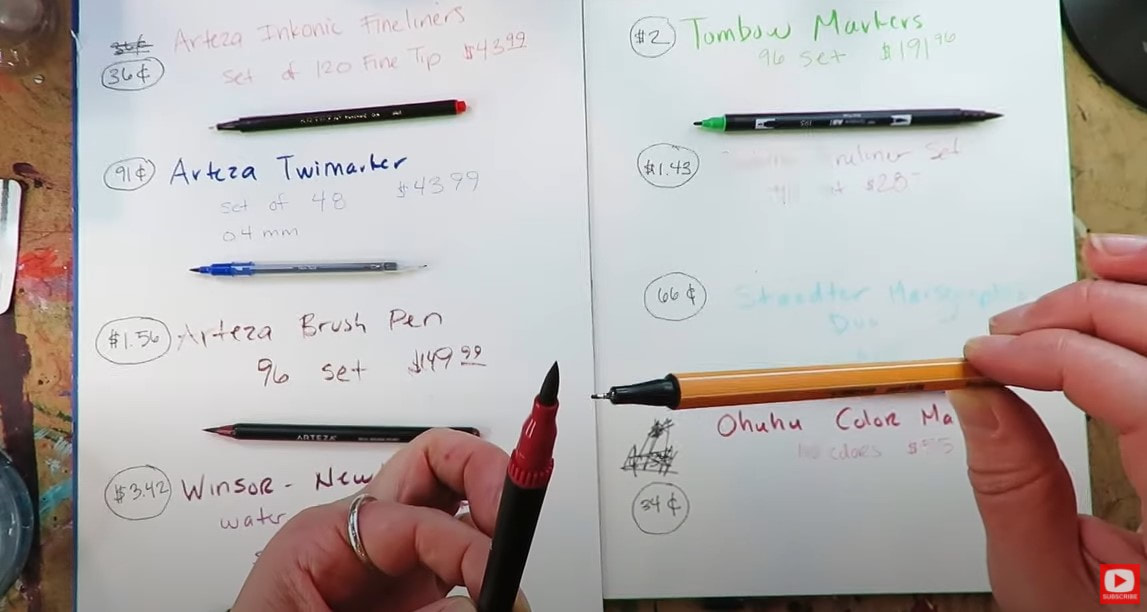
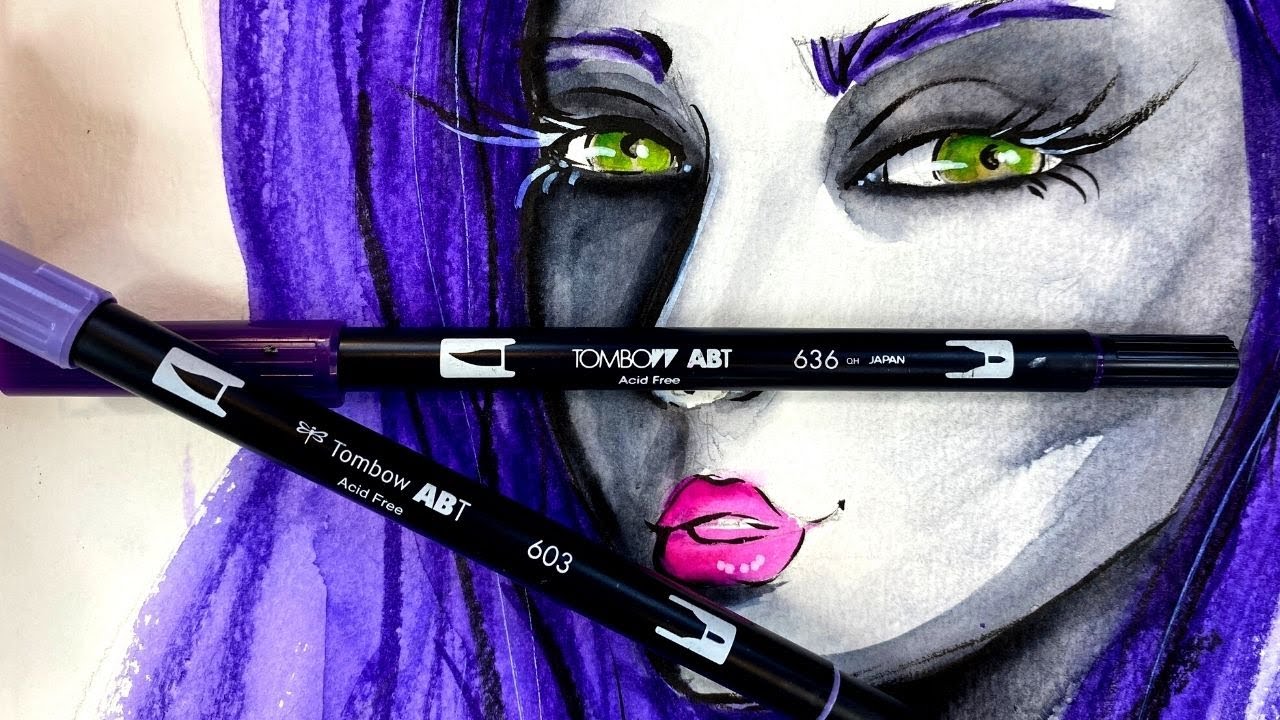
Tombow is another brand I totally love! I take my Tombow dual brush pens everywhere, and have completely fallen for the watercolor painting effect I can achieve with them (below). Isn't that fun?!
I was a little disappointed to realize just how much my beloved Tombows cost per brush pen. My set of 96 cost just under $200, making each marker about $2 per piece. (Sadly this set is currently listed on Amazon for $279, but there are three smaller sets for less, saved in my store for you).
Next on my list to test today is Winsor Newton Water Colour Markers. These are the only product in today's comparison that contain a fine art product inside the tube. They're lightfast and gorgeous.
The biggest set you can buy is only a set of 12, and it's about $40. That makes each marker an expensive $3.42 each. They're not cheap, because they are a fine art product. There really is no comparison when I look at the other products on the table today. In a way that's not really fair, because this is the only product from the rest that isn't a dye based craft product. But I use these all the time, so added them to the test. Here are the current Winsor Newton watercolor marker sets I could find for you on Amazon: Sky, Landscape, and Basic (don't be deterred from the "basic" set - the colors are FAR from basic!).
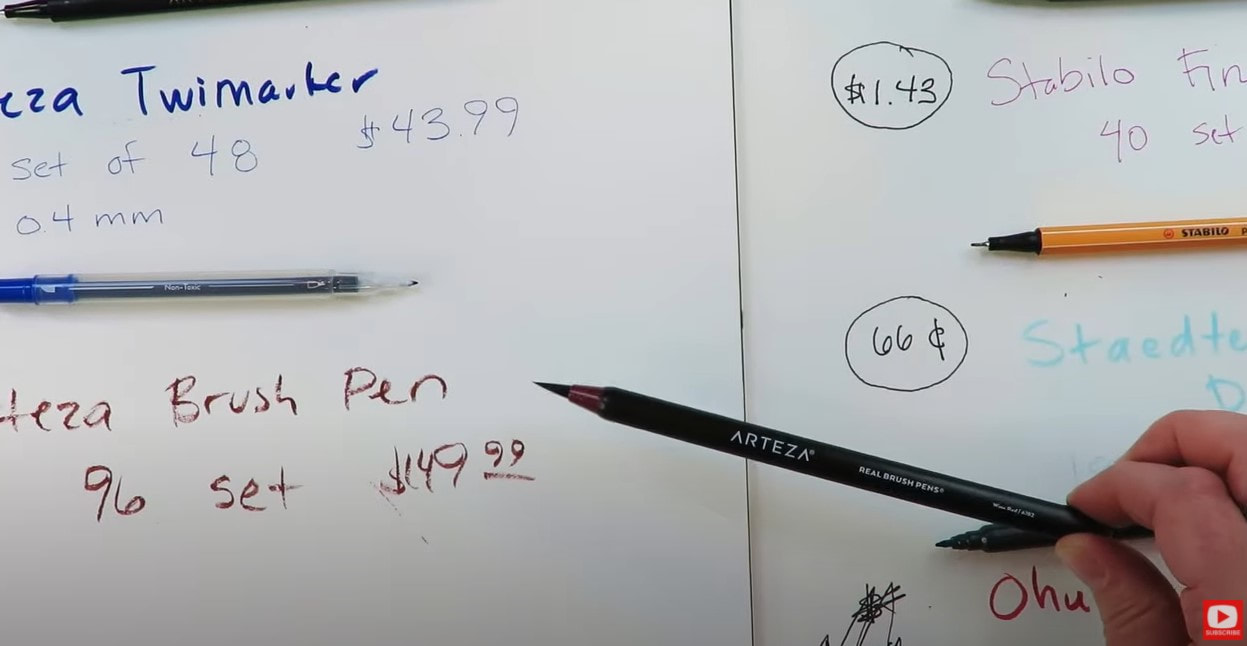
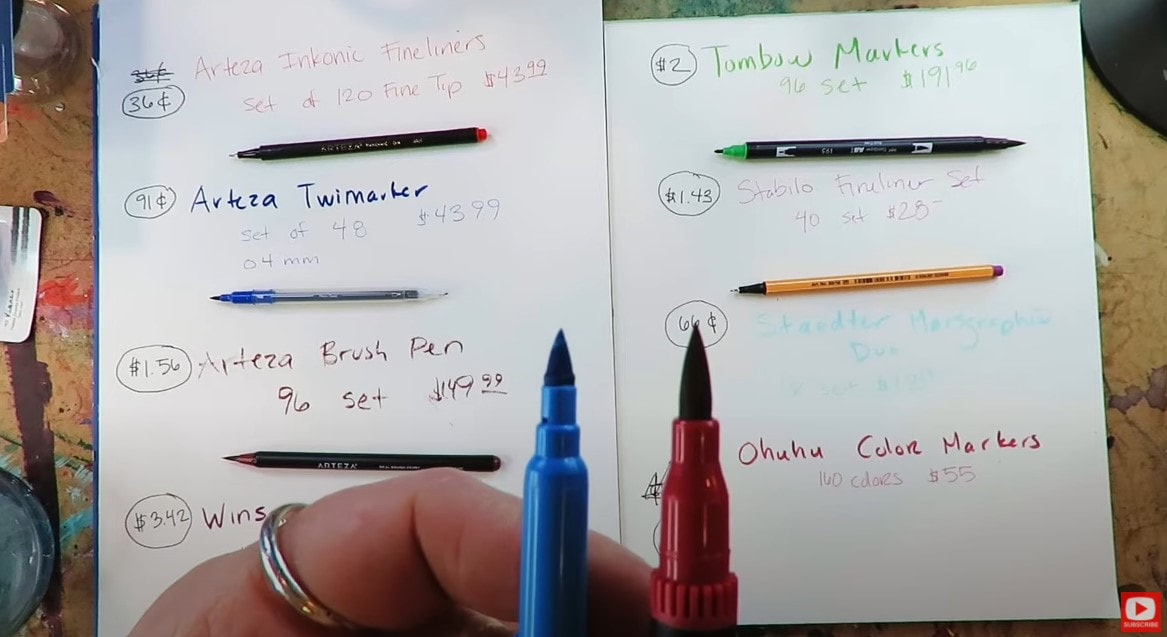
The Arteza Brush Pens really don't do anything for me (so no link to buy). As you can see in the above photo, the ink doesn't even really flow the way it should just to write the simple product name on my paper. These are not nearly as juicy as I think they should be for the price. And, there's nothing you can do to get the ink flowing better.
Their nib is actually bristles like a paint brush instead of a foam tip shaped like a paint brush tip. You would think this is a benefit, but I think it actually makes them harder to work with. 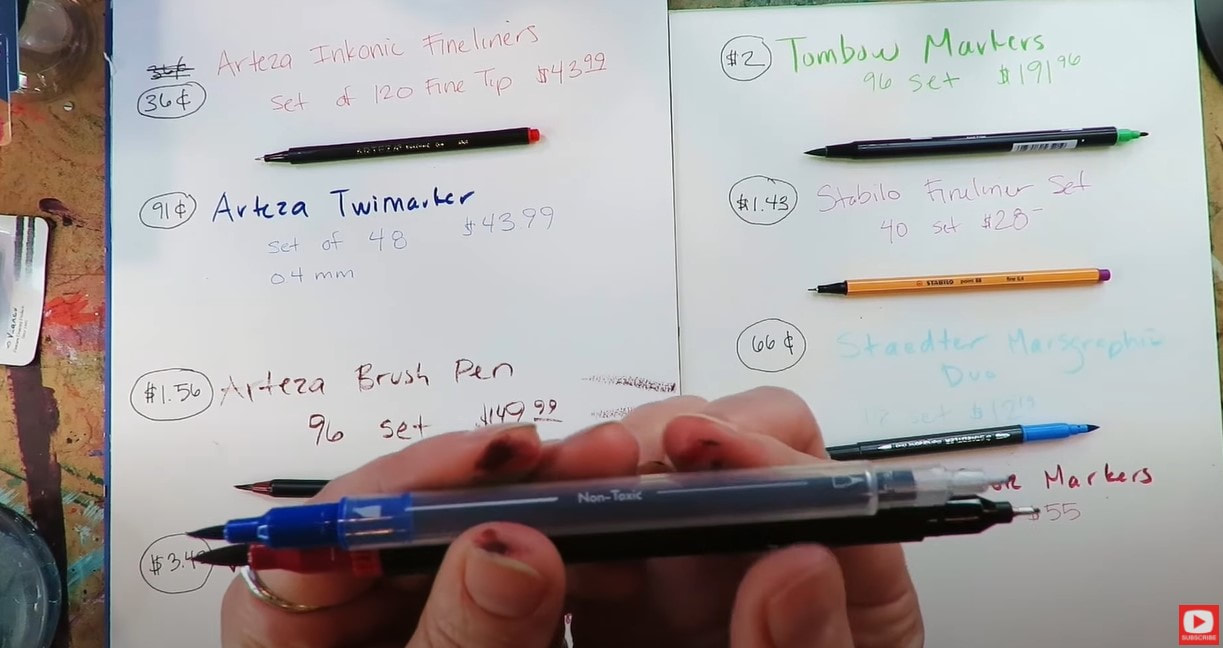
On the other hand, Arteza Twimarkers are a much better value and compare more appropriately with the Ohuhu color markers (shown above). These have both a brush nib and fineliner nib in one. However, you may have seen there are a lot of negative reviews out there on the Twimarkers, because the bullet nib frays easily. It's not encased in metal like the Ohuhu marker, so this creates a problem.
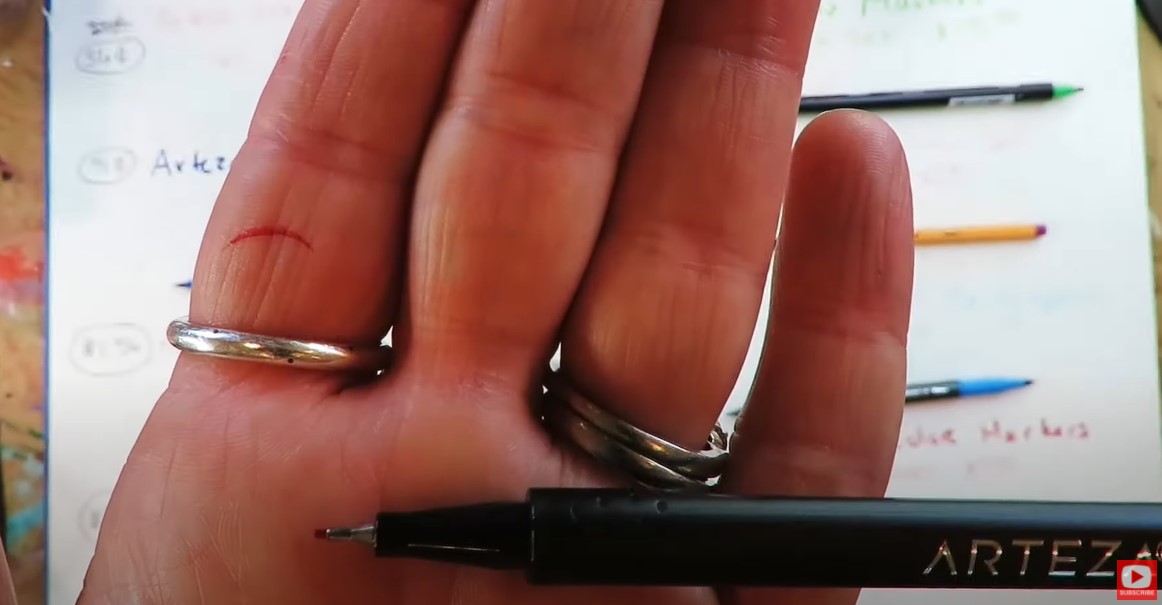
The Arteza Inkonic fineliners are just a classic fineliner. They come in a beautiful set of 120, but the Ohuhus come with a brush nib too, plus 40 additional colors and are 2 cents/marker CHEAPER! I was really surprised to see this when I did the math. The Ohuhus are killing it so far in value.
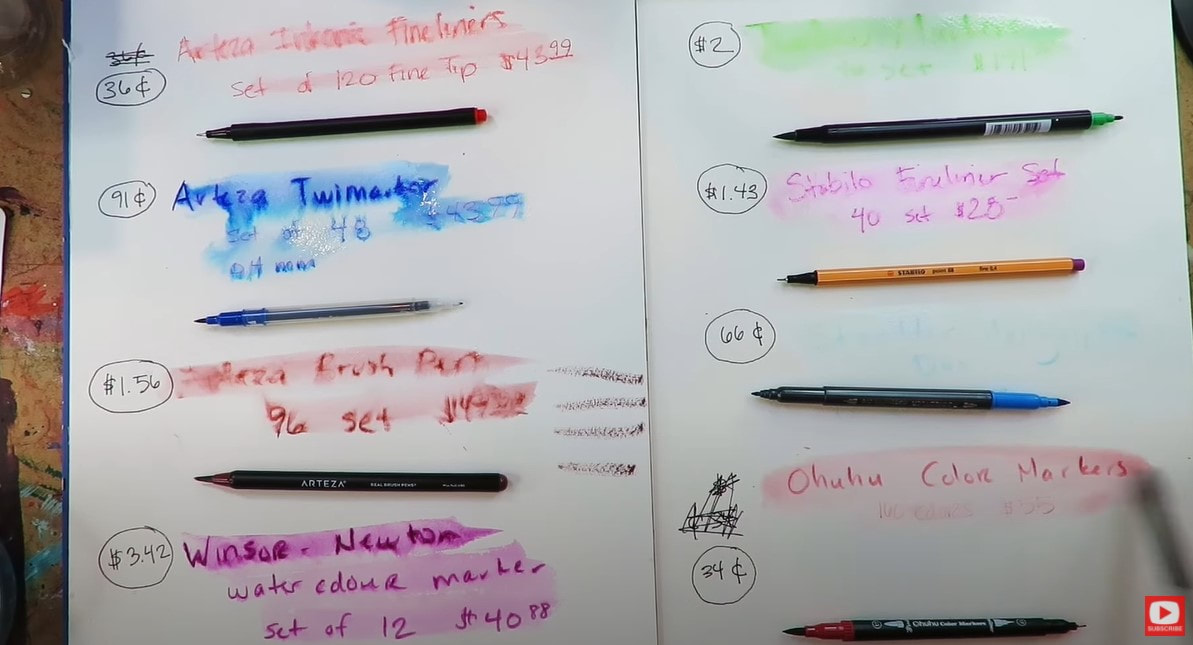
After I run my watercolor brush (with plain water) over each sample, you can see how water soluble each product is. The Tombows disolve the most. If watersolubility is important to you- you might want to keep that in mind when buying a set of these markers - the Ohuhus seem to disolve too, but not nearly to the extent of the Tombows.
To get started with this particular project, I decided to flip through the reference photos for drawing I compiled in my book called The Celtic Collection. 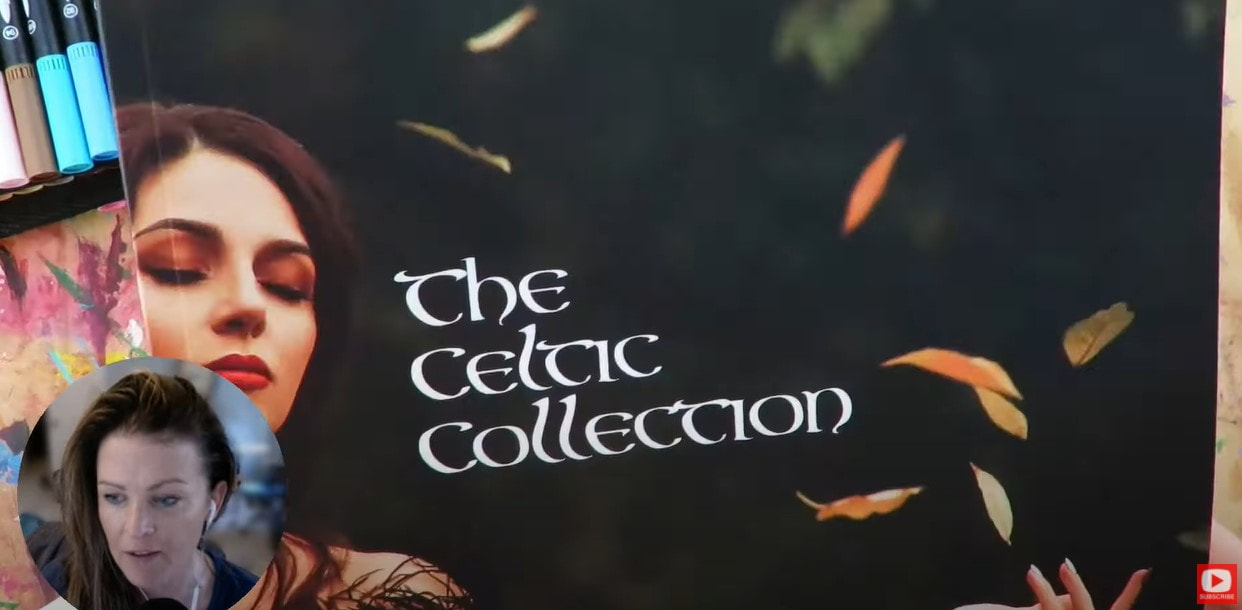
This is a fun book of copyright free fantasy art reference images I compiled for one of my art clubs called The Celtic Collective, that I run with one of my art besties, Lucy Brydon. If you love fairies and fantasy art, click here to learn more about The Celtic Collective.
Press play on today's video to see if I was able to achieve the watercolor painting effect I love from the water based Ohuhus. Thanks for hanging out with me today! ❤️ CHECK OUT ALL MY ONLINE ART CLASSES & Art Clubs ❤️ CHECK OUT ALL my art books ❤️ MY FAVORITE ART SUPPLIES on AMAZON ❤️ MY BELOVED FACEBOOK GROUP
How have I NEVER tried pan pastels before in any of my mixed media portraits?! I KNOW!! I just purchased a pan pastel set of 80, and am super excited to PLAY with them for the FIRST TIME. Will my pan pastels portrait fail on yupo paper? Is layering pan pastels easy or hard? What art supplies "play nicely" with them? NO CLUE!
Today's mixed media art supply demo is all about letting go & discovering the answers on my own as I play. It is in this space of experimentation where we can truly be FREE as artists! If you're new to pan pastel art like me, need a little push to TRY something new, or curious if you should add some pan pastel colors to your own art supply stash - THIS VIDEO is FOR YOU! 
I don't about you, but I like to dive in "blind" whenever I experiment with a new art supply! I think it's fun to not know how things are gonna work, how they'll react together, and figure it all out by myself first!
Then I love to dive into research LATER if things went wrong, because for me - my experience helps me to craft my knowledge. My hope for you with today's video is that you feel empowered to try anything and everything you want to all by yourself. You can learn SO much by doing this!! Before we continue, super quick announcement: All product links are Affiliate. I may earn a small commission if you choose to order through these links but by law there is never any additional cost to the consumer for doing so. I thank you for your support. 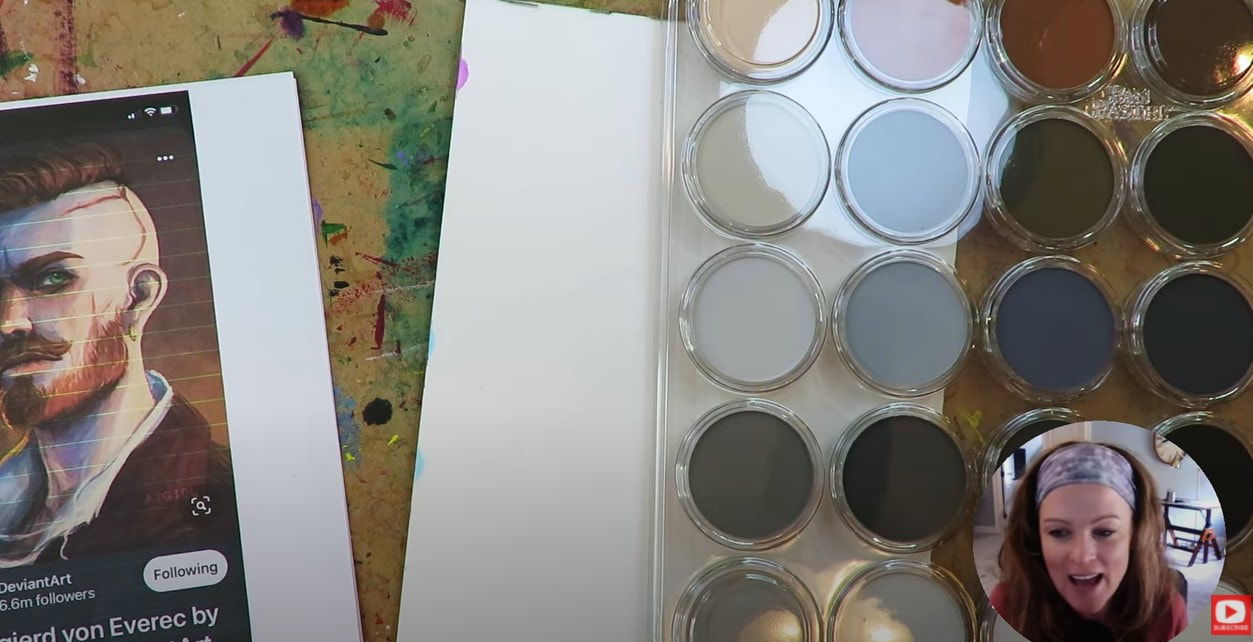
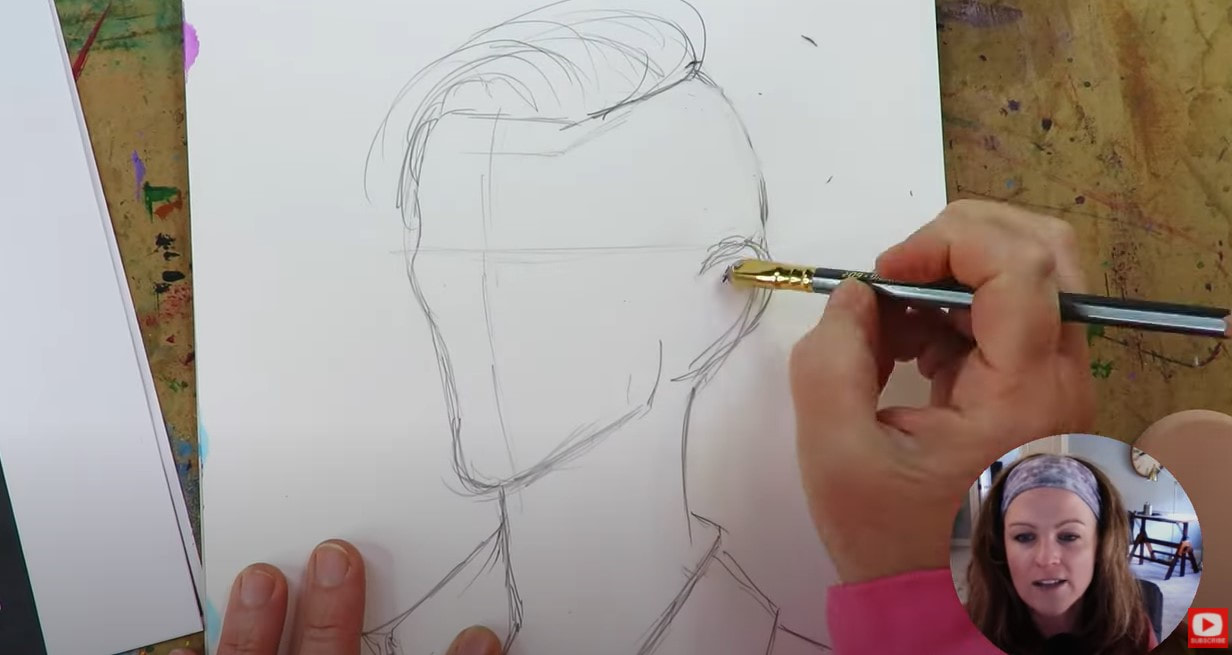
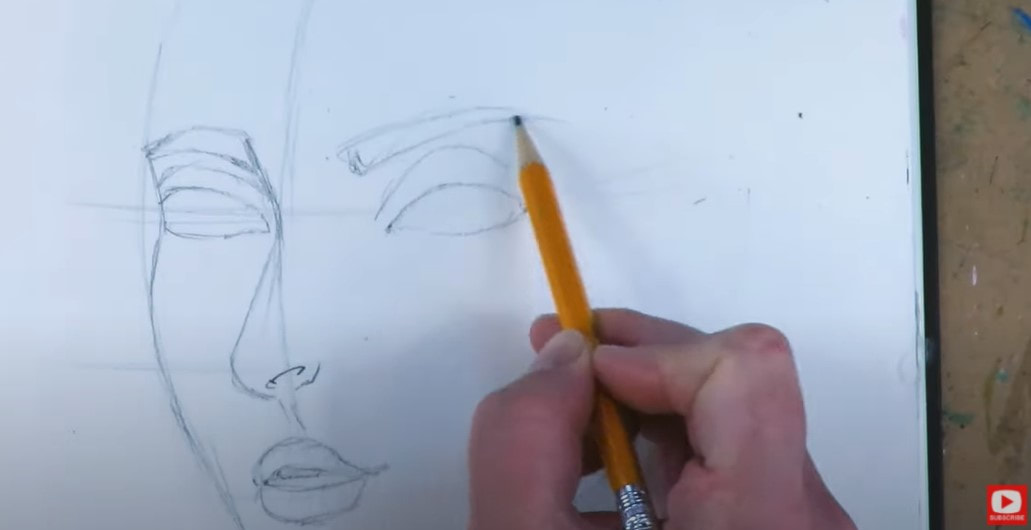
I found an awesome face shading reference photo on DeviantArt that inspired today's project. He's a side profile drawing in 3/4 view.
If you'd like to try drawing a 3/4 portrait, and need a little help, click the button below to download my FREE 3/4 view Face Drawing Guidelines! I'll email them right over to you. 
The paper I'm using today is called Yupo paper. It's 100% non-pourous, and basically plastic! When you draw on it - you'll experience a really slippery sensation, like 80x slippier than bristol!
As you'll see in the video- it doesn't matter how many times I've drawn a face, I ALWAYS go back to basics and sketch in my face drawing guidelines first. This helps me ensure the face I'm drawing will come out with facical features that are proportionate. If you need help getting the proportions of the 3/4 portrait correct, CLICK HERE to download my free cheatsheet. 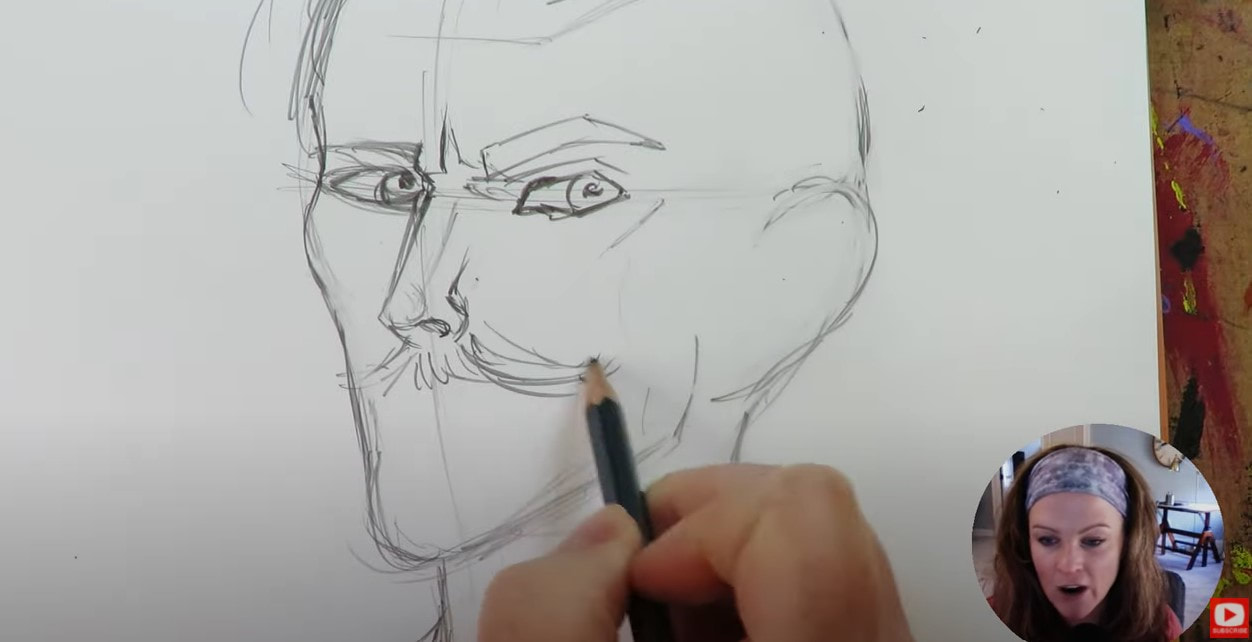
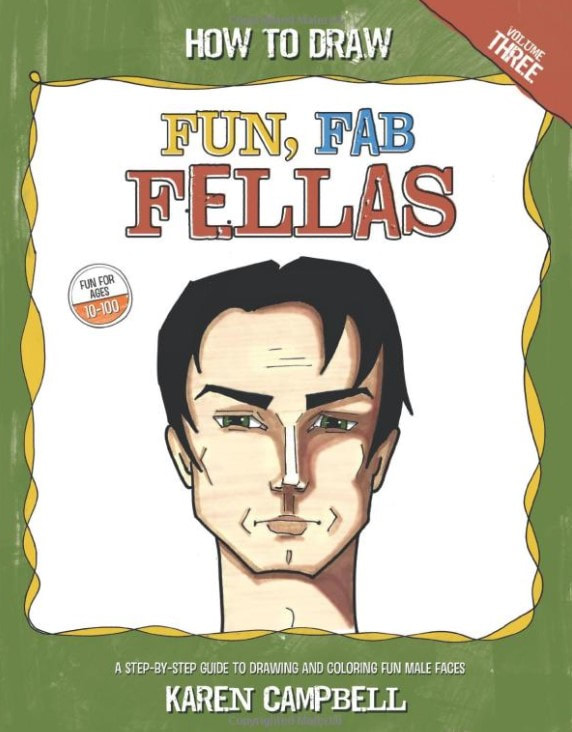
If you're interested in learning more about how to draw male faces check out my book - How to Draw Fun Fab Fellas. I don't draw guys nearly enough, honestly! And they're really fun because the angles in their faces are SO different from women.
As I was drawing this particular guy, I really felt like he was turning into a young Van Gough!
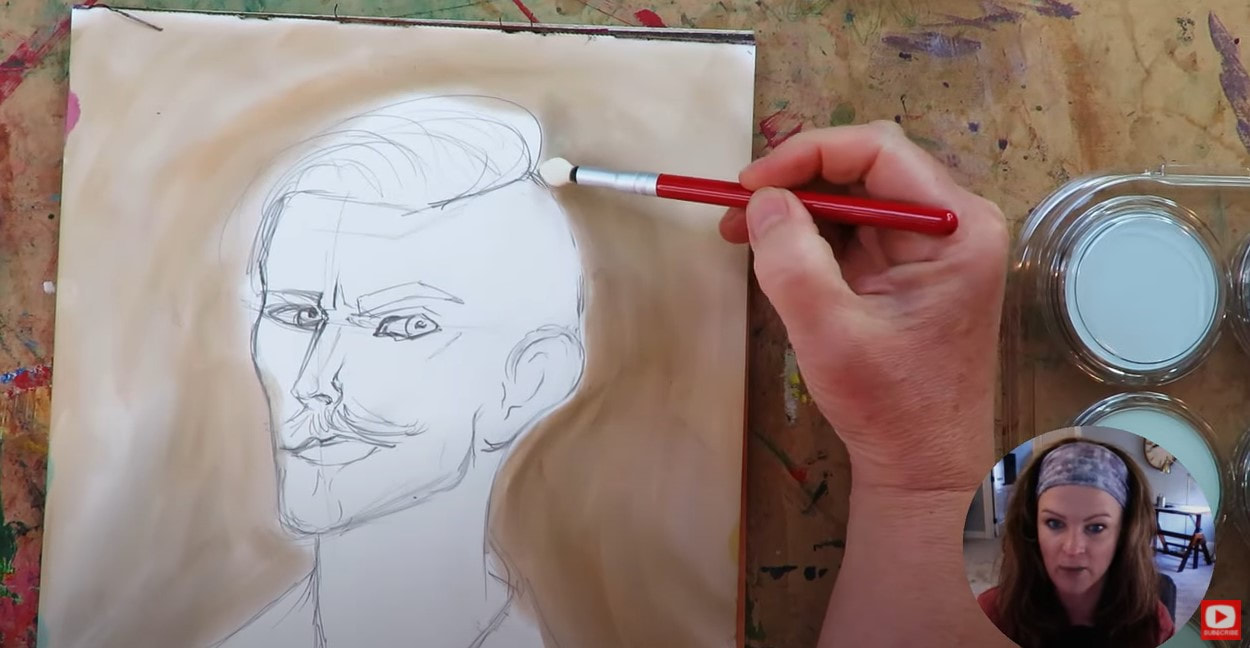
Since I'm totally doing this project from the perspective of a pan pastels beginner... and also new to working on Yupo paper- I have no idea how my first layer of pan pastels is going to stick to the paper, because it literally has zero texture and feels like a skating rink.
If you don't have any pan pastel sets yet, I recommend trying the set of 20, or the skin tones set of 7. I used one of the pan pastel Sofft tools (they came with my pan pastels set of 80), to apply some color to the background, and it was seriously done in under a minute. If you need some applicators, try this little set of 12 mini sponges, and/or this set Craft Ink Blending Brushes. 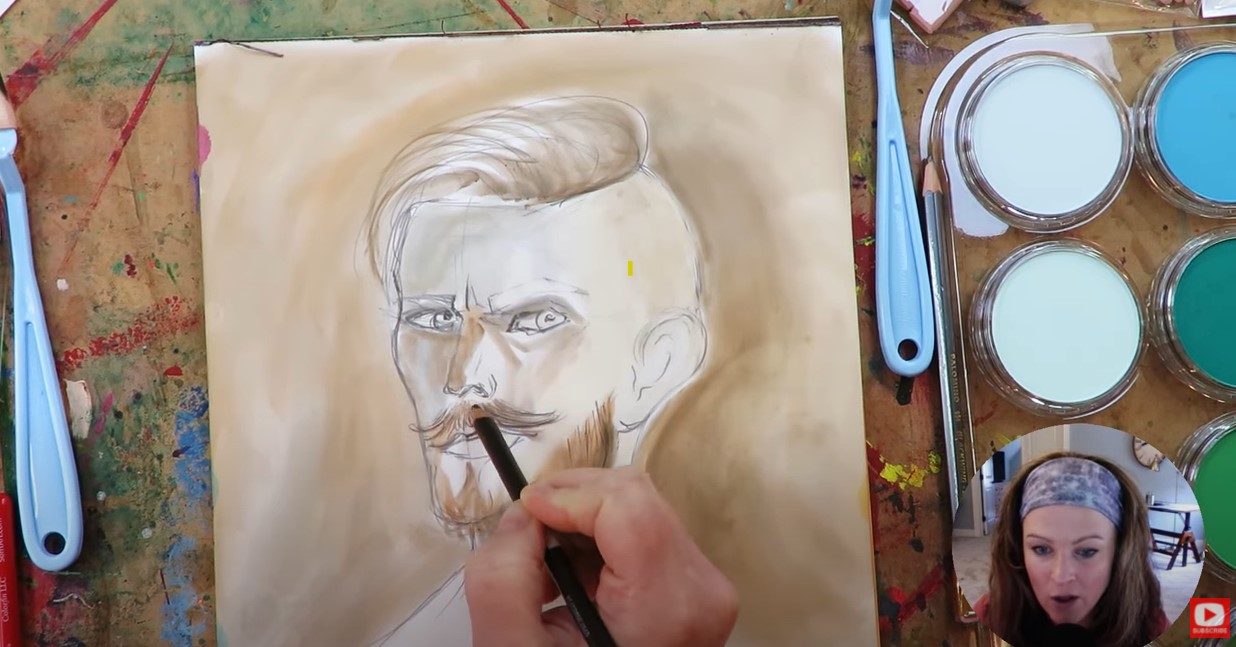
I experimented with trying combining my pan pastels and Prismacolor colored pencils, but wasn't patient enough to work with that for a long period of time. It was great for adding some detail in the beard (above), but I needed something bolder and faster to work with.
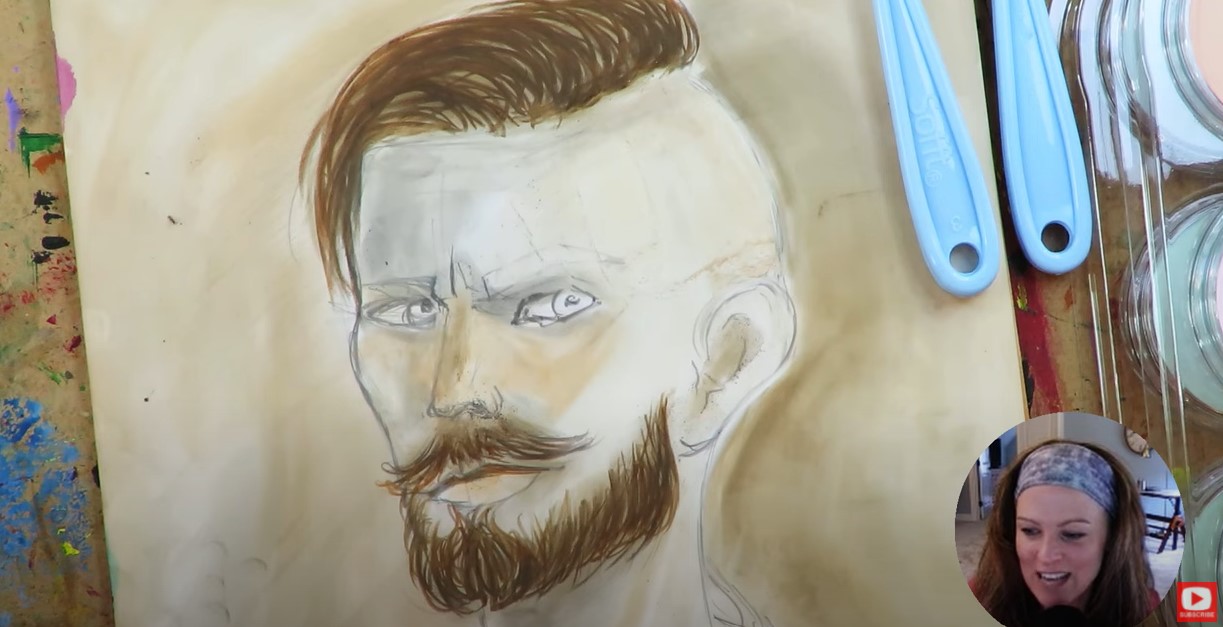
I discovered using my Neocolor IIs by Caran d'Ache really worked well and helped me to achieve the depth I was struggling to get out of the pan pastels alone.
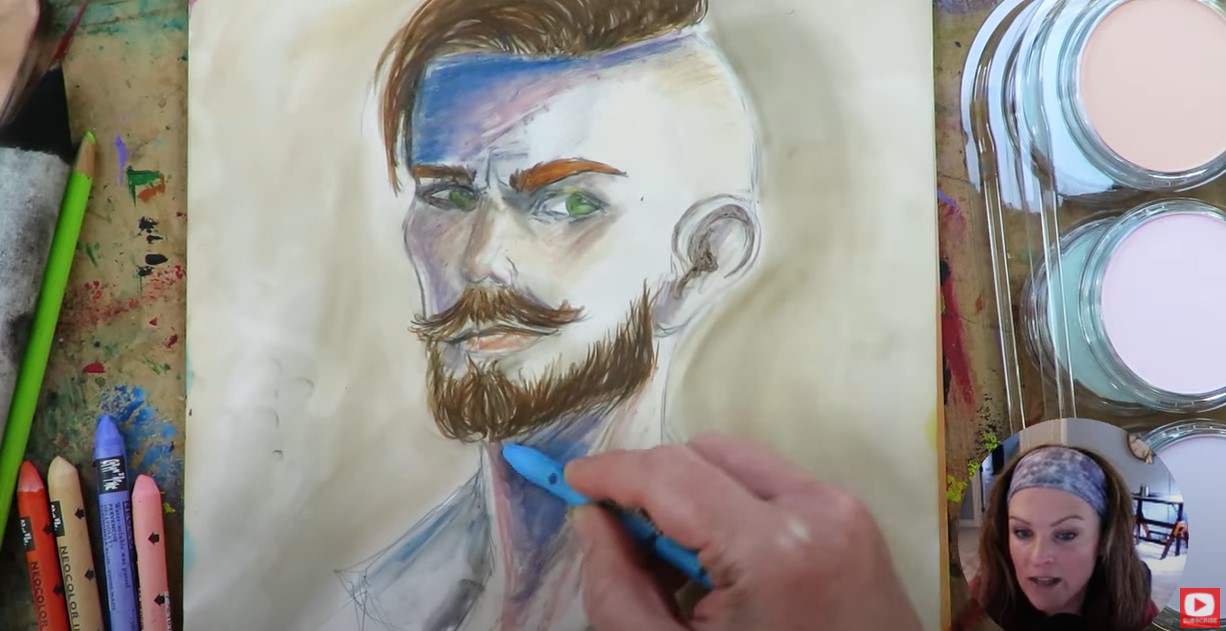
I had heard pan pastels are eraseable, but they didn't erase well with my beloved vanish eraser. I also tried using the eraser on my Blackwing pencil, and had much better luck. I love chiseling highlights out of the face shading I do, so enjoyed playing with this fun pan pastels technique!
If you know me and my work at all, you know I'm a HUGE FAN of outlining. And you may know that as soon as I pull out my pentel pocket brush, the project is basically over! LOL. I hope you have fun with this demo, and enjoy working with pan pastels on your own as much as I did!
Silver Black Velvet brushes have been a part of my mixed media painting world for YEARS! They are high end, professional watercolor brushes that work like a charm, but unfortunately come with a hefty price tag.
Even though I love them, I'm always on the lookout for alternatives to recommend for my students over at Awesome Art School in case they're on a budget. Join me for a battle of the watercolor brushes today as I compare my Silver Black Velvets against the competition from Polina Bright, Creative Mark and ZenART Supplies. 
Before we continue, super quick announcement: All product links are Affiliate. I may earn a small commission if you choose to order through these links but by law there is never any additional cost to the consumer for doing so. I thank you for your support!
Over the years I've developed a few qualities I look for in a watercolor brush.
The first feature I look for in a watercolor brush is shape. When you're talking watercolor brushes, this often means the "round" brush shape (you'll likely recognize it as the brush most watercolor artists using). This is what my round Silver Black Velvet brush looks like. See how the taper comes to a point? 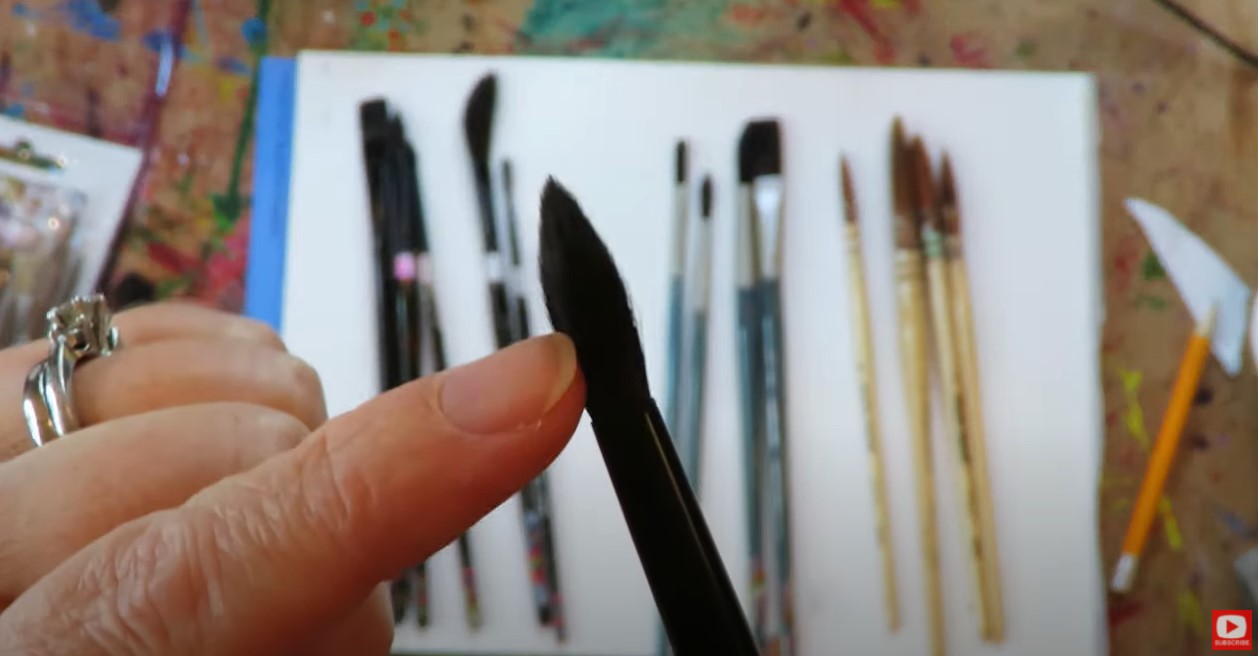
For years, this taper is one of the things I loved about this brand and didn't think I'd find from another brand. Since the price is not budget friendly for my students, I've occasionally tried other brands looking for alternatives. If you're not super concerned about cost, I recommend the Silver Black Velvet set of 3 brushes for $47 on Amazon.
While looking for an alternative, I kinda fell in love with another pricey brand made by Polina Bright. If you haven't see her work before, you HAVE to check her out. Polina's brushes are a little pricey because they ship from Australia, but SHE SPECIFICALLY CREATED A COUPON for my followers so you can save 10%. Simply enter my name in all caps (KARENCAMPMBELL) at checkout. if you can afford a splurge or drop them on your wish list for the holidays - you might fall in love with them too! For the students at Awesome Art School looking for value in their watercolorbrush set, I highly recommend the $17, 5-pack watercolor brush set by Creative Mark. They perform beuatifully for the money and are synthetic like Polina's. Brands shown below from left to right: Silver Black Velvet, Creative Mark, Polina Bright 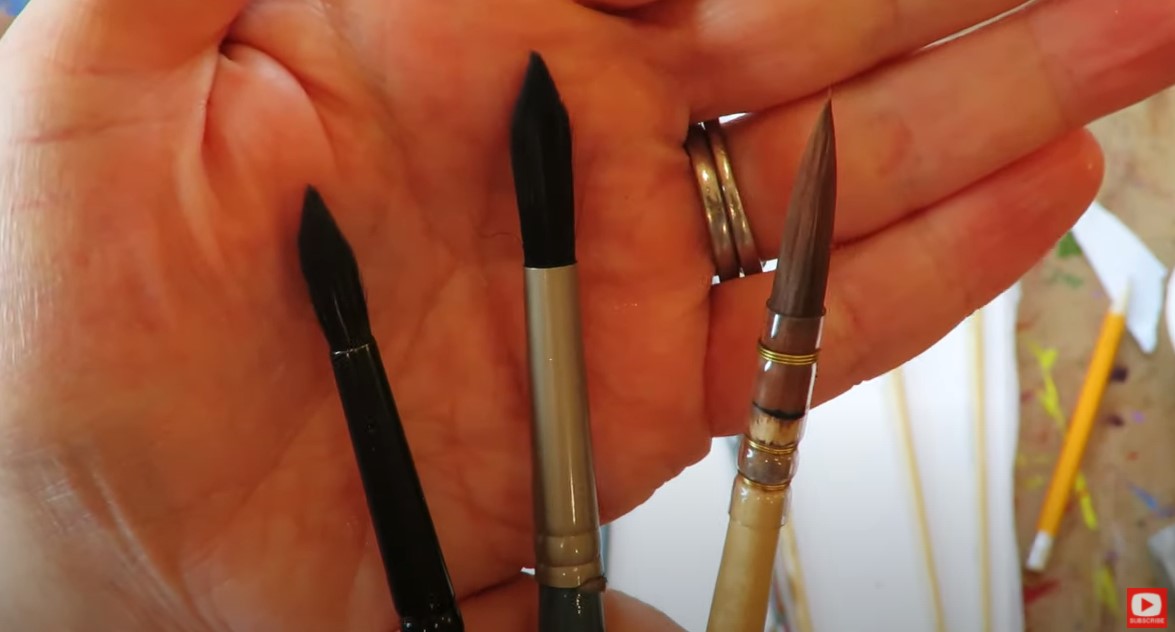
The second feature I look for in a watercolor brush is it's ability to hold water. Ideally you want it capable of holding tons of water over to the palatte, and tons of pigment from palette to your paper. All three brands performed well here, but I felt Polina's long/lean brush did best (simply my own personal perference).
The third thing to look for in a watercolor brush is the "spring," or the brush's ability to glide naturally in the water, and across your page. The spring in Silver Black Velvets is pretty amazing becuase the brush tip is made from squirrel hair, so naturally it will do well in water. Typically this is where a synthetic brush will struggle to keep up and feel a bit stiff in comparison. I don't find the synthetic hair to be a problem in Polina's brushes or Creative Mark's. I was recently sent a watercolor brush set by ZenArt Supplies to review (shown below, 6-pack of brushes for $28 on Amazon). I thought today's video would be the perfect opportunity to give these a try. 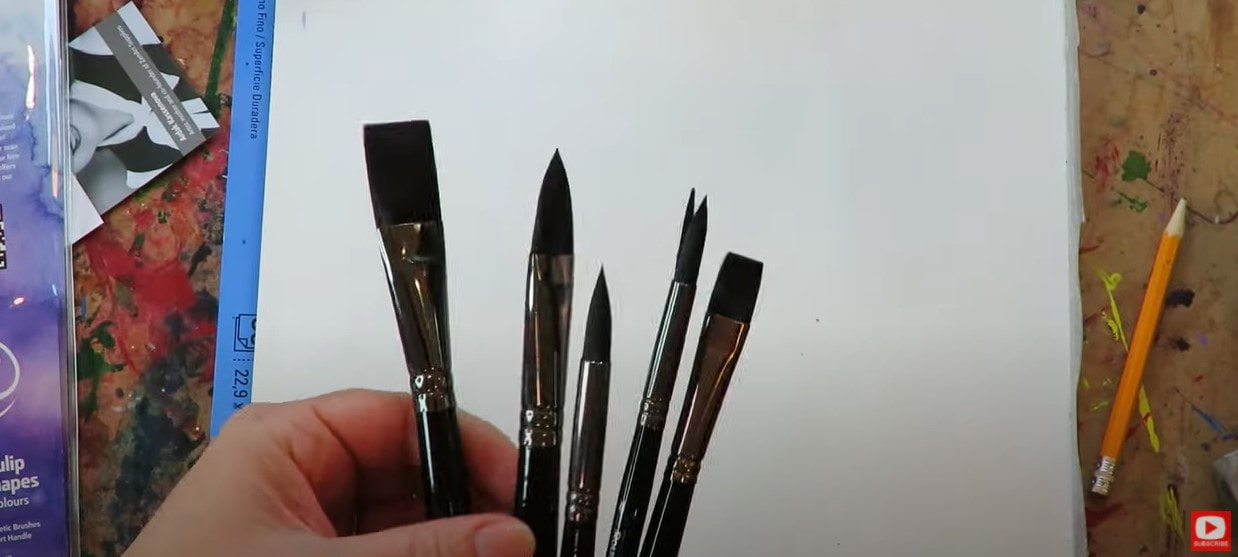
Right outta the package, I love the assortment of brushes ZenART sent -especially the fact that they've included "flats" in the set because I LOVE working with flat watercolor brushes (these are the ones that have a straight, flat edge across the bristles). When I unwrap the brushes, they feel a little synthetic, but it's hard to tell how a brush is going to perform until you get it wet. I feel like the best way to really test out a product that's new to me, is to create a full project with it. Click over to the video to watch as I do a little whimsical face shading in watercolor to give the ZenArts watercolor brush set a test run. 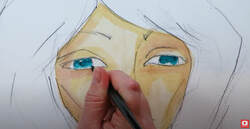
Stick around till the end of the demo for my final thoughts on the ZenARTs when compared to my other three favorite watercolor brush brands!
Thanks for hanging out with me today! ❤️ CHECK OUT ALL my art books on AMAZON ❤️ MY FAVORITE ART SUPPLIES on AMAZON ❤️ MY BELOVED FACEBOOK GROUP ❤️ FOLLOW ME ON INSTAGRAM
Tombow Brush Pens are one of my all time FAVORITE art supplies. Lots of mixed media artists use them for making cards & brush lettering, but I use them to PAINT! In today's art supply demo, I'll show you why they're a MUST HAVE in my studio + the QUICK & EASY way I use them to create MAGICAL mixed media portraits. If you're a beginner in the world of mixed media art, or just curious about what tombows can do for you - today's video is a MUST SEE!!
Tombows are super popular with mixed media artists -especially card makers and stamping fanatics. People LOVE using them for brush letting and calligraphy type projects.
Tombow dual brush pens come with two nibs, one on each end. One is a brush nib and the other is a bullet nib. I really love the dual nib feature because it feels like I've got both a paintbrush AND a fineliner all in one product. Tombows are also great because they're acid free and super watersoluble (which means they melt like watercolors if you add water to them).
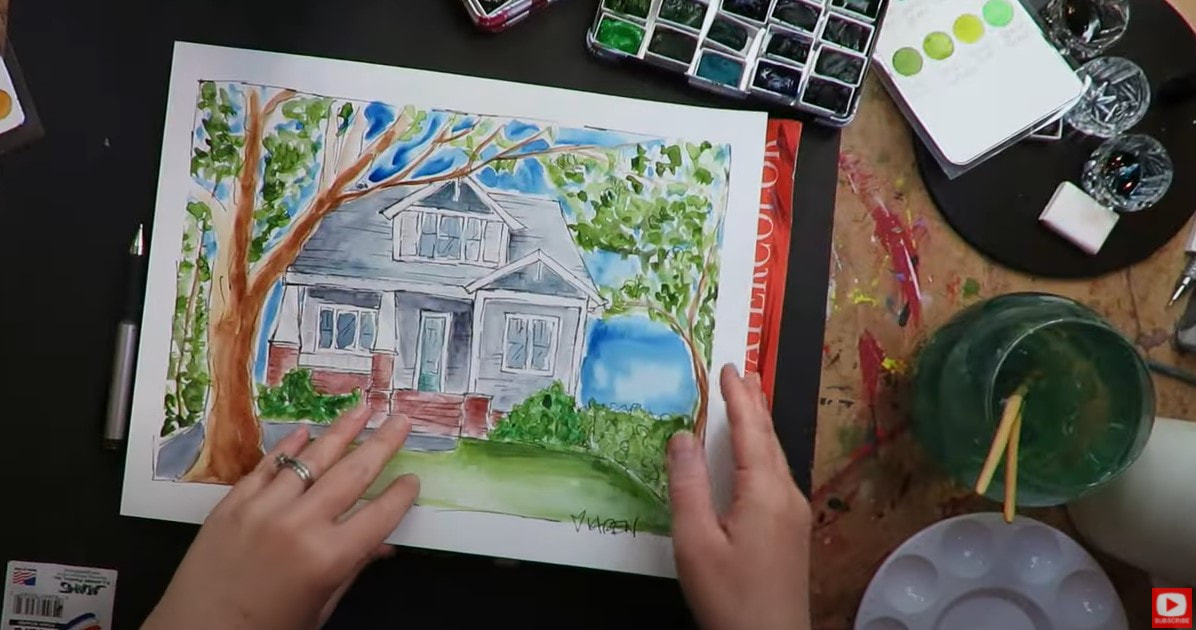
Today I'm working in my large 11x14 strathmore watercolor journal. It's filled with 140 pound color press paper, which can REALLY take a beating from whatever art supplies I feel like throwing at it! As you can see - I don't just do watercolor in this journal. I use it for mixed media projects too because it's so sturdy! Here's a fun project I did a few months ago...
I highly suggest if you're doing ANYTHING with watersoluble art supplies, you REALLY pay attention to the kind of paper you're using. I believe it's JUST AS IMPORTANT as your art supplies. In fact it IS one of your art supplies, and it totally makes a difference.
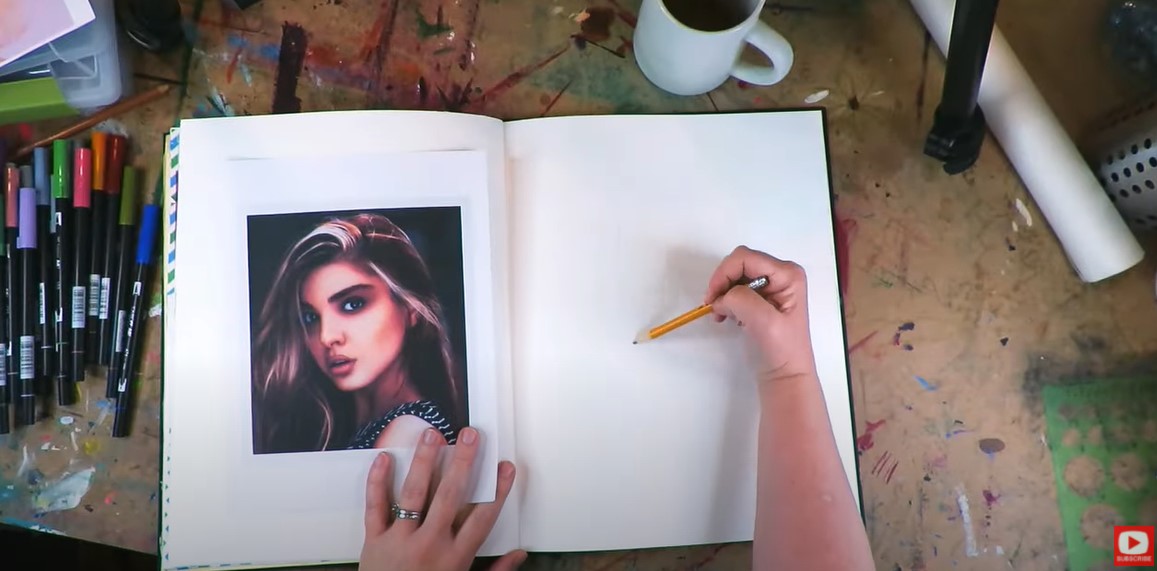
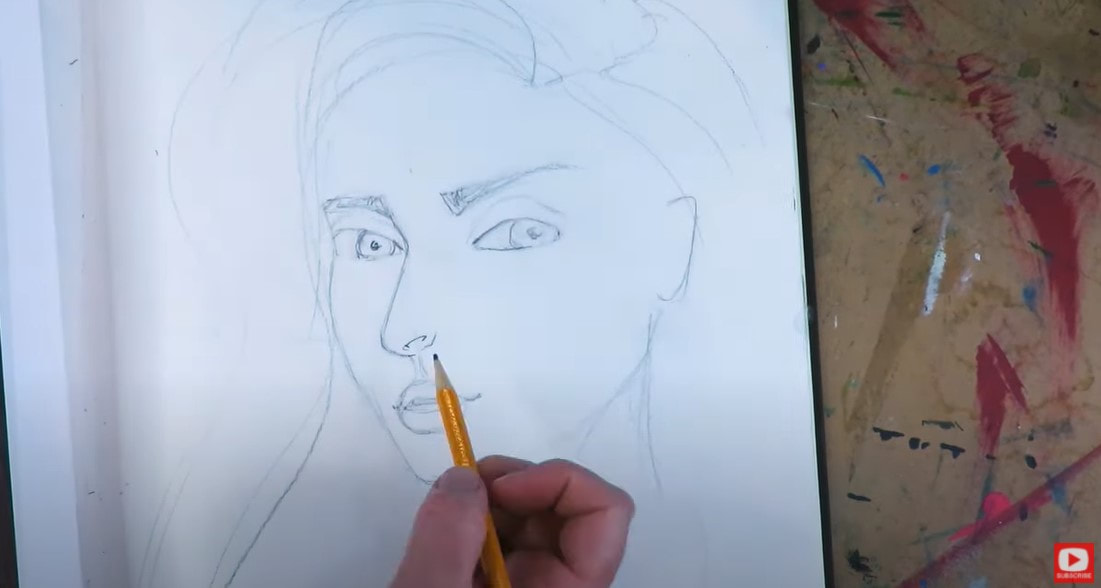
As you can see, I'm using a face drawing reference because that's usually how I work. I don't really use my references to try and copy exactly what the image looks like because I'm not super into realism.
I just think using a face photo reference while I draw inspires me to add details I may not have thought of from facial feature nuances to hairstyles, etc. I think a face drawing reference is also REALLY helpful to use as a face shading reference because it takes the guesswork out of deciding where to place shadows. You just look at your reference and BOOM. It tells you everything you need to know! 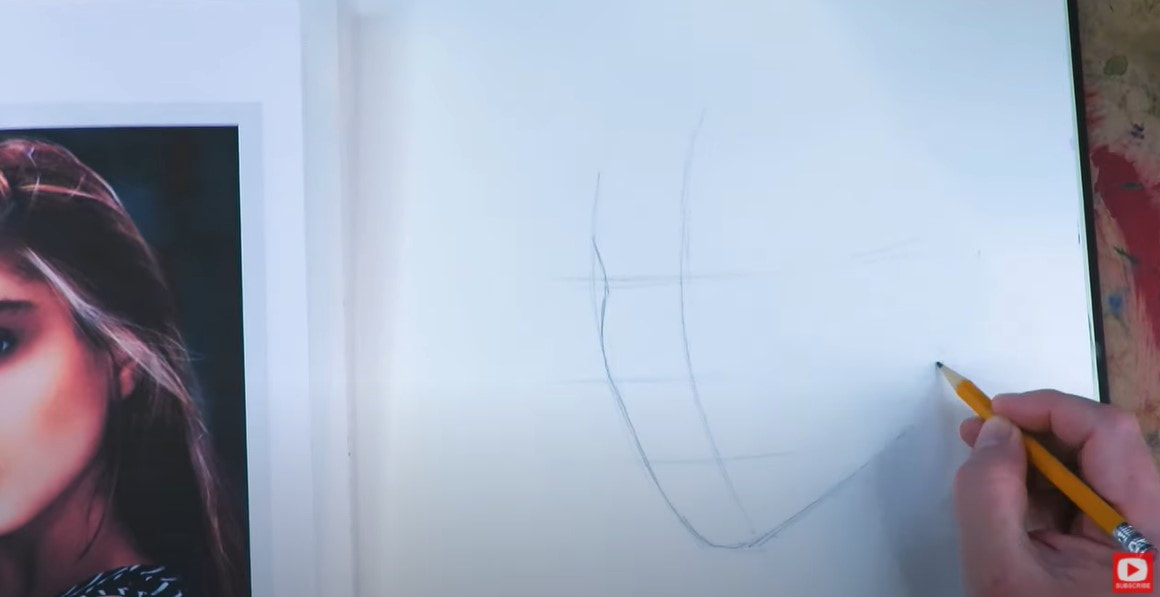
Now today's side profile drawing is one of the trickiest profile drawings to master- called the three quarter view portrait. If you need help with how to draw a 3/4 view profile - here is a playlist for your from my YouTube Drawing Channel to get you started.
I've also got a FREE cheatsheet to help you remember the basics of drawing three quarter view faces.
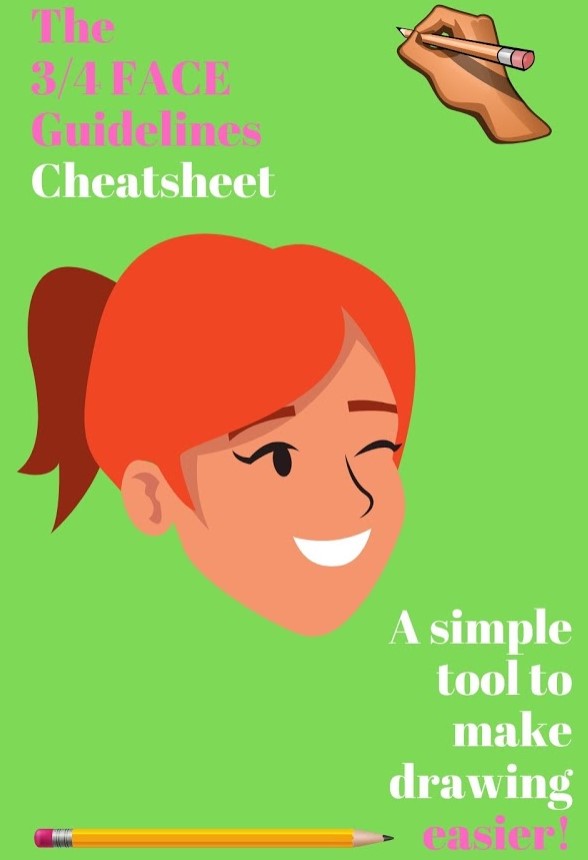
Simply click the button below and I'll send it straight to your inbox.
Before you start with face shading, I HIGHLY recommend you swatch out your art supplies- whatever you are coloring with because I've been surprised ONE too many times when the color comes out not quite looking like the marker cap or tube of paint, so this can be a real life saver!
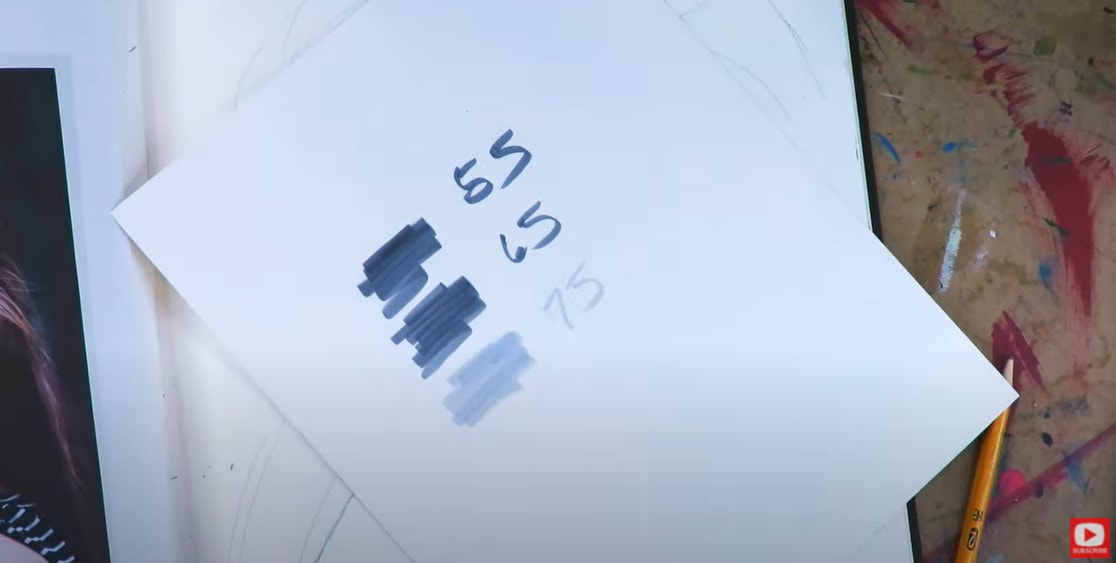
Some artists may want to keep a swatch sheet on every color they own. There are some products I do that with (especially my watercolors!!), but most often I'm more into just scribbling a few strokes off to the side for whatever piece I'm currently working on.
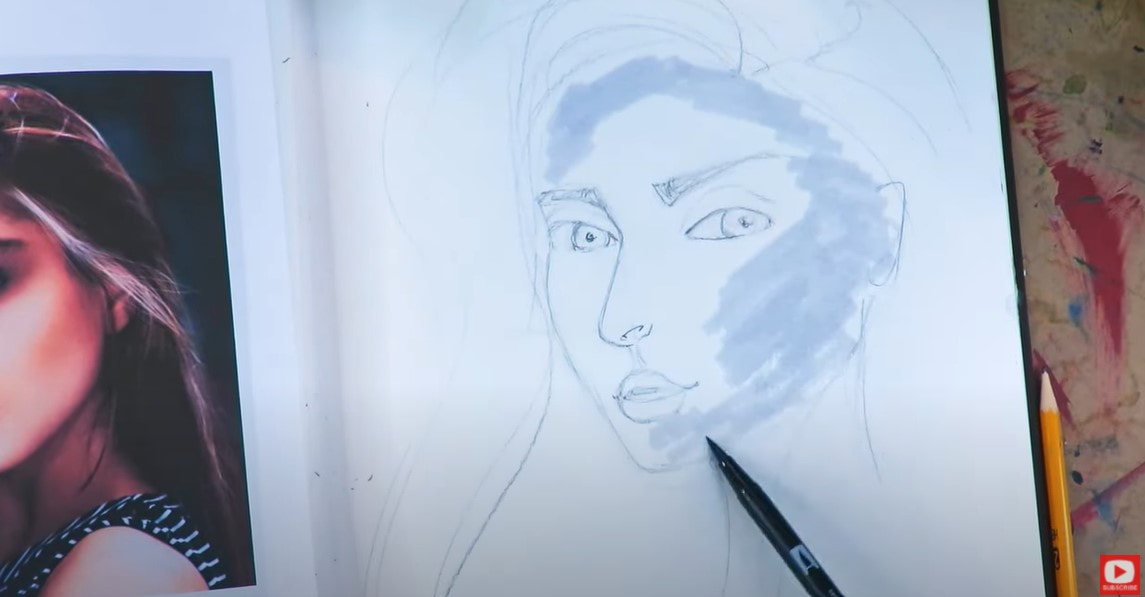
When I'm shading a face with my tombow dual brush markers, I hold my marker on the side and use it similarly to a paintbrush (on the brush nib side) to lay down a big chunk of color like in the picture above.
Since my intention is to add water and use my paintbrush to move the color around, I'm deliberately loose with my shading here. I just throw some color down in my lightest shade and move on. I'm all about quick and easy and THIS TECHNIQUE is BOTH!! 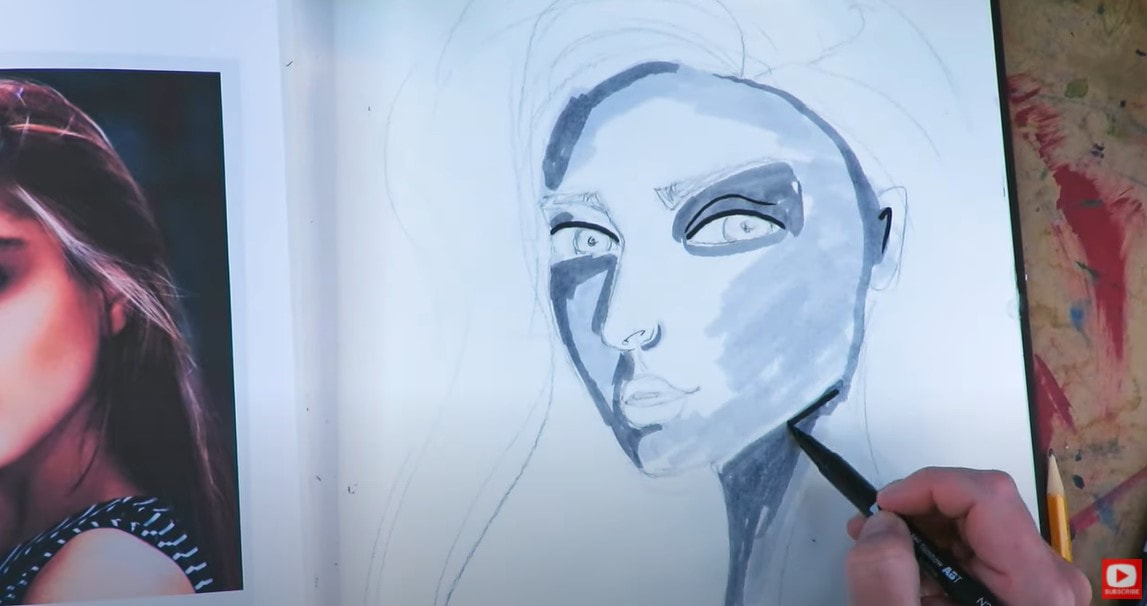
As you'll notice in the video, I followed my lightest shade marker with a medium shade - using my photo reference as a guide to help me note darker shadows, and then switched to a dark shade to indicate the darkest shadows.

Simply adding a little water with your paintbrush will melt ALL the marker layers together to create BEAUTIFUL face shading on your drawing. Isn't this gorgeous???

When you're painting with tombows or any watersoluble marker - make sure each layer you do is completely dry before going back on top with your original supply because the fastest way to kill a marker is to put it into water.
NO markers "like" being added to a wet surface, so simply hit your piece up with a little hair dryer action before you go back in for another marker layer, and you'll be good to go. 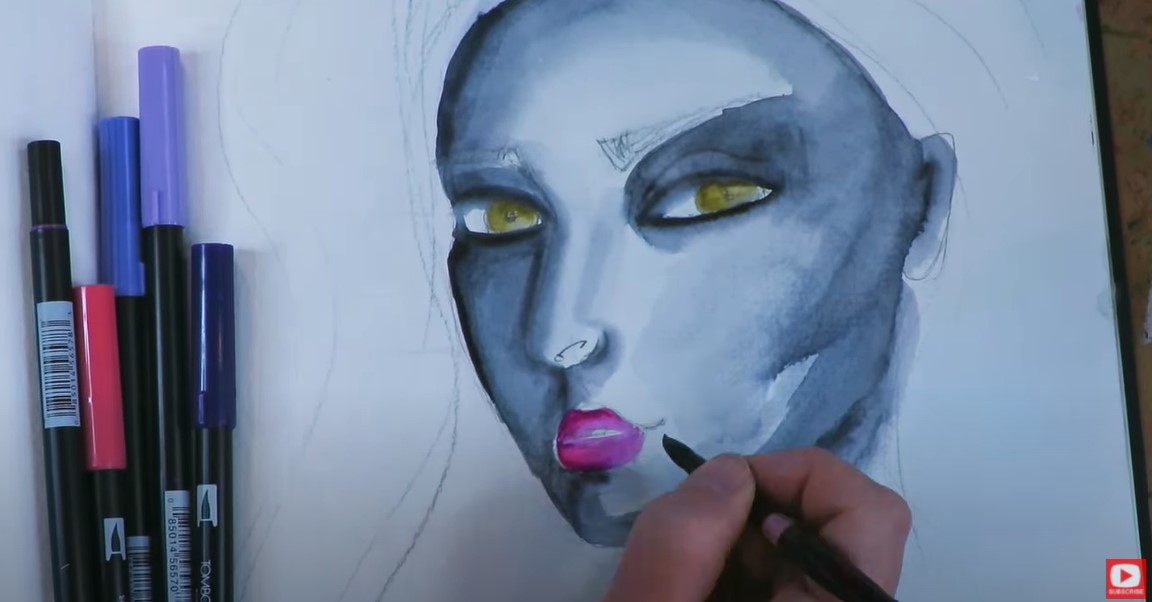
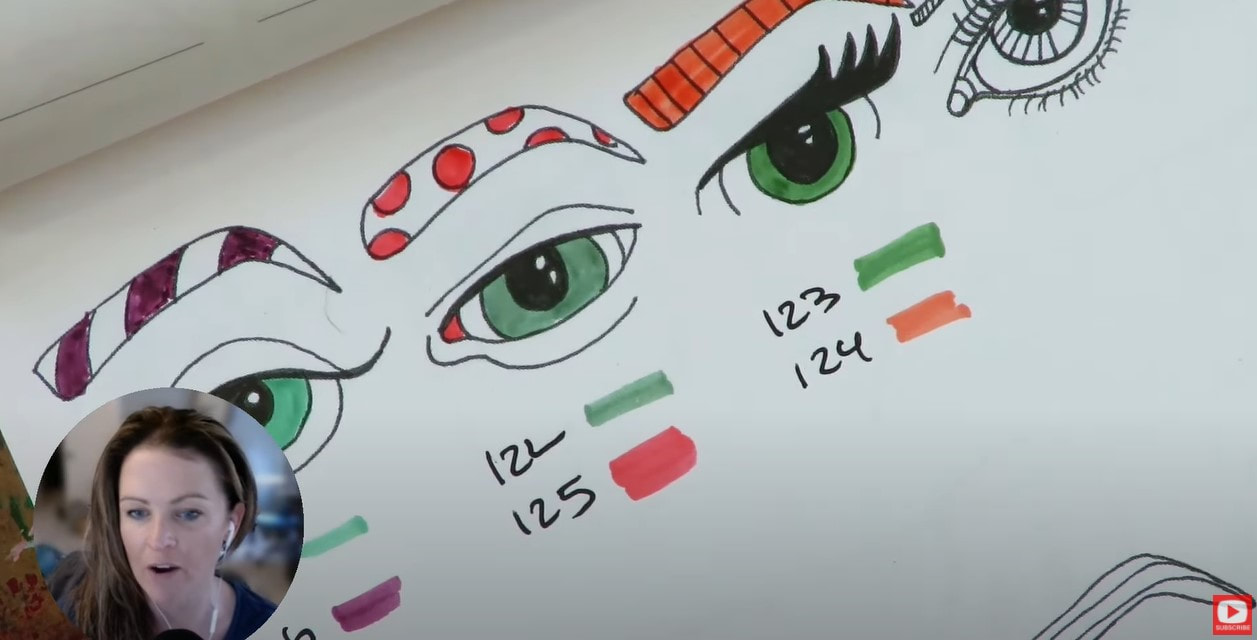
Check out how sparsely I lay down swathes of three purple tombow shades (light, medium & dark) while drawing a hairstyle for this profile drawing. This is ALL the color I put down.
When I'm playing around with watersoluble media I often activate TWO of my marker layers with water, and then draw on top and leave that final layer UNACTIVATED - to make the details pop. 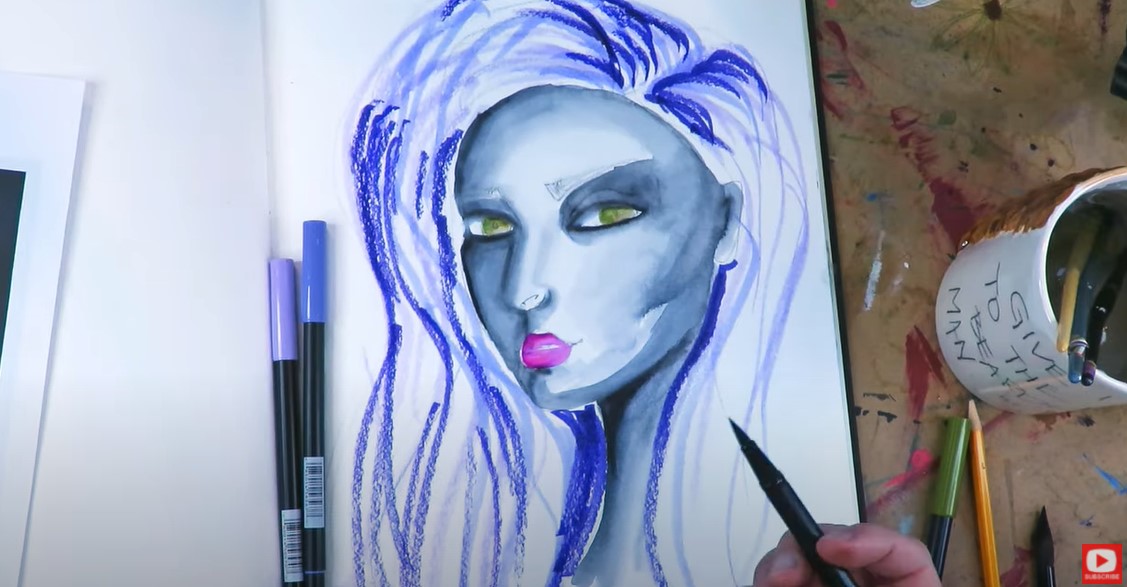
The only drawback I've found with tombows is they are not lightfast. Definitely keep that in mind if you're creating art to sell or gift. I don't actually recommend selling or gifting your originals because of this - but you could TOTALLY sell prints of them!!
I have found that tombows won't fade AS MUCH if your work is in an art journal because they'll be hidden from the sunlight. 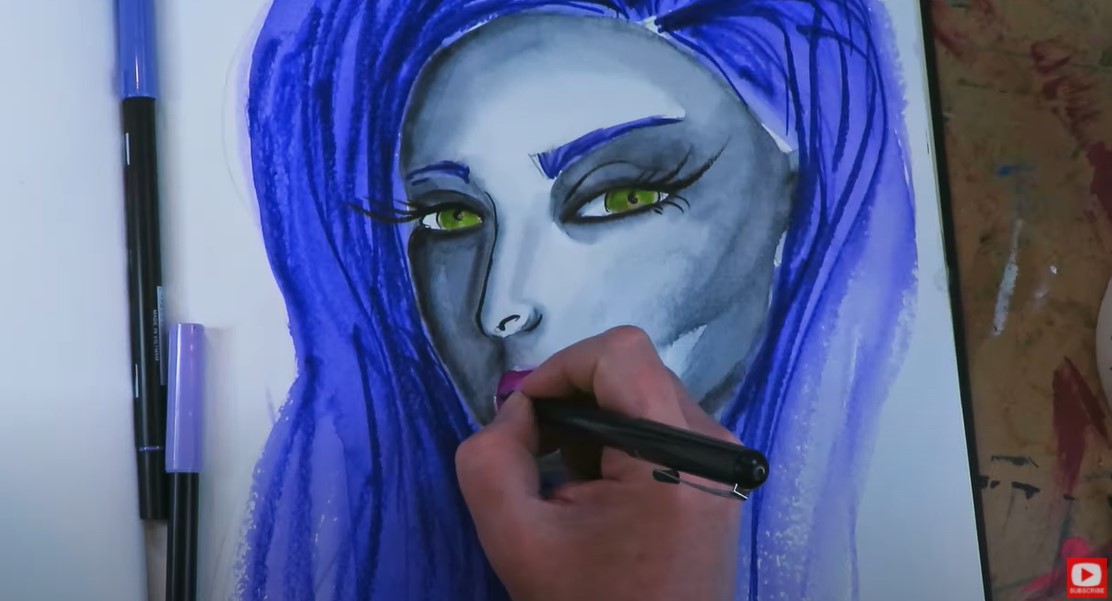
When it's time to add some detail, I pull out my pentel pocket brush. This is my FAVORITE art supply for eyelash drawing (remember NOT to use this until the layers underneath are FULLY DRY).
This pocket brush nib is like a paintbrush- it's made of a group of hairs and doesn't perform like your typical marker. A tombow "brush" nib is basically foam that's been shaped to LOOK like a brush and feel like you're working with a paintbrush (but it provides a bit more control than the pocket brush). If you need help with drawing eyelashes, click the button below and I'll send my EYELASHES CHEATSHEET straight to your inbox.
I've got a great eyelash drawing tutorial on my mixed media channel and another on my YouTube Drawing Channel to help you out if this is something you struggle with.

I hope you enjoy this mixed media tutorial and TRY tombows out for yourself!! They really are fantastic. The colors are unbelieveable and the markers themselves are really affordable. I think you'll love painting with them as much as I do!!
REMEMBER TODAY (APRIL 26th) is the KICKOFF of my FUN FAB FAIRIES WORKSHOP!!!
You can STILL sign up to join me and the rest of the gang for an amazing week of fairy drawing lessons! CLICK HERE to REGISTER. If you find this post well after the live portions of this workshop have ended, all you're missing out on are the daily giveaways and Facebook LIVES. The Fun Fab Fairies course is STILL available at Awesome Art School as a stand alone course for you to enjoy!!
❤️Did you know I've started a FUN new podcast with my Scottish, artsy bestie, Lucy, ALL ABOUT SCOTLAND & the mythical goodness I can't get enough of about this magical place?! YES - we talk about everything including ARE Fairies Real?! (You know I think they are!!)
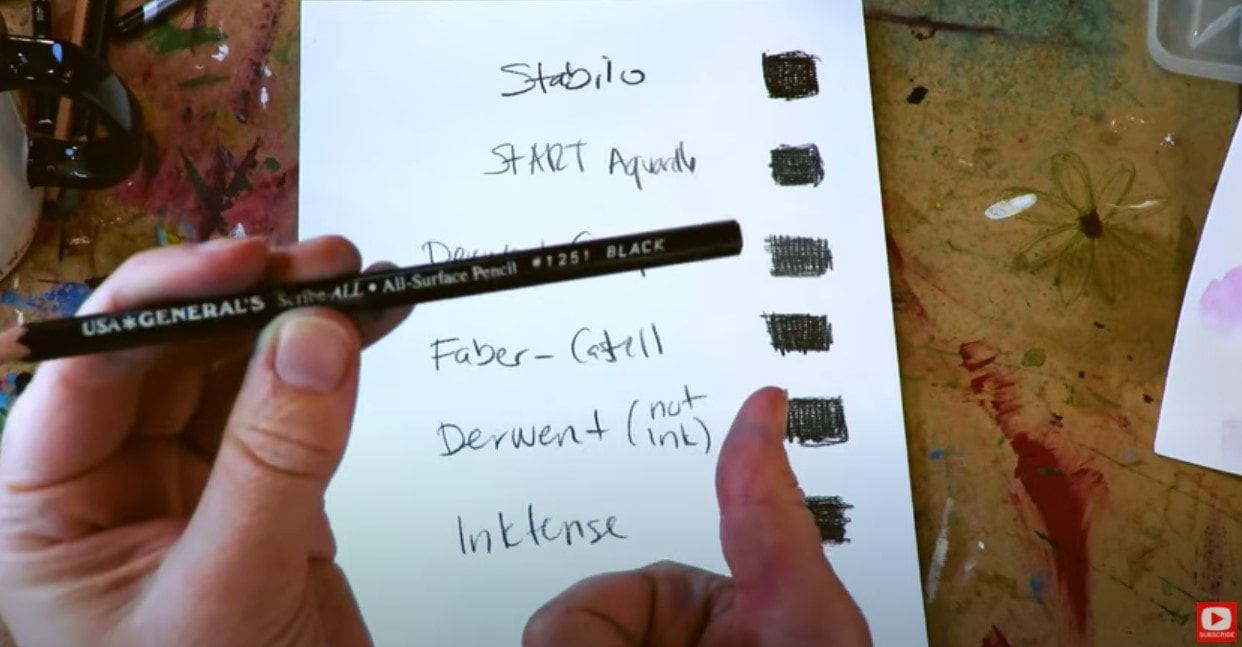
The podcast is called 1 Scot, 1 Not! Check us out on YouTube and here's our podcast website! ❤️Want FREE, immediate access to my Fun Fab Drawing Club and/or Mixed Media Society plus discounts on all my art books, sneak peek at YouTube videos and new book content, behind-the-scenes fun and MORE? Join me over on Patreon today and get HUGE PERKS in return for a small monthly donation. ❤️ CHECK OUT ALL my art books on AMAZON (available in both Kindle and Paperback) ❤️ SIGNED COPIES of my art books on ETSY ❤️ MY FAVORITE ART SUPPLIES on AMAZON ❤️ MY BELOVED FACEBOOK GROUP ❤️ FOLLOW ME ON INSTAGRAM ❤️ FOLLOW ME ON FACEBOOK I have been IN LOVE with my black stabilo for YEARS!! After last week's review of water soluble pencils in color, I decided I should probably put my black stabilo all pencil to the test to make sure it still deserves to be my go-to for mixed media drawing!! Join me over on YouTube to see what I found out!!  Before we continue, super quick announcement! All product links noted below are Affiliate. I may earn a small commission if you choose to order through these links, but by law there is never any additional cost to the consumer for doing so. I only reccommend products I actually use and love. Thank you for your support! It's NO secret that I love my black stabilo all pencil (waaaay cheaper by the dozen, by the way). I've been using this water soluble pencil FOREVER. I tested it against other water soluble pencils years ago and have been using it faithfully ever since. The girl on the right (below) is one of my countless stabilo girls! 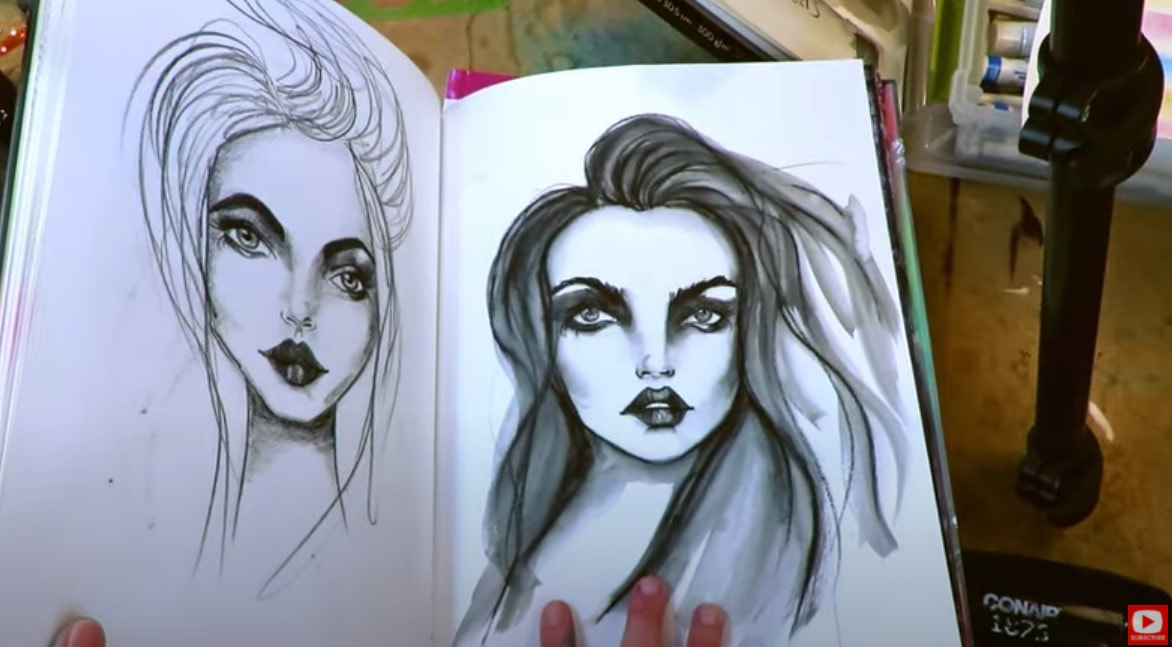 I loved the chick on the right SO much that I put her on the cover of my How to Draw & Find Your Style Book! 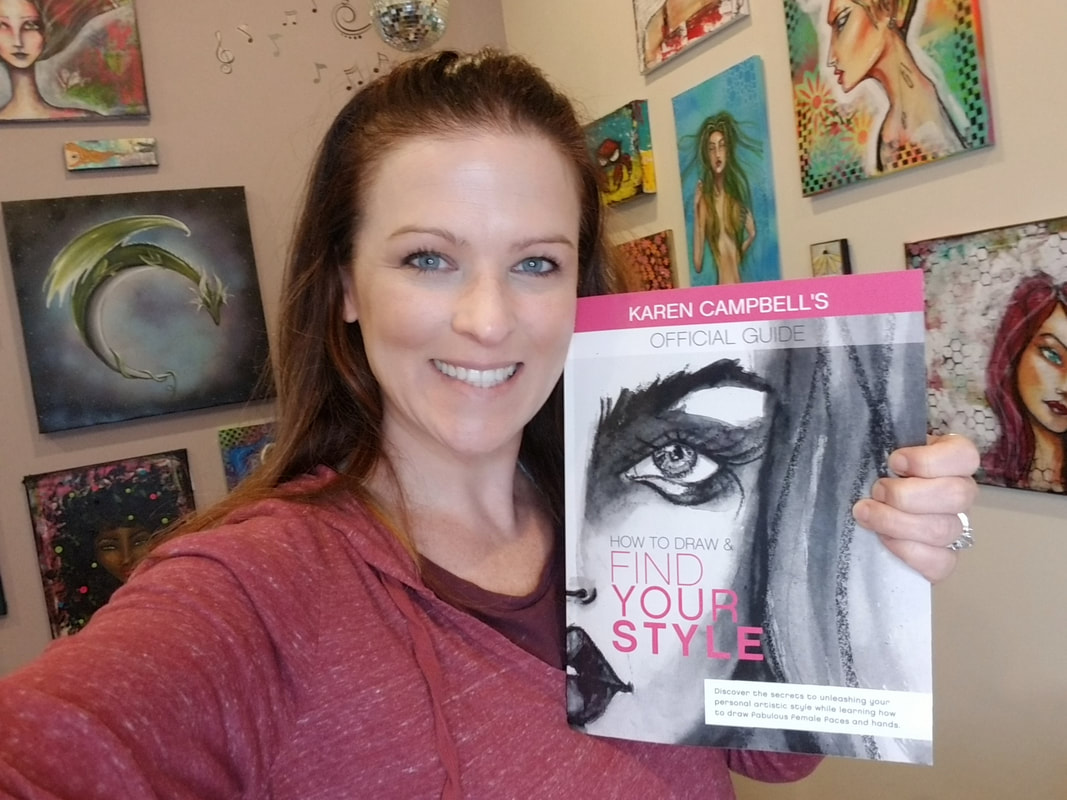 Just to be sure I'm not missing out on anything from another brand, let's put my stabilo to the test. 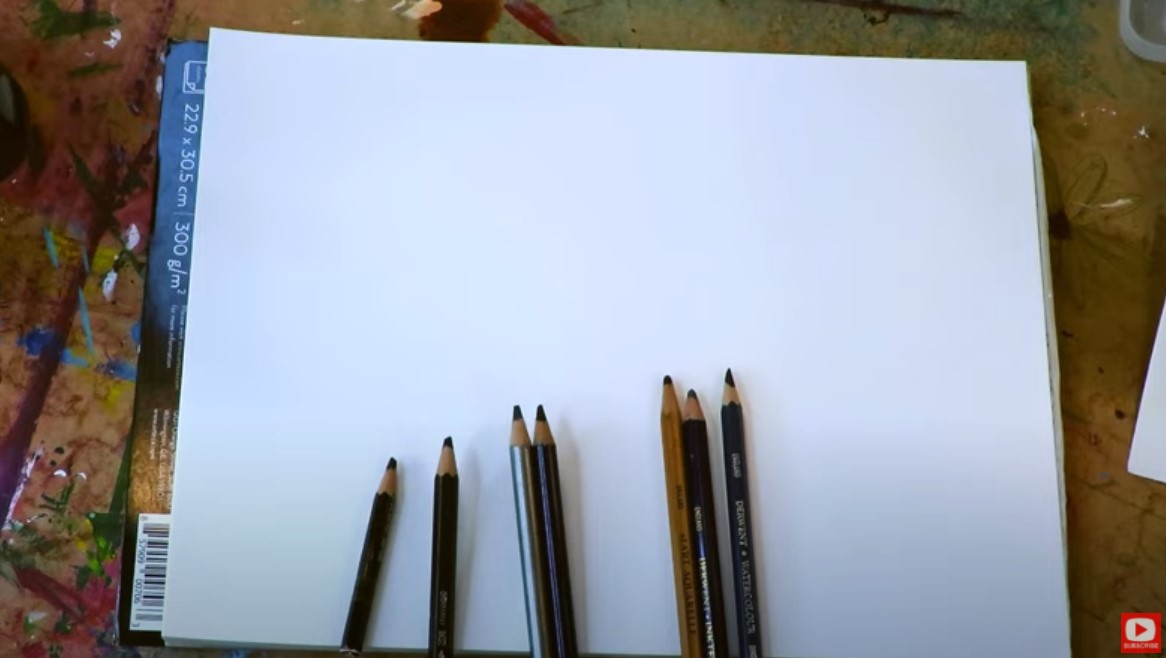 I gathered 7 water soluble pencils and am looking not only for water solubility, but for richness in pigment- something magical I LOVE about my stabilo all.  Products I'm testing today in black include:
 After I write down the name of each product and scribble a little square off to the side, I activate each line with some clean water and a watercolor brush. Be sure to click over to the video to see this in action! 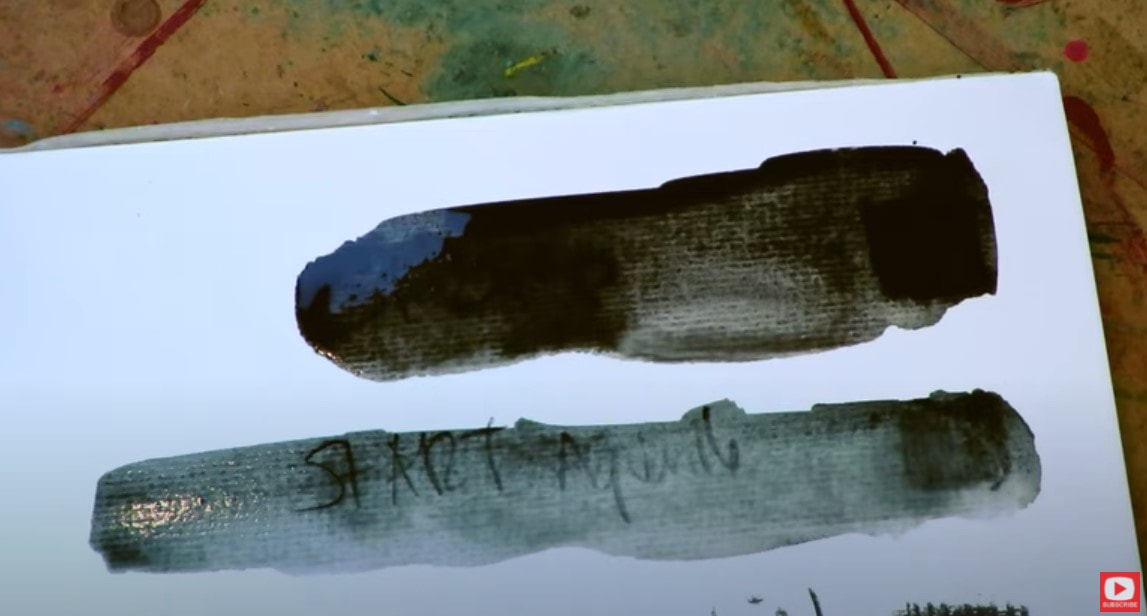 Look at that first line - stabilo NEVER lets me down! You can barely see my writing because there is so much black pigment pooling. YES!! 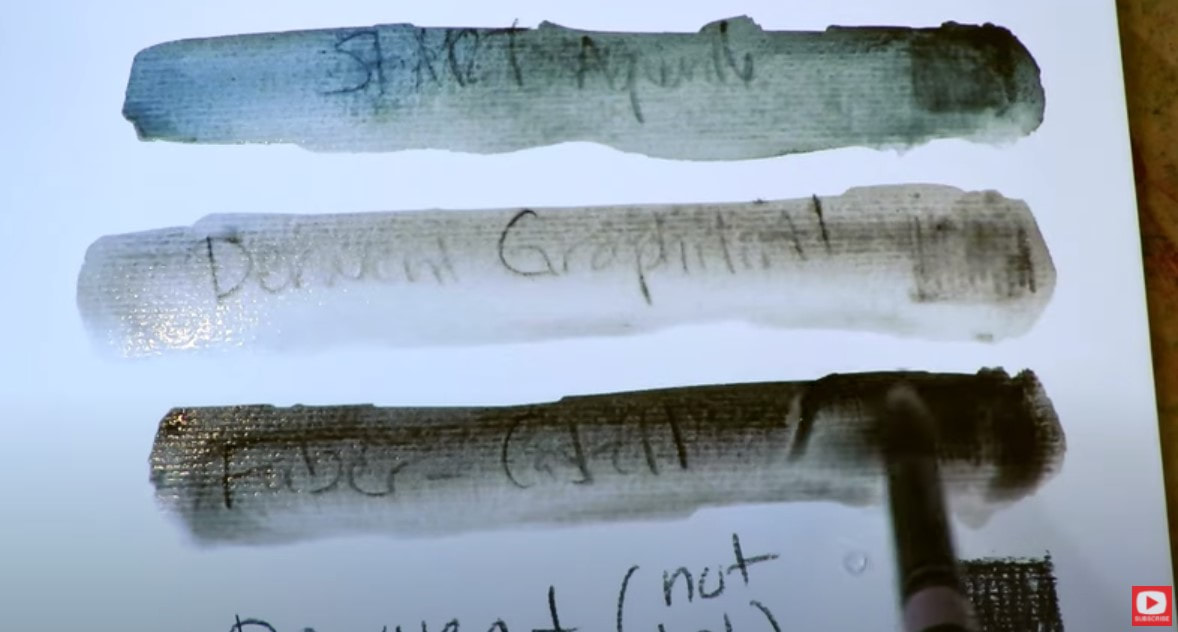 I'm also loving the results of the Faber Castell Albrecht Durer as well. Look at this rich, yummy goodness (third line above). As I do this test, I'm reminded of something I noticed when I did this years ago. Some of these brands seem to have a touch of color in them, or don't feel like they're jet black once activated with water. I'm seeing some faint green in the Aquarell (first line below) and a little blue in my black Derwent watercolor pencil (fourth line below). 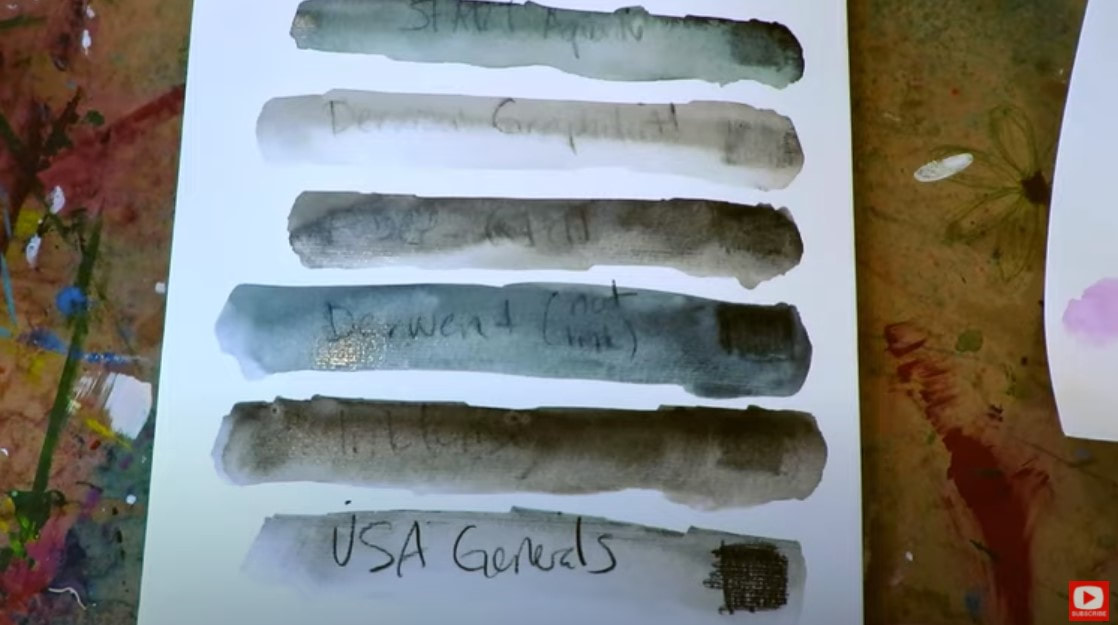 After I dry my paper with the hairdryer, I attempt to reactivate each line to see what happens... and which products I want to recommend for projects using my "Hamburger System." 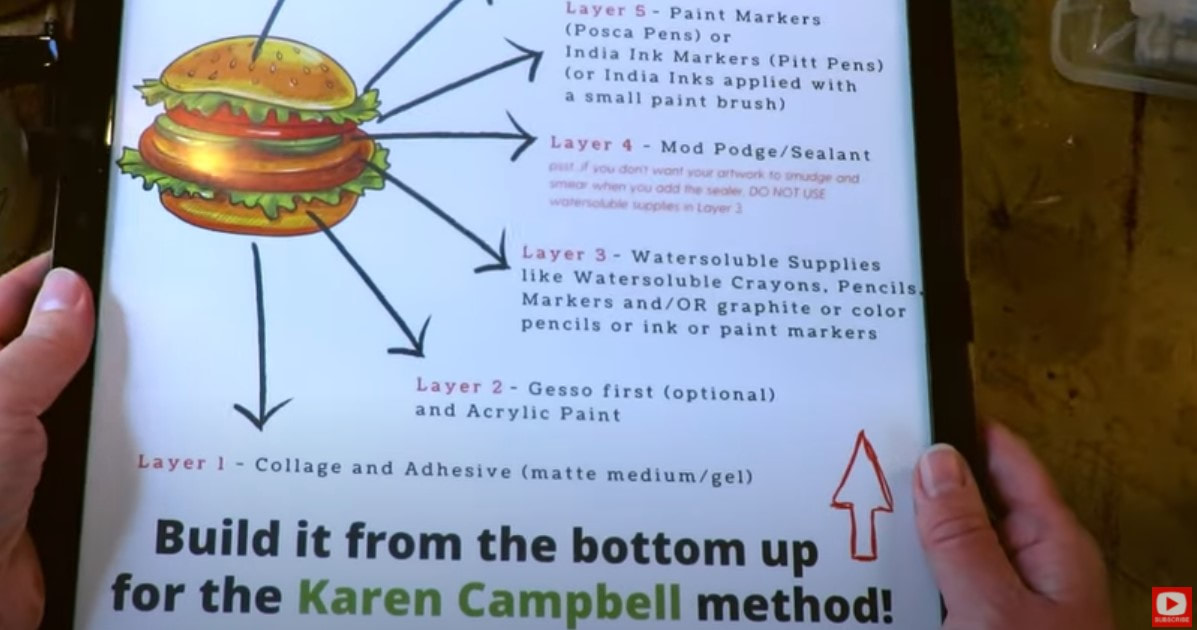 If you're not sure what I'm talking about, the art supply layering system I often use for my mixed media art projects is something I lovingly refer to as my mixed media "Hamburger System." I compare layering my supplies to the way you layer toppings for the perfect burger! I've actually got an entire FUN YouTube series of tutorials, cheatsheets, and even wrote a mixed media art BOOK about it!! Download the FREE, one-page cheatsheet that explains it all by clicking the button below. I'll send it straight to your inbox so you can print it and keep it at your art table for reference to help you with your own mixed media layering. Check out today's video to find out which of these water soluble pencils I recommend using and WHY!! Thanks for hanging out with me today!! ❤️Want FREE, immediate access to my Fun Fab Drawing Club and/or Mixed Media Society plus discounts on all my art books, sneak peek at YouTube videos and new book content, behind-the-scenes fun and MORE? Join me over on Patreon today and get HUGE PERKS in return for a small monthly donation. ❤️ CHECK OUT ALL my art books on AMAZON (available in both Kindle and Paperback) ❤️ SIGNED COPIES of my art books on ETSY ❤️ MY FAVORITE ART SUPPLIES on AMAZON ❤️ MY BELOVED FACEBOOK GROUP ❤️ FOLLOW ME ON INSTAGRAM ❤️ FOLLOW ME ON FACEBOOK Derwent Inktense Pencils are water soluble pencils that ALSO claim to be PERMANENT once dry. I've actually never tried inktense pencils in my Hamburger system and decided to test this permanent claim out first to see if it's true. Get ready for a SHOCKER in today's mixed media art supply demo!! 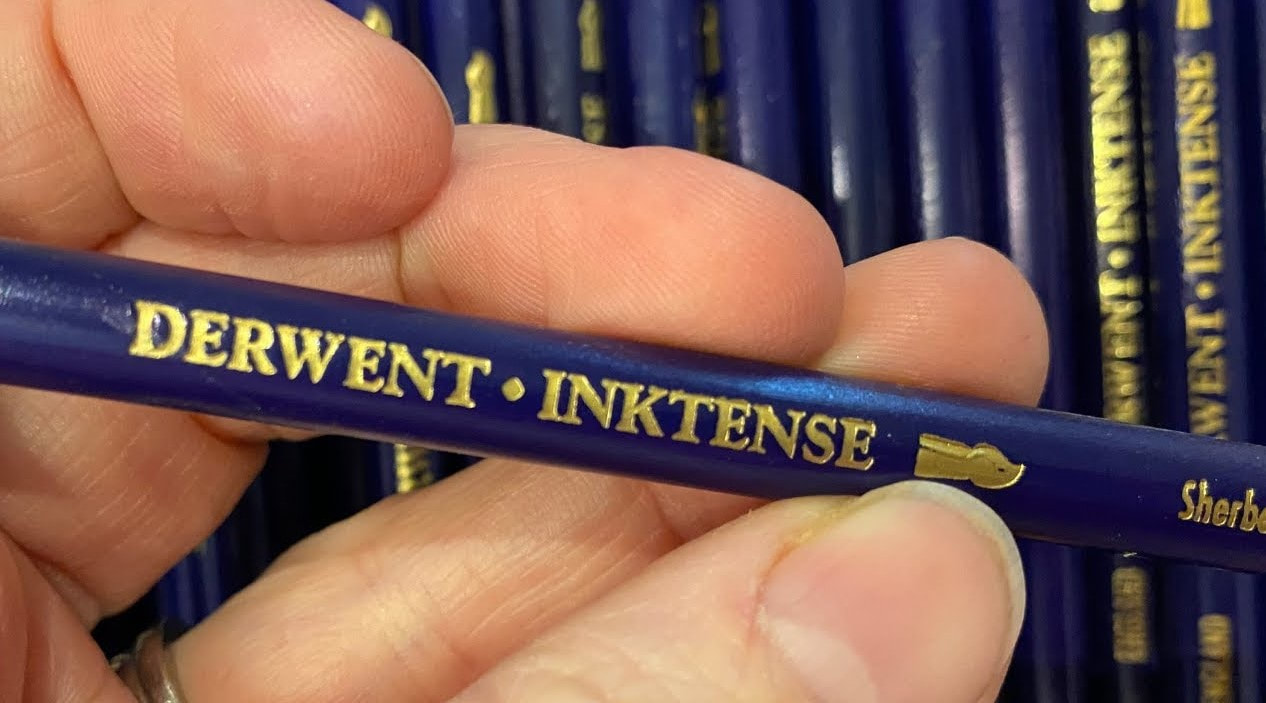 Inktense water soluble pencils are filled with a "magical" ink - that's why they're called "inktense" instead of watercolor pencils. Confession: I never work with Derwent inktense pencils other than to occasionally use them like I would use a watercolor pencil! I decided today's test was the perfect opportunity to try a variety of water soluble pencils vs watercolor pencils to see which ones move the most when I attempt to reativate them all a second time!  If you've got a copy of my hamburger system cheatsheet, water soluble supplies can be used in layer three, OVER your collage and paint layers. Not sure what my Hamburger System is? It's my signature mixed media layering process! I compare layering my supplies to the way you layer toppings for the perfect burger! I've got an entire FUN YouTube series of tutorials, cheatsheets, and even wrote a mixed media art BOOK about it!! Download the FREE, one-page cheatsheet that explains it all by clicking the button below.  I'll send it straight to your inbox so you can print it and keep it at your art table for reference to help you with your own mixed media layering.  I've collected a ton of watercolor pencils and watersoluble pencils over the years because these are one of my favorite ways to draw something cute, and add a little quick shading with watercolor effects. I've lined up 10 watercolor and watersoluble pencils for today's Derwent Inktense review. 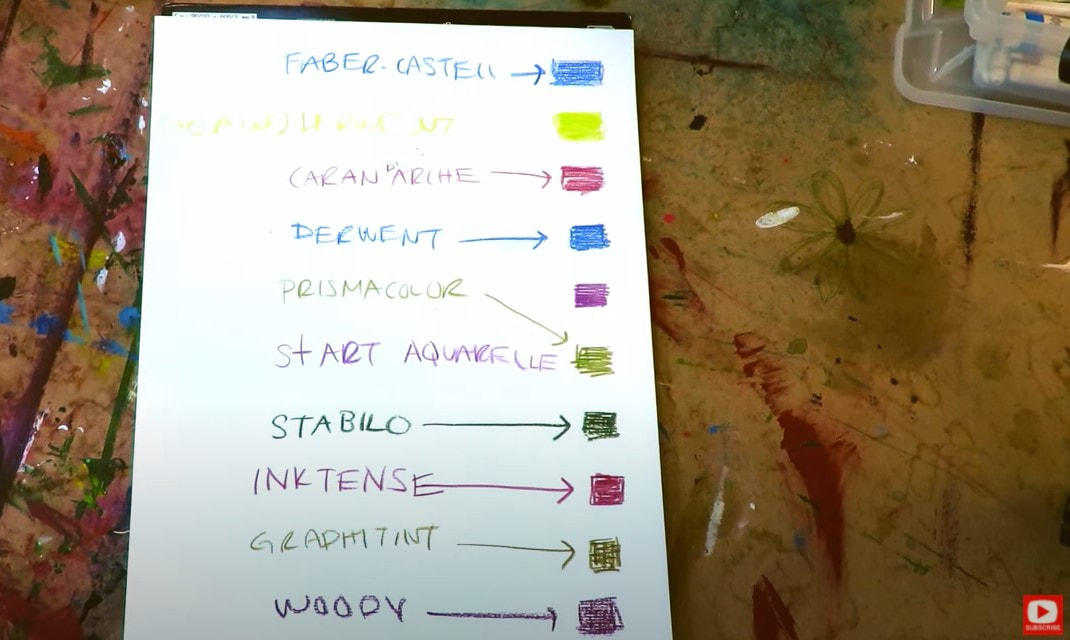 So far I'm loving how the Aquatones (also by Derwent) are activating. Sadly, this product is becoming hard to find though. There's a rumor it was discontinued, so if you go hunting for them, you might have a hard time. 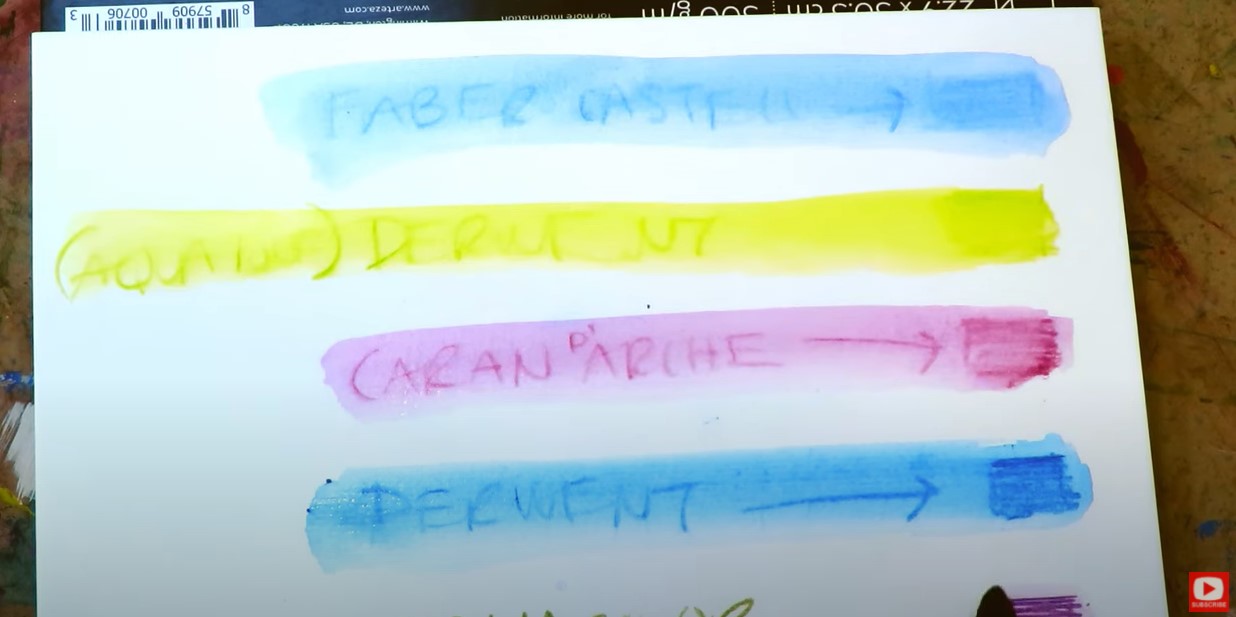 As you can see in today's mixed media art supply demo, even after I activate all the products, you can still see the pencil line from each one (except for the aquatones - which really seem to melt as soon as the water hits them). 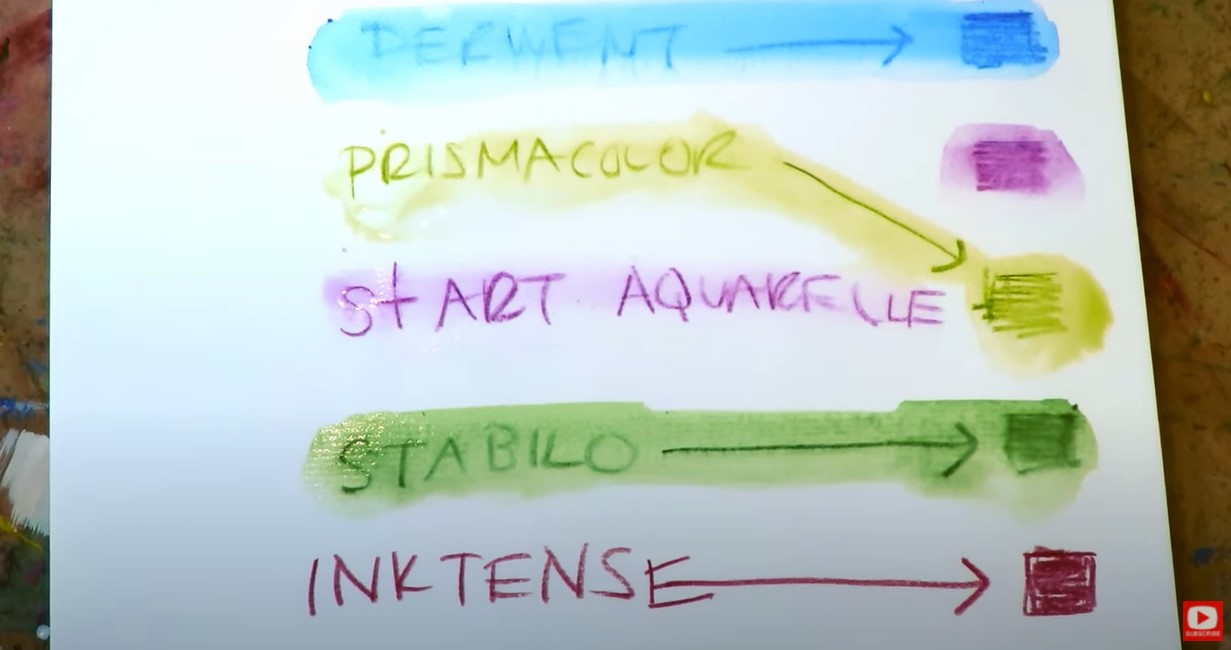 This is a super cool effect if you like the look of mixed media drawing and still want pencil lines to be visible in your work. If you don't - you may prefer to reach for a watercolor marker, because that pigment will totally dissolve for you. After I activated each product, I hit the page with my hairdryer to make sure each one is fully dry. 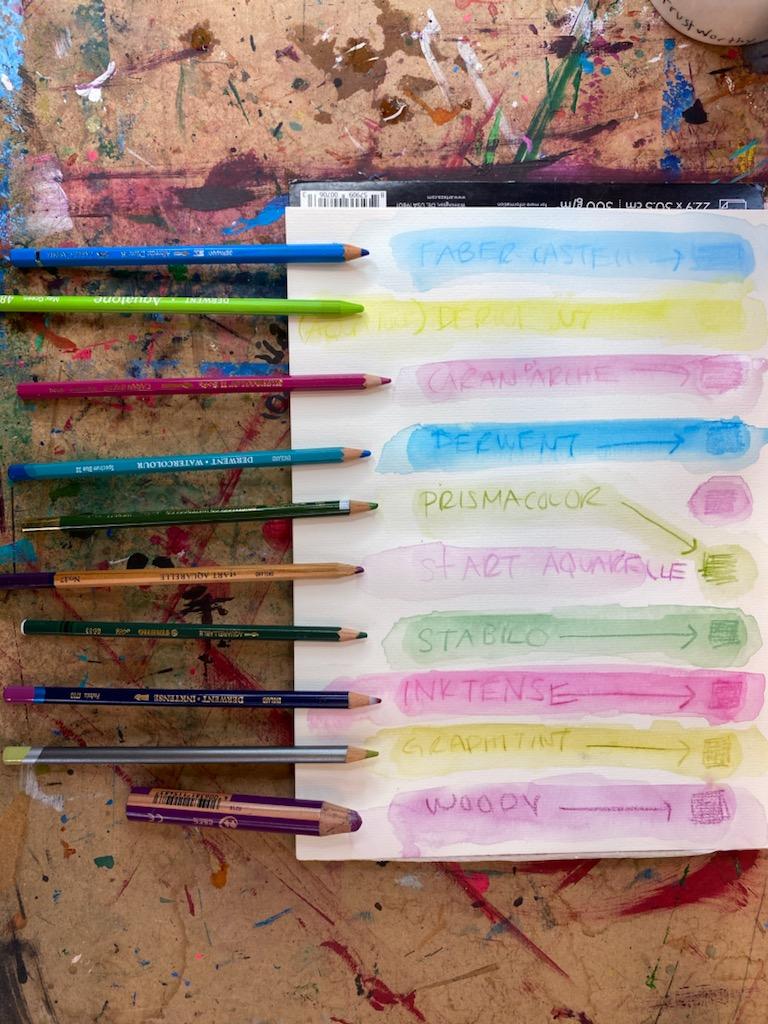 Once I dried everything and came back to rewet, the Derwent Aquatones (woodless pencil), Watercolor and Derwent Graphitint are the MOST watersoluble. I tested the inktense pencils last! CLICK OVER to watch the video and find out if they live up to their marketing claim ... is the ink permanent, or will it move? Thanks for hanging out with me today! I hope you have a fab week!!
❤️Want FREE, immediate access to my Fun Fab Drawing Club and/or Mixed Media Society plus discounts on all my art books, sneak peek at YouTube videos and new book content, behind-the-scenes fun and MORE? Join me over on Patreon today and get HUGE PERKS in return for a small monthly donation. ❤️ CHECK OUT ALL my art books on AMAZON (available in both Kindle and Paperback) ❤️ SIGNED COPIES of my art books on ETSY ❤️ MY FAVORITE ART SUPPLIES on AMAZON ❤️ MY BELOVED FACEBOOK GROUP ❤️ FOLLOW ME ON INSTAGRAM ❤️ FOLLOW ME ON FACEBOOK Faber Castell Gelatos are one of my all time FAVORITE art supplies. Lots of mixed media artists aren't quite sure how to use them, or only associate gelatos with background work. In today's art supply demo, I'll show you why they're a MUST HAVE in my studio + the QUICK & EASY way I use them to create MAGICAL mixed media portraits. If you're a beginner in the world of mixed media art, or just curious about what gelatos can do for you - today's video is a MUST SEE!!  Before we continue, super quick announcement! All product links noted below are Affiliate. I may earn a small commission if you choose to order through these links, but by law there is never any additional cost to the consumer for doing so. I only reccommend products I actually use and love. Thank you for your support! 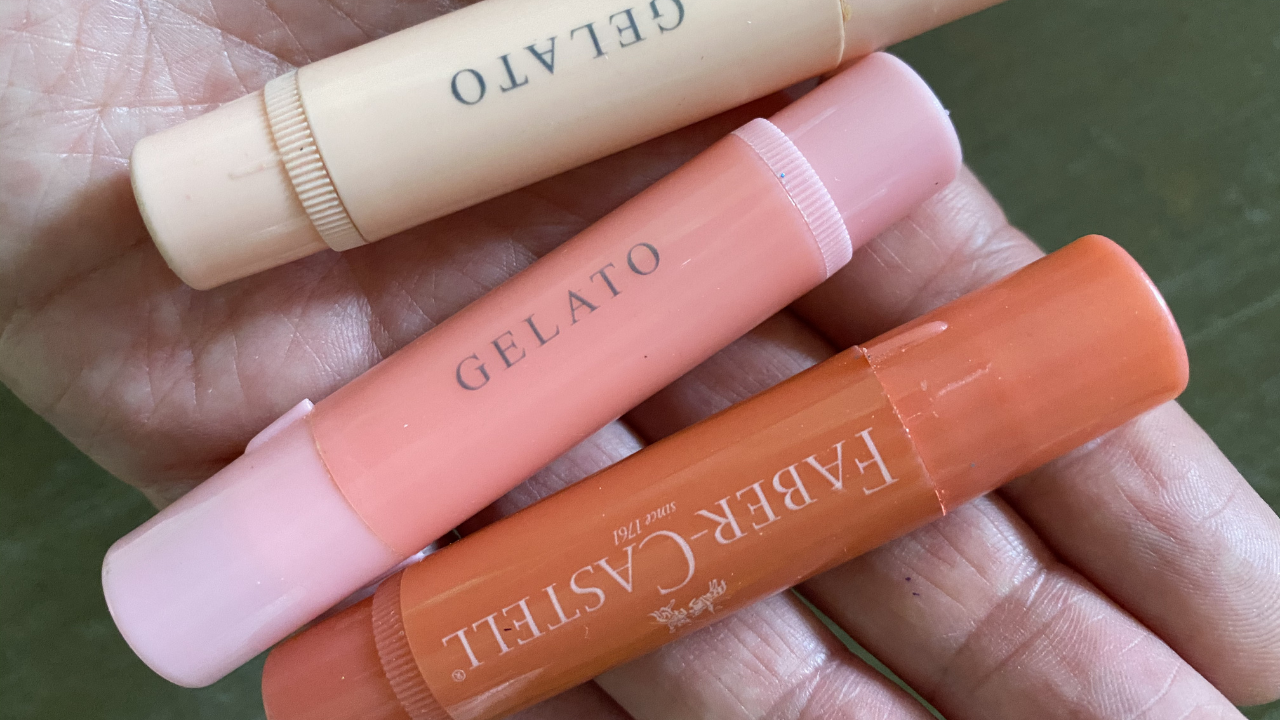 When students first start working with me, they often ask, what are gelatos? Gelatos are a fun art supply made by a fine art supplies company called Faber Castell! Gelatos are supposed to be a fine art product, but I think a lot of artists would probably put them into the "craft" category because they are not light fast. If you haven't seen these before, they kinda look like a tube of chapstick with a blunt tip. 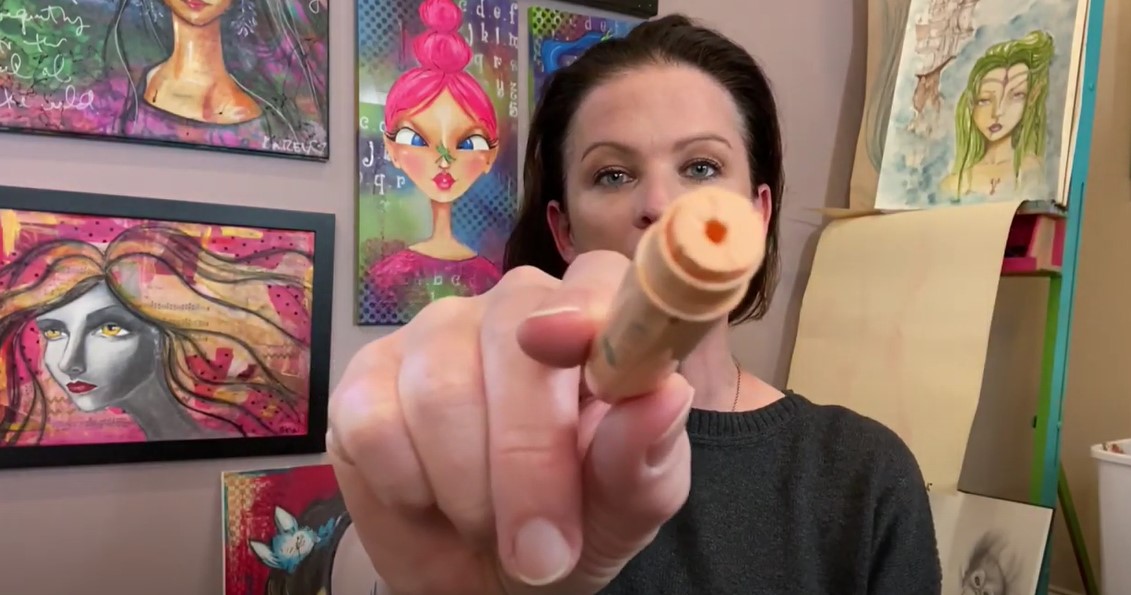 Gelatos come in a wide range of colors. They even have a metallic line. I do want to caution you if you're drawn to metallics. If you follow me and have picked up the Faber castell gelatos metallic set, hoping to use them like I do in my Mixed Media "Hamburger" projects, unfortunately they DON'T work. So just be forewarned, if you want to play along with me- the metallic version has been tested, and sadly failed. Pick up the flat/matte set and you'll be good to go! In fact, here is my favorite. It's got all the skin tones I love, and I think you'll REALLY enjoy yourself!! Not sure what my Hamburger System is? It's my signature mixed media layering process! Lots of people struggle with understanding their mixed media art supplies and how they work best together. It's really not that hard once someone shows you how! I compare layering my supplies to the way you layer toppings for the perfect burger! I've got an entire FUN YouTube series of tutorials, cheatsheets, and even wrote a mixed media art BOOK about it!! Download the FREE, one-page cheatsheet that explains it all by clicking the button below. I'll send it straight to your inbox so you can print it and keep it at your art table for reference to help you with your own mixed media layering.  If you haven't worked with them before, gelatos are a watersoluble product. That means if you put them down on a piece of paper and add water to them - they WILL melt and move around on you. There are a lot of other products on the market that work just like gelatos- including Marabu art crayons (they can really smear on you) and Distress crayons (not lightfast at all, so I quit using them).  What I LOVE about gelatos is they're not AS watersoluble as these other brands. The way that I like to use them is for accentuating the shading and tones on top of my acrylics. They blend out just perfectly, and I'll show you in today's video. I think they're AMAZING for adding skin tone shading, or adding any shading on any subject you're featuring in your mixed media projects! 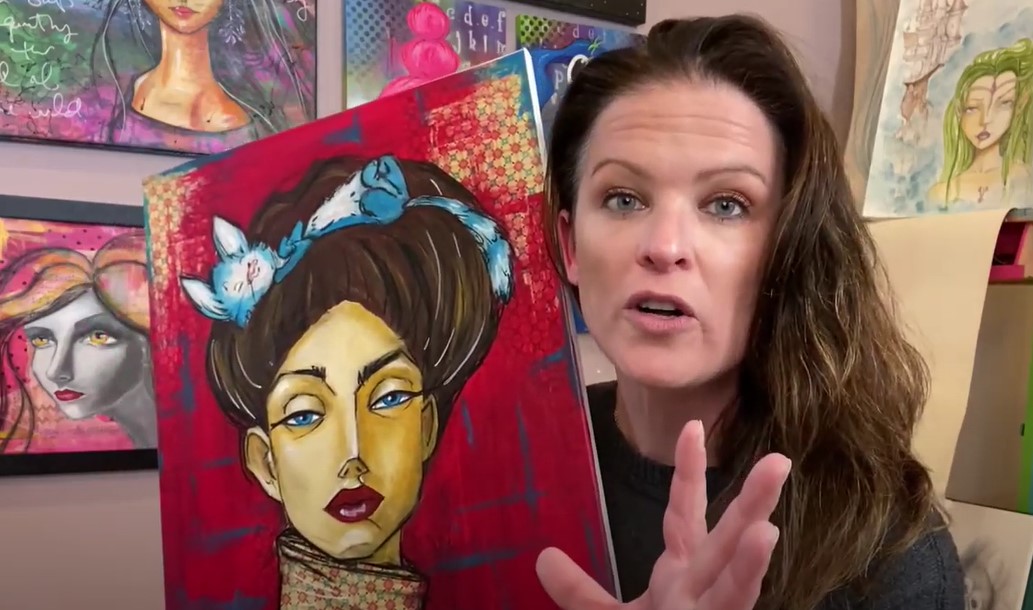 Personally I love mixed media projects to be fast and FUN!! And I want to see an instant success. For me, Faber-Castell gelatos DO just that. I don't have to spend TONS of time blending my acrylic paints, I can just work some gelatos on top of my acryilcs, it's super easy, and BOOM. Gorgeous shading, every time! Watch the video to see where I've used gelatos specifically in this cute mixed media face and in the one above. 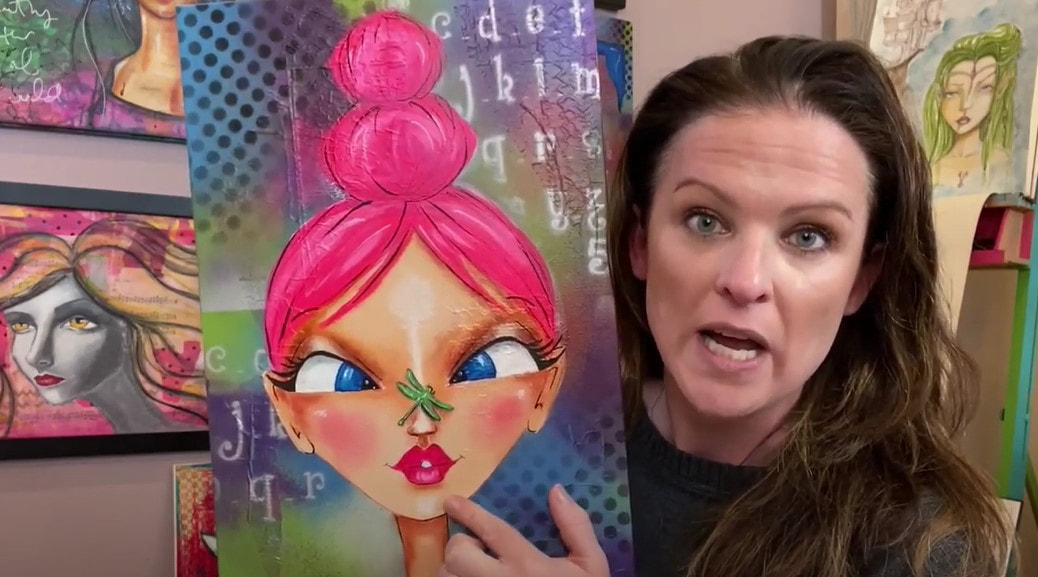 Now, let's move on to the product demo! CLICK over to the video so you can see exactly what I'm talking about ;) To get the demo started, I painted an acrylic head shape in four different skin tone shades using craft paints. Using craft paint is totally normal for me when I'm doing skin tones because I love how the paint that comes out of the bottle in the prefect skin tone I'm looking for in a base coat. I don't have to mix a thing! Then I add 2-3 shades of gelatos on top for shading, and they look amazing! 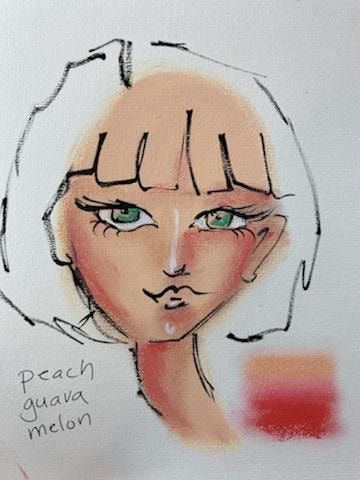 I noted the gelato shades I used in the above girl off to the side, and showed you just how EASY it is to blend with these on the right. They totally melt right into each other. And this is without adding anything to them. 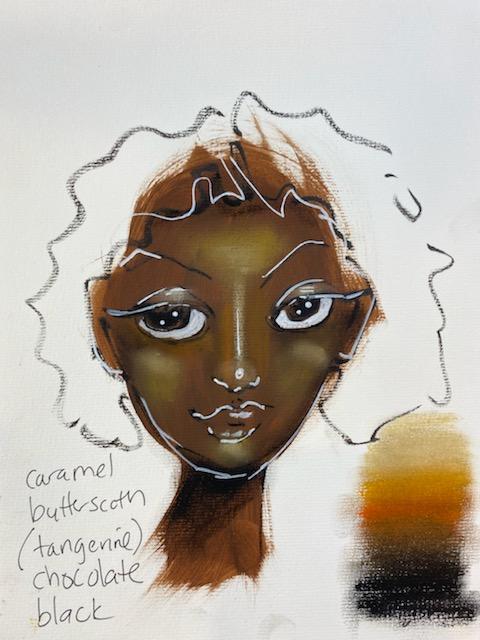 In this one I used five shades of gelatos instead of three because I just couldn't stop! LOL! I love these things. Isn't that the most beautiful blend off colors off to the right? I told you these things were magical for mixed media work!! 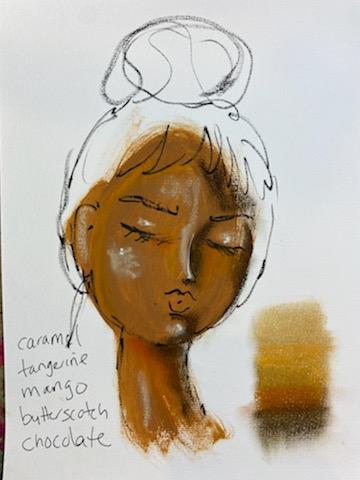 So fun!! I love how these shades blend together for a rich medium skin tone. You really can add such a rich layer of color to your faces and I'm not kidding... it only takes a couple of strokes and a little blending with your finger and you're done. SO much faster than doing countless layers of blending with your acrylics!! The highlights throughout this face (above) were done in the color caramel. Using white would've been too strong here. Make sure you try incorporating tangerine if you're playing with darker skin tones because it REALLY adds a beautiful effect. 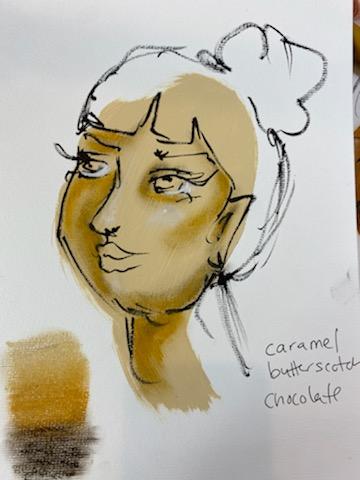 And here is the last one! Just a different direction from the first pale skinned girl. This one goes more into the yellow color family and butterscotch. If you look closely, you'll see a few white highlights I added with my white gelato. This has a very soft effect. And again, SUPER easy and fast. Especially if you're only using three shades! 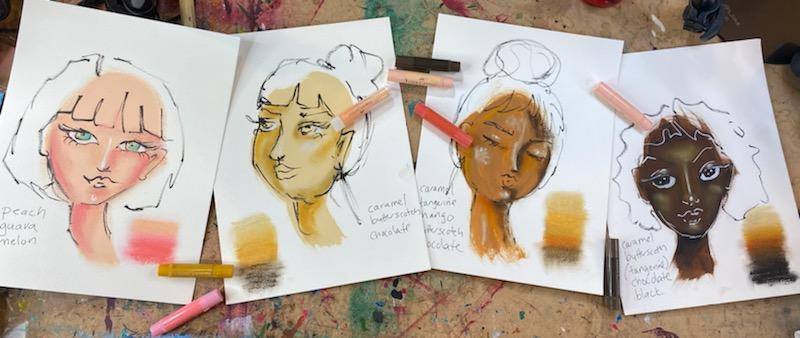 Now! If this was a "real" mixed media project for me (not just a value scale demo showing you how I love to use gelatos)... there are a lot more steps I take to tie a project together. Be sure you click over to the video to see a quick demo of what comes next. I know tons of people have questions about how to SEAL faber castell gelatos! I have found they do fantastic with a layer of mod podge on top! Check this out...  but this STILL isn't the end... There's even MORE!! If you want to see what comes next, click over to watch my Hamburger System playlist after today's video, and I'll take you layer by layer through the entire SUPER FUN process!! Thanks for hanging out with me today! I hope you have a fab week!!
❤️Want FREE, immediate access to my Fun Fab Drawing Club and/or Mixed Media Society plus discounts on all my art books, sneak peek at YouTube videos and new book content, behind-the-scenes fun and MORE? Join me over on Patreon today and get HUGE PERKS in return for a small monthly donation. ❤️ CHECK OUT ALL my art books on AMAZON (available in both Kindle and Paperback) ❤️ SIGNED COPIES of my art books on ETSY ❤️ MY FAVORITE ART SUPPLIES on AMAZON ❤️ MY BELOVED FACEBOOK GROUP ❤️ FOLLOW ME ON INSTAGRAM ❤️ FOLLOW ME ON FACEBOOK |
Karen CampbellFounder of Awesome Art School. Mixed Media Artist. Author of 18 Instructional Art Books! 
   
 Archives
April 2024
Categories
All
|
 RSS Feed

"Karen is flipping hilarious and she's very real...I like the way she teaches in a way that really gives you confidence, whether you're a beginner or advanced there's always something new to learn!"
- Elizabeth W. |
What Fans Are SayingKaren, you are absolutely fabulous! You make me feel like I can draw anything. I have recently retired and finally have the time to do some of the art that I have loved since I was in school. I am really at the beginning of my art journey and I hope to learn as much as I can. Thank you for all you do. |
Contact ME |