
EASY Fairy Drawing in Alcohol Markers with Karen Campbell [Week 3 #50FunFabFaries Challenge]14/6/2022
Wanna create this EASY fairy drawing with me in alcohol markers? These are one of my FAVORITE art supplies to use when shading faces I draw. If you've never tried them before, stick with me - I'll guide you step by step in today's drawing tutorial as we continue with week three of the #50FunFabFairies drawing challenge!
To find ALL the info for the FREE #50FunFabFairies drawing challenge, simply click the button below to receive instant access to ALL the fairy reference images for each drawing prompt, plus info on supplies, cheatsheets and more!

Wanna become a better artist? Do today's lesson (and every lesson of the challenge) five times, making a few creative alterations of your choice, and watch your skills soar as you practice fairy eyes drawing, fairy ears drawing AND fairy hair drawing 50 different ways!
Before we continue, super quick announcement: All product links are Affiliate. I may earn a small commission if you choose to order through these links but by law there is never any additional cost to the consumer for doing so. I thank you for your support.
Just because we're switching up our supplies for week three of #50FunFabFairies, I don't want you to get distracted from the actual purpose of this fairy drawing challenge - which is increasing your drawing skills!
You're learning how to draw faces and where to look in reference images for face shading guidance so you know how to add depth to your drawings. If all you have is a pencil and a piece of paper and you want to do this drawing challenge - that's perfect. You're good to go! All that matters is you draw. 
If you're new to my world, my absolute favorite alcohol markers are copics, but they cost between $8-9/each, so when I teach my students how to use alcohol markers I use Ohuhus (especially for skin tones!) because they only cost $1/marker.
I was recently approached by a company called ArtBeek to try out their alcohol markers. I said I would because their cost per marker is only 40 cents and they have a brush nib on their markers -which is a must have for me. So today's project is not only our #50FunFabFairies drawing prompt number 3, it's a product test and review for ArtBeek Alcohol Brush Markers. 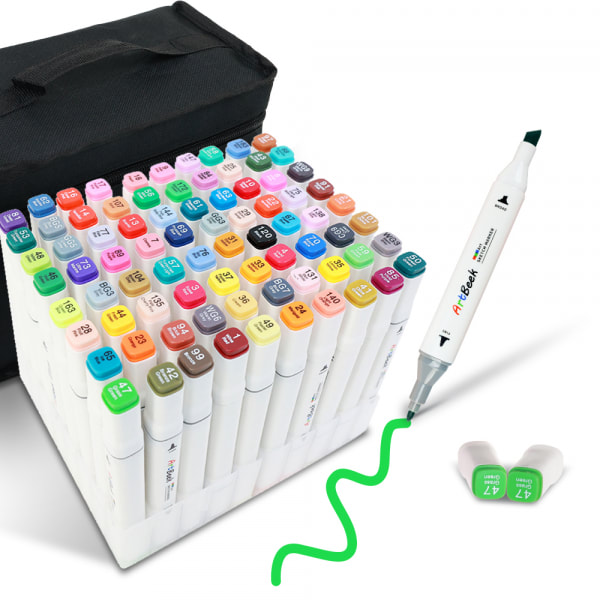
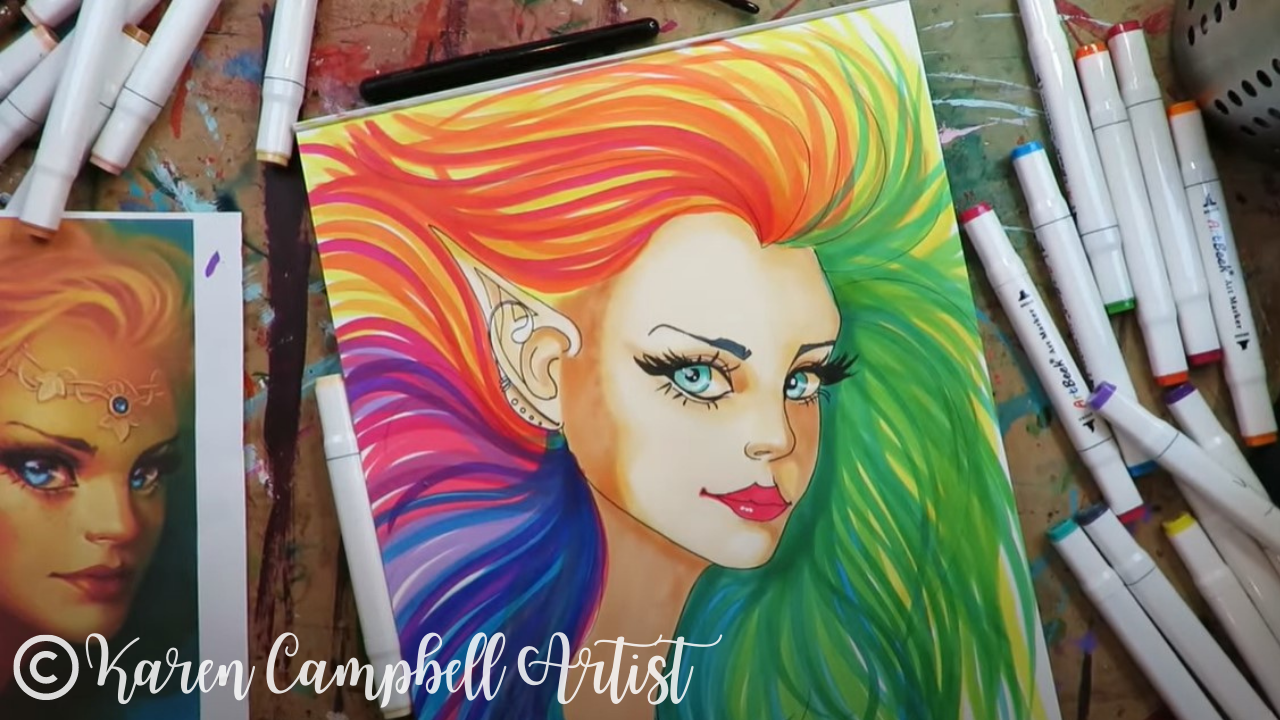
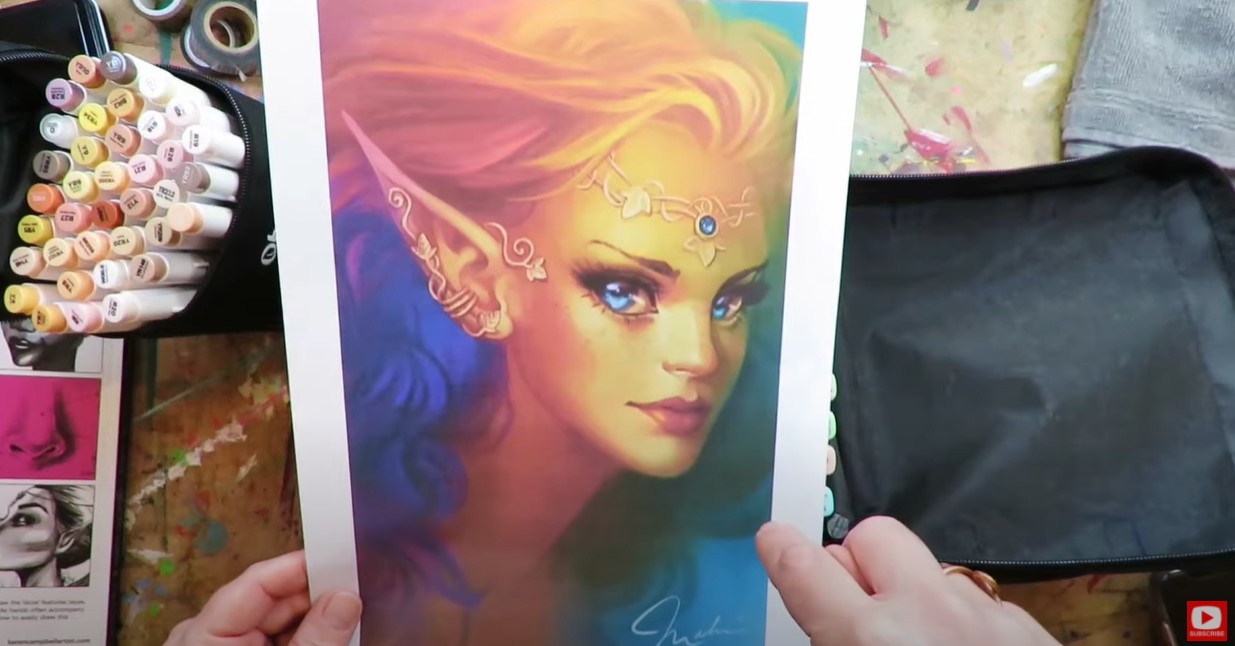
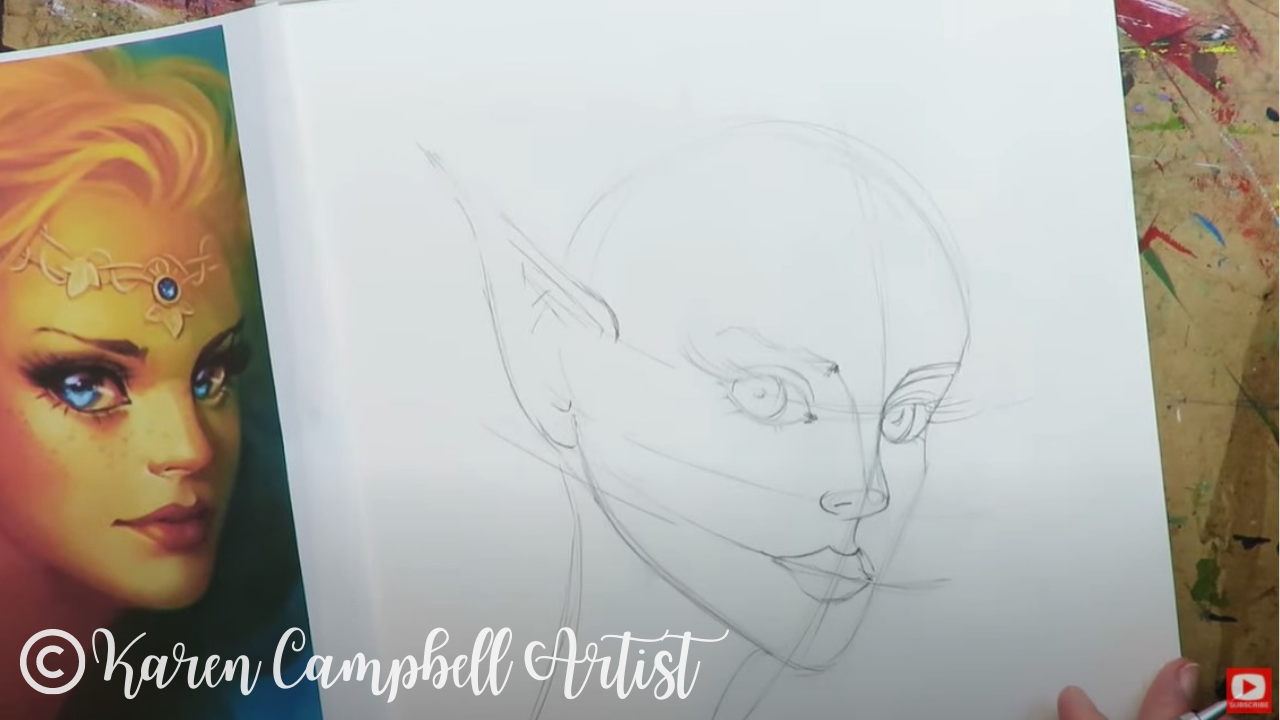
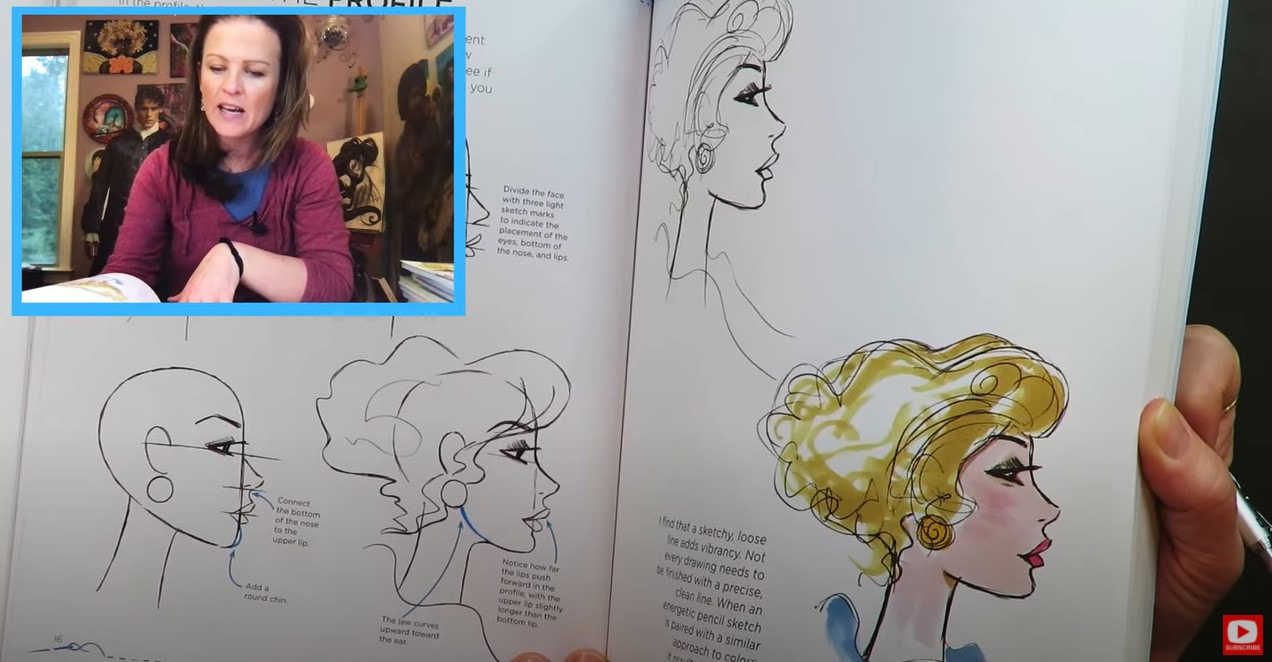
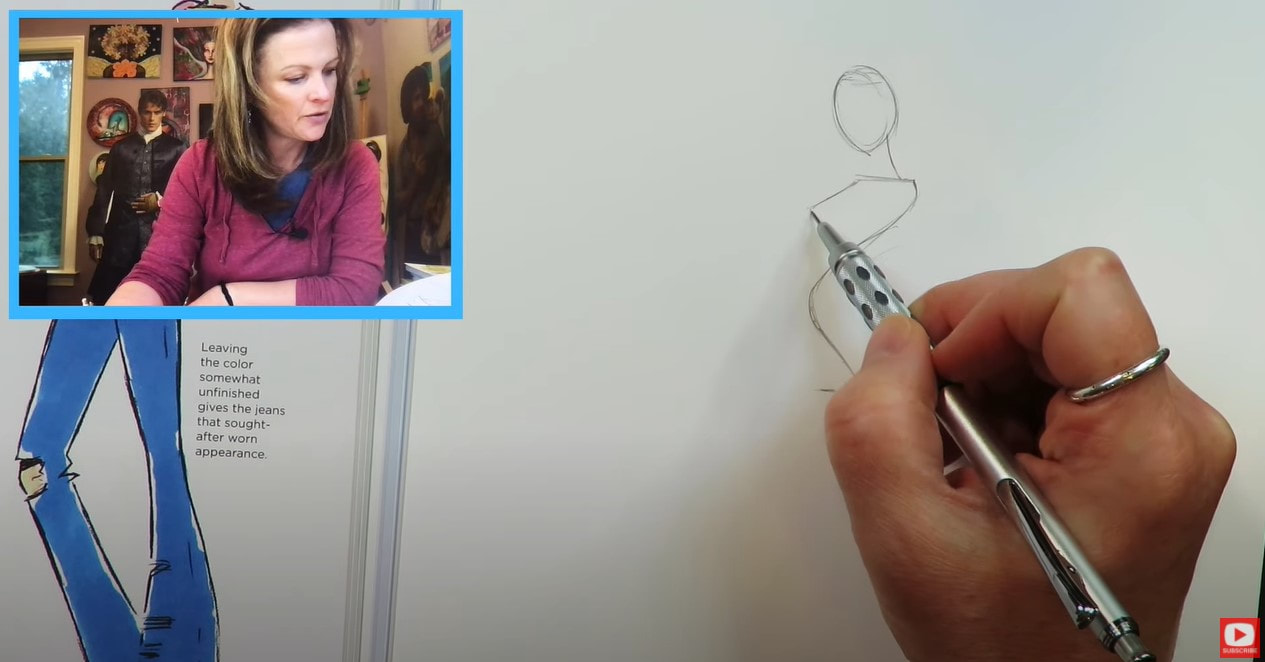
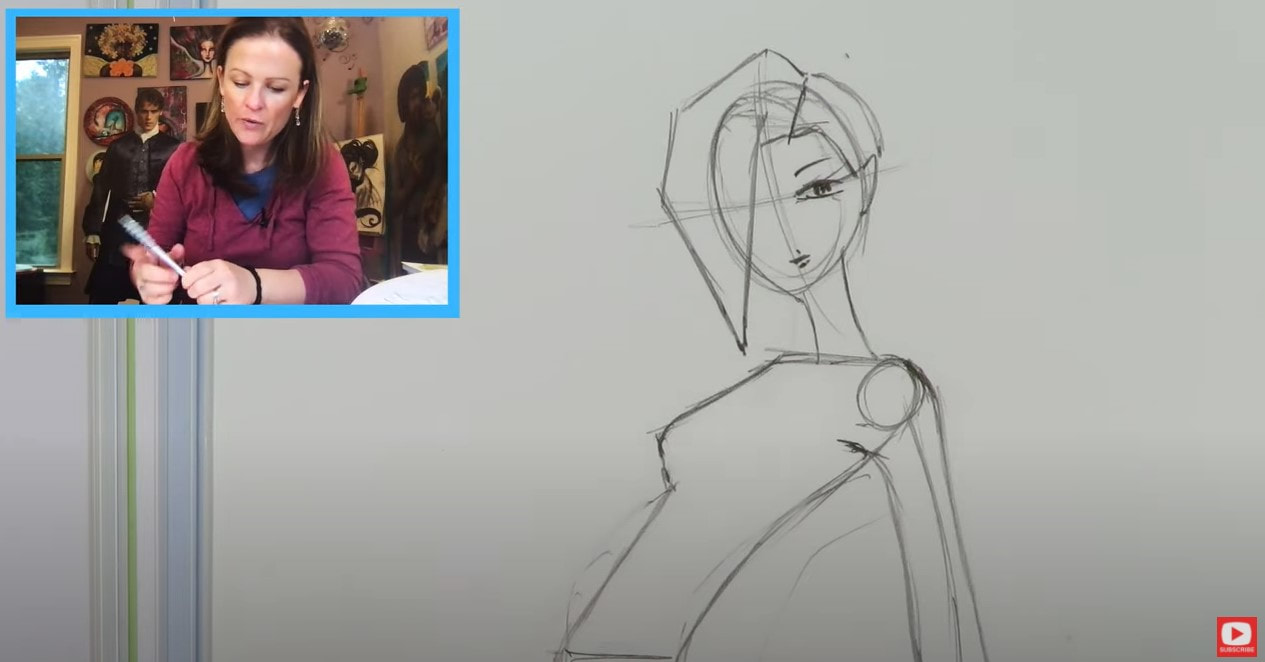
The fairy face drawing we're doing today is a side profile drawing in the three quarter view pose. While this is the most challenging view to draw - I think it's important for you to start practicing this right away so you don't feel intimidated.
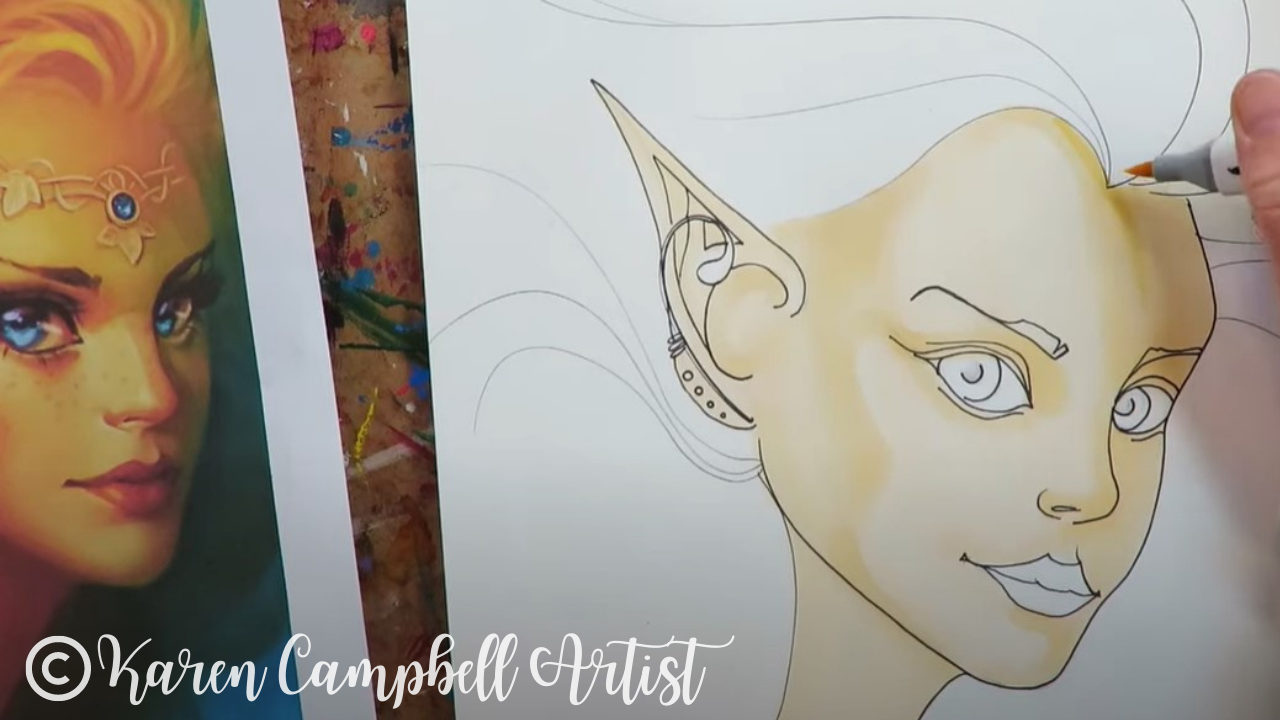
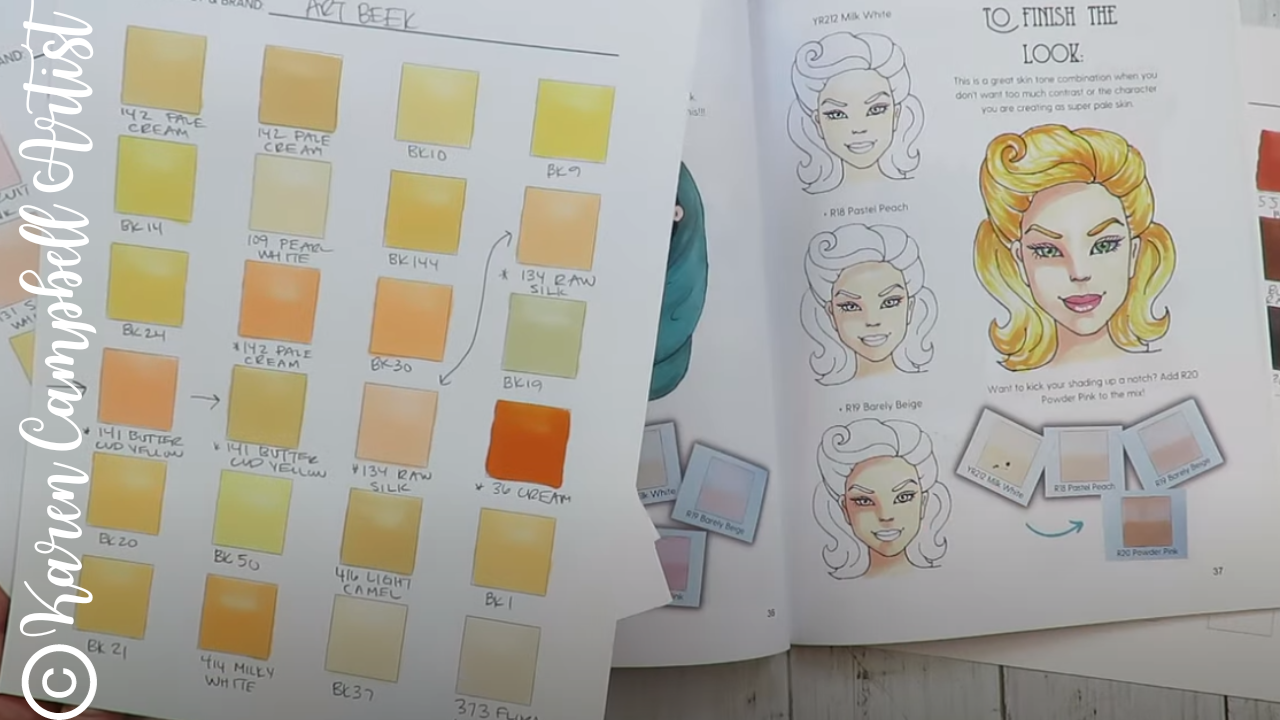
I'm including cheatsheets on how to draw a three quarter portrait from my book How to Draw & Find Your Style in the #50FunFabFairies classroom for you over at AwesomeArtSchool.com. I'm also referring to my book Skin Tone Secrets for a little help in locating the skin tone marker shades I want to use for this drawing. I love the rainbow vibe in our reference fairy drawing image. I see seeing a lot of yellow in the lightest areas, so immediately connected with this page from Skin Tone Secrets. 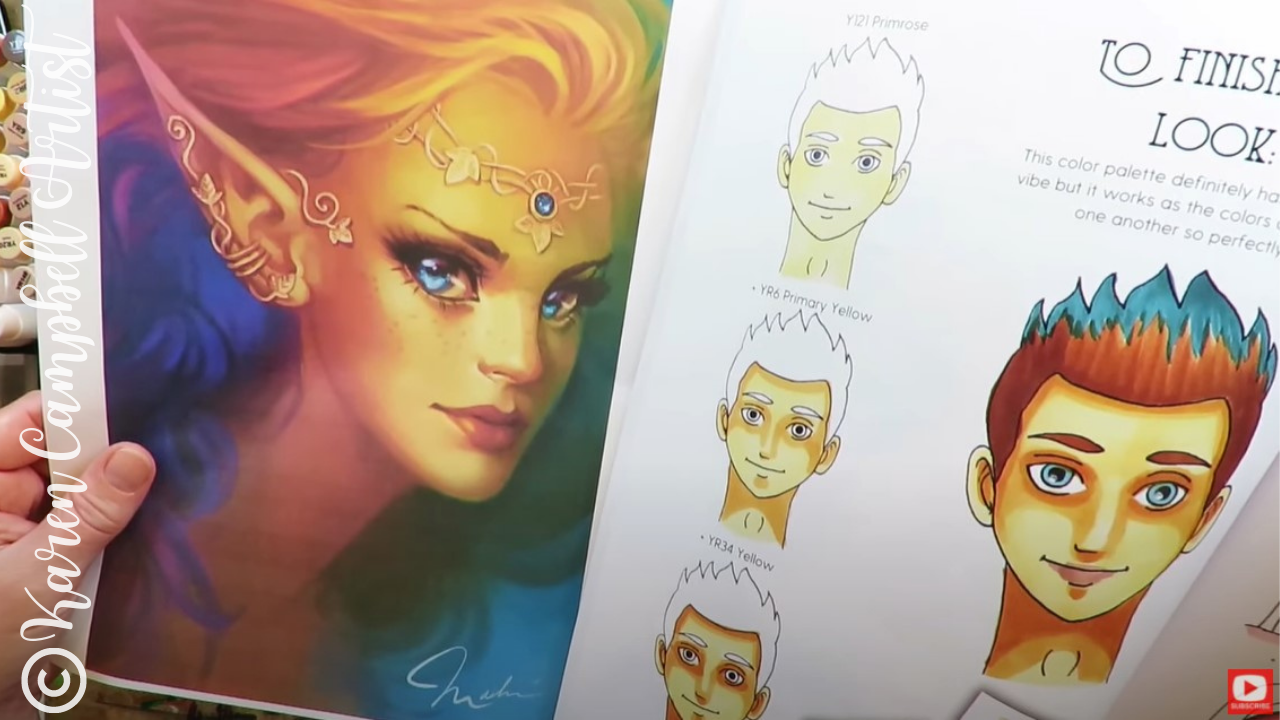
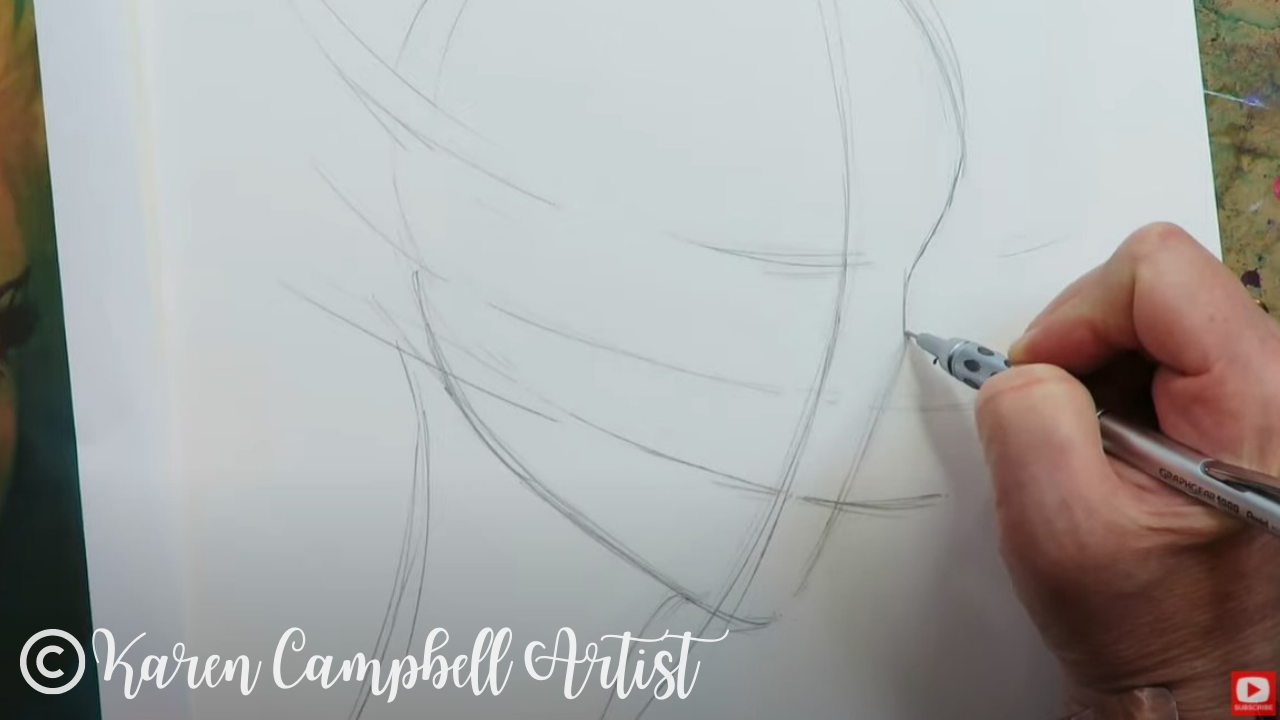
To get started, we need to sketch in the basic side profile drawing shape for a three quarter portrait AND the facial feature guidelines. If you know me - you know I NEVER draw a face without guidelines, because they're just too important!
If you're not sure how to draw fairy ears, I've got you! Simply watch the video, and I'll show you step by step.
Once I've penciled in a few swirly hair lines, it's time to get rid of our graphite as well as we can, because graphite and alcohol markers really don't mix. The brush nib of an alcohol marker can get dirty and pick up graphite super easily. This can drag all over your drawing and muddy things up, so make sure you take enough time to erase as much of the graphite as possible.
I use my vanish eraser for this. After the guidelines are gone, I actually pounce my eraser over the rest of my lines just to remove even more. 
HOT TIP: If you're an outliner like me, and want to do those first, make sure you're NOT using a sharpie because these are also alcohol markers and they will naturally want to bleed and blend in with the other colors you're using.
Instead, opt for a fineliner that is water-based or pigmented, like this one from Molotow. These will NOT smear when you're working with Copics, Ohuhus, or the new markers I'm testing out today by ArtBeek. 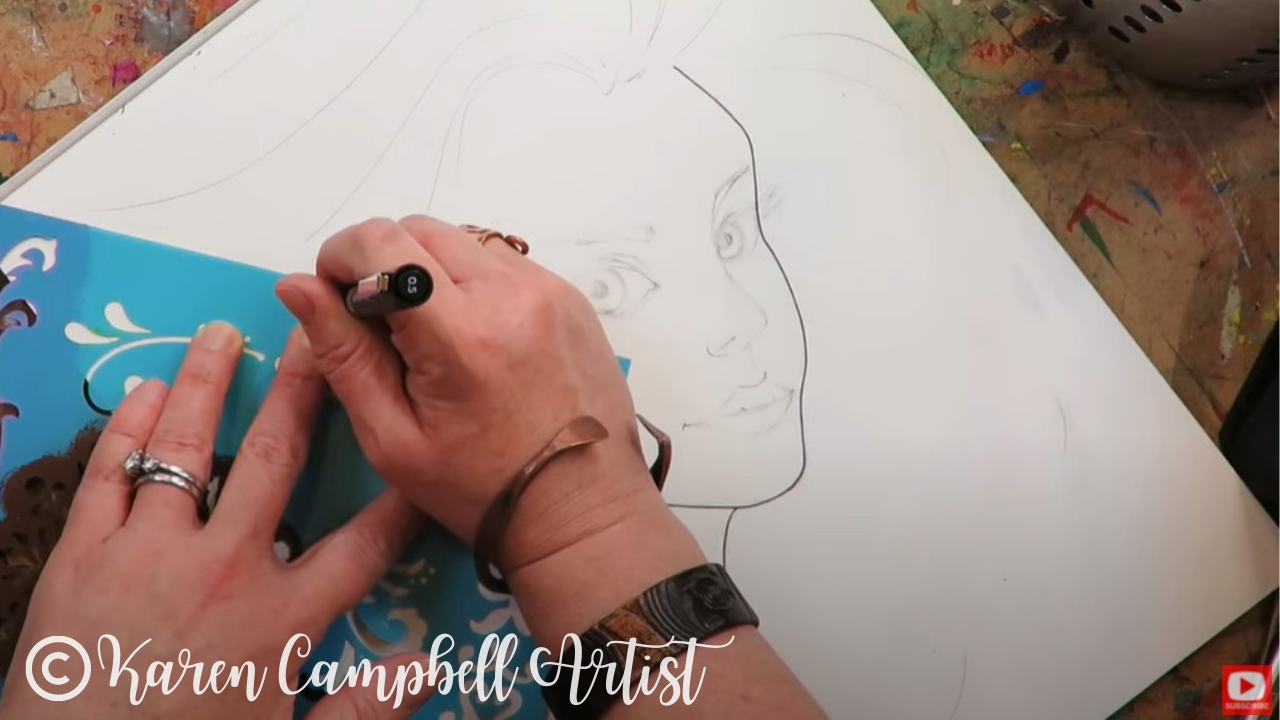
HOT TIP: There are lots of fun swirlies in our fairy drawing image for jewelry, I love using a STENCIL to do this! It takes the pressure off trying to copy something exactly and looks SO precise in your drawing. I highly recommend you do this as well :)
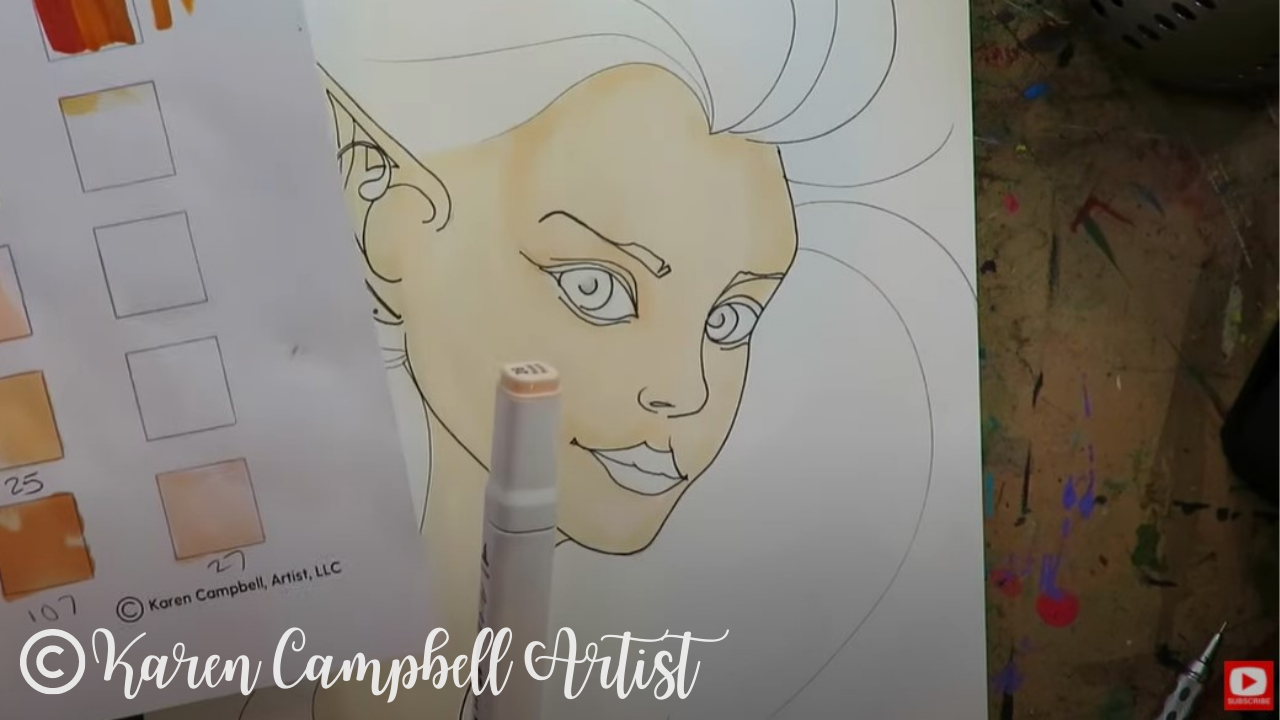
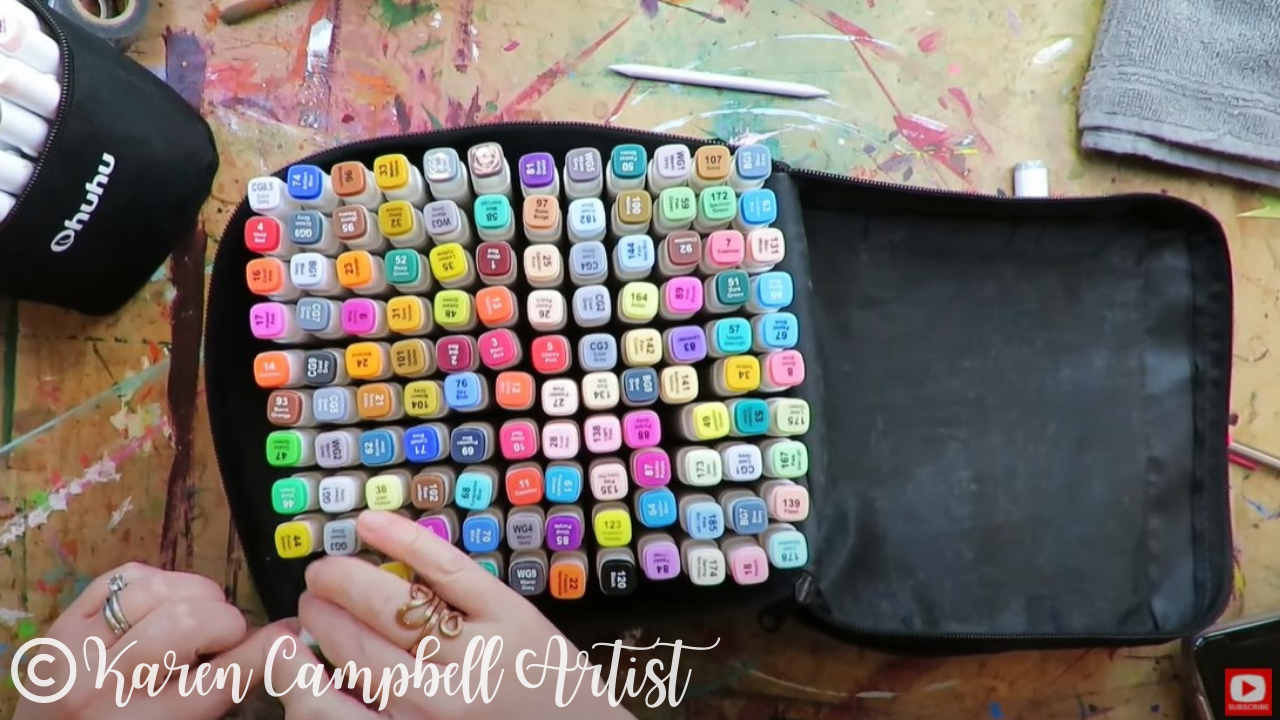
Since I'm using a new to me set of alcohol markers, I do need to swatch them out prior to coloring today. As I do this, I'm loving the soft brush tip of the ArtBeek markers. There aren't a lot of skin tones (even in the large set of 120), but I do feel like they're even softer to work with than the Ohuhus, which kinda surprises me!
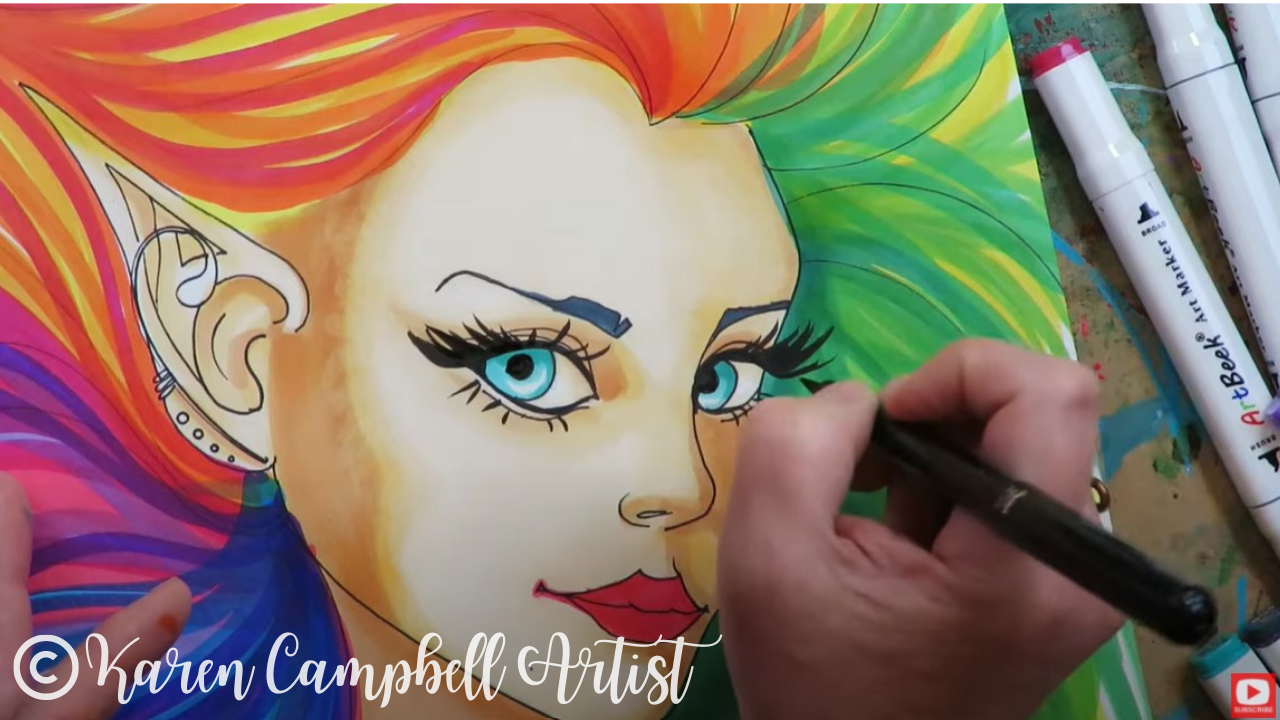
In the video, you'll really see how I look to my reference fairy drawing image to "inform" my face shading. If you're scared to change marker shades as you get into shading the face - that's ok. Just use the same shade you were working with for layer one and darken your drawing with a second coat of that same color to start creating subtle shadows (above). It's totally fine to do this in baby steps until you're comfortable.
Typically I recommend using three shades of a color to do face shading in alcohol markers. As you can see in the photo above, each time you add a layer of shading that is slightly darker than the one you did previously, leave that a bit of that previous color exposed to really add depth to your drawing. In the photo above, you can see all four skin tone marker shades I used in the shadow on her face, next to her ear.
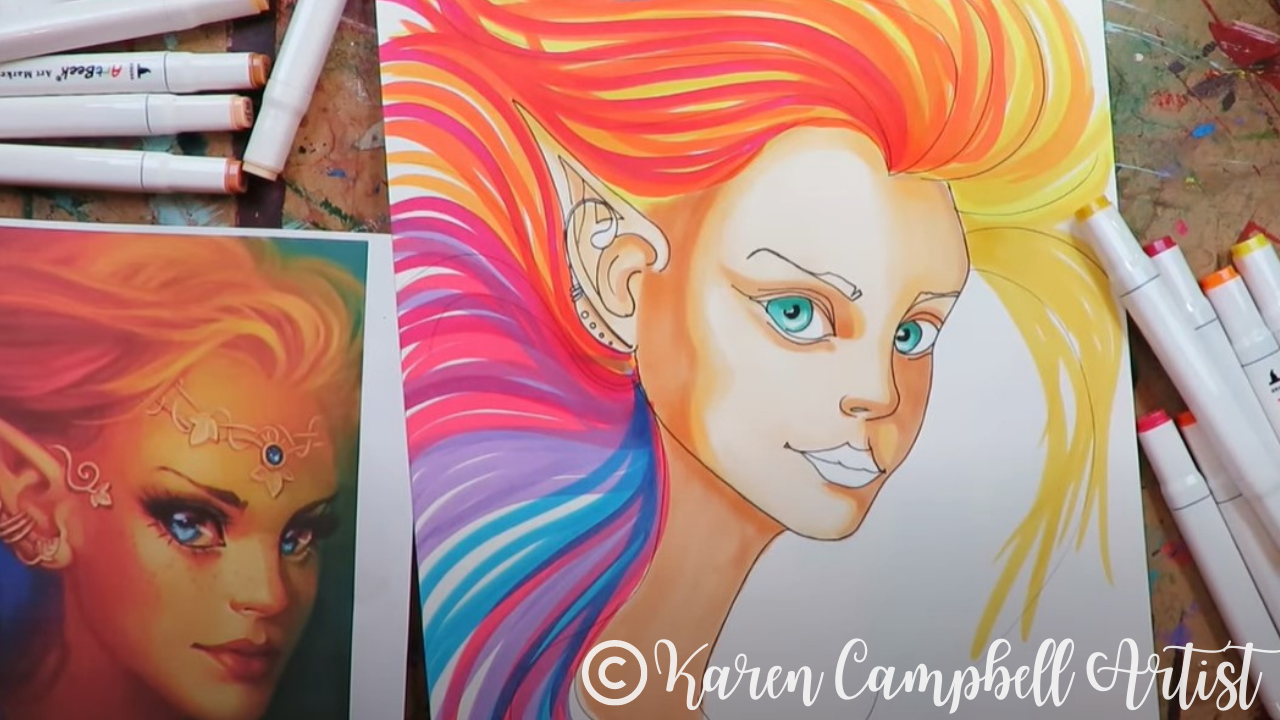
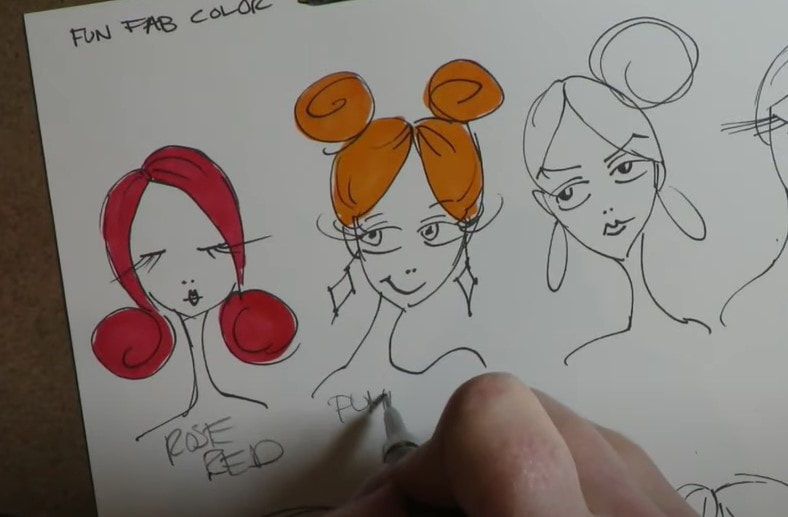
The hair on this fairy is wild and SO much fun! I am in love with the rainbow and the fact that it gives me the opportunity to use so many colors from this fun new marker set by ArtBeek.
After my fairy is done, it's time for me to pull out my secret weapon for drawing killer eyelashes! I LOVE my pentel pocket brush. It's also water-based so works just as beautifully with alcohol markers as it does over china markers and my mixed media paintings!
I hope you enjoyed today's fairy drawing lesson. Remember, if you haven't signed up for the FREE #50FunFabFairies drawing challenge - you can still do that whenever you want to. It's not too late to join, and there is no "behind" with the challenge. Everything is draw at your own pace on your own time! I've stocked the FREE classroom at AwesomeArtSchool.com for you with PDFs of our fairy reference images for each lesson, plus drawing cheatsheets to help you along, info on supplies and SO much more! Have so much fun and I'll see ya in the classroom, or if you're posting your progress in the Facebook group! If you're OBSESSED with fairies and fantasy art like me, you might just LOVE the Celtic Collective over at Awesome Art School. It's an art membership my Scottish bestie, Lucy Brydon, and I run together! 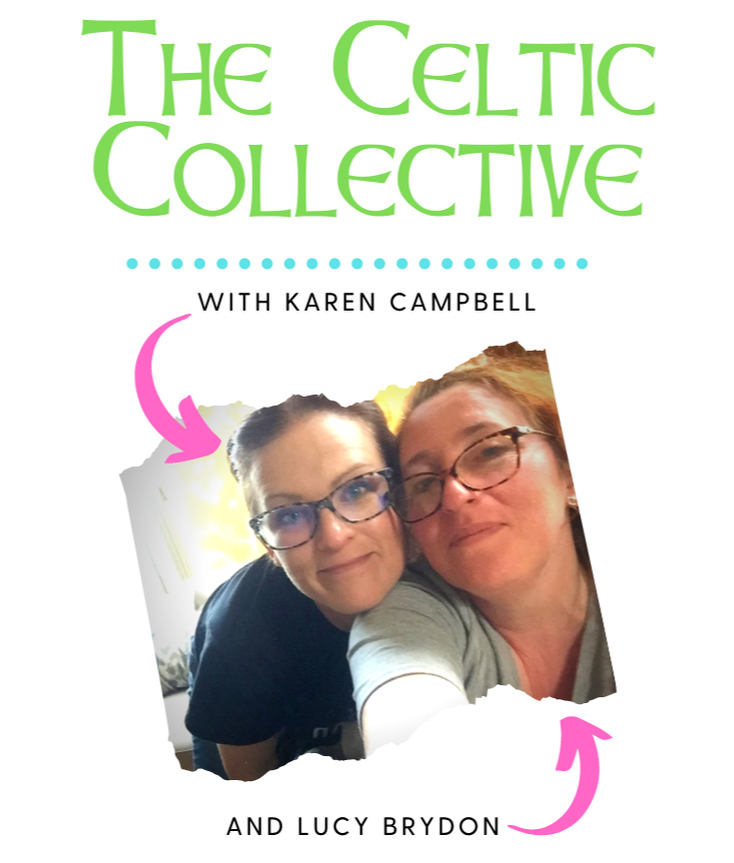
You might ALSO enjoy our podcast, 1Scot,1 Not. We talk about everything under the sun to do with Scotland - whether it's historical, fantasy, whatever. Just a quick warning - we have a blast and are totally ourselves on the podcast, which means there is some drinking and swearing.
❤️ CHECK OUT ALL my art books on AMAZON ❤️ MY FAVORITE ART SUPPLIES on AMAZON ❤️ MY BELOVED FACEBOOK GROUP ❤️ FOLLOW ME ON INSTAGRAM
0 Comments
SKIN TONE MARKER SECRETS for Shading GORGEOUS FACES with Copics & Ohuhu Markers [NEW BOOK Flip Thru]27/4/2022
Today I'm spilling ALL my skin tone marker SECRETS for shading gorgeous faces with copics and ohuhu alcohol markers!
Get a sneak peek at my BEST ohuhu and copic marker blending tips & tricks inside my latest drawing book, "Skin Tone Secrets" - now on Amazons worldwide! Stay with me till the end of this video for a quick face shading demo on an adorable baby face. I'll show you just how EASY it is to add depth to your face drawings using my simple shading guide & just 3 alcohol markers! 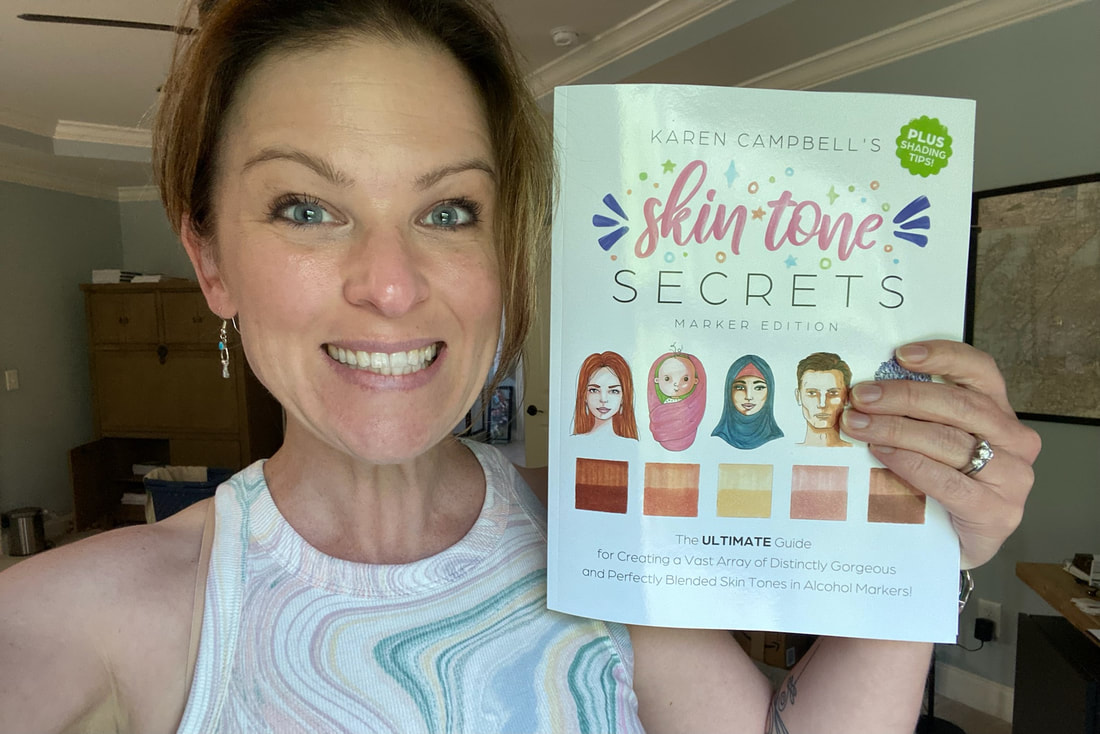
If you're not into drawing, but enjoy coloring (or just love any excuse to use your alcohol markers like I do!), I've got a FREE download just for you.
Simply click on the button below, and I'll send you a 25-Page PDF of Coloring Sheets with faces of all the characters in this fun, new book! 
Print them out at home and use them for swatching and coloring away till your heart's content!
Before we continue, super quick announcement: All product links are Affiliate. I may earn a small commission if you choose to order through these links but by law there is never any additional cost to the consumer for doing so. I thank you for your support.
My students always ask me what alcohol marker paper I use for coloring. If you're printing these FREE coloring pages at home, I suggest you use a nice cardstock. My favorite is by Hammermill. I just buy a giant pack off Amazon and it lasts forever. The paper is super smooth, feels like Bristol, but is SO much cheaper!

As you'll see in today's video, my new book opens with a general overview of art markers and an intro about what makes alcohol markers so special (to ME, at least).
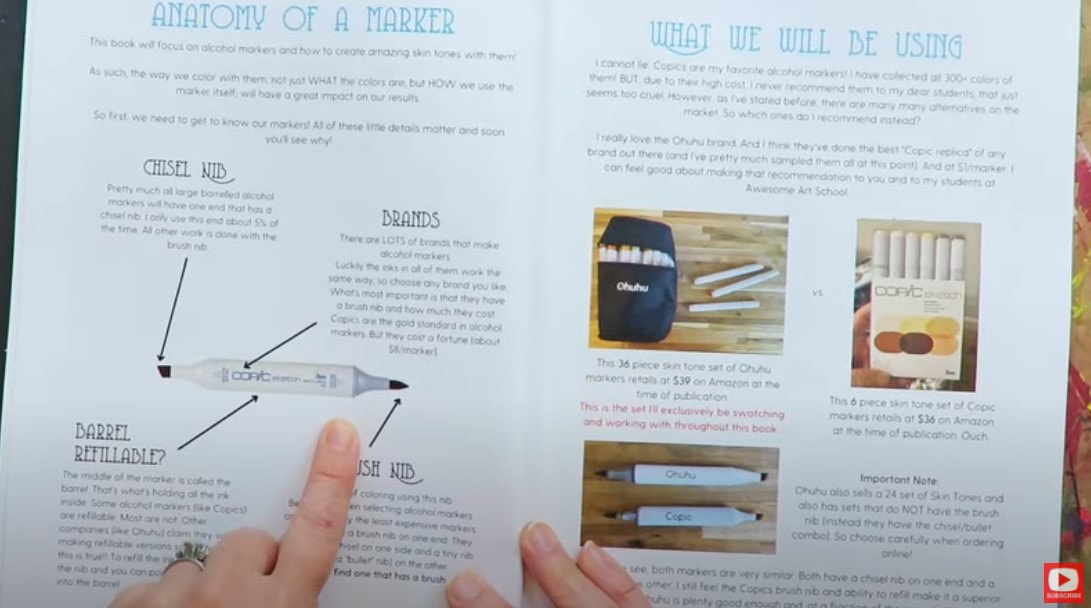
Next you'll get a quick overview of what I call "the anatomy" of an alcohol marker. Many have both chisel and brush tips, plus a refillable barrel.
As you can see off to the right in the above photo, I have two alcohol marker brands I recommend to my students and use ALL the time myself: Copics and Ohuhu brush markers. 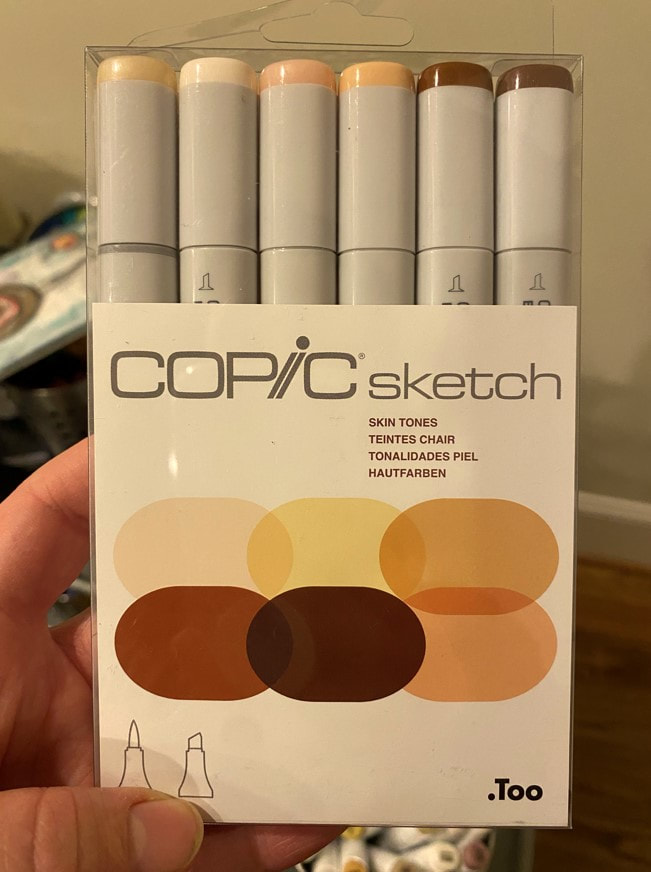
If you've been following me a while, you know I adore my copics and think they feel like butter sliding across my paper.
The only catch is, they are super expensive (the above set of 6 skin tone copic markers on Amazon costs ~$36). I've spent years building my copic marker collection, and just about as long testing copic alternatives so I can recommend another brand to my students who want to enjoy high quality alcohol markers at a lower cost.
About a year ago, while I was working on another book, Whimsical Women of the World, I discoverd an amazing brand of alcohol markers for a fraction of the cost. If you look at the Ohuhu Skin Tone Set (below), there are FOUR TIMES the number of colors provided in the Copic marker skin tone set shown above.
That alone gets my attention, but the price for this ohuhu marker set on Amazon is even better- just $30! It's a no-brainer, right? 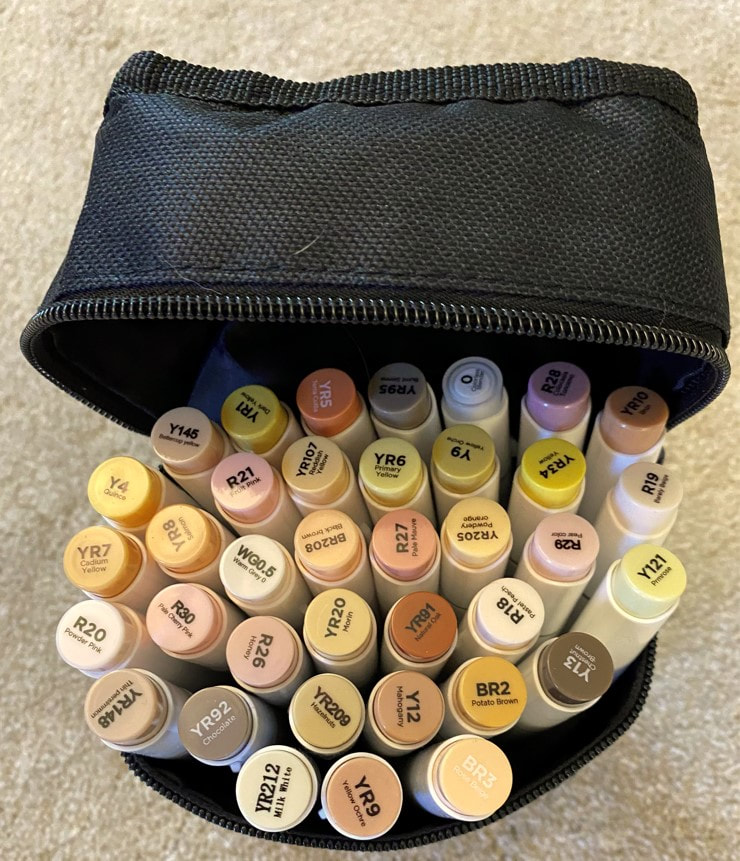
I adore my Ohuhu skin tone marker set and recommend it all the time! There is such a huge array of colors to shade beautiful faces for any and every ethnicity your heart desires. Even better- the quality of these alcohol markers is really up there with copics. Ohuhs also blend interchangeably and beautifully with copics - in case you've already started collecting those, or want to start!
Back to the flip through...
After I run through the basics about alcohol markers in Skin Tone Secrets, my favorite brands, which alcohol marker paper I recommend, how to layer and blend alcohol markers (while avoiding streaking), I'll take you through a series of cute characters that you can draw along with me. You'll notice I spend extra time on their fun hairstyles because TONS of people struggle with how to draw hair. In this book you'll get a little bit of everything from how to draw straight hair and updos, to long hair, short hair, ideas for men and how to draw curly hair! 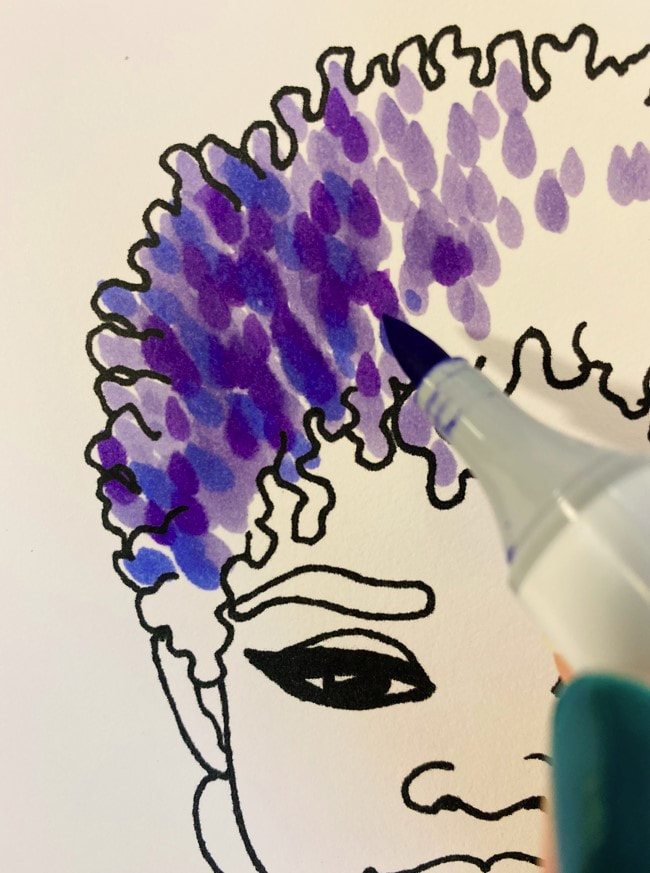
You'll also get TONS of super helpful tips on how to shade faces - by imagining where the light source is coming from for each face you create. It's much easier than people think, once someone shows you how!
You'll also learn about my three FAVORITE face shading patterns and how those are replicated with alcohol markers. 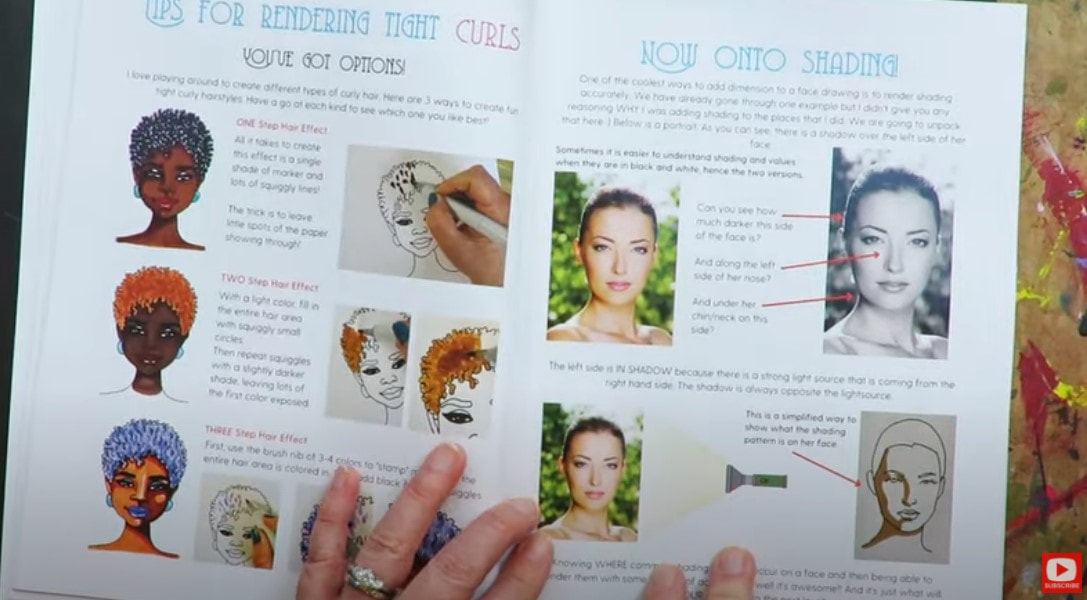
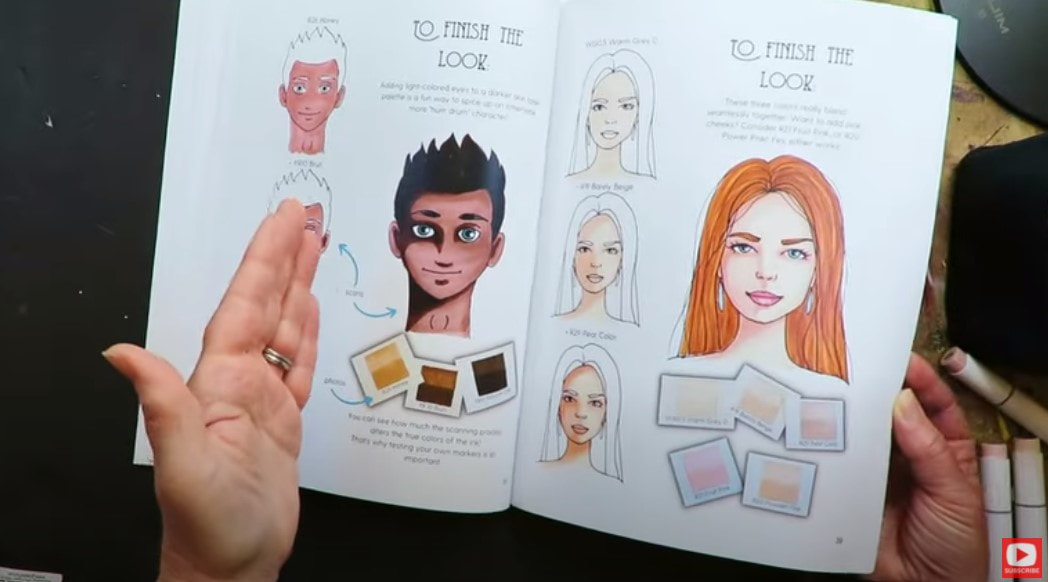
I've even put together a great reference sheet on WHERE to add highlights to your face shading. I'm ALWAYS asked about this, so hopefully this guide clears up any confusion and can become a simple cheatsheet for you to refer back to.
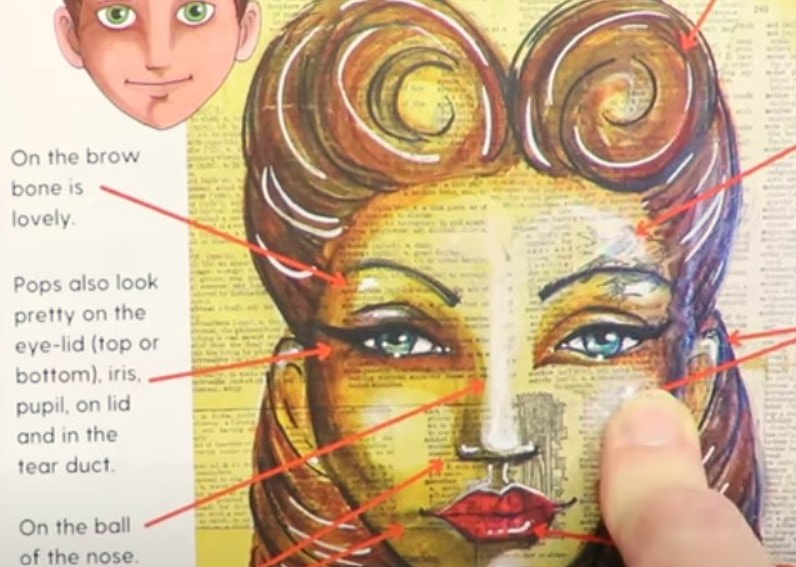
HOT TIP: As you can see in the pic above, these face highlighting tips work for shading faces mixed media style or in any kind of drawing from pencil to toned paper drawing and coloring with alcohol markers.
As the book continues, you'll learn exactly HOW and WHERE to layer three skin tone shades of markers on a face step by step, start to finish. I'll teach you exactly which 3-color combos go well together to create light, medium and dark skin tones and will show you the specific marker numbers I'm using in either Ohuhu or Copics.
If you're not into alcohol markers, this book can still be helpful to you because it contains so many valuable tips about how to shade a face. Those concepts are the same, no matter what art supply you want to work with!
Make sure you click over to watch the video so I can walk you through each page, and then show you exactly how to use this book to shade the cute little baby's face!
Are you a club member at Awesome Art School? The ebook version of Skin Tone Secrets is already in your library for free as an additional club perk ? Thanks for hanging out with me today! ❤️ CHECK OUT ALL my art books on AMAZON ❤️ MY FAVORITE ART SUPPLIES on AMAZON ❤️ MY BELOVED FACEBOOK GROUP ❤️ FOLLOW ME ON INSTAGRAM FUN & EASY Male Fashion Illustration Sketches like Christopher Hart! [Perfect for Beginners]12/4/2022
Feel like adding some MALE fashion illustration sketches to your sketchbook? I hear ya! I LOVE drawing female faces & fashions. But every once in a while- I like to mix things up and draw a dude.
Today we're sketching an EASY fashion illustration figure in pencil, and coloring him in with alcohol markers. He's simple enough to do even if you've never tried fashion figure sketching before. Grab a pencil, some markers & come draw with me! 
If you're new to drawing and coloring with alcohol markers, or have a brand new set of markers, make sure you grab my FREE Swatch Sheet so you can swatch your markers out before we get to the coloring portion of today's project. Simply click on the button below, and I'll send it straight to your email!

Before we continue, super quick announcement: All product links are Affiliate. I may earn a small commission if you choose to order through these links but by law there is never any additional cost to the consumer for doing so. I thank you for your support.
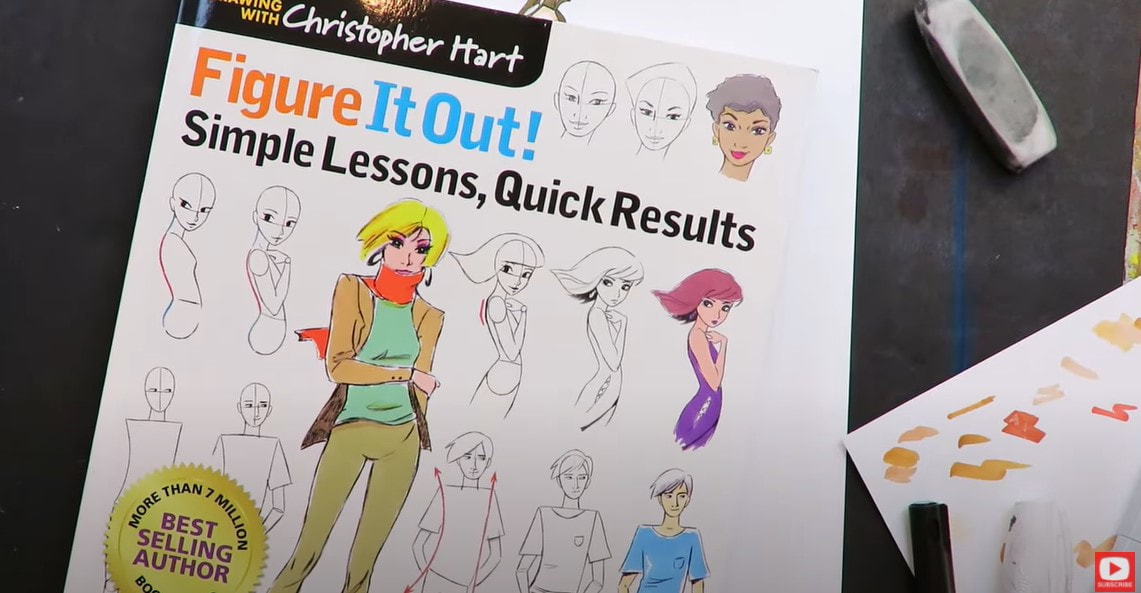
I can't wait to show you a flip through of the fashion sketching book that inspired today's video, Figure it Out! Simple Lessons, Quick Results by Christopher Hart. It's literally filled with lessons & drawing references that will keep you drawing for days.
A couple of weeks ago I did a female fashion sketch tutorial inspired by another one of Christopher Hart's books (I have ELEVEN of them because I LOVE him that much!). SO many people in my Facebook group were drawing along with me and I just loved it, so decided I had to do another one!
There are so many ways to draw the figure. I'm actually writing a new book right now about how to draw figures using my own Quadrant Method (check this video out if you want to see how the Quadrant Method works for figure drawing).
As I said in my previous Christopher Hart project video - I LOVE his instruction. It's clear, concise, and simple to follow.
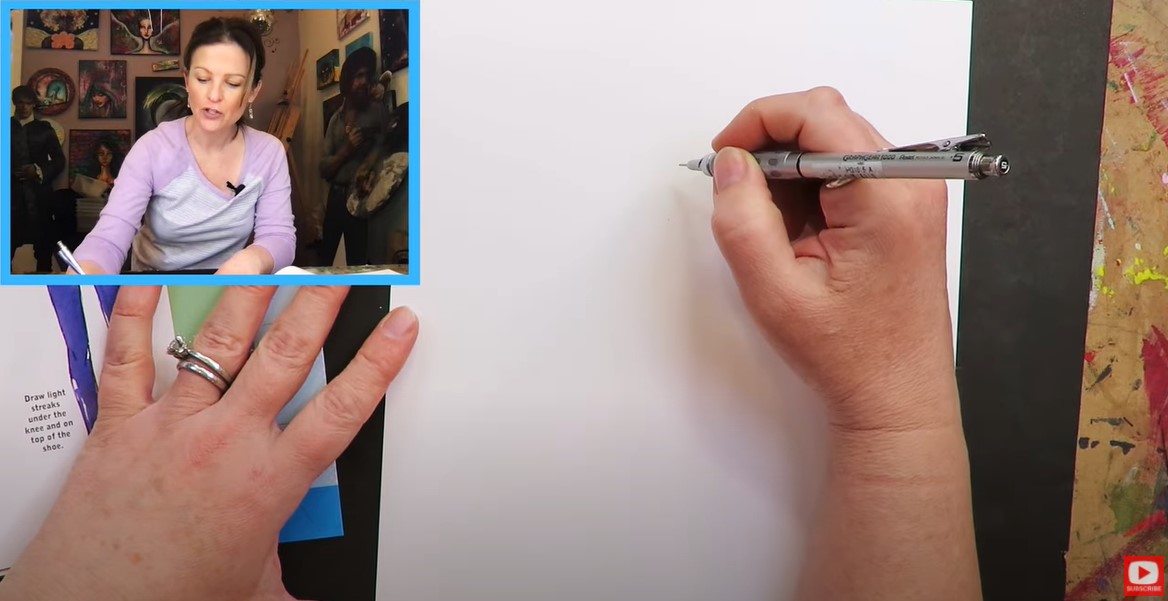
I'm using a mechanical pencil to sketch today's male fashion figure. I love the Graphgear Set by Pentel that I'm using in the video because it's weighted and helps me feel like I've got better control. 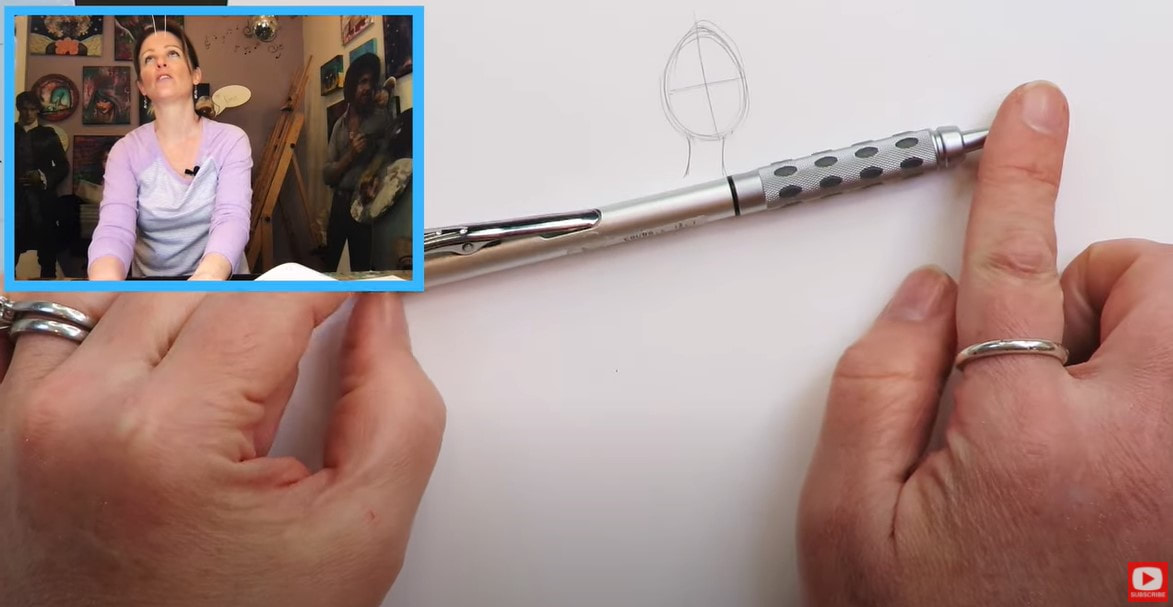
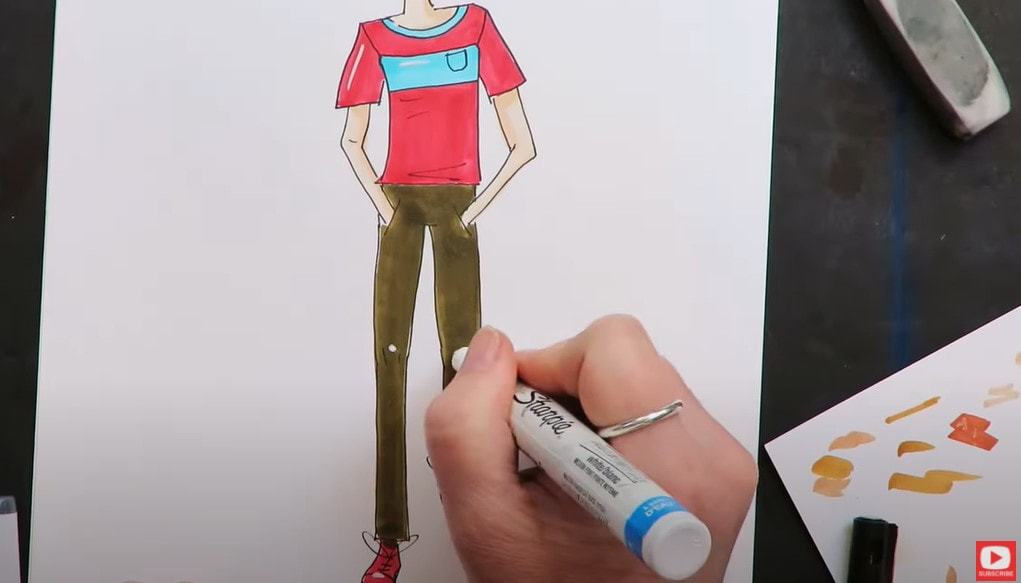
This particular drawing prompt from Christopher Hart shows the head tilted just a bit, as well as the shoulders. Since we're drawing a guy- the shoulders are fairly squared off and angular.
Our dude has a bit of a swagger in his step, which makes his torso curve. We're also drawing one leg "shorter" than the other to indicate he's in motion, mid-step. 
You'll notice the joints in fashion illustration are initially sketched in as balls or circles. These guidelines will get erased when the drawing is finished, leaving a gentle curve behind.
Fun fact about fashion figure sketching - the elbows of your figure should always end up at the waist of your model, so keep that guideline in mind as you're drawing. I love that this illustration has the guy's hands in his pockets! Makes things SO much easier - no fingers to worry about. If you are someone who wants to learn how to draw hands and fingers realistically, I've got a course over at Awesome Art School just for you, and a book of the same hand drawing projects on Amazon. 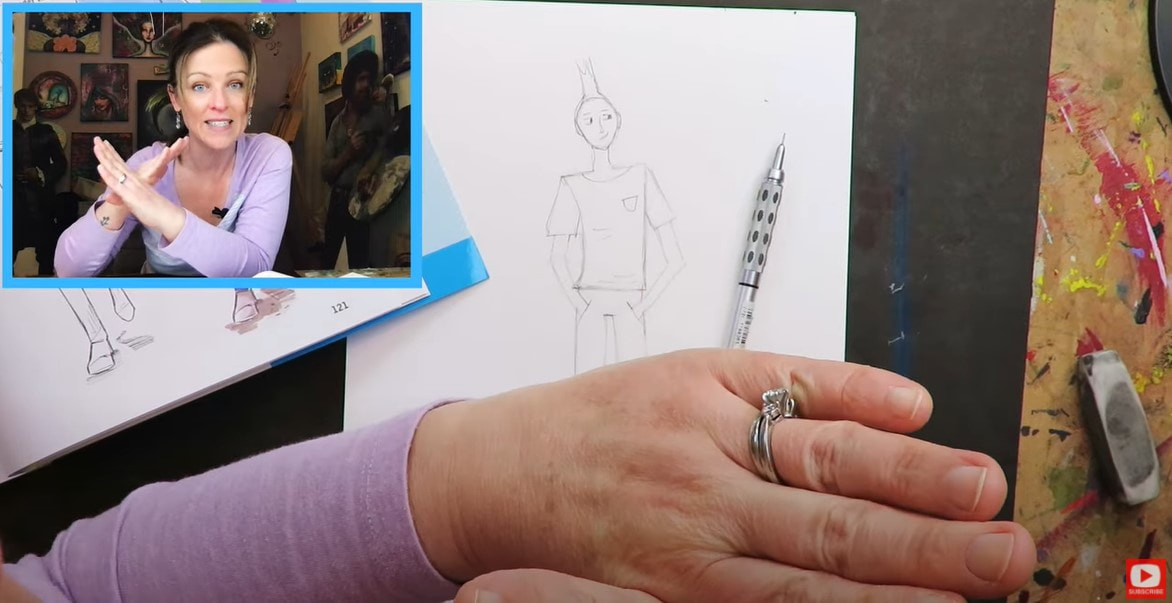
Once you've got the arms of today's guy sketched in, and have a little detail added to the pants and shirt, it's time to get rid of some of your guidelines.
I'm using my favorite vanish eraser. It's super gentle on your paper and really lifts the graphite quickly. They sell these at Jerry's Artarama for $2! If you don't have a Jerry's near you, you can also pick them up on Amazon at that link above. 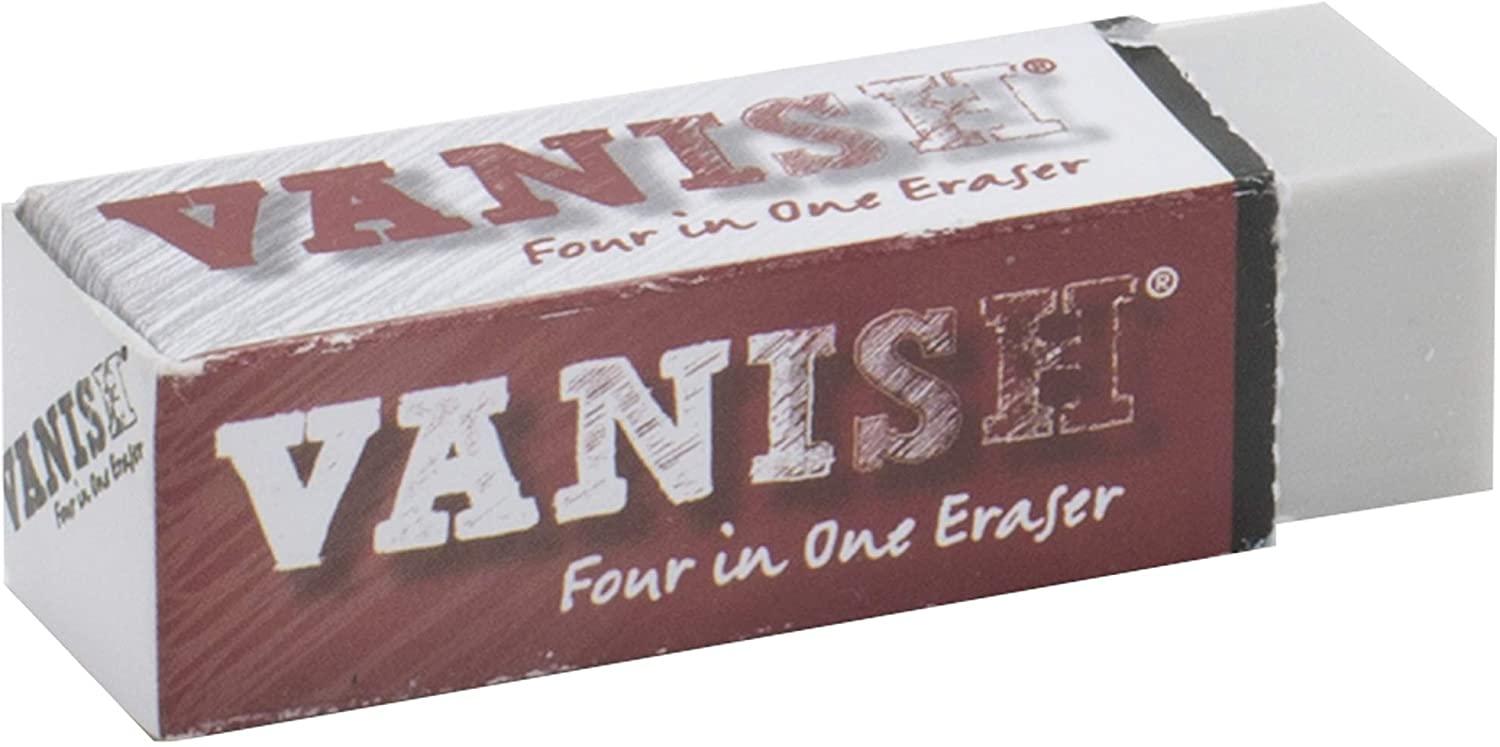
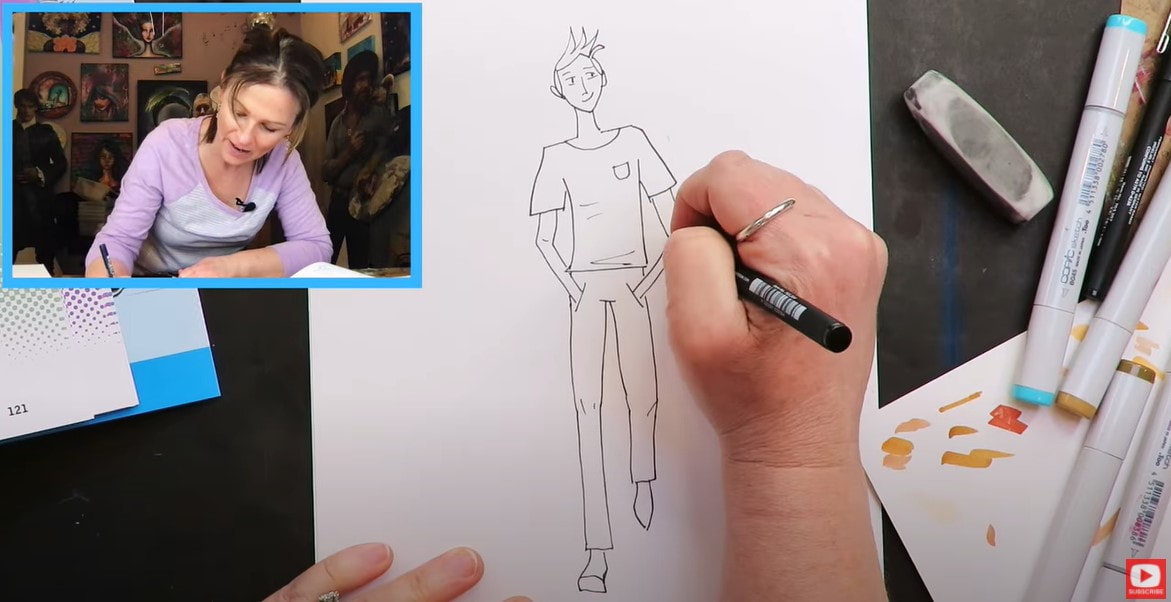
Super important tip if you're planning on using alcohol markers (Copics, Ohuhus, sharpies, etc.) to color your dude in...
You'll want to outline first in a fineliner, then erase all remaining graphite because if you color OVER graphite with your alcohol markers, the underlying graphite will smear. It can also really wreck/stain your lighter marker shades like yellows, light skin tones or pastels. You also need to really make sure you pay close attention to what your fineliners are made of. Alcohol markers blend beautifully with other alcohol markers. But... if you outline in sharpies (this is ALSO an alcohol marker)- you're gonna get smearing or "bleeding" because the fineliner is gonna try to blend with the alcohol markers you're shading with. Do yourself a favor and use a fineliner that's a water based or pigment based. This will ensure NO blending takes place where you don't want it. I love this set by Molotow. It's a great value (11 fineliners in a variety of nib sizes for around $28). 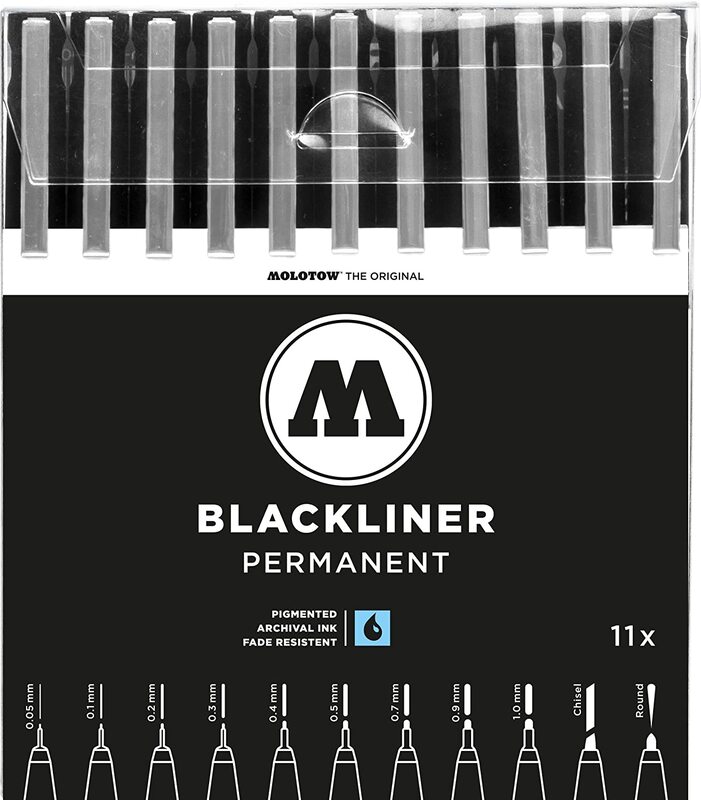
After your finelining is done, take another pass over the whole drawing with your eraser to make extra sure there is no remaining graphite.
You'll notice just before I grabbed my fineliner, I decided I wasn't as in love with the mohawk I'd drawn in for my dude's hair as I thought I would be. My How to Draw Fun Fab Fellas drawing book was on my art table, so I decided to flip through it for a little men's hairstyle inspiration.
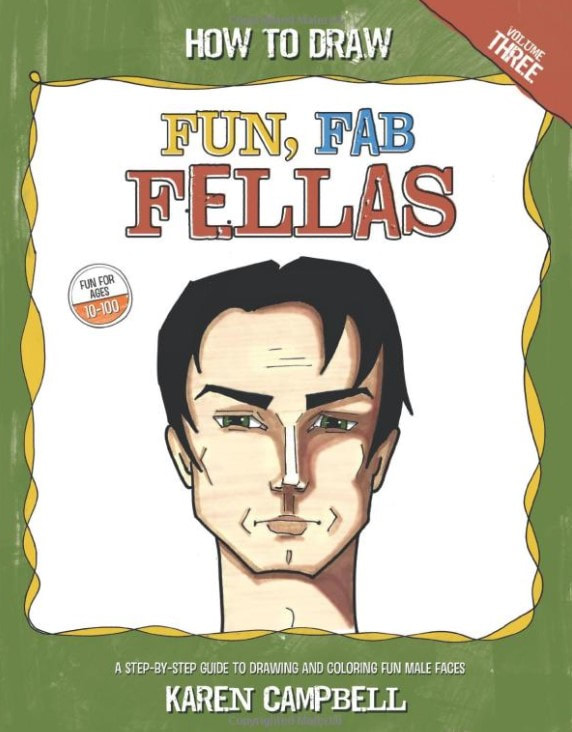
This book was part of my original How to Draw Fun Fab Faces trilogy, and came about because I've got three sons. They used to joke about how I only drew girls, so this book was kinda for them (and anyone out there who loves drawing faces or wants to learn how to draw a male face).
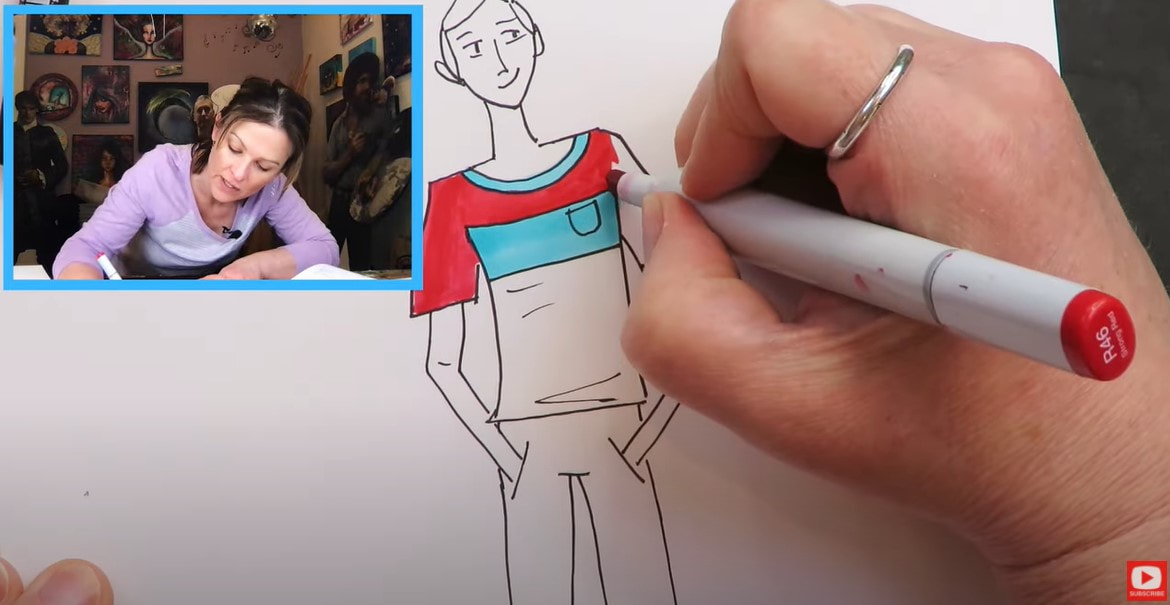
For coloring with alcohol markers (or really any art supply), I recommend you use at least 2 shades of the same color so you can show a little dimension in your shading. It just makes your drawings look so much more sophisticated.
If you don't have two shades of a color available - just use the same color and add another layer to darken parts of your drawing and indicate shadows. That's what I'm doing today. If you've been following me for a while, you know I'm in LOVE with my copic markers! But they cost an arm and a leg to collect (trust me- I've been adding to my collection for YEARS!). Usually I tell my students to purchase a set of Ohuhu alcohol markers because they're much cheaper and still great quality. You can get this giant set of 120 shades for around $99. I know $99 for markers still sounds kinda high - but if you want to play with the rainbow and not sacrifice quality, this is your brand. 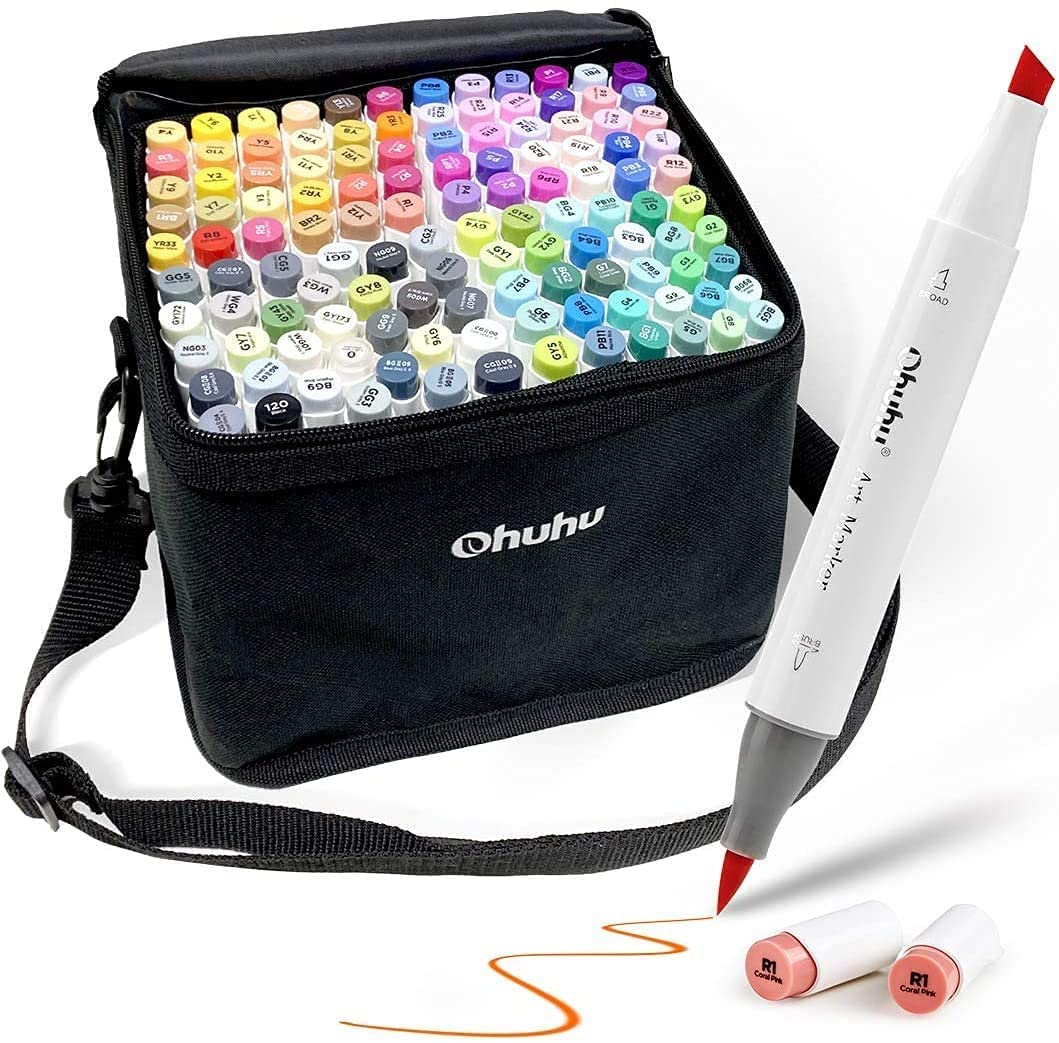
They have an excellent skin tone set too! Just for comparison, this Ohuhu skin tone set comes with 24 markers and runs around $30 on Amazon. The copic marker skin tone set (while gorgeous & top of the line), only comes with 6 markers and costs around $45.
If you're new to working with alcohol markers, watch this video - it's everything you need to know to get started. You can totally mix and match your alcohol marker brands too. So if you feel like splurging on a smaller set of copics and grabbing the Ohuhu skin tone set - they work beautifully together. I work with both brands interchangeably all the time! Can you tell I've mixed brands below? 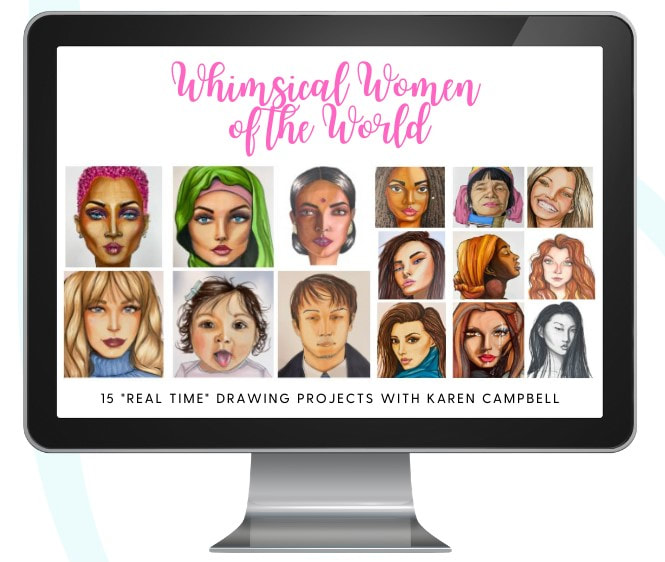
Didn't think so ;) Once you've finished coloring today's adorable fashion dude, don't forget to add some white highlights at the end. This is one of my absolute favorite parts of my projects, and really takes your art to the next level.
I had a white poster paint sharpie nearby, so I simply grabbed that to add my highlights in. You could also use a white posca pen here. They're interchangeable too, and both work really well on top of alcohol markers.
Make sure you stick with me until the end of today's video for a FULL flip through of Christopher Hart's book, Figure It Out! Simple Lessons, Quick Results. You're gonna love it! Thanks for hanging out with me today! ❤️ CHECK OUT ALL MY ONLINE ART CLASSES & Art Clubs ❤️ CHECK OUT ALL my art books ❤️ MY FAVORITE ART SUPPLIES on AMAZON ❤️ MY BELOVED FACEBOOK GROUP
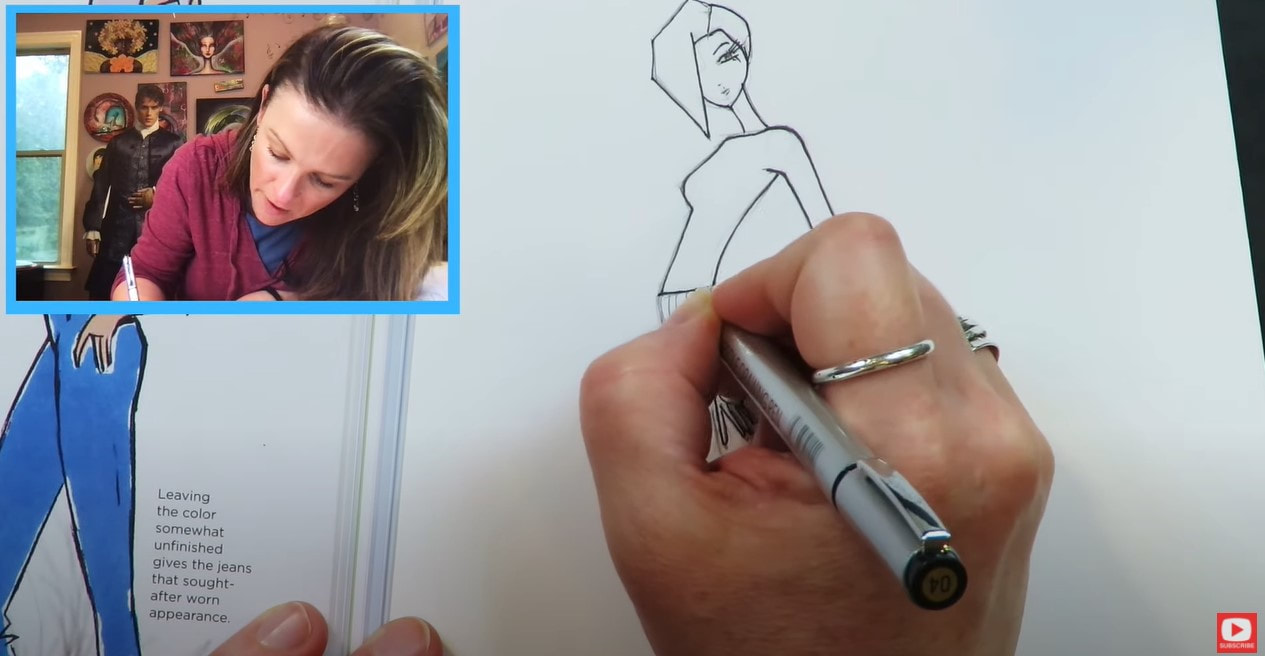
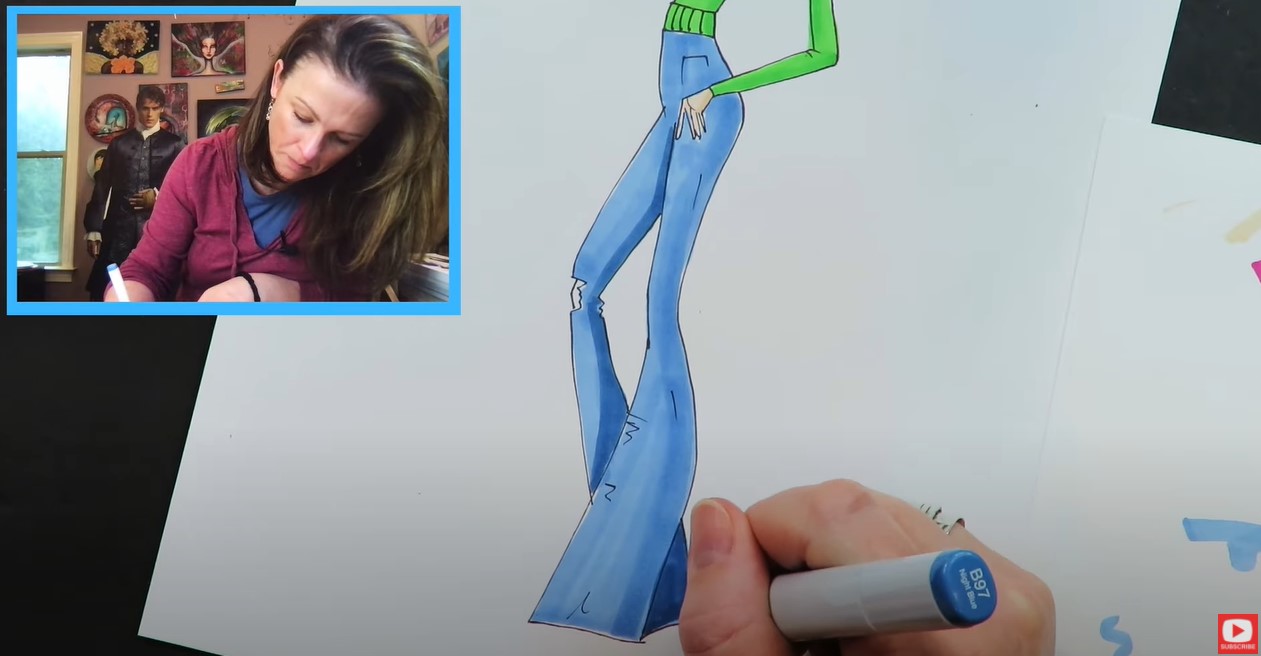
Need some FUN fashion illustration sketches that are simple enough to do even if you've never done fashion figure sketching before? You're in the right place!
Today we're sketching an EASY fashion illustration figure in pencil, and coloring her in with alcohol markers. Grab a pencil, some markers & come draw with me! 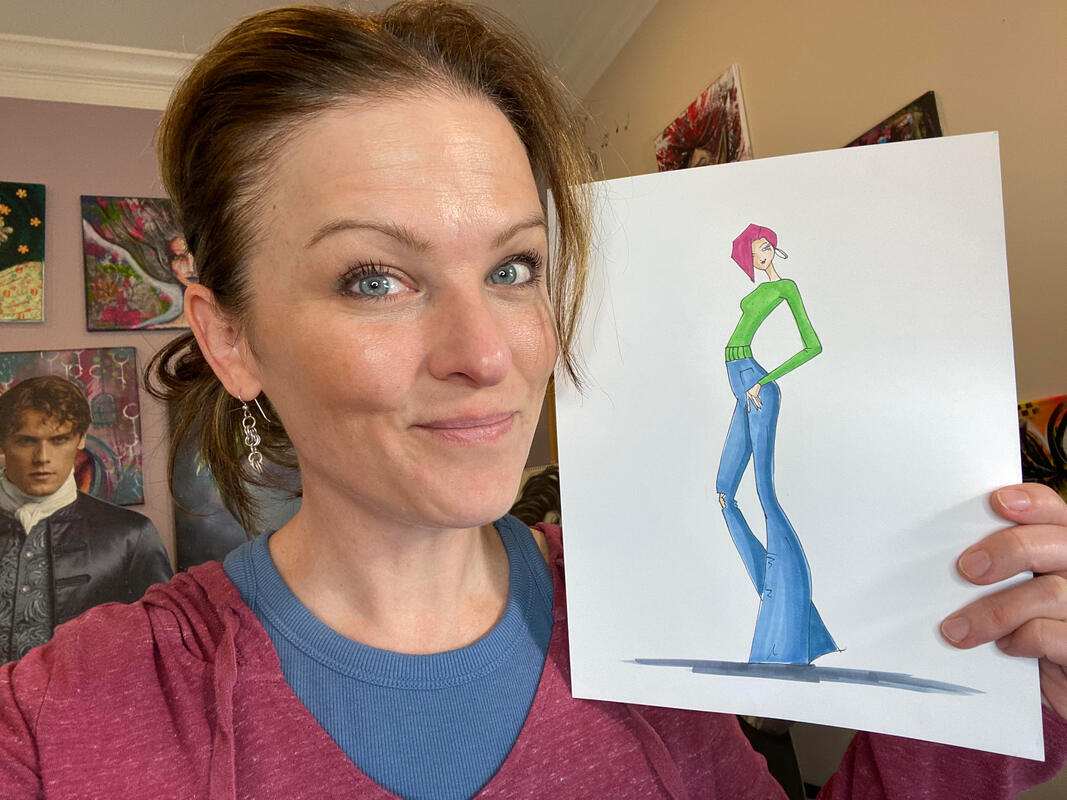
If you're new to drawing and coloring with alcohol markers, or have a brand new set of markers, make sure you grab my FREE Swatch Sheet so you can swatch your markers out before we get to the coloring portion of today's project. Simply click on the button below, and I'll send it straight to your email!

Before we continue, super quick announcement: All product links are Affiliate. I may earn a small commission if you choose to order through these links but by law there is never any additional cost to the consumer for doing so. I thank you for your support.
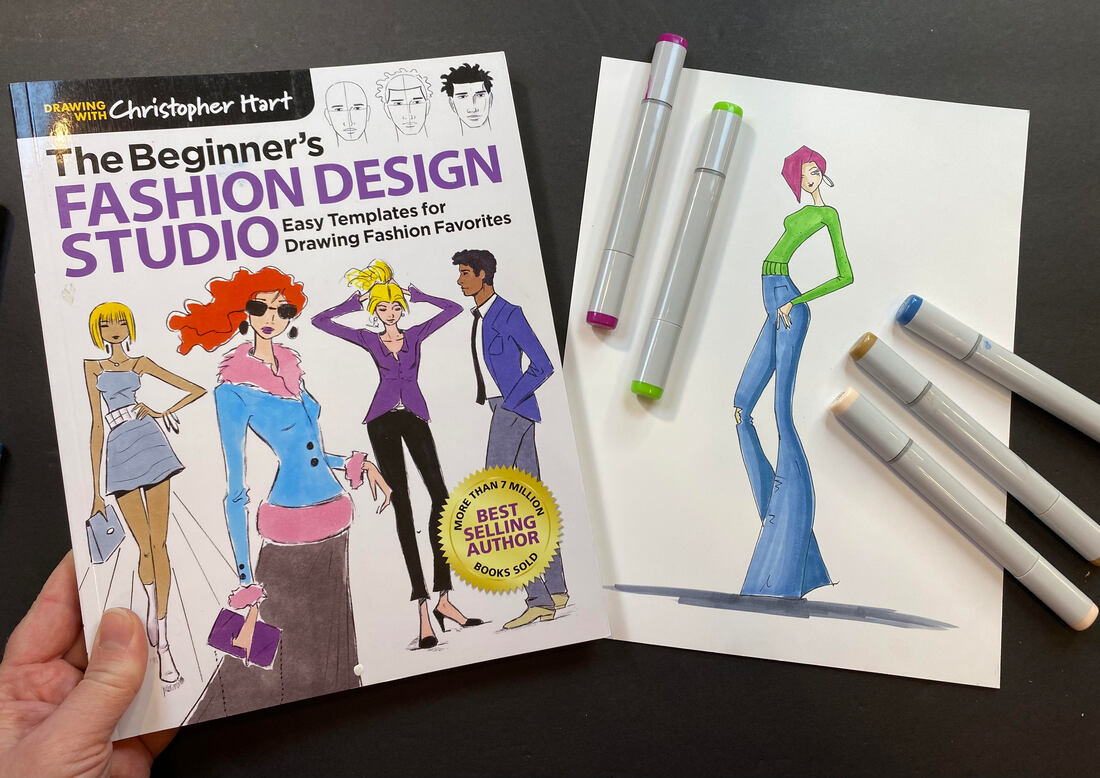
I can't wait to show you a flip through of the drawing book that inspired today's video, The Beginner's Fashion Design Studio: Easy Templates for Drawing Fashion Favorites (Drawing with Christopher Hart). It's literally filled with lessons & drawing references that will keep you drawing for days.
I'm completely in love with the author's style (I've got ELEVEN of his books). His faces and figures have a very cartoon-y or semi-realistic drawing style like mine do. I think that is one of the things that attracted me to his work.
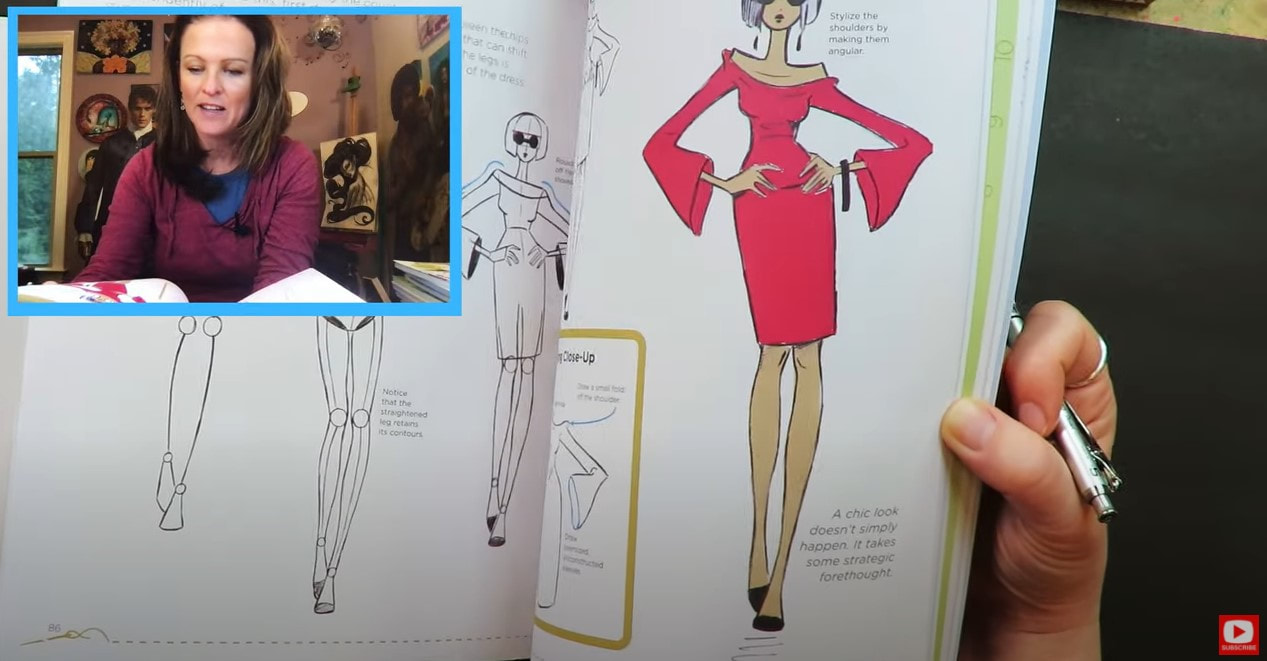
I am also very picky about art book instruction (as you may know if you've been following this series on YouTube).
As an art book author myself, I really try to make drawing instruction simple and step by step for my readers. When I find someone who does the same thing (like Christopher Hart!), I get super excited and can't wait to recommend the book to my students. Why don't we get started with today's fashion illustration figure? 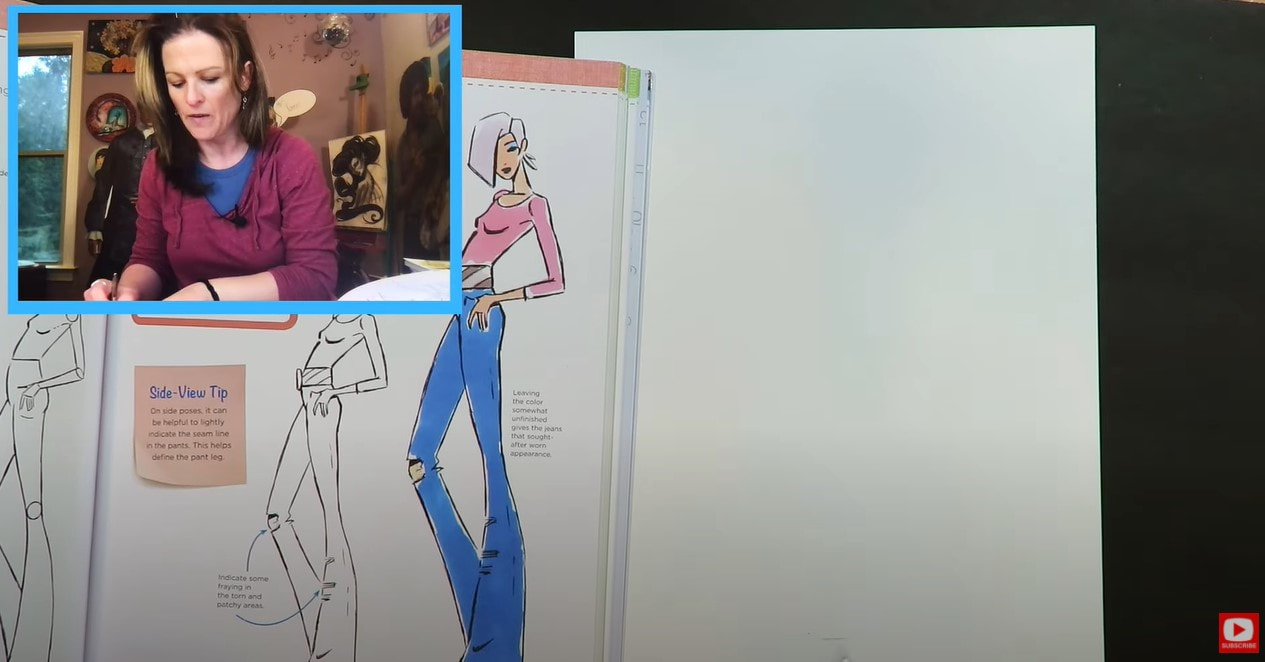
One of the first things I love to do when I'm just getting started with a drawing is to lay out parameters for myself. For example - take a look at the shot above. Her legs go on for miles, right?! To help me get the proportions right, I marked in a faint line where I want the ground to be, as well as where her waist is, so I know in general where I'm going.
All of the subtle angles and movements in the body are what makes the figure so hard to draw. However, if you've got someone like Christopher Hart holding your hand and showing you exactly what to do - I just let them lead the way. Trust me we're in great hands with this fun fashionista sketch!
Look at how sassy she is already!
Take note of how simple her hair is. Tons of my students tend to freak out about hair, but honestly it's so much easier than you think. I always break it down into simple shapes that I can fill in later with detail if I'm in the mood. If I'm not in the mood- I color the blocky hair shape in, and call it a day, because it's super cute and stylistic! 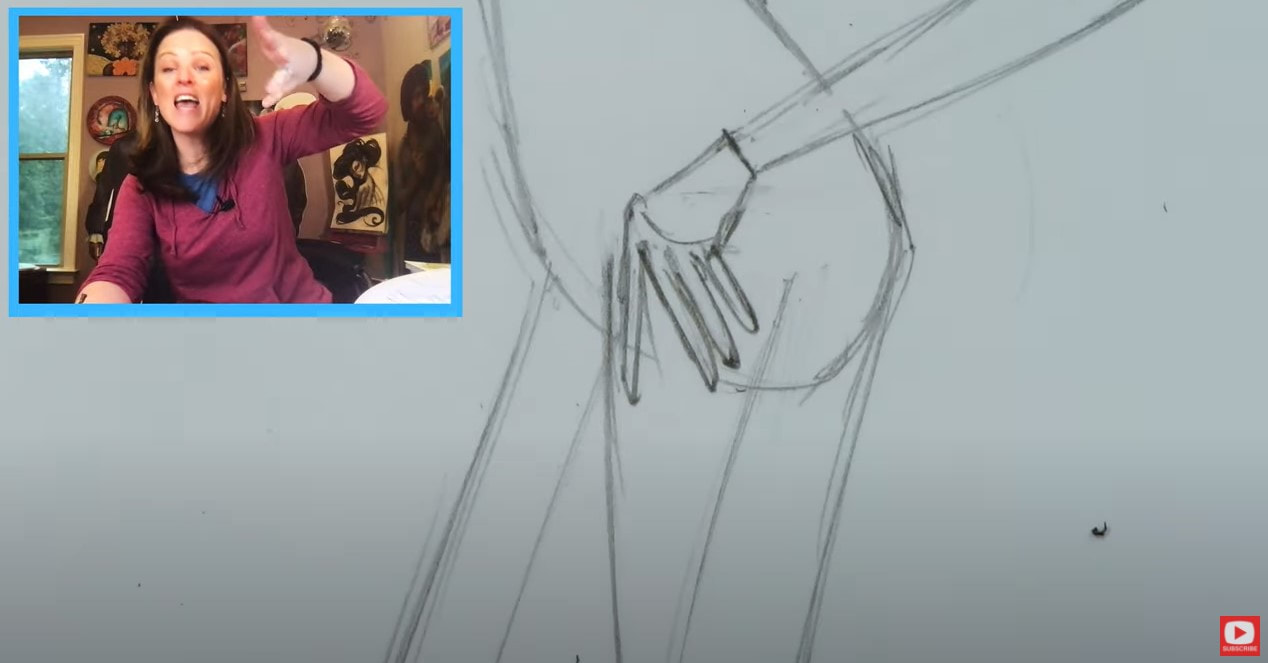
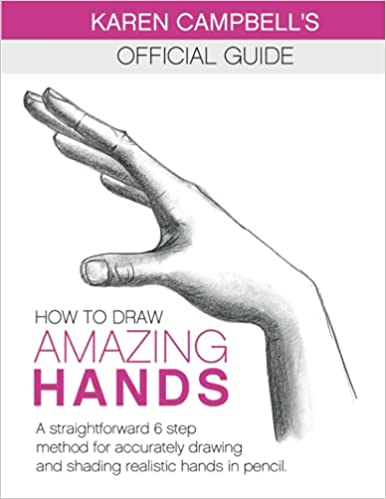
If you're new to my world, my "kryptonite" is drawing small. LOL! So drawing these teeny tiny hands in feels so hard! Just do what you can and move on with your life. If drawing realistic hands sounds like fun to you, or a challenge you'd like to conquer, I've got both a drawing book and an online art class in my Fun Fab Drawing Club dedicated to "How to Draw AMAZING Hands," filled with 31 hand drawings you can do with me from scratch!
Wanna learn How to Draw Fashion Hands 10 Ways? This video is a bit older, but it's got easy ideas you might love incorporating into your own work.
Whenever I'm doing an alcohol marker project like today's, I love to start my coloring by outlining with a black fineliner. The reason I like to do fineliner and then color my drawings in, is because I want to erase all the graphite on my page. Graphite will smear with alcohol markers and make the nibs of your markers dirty. Erasing pencil lines before you start shading with alcohol markers works great and prevents that mess. If you're looking for an amazing eraser, this one if my fave.
Lately I've really been into using my black fineliners by Molotow. They're pigment based, and do not smear when I use them with alcohol markers.
Speaking of alcohol markers - I LOVE my copics, but they took forever to collect because they're so expensive. If you need to stick to a budget, try Ohuhus. They're awesome, and super affordable. I especially love the Ohuhu skin tone collection. (By the way - copics and ohuhus blend beautifully together, so don't be afraid to mix the brand shades in the same project!) 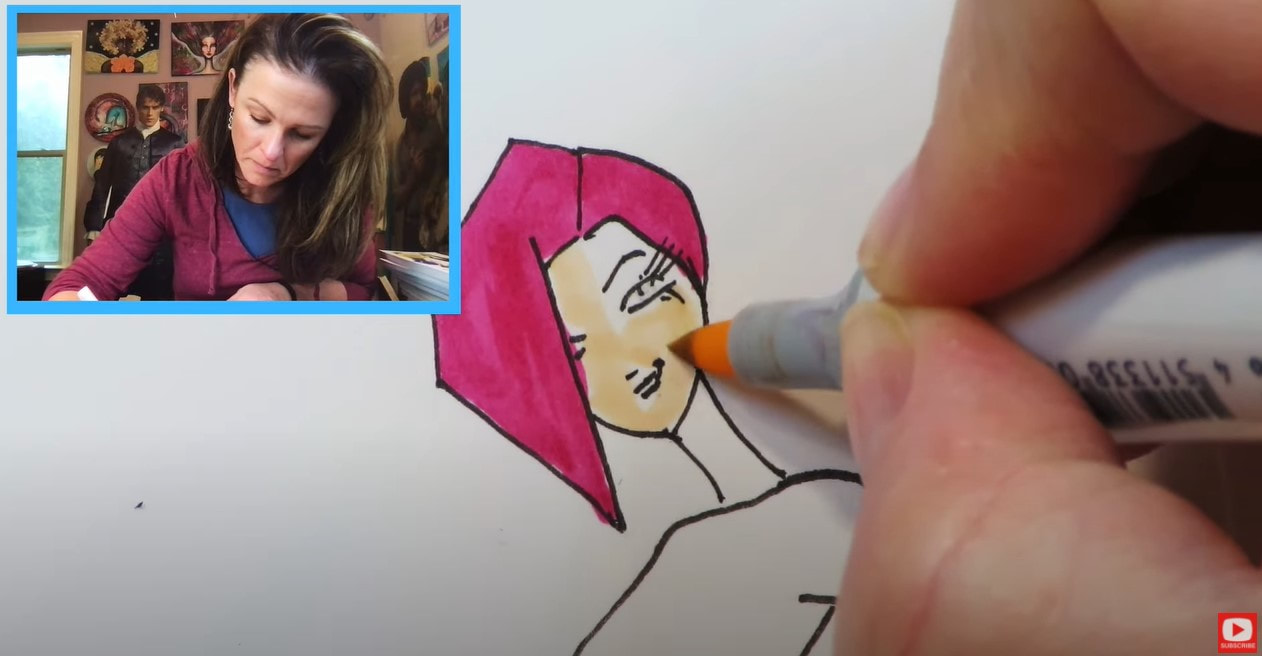
See how simple the hair is on this girl? It's basic block shapes and I'm coloring it all one shade. I may just leave it like that because I'm in the mood for fast and easy!
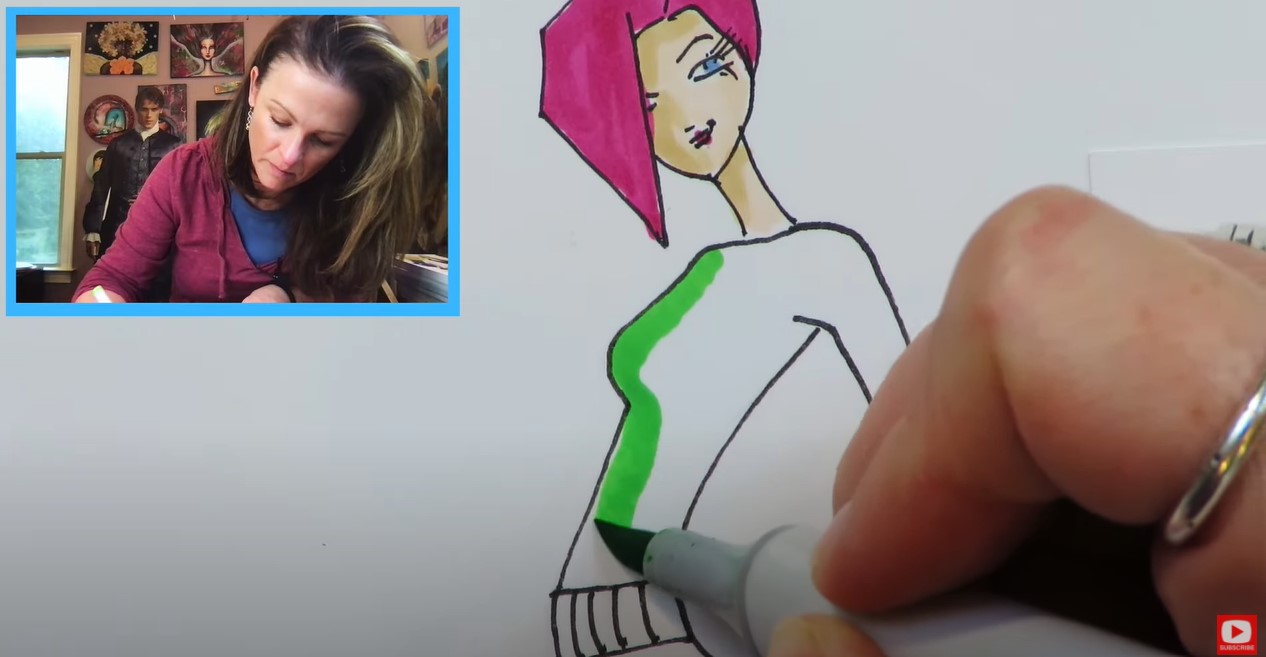
How fun is this green in her sweater?! Love it!
I hope you have so much fun with today's fashion illustration project! And if you decide to get one of Christopher Hart's books - they're ALL fabulous. Take it from me... I've got ELEVEN!!
Need help learning how to color with alcohol markers? Check out this playlist! Thanks for hanging out with me today! ❤️ CHECK OUT ALL MY ONLINE ART CLASSES & Art Clubs ❤️ CHECK OUT ALL my art books ❤️ MY FAVORITE ART SUPPLIES on AMAZON ❤️ MY BELOVED FACEBOOK GROUP
My latest face drawing book is on Amazons worldwide! If you're looking for female face drawing references or a great new drawing book for adults (young & old!) - this book is for YOU! In today's drawing book flip through, I'll show ya a sneak peek of what's behind the cover! Artists of all ages and stages will learn how to draw faces step by step + get ALL MY BEST face shading techniques!
Before we continue, super quick announcement! All product links noted below are Affiliate. I may earn a small commission if you choose to order through these links, but by law there is never any additional cost to the consumer for doing so. I only reccommend products I actually use and love. Thank you for your support! 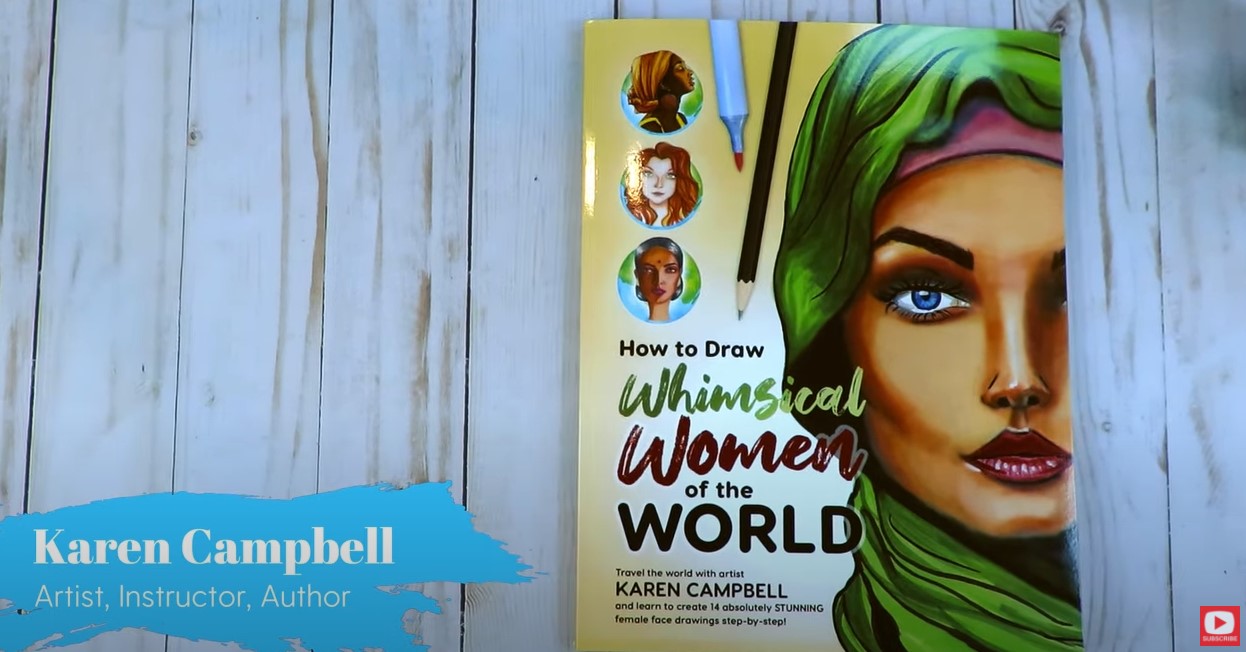
If you've been following me on my YouTube drawing channel for a while, you may remember we recently completed a 15 week face drawing series called Whimsical Women of the World!
This book features the projects from that face drawing series for people who prefer to learn how to draw using a drawing book instead of a video! 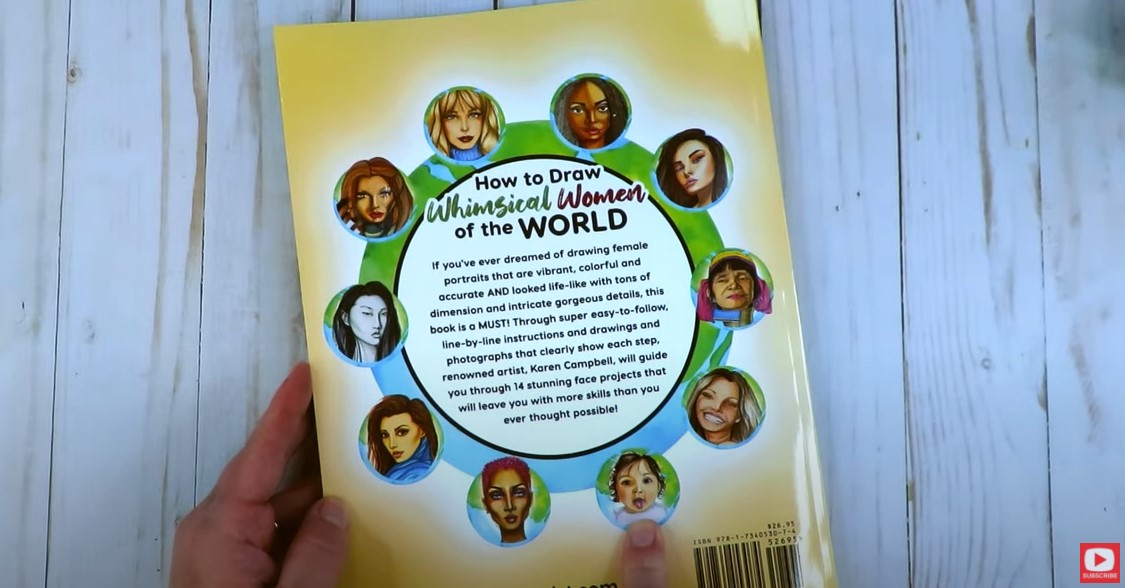
Even though the faces in this series were quite challenging and fairly realistic, I call them whimsical - because I feel this one word helps take the pressure off having to be perfect!
Realism requires dilligent attention to detail and hyper focused observational skills! While sometimes I might enjoy a little of that challenge as an artist - most of the time, it takes the FUN out of things for me!! 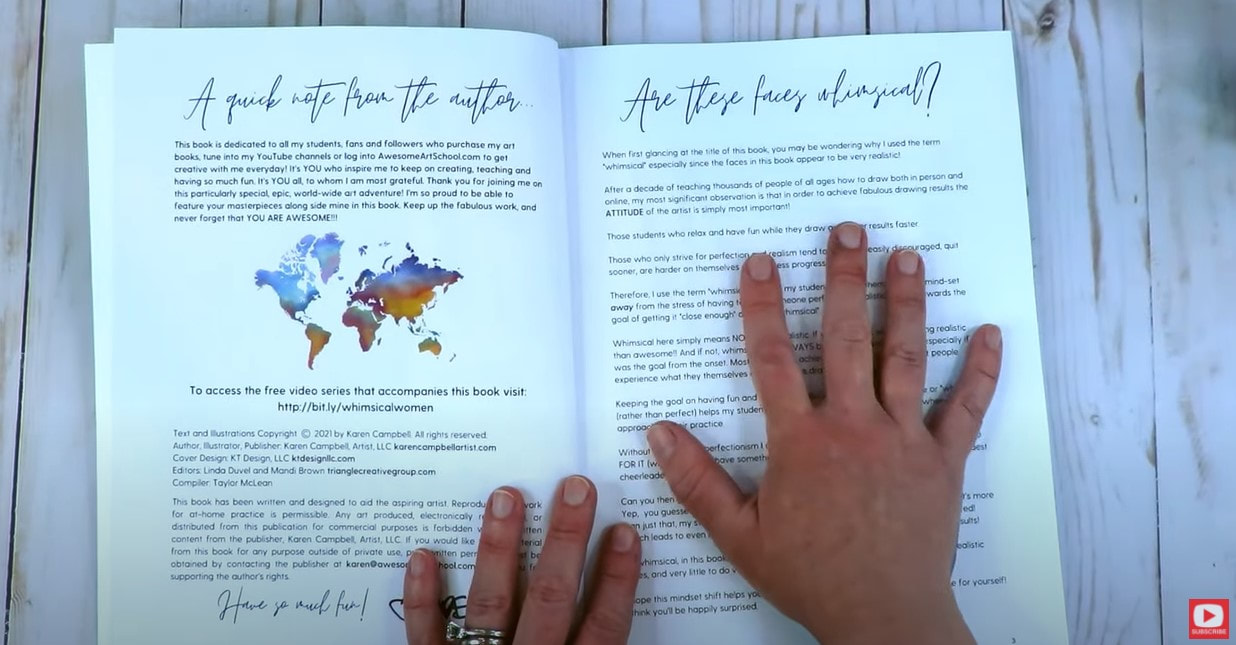
For me - having FUN is the whole reason I create art in the first place, and it's why most of my students are into art as well!
Over the years I've discovered that if something is fun - you'll want to do MORE of it, AND the more you do of something -the better you get at it! That's my goal for my students and for myself - FUN and growth for all of us as artists! 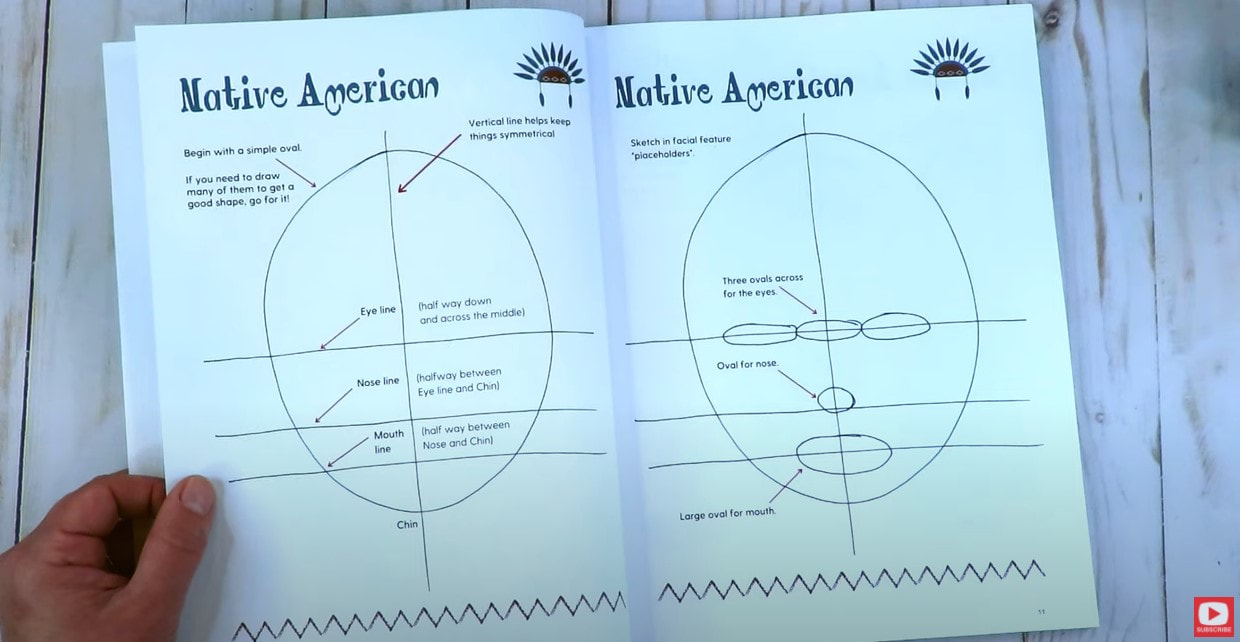
As you'll see in the video, each step by step drawing portrait starts at the very beginning with no more than three simple steps on a page.
This approach helps the projects not feel overwhelming, and sets up artists of every stage and age for success!
The coloring process is also broken down step by step to help you learn how to shade a face. You'll learn my best face shading techniques for shading a face in color (no matter WHAT art supply you're using!).
I used alcohol markers and colored pencil for every project, but I specifically don't note the individual alcohol marker shades I used for each project because I know each artist is coming to these projects in her own context.
Maybe you only have 3 copic markers because they're SO expensive (trust me- I get it and built my collection over many years!!!). Maybe you have zero copics because you've never tried drawing in anything other than pencil, maybe you have the whole set, or maybe you're into ohuhus! To each their own!! I don't care what you use- I just hope YOU DRAW!! 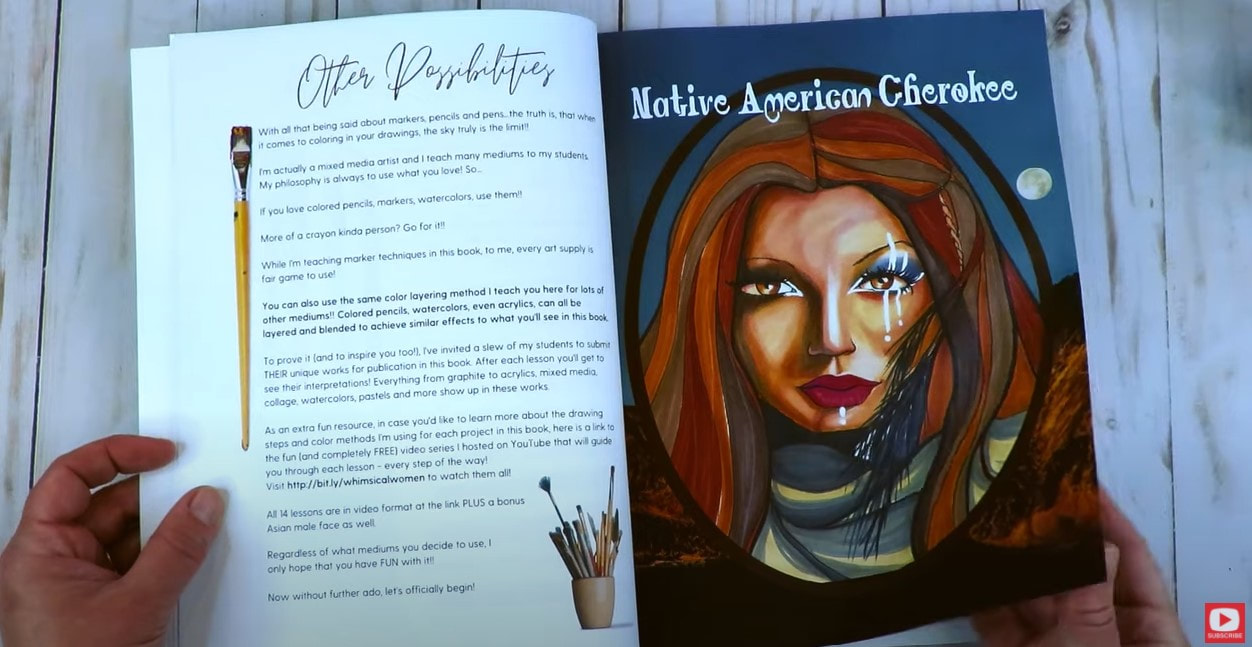
If you ARE interested in learning about which specific marker colors I'm using, you can sign up to join my Fun Fab Drawing Club or purchase the Whimsical Women of the World classroom where everything is in real time (no timelapsed video- even for the shading portions of each project). You'll also find the original face drawing reference for each project here as well.
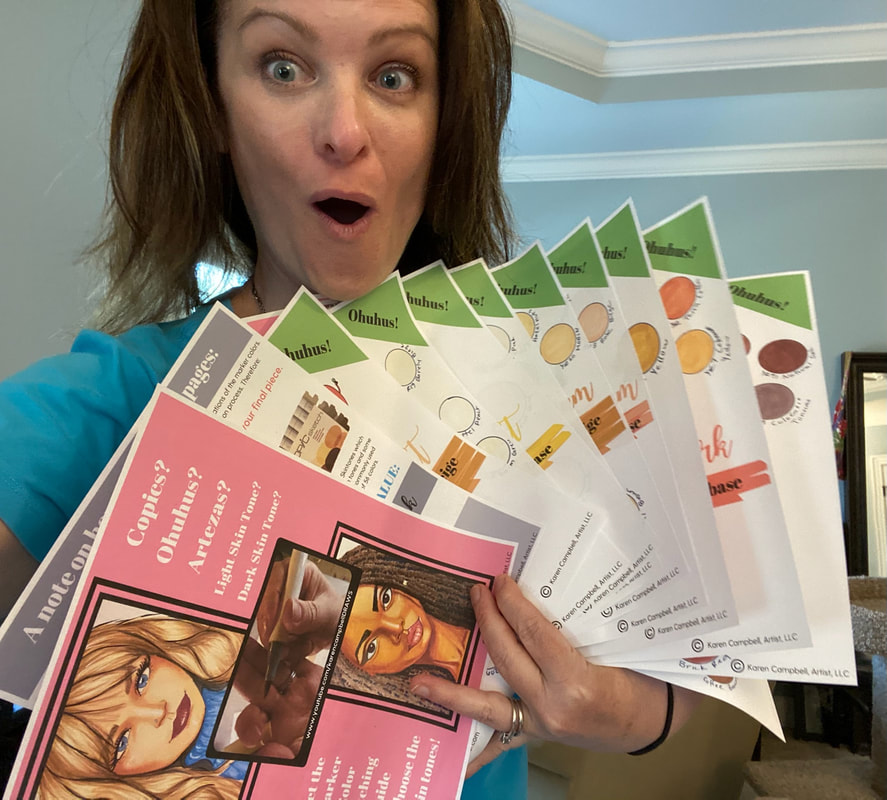
If you'd just like a little more info on skin tone markers so you have an idea of where to start with these if you've never used them before- or find starting an alcohol marker collection overwhelming - I recently created a FREE cheatsheet ALL about this to help ya out!! I organized this by color family for skin tones that are light, medium, or dark and have marker swatches from 3 alcohol marker brands that will work well. This should REALLY save you some swatching and trial/error time! Click the button below and I'll send my Skin Tone Markers Guide straight to your inbox. 
There are 12 pages in my Skin Tone Markers Guide and will be your best friend if you're thinking about using alcohol markers to work on these fun projects!
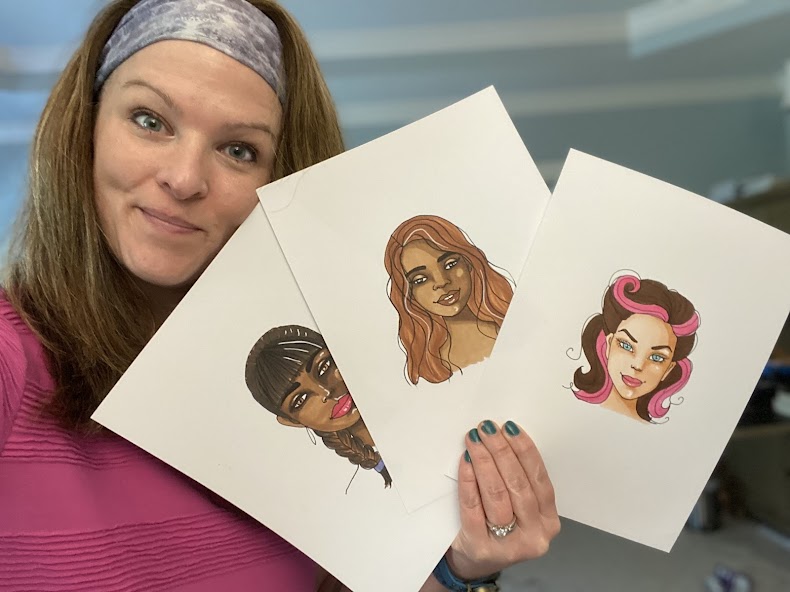
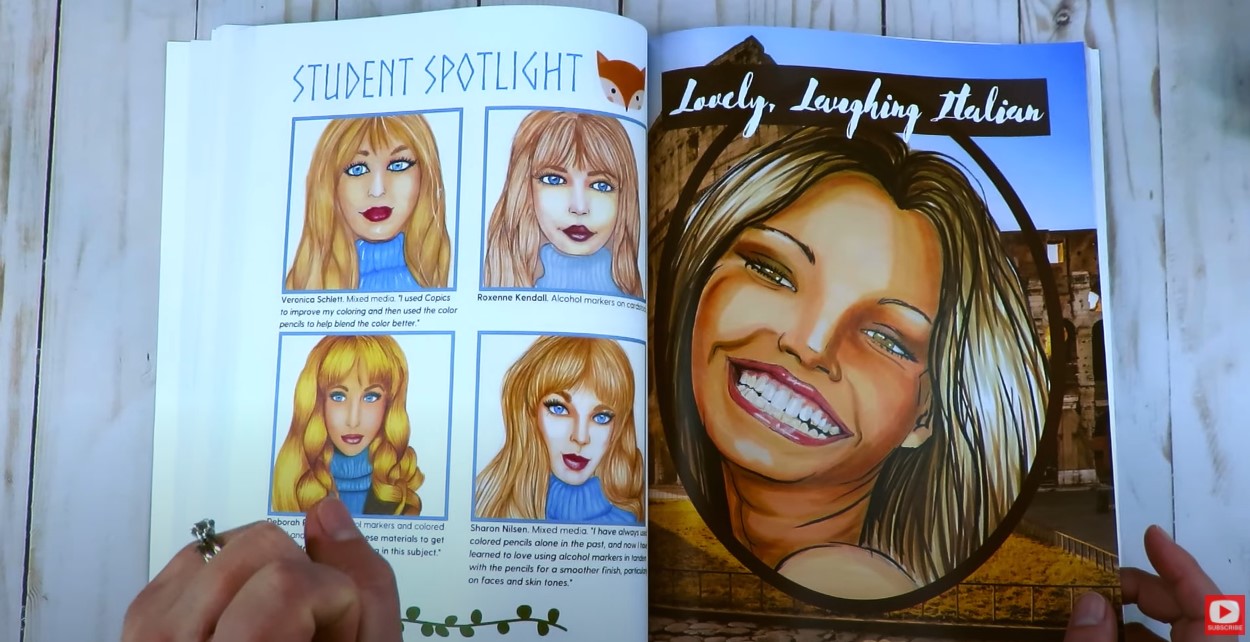
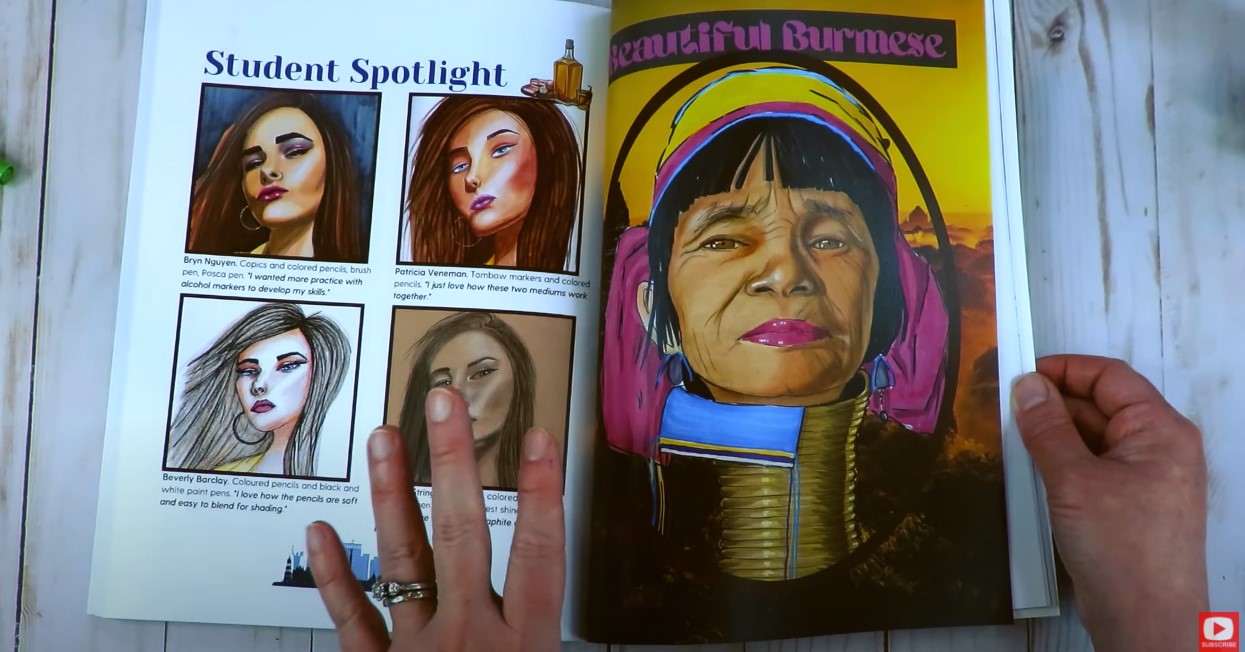
In today's video, you'll also get a little preview of the beautiful student artwork I'm thrilled to be featuring in this book as well! There are four gorgeous student versions for each drawing!!
Here are four of my favorite student pieces for my Native American face drawing project (see below)! 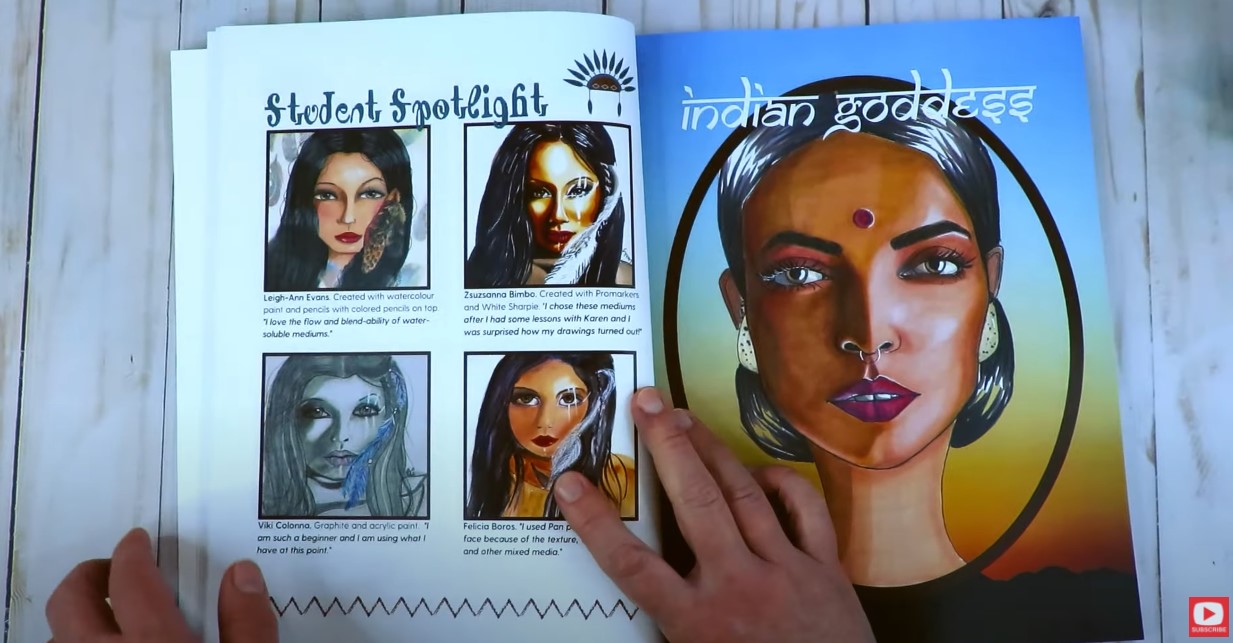
Artists will also learn how to create profile drawings, as well as side profile drawing in a 3/4 view in Whimsical Women of the World.
In addition, I made sure to focus on the most frequently requested lesson topics students always ask me for - like how to draw a smile with teeth and how to draw a head from different angles.
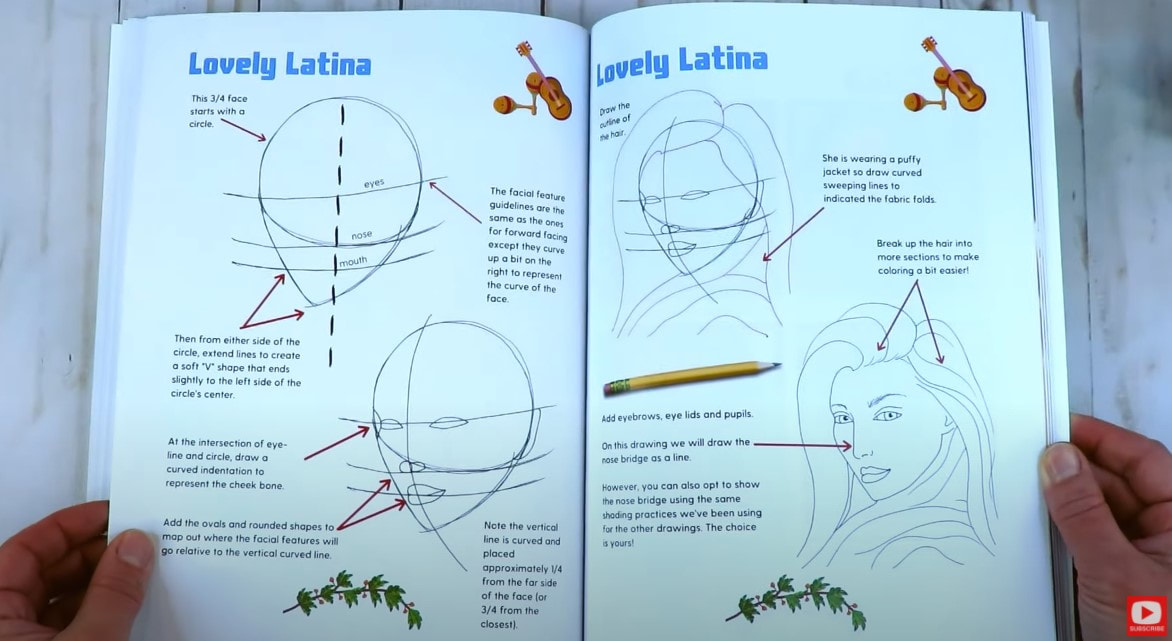
My Lovely, Laughing Italian (below right) covers these two for sure!!
I also get tons of requests to draw older, more mature women so I can teach how to draw wrinkles! My Burmese Beauty (below) is the perfect project to develop those skills and MORE!
Come check out the flip through video for Whimsical Women of the World. I can't wait to show you what's inside!!
Thanks for hanging out with me today!!
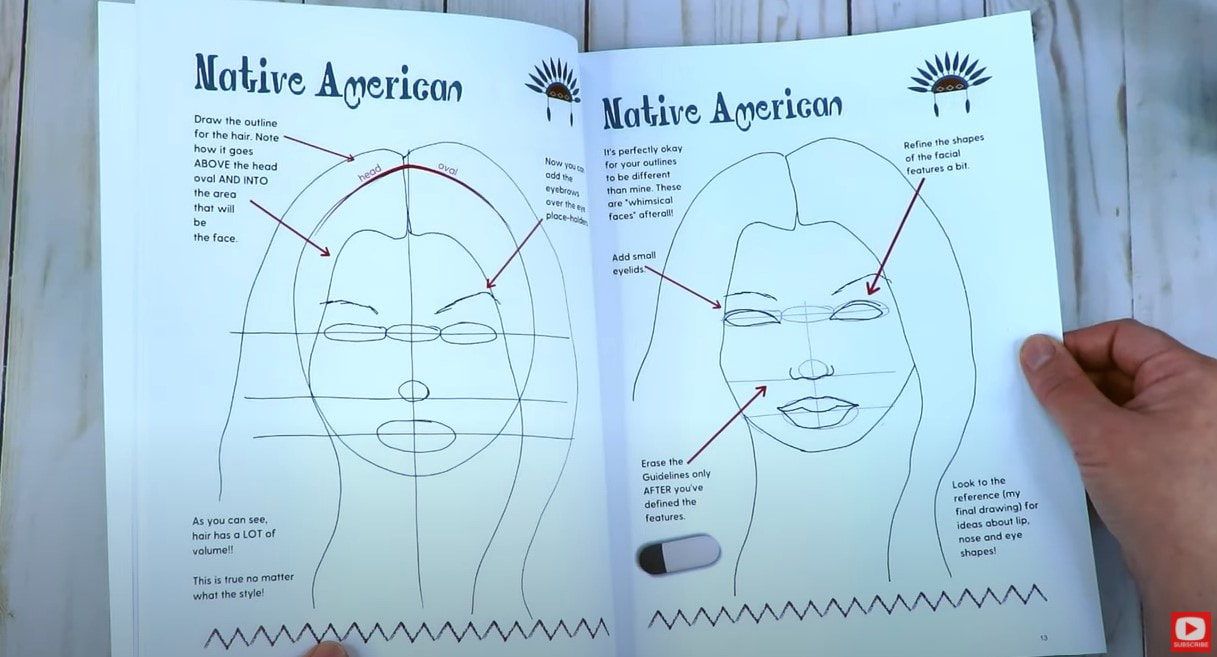
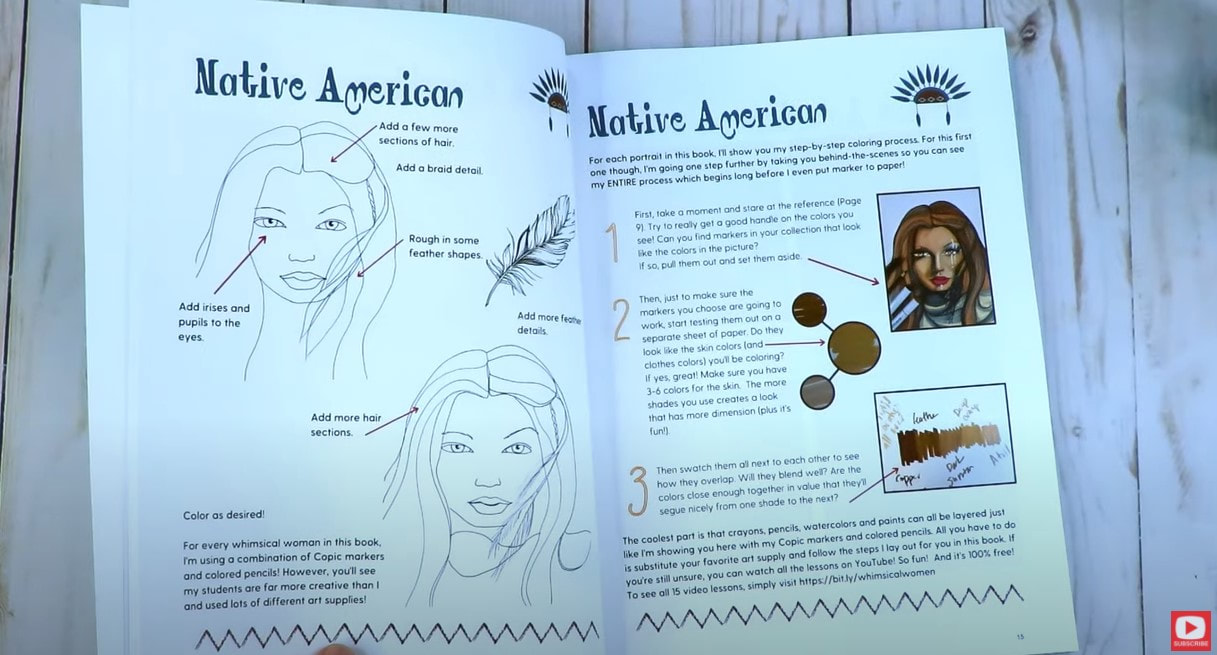
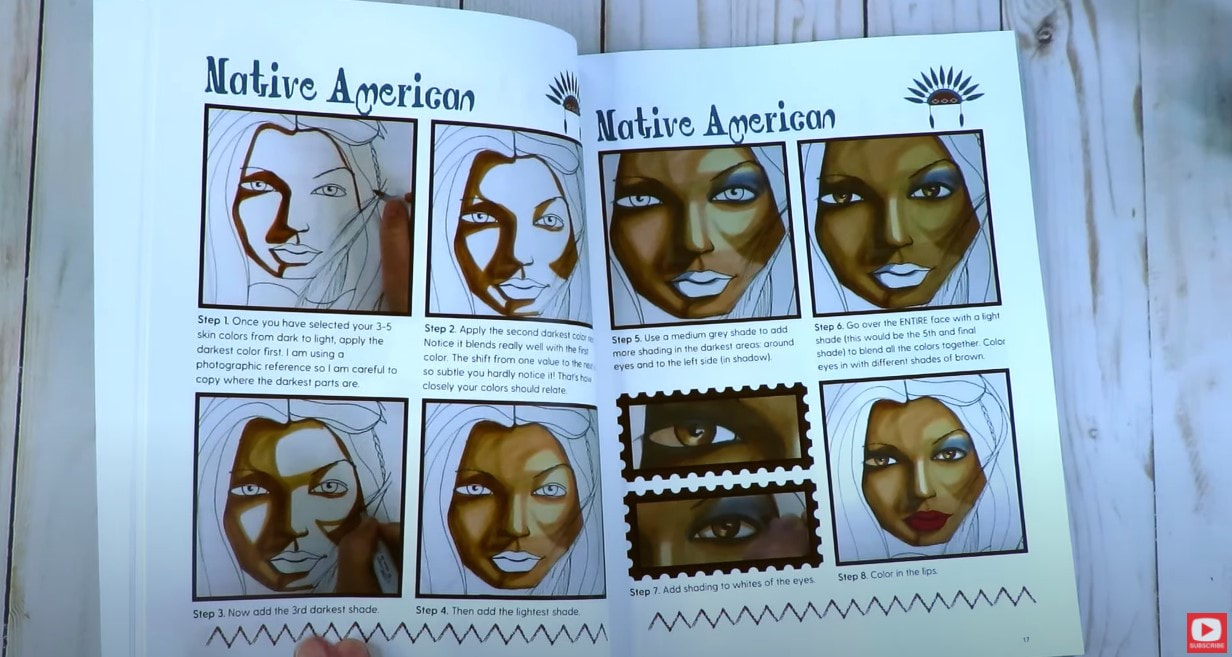
❤️Want FREE, immediate access to my Fun Fab Drawing Club and/or Mixed Media Society plus discounts on all my art books, sneak peek at YouTube videos and new book content, behind-the-scenes fun and MORE? Join me over on Patreon today and get HUGE PERKS in return for a small monthly donation. ❤️ CHECK OUT ALL my art books on AMAZON (available in both Kindle and Paperback) ❤️ SIGNED COPIES of my art books on ETSY ❤️ MY FAVORITE ART SUPPLIES on AMAZON ❤️ MY BELOVED FACEBOOK GROUP ❤️ FOLLOW ME ON INSTAGRAM ❤️ FOLLOW ME ON FACEBOOK HOW to DRAW & SHADE a WHIMSICAL UK Face with Short Curly Hair in Copic Markers (Whimsical Women #9)7/12/2020 How to draw a whimsical face is one of my FAVORITE things to teach, and I'm having an absolute blast with the whimsical face drawing tutorials in this series! Since I don't know where the GORGEOUS model in today's art reference photo is from - I've decided to call her "UK Cool chic" because of her funky, pink hair! We begin this whimsical drawing like we have each one in the Whimsical Women of the World portrait drawing series - by sketching in our guidelines!  The bone structure is super important on this girl because her hair isn't covering anything up! Speaking of hairstyle - I have no idea yet how I'm gonna pull this one off, but I'll get there... just gonna have to think on that a bit!! 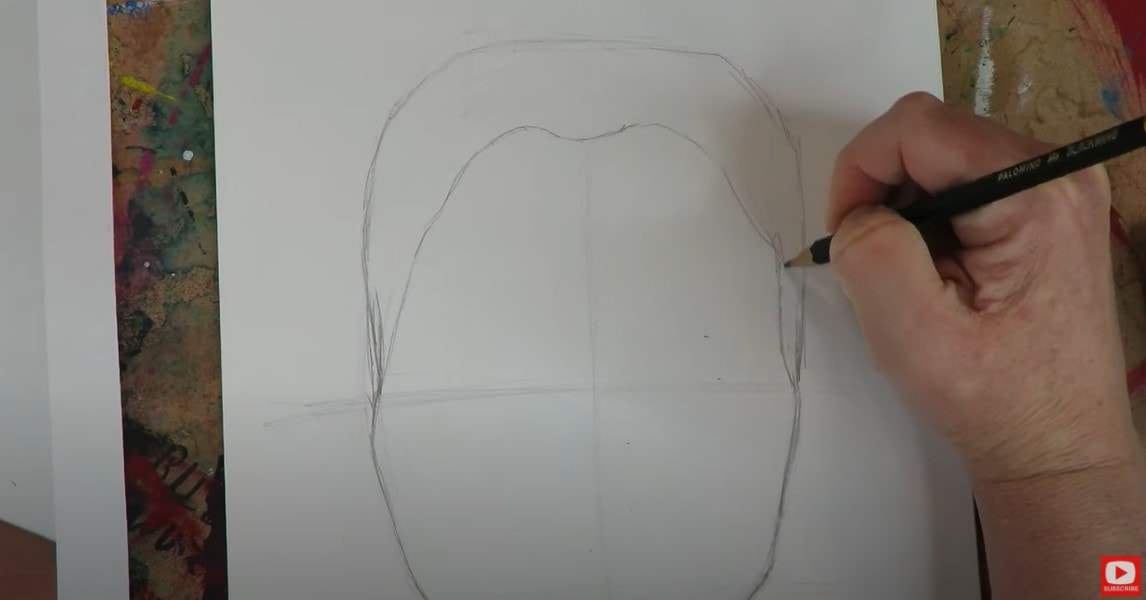 Then it's time to sketch in our whimsical face drawing guidelines. If you're not sure what I'm talking about, I'm guessing you might need my cheatsheet to help you out! I printed and laminated this because drawing proportions of the face are SO important. They also really are the same no matter what ethnicity you are drawing. We all start out with a human oval for the face, so this is a reference I've ALWAYS got on my art table. Click the button below and I'll send it straight to your email. 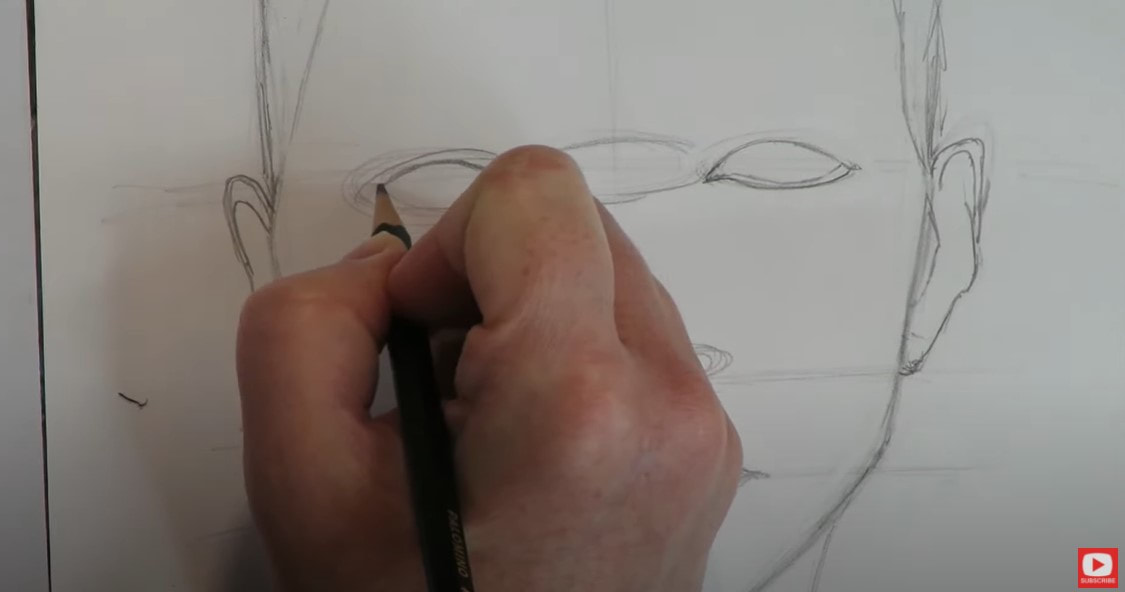 The model for today's whimsical face drawing tutorial has got SUCH COOL EYES!! And her eye makeup is really awesome. There is some kind of hot pink going on in the wet line under her eyes that I already CAN'T WAIT to get in there with my markers and add!! Faces are kind of like vases, you know? If you draw one side, it's really hard to finish that and then hop over to the other side and get them to match! Am I right?! Over time, I've really learned to build both sides up at the same time - especially when it comes to the EYES. This way they are much more likely to end up symmetrical than if I completed the whole right half of a face, and then tried to replicate it symmetrically on the left! It just doesn't work that way for me, so this is my trick. 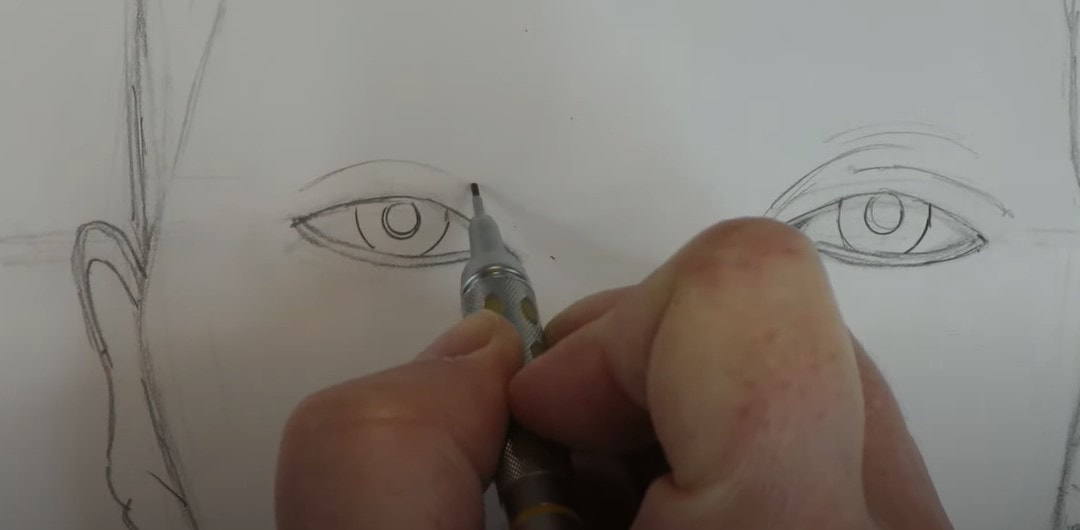 I see some lines under our model's eyes, so I'm just drawing them in. I always draw what I see. This is how you capture someone's likeness. And honestly, what makes lines on peoples' faces such a big deal anyway?! It just adds to their beauty! Be sure to watch the video because the drawing portion is all in REAL TIME so you don't have to keep pausing the video to keep up with me ;) Just copy what I do, and draw right along with me. 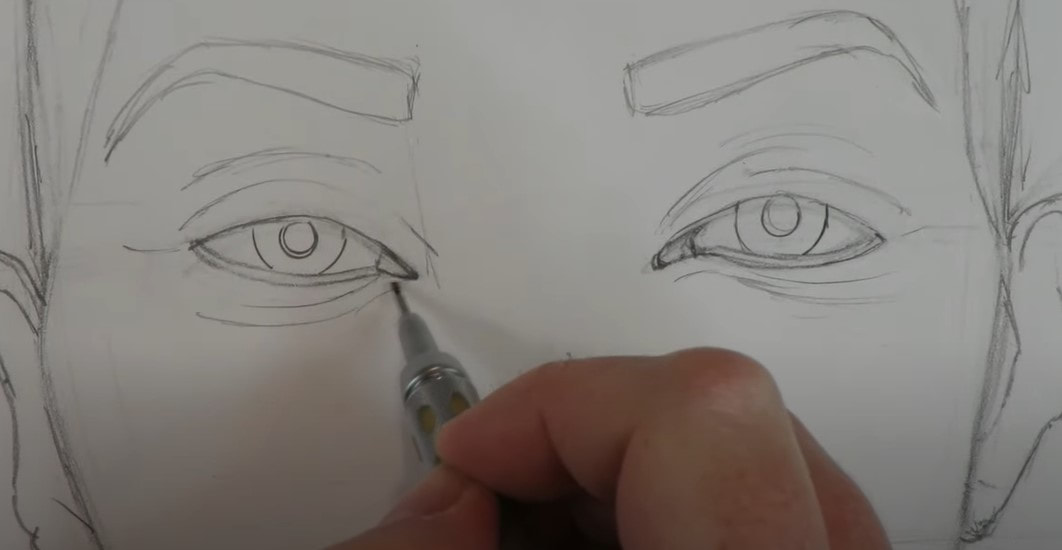 The eyebrows on this woman are just gorgeous - super sculpted and glamorous!! 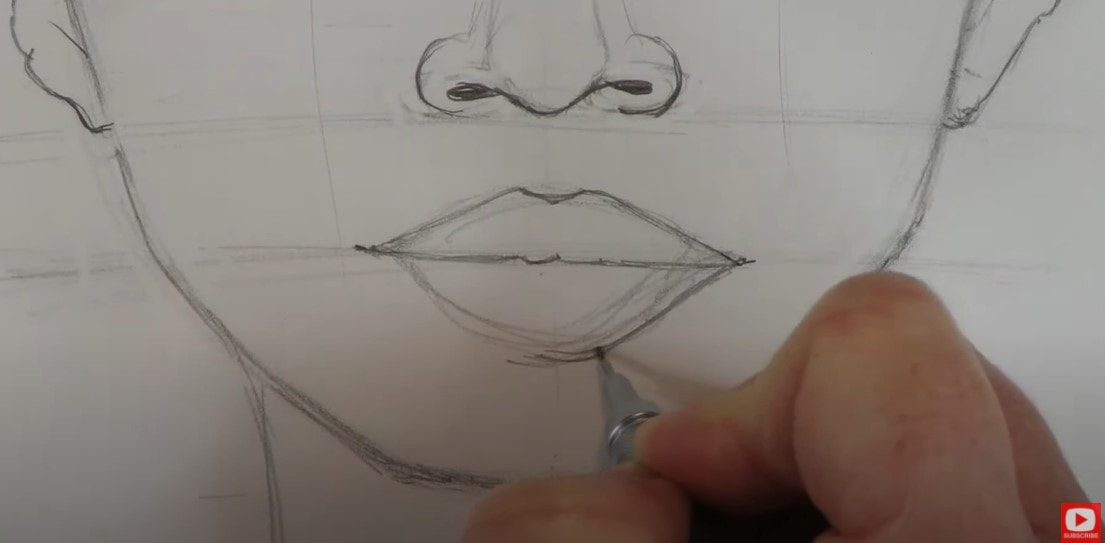 I'm loving her gorgeous full lips too, and can't wait to start adding some color! Before we go any further, super quick announcement: All product links are Affiliate. I may earn a small commission if you choose to order through these links, but by law there is never any additional cost to the consumer for doing so. I thank you for your support! 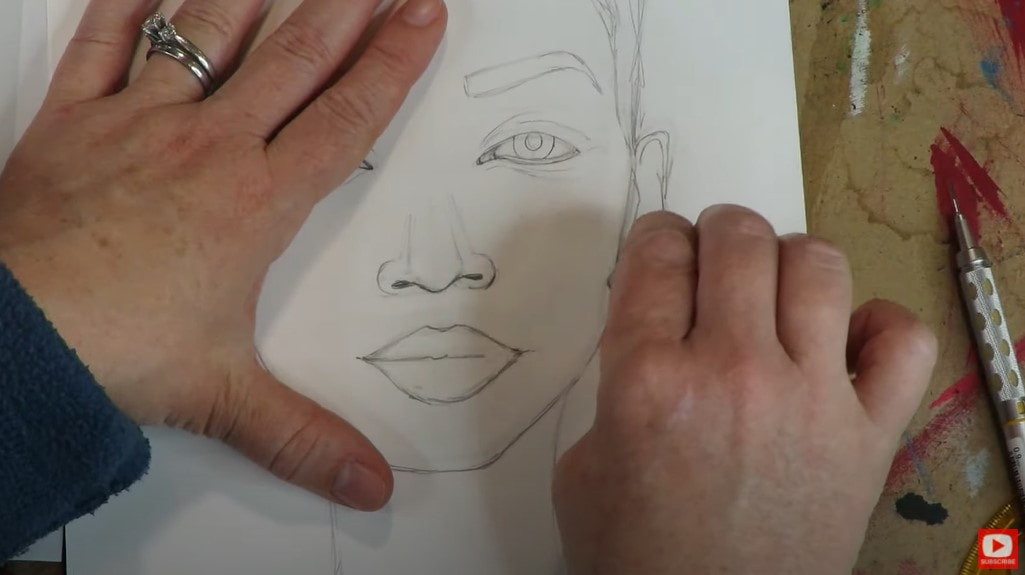 Students ALWAYS ask me about my eraser, and I'm in love with it. It does such an amazing job lifting the graphite off my page without ripping the paper. It's called the Vanish Eraser. You can grab them on Amazon. If you live near a Jerry's Artarama, they're only like $2 if you can get over there in person! Let's wrap her up and erase all those guidelines. 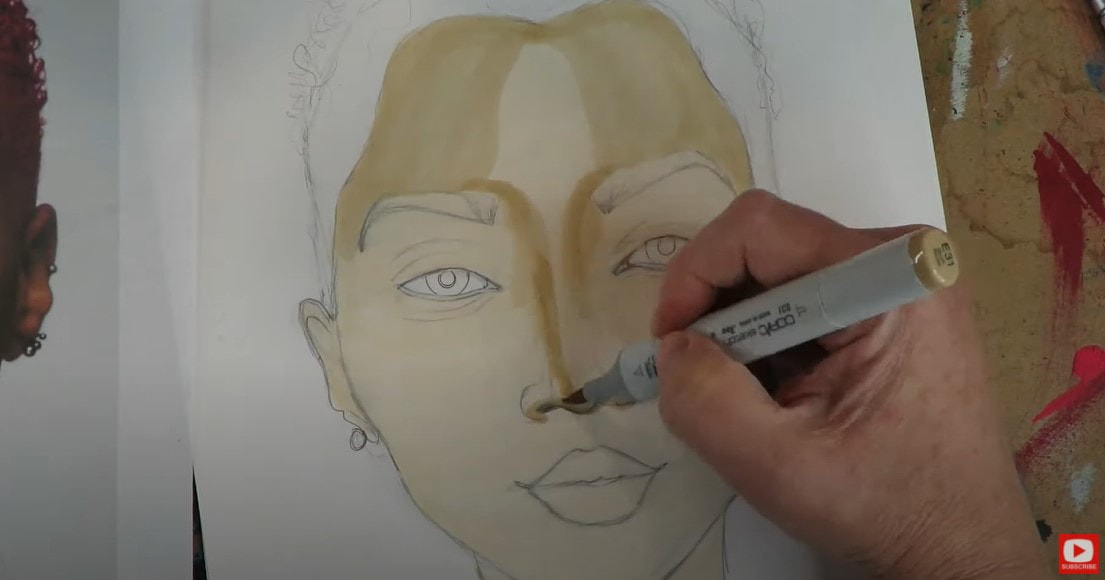 The first step with whatever art supplies you choose for coloring, is to lay down a foundational color. I either work light to dark, or dark to light with my copics - either way is totally fine. Be sure to pause the video as you're going along to catch where the shading is getting put in. 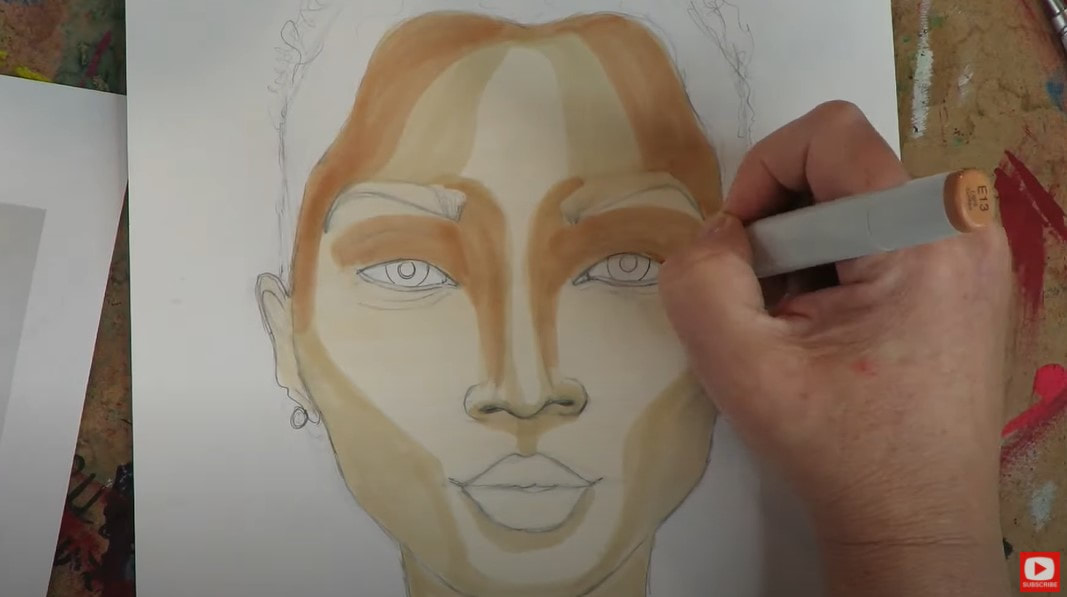 I love the way the light is hitting our model's face today. It's one of my absolute favorite shading patterns to replicate - in any medium! It's super symmetrical. Whatever you do on the right side- just replicate on the left. This is also one of the EASIEST lighting patterns to shade onto a face! So even if you're a beginner- YOU CAN DO THIS! 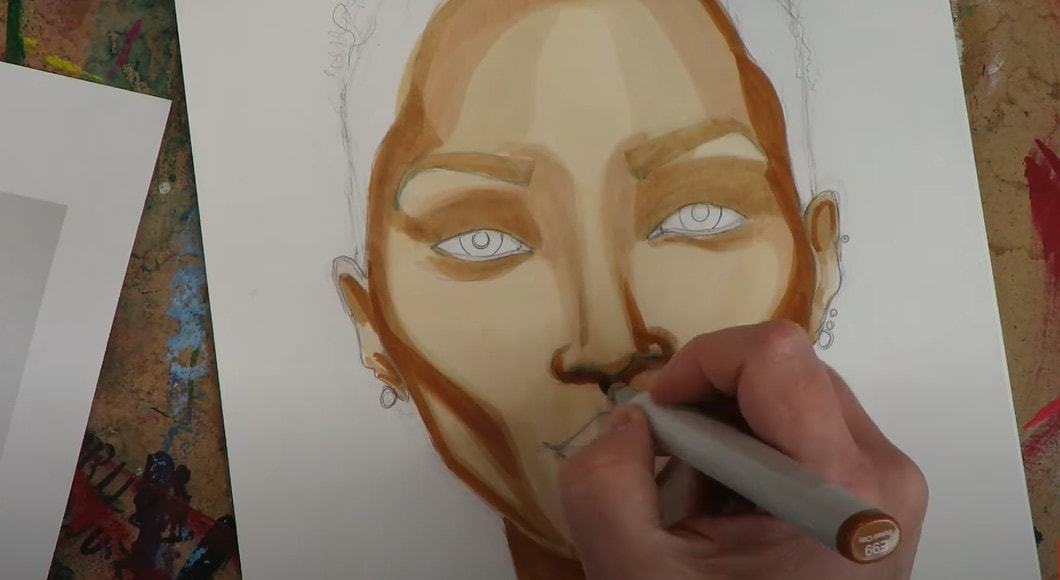 If you've seen my videos in the past, you know we all hit a point about half way into a project when the face we're working on is in what I LOVINGLY refer to as ....the ugly phase. When you're shading with copic markers (or any brand of alcohol markers), you tend to hang out in "the ugly phase" for quite a while because there is a lot of layering to get the shading right, etc. You've gotta just embrace it! Acknowledge the ugly phase when you arrive, and KEEP GOING. Typically whenever I've hit the ugly phase, I help my girl start working her way out of it by sweeping a light to medium shaded skin tone marker over the the entire face. The alcohol in that marker RE-WETS all the previous alcohol marker layers and it helps to blend them all together. COOL TRICK, right?! 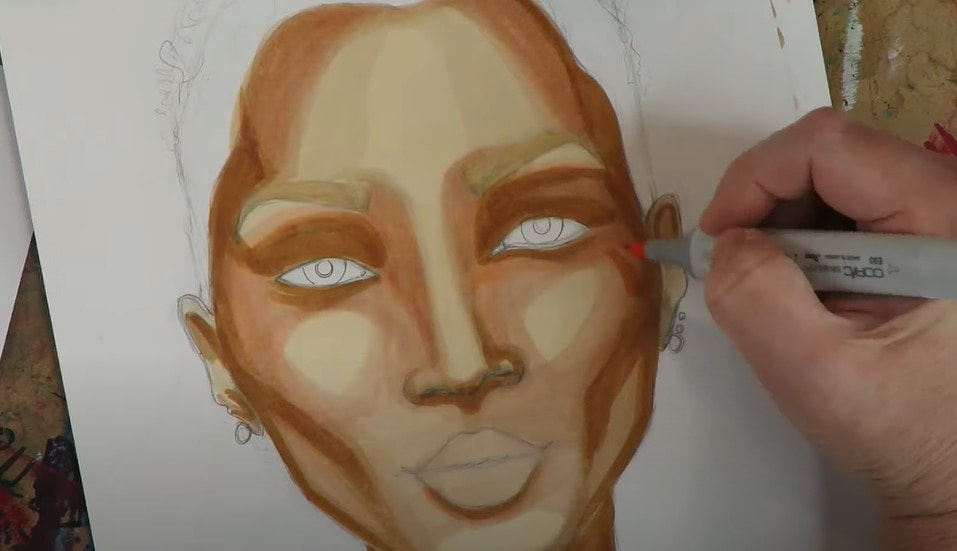 As you're laying down darker shades of color throughout the coloring process, don't freak out if they feel like they're too dark. Alcohol markers go down kinda like watercolors and appear much darker when they first hit the page. They dry much lighter - so don't worry!! 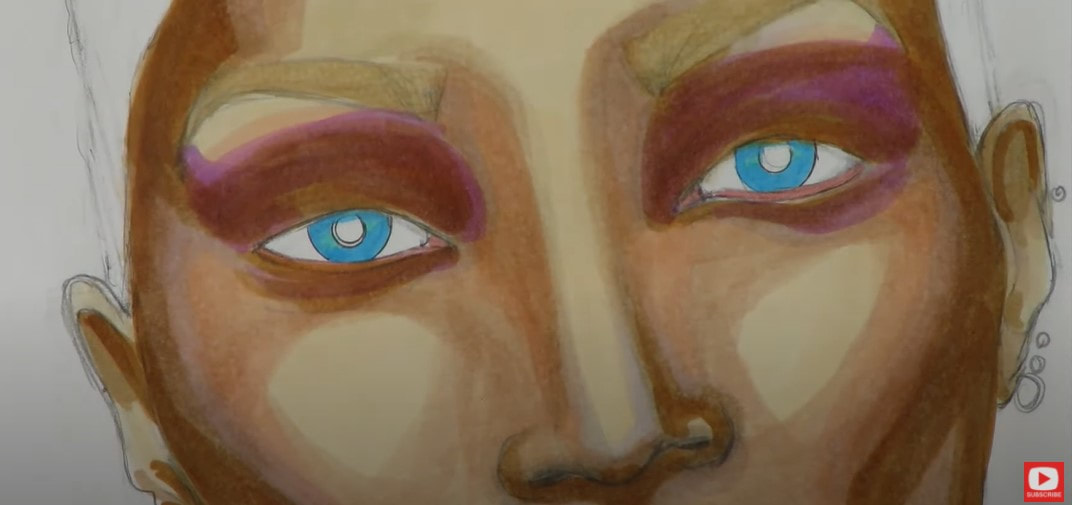 While I'm adding some pink around her eyes, I decide to just go for it with her hair- even though I still have no idea how to do it! I study my reference and just start adding color. For me- I really feel like when you're shading in color, you really need at least three colors to produce a 3-dimensional look - a light, medium and dark. I select my three colors and go for it with some "kindergarten" squiggles! 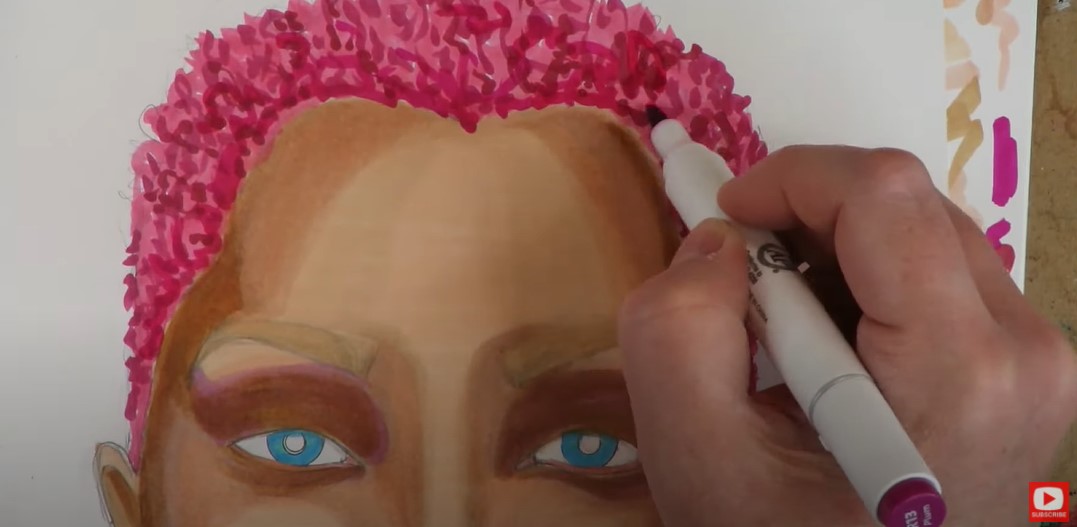 If you've been watching the Whimsical Women of the World series, you'll know I've been using colored pencils to add some shading on top of my markers to add texture, fix my mistakes, or help blend the transitions between marker shades. In this video, I really relied on my colored pencils to help me achieve the look I'm seeing in the reference image in terms of makeup. For continuity among the other Whimsical Women in this series AND because I'm obsessed - I turn to my pentel pocket brush for detailing in the eyelashes, eyebrows, hair, and outlining throughout. 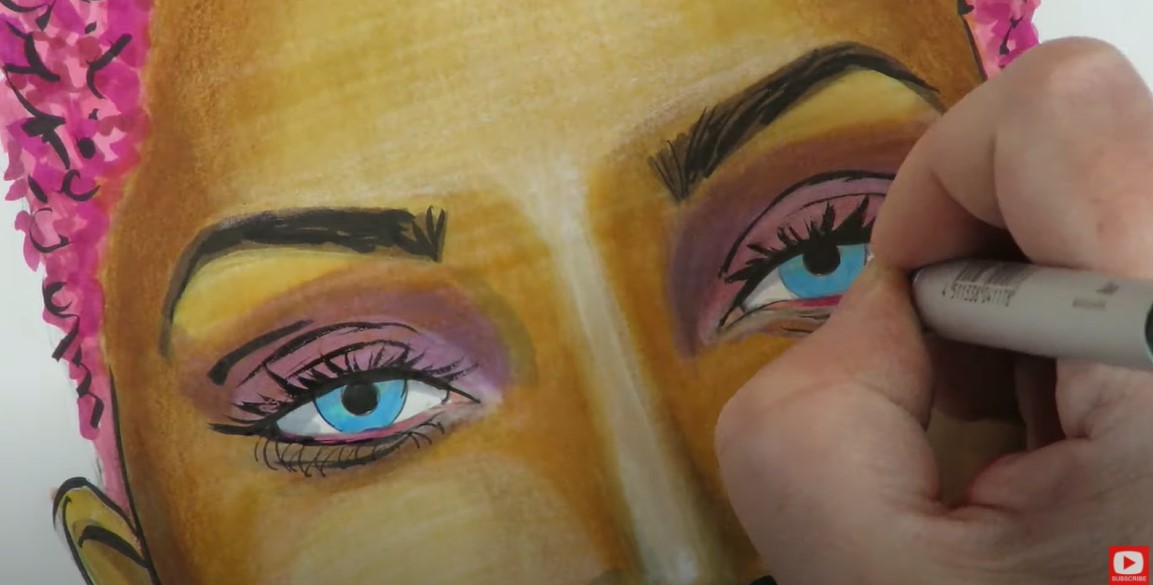 I finish the project with while highlights in posca pens - which I totally love, because they add SO much more dimension and sophistication to my pieces with pops of light in the eyes, lips, nose, and wherever I see sparkles throughout the features in my art reference photo. 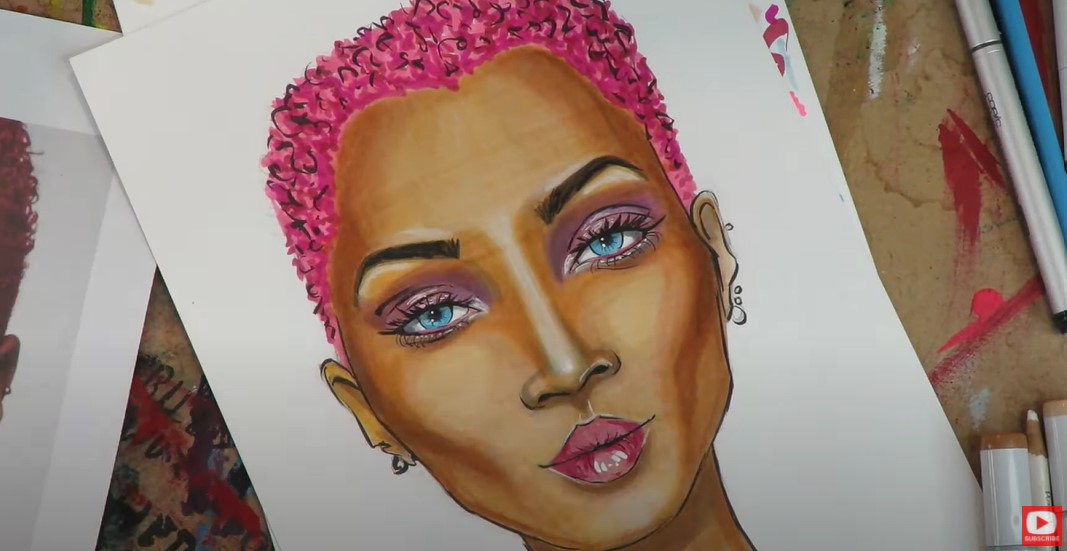 I hope you DO NOT HOLD BACK when you're doing your own highlights in your own projects! I know this can be scary for some of my students, but they pack the biggest punch and can make such a difference in your work. My wishes for you ... be DARING with your shadows and BRAVE with your highlights! And above all, HAVE FUN!! Enjoy today's Whimsical Women of the World face drawing tutorial! Thanks for joining me! See ya back here next week! How to DRAW & SHADE a WHIMSICAL Middle Eastern Face with Hijab in Copic Markers (Whimsical Women #6)14/11/2020 I love teaching how to draw a whimsical face, and am having an absolute blast with the portrait drawing tutorials in my Whimsical Women of the World series! Today's art reference photo is of a GORGEOUS Middle Eastern woman wearing a hijab. 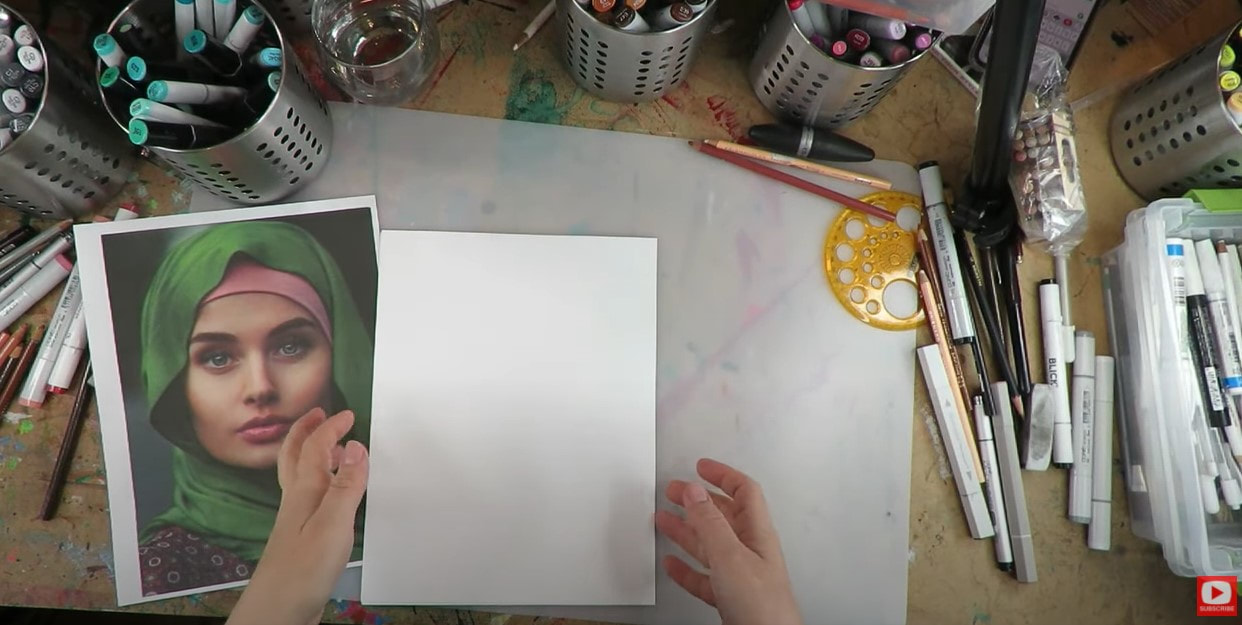 My reference photo for this project didn't have any information attached to her, so unfortunately, I don't know the model's actual ethnicity. I'm guessing she is from somewhere in the Middle East, or at least has roots there. I called a friend of mine who has helped Syrian refugees for years to see if she could provide a little insight. She thought possibly Syrian or Turkish? At the moment, that is our best guess. If YOU have any opinions to share here, I need your help on this one! I'm super curious and would love to identify her background. I'd also love for YOU to draw along with me, so grab a sheet of cardstock or whatever your favorite paper is for doing alcohol marker art / copic marker art, and let's sketch in our face drawing guidelines. 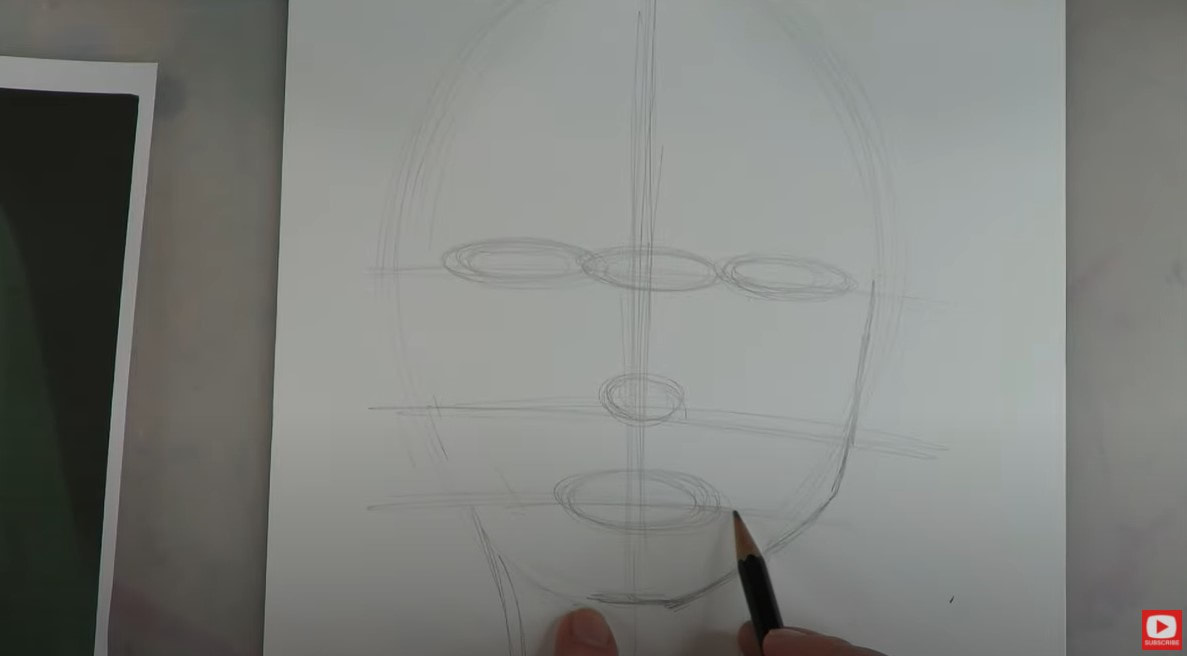 If you're not sure what I'm talking about, you HAVE to download my FREE Face Drawing Guidelines Cheatsheet to help you out! I printed and laminated this for myself because drawing proportions of the face are so important. They also really are the same no matter what ethnicity you are drawing. It's a reference I've ALWAYS got on my art table. Click the button below and I'll send it straight to your email ;) 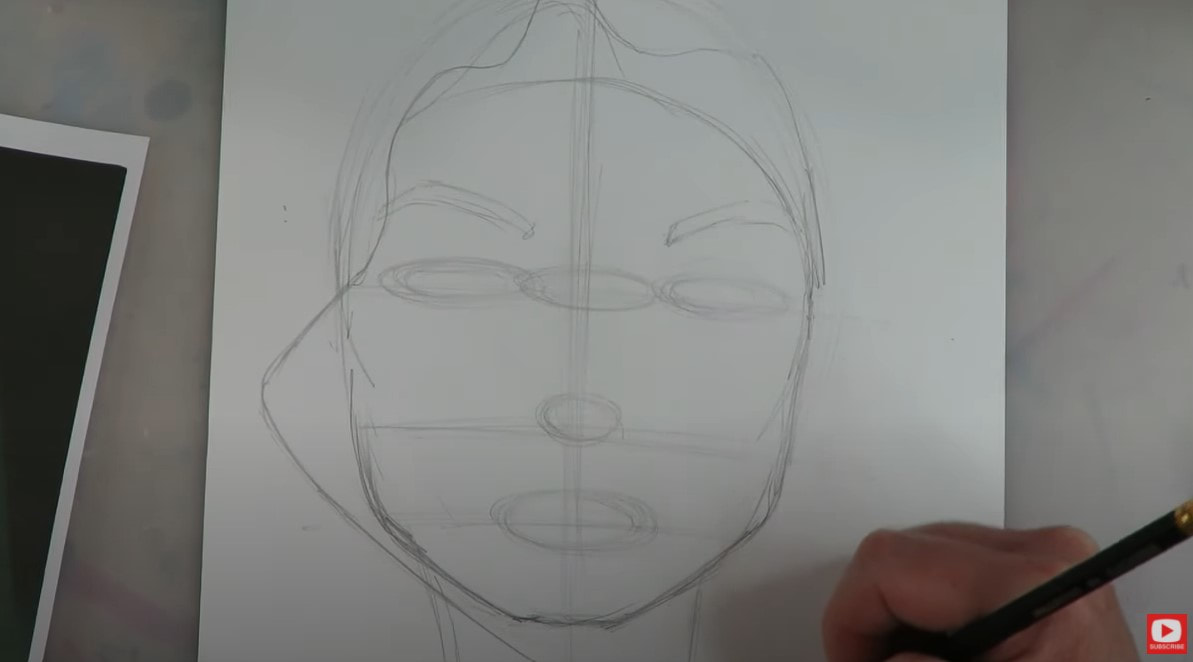 Ok back to our gorgeous girl for THIS week!! She has stunning cheekbones so I really study my art reference photo to try and capture them! As I sketch in the placeholders for drawing facial features later - I also rough in the shapes I'm seeing close to her face that are formed by her headscarf. 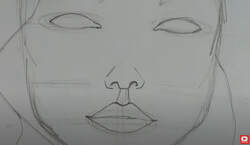 Slowly, I begin to darken the facial features as I gain a bit more confidence in their placement. If you're struggling with this - make sure you click over to the video so I can demonstrate for you step by step!! 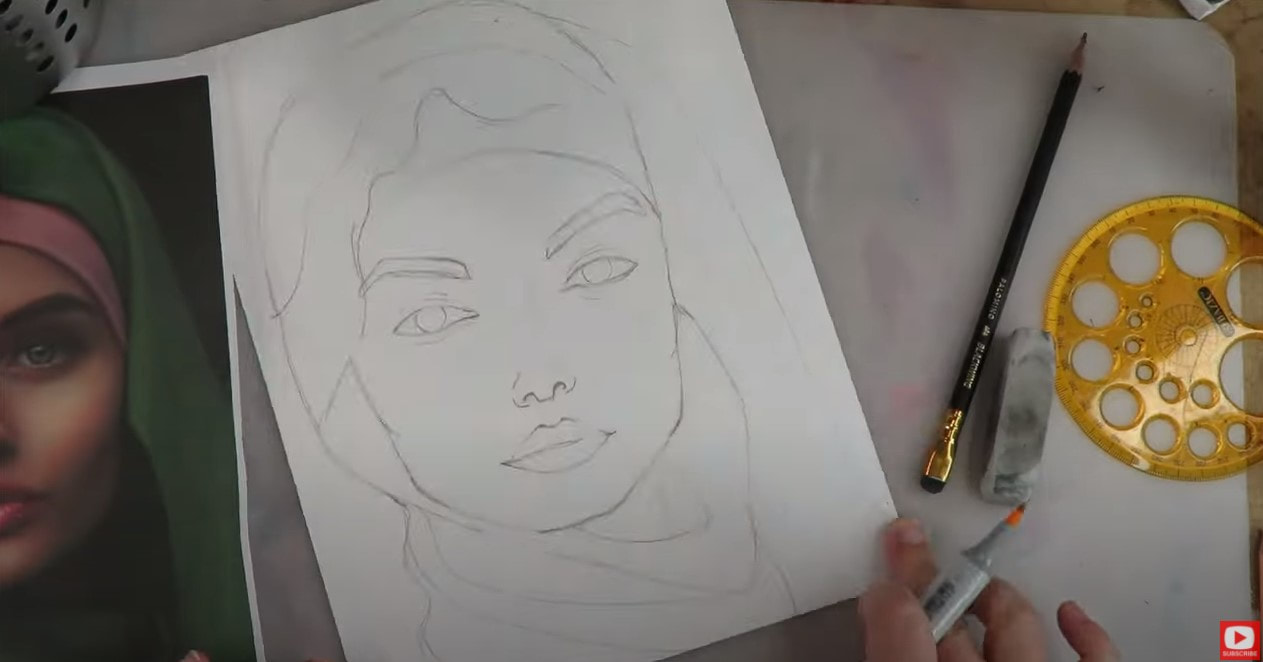 If the idea of how to draw a hijab, how to draw a headscarf, or how to draw fabric folds stresses you out, I HEAR YOU!! I was totally intimidated at first, but like anything - you just gotta dive in. Honestly, it ended up being a LOT like drawing hair! Drawing a hijab may EVEN be easier!! Now let's get our copic markers out to start shading!! 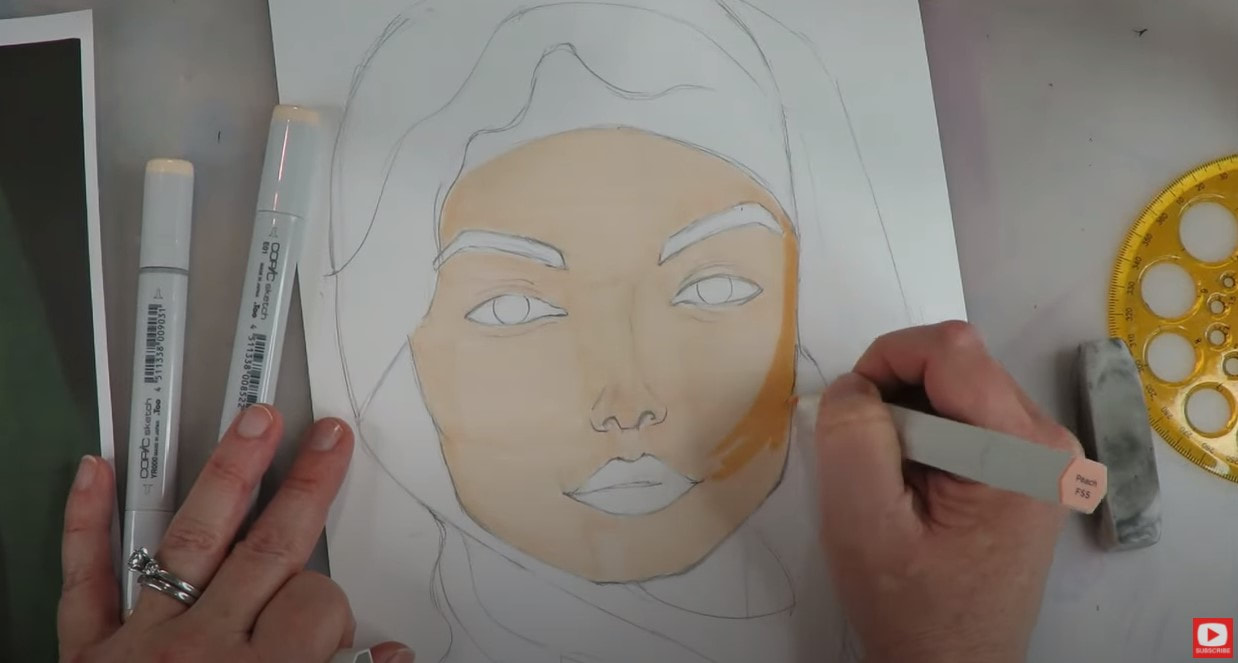 Remember, if you don't have copics, any alcohol markers will do! I know copics are super expensive, so I'm constantly looking for alternatives for my students to try. Over the weekend I posted in my Facebook Group about the skin tone pack from Ohuhu. These are actually SUPER juicy and totally worth a try at around $1/marker. 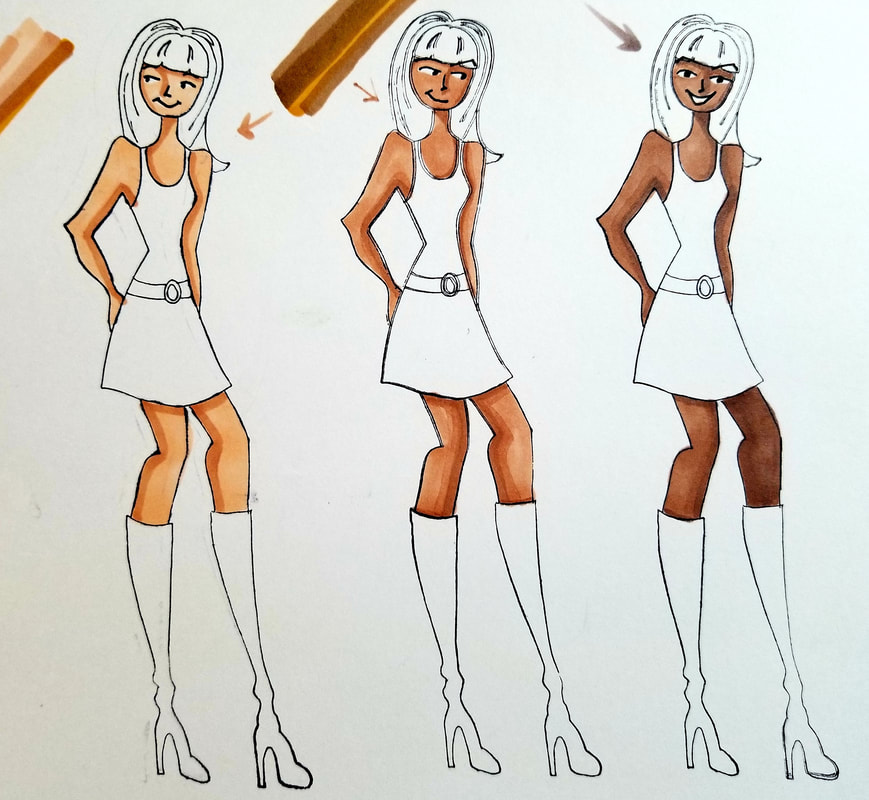 Before we continue, super quick announcement: All product links are Affiliate. I may earn a small commission if you choose to order through these links, but by law there is never any additional cost to the consumer for doing so. I thank you for your support! If you're in the market for new skin tone markers, or just love trying new art supplies, click here to grab some on Amazon. I totally think the 24 pack is sufficient for ANY face drawing project you have in mind!! If you're new to me - you'll soon find out I'm a HUGE FAN of using WHATEVER you have on hand for any and all art projects! For me - art is just about creating and having fun!! You can do both with ANYTHING you already have. As a teacher, students are always asking me my advice on art supplies, so I'm constantly testing things out. This way you don't have to buy all the things! I'll tell ya what's worth trying whenever I find something good. That way, I can help you save a little of your money so you can spend it on the supplies YOU LOVE!! 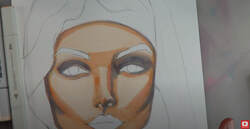 There are two ways to shade a face with copic markers. Either start with the lightest shade and work dark, or start dark and work light. I find it's a bit less scary to start light and work dark. It feels WAY less intimidating! I do my best to "map out" the shadows on her face as we go. As you can see- I'm incorporating gray and even using some purple grays to get my shadows in. This helps to tone down all the peach and pinky "heat" from the warmer skin tones. It evens it all out and makes her look a little more neutral. 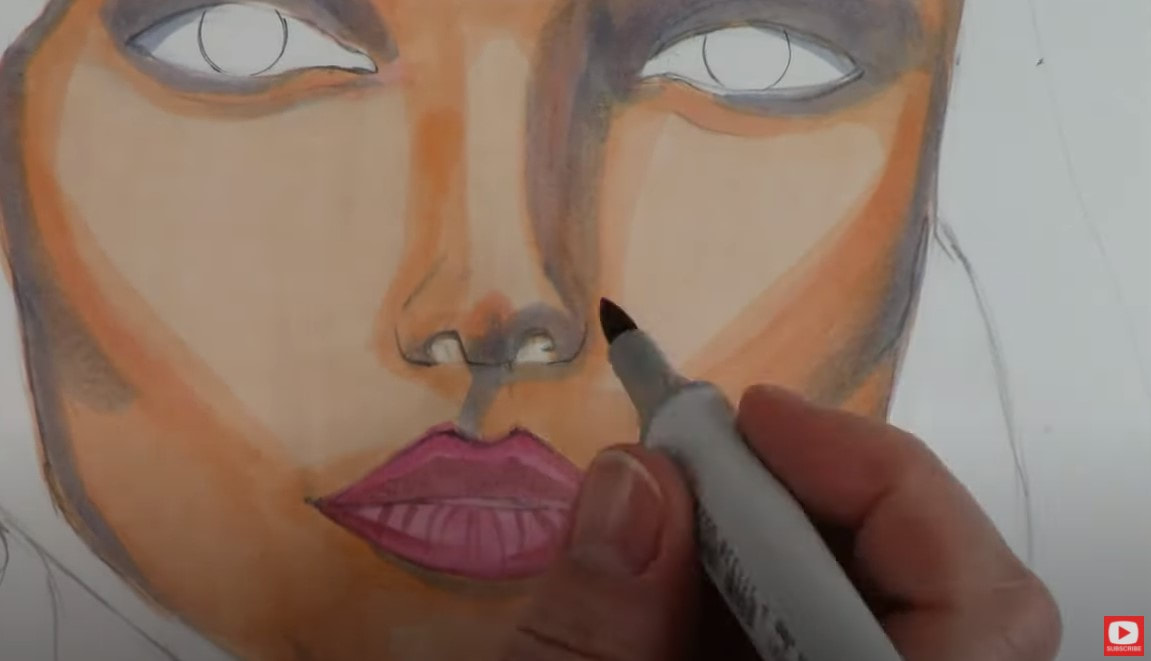 Right now you're probably thinking EWWW!!! LOL. We've just entered what I lovingly refer to as "The Ugly Phase." Unfortunately, we're stuck in the "ugly phase" for quite a long time when we're working with alcohol markers because we do a lot of layering! When you hit this phase, you've just gotta embrace it! Acknowledge it and KEEP GOING!  Every time I introduce a new color in my shading, I try to pop a little of that color throughout the entire piece. I've found this helps me to unify each piece of art and really stick to a color scheme. 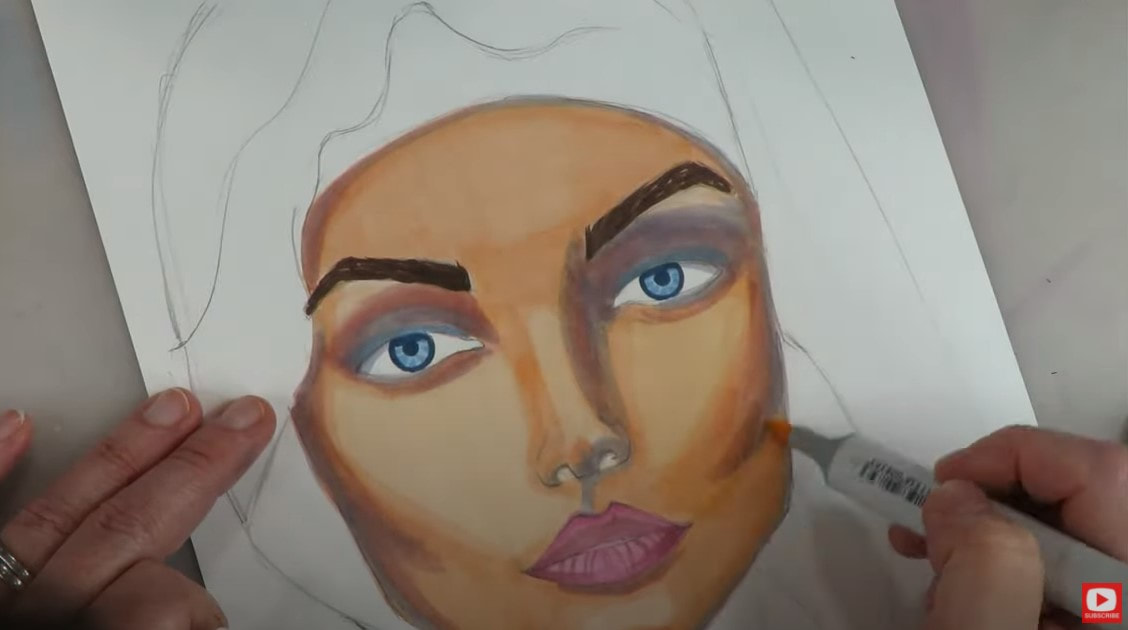 This week I tried a new technique for shading eyebrows. First I used a skin tone color, then I drew individual hairs in a darker brown. I like the way it turned out! This might be a fun technique for you to try, too. 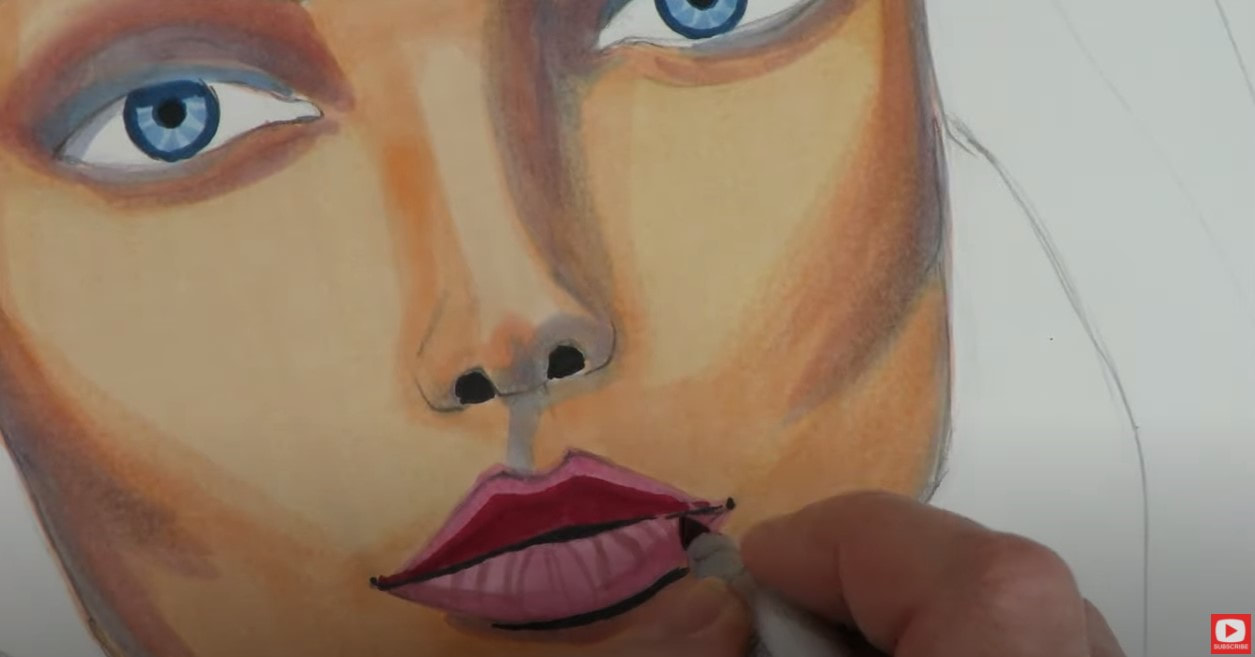 She's starting to look a little more human, isn't she? LOL. We're slowly working our way out of the ugly phase! 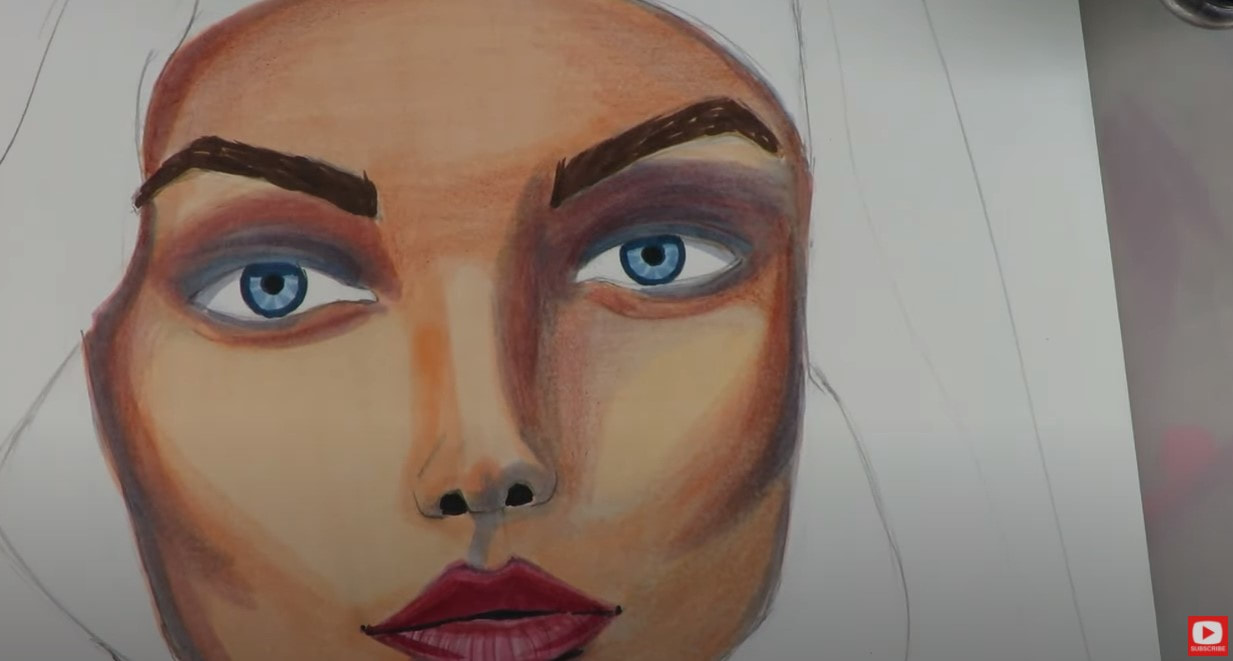 After I've got some good layering going on with my alcohol markers, it's time to pull the transitions together with my colored pencils. I find this helps A TON with copic marker blending and really minimizes the streaks that are bound to happen. There's a lot of magic that happens when the colored pencils come out!! As you'll see in today's whimsical portrait drawing tutorial, I alternate quite a bit between my copics and my colored pencils. Go ahead and keep doing this until you get what you're looking for in terms of skin tones and blending. 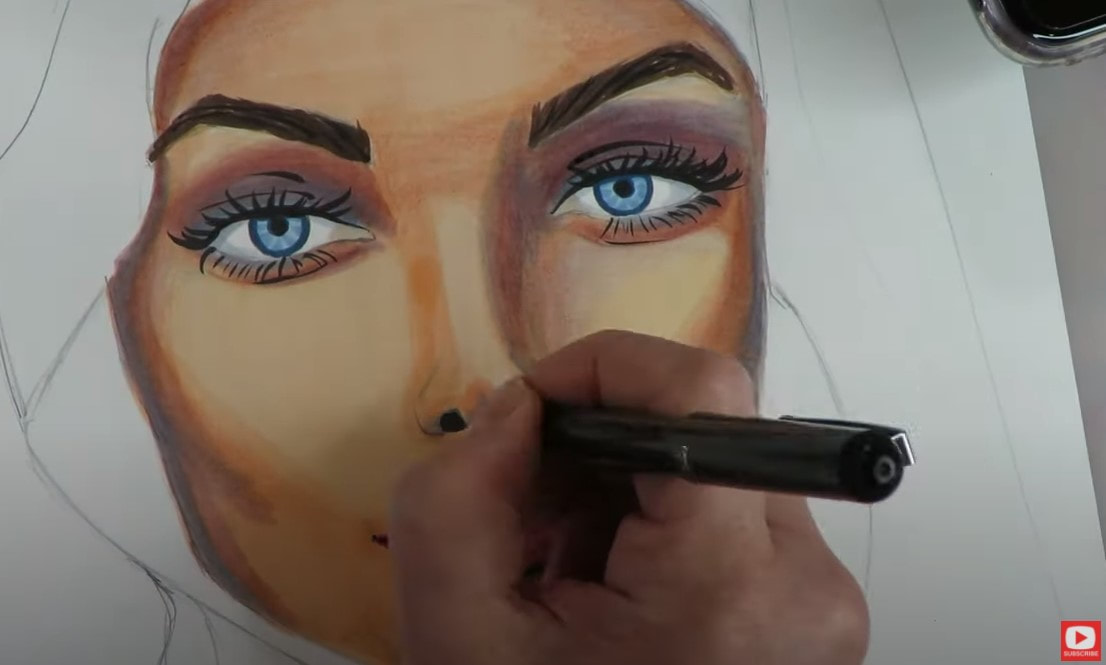 Next, I pull out my "secret weapon" for drawing eyelashes! I am obsessed with my pentel pocket brush and use it for drawing eyelashes on all of my girls- no matter what medium I'm doing. If you struggle with how to draw eyelashes, you have to check out this video, because I did a whole tutorial on it. I've also got a cheatsheet for that!! This is another awesome reference to keep on your art table. As you'll see - directionality of your lines are SUPER important when it comes to eyelash drawing. 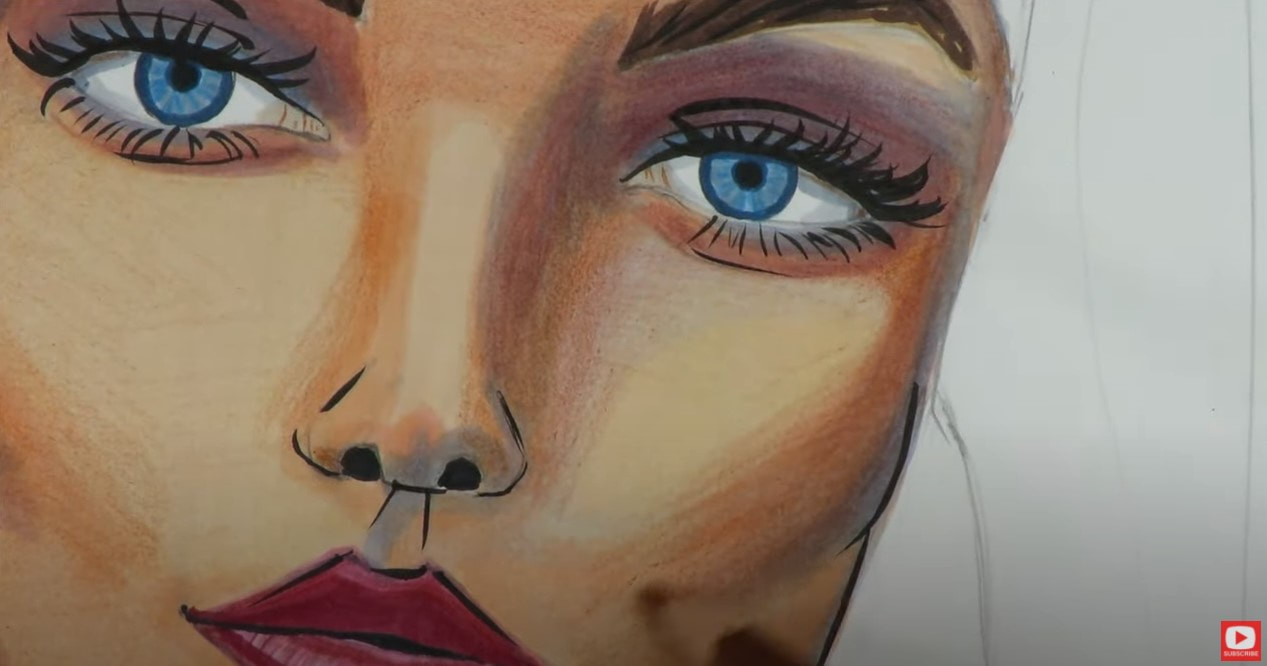 Now she's coming alive, right?! As soon as those pupils get popped in, and the eyelashes are added - she really starts looking human AND beautiful, doesn't she?! It's only gonna get better from here! Now it's time for the eyeshine...one of my favorite parts!! 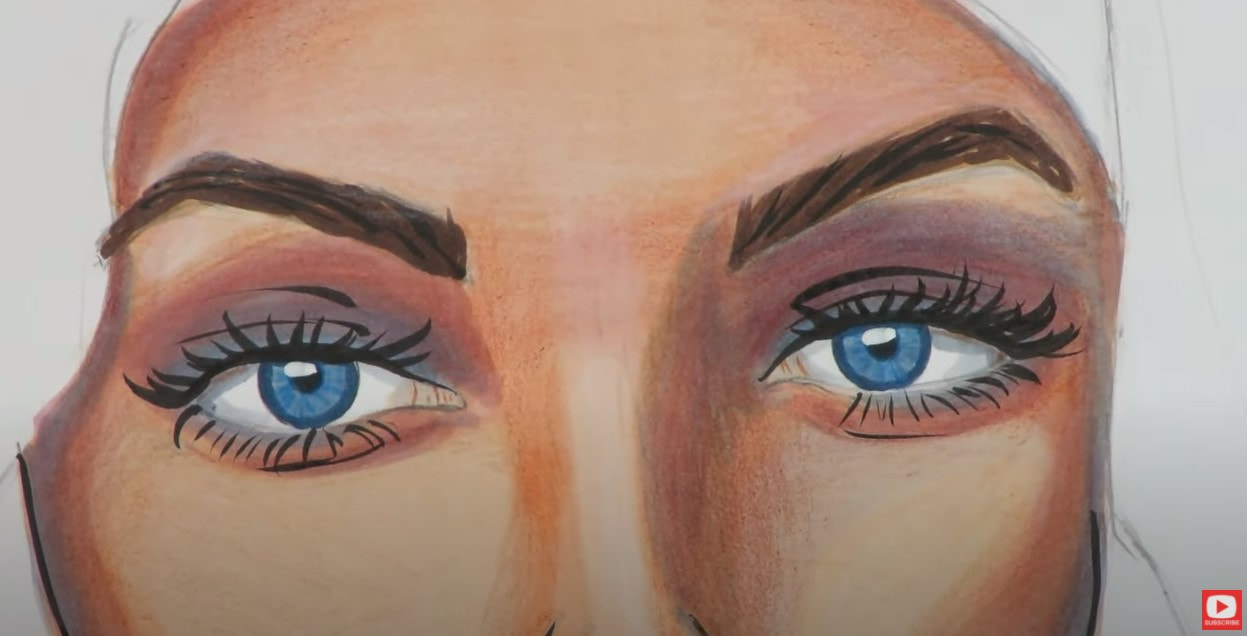 I add the eyeshine wherever I see it in my reference photo. I either use a white sharpie or my white posca pen for this. Wherever you add the eyeshine to the first eye, add the same style mark to the second eye, so both eyes match. Then I continue with my white paint pen highlights -adding a little to her nose and to her lips. My reference photo for today has a TON of gorgeous shine on her lower lip. Excited to get that in! 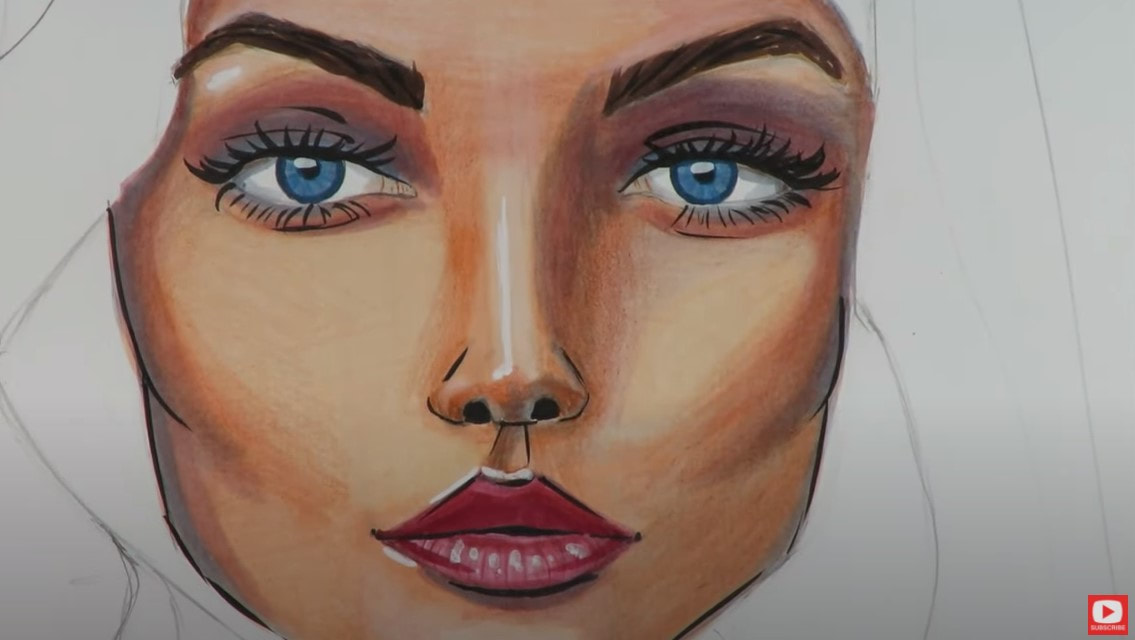 Always take a step back and look at your work from a distance. What do you see? What can be improved? 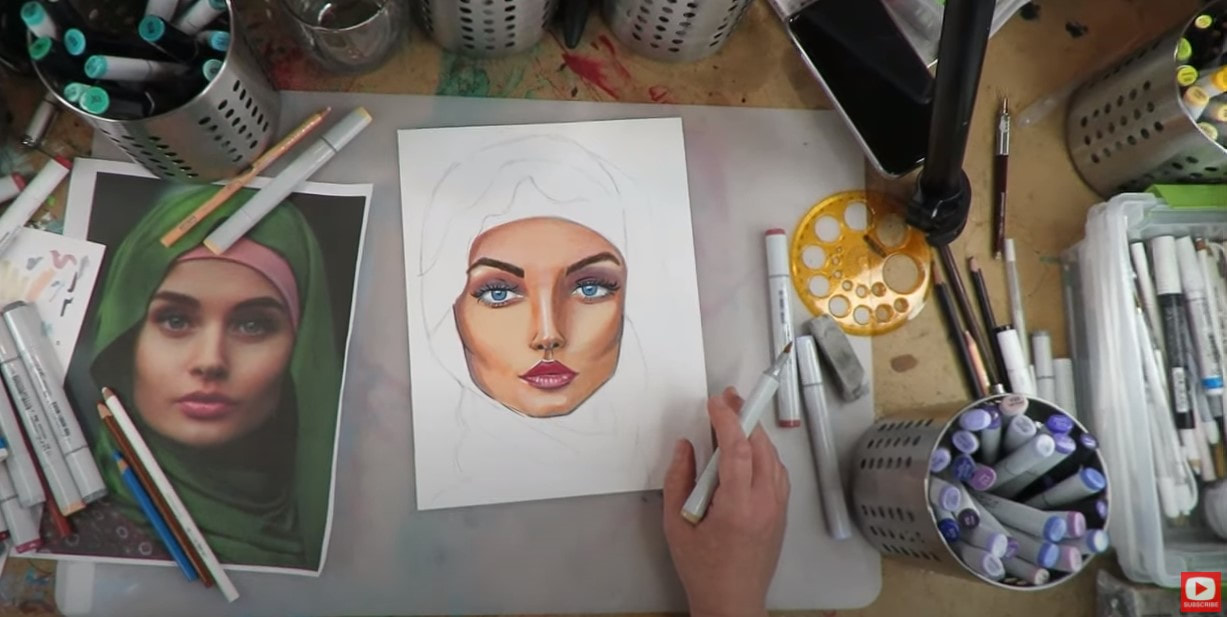 I decide to add a few more shadows to the outer corners of her forehead - right near where the edges of her hijab are resting. Remember, when you want to add more drama to your shading, always darken a small subsection of an area you've already shaded. Watch the video to see exactly what I mean! 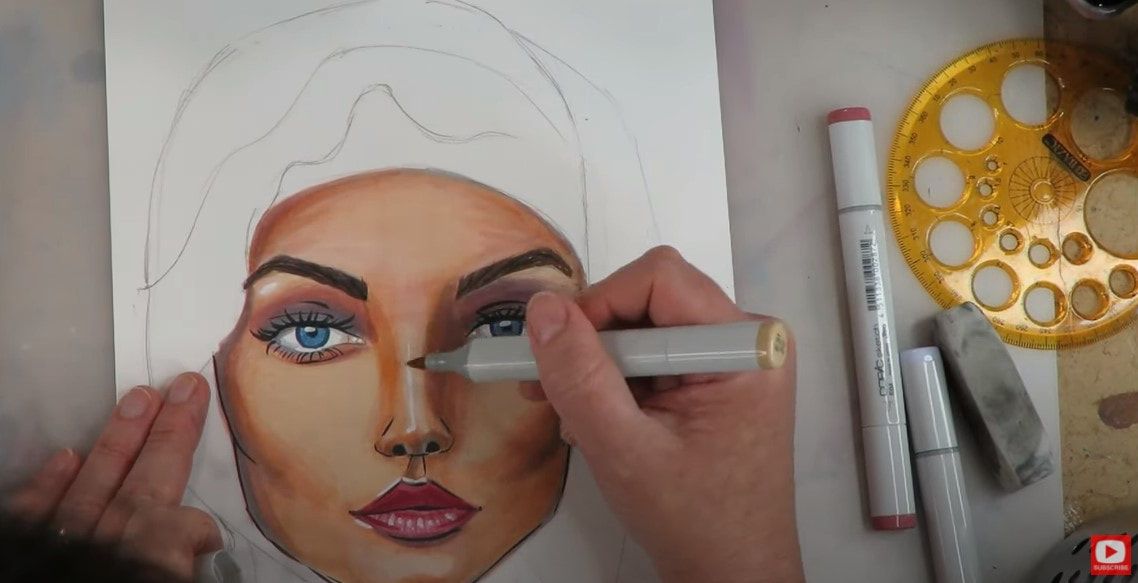 I could seriously keep layering over her gorgeous face ALL DAY!! But I'm sure you're ready to move on... 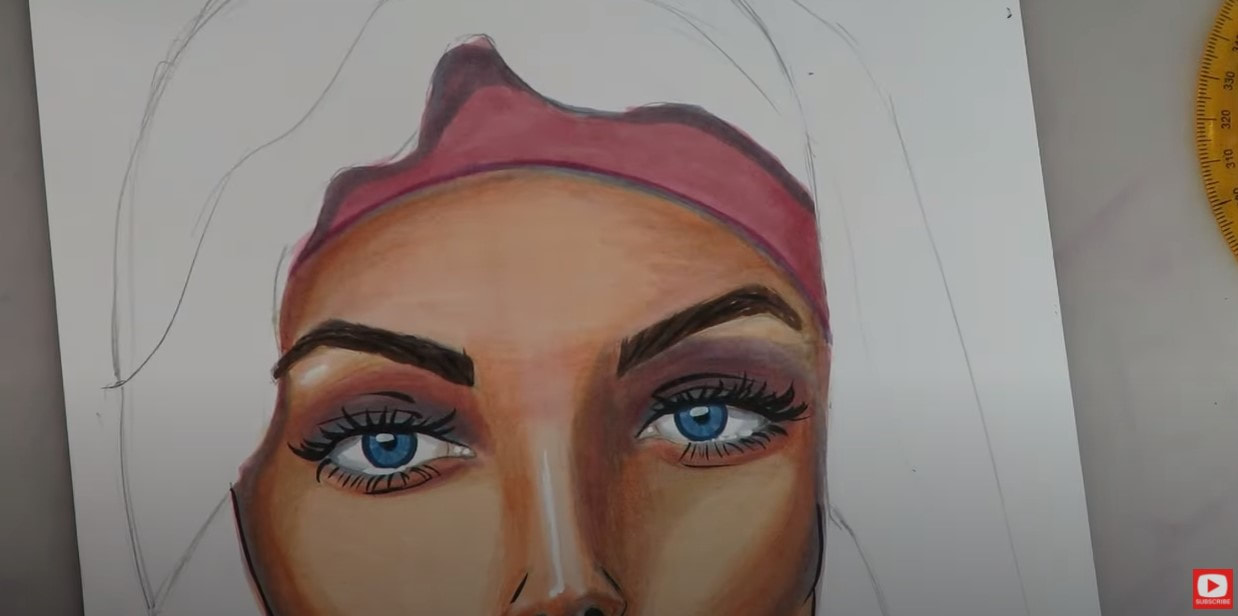 Just a quick reminder - there is a WHOLE BOOK coming out of this fun Whimsical Women of the World portrait drawing series!! I'd love to feature YOUR interpretation of these drawing projects in my book! Simply hop over to GET PUBLISHED, read through the submission requirements, and send in a photo of your work. I can't wait to see!! 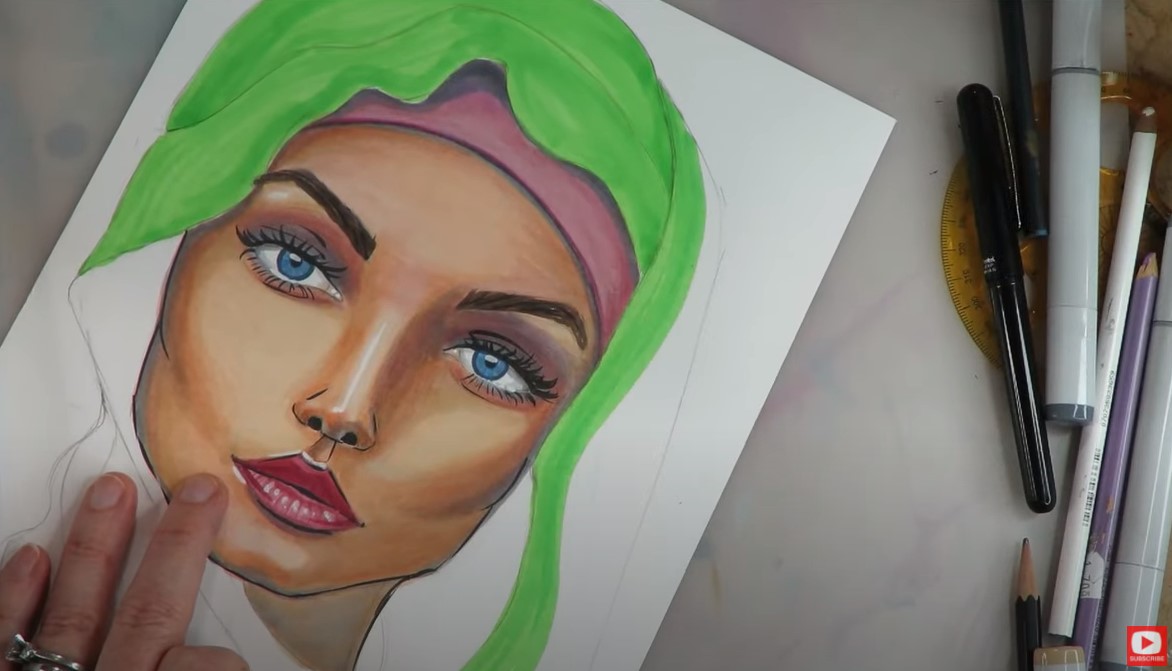 Now, onto shading her headscarf... I started out by coloring the entire hijab in one shade of green. I'm using copics here, and my shade is called Acid Green. GORGEOUS!!! If you move quickly with your alcohol marker shading, it helps to reduce the streaking. Next, I begin layering some shadows with a darker shade called Moss. I simply study my art reference photo and try to replicate exactly what I see. 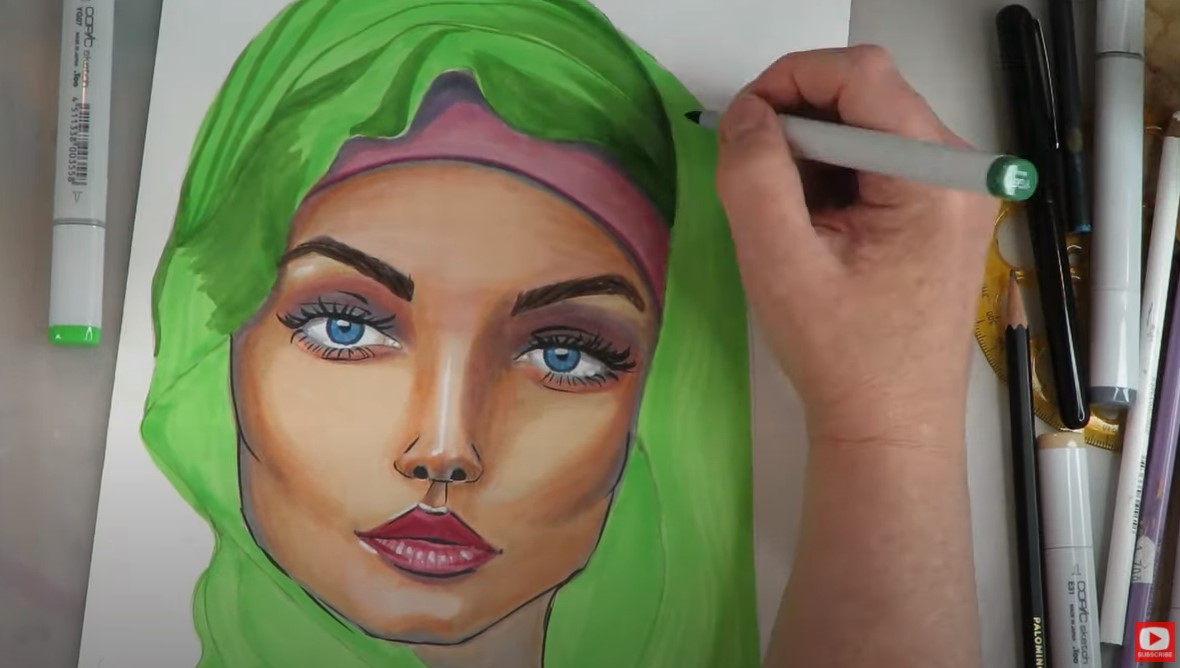 My second shadow layer is in a dark gray, Copic N7. This is to hit the darkest areas of depth, and the underside areas of her scarf. As you'll notice, these darkest shadows all occur along the edges of the face. 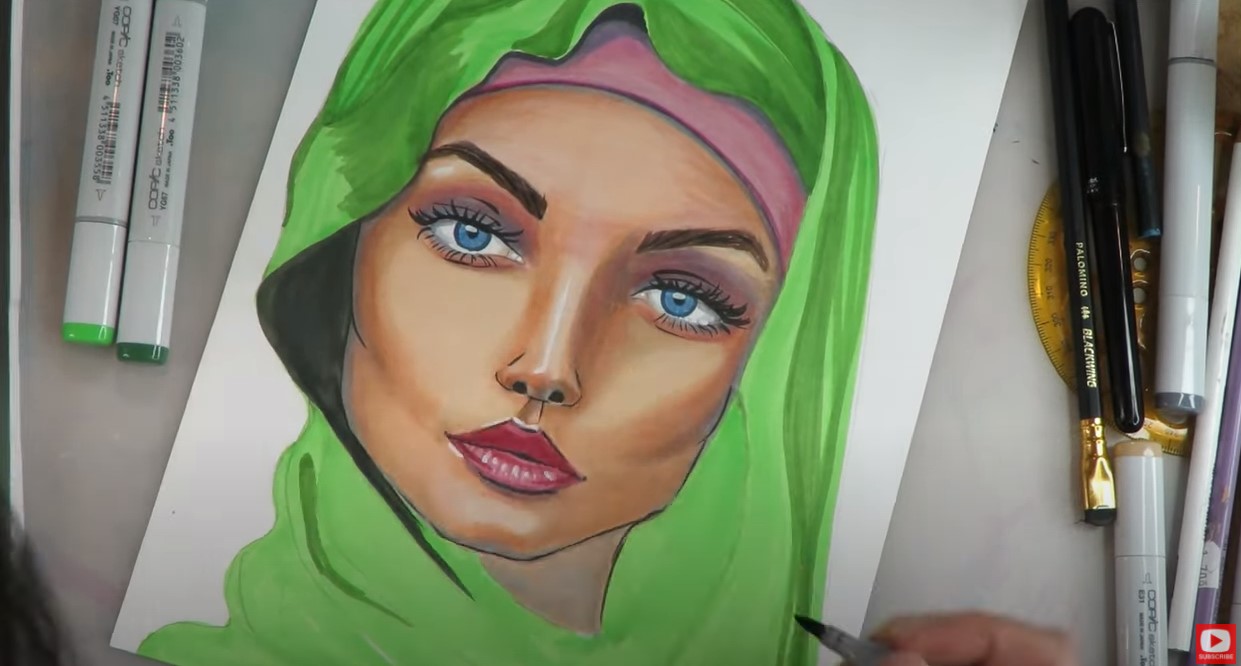 SOOO pretty!!! 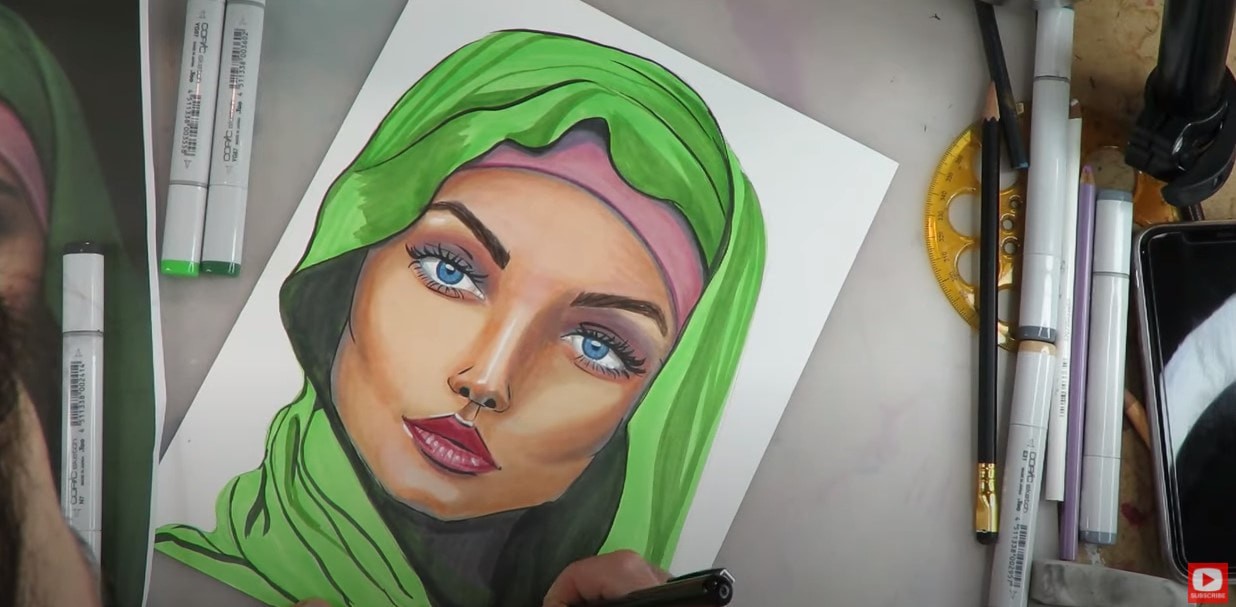 Hijab drawing is really similar to drawing hair, and could even be a little easier! With hair, the strands closest to the face are darkest. I'm seeing the same pattern happening in the folds of fabric closest to her face. These are the darkest darks. Once they are shaded, they REALLY make her face pop forward.  I finished up my hijab girl drawing by adding a few more details with my pentel pocket brush (what I used for drawing her eyelashes!), and she's done! I hope you enjoy today's FREE 30 minute portrait drawing tutorial, Whimsical Women of the World #6. Thanks for watching!! See ya Friday. Today I'm beginning a new face drawing series on my YouTube Drawing channel that I'm super excited to share with you. Last week when I was live in my Facebook group, I asked members what they were interested in learning over on YouTube, and we came up with drawing a series of SEXY faces in various ethnicities! THEY requested the "sexy" part, which cracked me up! LOL! This week's tutorial is in REAL TIME, so go grab a pencil and a sheet of card stock or something similar (for alcohol marker art) if you'd like to work alongside me. 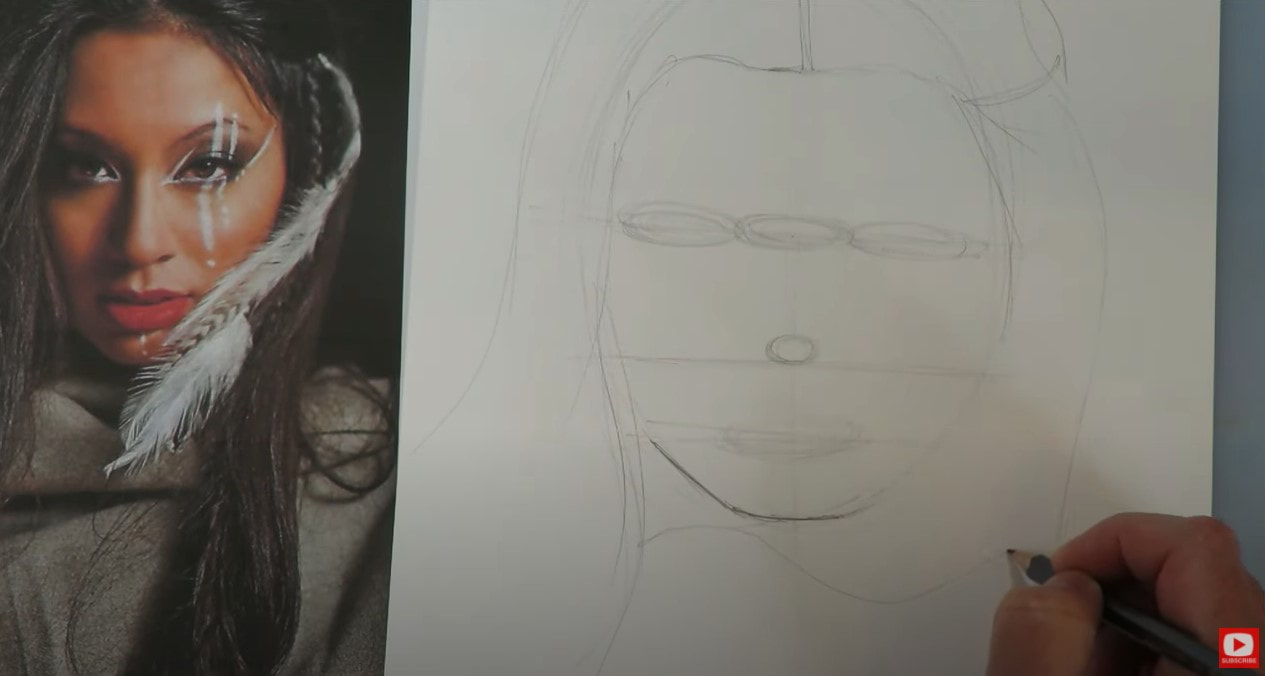 I love the Native American reference photo I found for today! There are so many FUN elements to her look that we're going to enjoy playing with!! She's got some sexy, dramatic makeup going on, and a tiny braid with feathers in her hair. To get us started, as always, begin by sketching in our face drawing guidelines to make sure the face we're drawing is proportionally correct. 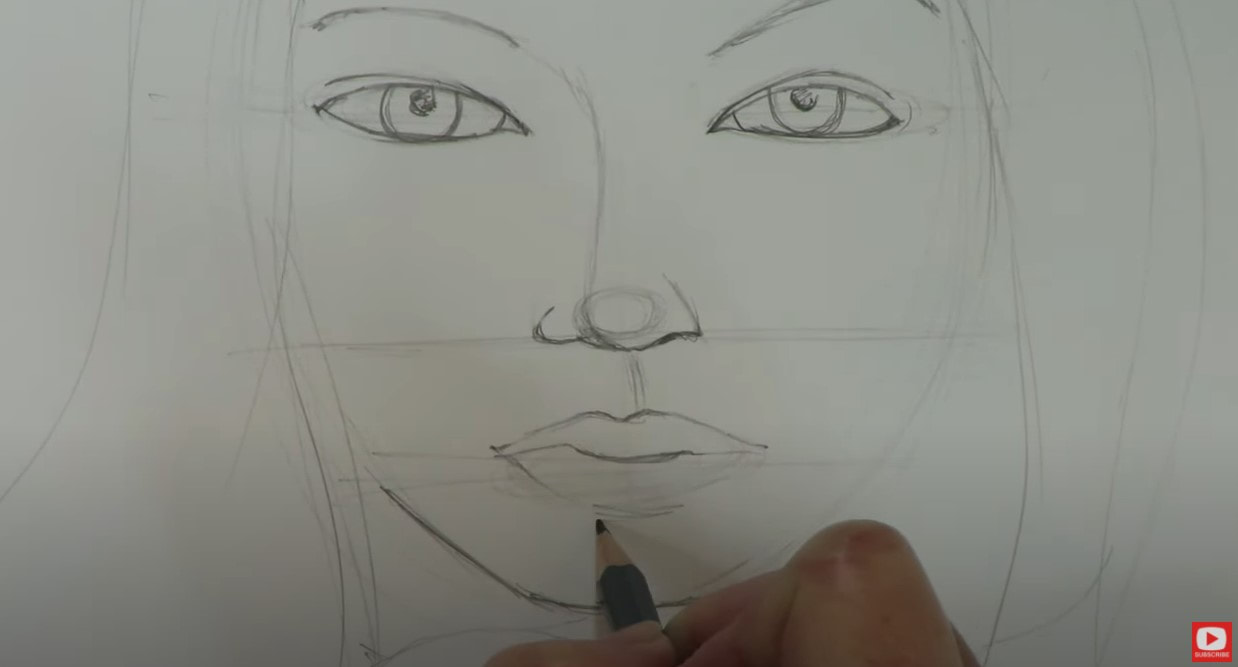 When you've got the facial features exactly how you want them, go over those lines with a fine copic multi-liner. A sharpie works well here too - if you don't have one of the copics! 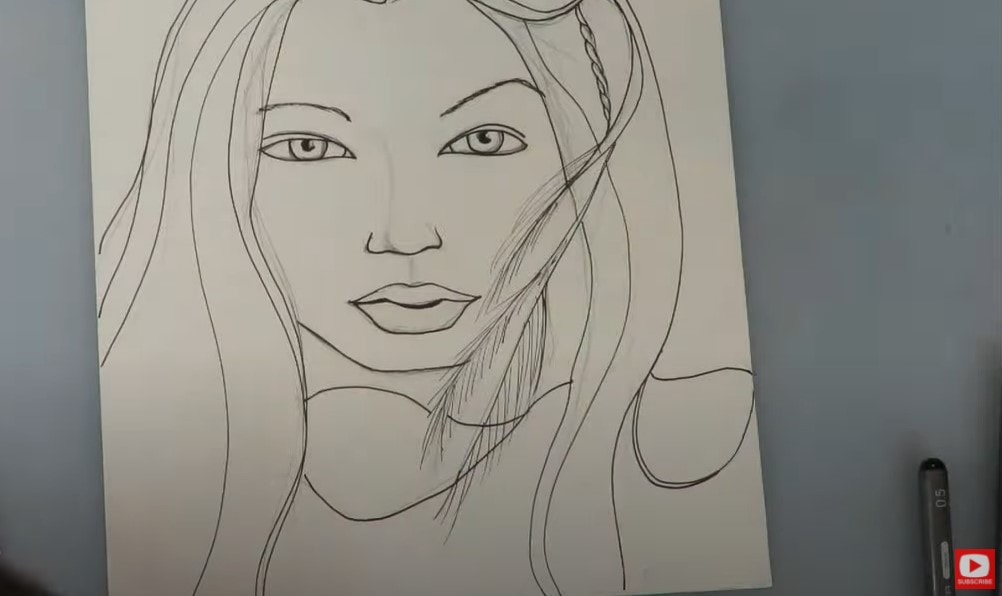 Once she's outlined, I pulled a variety of skin tone markers from my copic stash to see what might work well together. DON'T SKIP THIS STEP! Take a minute to do some copic marker swatches of your skin tones on a scrap piece of paper. This is super important because if you start laying down color based on the caps and what you THINK will come out- something inevitably goes wrong ;) TRUST ME!! From my collection, I decided to pull Yellowish Shade, Light Orange, Light Caramel, Light Suntan, Baked Clay, Chamois, Hazelnut, Leather, Copper, Dark Suntan and Dark Brown. I started my face shading with the darkest shade today, and studied my reference photo carefully to inform the shadows I recreated. 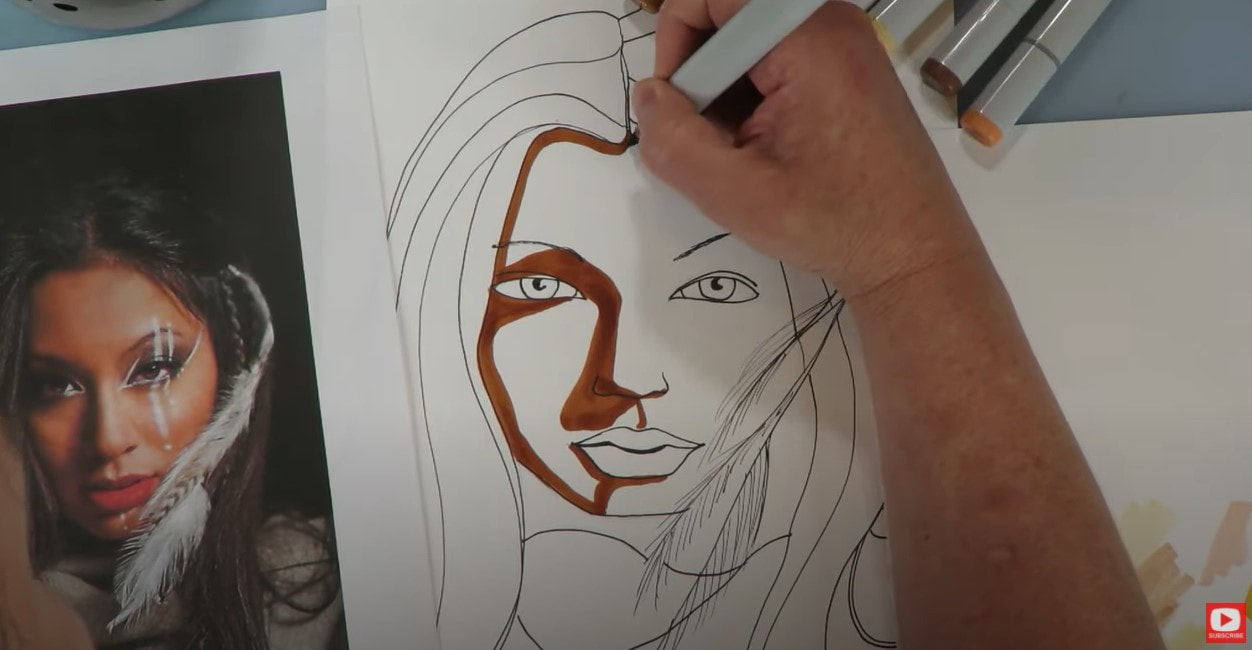 Once I had a good base for the darkest darks down, I start pulling in the medium and lighter skin tones. Then, I use my lighter markers to blend out some of my marker strokes and to soften the transition between colors. 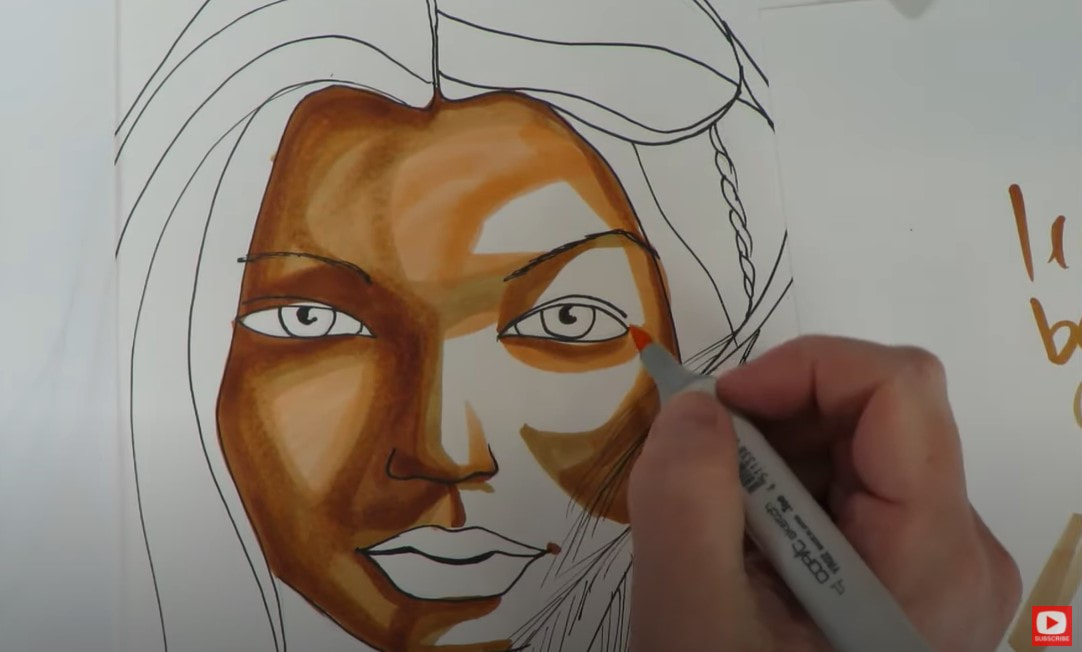 The makeup in my reference photo is really dramatic (which I LOVE!), so when I've finished with the main skin tones, I bring in a couple shades of gray to add a bit more depth into the darker areas of her makeup - especially around the eyes, along the left side of her cheek, and a touch onto the lips! Then, I head straight for my crimson marker to color those gorgeous, full lips! 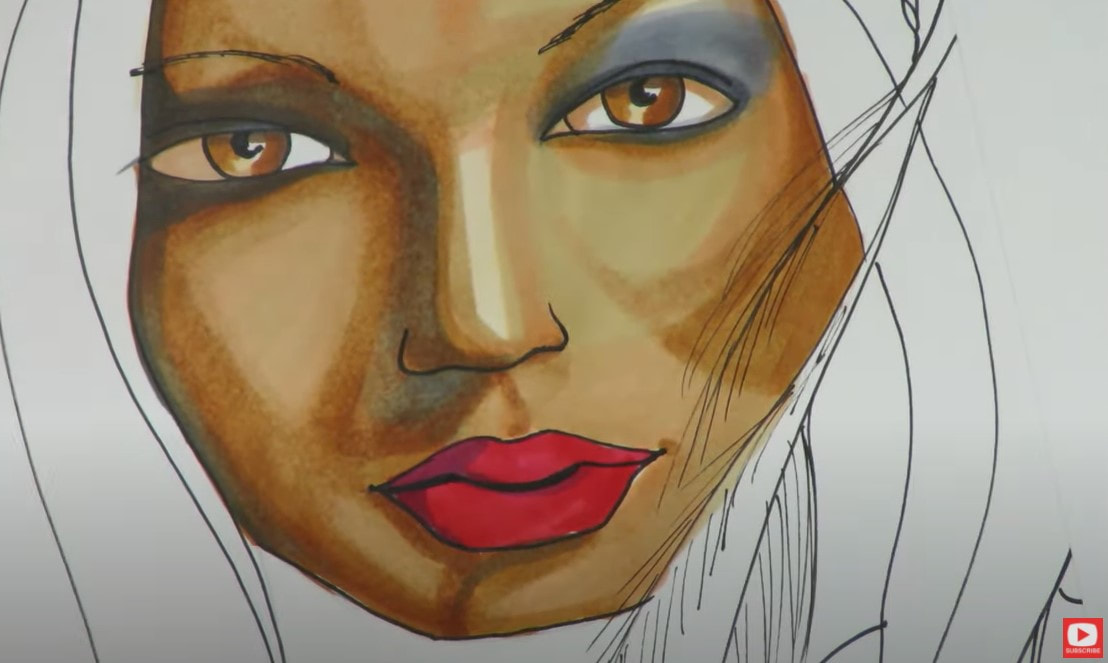 Even though the hair in my reference photo is basically black, I decided to alter that to dark browns so I could show some highlights and lowlights in the hair to make things a bit more colorful.  Once these sections of hair were colored, I added a touch of black outline (you can totally use a sharpie here, that nib may even feel a bit more stable for these lines). Next, I pulled out a variety of skin tones from my prismacolor colored pencils to blend the shadows a bit more and soften some of the transition lines between marker shades. I even use an indigo in some of my shadows because shadows are "cool colors," and bringing in some indigo or a deep plum add a bit more sophistication to your work. 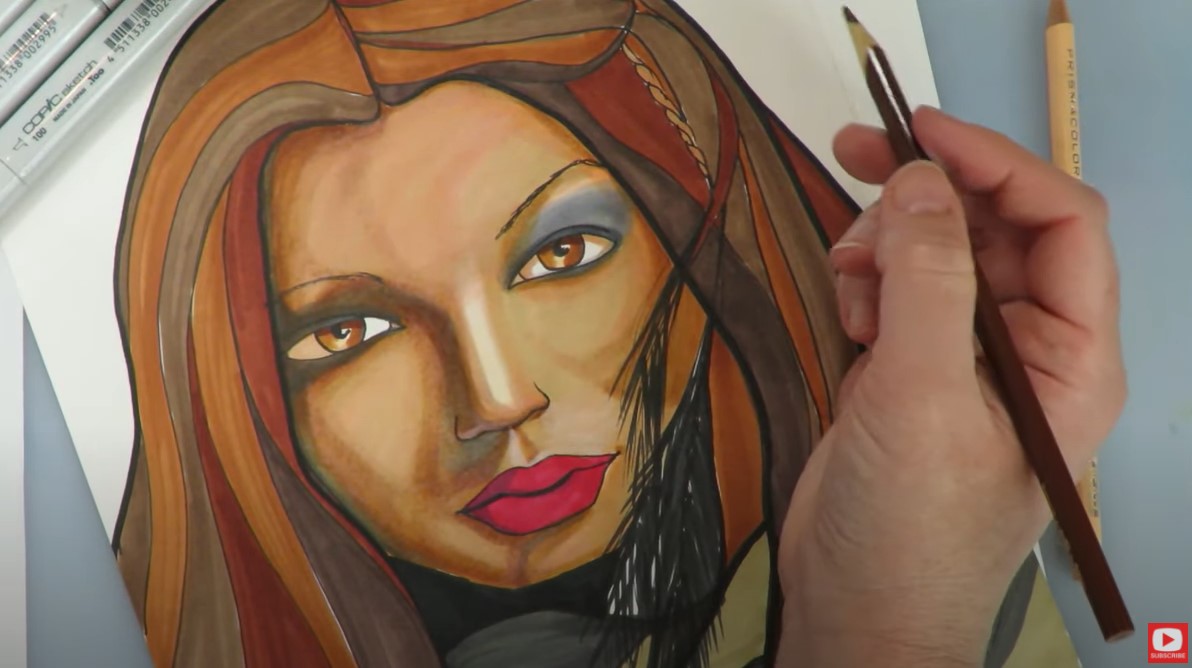 For the final layers, I added a few lip lines in colored pencil to her bottom lip, pulled a few white colored pencil lines through her hair for highlights, attacked that dramatic, white makeup with my posca paint pen, and added in some eyelashes with my pentel pocket brush. LOVE!!! 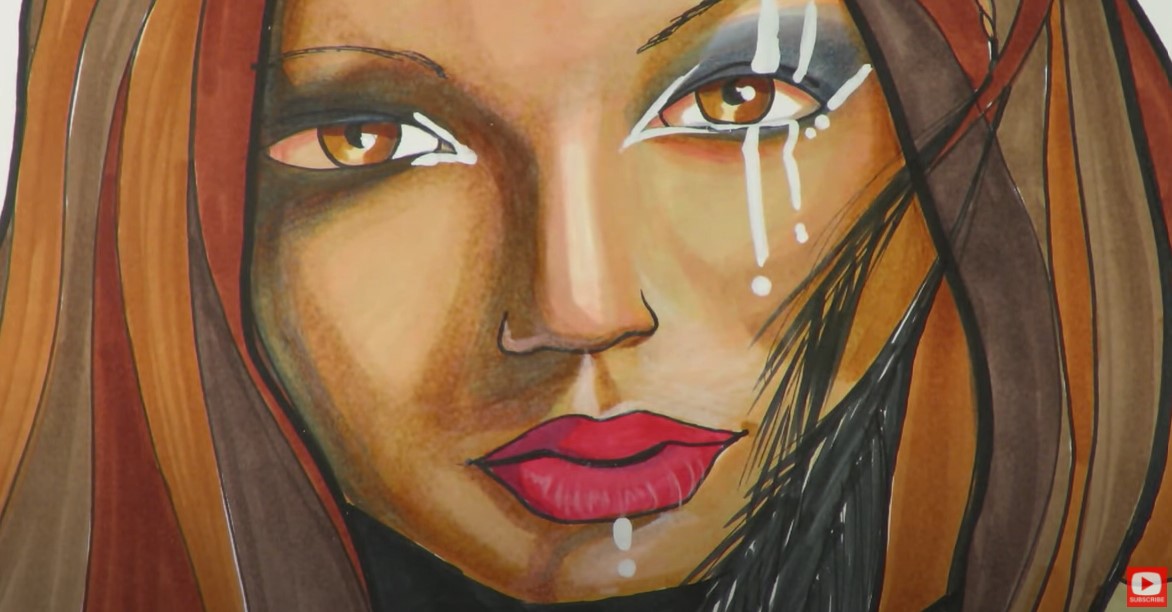 l hope you enjoy today's drawing tutorial! Thanks for watching and I'll see ya next week!! |
Karen CampbellFounder of Awesome Art School. Mixed Media Artist. Author of 18 Instructional Art Books! 
   
 Archives
April 2024
Categories
All
|
 RSS Feed

"Karen is flipping hilarious and she's very real...I like the way she teaches in a way that really gives you confidence, whether you're a beginner or advanced there's always something new to learn!"
- Elizabeth W. |
What Fans Are SayingKaren, you are absolutely fabulous! You make me feel like I can draw anything. I have recently retired and finally have the time to do some of the art that I have loved since I was in school. I am really at the beginning of my art journey and I hope to learn as much as I can. Thank you for all you do. |
Contact ME |